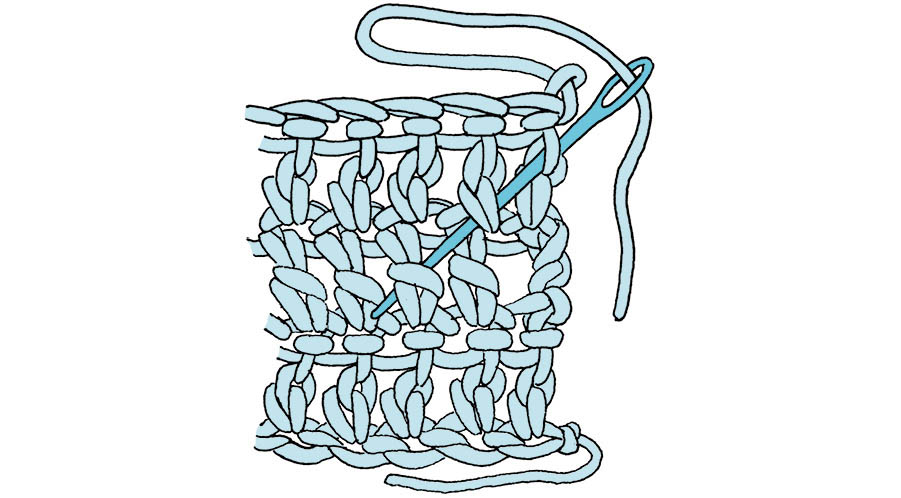
weaving in ends
So you’re almost finished stitching, but you dread the next step? Although finishing may never be one of your favorite tasks, with the right knowledge you may find it becomes less onerous.
Q: What is the first step in finishing?
A: Starting out right. An important but often overlooked aspect of finishing starts before you first pick up your hook. Knowing what to expect of your fabric and using good technique throughout makes the final finishing steps easier. Use your washed and blocked swatch to practice borders, buttonholes, and any other finishing details.
See also: Pages 155–69 for working a swatch.
Q: Too late. I didn’t read that part about blocking my swatch and I’ve already finished stitching. What do I do now?
A: Once again the answer is: “It depends.” The finishing methods you choose depend in part on the yarn, the fabric you have made, and the purpose of the finished item. For instance, if you are making a stuffed toy, you can just stuff it and sew it together with no blocking. If you are making a thread doily, on the other hand, you need to wash, block, and starch it. If you are making a garment, you may need to block the pieces before you sew them together, then add edgings or other finishing touches. No matter what the finishing method, the first step is weaving in ends.
A: There is no one right way to weave in ends. Whatever method secures the ends, works for you, and makes you satisfied is right. The ends don’t have to be invisible from the wrong side, but you don’t want them slipping to the front of the work to be seen by all and sundry.
Here’s one method that works well on most fabrics: Thread a tapestry needle with the yarn tail. (When beginning and ending a yarn, always leave at least a 6" tail, so you’ll have an end to work with.) On the wrong side, run the tip of the tapestry needle through the back of several stitches in one direction, then turn and run it through the back of every other stitch in the other direction, or through the back of every stitch on the next row in the other direction. You may need to try a variety of ways to get ends to stay put, depending on your yarn and fabric. If you’re working with silk, rayon, or other slippery yarns, you need longer tails so that you can weave them diagonally one way and then diagonally in the other direction.
If you have long tails left where you finished a ball and are going to be sewing a seam, you may leave those alone for now. You can either use those ends for seaming, or work the tails into the seam after it is made.

weaving in ends
Q: Any tips on threading a tapestry needle? I hate the way the yarn always seems to split when I try.
A: The easy way? Fold the yarn tail over the needle and pinch it up near the needle. Holding your fingers next to the needle, slide the yarn off the pointed end of the needle and insert the folded end into the needle’s eye.

threading a tapestry needle
Q: I hate weaving in ends. Is there any way to take care of tails left when starting a new color or ball so that I don’t have to worry about them later?
A: Many crocheters like to work over the tail of the old yarn as they work the first few stitches in a new yarn. As you begin a new yarn, hold the tails of yarn to the left (to the right for Lefties) along the top of the stitches on the previous row or round. When you insert the hook into the next stitch and pull up a loop, make sure that you are working around the yarn tails, catching and securing them into the fabric as you work each of the next couple of inches of stitches. If you find that this method is too bulky, leave the ends to be woven in later.
One disadvantage of this method is that the ends tend to work themselves out over time. To avoid this, work over the yarn tails for several stitches, then leave a 4" tail free. When the crocheting is finished, go back and weave in those short yarn tails with a tapestry needle as described above.

working in tails as you stitch
Q: I’m using a very slippery yarn and finding it particularly difficult to hide the ends, which tend to pop out of the finished fabric. Do you have suggestions?
A: The usual method of weaving in ends as you work is less successful with slippery yarns, and it also may not hide contrasting yarns satisfactorily. Some silk and rayon ribbons take any opportunity to slide free. Whenever you’re working with these yarns, leave longer ends (8"), so that when the fabric is finished, you can work them diagonally through the back of several stitches one way, and then diagonally in the opposite direction. You could also try tacking down the ends with sewing thread in a matching color. You may find it helpful to put a dot of soft fabric glue on the ends. (Try it first on your swatch to make sure you are happy with the way it feels against your skin.)
Q: What if my ends are too short to weave in?
A: You can use a crochet hook or latch hook to draw the ends under other stitches. Next time you make something, be more generous with the ends so that you’ll have more to work with.
Q: How do I weave in ends on a chain?
A: This presents a bit more of a problem, since you don’t have much there to weave into. With a tapestry needle, go back and forth around the bump on the reverse side of the chain, or try going round and round that bump. Tug the chain a bit before trimming the ends to allow the tails to stretch with the chains. Try different methods to see what works best with your yarn.
See also: Where in the stitch do I insert my hook into a foundation chain? for back bump of chain.
Q: What is blocking? Do I have to do it?
A: Blocking is the means by which pieces are shaped to their final measurements, using moisture and sometimes heat. It may be compared to pressing seams open in sewing, but it is not ironing. Blocking sets the stitches and may enhance the drape of the fabric. It can make all the difference between a sweater that is obviously homemade and a quality handcrafted sweater. Blocking makes it easier to work seams and edgings and may enable you to make minor size adjustments. But blocking is not the time to correct size problems caused by inaccurate gauge calculations. It’s too late for that! Many crocheted items benefit from a quick dose of steam, and some, such as doilies, require blocking in order to reach their final shape.
Q: What materials do I need in order to block?
A: Depending on which blocking method you use, you need a yardstick or tape measure; rustproof pins; a steamer, steam iron, or plant mister; water; and some type of water- and heatproof surface that you can pin into. Blocking wires are a nice option for blocking lace.
Q: What kind of work surface do I need?
A: It needs to be large and flat, so that the pieces lie flat without hanging over the edge. An ironing board works for small pieces, but you often need something bigger.
The work space needs to be able to withstand some abuse, as it is subjected to moisture and/or heat, as well as to being stuck with pins. It also needs to remain undisturbed until the blocking is finished. This may take from a few minutes to a day or more, depending on the circumstances. For example, wet cotton can take days to dry in the humid summer season. (Voice of Experience: Cats love warm, steamy fabric. A door that closes securely is a bonus.) The surface also needs to be waterproof and not subject to dye transfer. In other words, make sure your blocking surface won’t add color to your crochet, and that your crochet won’t add color to your blocking surface.
Q: Do I need to buy a special blocking board?
A: No, although having a blocking board made especially for the purpose is a great tool if you have the space to store it. These are available from retailers, or you can make your own from rigid insulation board, cork boards, or interlocking foam floor mats, which can be configured in different shapes to fit your needs. Cover any do-it-yourself blocking boards with colorfast towels or cotton cloth.
Q: If I don’t have a blocking board, what should I do?
A: You can use a spare bed, a carpeted corner of a room, a large sofa cushion, or a piece of foam rubber. Cover it with a waterproof layer, such as an old shower curtain or trash bag, topped by a couple of layers of towels or blankets. Be sure the towels are old so their colors won’t bleed onto your work. (Voice of Experience: Count the number of pins you use and be sure to collect them all when you finish. You don’t want to share your bed, carpet, or sofa with large straight pins.)
Q: Is there more than one way to block?
A: You can choose among three basic methods, based on the fiber content of your yarn and your own preference:
Q: Which blocking method should I use?
A: Look at your yarn label; it may indicate the best blocking method for that yarn. If different fibers have been combined in the same item, choose the method appropriate for the most delicate fiber. Most animal fibers (wool, mohair, alpaca) tolerate steaming. Plant fibers like cotton and linen can be wet-blocked. Some man-made fibers can be ruined (the technical term is killed — truly) by too much heat, so wet or cold blocking is best for those. Novelty and metallic yarns may not be suitable for any type of blocking.
Q: How does wet blocking work?
A: Wash or thoroughly wet the pieces, then squeeze out excess water. Do not wring or twist! Place pieces face down on the blocking surface and pat into shape. Use a yardstick to make sure the pieces are the size you want. Check to be sure that each sleeve is blocked to the same dimension. Pin onto the blocking surface at each corner and at approximately 2"–3" intervals along edges. (Voice of Experience, emphatic: Make sure your pins are rustproof. Rust stains do not come out.) Allow the items to dry. If you are impatient, you can set up a fan to blow over the surface to hasten drying.

wet blocking
Q: What’s the procedure for cold blocking?
A: Place the dry pieces on the blocking surface as for wet blocking, and pin along each edge. Check your measurements, and make sure that the rustproof pins are close enough together so they don’t distort the fabric. Spritz the pieces with clean water until they are damp. Allowthem to dry.
Q: How do I steam block?
A: Measure and pin the dry pieces as for wet blocking. Fill a steam iron or steamer with water, and use the “steam” setting. Hold the iron no closer than 1" over fabric, and allow steam to work into fabric. Move the iron as needed to cover entire fabric. Do not press or allow the iron to touch the fabric. Leave undisturbed until pieces are cool and completely dry.
Q: How do I use blocking wires?
A: Carefully thread a blocking wire through each straight edge of your crocheted piece without piercing the yarn. If the edge is straight, thread the wire in and out through every other row of selvedge stitches; if the edge is scalloped or pointed, insert the wire through the tips of the points or scallops. Arrange one blocking wire in a straight line on your blocking surface and pin it in place, inserting the pins at equal distances next to the blocking wire (not in the actual fabric) and smoothing and stretching the fabric to the desired finished dimensions as necessary. Once the first side is straight, continue pinning the other blocking wires in turn, taking care to check for right angles and straight edges.
Q: What’s the recommended way to block three-dimensional pieces?
A: Wet blocking may be the best bet. Get the pieces damp, then stuff them with rolled-up plastic grocery bags or other waterproof material. If the piece is round, fill it with an inflated balloon. Leave it undisturbed until it is dry. You can put a hat on a wig stand.
Q: How do I block a doily?
A: Doilies, snowflakes, and other lacy thread crochet items sometimes come off the hook looking a bit like a rag, but careful blocking brings out their beauty. To ensure that your points are symmetrical, prepare a template for the piece by drawing the desired shape on a piece of paper. Cover the paper with plastic wrap or wax paper, and place it on your blocking board. If you are going to starch the piece, do so now (see next question). Otherwise, wash or wet the item thoroughly, then pin it onto the template using rustproof pins. You may need to stretch it a bit. Start by pinning opposite sides and the major points, then pin out scallops or any other special shaping. Allow it to dry thoroughly. You may find it helpful to copy and enlarge the sample doily blocker shown here.
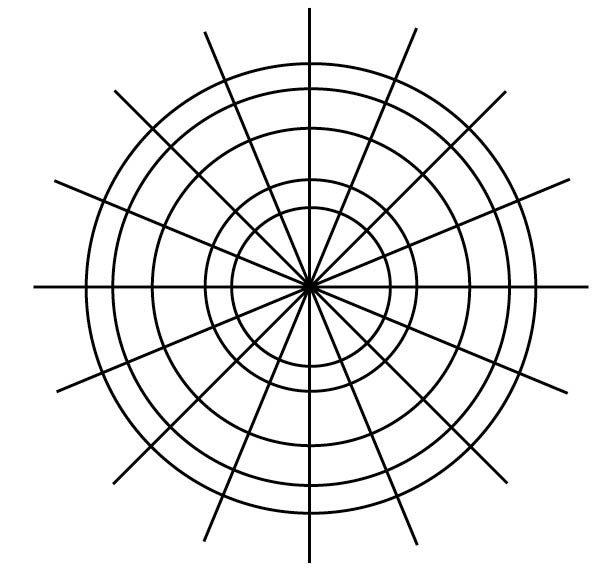
sample doily blocker
Q: How do I stiffen thread crochet?
A: Whether and how you stiffen your thread crochet item depends on its intended use. Three-dimensional items like baskets may require a permanent hard finish, while doilies may look better with a softer hold. Some methods result in a permanent hold, while others must be reapplied with each washing. When you select your starch, keep in mind that some turn yellow with age and many are not resistant to moisture.
There are several other commercial stiffening products on the market, each with different holding properties. Follow instructions on the container.
Q: Blocking sounds like too much trouble. Do I always have to do it?
A: No. Some things really are fine without any blocking at all. Some three-dimensional pieces might be difficult to handle, certain fibers may not be suitable for blocking, and very small items such as Christmas ornaments may not need it at all. Some acrylics do best with a simple trip through the washer and dryer. However, most natural fibers, garments, and anything that needs to be seamed benefit from a good blocking.
Q: My afghan squares aren’t all the same size. Is there anything I can do about it?
A: Oops! If you notice the problem right away, before you finish stitching, check to be sure you are following the instructions correctly and that you didn’t accidentally change hook sizes. If the squares are done in different stitch patterns, however, you may have to use a different hook size for each stitch pattern in order for all the squares to come out the same size.
If you notice the problem after you’ve made all of your squares, maybe you can block them to match. Blocking can sometimes accomplish small size changes, but don’t count on brute force and a bit of steam to make a 10" square into a 12" square. Instead, try working an extra round or two on the smaller squares to bring them up to size. If just a few squares are larger than the others, perhaps you can take out a round or two to bring them into line, or restitch the large ones on a smaller hook.
Q: How do I join separate motifs?
A: You have a lot of choices here. Your joining method is dependent on the look you want and on the type of stitch you used on the last round of your square. Do you want the join to be part of the overall design, or do you want it to be invisible, or almost so? Stitching the final round of each square in the same color makes invisible joining easier. A single crochet seam on the right side, on the other hand, makes the join a decorative element.
If specific joining instructions are not given in your published pattern or if you want a different look to your finished project than the original, experiment with each of the options listed below to determine which one looks best with your project. No matter which method you use, check from time to time to make sure you are working at the correct tension. The seams or joins should have a similar feel and fluidity to the rest of the fabric.
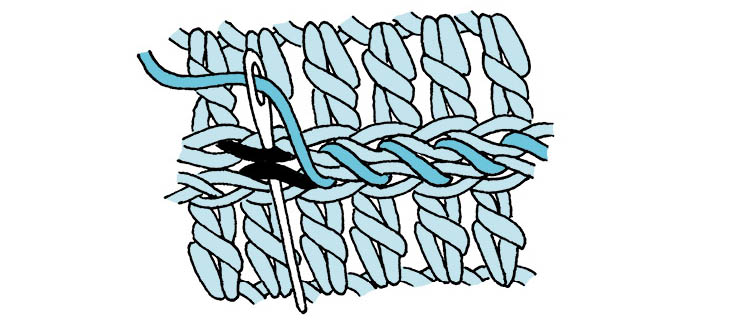
whipstitching through inside loops only
See also: Slip stitch and single crochet seams
See also: How do I join motifs as I go?; Connect the Shapes Crochet Motifs (see Books) for more joining methods.
Q: How do I work a zigzag chain?
A: There are various ways to use chain stitches as decorative joins. Here is a zigzag chain that can be adapted to a number of situations:
Working with square pieces, arrange the squares in the desired pattern. Slip stitch or single crochet in the corner of one square to join yarn, chain 3, then slip stitch or single crochet into the second or third stitch from the corner of the adjacent square. Continue to alternate slip stitches or single crochets and 3-stitch chains back and forth between the squares, skipping one or more stitches between each joining stitch.

zigzag chain join
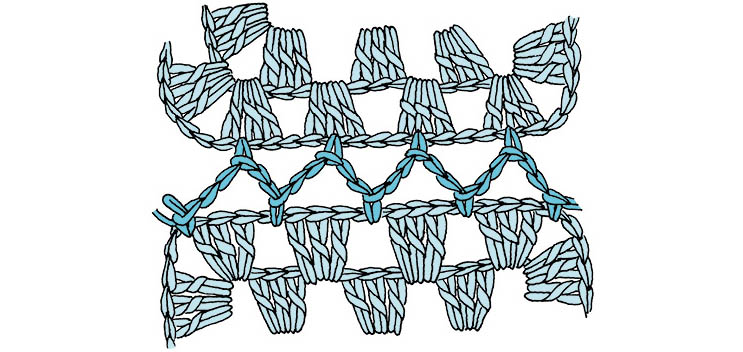
zigzag join for granny square
Q: How do I work a chain-and-skip seam?
A: This is another useful and decorative seam that can be adapted by chaining and skipping the appropriate number of stitches for the situation. With right or wrong sides together as desired, single crochet through both loops of both pieces, chain 2, skip 2 stitches, sc through the next pair of stitches. Continue connecting the pieces with single crochet stitches separated by a short chain over the skipped stitches.
Q: How do I join motifs as I go?
A: The join-as-you-go (JAYGo) method works best when the final round of each motif has a lacy or openwork edge. If you are working from a published pattern, the instructions may explain how to join the motifs as you work. If you don’t have finishing instructions, look at your motifs and see how they fit together. Draw a diagram so you can see where the motifs touch. Do they meet at certain points only or do they touch along the entire edge? If they touch along the entire edge, you may choose to join them in every stitch, or only to join them in every other stitch, or some other interval that seems appropriate for the design.
For a basic JAYGo project, complete one motif. Work the next motif up to the final round; then on the final round, work to the spot where the motifs should touch. Insert the hook into the first motif at the corresponding connection point (possibly a chain space); work a joining stitch to join the two motifs, then continue to work the final round of the current motif, joining to the previous motif at appropriate points in the same manner. There are several choices for joining stitches; experiment, then choose the best one for your situation.
Q: How do I join motifs with a slip stitch?
A: This is a fast and easy join that brings the pieces up very close to one another. The slip stitch sits on top of and dominates the stitch it is worked into.

Q: How do I make a single crochet join?
A: This join is a bit larger and more visible than the slip stitch join, and it allows a bit of space between the pieces.
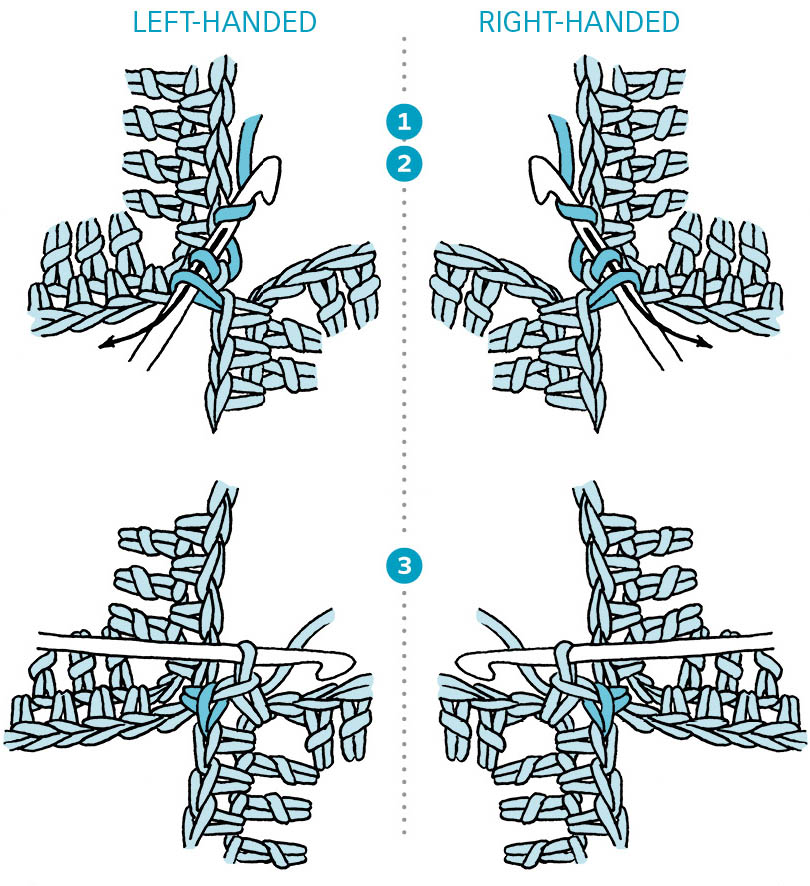
Q: How do I make a flat join?
A: If you prefer a more invisible connection between the two motifs, try a flat join. Work to the joining point on the current motif, drop the loop from the hook and insert hook from front to back (right side to wrong side) into the corresponding connection point on the previous motif. Pick up the dropped loop and pull it through everything on the hook, then continue working the next stitch on your current motif. This is a quite beautiful and easy join that brings the pieces close together yet keeps the two pieces in balance; neither side of the join dominates the other.
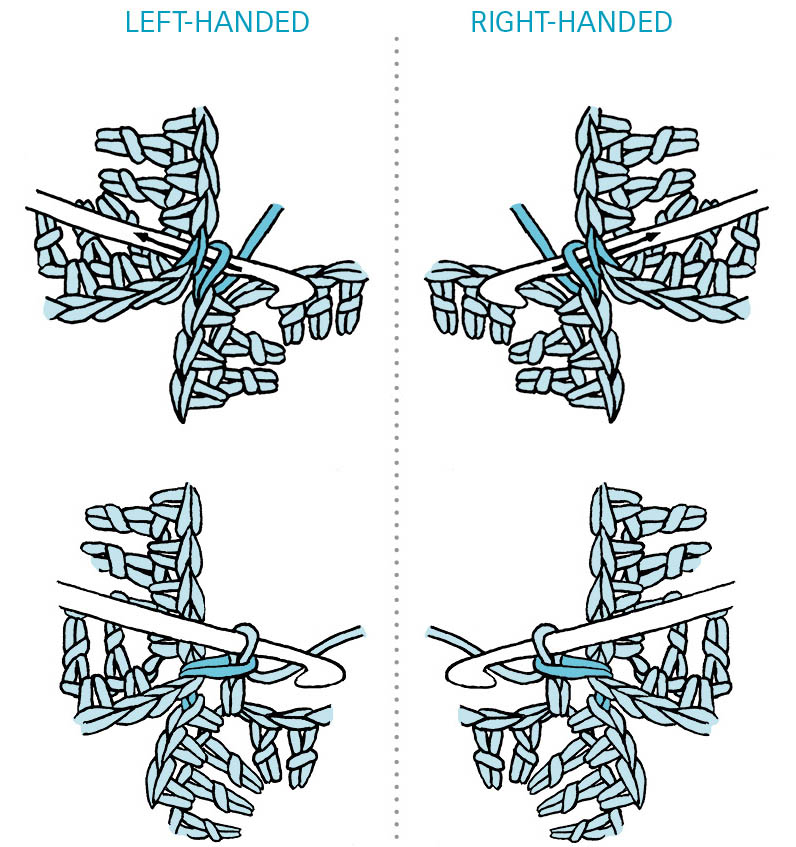
Q: How do I make a whipstitch seam?
A: This is the most common way of sewing a seam in crochet. Thread a tapestry needle with yarn. Holding pieces with right sides together, insert the needle from front to back through both layers of fabric and pull the yarn through. Take care to work under the strands of yarn without splitting them. Work close to the selvedge when working along a vertical edge; on a horizontal edge, you may choose to work under one or two loops of the V.

whipstitch seam
Q: What is mattress stitch?
A: Mattress stitch is a type of seam done using a tapestry needle and working on the right side of the fabric. After all, that’s the side that needs to look good, so you want to be able to keep an eye on how the seam is shaping up. Working from the right side makes matching stripes or stitch patterns a breeze.
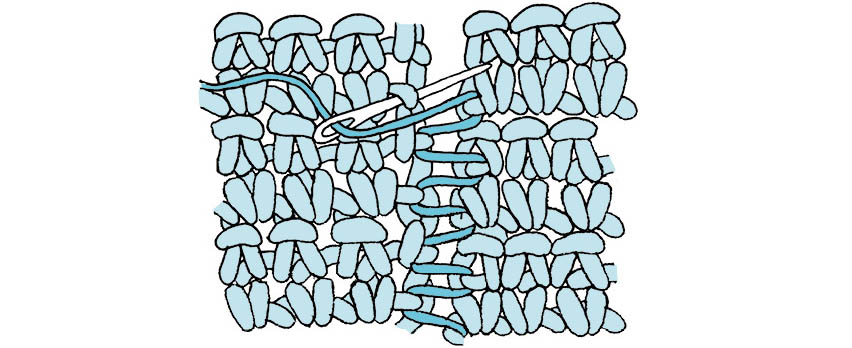
mattress stitch
Q: How do I handle mattress stitch with different kinds of stitches?
A: When you are joining single crochet fabric, you’ll probably go into every stitch on each side. If you are working with a double or treble crochet fabric, you may need to put a stitch into the side of each post as well as at the top or bottom of the stitch. When using a fancy or openwork pattern stitch, experiment to discover the best place to put your seaming stitches. If you are joining fabrics with different types of stitches along their edges, use your judgment and check from time to time to make sure the pieces are aligned correctly.
Q: How do I slip stitch pieces together?
A: This is usually done on the wrong side of the fabric. Hold the pieces to be joined with right sides together. Insert the hook all the way through both edge stitches. Yarnover and pull through a loop. *Insert the hook into the next pair of stitches and pull up a loop through both layers of fabric and on through the first loop on hook; repeat from * until the entire length is joined. Slip stitch seams can be tight and unforgiving. As you work, stop and examine what you’ve done to ensure that you have maintained an even tension. If your seam is too tight, you may need to use a larger hook than the one you used on the garment.

Q: How do I single crochet pieces together?
A: This is similar to making a slip stitch seam, but you work single crochet instead of slip stitch. The seam is bulkier yet more flexible than a slip stitch seam. The seam will be on the wrong side if worked holding right sides of the pieces together. If worked with wrong sides together, the seam becomes a decorative element on the right side.

Q: Why don’t my pieces fit together evenly?
A: Count your rows or stitches to make sure they are the same on each piece to be joined. If not, can you add or remove a row or two? Did your gauge change? Try sewing the pieces from the right side, matching row for row.
You may be able to block them to the same size, or possibly adjust which rows/stitches you are joining a bit when you sew them together to make a better match. (Just a little adjusting here: Don’t try to hide a 2" difference, as a buckling seam is sure to give away your secret!)
Q: How do I clean my finished piece?
A: Now that you’ve spent all that time making your gorgeous crocheted project, you’ll want it to last a long time. When you made your swatch, you read the care instructions on the yarn label, and then washed and blocked your swatch as appropriate for the fiber content, so you know what to expect. Before you launder your handiwork, take a look to see that buttons and any embellishments are secure, and that no ends are coming loose. (Voice of Experience: Some buttons cannot be laundered; others cannot be dry-cleaned. You may need to remove these before washing or dry-cleaning.)
Machine wash. If you can machine-wash and -dry your item, by all means do so. Use the gentle cycle and low heat. Many machine-washable yarns need to be machine-dried as well to regain their elasticity.
Hand-wash fabrics by using tepid water and a small amount of gentle soap or detergent. Put the item into the sudsy water and gently squeeze the lather through the fabric. Rinse well. Squeeze out excess water gently. Do not wring or twist! Now you have two options for removing excess water:
Dry cleaning is a good option for novelty yarns and others labeled “dry clean only.” (Voice of Experience: Some yarns labeled “dry clean” can be carefully hand-washed. If you suspect yours can be hand-washed, try washing a swatch.)
See also: Yarn Care Symbols
Q: How should I store crocheted items?
A: Clean them first; body oils attract dirt that appears like magic when items are put away and makes wool more attractive to moths. Fold crocheted items, if possible, and store them in a dark, dustproof container. If the item is going to be stored for a long time, refold it from time to time to avoid permanent creases that might weaken the fabric. Some items can be wrapped around a wrapping-paper tube instead of being folded; use acid-free tissue paper to keep the item from directly touching the cardboard, and between layers of the fabric. Use a moth repellent for animal fibers or blends.