

In this chapter, we’ll add timer-based animation to our BubbleDraw app to create floating, bouncing bubbles, and we’ll enhance the app with a user-friendly GUI interface. The enhanced app, called BubbleDrawGUI, will add a JPanel containing the GUI components shown in Figure 10-1, giving the user the power to animate or pause the bubbles, change the animation speed, and clear the screen.
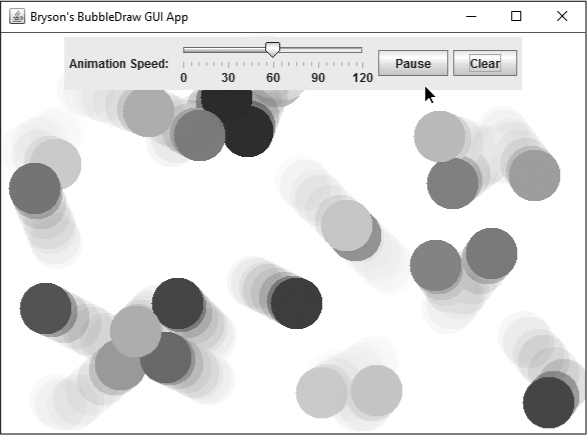
Figure 10-1: The enhanced BubbleDrawGUI app features animated, bouncing, semitransparent bubbles, with a GUI interface to control the animation.
This version of the app is even more interactive and user-friendly than before, allowing the user to draw with floating, bouncy bubbles as they click and drag their mouse on the screen.
The new GUI app will build directly on the BubbleDraw project from Chapter 9. So, instead of creating a new Java project from scratch, we’ll copy the BubbleDraw project and paste it into the same workspace with a new name. This is a useful approach anytime you want to expand and work on a newer version of a program while keeping the previous version intact.
In Eclipse, right-click the BubbleDraw project folder in the Package Explorer pane and select Copy. Then, right-click in the Package Explorer pane and select Paste. The Copy Project pop-up window will allow you to give the copied project a new name. Enter BubbleDrawGUI and click OK. Eclipse will create a new copy of the BubbleDraw project in the Package Explorer pane as BubbleDrawGUI.
Now let’s rename the BubbleDraw.java file. This is the file with a public static void main() method that runs the application, and renaming it will help us distinguish between the new app and the old version. Inside the new BubbleDrawGUI project folder, right-click BubbleDraw.java and select Refactor ▸ Rename.
Refactoring means restructuring your code, but not its functionality. Usually programmers refactor when they’ve thought of a better, more efficient way of getting their code to do the same thing. When the Rename Compilation Unit window pops up, enter the new name, BubbleDrawGUI, and then click Finish. A second window may pop up, warning you that the class contains a main() method. You can ignore this warning and just click Finish a second time. The refactoring process will rename both the class and the Java file to BubbleDrawGUI. We’ll leave the BubblePanel class unchanged for now.
Finally, let’s modify the JFrame window’s title to match the new GUI version of the app. Open the BubbleDrawGUI.java file. Find the line that creates the JFrame and modify it to say Your Name's BubbleDraw GUI App as follows:
import javax.swing.JFrame;
public class BubbleDrawGUI extends JFrame {
public static void main(String[] args) {
JFrame frame = new JFrame("Your Name's BubbleDraw GUI App");
NOTE
The first time you run an app containing multiple files, such as the BubblePanel and BubbleDrawGUI apps, you’ll need to run the file that contains the main() method. Running the main file will create configurations that enable you to run the program just by clicking the run button from then on. The BubblePanel class doesn’t contain a main() method, so we must either run BubbleDrawGUI.java or right-click the BubbleDrawGUI project folder and select Run As ▸ Java Application.
Save your file and then run it to see the new title in the title bar at the top of the window, as shown in Figure 10-2.
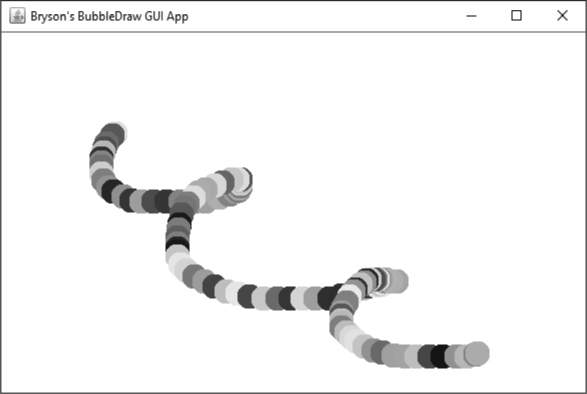
Figure 10-2: The new BubbleDrawGUI.java file opens a window with “Your Name’s BubbleDraw GUI App” in the title bar.
Now, let’s make one more change to make the bubbles look more realistic.
Real bubbles often have a semitransparent look. Think about blowing a bubble with bubble gum: once it gets big enough, you can see through the thin surface of the bubble. We can add transparency to the bubbles in the BubbleDrawGUI app to give them a more lifelike appearance.
In addition to the RGB color components you learned about in Chapter 9, Java can store a fourth component in the java.awt.Color class. This is called the alpha component, and it represents how transparent or opaque a color should appear onscreen when it is drawn in front of other objects. Just like the RGB color values, the alpha component can have values from 0 to 255. An alpha value of 0 will make the color invisible, 128 will make it look semitransparent like watercolor paint, and 255 will make it completely obscure any objects behind it.
Because the Color class’s constructor can accept the alpha value as a fourth argument (right after the RGB color values), we only need to change one line in the BubblePanel.java file to add transparency. Open BubblePanel.java under the BubbleDrawGUI project’s src folder and scroll to the bottom of the file where the Bubble class is defined:
private class Bubble {
private int x;
--snip--
color = new Color(rand.nextInt(256),
rand.nextInt(256),
rand.nextInt(256),
rand.nextInt(256) );
}
Here we change the color variable’s constructor by adding a fourth random value that can range from 0 to 255. We do so by adding a comma at the end of the third rand.nextInt(256) in the color statement and adding a fourth rand.nextInt(256) before the closing parenthesis of the Color() constructor. Be careful to check your commas and parentheses against the code shown here, or the app won’t work.
Save the file and then run it. Click around the screen to draw dots that overlap slightly, as shown in Figure 10-3.
You’ll see now that the bubbles have not only random colors but also varying levels of transparency. Some bubbles are opaque and completely cover the screen behind them, while others are so transparent they’re barely visible. Our bubbles are more bubbly than ever! Now let’s make them float for an even more realistic appearance.
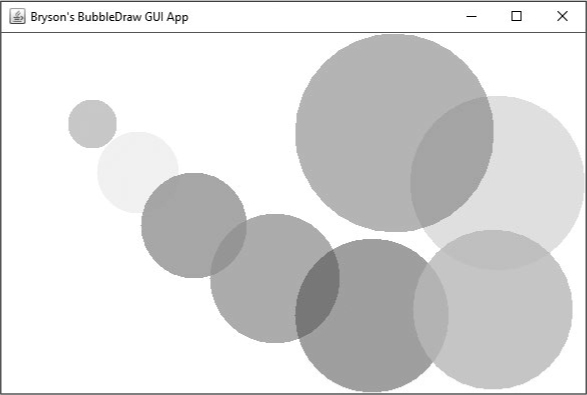
Figure 10-3: Adding an alpha component to the color of each bubble gives them a cool, transparent appearance.
Animation is the illusion of movement created by showing a sequence of images on the screen. You may have created a flipbook-style animation in a notebook: each drawing was shifted slightly from the previous one, and when you flipped through the notebook, you could see the animation come to life. We’ll add this type of effect to make it look like the bubbles are floating away in the BubbleDrawGUI app.
To animate the bubbles, we need to draw all the bubbles on the screen, change their location slightly, and then draw the screen again a few times every second. Each screen we draw is called a frame. If we redraw the objects quickly enough, our eyes and brains fill in the gaps between frames, making us believe the same object has moved in a smooth path. The animation’s frame rate, or how quickly we redraw the screen, is usually around 30 frames per second. We’ll use a new class, javax.swing.Timer, which creates timers, to tell our program when to redraw the bubbles. We’ll also use an event handler to update the bubbles’ location and repaint the screen each time the timer goes off.
There are four steps to create the animated bubbles: adding a timer, setting the timer, preparing the animation, and starting the timer. These are the same steps you would use to add animation to a game or any other app that uses a timer in Java.
To add a timer to our app, we’ll need to import the javax.swing.Timer class. At the top of your BubblePanel.java file, add the following import statement:
import javax.swing.Timer;
import java.awt.event.*;
import java.util.ArrayList;
import java.awt.Graphics;
import java.util.Random;
import java.awt.Color;
import javax.swing.JPanel;
Importing the Timer class from javax.swing enables us to create a timer object that triggers an event as often as we choose. Notice on the second line in the code snippet, we have already imported java.awt.event.*. This line imports all the java.awt event handlers, including the ActionListener class we’ll use to handle timer events.
Next, inside the BubblePanel class, add two variables: one named timer for the timer itself and an int named delay to store how many milliseconds the timer should wait before redrawing the screen:
public class BubblePanel extends JPanel {
Random rand = new Random();
ArrayList<Bubble> bubbleList;
int size = 25;
Timer timer;
int delay = 33;
Timers in Java need to know how many milliseconds, or thousandths of a second, to wait until they trigger a timer event. A millisecond is really fast, so I’ve chosen a delay of 33 milliseconds. This will cause the screen to be redrawn about 30 times per second, since 1 second = 1,000 milliseconds and 1,000 / 33 = 30 drawings per second. This is about the same rate as a cartoon on television.
Now we’re ready to set the timer. Inside the BubblePanel() constructor, add the following line to initialize the timer and set it with the given delay:
public BubblePanel() {
timer = new Timer(delay, new BubbleListener() );
bubbleList = new ArrayList<Bubble>();
setBackground(Color.BLACK);
// testBubbles();
addMouseListener( new BubbleListener() );
addMouseMotionListener( new BubbleListener() );
addMouseWheelListener( new BubbleListener() );
}
The constructor for a new Timer() requires two parameters: the first is the delay in milliseconds, and the second is the event handler that will listen for timer events. A timer triggers an actionPerformed() event every time it goes off, similar to the actionPerformed() event we handle for button clicks in a GUI interface. A timer is sort of like an automatic button that “clicks” itself every few milliseconds. We’ve placed the timer first in the constructor so that we can change it in response to GUI events later.
To listen for timer events, we’re going to modify the BubbleListener class. Scroll down in BubblePanel.java to find the private class BubbleListener that we created earlier. Then add implements ActionListener before the opening brace for the class:
private class BubbleListener extends MouseAdapter implements ActionListener {
This change allows the BubbleListener class to listen for actionPerformed() events by implementing the ActionListener class from java.awt.event.*. Implementing an event listener class is another way of handling user events. To handle these timer events, we’ll need to add an actionPerformed() event handler. Add the following method to the bottom of the BubbleListener class:
private class BubbleListener extends MouseAdapter implements ActionListener {
public void mousePressed(MouseEvent e) {
--snip--
}
public void mouseDragged(MouseEvent e) {
--snip--
}
public void mouseWheelMoved(MouseWheelEvent e) {
--snip--
}
public void actionPerformed(ActionEvent e) {
}
}
This new actionPerformed() method is where we’ll add the code that moves the bubbles and repaints the screen every time the timer goes off. We’ll add those statements next.
Now that we’ve added a timer and set up the BubbleListener to listen for timer events, we need to tell Java what to do when the timer triggers an event.
Every time the timer fires off an event, it’s time to draw the next image in the animated bubble sequence. First, we’ll tell the actionPerformed() event handler to update the bubbles and redraw the screen. Then, we’ll tell the Bubble class to update a bubble by moving it upward on the screen. We’ll have the program do these steps about 30 times per second.
Inside the actionPerformed() method that we added to the BubbleListener class, add the following three lines of code to update the bubbles and repaint the screen:
public void actionPerformed(ActionEvent e) {
➊ for (Bubble b : bubbleList)
➋ b.update();
➌ repaint();
}
At ➊, we’re using the for-each version of a for statement to loop through each Bubble b in bubbleList. Remember that bubbleList is the ArrayList containing all the bubbles we’ve created by clicking and dragging the mouse on the screen.
As we loop through each bubble in bubbleList, we call a new function named update() ➋ on all the bubbles. Eclipse underlines this statement in red because we haven’t yet defined the update() method in the Bubble class, but we’ll do that in just a moment. The update() method is where we’ll change the location of the bubbles to make them look like they’re floating up toward the top of the screen.
At ➌, we call the repaint() method to refresh the screen, clearing the drawing window and painting the bubbles in their new, updated locations. By doing this 30 times per second, we’ll achieve the animated effect we want to see.
Now let’s create the update() method to tell the Bubble class how to move bubbles each time the animation timer is triggered. In Java’s (x, y) coordinate system, we need to subtract from the y value (the top of the screen is where y equals 0). So, to make the bubbles appear to move upward, we can subtract a small amount from the y-coordinate at each update.
Scroll down to the bottom of BubblePanel.java where we defined the Bubble class and add the update() method just below the draw() method, as shown here:
public void draw(Graphics canvas) {
canvas.setColor(color);
canvas.fillOval(x - size/2, y - size/2, size, size);
}
public void update() {
y -=5;
}
}
}
The function to update the position of a bubble subtracts five pixels from the y value for that bubble. Each time a bubble is redrawn on the screen, it will be located five pixels higher than before.
Save your file. You only have one more step before you can run the app!
The final step in animating the BubbleDrawGUI app is starting the timer. Scroll up to the BubblePanel() constructor and add the following line:
public BubblePanel() {
timer = new Timer(delay, new BubbleListener() );
--snip--
addMouseWheelListener( new BubbleListener() );
timer.start();
}
The timer.start() method will start the timer so that it will fire events every few milliseconds as specified, until the timer.stop() method is called or until you exit the program.
Save and run the program now. When you draw bubbles, they should float upward, smoothly animated by the timer event handler.
The mouse scroll wheel and every other feature we built in Chapter 9 still work with our mesmerizing animation effect. The bubbles float in only one direction so far, but we’ve achieved the illusion of motion we were aiming for. In the next section, you’ll learn how to make the bubbles float in every direction.
The update() function we created in the previous section changed only the y-location of each bubble, causing the bubbles to move vertically every time the screen was redrawn. In this section, we’ll make the bubbles move both vertically and horizontally at random speeds so they appear to be blowing away in every direction, as shown in Figure 10-4.
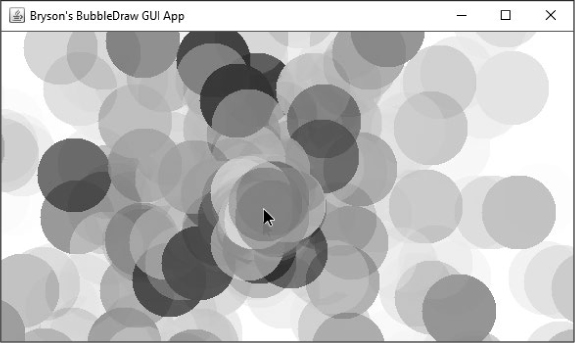
Figure 10-4: Changing both the x- and y-locations of each bubble makes the bubbles look like they’re blowing in random directions from the mouse pointer as we drag.
The bubble’s horizontal speed is how many pixels to the left or right it moves each frame. This is what determines the bubble’s new x-location. Similarly, the bubble’s vertical speed determines its new y-location. By just moving the bubble in the horizontal and vertical directions, we can make it move in any direction. Figure 10-5 shows how the horizontal speed and vertical speed combine to create the illusion that the bubble is moving diagonally.
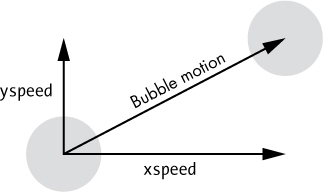
Figure 10-5: Changing a bubble’s location in both the x- and y-directions quickly will make the bubble appear to move diagonally on the screen.
First, let’s add variables to store how many pixels each bubble should travel in the x- and y-directions each time the screen is redrawn. Add these two lines to the top of the Bubble class:
private class Bubble {
--snip--
private Color color;
➊ private int xspeed, yspeed;
➋ private final int MAX_SPEED = 5;
At ➊, we’ve declared two integer variables: xspeed for the number of pixels the bubble will move horizontally each time the screen updates and yspeed for the number of pixels the bubble will move vertically. At ➋, we add a constant called MAX_SPEED for the maximum number of pixels a bubble should move at one time. Constants are named values similar to variables, but constants don’t change inside a program, so we declare them as final to tell Java that the value of the constant is permanent. We also name constants in all uppercase as a convention so we can tell them apart from regular variables.
We’ll give each bubble a random x and y speed using the rand.nextInt() method, just as we did for the bubble’s color. Add these two lines to the Bubble() constructor:
public Bubble(int newX, int newY, int newSize) {
x = newX;
y = newY;
size = newSize;
color = new Color(rand.nextInt(256),
rand.nextInt(256),
rand.nextInt(256),
rand.nextInt(256) );
xspeed = rand.nextInt(MAX_SPEED * 2 + 1) - MAX_SPEED;
yspeed = rand.nextInt(MAX_SPEED * 2 + 1) - MAX_SPEED;
}
We need the x and y speed values to allow the bubble to move in any direction, but we have only two variables for four directions (left or right, up or down). We can handle this by using both negative and positive values. When the xspeed is negative, the bubble will move toward the left, and when it’s positive, the bubble will move to the right. The yspeed will make the bubble move upward when negative and downward when positive. To make the xspeed and yspeed ranges span negative and positive values, I’ve multiplied MAX_SPEED by 2 and added 1, which is equal to 11 since 5 * 2 + 1 = 11. This makes rand.nextInt(MAX_SPEED * 2 + 1) equivalent to rand.nextInt(11), which will return a number between 0 and 10. By subtracting MAX_SPEED from this value, you’ll get a result between -5 and +5 since 0 - 5 = -5, and 10 - 5 = 5.
Finally, we need to change the update() function to move the bubble to its new location each time the screen is redrawn. Replace the statement y -= 5; with the following two statements:
public void update() {
x += xspeed;
y += yspeed;
}
Instead of moving up five pixels every time the screen is redrawn, each bubble will move horizontally by the xspeed and vertically by the yspeed values we randomly generated for that bubble. The result is a colorful explosion of bubbles everywhere we drag the mouse!
Save and run the program with these changes, and you’ll see an animated effect like the one we saw in Figure 10-4. The effect of moving the bubbles in the x- and y-directions over time gives each bubble the illusion of both a random speed and direction.
One curious behavior that you might notice is that some bubbles, such as the ones in the center of Figure 10-6, stay put. This is because we’re randomly generating numbers between -5 and +5 for the x and y speed, and sometimes a bubble’s xspeed and yspeed will both be 0. When this happens, the bubble won’t move at all.
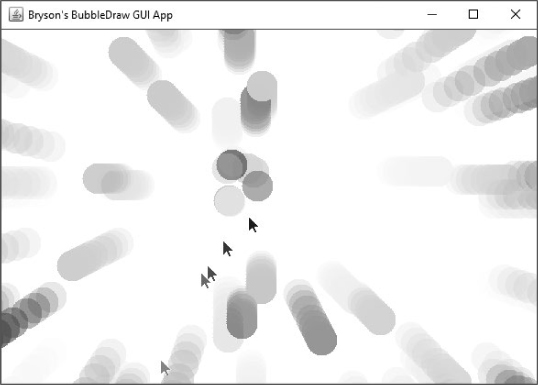
Figure 10-6: Because the random speed values can be 0, bubbles like the ones near the center here will stay put.
You can avoid having stuck bubbles by checking whether both xspeed and yspeed are equal to 0 and changing one or both of them—this is Programming Challenge #1 on page 244.
Now that our bubbles are floating away as we draw them, there are a couple of functions we might want to add to the app: the ability to pause the animation and to clear the screen. It’s time to build a GUI interface within our animated, graphical app.
The BubbleDrawGUI app is graphical, but it doesn’t have an interface like our other GUI apps. A Pause/Start button and a Clear button, shown in Figure 10-7, would make it easy for the user to understand and interact with the app, so let’s add those next.

Figure 10-7: The Pause/Start and Clear buttons
In the Package Explorer pane, right-click BubblePanel.java and select Open With ▸ WindowBuilder Editor. Click the Design tab, and you should see the GUI design view.
First, let’s add a JPanel to serve as the container for the Pause/Start and Clear buttons, as well as any other GUI components you might want to add later. In the Palette pane, under Containers, select JPanel. Then, hover your mouse over the design preview to the right and click the BubblePanel design preview to place a new JPanel onto the black background.
Alternatively, you can add a new JPanel by clicking the javax.swing.JPanel entry under the Structure pane and inside the Components pane to the left. You’ll see a very small gray JPanel appear at the top of the black BubblePanel design preview.
Next, let’s place the Pause/Start and Clear buttons. In the Palette pane, scroll down to the Components section, select the JButton component, and then hover and click inside the small JPanel we just added to place the first JButton. Enter Pause as the button’s text, either directly in the GUI preview or in the Properties pane. (You’ll see why we refer to it as the Pause/Start button shortly.)
Follow the same steps for the clear button: select JButton in the Palette pane, click inside the JPanel to place the button, and enter Clear for the button’s text.
If it’s difficult to place the buttons in the JPanel because it is too small, select JButton in the Palette and then click the panel in the Structure pane to the left to place each button inside the panel, as shown expanded in Figure 10-8. Name the buttons btnPause and btnClear either as you place them or by changing the Variable property in the Properties pane.
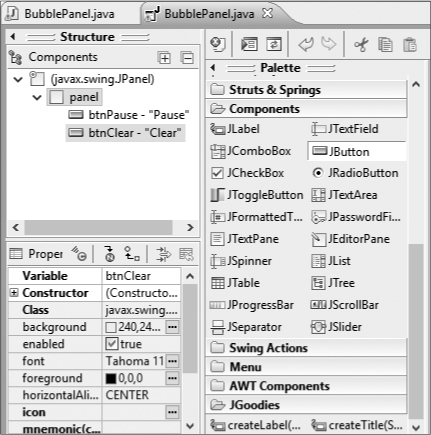
Figure 10-8: When building a GUI, you can select components from the Palette and add them directly to the Structure pane. Here, we’ve added btnPause and btnClear to the panel we just created.
The Structure pane is a useful way to add components to the GUI in situations like this, when we can’t see the JPanel well in the design preview, or when we want to change the ordering or grouping of the components in the GUI. Figure 10-9 shows both buttons in the finished GUI.
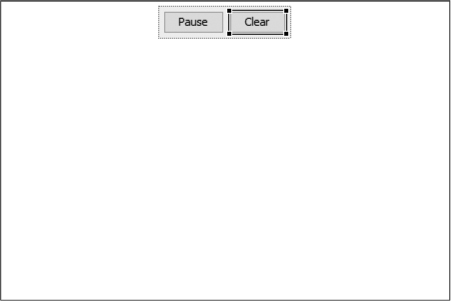
Figure 10-9: The Pause/Start and Clear buttons in the finished GUI
Now that we’ve added the Pause/Start and Clear buttons to the top of the drawing screen, it’s time to code the buttons’ event handlers.
Let’s start with the Clear button. One way to clear all the bubbles from the screen would be to reset the bubbleList variable to a new, empty list—that way, there are no bubbles to be drawn, and the user can begin painting afresh. To implement this behavior, double-click the Clear button (remember that double-clicking a button in the Design tab will create an event listener for the button and switch you back to the Source tab) and then add the following two lines inside the braces for bubbleList’s action listener:
JButton btnClear = new JButton("Clear");
btnClear.addActionListener(new ActionListener() {
public void actionPerformed(ActionEvent arg0) {
➊ bubbleList = new ArrayList<Bubble>();
➋ repaint();
}
});
panel.add(btnClear);
At ➊, we clear the bubbleList variable by setting it equal to a new ArrayList of Bubble objects. This new list will be empty, so all we have to do is repaint the screen and we’ll have a clean, black background just like when we opened the app. At ➋, we call the repaint() function to draw the new, empty screen.
Save and run the app. Then draw a few bubbles and click the Clear button to clear the screen.
Switch back to the Design tab and double-click the Pause/Start button to create another event listener. When the user clicks the Pause/Start button, we want to not only stop the animation by stopping the timer but also change the text on the button to Start. Then, when the user clicks again, we want to restart the timer to resume the animation and set the button’s text back to Pause.
Enter the following code into the actionPerformed() method Eclipse provided when you double-clicked the Pause/Start button.
NOTE
Make sure your ActionEvent variable in the actionPerformed() method is named e, as highlighted in bold in this code.
JButton btnPause = new JButton("Pause");
btnPause.addActionListener(new ActionListener() {
public void actionPerformed(ActionEvent e) {
➊ JButton btn = (JButton)e.getSource();
➋ if (btn.getText().equals("Pause")) {
➌ timer.stop();
➍ btn.setText("Start");
}
else {
➎ timer.start();
➏ btn.setText("Pause");
}
}
});
panel.add(btnPause);
At ➊, going from right to left, we use the e.getSource() method to find out which button was clicked, cast it to a JButton variable type, and store a link to the button as btn. The getSource() method is useful for finding out whether a GUI element has been clicked or changed, especially when you’re writing event handlers for multiple elements at once. In this example, we can use getSource() to access the button’s properties, such as its text property.
At ➋, we check whether the text on the button is equal to the string "Pause". If so, we stop the timer ➌ to pause the animation, and then we change the text on the button to the string "Start" ➍.
If the text on the button wasn’t "Pause"—in other words, if the animation was already paused and the text on the button had been changed to "Start" from a previous click—the event handler would go to the else statement instead and start the timer ➎ to resume the animation. Finally, the text on the Pause/Start button will change back to "Pause" ➏.
Save the file and run it once more. Now you can pause the animation, draw something, and then restart the animation to achieve the jaw-dropping, exploding-bubbles effect shown in Figure 10-10.

Figure 10-10: Pause the animation, draw a shape, and then start the animation again to see your drawing explode into colorful bubbles.
The BubbleDrawGUI app is a visually stunning animated app, and the buttons give the user more control over the drawing screen. But once the animation runs, bubbles float off the edges of the screen, never to return. What if we could make the bubbles bounce around inside the window so that they stayed around a bit longer?
Animation isn’t just for flipbook cartoons and screensavers. There’s another place you encounter animation all the time: computer games. Whether it’s a mobile app or the latest online or console game, animation is how game developers give the user a sense of movement and action.
One useful game programming concept that we can add to the final version of the BubbleDrawGUI app is collision detection, which allows us to check whether two objects overlap, or collide, on the screen. You might use collision detection to tell the program what to do when a player shoots an enemy spaceship or kicks a football in a video game. In this app, we want to find out whether a bubble has reached the edge of the drawing screen so we can change the bubble’s direction, making it appear to bounce off the edge of the screen back toward the center like the bubble in Figure 10-11.
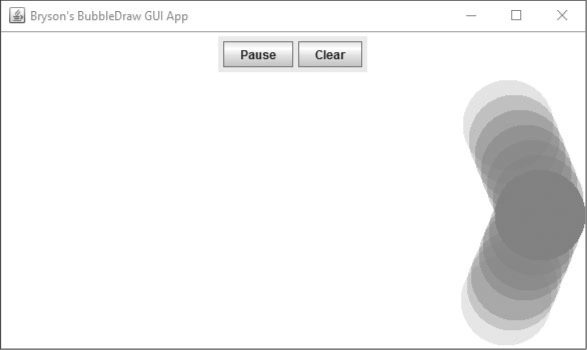
Figure 10-11: The bubble bounces off the right edge of the window, courtesy of collision detection.
Collision detection can give virtual objects, such as our bubbles in BubbleDrawGUI, a more realistic appearance. In your favorite computer game, collision detection is what keeps your player from falling through the floor or walking through walls. These objects are imaginary—they’re all just computer graphics, so they can’t actually bump into one another—but collision detection creates the illusion that they are solid. So, if we give our bubbles a gentle bounce off the edges of the screen, they’ll feel more like real objects to us. Let’s see how that works.
First, we’ll break down how collision detection works for bubbles bouncing off the window’s edges. We already know that each bubble has a pair of x -and y-coordinates for its location and an xspeed and yspeed for the number of pixels to move horizontally and vertically from one screen refresh to the next.
To figure out whether a bubble has collided with the window’s edge, we need to know the x- and y-coordinates of the edges of the screen so we can compare them to the bubble’s x- and y-coordinates. The left edge of the screen is the lowest x value, or x==0. And the top of the screen is the smallest y value, or y==0. But how about the right edge and bottom of the screen?
Every GUI component in Java inherits a pair of methods to return the width and height of the component: getWidth() and getHeight(). Our drawing screen for the BubbleDrawGUI app is the JPanel BubblePanel. So, if we call the getWidth() and getHeight() functions inside BubblePanel, the maximum x value is getWidth(), and the maximum y value is getHeight().
We check whether a bubble’s x and y value has collided with an edge of the screen in the Bubble class’s update() method. You might remember that the update() method is also where we change each bubble’s x- and y-coordinates using xspeed and yspeed to give it the illusion of motion.
Let’s be more precise about what we mean by a “bounce.” Back in Figure 10-11, the bubble is moving toward the right edge of the screen, where x==getWidth(), meaning the bubble’s x value is at the maximum x-coordinate, the width of the screen in pixels. To make the bubble look like it’s bouncing, we change the direction it’s moving by reversing the xspeed. The bubble was moving by some positive number of pixels each time it updated; after it touches the edge of the screen, we can make it move in the opposite direction by changing the sign of xspeed. In other words, we can make xspeed negative to make the bubble move to the left and away from the right edge of the screen after it bounces.
We can reverse the bubble’s horizontal speed by setting xspeed = -xspeed, which makes xspeed the opposite of itself. So, an xspeed of 3 pixels per frame would change to an xspeed of -3 pixels per frame after the bubble collides with the right edge of the screen, reversing its direction after the bounce.
We can do the same with the left edge of the screen, where x==0. If the bubble’s x value allows the bubble to touch the left edge, setting xspeed = -xspeed flips the horizontal motion again: an xspeed of -3 would become -(-3), or +3. This will make the bubble move to the right again, away from the left edge of the screen.
In BubblePanel.java, scroll all the way down to the bottom of the file, where we defined the Bubble class. Find the update() method and add the following collision detection code for the left and right edges of the screen:
public void update() {
x += xspeed;
y += yspeed;
if (x <= 0 || x >= getWidth())
xspeed = -xspeed;
}
If the bubble’s x value goes below 0, or if x goes past the width of the screen, the bubble must have touched either the left or right edge of the screen, so we change the xspeed to send the bubble bouncing in the opposite direction.
For the top and bottom edges, we’ll do the same thing, but this time we change the yspeed:
public void update() {
x += xspeed;
y += yspeed;
if (x <= 0 || x >= getWidth())
xspeed = -xspeed;
if (y <= 0 || y >= getHeight())
yspeed = -yspeed;
}
If the bubble’s y value goes below 0, or past the height of the screen in pixels, we change yspeed to -yspeed to make the bubble move in the opposite direction.
Once you’ve made these additions to the update() method, save and run the file again. This time, you’ll see the bubbles you create rebound softly off all four edges. You may notice a small issue, however: the bubbles move halfway off the screen in any direction before they seem to bounce, as shown in Figure 10-12.
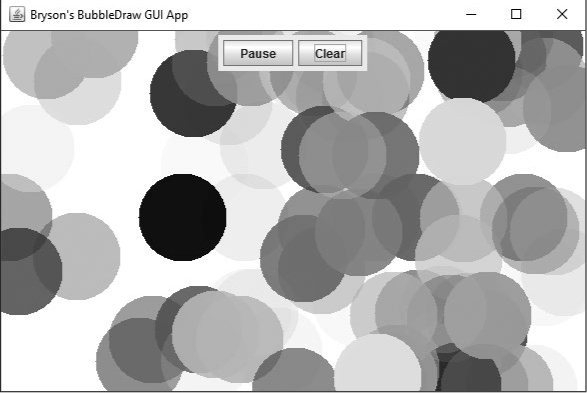
Figure 10-12: Around the edge of the window there are many bubbles that are almost halfway off the screen before they rebound.
This “soft” bounce happens because we’re checking for a collision between the center of each bubble and the edges of the screen. Recall that we centered each bubble around the (x, y) coordinates of the user’s click in Chapter 9, so each bubble’s x and y values represent the location of the center of that bubble. To make the bubbles stay on the screen completely, we’ll need to test for collisions between the outside edge of each bubble and the edges of the drawing window.
To check for collisions with the edge of each bubble, we’ll have to account for the distance from the center of each bubble to the edge, which is the bubble’s radius (since each bubble is a perfect circle). The radius is the same as half of the size value of each bubble, or size/2. Modify the two if statements in the update() method to account for the size of each bubble as shown here:
public void update() {
x += xspeed;
y += yspeed;
➊ if (x - size/2 <= 0 || x + size/2 >= getWidth())
xspeed = -xspeed;
➋ if (y - size/2 <= 0 || y + size/2 >= getHeight())
yspeed = -yspeed;
}
At ➊, we subtract size/2 from x to see whether the left edge of the bubble has touched the left side of the screen, which will be true if x - size/2 is less than or equal to 0. Division is performed before subtraction. Therefore size/2 will be evaluated first and then subtracted from x, so we don’t need to add parentheses around size/2. We also add size/2 to x to see whether the right edge of the bubble is touching the right edge of the screen, which would mean x + size/2 is greater than or equal to getWidth(). At ➋, we make the same changes to check for the top edge (y - size/2) and bottom edge (y + size/2) of each bubble to see whether they are touching the top or bottom, respectively, of the drawing window.
Save your program and run it again. Now all the bubbles you create, big and small, bounce solidly off the edges of the window, as shown in Figure 10-13.
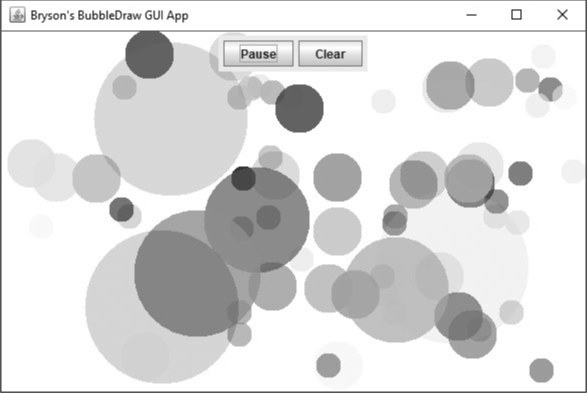
Figure 10-13: Now our bubbles make a “hard” bounce against the window’s edges, for a more solid appearance.
Click the maximize button on the app’s title bar or double-click the title bar to expand the window. You’ll see that the bubbles expand to bounce off the edges of the drawing window even when the app is fullscreen. We used the getWidth() and getHeight() methods to determine the right and bottom edges, and those methods will always return the current width and height, so feel free to resize the app as you draw.
Now let’s make one final addition to give the user even more control via the GUI.
At this point, we’ve given the user control over pausing and clearing the screen, as well as the ability to create big and small bubbles. Let’s also give them control over the animation speed by providing a slider that changes the timer’s delay, as shown in Figure 10-14.

Figure 10-14: Adding a slider will allow the user to speed up or slow down the animation.
First, switch back to the Design tab and add a JLabel and JSlider to the GUI control panel. Scroll down under the Palette to find the Components section and select JLabel. Click inside the small panel just before the Pause/Start button in your GUI design preview to place the label. Change the label’s text to Animation Speed:.
Next, click the JSlider component on the Palette. Then click between the Animation Speed label and the Pause/Start button to place the slider, as shown in Figure 10-15.
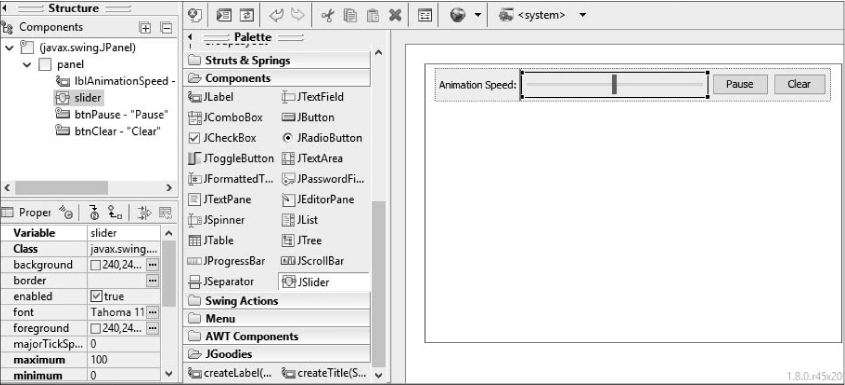
Figure 10-15: Add a label and slider to the app’s GUI control panel in the design view.
You may notice that the JPanel for all the GUI components grows as we add elements. If you click the panel in the Structure pane, you’ll see that the Layout property has the default value java.awt.FlowLayout. This layout expands to fit as many GUI elements as you place inside it. We used the AbsoluteLayout for the Hi-Lo guessing game and Secret Messages apps because we wanted to place elements in specific positions. In this drawing app, we can be more flexible, and the FlowLayout is perfect for adding GUI components on the fly.
We’ll change a few properties to customize the slider next, so let’s figure out what we want the slider to look like. The slider should allow the user to change the animation speed easily and intuitively. In other words, if the user slides the animation speed to 0, the animation should slow down almost to a stop. If the user slides the animation speed all the way to the right, the animation should go really fast.
Monitors usually refresh the screen between 30 and 120 times per second, with 60 Hz (short for hertz, a measure of frequency per second) being the most common refresh rate. If we animate the bubbles faster than 120 times per second, your monitor likely won’t be able to show all of the individual frames in the animation. So it makes sense to set our maximum speed value on the slider to 120 frames per second.
The number of frames per second, abbreviated fps, is often a measure of the smoothness of the animation. A game that runs at 60 fps on your computer will look smoother than a game that runs at 30 fps.
Select the slider in your design preview. In the Properties pane in the lower left, set the range by specifying a maximum of 120 and a minimum of 0 (the default). To prepare the labels and tick marks, set majorTickSpacing to 30, set minorTickSpacing to 5, and select the checkboxes next to paintLabels, paintTicks, and paintTrack to make all three values true. Finally, change the value property to 30, the default number of frames per second. Figure 10-16 shows the Properties pane with all of our customized values, along with a preview of the JSlider after the changes.
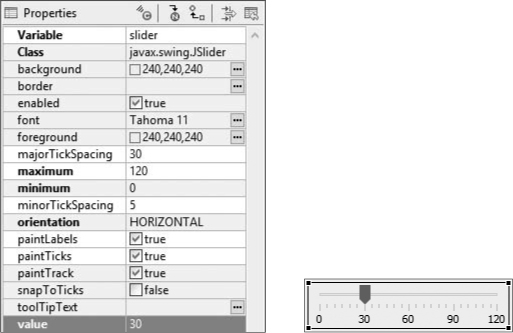
Figure 10-16: The Properties pane for the Animation Speed slider with customized values (left); a preview of the slider showing the customizations (right)
The slider is labeled from 0 to 120 in increments of 30 because you checked paintLabels and set majorTickSpacing to 30. The small tick marks show up between those values because you set minorTickSpacing to 5 and checked paintTicks. We’ve got a customized slider ready to change the animation speed, so now let’s edit the code to put the slider to work.
In the Design tab’s design preview, right-click the slider and select Add event handler ▸ change ▸ stateChanged. Eclipse will add a ChangeListener with a stateChanged() method like the one we used in the Secret Messages app’s slider implementation. The code looks like the following:
JSlider slider = new JSlider();
slider.addChangeListener(new ChangeListener() {
public void stateChanged(ChangeEvent e) {
}
});
First, we need to declare the JSlider at the top of the class so that we’ll be able to access the slider’s value inside the stateChanged() event handler’s code. Scroll up to the top of the BubblePanel class and add the following line just below the timer and delay variables:
public class BubblePanel extends JPanel {
Random rand = new Random();
ArrayList<Bubble> bubbleList;
int size = 25;
Timer timer;
int delay = 33;
JSlider slider;
Next, scroll back down to the slider code and remove the JSlider type declaration from the beginning of the first line:
slider = new JSlider(); // Remove "JSlider" from beginning of line
slider.addChangeListener(new ChangeListener() {
public void stateChanged(ChangeEvent e) {
}
});
When the user changes the slider’s position, we want to change the speed of the animation by changing the length of delay between each timer event. To do this, we’ll need to get the speed value from the slider, convert the speed into a number of milliseconds, and then set the timer’s delay to the new value. Add the following three lines inside the braces for the stateChanged() method:
slider = new JSlider();
slider.addChangeListener(new ChangeListener() {
public void stateChanged(ChangeEvent arg0) {
➊ int speed = slider.getValue() + 1;
➋ int delay = 1000 / speed;
➌ timer.setDelay(delay);
}
});
At ➊, we use the getValue() method to get the speed value from the slider and store it in an integer variable named speed. Notice, though, that we add 1 to the slider value here. We’re doing this to prevent a division-by-zero error at ➋, where we divide 1000 by the speed to determine the number of milliseconds of delay between each frame. The slider can go all the way down to 0, but by adding 1 to its value, we prevent the delay from causing an error: 1000/0 throws a division-by-zero exception, but 1000/1 gives us a very slow 1,000 milliseconds between frames that feels like the animation is nearly stopped. This means that when the user moves the slider to 0, the animation won’t actually stop. In order to stop the animation completely, they’ll need to click the Pause/Start button instead.
Finally, we update the timer by setting the new delay value in milliseconds ➌. This will slow down or speed up the animation by changing the amount of time between timer events.
Save the file and run it. Move the slider back and forth, and you’ll see you now have control over the speed of the animation.
The BubbleDrawGUI app is our most interactive, entertaining, visually engaging app so far—a graphical, animated drawing app with a GUI interface that gives the user complete control over the animation. Play around with it for a while—and congratulate yourself on a job well done!
We built on the BubbleDraw app from Chapter 9 to produce an animated GUI version with bouncing bubbles. Here are some of the skills we’ve added in this chapter:
• Combining a graphical app with a GUI interface
• Copying a project and pasting a new version in the Package Explorer in Eclipse
• Renaming a class or object by refactoring
• Using transparency by setting the alpha component in RGBA colors
• Creating, setting, and starting a Timer object
• Handling Timer object events
• Creating an animation by moving graphical objects with a timer
• Making virtual objects bounce via collision detection
• Using getWidth() and getHeight() to find the edges of the window
• Using a slider to change a timer’s delay
• Varying an animation’s speed by changing the delay property of a timer
Try these programming challenge exercises to review and practice what you’ve learned, as well as to expand your programming skills. Visit the book’s website at https://www.nostarch.com/learnjava/ for sample solutions.
One problem we noted in the chapter was that some bubbles get a random speed of 0, causing them to seem stuck in place while the other bubbles float away. This happens when the bubble’s xspeed and yspeed are both set to 0. For this challenge, add some code to make sure that no bubbles get a random speed of 0. To do so, you’ll test the xspeed and yspeed values to see whether they’re both equal to 0. If they are, all you need to do is set the two values to something else, like 1.
HINT
Add the if statement inside the Bubble() constructor, after the xspeed and yspeed values are created.
private class Bubble {
--snip--
public Bubble(int newX, int newY, int newSize) {
--snip--
xspeed = rand.nextInt(MAX_SPEED * 2) - MAX_SPEED;
yspeed = rand.nextInt(MAX_SPEED * 2) - MAX_SPEED;
if // Add your code here
}
Make your changes, save and run the file, and voilà—no more stranded bubbles!
Because of the random speed values, the bubbles move in every direction, which is the effect we originally wanted. But what if we wanted to draw shapes and have them stay together?
Setting the speed of every bubble to the same fixed value creates a funky, flexible, twisty effect as the objects bounce off the edges of the screen, as shown in Figure 10-17.

Figure 10-17: Giving all bubbles the same xspeed and yspeed creates a flexible, bouncy effect that keeps shapes together as they rebound and twist off the edges of the screen.
For this challenge, create a new copy of the app so that the original version is still available. Copy and paste the BubbleDrawGUI project in the Package Explorer pane, renaming it FlexiDraw or another app name of your choice. In the BubblePanel file, change the Bubble() constructor so that instead of creating random xspeed and yspeed variables, it sets them equal to the same value, perhaps like this:
xspeed = yspeed = 2;
This line of code makes use of an interesting feature of the assignment operator (=). This is called a chained assignment, because both xspeed and yspeed are being assigned the value of 2, and the equal sign allows us to assign the same value to several variables in a chain sequence.
You can pick a higher or lower number for your speed value. The important point to note is that we’ve replaced the random speeds with a fixed starting speed and direction for every bubble. Each bubble will move right two pixels and down two pixels the first time it’s drawn, so the bubbles will form groups as you draw.
Save the file, right-click the FlexiDraw folder in the Package Explorer, and select Run As ▸ Java Application. Pause the animation to draw, and then press Start to see your shapes bend, twist, and bounce as they move around the screen! You can even draw as the animation runs for a cool spiral effect.
For this challenge, you’ll reuse the PixelDraw code from Chapter 9 (Programming Challenge #2 on page 219). Adding the pixelated effect to the animated drawing program will allow you to draw square pixel shapes and animate them. Combine this effect with the FlexiDraw trick from the previous challenge exercise, and you’ve got a bouncing, bending Minecraft-esque drawing app like the one shown in Figure 10-18.

Figure 10-18: The PixelDraw 2.0 effect (left); the same shape after bouncing off the sides and twisting upside down and backward (right)
Pause the animation to keep the blocks in a clean, gridlike shape like the example in Figure 10-18. Draw with the animation going to achieve a stacked, 3D look like the example in Figure 10-19.
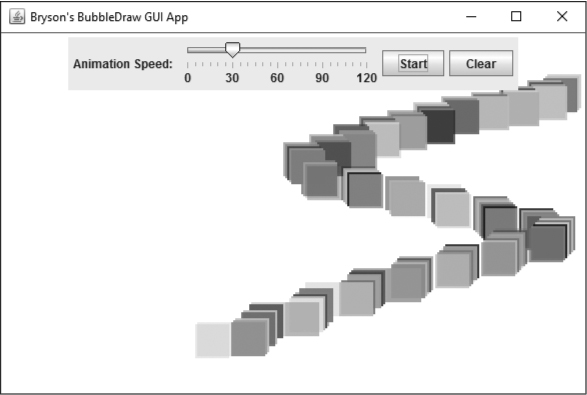
Figure 10-19: The PixelDraw 2.0 code creates a stacked, 3D effect if you drag the mouse while the animation is running.
Here’s a hint to help with the math: to achieve the blocky style, you need to “divide” the screen into a grid based on the size of each block, and then draw a block at that grid location. This time, try changing your x and y variables at the top of the Bubble() constructor to something like the following:
x = (newX / newSize) * newSize + newSize/2;
y = (newY / newSize) * newSize + newSize/2;
The first part of the formula, (newX / newSize) * newSize, divides the screen into grid blocks based on newSize, the size of the current bubble. In order to align the x- and y-positions with a newSize by newSize grid, we need them to be multiples of newSize. For the x-coordinate, we do this by dividing newX by newSize, which results in an integer without decimal points that we multiply by newSize to make an integer that is a multiple of newSize. This places the x-coordinate of the bubble at the edge of the grid block the user clicks in. For example, if newSize is 10, the division and multiplication “snap” the x-coordinate to 10 by 10 gridlines by making x a multiple of 10. If we stopped there, this would result in a bubble with its center at the point where the gridlines meet. Since we want the bubble to be contained within a grid block instead, the second part (+ newSize/2) shifts the bubble to the center of that block.
Finally, draw blocks instead of bubbles by changing the draw() method to fill rectangles instead of ovals using fillRect().
That’s it! But you can—and should!—make additional changes to customize the new app even further and make it your own. Change the JFrame title in the BubbleDrawGUI.java file or even refactor/rename the files if you’d like. The sky’s the limit!
After making those changes, you’ll be able to draw beautiful, blocky, pixelized, and animated creations. Take a screenshot and tweet it to your friends. Use the hashtag #JavaTheEasyWay or tag me @brysonpayne, and I’ll retweet it to a few thousand of my friends as well!