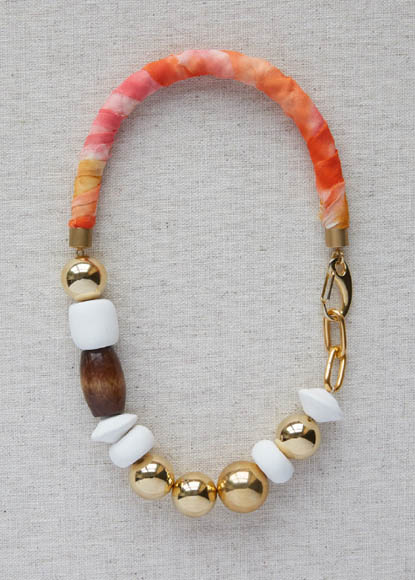
WE HAVE A NICKNAME FOR THIS STYLE AROUND THE STUDIO: ceramics teacher chic, and we can’t get enough of it. The mix of prints, natural materials, and scale feels bohemian without being hippie. Making your own beads out of polymer clay is surprisingly easy and allows you to create them in any shape, size, texture, and finish. Make this style your own by playing with fabric prints, bead shapes, and colors. Pair your necklace with a long flowy dress.
3 packages of 2 oz/55 g polymer clay to make 5 polymer clay beads (2 donut-shaped, 2 disc-shaped, and 1 barrel-shaped)
1 yd/1 m strip of 2-in-/5-cm-wide fabric, in a print you love
At least 10 in/25 cm of rope, 10 mm
2 end caps that fit the rope end snugly
1 yd/1 m flexible beading wire
2 gold crimp beads, 2 mm dia.
4 hollow brass beads, 20 mm dia.
1 hollow brass bead, 22 mm dia.
1 wood bead, 20 mm wide × 30 mm long
2 large oval gold jump rings
1 large gold spring ring clasp
1 medium gold jump ring
Flat-bottom drinking glass or another flat, even surface
Plastic drinking straw, 5 mm dia.
Cookie sheet
Wax paper or parchment paper
Ruler
Oven
Scissors
E-6000 glue
2 pairs of chain-nose pliers
Clippers
Make the clay beads
1 To create the 2 donut-shaped beads, roll the clay into balls with your hands and flatten them slightly with a glass. The donut-shaped beads pictured are approximately 10 mm wide × 20 mm long.
2 To create the large barrel-shaped bead, roll out a log of clay and flatten it slightly with a glass. This bead measures approximately 20 mm wide × 23 mm long.
3 To create the 2 disc-shaped beads, roll the clay into balls and simultaneously pull the edges out and pinch or flatten the top and bottom inward. These beads are approximately 20 mm wide × 10 mm long.
4 Smooth out the beads with your finger and a bit of water.
5 Insert the straw into the center of each bead to create a hole. Twist the straw slightly as you remove it to make sure the bead has a smooth hole.
6 Place the beads on a cookie sheet lined with wax paper or parchment paper. Bake in the preheated oven at 275°F/135°C for about 40 minutes. If your baked bead sizes don’t conform to the ones given in steps 1–3, just remember to cook 15 minutes for every 1/4 in/6 mm of clay. Check on the beads about every 10 minutes. The clay should feel firm but retain its white color. Polymer clay can become brownish in color if overbaked. Remove from the oven and let cool for 1 hour.
7 Wrap the fabric strip around the rope diagonally until you’ve covered 8 in/20 cm of rope. Cut each end of the rope, and wrap the fabric around the rope ends so it covers all the frayed rope threads.
8 Add a dab of glue to the inside of each end cap. Twist one end of the wrapped rope into one of the end caps. If it’s a tight fit, twisting the rope as you insert it will help. Repeat for the other rope end and end cap. Set the rope aside for the glue to dry, about 15 minutes.
Assemble the necklace
9 Loop the flexible beading wire through a crimp bead, through the loop on one of the end caps, and then thread the wire end back through the crimp bead. With chain-nose pliers, flatten and secure the crimp bead around both strands of the flexible wire.
10 In your desired order, string your brass, clay, and wood beads onto the flexible beading wire, covering the crimp bead.
11 Add a second crimp bead, loop the flexible beading wire through one of the large oval jump rings, and thread the wire tail back through the crimp bead. Slide the crimp bead down over both wire strands so that it’s between two of the beads, and with the chain-nose pliers, crimp it around both wire strands. Clip any excess wire, leaving a small tail hidden between the beads.
12 Connect the gold jump ring clasp to the other end of the rope with the medium gold jump ring. Then clasp it to a second large oval gold jump ring attached to the end cap on the first end of the rope.