Chapter 3
Getting to Know PHP and MySQL
IN THIS CHAPTER
 Working with PHP and MySQL
Creating a page with PHP
Managing a database with MySQL
In Book 6, you dig into the code necessary to create functions and features on your website. Many, if not all, of these functions and features use Hypertext Preprocessor (PHP) tags. When combined with the WordPress code, these tags make things happen (such as displaying post content, categories, archives, links, and more) on your website.
One of the reasons WordPress is the most popular content management system (CMS) is that you don’t need to know PHP code to use it. That’s to say, you can use WordPress easily without ever looking at any of the code or template files contained within it. If, however, you want to tweak the settings of your WordPress theme (flip to Book 6) or the code of a particular plugin (see Book 7), you need to understand the basics of how PHP works. But don’t worry; you don’t need to be a PHP programmer.
This chapter introduces you to the basics of PHP and MySQL, which is the database system that stores your WordPress data. After you read this chapter, you’ll understand how PHP and MySQL work together with the WordPress platform to serve up your website in visitors’ browsers.
 This book doesn’t turn you into a PHP programmer or MySQL database administrator, but it gives you a glimpse of how PHP and MySQL work together to help WordPress build your website. If you’re interested in finding out how to program PHP or become a MySQL database administrator, check out PHP, MySQL & JavaScript All-in-One For Dummies, Richard Blum (John Wiley & Sons, Inc.).
Understanding How PHP and MySQL Work Together
WordPress uses a PHP/MySQL platform, which provides everything you need to create your own website and publish your own content dynamically without knowing how to program those pages. In short, all your content is stored in a MySQL database in your hosting account.
 PHP is a server-side scripting language for creating dynamic web pages. When a visitor opens a page built in PHP, the server processes the PHP commands and then sends the results to the visitor's browser. MySQL is an open-source relational database management system (RDBMS) that uses Structured Query Language (SQL), the most popular language for adding, accessing, and processing data in a database. If all that sounds like Greek to you, just think of MySQL as a big file cabinet where all the content on your blog is stored.
Every time a visitor goes to your site to read your content, she makes a request that’s sent to a host server. The PHP programming language receives that request, makes a call to the MySQL database, obtains the requested information from the database, and then presents the requested information to your visitor through her web browser. PHP doesn’t require a MySQL database to perform some functions, but for the purposes of this chapter, understand that PHP is making requests for data stored in the MySQL database.
Here, content refers to the data stored in the MySQL database — that is, your site posts, pages, comments, links, and options that you set up on the WordPress Dashboard. But the theme (or design) you choose to use for your website — whether it’s the default theme, one you create, or one you’ve custom-designed — isn’t part of the content in this case. Theme files are part of the file system and aren’t stored in the database. Therefore, it’s a good idea to create and keep backups of any theme files that you’re currently using. See Book 6 for further information on WordPress theme management.
Make sure your web host backs up your site daily so that your content (data) won’t be lost in case something happens. Web hosting providers that offer daily backups as part of their services can save the day by restoring your site to its original form. Additionally, Book 2, Chapter 7 covers important information about backing up your website.
Exploring PHP Basics
WordPress requires PHP to work; therefore, your web hosting provider must have PHP enabled on your web server. If you already have WordPress up and running on your website, you know that PHP is running and working just fine. Currently, the PHP version required for WordPress is 7.2 or later.
Before you play around with template tags (covered in Book 6) in your WordPress templates or plugin functions, you need to understand what makes up a template tag and why, as well as the correct syntax, or function, for a template tag as it relates to PHP. Additionally, have a look at the WordPress files contained within the download files. Many of the files end with the .php file extension — an extension required for PHP files, which separates them from other file types, such as JavaScript (.js) and CSS (.css).
As I state earlier, WordPress is based in PHP (a scripting language for creating web pages) and uses PHP commands to pull information from the MySQL database. Every tag begins with the function to start PHP and ends with a function to stop it. In the middle of those two commands lives the request to the database that tells WordPress to grab the data and display it.
A typical template tag, or function, looks like this:
<?php phpinfo(); ?>
This example tells WordPress to do three things:
- Start PHP:
<?php - Use PHP to get information from the MySQL database and deliver it to your website:
phpinfo(); - Stop PHP:
?>
In this case, phpinfo(); represents the tag function, which grabs information from the database to deliver it to your website. The information retrieved depends on what tag function appears between the two PHP commands.
Every PHP command you start requires a stop command. For every <?php, you must include the closing ?> command somewhere later in the code. PHP commands that are structured improperly cause ugly errors on your site, and they've been known to send programmers, developers, and hosting providers into loud screaming fits. You find a lot of starting and stopping of PHP throughout the WordPress templates and functions. The process seems as though it would be resource-intensive, if not exhaustive, but it really isn’t. You can read all about PHP tags at the official PHP docs site at https://secure.php.net/manual/en/language.basic-syntax.phptags.php.
 Always, always make sure that the PHP start and stop commands are separated from the function with a single space. You must have a space after
 <?php and a space before ?>, because if you don't, the PHP function code doesn’t work. Make sure that the code looks like this
<?php phpinfo(); ?>
and not like this:
<?phpphpinfo();?>
Trying Out a Little PHP
To test some PHP code, follow these steps to create a simple HTML web page with an embedded PHP function:
Open a new blank file in your default text editor — Notepad (Windows) or TextEdit (Mac) — type
<html>, and then press Enter.The
<html>tag tells the web browser that this file is an HTML document and should be read as a web page.Type
<head>and then press Enter.The
<head>HTML tag contains elements that tell the web browser about the document; this information is read by the browser but hidden from the web-page visitor.Type
<title>This Is a Simple PHP Page</title>and then press Enter.The
<title>HTML tag tells the browser to display the text between two tags as the title of the document in the browser title bar.Note: All HTML tags need to be opened and then closed, just like the PHP tags that I describe in the preceding section. In this case, the
<title>tag opens the command and the</title>tag closes it, telling the web browser that you're finished dealing with the title.- Type
</head>to close the<head>tag from step 2 and then press Enter. Type
<body>to define the body of the web page and then press Enter.Anything that appears after this tag displays in the web browser's window.
Type
<?phpto tell the web browser to start a PHP function and then press the spacebar.See ”Exploring PHP Basics” earlier in this chapter for details on starting and stopping PHP functions.
Type
echo '<p>Testing my new PHP function</p>';and then press the spacebar.This function is the one that you want PHP to execute on your web page. This particular function echoes the text Testing my new PHP function and displays it on your website.
- Type
?>to tell the web browser to end the PHP function and then press Enter. Type
</body>to close the<body>HTML tag from step 5 and then press Enter.This tag tells the web browser that you're done with the body of the web page.
Type
</html>to close the<html>tag from step 1 and then press Enter.This tag tells the web browser that you're at the end of the HTML document.
When you’re done with steps 1 through 10, double-check to make sure that the code in your text editor looks like this:
<html>
  <head>
    <title>This Is a Simple PHP Page</title>
  </head>
  <body>
    <?php echo '<p>Testing my new PHP function</p>';
  </body>
</html>
After you write your code, follow these steps to save and upload your file:
- Save the file to your local computer as
test.php. Upload the
test.phpfile.Via Secure File Transfer Protocol (SFTP), upload
test.phpto the root directory of your web server. If you need a review of how to use SFTP to transfer files to your web server, look through the information presented in Book 2, Chapter 2.Open a web browser, and type the address
http://yourdomain.com/test.phpin the web browser's address bar (where yourdomain is your actual domain name).As shown in Figure 3-1, a single line of text displays:
Testing my new PHP function.
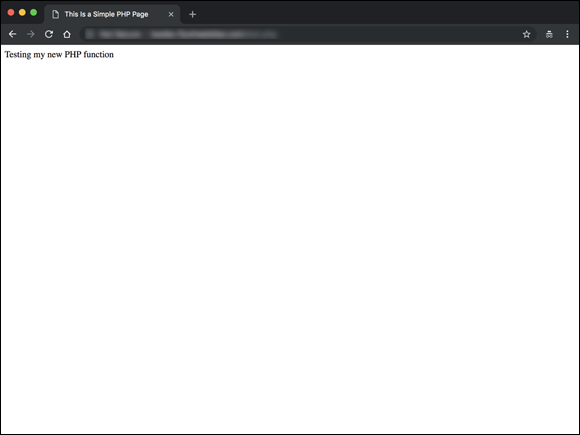
FIGURE 3-1: A basic PHP page in a browser window.
If the test.php file displays correctly in your browser, congratulations! You've programmed PHP to work in a web browser.
 If the
 test.php file doesn’t display correctly in your browser, a PHP error message gives you an indication of the errors in your code. (Usually included with the error message is the number of the line where the error occurs in the file.)
Managing Your MySQL Database
Many new WordPress users are intimidated by the MySQL database, perhaps because it seems to be way above their technical skills or abilities. Truth be told, regular users of WordPress — those who use it just to publish content — don’t ever have to dig into the database unless they want to. You need to explore the database only if you’re dealing with theme or plugin development, or if you’re contributing code to the WordPress project.
This section gives you a basic overview of the WordPress database stored in MySQL so that you have an understanding of the structure and know where items are stored.
Currently, WordPress requires MySQL version 5.6 or greater to work correctly. If your web hosting provider doesn’t have version 5.6 or later installed on your web server, kindly ask to upgrade. WordPress can also use MariaDB version 10.0 or later, but the typical use is MySQL.
After WordPress is installed on your server (which I discuss in Book 2, Chapter 4), the database gets populated with 12 tables that exist to store different types of data from your WordPress blog. Figure 3-2 displays the structure of the tables, as follows:
wp_commentmeta: This table stores information, or metadata, for every comment published to your site and includes:- A unique comment ID number
- A comment meta key, meta value, and meta ID (unique numerical identifiers assigned to each comment left by you or visitors to your site)
wp_comments: This table stores the body of the comments published to your site, including- A post ID that specifies which post the comment belongs to
- The comment content
- The comment author's name, URL, IP address, and email address
- The comment date (day, month, year, and time)
- The comment status (approved, unapproved, or spam)
wp_links: This table is no longer actively used by the latest version of WordPress, it exists for backward compatibility from a time when WordPress used to have a Link Manager feature. This table stored the name, URL, and description of all links created by using the WordPress Link Manager. It also stored all the advanced options for the links created, if any.wp_options: This table stores all the option settings that you set for WordPress after you installed it, including all theme and plugin option settings.wp_postmeta: This table includes information, or metadata, for every post or page published to your site and contains metadata that includes- The unique post ID number. (Each blog post has a unique ID number to set it apart from the others.)
- The post meta key, meta value (unique numerical identifiers for each post created on your site), and any custom fields you've created for the post.
wp_posts: This table features the body of any post or page you’ve published to your website, including autosaved revisions and post option settings, such as- The post author, date, and time
- The post title, content, and excerpt
- The post status (published, draft, or private)
- The post comment status (open or closed)
- The post type (page, post, attachment, or custom post type)
- The post comment count
wp_termmeta: This table stores the metadata for terms (taxonomies, categories, and tags) for content.wp_terms: This table stores the taxonomies and categories you've created for posts, as well as tags that have been created for your posts.wp_term_relationships: This table stores the relationships among the posts, as well as the taxonomies, categories, and tags that have been assigned to them.wp_term_taxonomy: WordPress has three types of taxonomies by default: category, link, and tag. This table stores the taxonomy associated for the terms stored in thewp_termstable.wp_usermeta: This table features information, or metadata, from every user with an account on your WordPress website. This metadata includes- A unique user ID
- A user meta key, meta value, and meta ID, which are unique identifiers for users on your site
wp_users: The list of users with an account on your WordPress website is maintained within this table and includes- The username, first name, last name, and nickname
- The user login
- The user password
- The user email
- The registration date
- The user status and role (subscriber, contributor, author, editor, or administrator)
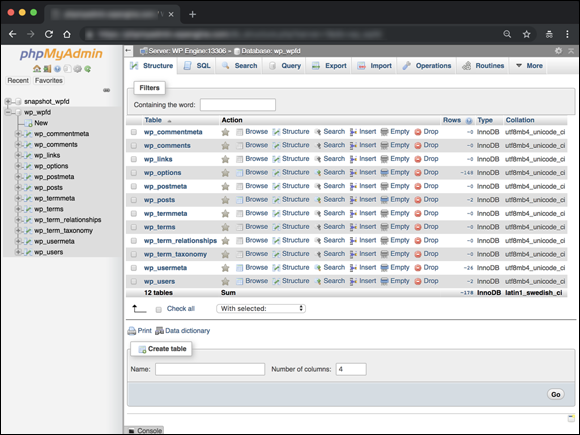
FIGURE 3-2: The WordPress database structure.
Most web hosting providers give you a utility, or an interface, to view your MySQL database; the most common one is phpMyAdmin (refer to Figure 3-2). If you're unsure how you can view your database on your hosting account, get in touch with your hosting provider to find out.
When the Multisite feature in WordPress is activated (check out Book 8 for information about the Multisite feature), WordPress adds six additional tables to the database:
wp_blogs: This table stores information about each site created in your network, including- A unique site numerical ID
- A unique site ID number (determines the ID of the network site to which the site belongs)
- The site domain
- The site server path
- The date the site was registered
- The date the site was updated
- The site status (public, private, archived, or spam; see Book 8 for more information on site status)
Although the database table that contains information about each site within the network is called wp_blogs, it actually refers to sites within the network. The labeling of this database table happened in the early years of WordPress, back when it was considered to be a blogging platform only. These days, WordPress is considered to be, and is most often used as, a full website content management system.wp_blog_versions: This table stores general information about each network site ID, database version, and date of last update.wp_registration_log: This table stores information about registered users, including- Unique user numerical ID
- User email address
- User IP address
- User site ID
- The date the user registered
wp_signups: This table stores information about user signups, including all the information from thewp_registration_logtable, the date the user account was activated, and the unique activation key the user accessed during the signup process.wp_site: This table stores information about your main installation site (or network site), including the site ID, domain, and server path.wp_sitemeta: This table stores all the information about the multisite configurations set after you install the Multisite feature. (See Book 8.)