Chapter 4
Installing WordPress on Your Web Server
IN THIS CHAPTER
 Discovering preinstallations by your host
Manually installing WordPress
Running installation scripts
This chapter takes you through two installation methods for WordPress: automatic installation with an installer provided by a managed web hosting service, which is available from your web hosting provider, and manual installation.
I also show you how to set up a MySQL database by using the cPanel web hosting management interface. By the time you’re done reading this chapter, you’ll be logged in to and looking at your brand-spanking-new WordPress Dashboard, ready to start publishing content right away. (If you already have WordPress installed, go ahead and skip to Book 2, Chapter 5, which contains great information about configuring WordPress for optimum performance and security.)
 Before you can install WordPress, you need to complete the following tasks:
- Purchase the domain-name registration for your account (Book 2, Chapter 1).
- Obtain a hosting service on a web server for your website (Book 2, Chapter 1).
- Establish your hosting account username, password, and Secure File Transfer Protocol (SFTP) address (Book 2, Chapters 1 and 2).
- Acquire an SFTP client for transferring files to your hosting account (Book 2, Chapter 2).
If you omitted any of the preceding items, flip to the chapters listed to complete the step(s) you’re missing.
Exploring Preinstalled WordPress
The WordPress software has become such a popular publishing tool that almost all hosting providers available today provide WordPress for you in a couple of ways:
- Already installed on your hosting account when you sign up
- A user dashboard with a utility for installing WordPress from within your account management
 If your hosting provider doesn’t give you access to an installation utility, skip to “Installing WordPress Manually” later in this chapter for the steps to install WordPress manually via SFTP.
One of the most popular web hosts for managed WordPress hosting is a service called WP Engine, which you can find at https://wpengine.com. The service provides a handy, easy-to-use installation utility that’s built right into your account dashboard at WP Engine to allow you to get up and running with WordPress right away.
You may not be using WP Engine, so your host may have a slightly different utility, but the basic concept is the same. Be sure to apply the same concepts to whatever kind of utility your hosting provider gives you.
To install WordPress from within the account dashboard of WP Engine, follow these steps:
- Log in to the WP Engine user dashboard.
- Browse to
https://my.wpengine.comto bring up the login screen. - Enter the email address you used to sign up, enter your password, and then click Log In. The page refreshes and displays the dashboard for your account.
- Browse to
Click the Sites link on the top menu.
The Sites page displays in your browser window, as shown in Figure 4-1.
Click the Add Site button.
A small window labeled Add Site opens.
Type the name of your new WordPress installation in the Site Name field.
This name is the temporary domain name of your new website. As shown in Figure 4-2, I’m using wpfd, which stands for WordPress For Dummies. This step creates the domain name
wpfd.wpengine.com.Choose Ungrouped from the Site Group drop-down list.
This step ensures that your new WordPress installation isn't associated with any other sites that you may already have set up within your WP Engine account.
Leave the Transferable check box unselected.
There may come a day where you want to create a WordPress installation that can be transferred between two WP Engine accounts, but today isn’t that day. You can read about the process at
https://wpengine.com/support/billing-transfer-information-for-developers.Click the Add Site button.
This step creates the WordPress installation in your account and takes you to the Overview page, where a message states that your WordPress installation is being created. When the installation is ready to use, you receive an email from WP Engine that contains the link to your new installation, along with login information.
In my experience, WP Engine always has the most up-to-date version of WordPress available for installation. Be sure to check that your hosting provider is supplying the latest version of WordPress with its installation utility.
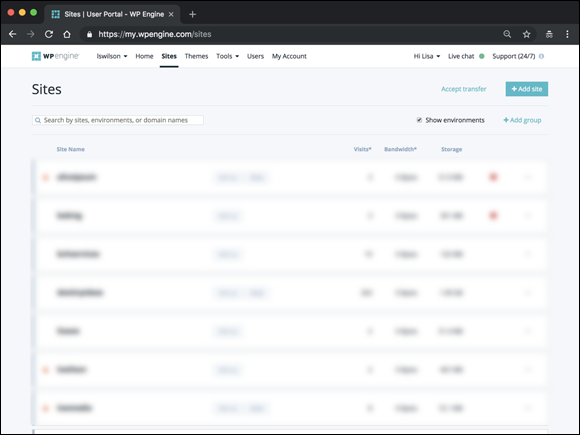
FIGURE 4-1: The Sites page at WP Engine.

FIGURE 4-2: The Add Site window at WP Engine.
Your WordPress installation via your provider’s utility is complete, and you’re ready to start using WordPress on your web server. If you installed WordPress by using your provider’s utility method and don’t want to review the steps to install WordPress manually, flip to Book 2, Chapter 5 for the steps to optimize your WordPress installation for performance and security.
Installing WordPress Manually
If you install WordPress manually, here’s where the rubber meets the road — that is, where you’re putting WordPress’s famous five-minute installation to the test. Set your watch, and see whether you can meet the five-minute goal.
The famous five-minute installation includes only the time it takes to install the software — not the time it takes to register a domain name; obtain and set up your web hosting service; or download, install, configure, and figure out how to use the SFTP software.
Setting up the MySQL database
The WordPress software is a personal publishing system that uses a PHP/MySQL platform, which provides everything you need to create your own website and publish your own content dynamically without knowing how to program those pages. In short, all your content (options, posts, comments, and other pertinent data) is stored in a MySQL database in your hosting account.
Every time visitors go to your website to read your content, they make a request that’s sent to your server. The PHP programming language receives that request, obtains the requested information from the MySQL database, and then presents the requested information to your visitors through their web browsers.
Every web host is different in how it gives you access to set up and manage your MySQL database(s) for your account. In this section, I use cPanel, a popular hosting interface. If your host provides a different interface, the same basic steps apply, but the setup in the interface that your web host provides may be different.
To set up the MySQL database for your WordPress site with cPanel, follow these steps:
- Log in to the cPanel for your hosting account:
- Browse to
http://yourdomain.com/cpanel(where yourdomain.com is your actual domain name) to bring up the login screen for your cPanel. Enter your specific hosting account username and password in the login fields, and then click OK.
The page refreshes and displays the cPanel for your account.
- Browse to
Locate the MySQL Databases icon.
Click the MySQL Databases icon to load the MySQL Databases page in your cPanel.
Enter a name for your database in the Name text box.
Be sure to make note of the database name, because you need it to install WordPress.
Click the Create Database button.
A message appears, confirming that the database was created.
Click the Back button on your browser toolbar.
The MySQL Databases page displays in your browser window.
Locate MySQL Users on the MySQL Databases page.
Scroll approximately to the middle of the page to locate this section.
Choose a username and password for your database, enter them in the Username and Password text boxes, and then click the Create User button.
A confirmation message appears, stating that the username was created with the password you specified.
For security reasons, make sure that your password isn't something that sneaky hackers can easily guess. Give your database a name that you’ll remember later. This practice is especially helpful if you run more than one MySQL database in your account. If you name a database WordPress or wpsite, for example, you can be reasonably certain a year from now, when you want to access your database to make some configuration changes, that you know exactly which credentials to use. Make sure that you note the database name, username, and password that you set up during this process. You need them in the section “Running the installation script” later in this chapter before officially installing WordPress on your web server. Jot these details down on a piece of paper, or copy and paste them into a text editor window; either way, make sure that you have them handy.
Click the Back button on your browser toolbar.
The MySQL Databases page displays in your browser window.
In the Add User to Database section of the MySQL Databases page, choose the user you just set up from the User drop-down list and then choose the new database from the Database drop-down list.
If the user and/or database you created in the earlier steps don’t display in these drop-down lists, you’ve done something wrong and should start over from step 1.
Click the Add button.
This step displays the Manage User Privileges page in your browser window.
Assign user privileges by selecting the All Privileges check box.
Because you’re the administrator (or owner) of this database, you need to make sure that you assign all privileges to the new user you just created.
Click the Make Changes button.
The resulting page displays a message confirming that you’ve added your selected user to the selected database.
Click the Back button on your browser toolbar.
You return to the MySQL Databases page.
The MySQL database for your WordPress website is complete, and you’re ready to proceed to the final step of installing the software on your web server.
Downloading the WordPress software
Without further ado, get the latest version of the WordPress software at https://wordpress.org/download.
WordPress gives you two compression formats for the software: .zip and .tar.gz. Use the .zip file because it's the most common format for compressed files and because both Windows and Mac operating systems can use the format. Generally, the .tar.gz file format is used for Unix operating systems.
Download the WordPress software to your computer and then decompress (unpack or unzip) it to a folder on your computer’s hard drive. These steps begin the installation process for WordPress. Having the program on your own computer isn’t enough, however. You also need to upload (or transfer) it to your web server account (the one discussed in Book 2, Chapter 1).
Before you install WordPress on your web server, you need to make sure that you have the MySQL database set up and ready to accept the WordPress installation. Be sure that you’ve followed the steps to set up your MySQL database before you proceed.
Uploading the WordPress files via SFTP
To upload the WordPress files to your host, return to the /wordpress folder (shown in Figure 4-3) on your computer, where you unpacked the WordPress software that you downloaded earlier. If you need a review on using SFTP (Secure File Transfer Protocol) to transfer files from your computer to your web server, see Book 2, Chapter 2.
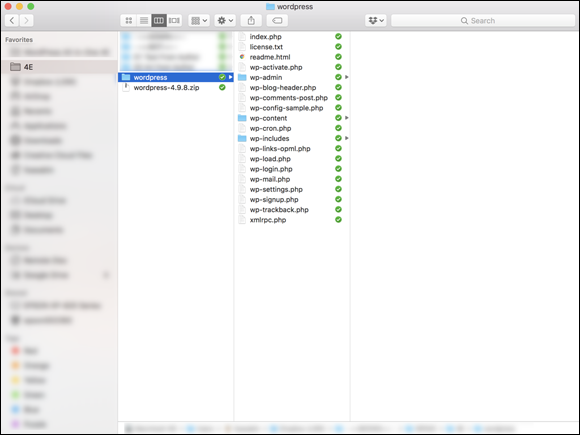
FIGURE 4-3: WordPress installation files to be uploaded to your web server.
Using your SFTP client, connect to your web server and upload all these files to the root directory of your hosting account.
If you don't know what your root directory is, contact your hosting provider and ask, “What is my root directory for my account?” Every hosting provider’s setup is different. The root directory is most often the public_html folder, but you may find an httpdocs folder. The answer depends on what type of setup your hosting provider has. When in doubt, ask!
Here are a few things to keep in mind when you upload your files:
- Upload the contents of the
/wordpressfolder to your web server — not the folder itself. Most SFTP client software lets you select all the files and drag and drop them to your web server. Other programs have you highlight the files and click a Transfer button. Choose the correct transfer mode. File transfers via SFTP have two forms: ASCII and binary. Most SFTP clients are configured to autodetect the transfer mode. Understanding the difference as it pertains to this WordPress installation is important so that you can troubleshoot any problems you have later:
- Binary transfer mode is how images (such as JPG, GIF, BMP, and PNG files) are transferred via SFTP.
- ASCII transfer mode is for everything else (text files, PHP files, JavaScript, and so on).
For the most part, it's a safe bet to make sure that the transfer mode of your SFTP client is set to autodetect. But if you experience issues with how those files load on your site, retransfer the files by using the appropriate transfer mode.
- You can choose a different folder from the root. You aren’t required to transfer the files to the root directory of your web server. You can choose to run WordPress on a subdomain or in a different folder on your account. If you’re running just a blog (without a full accompanying website) and want your blog address to be
http://yourdomain.com/blog, you transfer the WordPress files into a/blogfolder (where yourdomain is your domain name). - Choose the right file permissions. File permissions tell the web server how these files can be handled on your server — whether they're files that can be written to. Generally, PHP files need to have a permission (CHMOD is explained in Book 2, Chapter 2) of 666, whereas file folders need a permission of 755. Almost all SFTP clients let you check and change the permissions on the files, if you need to. Typically, you can find the option to change file permissions within the menu options of your FTP client.
 Some hosting providers run their PHP software in a more secure format: safe mode. If this is the case with your host, you need to set the PHP files to 644. If you’re unsure, ask your hosting provider what permissions you need to set for PHP files.
Running the installation script
The final step in the installation procedure for WordPress is connecting the WordPress software you uploaded to the MySQL database. Follow these steps:
Type the URL of your website in the address bar of your web browser.
If you chose to install WordPress in a different folder from the root directory of your account, make sure you indicate that in the URL for the install script. If you transferred the WordPress software files to the
/blogfolder, for example, point your browser to the following URL to run the installation:http://yourdomain.com/blog/wp-admin/install.php. If WordPress is in the root directory, use the following URL to run the installation:http://yourdomain.com/wp-admin/install.php(where yourdomain is your domain name).Assuming that you did everything correctly, you should see the first step in the installation process that you see in Figure 4-4. (See Table 4-1 for help with common installation problems.)
Select your preferred language from the list provided on the setup page, shown in Figure 4-4.
At this writing, WordPress is available in 116 languages. For these steps, I'm using English (United States).
Click the Continue button.
You see a new page with a welcome message from WordPress and instructions that you need to gather the MySQL information you saved earlier in this chapter.
Click the Let’s Go button.
A new page loads and displays the fields you need to fill out in the next step, shown in Figure 4-5.
- Dig out the database name, username, and password that you saved in the earlier section “Setting up the MySQL database,” and use that information to fill in the following fields, as shown in Figure 4-5:
Database Name: Type the database name you used when you created the MySQL database before this installation. Because hosts differ in configurations, you need to enter the database name by itself or a combination of your username and the database name, separated by an underscore (
_).If you named your database wordpress, for example, you enter that in this text box. If your host requires you to append the database name with your hosting account username, you enter username_wordpress, substituting your hosting username for username. My username is lisasabin, so I enter lisasabin_wordpress.
- Username: Type the username you used when you created the MySQL database before this installation. Depending on what your host requires, you may need to enter a combination of your hosting account username and the database username separated by an underscore (
_). - Password: Type the password you used when you set up the MySQL database. You don't need to append the password to your hosting account username here.
- Database Host: Ninety-nine percent of the time, you leave this field set to
localhost. Some hosts, depending on their configurations, have different hosts set for the MySQL database server. Iflocalhostdoesn't work, you need to contact your hosting provider to find out the MySQL database host. Table Prefix: Leave this field set to
wp_.You can change the table prefix to create an environment that’s secure against outside access. See Book 2, Chapter 5 for more information.
After you fill in the MySQL database information, click the Submit button.
You see a message that says,
All right, sparky! You've made it through this part of the installation. WordPress can now communicate with your database. If you’re ready, time to run the install!Click the Run the Install button.
Another page appears, welcoming you to the famous five-minute WordPress installation process, as shown in Figure 4-6.
- Enter the following information:
- Site Title: Enter the title you want to give your site. The title you enter isn’t written in stone; you can change it later, if you like. The site title also appears on your site.
- Username: Enter the name you use to log in to WordPress. By default, the username is admin, and you can leave it that way. For security reasons, however, I recommend that you change your username to something unique. This username is different from the one you set for the MySQL database in previous steps. You use this username when you log in to WordPress to access the Dashboard (which is covered in Book 3), so be sure to make it something you’ll remember.
Password: Type your desired password in the text box. If you don’t enter a password, one is generated automatically for you. For security reasons, it’s a good thing to set a different password here from the one you set for your MySQL database in the previous steps; just don’t get the passwords confused.
For security reasons (and so other people can’t make a lucky guess), passwords should be at least seven characters long and use as many different characters in as many combinations as possible. Use a mixture of uppercase and lowercase letters, numbers, and symbols (such as ! " ? $ % ^ &).- Your Email: Enter the email address you want to use to be notified of administrative information about your blog. You can change this address later, too.
- Search Engine Visibility: By default, this option isn’t selected, which lets the search engines index the content of your website and includes your site in search results. To keep your site out of the search engines, select this check box. (See Book 5 for information on search engine optimization.)
Click the Install WordPress button.
The WordPress installation machine works its magic and creates all the tables within the database that contain the default data for your blog. WordPress displays the login information you need to access the WordPress Dashboard. Make note of this username and password before you leave this page. Scribble them on a piece of paper or copy them into a text editor, such as Notepad.
After you click the Install WordPress button, you’re sent an email with the login information and login URL. This information is handy if you’re called away during this part of the installation process. So go ahead and let the dog out, answer the phone, brew a cup of coffee, or take a 15-minute power nap. If you somehow get distracted away from this page, the email you receive contains the information you need to log in to your WordPress blog.Click the Log In button to log in to WordPress.
If you happen to lose this page before clicking the Log In button, you can always find your way to the login page by entering your domain followed by the call to the login file (such as http://yourdomain.com/wp-login.php, where yourdomain is your domain name).
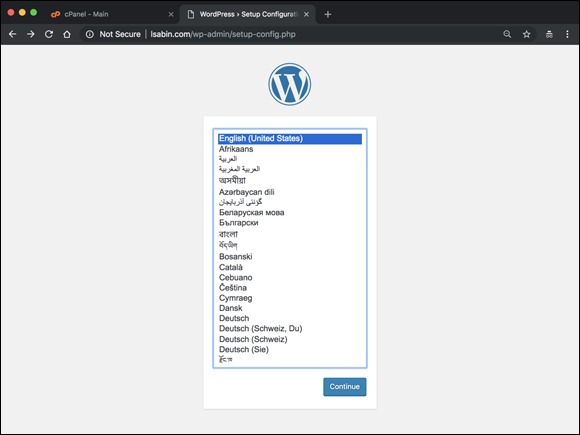
FIGURE 4-4: Choose the language for your installation.
TABLE 4-1 Common WordPress Installation Problems
Error Message |
Common Cause |
Solution |
|
The database name, username, password, or host was entered incorrectly. |
Revisit your MySQL database to obtain the database name, username, and password and then reenter that information. |
|
A syntax error occurred in the |
Open the |
|
Permissions on PHP files are set incorrectly. |
Try setting the permissions (CHMOD) on the PHP files to 666. If that change doesn't work, set them to 644. Each web server has different settings for how it lets PHP execute on its servers. |
|
The URL for the login page is incorrect. |
Double-check that the URL you're using to get to the login page is the same as the location of your WordPress installation (such as |
|
An |
WordPress is a PHP application, so the default home page is |
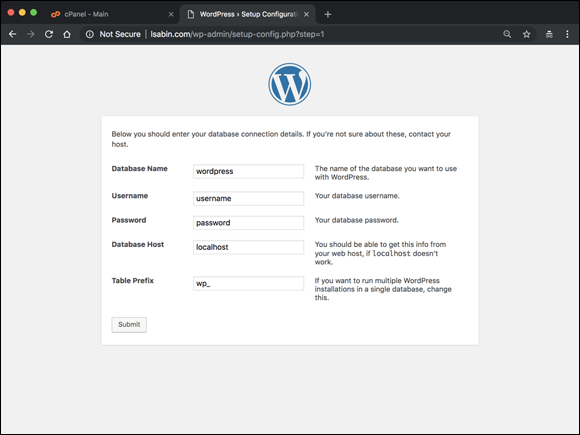
FIGURE 4-5: Entering the database name, username, and password.
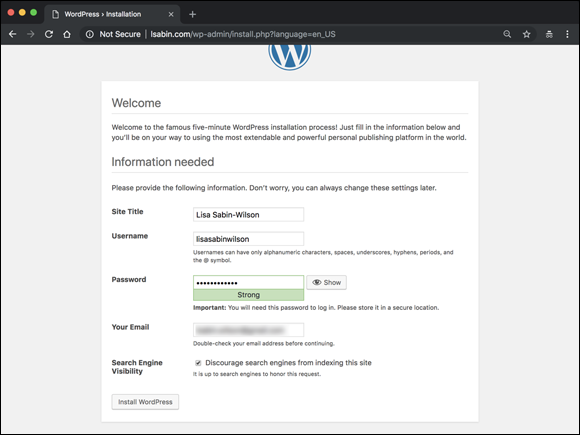
FIGURE 4-6: Finishing the WordPress installation.
You know that you're finished with the installation process when you see the login page, shown in Figure 4-7. Check out Table 4-1 if you experience any problems during this installation process; it covers some of the common problems users run into.

FIGURE 4-7: You know you’ve run a successful WordPress installation when you see the login page.
So do tell — how much time does your watch show for the installation? Was it five minutes? Stop by my website sometime at https://webdevstudios.com and let me know whether WordPress stood up to its famous five-minute installation reputation.
The good news is — you’re done! Were you expecting a marching band? WordPress isn’t that fancy … yet. Give it time, though. If anyone can produce it, the folks at WordPress can.
Let me be the first to congratulate you on your newly installed WordPress blog! When you’re ready, log in and familiarize yourself with the Dashboard, which I describe in Book 3.