Chapter 2
Creating a Static Page
IN THIS CHAPTER
 Differentiating posts and pages
Creating a new static page on your website
Adding a blog to your site
In Book 3, Chapter 5, I discuss the different ways that content gets archived by WordPress, and in Book 3, Chapter 1, I give you a very brief introduction to the concept of pages and where to find them on the WordPress Dashboard.
This chapter takes you through the full concept of pages in WordPress, including how to write and publish them. This chapter also fully explains the difference between posts and pages in WordPress so that you know which to publish for different situations.
Understanding the Difference between Posts and Pages
Pages, in WordPress, are different from posts because they don’t get archived the way your posts do. They aren’t categorized or tagged, don’t appear in your listing of recent posts or date archives, and aren’t syndicated in the RSS feeds available on your site — because content within pages generally doesn’t change. (Book 3, Chapter 5 gives you all the details on how the WordPress archives work.)
 Use pages for static or stand-alone content that exists separately from the archived post content on your site, such as an About or Contact page.
With the page feature, you can create an unlimited number of static pages separate from your posts. People commonly use this feature to create About Me or Contact Me pages, among other things. Table 2-1 illustrates the differences between posts and pages by showing you the different ways the WordPress platform handles them.
TABLE 2-1 Differences between a Post and a Page
WordPress Options |
Page |
Post |
Appears in blog post listings |
No |
Yes |
Appears as a static page |
Yes |
No |
Appears in category archives |
No |
Yes |
Appears in monthly archives |
No |
Yes |
Appears in Recent Posts listings |
No |
Yes |
Appears in site RSS feed |
No |
Yes |
Appears in search results |
Yes |
Yes |
Uses tags and/or categories |
No |
Yes |
Creating the Front Page of Your Website
For the most part, when you visit a site powered by WordPress, the blog can appear on the main page or as a separate page of the site. My business partner, Brad Williams, keeps a personal blog at https://strangework.com, powered by WordPress (of course). His personal website shows his latest blog posts on the front page, along with links to the post archives (by month or by category) in the sidebar. This setup is typical of a site run by WordPress. (See Figure 2-1.)
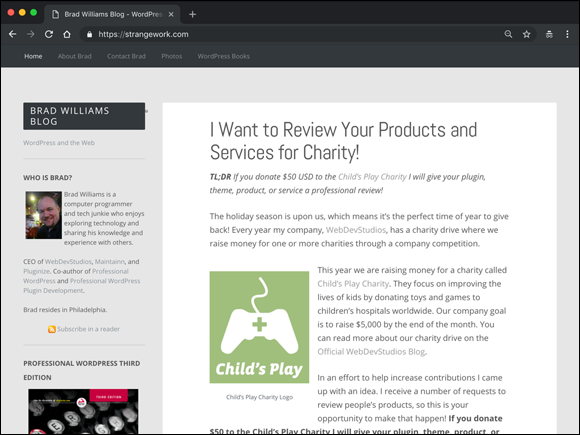
FIGURE 2-1: A personal blog.
On the other hand, the front page of our business site at https://webdevstudios.com, also powered by WordPress, doesn’t display any blog posts, but the website does contain a blog section. (See Figure 2-2.) Instead, it displays the contents of a static page that we created in WordPress. This static page serves as a portal that displays pieces of content from other sections of the site. The site includes a blog but also serves as a full business website with all the sections we need to provide our clients the information they need.
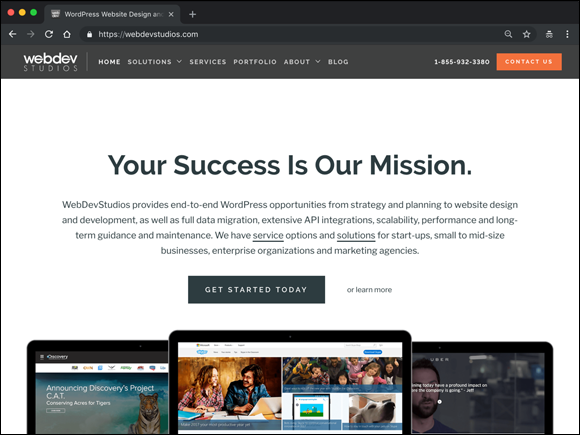
FIGURE 2-2: My business site, set up as a business website that has a blog.
My personal website at https://lisasabin-wilson.com is also built with WordPress, but that site doesn’t contain a blog anywhere. (See Figure 2-3.) That website serves as a simple page of information that I’ve chosen to publish. Just because I’m using the WordPress software to power my site doesn’t mean that I need to have a blog on it. Although WordPress started out being known as a blogging platform, it has grown over the years and has become a platform for building a variety of sites.
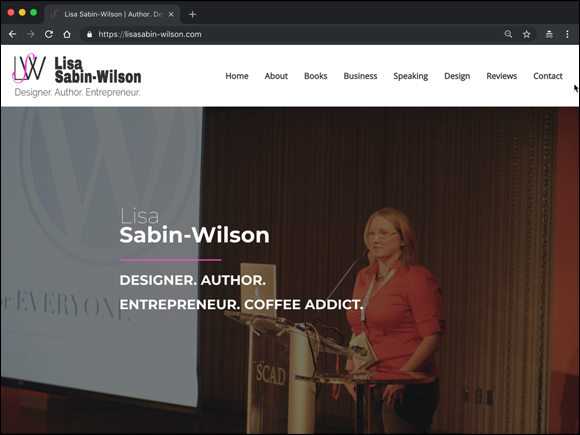
FIGURE 2-3: A WordPress website that doesn’t have a blog.
All three of these sites are powered by WordPress, so how can they differ so much in what they display on the front page? The answer lies in the content types and templates used to create the websites.
You use static pages in WordPress to create content that you don’t want to appear as part of your blog but do want to appear as part of your overall site (such as a bio page, a page of services, and a home page).
Creating a front page is a three-step process:
- Create a static page.
- Set that static page to be used as the home page of your site.
- Tweak the page to look however you like.
By using this method, you can create unlimited numbers of static pages to build an entire website. You don’t even need to have a blog on your site unless you want one.
Creating the static page
To have a static page appear on the home page of your site, first you need to create that page in the WordPress Dashboard. Follow these steps:
In the Dashboard, click the Add New link on the Pages menu.
The Edit Page screen opens, allowing you to create a new page for your WordPress site, as shown in Figure 2-4.
- Type a title for your page in the Add Title text box at the top.
- Create content for this page, using the Block Editor (Book 4, Chapter 1).
Set the options for this page.
I explain the options on this page in the following section.
Click the Publish button.
The page is saved to your database and published to your WordPress site with its individual URL (or permalink). The URL for the static page consists of your blog URL and the title of the page. If you titled your page About Me, for example, the URL of the page is
http://yourdomain.com/about-me. (See Book 3, Chapter 2 for more information about permalinks.)
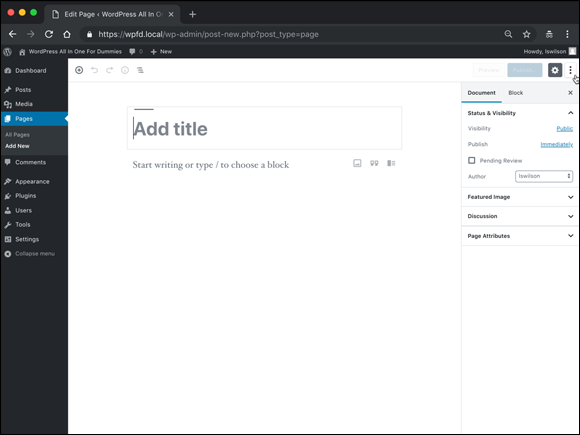
FIGURE 2-4: Create the static page that you want to use as your home page.
Setting page options
Before you publish a new page to your site, you can change options to use different features in WordPress. These features are similar to the ones available for publishing posts, which you can read about in Book 4, Chapter 1. For a static page, however, you don’t find as many options. Those options appear in the settings panel on the right side of the Edit Page screen (refer to Figure 2-4). The page options include
- Status and Visibility
- Publish (date and time): This option is covered in Book 4, Chapter 1.
- Pending Review: This option is covered in Book 4, Chapter 1.
- Author: This option is covered in Book 4, Chapter 1.
- Featured Image: This option is covered in Book 4, Chapter 1.
Discussion: This option is covered in Book 4, Chapter 1.
 Typically, you don’t see a lot of static pages that have the Comments feature enabled because pages offer static content that generally doesn’t lend itself to a great deal of discussion. There are exceptions, however, such as a Contact page, which might use the Comments feature as a way for readers to get in touch with you through that specific page. The choice is yours to make based on the needs of your website.
- Page Attributes
- Parent Page: Select a parent for the page you’re publishing. Book 3, Chapter 5 covers the archiving options, including the ability to have a hierarchical structure for pages that create a navigation of main pages and subpages (called parent and child pages).
Order: By default, this option is set to 0 (zero). You can enter a number, however, if you want this page to appear in a certain spot on the page menu of your site.
If you’re using the built-in menu feature in WordPress, you can use this option. A page with the page order of 1 appears first on your navigation menu, a page with the page order of 2 appears second, and so on. Book 6, Chapter 1 covers the Menu feature in greater detail. You don’t have to use the Order option, however, because you can define the order of pages and how they appear on your menu by using the WordPress menu builder (Book 6, Chapter 1).
Assigning a static page as the home page
After you create the page that you want to use for the home page of your website, you need to let WordPress know your intentions. Follow these steps to set a static page as the home page:
In the Dashboard, click the Reading link on the Settings menu.
The Reading Settings screen displays.
- In the Your Home page Displays section, select the option labeled A Static Page.
- From the Home page drop-down list, choose the page you want to use as the home page (see Figure 2-5).
Click the Save Changes button at the bottom of the Reading Settings screen.
WordPress displays the page you selected in step 3 as the front page of your site. Figure 2-6 shows my site displaying a static page as the home page.
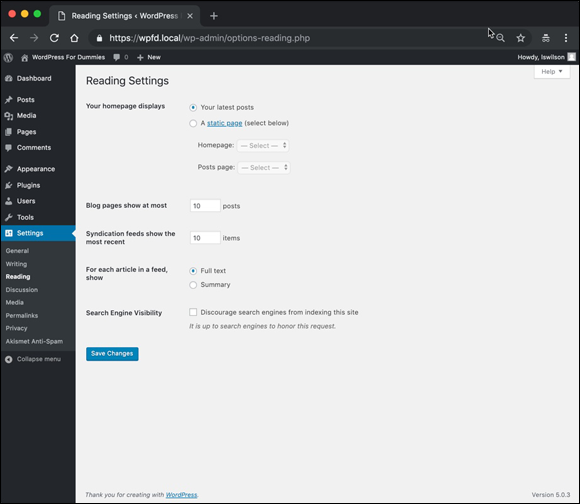
FIGURE 2-5: Choosing which page to display as the home page.

FIGURE 2-6: WordPress displays the page you selected as your home page.
Adding a Blog to Your Website
If you want a blog on your site but don’t want to display the blog on the home page, you can add one from the WordPress Dashboard. To create the blog for your site, follow these steps:
In the Dashboard, click the Add New link on the Pages menu.
The Edit Page screen opens, allowing you to create a new page for your WordPress site (refer to Figure 2-4).
Type Blog in the Add Title text box.
The page slug is automatically set to
/blog. (Read more about slugs in Book 3, Chapter 5.)Leave the rest of the page blank.
Don't add any text content or use any blocks from the Block Editor on this page.
Click the Publish button.
WordPress asks you whether you’re sure you want to publish this page. Click the Publish button a second time and the Blog page you created is saved to your database and published to your WordPress site. Now you have a blank page that redirects to
http://yourdomain.com/blog.Next, you need to assign the page you created as your blog page.
In the Dashboard, click the Reading link on the Settings menu.
The Reading Settings screen displays.
- Choose the Blog page from the drop-down menu labeled Posts Page.
Click the Save Changes button.
The options you set are saved, and your blog is at
http://yourdomain.com/blog(whereyourdomain.comis the actual domain name of your site). When you navigate tohttp://yourdomain.com/blog, your blog appears.
This method of using the /blog page slug works only if you're using custom permalinks with your WordPress installation. (See Book 3, Chapter 2 if you want more information about permalinks.) If you’re using the default permalinks, the URL for your blog page is different; it looks something like http://yourdomain.com/?p=4 (where 4 is the ID of the page you created for your blog).