
BLANCHING A VEGETABLE, FRESH HERB OR CITRUS PEEL
PEELING CITRUS & CUTTING SEGMENTS
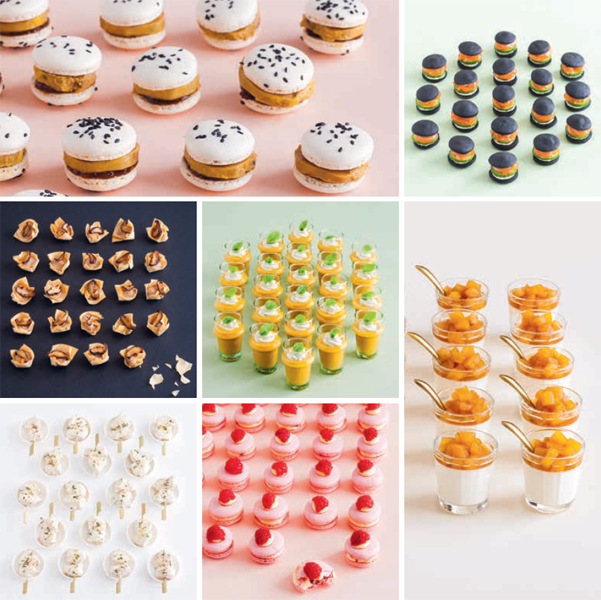
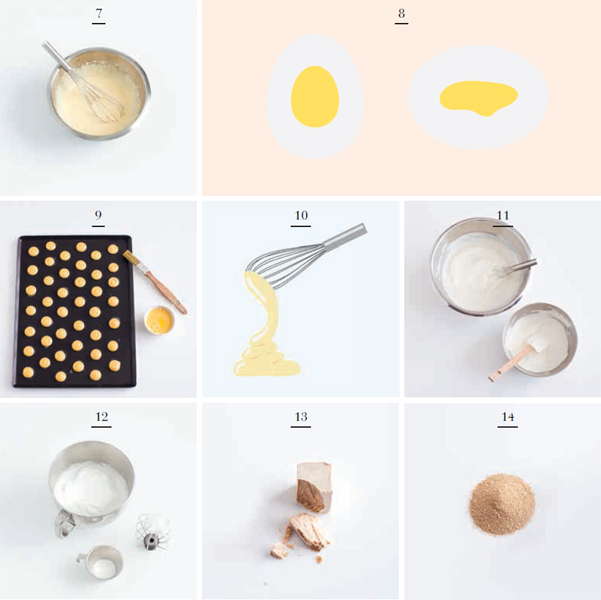
1: Mini Blinis with Smoked Trout
2: Foie Gras & Beetroot ‘Mille-Feuilles’
3: New Potatoes topped with Quail Eggs
A WEEK BEFORE
Pickle the ginger.
THE DAY BEFORE
Make the blinis and set aside in an airtight container in the refrigerator.
Cook and prepare the potatoes. Make the tartare sauce. Set aside both in the refrigerator.
Cut the slices of beetroot and refrigerate.
A FEW HOURS BEFORE
Make the mascarpone and dill cream. Assemble the blinis and set aside in the refrigerator.
Slice the foie gras and assemble the ‘mille-feuilles’; set aside in the refrigerator. Poach the quail eggs and assemble the potatoes.
WHEN READY TO SERVE
Take the pieces out 15–30 minutes beforehand so they can come to room temperature. At the last moment, season the 'mille-feuilles' with salt and pepper and balsamic vinegar and insert the cocktail skewers.

1: Borlotti Bean Soup with Duck Tuiles
3: Salmon & Passionfruit Croustades
3 MONTHS TO 15 DAYS BEFORE
Make the soup and freeze in an airtight container. Prepare the croustades and freeze uncooked.
Make the buns and freeze uncooked.
Make the eclairs and freeze cooked or not.
THE DAY BEFORE
Transfer the soup to the refrigerator to thaw.
ake the duck magret tuiles and set aside at room temperature.
Make and cook the mini balls and refrigerate in an airtight container.
Transfer the buns to the refrigerator to thaw.
Make the sauce gribiche.
Take out the eclairs and bake if necessary.
Cook the croustades, collect the pulp from the passionfruit and mince the ginger.
Make the avocado cream and refrigerate.
ON THE DAY
Make the mascarpone cream.
Marinate the salmon then cut in tartare.
Set buns to rise, then bake them and fill them.
Fill the eclairs. Ice them no more than 2 hours before serving.
WHEN READY TO SERVE
Bring the soup to the boil then plate up.
Reheat the mini balls for 40 minutes at 60°C.
Fill the croustades 15 minutes before serving.
Take the sliders and eclairs out 15–30 minutes in advance to bring them to temperature.
2: Salmon & Wasabi Cream Sliders
5: Chicken Skewers with Thyme Cream
6: Verbena & Raspberry Macarons
3 MONTHS TO 15 DAYS BEFORE
Make the foie gras rolls. Make all the macaron shells. Store in the freezer.
Make the buns and freeze them uncooked.
Make and freeze the chestnut cream.
THE DAY BEFORE
Transfer the foie gras rolls, buns and chestnut cream to the refrigerator.
Prepare the pastry cream, fig jam, wasabi cream, chicken skewers and thyme cream. Set aside in the refrigerator.
Pan-fry the mushrooms and refrigerate.
Make the filo cups.
Make the panna cottas and pineapples in syrup, leaving them in their cooking liquid. Refrigerate.
ON THE DAY
Make the pastry cream into diplomat cream.
Assemble the macarons 4–6 hours before serving.
Set the buns to rise, then bake them.
Marinate the salmon and assemble the buns.
Make the gazpacho.
Whisk the basil cream 1–2 hours before.
Caramelise the pineapple cubes, then cool and refrigerate.
WHEN READY TO SERVE
Warm the chestnut cream and the mushrooms.
Reheat the chicken skewers for 40 minutes at 60°C.
Reheat the sauce. Assemble and plate up.
Take out the sliders and macarons 30 minutes in advance.
Take out the panna cottas and add the pineapples and syrup 30 minutes before serving.
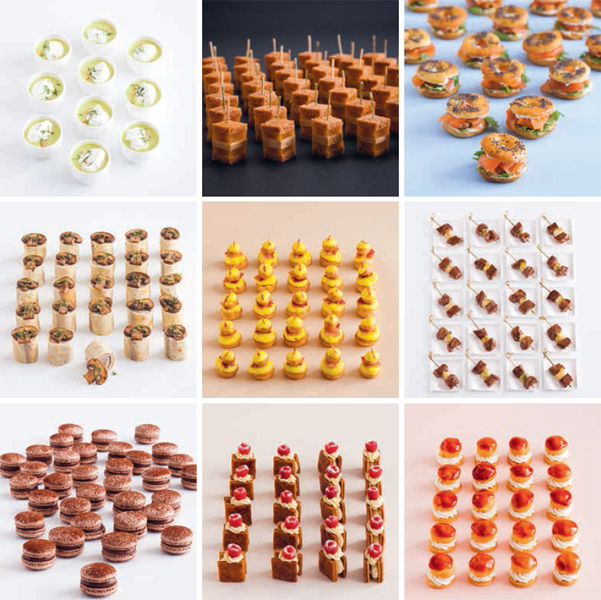
1: Cold Zucchini & Goat’s Cheese Soup
2: Foie Gras, Mango & Gingerbread Skewers
3: Smoked Salmon & Rocket Mini Bagels
4: Cream of Mushroom Crepe Rolls
5: Cream of Capsicum Religieuses
6: Beef Skewers with Caramelised Sauce
3 MONTHS TO 15 DAYS BEFORE
Assemble the foie gras, mango and gingerbread stacks. Freeze uncut.
Make the cream of mushroom crepe rolls. Freeze uncut.
Make the choux balls and freeze cooked or not.
Make the macaron shells and puff pastry squares. Store in the freezer.
THE DAY BEFORE
Make the soup and refrigerate. Toast the pine nuts.
Fry the mushroom slices and refrigerate.
Cook the choux balls and puff pastry squares.
Make the capsicum cream and refrigerate.
Make the beef skewers and the sauce.
Make the chocolate ganache and the pastry cream.
ON THE DAY
Make the goat’s cheese mousse and bacon tuiles.
Cut the foie gras, mango and gingerbread, and thaw in the refrigerator for 6 hours.
Make the bagel dough and cream cheese. Cook and assemble.
Take out and cut the crepe rolls 6 hours before serving.
Finish the diplomat cream. Make the chantilly cream.
Fill the choux. Ice/caramelise max. 2 hours before serving.
Assemble the macarons, mini St Honoré cakes and mille-feuilles.
WHEN READY TO SERVE
Plate up the cold soup 15 minutes before serving.
Reheat the beef skewers for 30 minutes at 60°C.
Reheat the sauce. Plate up.
Take out all the pieces 15–30 minutes before serving.
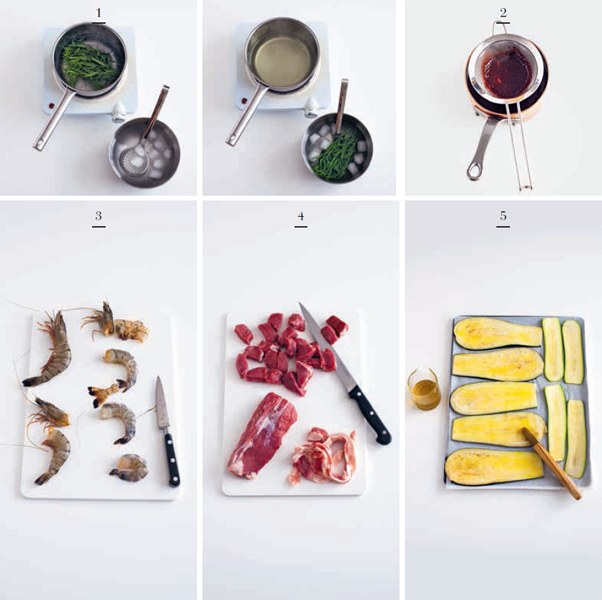
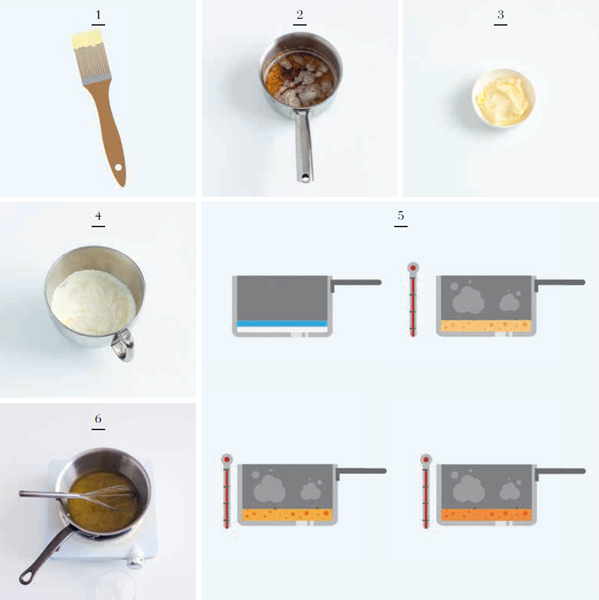
1 BLANCHING A VEGETABLE, FRESH HERB OR CITRUS PEEL
Plunging a foodstuff into boiling water for a few minutes then cooling rapidly, to retain the colour or taste, or to remove bitterness.
Citrus peel and zest: To remove bitterness, we blanch them several times. Boil some water, reduce the heat to a simmer and cook the zest for 2 minutes. Repeat the process three times, changing the water each time.
Fresh herbs: Plunge into boiling salted water to remove acridness or pungency, then cool in iced water to retain the colour.
Vegetables or English-style boiling: Boil a large volume of water with a pinch of coarse salt, and immerse the vegetables. Plunge into iced water at the end to stop them cooking.
Passing a mixture through a more or less fine strainer to remove or obtain solid residues.
Remove the head. Hold the body in one hand then with the other make a left-to-right movement to separate the tail. Press the middle of the body between your thumb and index finger to crack the shell, then lift it off, detaching it from the underside. With a kitchen knife, make an incision along the top of the prawn and remove the ‘vein’ (gut) by pulling on it.
Removing spoilt or less tasty parts.
For meat: Remove the sinew and fat with a knife.
For vegetables: With fennel or asparagus, for example, remove the hard and fibrous parts.
Applying a thin layer of olive oil using a pastry brush to prevent a foodstuff oxidising. In French, doing this is called lustrer.

Passing a food through a sieve to remove oversized or unwanted elements. Sift flour to aerate and remove lumps.
Colouring nuts, seeds and products such as coconut by heating, in a frying pan or in the oven, generally without any fat or oil, to develop the flavours.
Gradually spreading out a pastry dough with a rolling pin, always working away from you. To obtain an even thickness, set a rolling rod of the desired thickness on either side and roll until the rolling pin is resting on the rods.
Fold the four corners of the dough to the centre and press lightly to hold. Turn over the dough on a very lightly floured work surface (seam downwards) and turn between your palms to form a smooth ball.
Crushing to remove the carbon dioxide after rising.
Tempering dough: crushing and spreading the dough in one movement with the heel of your hand to check if it is smooth; repeat once or twice.
Filling the bag: Put the chosen nozzle in the bag. Fold the top of the bag over your hand. Using a silicone spatula, take the mixture and place it in the bag, scraping with the spatula. Fill to two-thirds maximum to prevent the bag overflowing. Pull the top of the bag back up and give it a quarter turn while pushing the mixture towards the nozzle.
Piping: Hold the bag straight up to form discs, and on an angle for eclairs. Press with one hand, while stabilising and guiding with the other.

A herb: Hold the herbs in a tight bunch or pile up the leaves and roll them up, then slice as thinly as possible.
An onion or French shallot: Cut in half. Slice thinly lengthways with a sharp knife, without going all the way through at the root end, then do the same across the width. Slice into cubes.
Cutting into thin slices or strips using a sharp knife.
Cutting a food into very small pieces using a knife, blender or food processor.
Remove the stalk and score a cross in the other end. Plunge into simmering water for 30 seconds, then remove with a skimmer and plunge into iced water. Once cooled, remove the skin.
Giving a neat shape by removing the unpresentable or inedible parts of the food.
6 PEELING CITRUS & CUTTING SEGMENTS
Cut off the ends. Cut off the peel, following the shape of the fruit and taking off a little flesh so there is no pith remaining. Remove the segments by passing the blade of the knife along either side of each white membrane.
Cuts: First cut into lengths, then in slices, strips and cubes. Use a mandoline for greater uniformity.
Mirepoix dice: 1 cm cubes
Macédoine dice: 5 mm cubes
Brunoise dice: 2 mm cubes
Julienne strips: 2 mm thick strips
The coloured part of citrus skin, with an intense acidic taste. The pith is the bitter white part between the flesh and the zest. Remove the zest using a zester or a microplane grater.
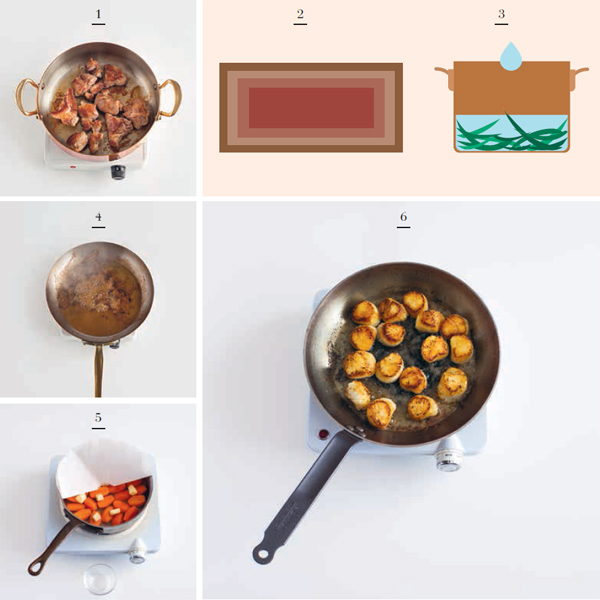
Heat the chosen oil in a pan over a high heat, then colour all the sides of the food until brown. You can keep cooking over a low heat or, for a piece of red meat, finish in the oven after resting for 30 minutes. This pause in cooking allows the blood in the meat to return to the exterior, which makes it more tender.
Bleu (very rare/blue): The meat is warm and raw in the middle.
Saignant (rare): The meat is hot, the middle nicely red.
À point (just right): The meat is hot and pink in the middle, and the blood pearls up on the outside.
Bien cuit (well done): The meat is completely cooked and the juices are brown.
You can check the cooking by looking, but also touching: the less cooked a meat, the more supple or soft it is.
Check if vegetables are cooked by piercing with the tip of a knife. When it goes in without difficulty, they are cooked.
Cooling rapidly after cooking usually stops the cooking process and retains the colour. Otherwise they will continue cooking off the heat.
Pouring a cold liquid (water, alcohol, etc.) into a dry, hot pan that has been used for cooking, and stirring to retrieve the flavourful stuck-on bits.
Put the vegetables in a saucepan without overlapping. Distribute small knobs of butter around the pan. Pour in water to the height of the vegetables and add a pinch each of salt and sugar. Cover with baking paper and cook over a high heat. Remove the paper when the water has evaporated, and shake the pan to roll the vegetables around and coat them well.
Short cooking that turns the surface of a food golden while retaining an uncooked interior.
Set the butter to melt in a saucepan. Using a pastry brush, butter the whole inner surface of the mould to prevent the mixture that is to be poured in from sticking during cooking.
Called beurre noisette in French, this is butter heated gently, from which the water evaporates until it takes on a hazelnut (noisette) colour. It is the milk protein in butter (casein) that colours and gives brown butter its characteristic taste.
Beurre pommade is butter that has been softened and worked until it has the consistency of cream before being incorporated into a mixture.
This helps prevent lumps and provides creaminess.
Cut the butter into pieces, let it soften at room temperature or soften it by applying gentle heat (without letting it melt, or it will lose its creaminess) then work it into a smooth cream using a spatula or whisk.
Whisk the cream vigorously until it doubles in volume and loses its sheen, becoming matt. It is simultaneously aerated and held together by its fat content, which crystallises around the air bubbles. Use a stand mixer fitted with the whisk attachment, a food processor with the chopping blade or an electric mixer.
Chantilly cream is whipped cream with sugar added.
There are different ways of making a caramel, depending on its intended use (sauce, icing, etc.).
Classic caramel is made from sugar and water, and used for decoration.
Dry caramel is made without water, has a more pronounced taste and is used to flavour a mixture.
Add glucose syrup to the sugar when you need to cook the caramel for longer and at higher heats; it prevents it from crystallising and keeps it translucent.
Use clean and dry utensils. Weigh the water and the sugar, pouring them in gently, without stirring. Clean any crystals from the side of the pan using a wet pastry brush. Heat over a medium heat.
Whisking egg yolks with sugar to obtain a foamy mixture. It will double in volume.
Hard-boiled: Cook for 10 minutes in boiling water with vinegar added; both white and yolk are coagulated (cooked).
Poached: Break the egg, pour it into boiling water with vinegar added, cook for 2–3 minutes, then refresh in iced water; the white is coagulated and the yolk runny.
Beat the egg. Dip in the pastry brush and drain off any excess. Brush the food before baking. During cooking, the egg will take on a golden colour and shiny appearance.
For egg yolks: Mix the egg yolks and sugar. The consistency should be smooth and even so that the mixture tumbles from the spatula in a continuous stream. The mixture will fall like a ribbon, folding back on itself.
For egg whites: When the base mixture for macaron shells is well mixed, you will obtain a ribbon.
Add one-third of the beaten egg whites to the mixture and whisk vigorously, then add the remaining beaten egg white and fold in gently using a silicone spatula.
To beat egg whites to stiff peaks, use a stand mixer fitted with the whisk attachment or an electric mixer. At the end of beating, whisk vigorously with a large and rapid movement to make the whites smooth and cohesive.
Fresh baker’s yeast is a microscopic single-celled fungus that multiplies by budding. In a floury, moist and tepid environment (bread dough, etc.), it begins fermentation, producing carbon dioxide that makes the dough rise. It will keep for 2–3 weeks in the refrigerator.
Dried yeast is obtained by vacuum-drying fresh baker’s yeast at low temperature and by freeze-drying. This yeast can be used instead of fresh baker’s yeast. As it contains almost no water, it keeps for longer; look for the use-by date on the packet.
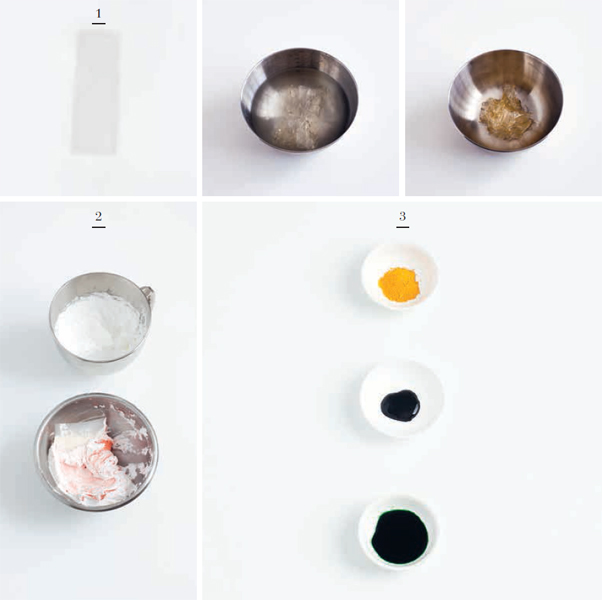
Gelatine allows us to ‘stick’ mixtures together, or in other words to give them shape. The setting time is quite fast; add or apply the mixture quickly once the gelatine is incorporated.
Hydrating gelatine: Leaf gelatine is dehydrated and needs to be rehydrated before being incorporated into a mixture. Immerse the gelatine in a bowl of quite cold water and leave to soak for about 15 minutes. Drain it by squeezing it between your hands, add to the mixture and stir well.
Powdered colourings are very strong but do not destabilise mixtures. Add gradually, with the tip of a knife, until you obtain the desired shade.
Vanilla, cinnamon, star anise, mint, coffee … Add them in a paste or powder, or infuse them into foods that contain fat, which will capture their taste. Kirsch, rum, Cointreau, Grand Marnier … Their flavour remains after cooking, even while the alcohol evaporates. Note that in an alcoholic sugar syrup, however, the alcohol remains.
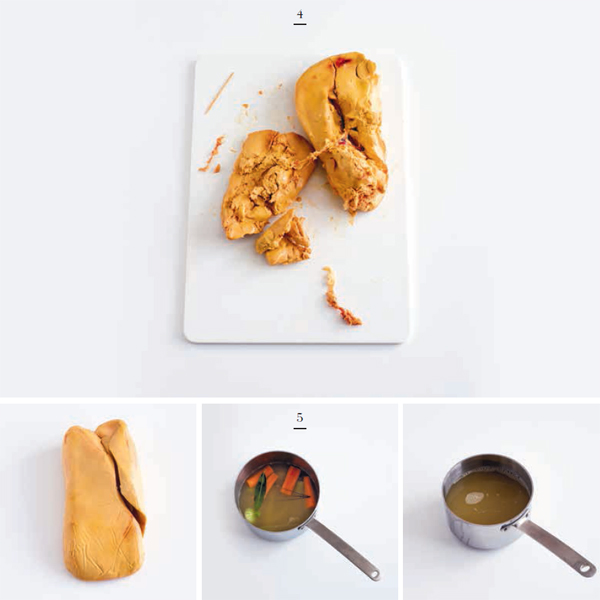
Fresh: Raw product, which needs to be prepared before being preserved or utilised in cooking. Keeps for a limited time only. In this book, it is used pan-fried and to make foie gras rolls.
Semi-cooked: Pasteurised by cooking through at less than 100°C. Semi-cooked foie gras is commonly available as a terrine or in jars. It keeps for several weeks in the refrigerator. It is creamy and retains all the aromas of freshly prepared liver. In this book, it is used to make finger food.
Cooked: Sterilised in jars at more than 100°C. It can be stored for several years.
Choosing fresh foie gras: Select a liver that is soft, yet firm to the touch, both are signs of freshness. It should not be grainy. It should have a lovely beige–ivory colour, without blemishes or bruising.
Preparing fresh foie gras: If the foie gras is very bloody, soak it for 1 hour in 1 litre milk mixed with 1 litre water.
It isn’t necessary to devein it completely, because it would lose too much fat during cooking. Leave the liver at room temperature for 30 minutes, then separate the lobes and pull gently on the large vein at the top of the lobe to pull away the larger part. Do the same with the second lobe. To work out how much seasoning is required for a foie gras terrine, weigh the foie gras after deveining. To pan-fry, slice it.
Stock is an infusion of bones, offcuts and carcasses accompanied by aromatic vegetables. The flavourful liquid obtained is used to make sauces. It will keep in the refrigerator for 3 days and in the freezer for 3 months. Reboil before use.
To enrich a purchased stock and give it greater depth, you can liven it up: mix powdered veal stock with 500 ml water, add aromatic flavourings (a garniture aromatique) – onions, carrots, thyme, bay leaves – and leave it to gently reduce for 30–45 minutes to concentrate the taste.