
Brakes come in many shapes and sizes; most road bikes use stoppers that squeeze the rims to bring your forward motion to a halt. In this section, we cover the basics of setup and maintenance for the most common types of rim brakes. For info on disc brakes, turn to Chapter 7.
• RIM BRAKE BASICS
• INSTALLING LEVERS
* Aero [aka Integrated Brake-Shift] Lever and Cable Installation
• INSTALLING AND ADJUSTING CALIPERS
* Sidepull Brake Removal and Installation
* Cantilever Installation and Adjustment
• BRAKE HELP
* Brake Pad Maintenance
• TROUBLESHOOTING RIM BRAKES


Cut cable housing with a sharp pair of cable or diagonal cutters. If a burr forms at the end, snip it away. File the end of the housing flat so that it doesn’t try to bite in under pressure and bind the cable.

The road grime that builds up on your rims can interfere with good braking performance. Periodically, wash rims with soapy water. To breakup any remaining residue, use a solvent such as rubbing alcohol and fine steel wool or an abrasive pad made of material that won’t scratch metal.
1. When installing aero levers, it’s important to seat the housing and ferrule (if there is one) carefully inside the lever. If either is not secure, the cable can bind and reduce the brake’s effectiveness. With the brake lever off the handlebar, grease the cable lightly and thread it through the lever, ferrule, and housing (see photo). The cable end should be cut cleanly and travel smoothly through the housing. If it doesn’t, recut the cable with cutters made for the purpose (such as the Park Tool CN-10 cablecutter). Make sure both ends of the housing are free of burrs; recut the ends if necessary.
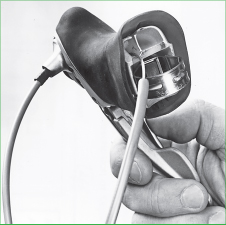
Step 1
2. Thread the brake cable through the brake caliper’s adjustment barrel and anchor bolt. Use a cable stretcher or toe strap, or squeeze the caliper and pull on the brake cable until the head of the cable and the housing are seated inside the lever. Tighten the anchor bolt. Release the caliper so the brake spring tension holds the housing and ferrule in place inside the lever.
Step 2
3. Move the housing to the slot for it inside the lever, and wiggle the lever onto the handlebar. Roll back the rubber hood to make it easier. Tighten the lever in place. To position the levers, hold a straightedge against the underside of the handlebar and slide the lever so its tip rests on the straightedge. The lever should also face directly forward, not point off at an angle. Secure the levers by tightening the bolt inside the lever body with a hex key.
4. Aero lever cable housing works best when the rear section travels in front of the stem before returning to the top-tube cable stop. This loop provides enough slack to turn the handlebar without binding. The front brake housing should go through this loop to the front brake (see photo). The cable routing should follow smooth, gradual bends for optimal braking action.

Step 4
5. Use electrical tape to affix the housing to the underside of the handlebar. Trim excess housing so the brake is as responsive as possible. To do this, loosen the cable anchor bolt to release the brake cable, grasp the head of the cable inside the brake lever with needle-nose pliers, and pull the cable out of the housing enough that you can cut off a section without cutting the cable. Again, make sure there are no burrs at the end of the housing. Use cable cutters or a file to fix this if necessary. Be careful not to cut off too much housing, which would cause the brakes or handlebar to bind.
6. Push the cable back through the housing and the brake anchor bolt. Use a third-hand tool to compress the brake caliper and pull on the end of the cable while you tighten the anchor bolt. Wrap the bar with handlebar tape (see instructions).
WATCH THIS FIX:
FIND A STEP-BY-STEP VIDEO OF HOW TO REPLACE BRAKE CABLES AND HOUSING AT
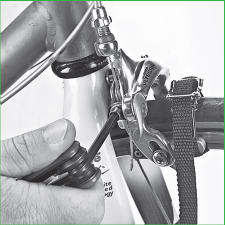
1. Loosen the cable anchor bolt and free the end of the cable. Loosen and remove the nut on the rear of the mounting bolt that runs through the brake body.

Step 1
Thread the nut off the end of the bolt, then pull the brake body away from the frame (see photo). If you have removed the brake to service it rather than replace it, clean it thoroughly. Use a rag dipped in solvent, and a brush to loosen the grease and dirt that’s on the surface of the calipers and hiding inside the nooks and crannies.
2. Unless you’re using something mild like alcohol, keep the solvent away from the brake pads. Better yet, remove the brake shoes to clean the pads separately.
Since oil and grease have a tendency to attract dirt, use them only where needed. On sidepull brakes, that means only at the pivot points and the spring anchors on the back of the calipers.
To minimize the possibility of getting lubricant on your brake pads, use grease rather than oil on the spring where it rubs against its anchors. Because it is difficult to work grease into the pivot area without dismantling the brake, spray those points with a small amount of lubricant containing Teflon.
3. To install a brake, insert the mounting bolt through the hole in the frame, and thread on the mounting nut. Leave the nut loose enough for the brake to be centered over the wheel by hand. Reconnect the brake cable to the brake calipers, and adjust the cable length by leaving the housing loops large enough to enter the housing stops in a straight line, but not too long either (too long causes excess drag; too short can kink the housing). See this page for advice on trimming housing. Check the caliper alignment. (Make sure the wheel is true and centered in the frame before aligning the calipers. If the wheel is out of true, no amount of brake adjustment will give you good performance.)
Before attempting to center the brake, check the relationship of the caliper arms to each other. If they’re too tight, they will not spring back after you release the lever.
4. If the caliper arms are too loose, they will vibrate excessively when you press the brake pads against the rim of the moving wheel. They should be as tight as they can be and still operate freely.
The tightness of lesser-quality calipers is controlled by a nut or pair of nuts on the front end of the mounting bolt. Because this part of the bolt functions as the pivot for the calipers, it is often referred to as the pivot bolt. If there are two nuts, the outer nut must be loosened and the pressure on the calipers must be adjusted with the inner one. Stop tightening the inner nut just before the calipers start to show resistance to pivoting, then lock the two nuts against one another to maintain the adjustment (see photo).

Step 4
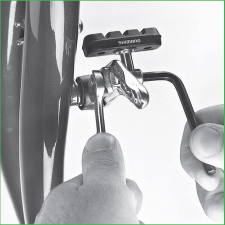
5. If your brake has only a single nut or bolt head in front, turn that to adjust the caliper tension. Rotate the brake by hand to center the pads. Then hold the brake in that position while you tighten the mounting nut (see photo).
Squeeze the brake lever a few times to see if the brake pads are striking the rim at the same time and whether the brake remains centered after being used. If the brake needs minor centering and it’s a modern dual-pivot model, look for a centering screw on top of or on each side of the caliper. Turning these small screws will move the brake slightly, centering it over the wheel.

Step 5
6. On older sidepulls, hold the brake steady again while you snug up the mounting nut a bit more. Then turn both wrenches together to rock the entire brake body in the direction needed to center it.
1. The cantilever brakes used on cyclocross bikes, some older mountain bikes, tandem bikes, and touring bikes are mounted differently than sidepull and conventional centerpull brakes. Each front cantilever is fastened by a bolt to a metal post brazed to the front of one of the fork legs (see photo). Cantilevers on the rear attach to posts brazed on the backs of the seatstays.

Step 1
The brake pads on cantilevers are slightly different from those on caliper brakes. The posts that extend from the backs of the shoes on cantilevers are fairly long and are used to adjust the distance of the shoes from the rim.
2. When installing new cantilevers or readjusting an old set, make sure that the wheel is true and centered in the frame. Set all the brake pads equidistant from the rim. You’ll probably need a hex key for the head of the pad mounting bolt and a combination wrench for the nut at its end (see photo).
Step 2
There are two factors to take into account in determining the proper setting of the pad. First, the pad should be turned so that it is parallel with the rim. Second, it should be set so it solidly contacts the rim when the arm is pushed toward the wheel. Too high and it may strike the tire; too low and it may dive into the spokes.
3. Cantilever brakes make use of a short cable—known as the linking, transverse, stirrup, or straddle cable—to connect the two braking arms. This cable may have a permanent fitting on only one end. If so, the other end is anchored by a bolt, and the cable length is adjustable.
Hook the end with the fitting into the cantilever arm that has a slot to receive it. Thread the other end through the anchor bolt found on the other arm. Where you anchor it depends in part on the frame. As a general rule, set the stirrup cable length such that when you pull up on its center, the angle is less than 90 degrees.
4. Give the main cable a light coating of grease, then push it through the housing, and seat the fitting on its upper end into the groove provided for it on the lever. Hook the center of the stirrup cable over the yoke and run the loose end of the main cable through its anchor bolt. If it’s a Shimano cantilever, the cable may not end at the yoke—it may pass through it and end at the anchor on one brake arm.
Before anchoring the main cable at the yoke or the arm, thread the adjusting barrel at the lever end down almost against the lever to provide plenty of adjustment space as the cable stretches.
5. Hold the cantilever arms against the wheel rim, pull the main cable taut, and tighten the bolt to anchor it (see photo). If the cable passed through the yoke on its way to the anchor on the brake arm, tighten the nut at the yoke, too, after making sure that both sides of the cable are the same length.
Squeeze the brake a few times. Adjust pad position and cable position if needed. If the brakes do not contact the rim at the same time, shift the position of the yoke along the stirrup cable toward the slower side. If that doesn’t solve the problem, look for centering screws in the sides of the arms. Or release the stirrup wire to open the brake and rock the sticky arm away from the rim to increase the spring tension. Hook it back up.
1. Keep brake pads close to and lined up with the rim so that when you brake, they don’t hit the tire (causing a flat) or dive into the spokes (which might cause a crash). Bad pad alignment also causes poor braking as well as squeaking and chattering when braking. As the pads wear, they’ll stop working properly, so it’s important to maintain, inspect, and replace them regularly.
Different types of brakes use different pad designs, but they all need the same basic care. You need to keep them tight, aligned, and clean. Gravel travels up the rims, and small bits get pressed into the pads during braking. When enough grit gets in there, the pads become abrasive to the point that you can wear out your rims. Inspect the pads frequently, and use an awl or sharp tool to pick out any debris stuck in them (see photo). Remove the wheels first to make this easier.

Step 1
2. Watch for uneven wear. Sometimes a pad will develop a lip if it’s aligned too low or too high. This may cause the brake to stick. Refurbish the pad by trimming it flat with a utility knife (see photo). If it’s a small defect, smooth it away with sandpaper.
Pad wear varies greatly. It’s actually possible to wear out a set in a single off-road ride if it’s muddy enough! They may last several years on a minimally used road bike, however.

Step 2
3. Most pads have grooves on them to help gauge wear (see photo). When the grooves begin to disappear, replace the pads. Also replace the pads anytime they are worn to the point that the metal pad holders are close to touching the rim. If the holders strike the rims, they’ll damage the braking surface.

Step 3
4. There are two basic pad types: one-piece pads that must be unscrewed, and cartridge pads with rubber that can be pulled or pried out of a holder so you can slide in new ones.
The second type makes pad replacement faster and simpler, because popping in new ones doesn’t require realigning the holders (meaning resetting the alignment to the rim). If your bike came with nonreplaceable pads, upgrade to replaceable pads once the old ones wear out.
To install a new one-piece pad, do one side at a time so you can compare the alignment and arrangement of the fastening pieces with the other side. Release the spring if you can, which will make alignment easier. Align the new pad so it strikes the rim squarely. On all brakes except direct-pull cantilevers, toe-in the pads very slightly. This means angling the pads so the front ends strike the rim first, which prevents squeaking.
5. Tighten each pad securely when it’s set up right, then move on to the next. If you have a brake that the pads cannot be angled on by adjustment (usually basic sidepulls or center-pulls), upgrade to adjustable pads or achieve toe-in by gently bending the brake arms with an adjustable wrench. Sometimes, to get enough leverage, you need to use two adjustable wrenches, one on each arm. Use one to hold the brake steady while you bend with the other.
Step 5
6. To install a cartridge-style pad, look for a set screw or small press-in pin holding the pad in place. If there isn’t one, pry the old pad out by pressing a thin-blade screwdriver behind it and working the pad free. Then slide in a new pad. If it goes in tightly, press it in carefully with water-pump pliers.

Step 6
7. If the pad has a retaining screw or pin, remove it, extract the pad, slide the new one in, and reinsert the pin. You may have to press on the end of the pad to get the pin to seat fully. When seated, the tip of the pin should be visible on the bottom of the pad holder.

Step 7
FIND A STEP-BY-STEP VIDEO OF HOW TO INSTALL ROAD BRAKE PADS ADS AT AT

14 COMMON PROBLEMS, SOLVED!
PROBLEM: A pad drags on the rim or stays closer than the other pad.
SOLUTION: Check that the wheel is properly centered in the frame. Check that the wheel is true. Does the brake still stick? Center the brake. Still sticking? Check the pads. If one is worn unevenly, it may be catching on the rim. If so, carve or sand the pad flat.
PROBLEM: The brake squeaks.
SOLUTION: Make sure the pads are aligned correctly, and angle them so that the front tips touch the rims before the backs (this is called toeing in the pads). Still squeak? Try sanding the rims with medium emery cloth to remove buildup and roughen the surface.
PROBLEM: The brake feels mushy, and the levers must be squeezed too far.
SOLUTION: Check the pads for wear, and replace them if necessary. Make sure that the cable anchor bolt is tight. The cable may have stretched. Tighten the adjustment by turning the brake adjustment barrel on the lever or caliper counterclockwise.
PROBLEM: The brake is binding. You squeeze the lever, but the brake doesn’t feel right. It’s harder to pull the lever, and the brake doesn’t snap back after you use it.
SOLUTION: Inspect the cables (also look inside the levers at the head of the cable) and housing sections (look for cracking and rust), and replace them if they’re worn. If the cables are okay, try lubricating them with oil or grease. Also lubricate the pivot points on the brake.
PROBLEM: The bike brakes poorly.
SOLUTION: Check for oil on the rims and pads. Inspect the pads for wear, and replace them if necessary. Replace pads that are old, as they can harden with age and stop gripping the rim. Make sure the cables are in excellent shape; replace them if needed.
PROBLEM: You brake and get a grabby, jerky feel from the bike as it slows down.
SOLUTION: You may have a ding or dent in your rim. This will hit the brake on each revolution of the wheel, causing an unnerving jerky sensation. Remove the dent and get the rim as straight as possible. Replace the rim if it can’t be fixed.
PROBLEM: The brake feels too tight. Squeezing and releasing the lever barely moves the brake.
SOLUTION: The cable adjustment is too tight. Look for a housing section that’s twisted somehow or a housing end that’s not seated in its frame stop. Housing okay? Try loosening the adjustment barrel at the lever or caliper (turn clockwise). Make sure there’s at least a 1⁄8-inch clearance between the pads and rims (you might need a little more than that on cantilever and direct-pull brakes).
PROBLEM: You installed cantilevers, and now one is tight on its post and won’t pivot freely.
SOLUTION: You may have overtightened the bolt, which is bulging at the frame post it’s screwed into, causing binding. Remove the bolt and brake arm, and sand the post until the brake fits on easily again. Don’t overtighten the bolt.
PROBLEM: You’ve removed the cable for maintenance and discovered that the brake action is jammed. It seems stiff and barely moves when you try to squeeze it by hand.
SOLUTION: Corrosion has seized the brake. Dismantle it and sand the corrosion from the brake and brake mount(s) with sandpaper. Then lubricate all moving parts (keep lube away from the pads) and reassemble.
PROBLEM: You crashed and bent the brake or lever.
SOLUTION: If you can still ride, pedal home. If the part is seriously bent, replace it. It will break when you try to straighten it or, worse, when you’re riding. If it’s a minor bend, you may be able to carefully straighten the part by hand or with a pair of pliers.
PROBLEM: One cantilever brake pad sticks to the rim.
SOLUTION: If there is a triangular cable carrier at the end of the main brake cable, try pushing it sideways on the transverse cable. When the carrier is out of position, it can cause one pad to hug the rim.
PROBLEM: You crashed and broke the cantilever brake. Now one side isn’t attached to the frame.
SOLUTION: Usually this can be repaired with a cantilever repair kit, which includes everything needed to repair the frame post and reattach the cantilever. Ask your local shop about these kits.
PROBLEM: On long descents, you hear a disconcerting grating sound when braking steadily. It sounds like metal on metal, and the braking action is poor.
SOLUTION: Check the pads. They may have worn out, or you might have bad pads (even some new pads are inferior); replace them. The pads may have gotten contaminated by aluminum from the rim or have road grit embedded in their surfaces. Pick out the debris with an awl, or replace the pads.
PROBLEM: Turning the handlebar sideways causes the rear brake to grab the rim.
SOLUTION: The cable housing may be too short, or it may have gotten twisted somehow. Fix the housing so that you can turn the handlebar as needed without causing the brake to be applied.
