Today’s rear derailleurs are strong and incredibly accurate, but they’re still vulnerable to problems that are obvious (crashes) and not so obvious (dirt, corrosion, wear). Here’s what you need to know to keep yours running—and shifting—just right.
• REAR DERAILLEUR BASICS
• REMOVE AND INSTALL A REAR DERAILLEUR
• ADJUST A REAR DERAILLEUR
• CHAIN ALERT!
• STRAIGHTEN A BENT HANGER
• TROUBLESHOOTING REAR DERAILLEURS

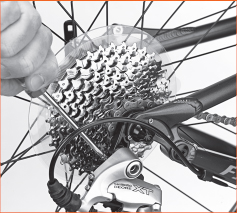
Rear derailleurs made for double-chainring road bikes have short chain cages (bottom), while those made for wide-range, triple-chainring bikes—such as mountain bikes—have longer cages (top) for greater amounts of chain wrap.
The pulley cage ought to be parallel to the centerline of the bike. If it’s straight when sighted from behind, an imaginary line drawn through the cassette cog will bisect the pulley wheels. If the cage tilts in toward the wheel, either the cage, the derailleur body, or the hanger (possibly even the dropout tab the hanger is attached to) may be bent.
1. The rear derailleur is positioned beneath the cassette and fastened by a bolt to a hanger, which sits beneath the right rear dropout. The dropouts are the slotted metal pieces that hold the rear wheel and are located at the junctions of the seat-stays and chainstays.
2. The derailleur hanger on a high-quality bike is usually integrated into the right rear dropout (see photo). An integrated hanger contributes to better shifting by being stiffer than a bolt-on hanger. Some integrated hangers, such as the one shown here, feature replaceable sections that prevent major frame damage if you bend the derailleur badly.

Step 2
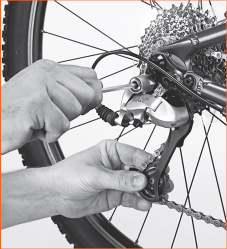
3. Before removing a rear derailleur for cleaning or replacement, you must free it from both the shift cable and the chain. To remove the cable, loosen the bolt that fastens it to the body of the derailleur and slip it out.
Freeing the chain from the derailleur can be done in one of two ways. One way is to use a chain tool to break a link in the chain, then pull one end of the chain free from the derailleur cage (see photo). Removing the chain makes sense if it needs cleaning or replacement.
4. The simpler method: Use a wrench to loosen the bolt that holds the idler pulley on the derailleur (see photo). Remove the idler pulley so the chain can be lifted off the jockey pulley. You may need to move the derailleur cage plates apart to free the chain. The derailleur can then be unbolted from the hanger and cleaned or replaced.

Step 4
5. When installing a rear derailleur, follow the same procedure in reverse. Bolt it onto the hanger, then replace the chain and shift cable. Before tightening the cable, put the wheel back on the bike and make sure that the chain is positioned on the smallest cassette cog so the derailleur is free to move to its outer limit.
Operate the shift lever to make sure it’s in its starting position so that the cable has all the available slack. Then thread the cable through the anchor on the derailleur body. Hold the cable taut with a pair of pliers and tighten the anchor bolt with a wrench.
6. After installing a new rear derailleur, check its range of motion and adjust it properly. Even if you are only remounting your old derailleur after a cleaning, it is a good idea to check the adjustment. Make sure the wheel is properly positioned on the frame before fine-tuning the derailleur.
WATCH THIS FIX:
FIND A STEP-BY-STEP VIDEO OF HOW TO INSTALL A REAR DERAILLEUR AT
1. Place the bike in a repair stand. Check the derailleur adjustment by pedaling with your left hand while shifting with your right. Adjust the inner throw of your rear derailleur first. Shift the chain onto the largest cog. It should seat quickly on the cog. If it hesitates or goes into the spokes, adjust the derailleur with the low-gear adjusting screw. It’s probably the upper one or the one nearest the rear (see photo). Counterclockwise turns allow the derailleur to move closer to the spokes. Clockwise turns limit travel.

Step 1
2. Shift the chain to the smallest cassette cog. Turn the high-gear adjusting screw until the pulleys line up beneath the small cog (see photo).

Step 2
With your bike still mounted on the repair stand, spin the crankarms and run through the gears. Pay attention to the shifts onto the largest and smallest cogs (the ones you used to set the derailleur adjustments).
If there’s any hesitation in these shifts or a lot of clatter after the shifts—or any sign that the chain might jump off the cogs-fine-tune the adjustments until the shifts become quiet and accurate.

After installing a new rear derailleur or changing the sizes of chainrings or cassette cogs, you may need to alter the chain length in order for the derailleur to shift properly. See this page for more.
3. Some derailleurs have a third screw called the B-tension screw or the B-angle screw (see photo). This adjusts the clearance between the jockey pulley and the cogs.
On single-pivot derailleurs like those manufactured by SRAM, the B-tension screw is used to directly adjust the distance between the jockey pulley and the largest cog. This distance should be about VA inch (6 millimeters)—close enough for quick shifting but clear enough that the chain can pass freely from the second-largest cog to the largest.
Double-pivot derailleurs rely on a spring inside the B-knuckle to actively adjust the cog-jockey clearance for each gear. The ideal setting can be a bit elusive. Adjust the B-tension screw so the pulley rides as close to the cogs as is practical without making noise in any gear.
When a bike falls over or gets hit on its right side, the rear derailleur can be damaged. Fortunately, the most likely damage, a bent hanger, is not expensive to repair—and you might be able to fix it yourself. If your derailleur-fastening bolt has a hex head, insert a wrench into it and use it and the derailleur body to lever the hanger back into line (see photo). Relying on the hex key alone may damage the derailleur pivot bolt or the key itself, so put a hand behind the derailleur and pull with it as you pull up on the bolt with your other hand. When you get home, perfect the “adjustment” with the aid of a derailleur hanger alignment tool.
4. Fine-tune the derailleur so it moves the chain to a new cog with each click of the shift lever. Do this with the adjustment barrel. Use your right hand to shift to the smallest cog while turning the crankarm with your left. Shift one click. The chain should instantly move to the second-smallest cog and stay there. If it doesn’t, turn the barrel adjuster counterclockwise one-eighth of a turn and try again. Continue to turn the barrel until shifts are quick and precise. If you go too far, the system will run noisily. In that case, turn the barrel clockwise one-eighth of a turn at a time as you pedal until the noise stops.

Step 4
As a final check, shift through all the gear combinations, making sure that the system works quickly and quietly.
WATCH THIS FIX:
FIND A STEP-BY-STEP VIDEO OF HOW TO AD JUST A REAR DERAILLEUR AT
5 COMMON PROBLEMS, SOLVED!
PROBLEM: You shifted into the rear wheel and trashed the rear derailleur. How do you ride home?
SOLUTION: Separate the chain with your chain tool (you did bring one along, didn’t you?), extract the chain from the derailleur, and rejoin the chain on the middle chainring and cassette cog. Pull the derailleur out of the spokes and limp home on your one-speed.
PROBLEM: You shift the lever, but the derailleur doesn’t quite shift into gear and there are a lot of clicking noises as you pedal.
SOLUTION: The derailleur may be bent. Have it checked. If it’s not bent, the cable tension has probably changed. If the shifting hesitates when moving to larger cogs, turn the adjusting barrel in one-eighth-turn increments toward the large cogs. If shifting to smaller cogs is the problem, turn the barrel toward them.
PROBLEM: You broke the shift cable and cannot shift into an easy gear to get home.
SOLUTION: If there’s enough cable still attached to your derailleur, pull it (by hand) into a mid-range gear and secure the upper end of the shift cable beneath a bottle-cage screw. Now you can ride home with your bike in that gear.
PROBLEM: The rear derailleur makes a constant squeaking noise.
SOLUTION: The pulleys are dry and need lubrication. Try dripping some lube on the sides. If that doesn’t work, disassemble the pulleys (one at a time), grease the bearing surfaces, and then reassemble.
PROBLEM: Shifting is difficult.
SOLUTION: The cables might be dirty. Shift onto the large cog, then move the shift lever back (without pedaling) to create cable slack. Lift the housings out of the stops, slide them down to expose the cable, oil or grease the cable, and reassemble the housings.