
As drivetrains add gears (we’re at 11 speeds and counting!), chains are becoming more highly engineered. They’re now precision instruments that require more care—and that’s where the following guidance will help.
• CHAIN BASICS
• CURE CHAINSUCK
• CLEAN A CHAIN
• REMOVE A QUICK-CONNECT CHAIN
• REMOVE A CHAIN
• INSTALL A CHAIN
• TROUBLESHOOTING CHAINS

If you have a new 10- or 11-speed drivetrain and chain, invest in a chain checker. This inexpensive device can alert you to chain wear before it eats your drivetrain. A less-precise option: Measure out 24 pins on your chain, from the center of the first pin to the center of the last. It should measure 12 inches. When the measurement hits 123⁄32 inches, install a new chain. Beyond 121⁄8 inch? You might need new chainrings and cogs, too.

There are two common causes of chainsuck: a dirty drivetrain and bent chainring teeth. If chainsuck happens to you, clean your chainrings thoroughly, and while you’re at it, inspect them for damaged teeth. Bend them back into position if necessary. Thoroughly lube (and wipe down) the drivetrain before riding again.

SRAM, KMC, and Wippermann manufacture chains with master links that slide apart, making a chain tool unnecessary (but carry a spare link in case your chain breaks on a ride). KMC also offers their master link, called the MissingLink, as an aftermarket product that comes in versions for most chains. SRAM also offers replacement PowerLink and PowerLock connectors, though they specifically recommend that these be used only on SRAM-brand chains. These special links are easy to spot, because they look different than the other links on the chain. Note that to handle the additional stresses on narrower, more flexible 10-speed chains, SRAM has developed the PowerLock link that snaps together and isn’t meant to be disassembled.
1. Cleaning and lubricating can usually be performed without disassembling the chain.
Wipe the chain down about once a week, or after any especially wet or muddy ride, with a rag soaked with a small amount of solvent. Allow the chain to air-dry before applying fresh lubricant. Drip lubricant onto the bushings and gaps where the inner and outer side plates meet.
Turn the crank backward a few revolutions to work the lubricant into the chain so it can coat the pins—where most wear occurs.
Finally, wipe excess lubricant from the outside of the chain with a dry rag. The outside of the chain needs only a thin film of lubricant to protect it from
2. If your chain is really grimy, clean it with a special combination brush-and-reservoir system (such as Park Tool’s CM-5 Cyclone Chain Scrubber) while on the bike.

Step 2
WATCH THIS FIX:
FIND A STEP-BY-STEP VIDEO OF HOW TO CLEAN AND LUBE A CHAIN AT
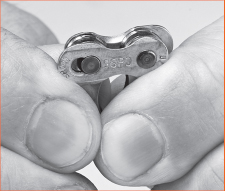
1. Quick-connect chains like SRAM’s Power Link Connector models make it simple and convenient to remove your chain for cleaning without the use of tools.
To begin, find the special connecting link. Some manufacturers make this link a different color so it’s easy to find. In all cases, the connecting link can be identified by elongated holes in the side plates.
Note: If the connecting link is colored black on your 10-speed chain, this may be a SRAM PowerLock link, which isn’t meant to be disassembled.
Pinch the side plates toward each other with your fingers. This frees the ends of the pins from recesses in the side plates.
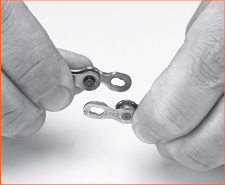
2. With the side plates pinched together, slide the pins toward each other. Each pin will move through the elongated hole in the opposite side plate to the release position.
Step 2
3. Separate the connecting link by moving the side plates away from one another. Reconnect the chain by reversing these steps.
Step 3
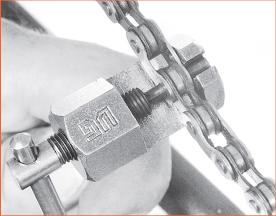
1. You’ll need a special chain tool (sometimes called a chain breaker) to separate a link.
Slip the chain off the chainring to remove tension. Wind the center rod of the chain tool back far enough for a link of chain to slip into the slot provided for it, then screw the rod forward against the pin (see photo).
Make sure that the rod and pin are properly aligned. Continue to wind the rod forward to push out the pin.
Step 1
2. Some older chains can be disassembled and reassembled using the same pin. To do this, don’t push the pin all the way out, as it’s nearly impossible to reinsert. Watch the pin closely, and when you think it’s most of the way through, unwind the chain tool and flex the chain sideways to separate it. If it won’t come apart the first time, carefully repeat the steps, incrementally, until it does.

Step 2
3. Shimano chains require that you push the pin out entirely and replace it with a special, hardened replacement pin. Campagnolo goes one step further and makes a kit of several links that replace a short segment of the chain to ensure an ideal connection. Find the pin where the chain was initially connected. It will usually have a different finish than the rest or sometimes a dimple. Break the chain as near to opposite this pin as you can estimate. Shimano and Campagnolo both recommend that a chain should not be broken and reassembled more than once after installation, so do this only if you think it’s absolutely necessary.
1. A general rule when installing a new chain is that it should be long enough to permit shifting onto the largest cassette cog while also on the largest chainring. This will prevent damage to the derailleurs in the event that you unintentionally shift into this normally unused combination. The rear derailleur should be almost fully extended at this point. Once you have the right length, use a chain tool (and the steps outlined on this page, in Remove a Chain) to get the chain down to size.
Be aware that some newer Shimano chains (CN-7900 and CN-6700, for example) are asymmetrical and should be installed on the bike with the engraved Shimano plates facing out. Shimano additionally recommends a specific direction for the chain. Holding the chain in front of you, the inner-plate end should be in your left hand and the outer-plate end in your right hand before installing it on the bike.

Step 1
2. Align the ends, and use the chain tool to force the pin in. If it’s a Shimano or Campagnolo special pin, it should be installed from the inboard side of the bike to the outside for the strongest connection; it will make a slight clicking sound when it’s seated. After that, you’ll need to remove the guide end of the pin (break it off with pliers if it is a one-piece pin and guide). Only Campagnolo n-speed chains require the additional step of flaring the ends of the replacement pins using their special UN-CT300 chain tool.
If the rejoined link is stiff, flex it back and forth sideways to loosen it. Mount the chain on the chainring, and lubricate.
8 COMMON PROBLEMS, SOLVED!
PROBLEM: The chain is always a black, grimy mess.
SOLUTION: Clean it, and use less lube or a lighter onr.
PROBLEM: The chain squeaks when you pedal, even though you’ve lubed it.
SOLUTION: Try a lube with better penetrating qualities. After applying it, let it sit for a while. Wipe off excess lube, because it will attract dirt.
PROBLEM: When you pedal hard, the chain skips.
SOLUTION: The chain may be worn out. Measure the chain with a chain wear indicator and replace it if necessary. If the chain isn’t worn, it may be a tight link. Find it by pedaling backward and watching for it to bind as it passes through the derailleur pulleys. Then flex the chain sideways to free the link. If the chain checks out okay and the problem still persists, inspect your cogs and chainrings for bent or broken teeth, and replace as necessary.
PROBLEM: The chain runs rough when you pedal.
SOLUTION: Replace it if it’s worn out, or try a different model of chain if yours is relatively new but runs rough. Some chains run smoother than others. It may also be a worn cog or chainring (if the teeth are smallish and hook-shaped, they’re worn).
PROBLEM: A few chain links got bent.
SOLUTION: Try straightening them by twisting the chain with pliers. Or replace them with new links (be sure to use the same type).
PROBLEM: The chain runs noisily.
SOLUTION: If the chain is lubed and not worn, it’s probably a derailleur adjustment problem.
PROBLEM: The chain falls off all the time.
SOLUTION: This is usually a derailleur adjustment problem. See this page.
PROBLEM: When you shift, the chain gets jammed between the chainrings.
SOLUTION: Make sure that the chain is the right width for the drivetrain. If it is, check the chainring bolts for tightness. Make sure the chainrings are straight. Check their spacing, and replace any worn ones.