
Well-built wheels don’t need periodic maintenance apart from hub lubrication (unless they get damaged). And good-quality tires will last for many hundreds of miles if kept properly inflated and free of glass, metal, wire, and other debris. That said, it pays to be prepared. What follows can help you avoid costly repairs—and keep you rolling instead of wobbling down the road.
• WHEEL AND TIRE BASICS
• TIRE THREAD COUNTS, UNRAVELED
• PATCH A TUBE
• TIP FOR DISC BRAKE USERS
• PATCH A TUBELESS TIRE
• PATCH A TUBULAR TIRE
• REPLACE A BROKEN SPOKE
• TROUBLESHOOTING WHEELS AND TIRES

Choosing a tire? Coarser casings (which means larger and fewer cords, of around 30 to 60 threads per inch, or TPI) usually result in a stiffer and more durable tire, while finer casings (100 TPI or more) yield a more supple, smoother-riding tire that can handle higher inflation pressure but may be less resistant to scuffs and cuts.
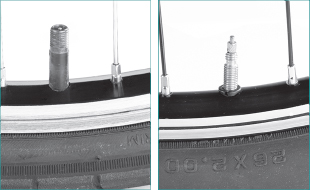
Schrader valves (left) are the same as those found on automobile tires; they require more force to inflate. Presta valves (right) are thinner, lighter, and easier to inflate.
WATCH THIS FIX:
FIND A STEP-BY-STEP VIDEO OF HOW TO INFLATE A TIRE AT

First, deflate the tube and push the tire bead toward the center trough of the rim, as shown above. Then use a tire lever to pry the bead over the side of the rim.

Tubeless and tubeless-ready tires rely on a special rim shape or rim strip to hold the tire bead in place and create an airtight seal.
WATCH THIS FIX:
FIND A STEP-BY-STEP VIDEO OF HOW TO INFLATE A TIRE AT
Disc brakes can become very hot during a ride and are also very sensitive to oil contamination. The trace amounts of oil on your skin can sometimes be enough to ruin a pair of disc brake pads. To avoid unnecessary contact with the brake disc, mount your quick-release levers on the side opposite the disc.
1. Remove the wheel from the bike. Mark the tire next to the valve stem to establish the relationship between the tire and tube (or simply always place the tire label by the valve stem). This makes it easier later to locate foreign matter that may still be embedded in the tire casing.
2. If any air remains in the tire, let it out by pressing on the valve (unscrew the tip of a Presta valve first). Start your tire removal on the side of the wheel opposite the valve to minimize the chances of damaging it. Squeeze the sides of the tire toward the trough at the center of the rim to produce slack, then hook a tire lever under the edge of the tire bead and pull it over the rim. (Use a good set of plastic tire levers with no sharp edges that could further damage the tube.) Hook the other end of the tire lever to a spoke.
Move a few inches along the rim, hook a second tire lever under the same bead, pull the bead over the rim (see photo), and hook the tire lever to a spoke. Once you get several inches of the tire bead over the rim edge, pull the rest of it over the rim by hand.
3. With one bead of the tire free from the rim, you can remove the tube for repair. There is no need to take the tire completely off the rim. Just push it over to one side while you remove the tube. Lift the tube’s valve stem out of its rim hole, being careful not to damage it. Then slip the remainder of the tube out of the tire and pull it away from the rim.
Pump some air into the tube and try to pinpoint the puncture by listening or feeling for the escaping air. If a source of water is available (use a puddle on the trail or road), immerse the tube and watch for air bubbles. When you locate a repairable puncture, mark the tube at that point (dry it first if it’s wet).
4. Pull the tire off the wheel and lay it down. Spread the tube over the tire so the two are in the same position as when they were together on the wheel. Lineup the valve stem with the mark you previously made on the tire. Then check both the inside and outside of the tire casing at the point of puncture. Remove any offending objects.
5. If you can’t find the puncture in the tube, check the valve stem. Tubes on underinflated tires can shift position, allowing the rim to cut into the side of the stem. If the stem is cracked or cut, you’ll need to replace the tube.
6. Spread the tube on a flat surface. Use the piece of sandpaper or the metal scraper from the tube repair kit to roughen up the puncture area. Brush off any dust with your hand.
Step 6
7. Coat the roughened area of the tube with a fine, even layer of glue that’s a little larger in diameter than the patch you intend to use. Make sure there are no globs that would prevent the patch from sealing properly. After spreading the glue on your tube, allow it to dry completely (this usually takes 5 minutes).

Step 7
8. Take a patch out of your repair kit. Choose a size that will cover the puncture and make good contact with the area all around it. Peel the foil from the sticky side of the patch, and fasten the patch in place on the tube.

Step 8
9. To make sure you get a good seal, press down hard to force out any air bubbles. Inflate the tube enough to give it shape.
Push one bead of the tire back onto the rim, leaving the other bead and most of the casing hanging off the rim while you replace the tube. Temporarily push the second bead of the tire over the rim at the valve hole, and push it over the first bead to uncover the hole.
10. Fit the tube’s valve stem through the hole, and pull the compressed section of the second tire bead back over the tube and off the rim. Starting in the area of the valve stem, work your way around the rim, tucking the tube back inside the tire.
Once the tube is in place, let the air out of it while you work the tire’s second bead onto the rim. Begin at the stem. With the first few inches of the bead in place, push the valve stem up into the tire to ensure that no part of the tube around the stem is caught under the bead. Then continue your way around the rim.
11. Avoid using tire levers to put the tire on the rim, which could pinch the tube and damage it. In most cases, you should be able to do it with your hands alone. To get the slack you need for the final part of the process, go around the tire and squeeze the two beads together so they will drop down into the trough in the middle of the rim.
12. When you get to the last section of tire, you may find it quite difficult to force it onto the rim.
Make sure you have given yourself all the available slack. Grasp the tire with both hands and, using a vigorous twisting motion of the wrists, try to roll the stubborn bit of bead over the edge of the rim. If this technique does not work, push the bead onto the rim bit by bit with your thumbs or the heels of your hands.

Step 12
13. Once the tire is on the rim, push the valve up into the tire and pull it back down to be sure the stiff portion of the tube surrounding the valve is not trapped beneath the tire bead. Then work around each side of the rim, rolling the tire back and looking to see if the tube is trapped beneath the tire bead anywhere else. If it is, the tube will get pinched and the tire won’t seat properly when you inflate it. Use a tire lever to poke the tube inside the tire. If everything looks okay, pump 20 to 30 pounds of pressure into the tube. If the stem is still straight and the tire is seating properly, continue pumping up to the recommended pressure (usually printed on the tire label).
1. Tubeless tire service is remarkably similar to that for any other clincher. The first step is to remove the wheel from the bike. Deflate the tire completely, and pinch the sidewalls together firmly to get one of the tire beads to pop out of its channel. Then determine which bead has dislodged, and work your way around the wheel, pushing the rest of this bead into the center of the rim.
2. The rim’s diameter is smallest at its center trough. With the bead in this position, you’ll now have enough play in it to pull the tire up and away from the rim on one side, freeing the bead from the rim. Avoid the temptation to use tire levers except as a last resort. Using tire levers on a tubeless tire or rim can be damaging and render the system no longer airtight. If you must use tire levers, be extremely careful and use broad, flat plastic levers.
3. Push the second bead free of its channel in the same manner as you did the first. Once the second bead is dislodged and in the center of the rim, the tire should easily come off the rim.

Step 3
4. Check the tire inside and out for the cause of the puncture, mark the location, and remove the foreign matter. If you’re on the trail, the quickest way to get rolling again is to remove the valve stem from the rim and install a tube in the same manner as you would on any other clincher tire (see “Patch a Tube”). You can then patch the tire itself in the comfort of your home shop.
5. Back at the shop? Good. Turn the tire inside out at the point of the puncture, and scuff it heavily with the coarse sandpaper or rasp included in your patch kit. Scuff an area around the hole slightly larger than the patch you plan to use.

Step 5
6. Apply a glob of glue and spread it around the roughened area. Let the glue set up for several minutes. You’re ready for the next step when the glue becomes cloudy.

Step 6
7. Remove the foil backing from the patch and firmly press the colored (usually orange) side of the patch into the glue. Keep constant pressure on the patch for 2 to 3 minutes, then carefully peel the clear plastic from the patch. Though it can be left in place, removing the film will help you be sure the patch is completely vulcanized to the tire’s lining. If the edges of the patch peel up, spread a small amount of glue over the top of the patch and smooth the edges down from the middle outward.
Step 7
8. While the patch dries, reinstall the valve stem and prepare the rim. Wipe the inside of the rim with a clean cloth to ensure a good seal with the tire. Spraying a diluted soap-and-water mixture (about ½ teaspoon of dish soap to 32 ounces of water) into the rim will make the tire’s beads pop into their respective channels more easily and help maintain a good seal. If you don’t have a spray bottle for this purpose, use a clean rag or sponge soaked in the same mixture.

Step 8
9. When the patch is dry, mount the tire. The first bead should slip into place easily. The starting point of the second bead is less important than with a tube-type tire, but it’s slightly easier to start opposite the valve stem. Hold the wheel in your lap with the free bead facing up. Set the bead into the rim’s center opposite the valve and work the bead over the rim wall little by little with your thumbs, moving them away from each other around the wheel.
As the last section of exposed bead becomes tight, recheck that the rest of the bead is settled into the center of the rim. Hold the wheel into your waist with the last section of bead away from you, and grip the tire firmly on both sides of the still-exposed section of bead. Roll your hands forward to stretch the last bit of bead over the rim. Some tires may prove difficult. Give it your absolute best shot to finish without using levers. Remember: There’s no tube to pinch, but you don’t want to compromise an expensive tubeless rim.
10. With the tire mounted, check once more that both beads are down in the rim’s center. Tubeless systems require a quick burst of air to create the initial seal between tire and rim. Using a floor pump or compressed air, quickly pump the tire to about 20 psi (for mountain tubeless) or about 100 psi (for road tubeless). Once the initial seal is created, pump the tire steadily, listening for the beads to pop into place. When this begins, inspect the tire every few strokes until the bead is seated evenly all the way around the wheel. Once the tire has reached about 40 psi, you can help the process along by gripping the tire with the heel of your hand near a section that hasn’t popped into place and pushing away with steady, even pressure. If necessary, keep inflating the tire up to (but not beyond) 60 psi for mountain bike tires and 120 psi for road tubeless. When the bead seat indicator (a textured line that extends about 1⁄16 to 1⁄8 inch beyond the rim wall) is fully and evenly exposed, that’s it. Set the tire to your chosen riding pressure, reinstall the wheel, and go for a ride.
WATCH THIS FIX:
FIND A STEP-BY-STEP VIDEO OF HOW TO INSTALL A MOUNTAIN BIKE TUBELESS TIRE AT
1. When a tubular tire goes flat, stop riding on it immediately. Take the wheel off, and pump in a little air to try to locate the puncture while the tire is still on the rim. If you find the leak, mark the spot and proceed with the removal of the tire from the rim. If not, you’ll have to pull the tire off the rim first.
If the tire was glued on properly, it won’t come off the rim easily. Try gripping one section of the tire with both hands and rolling it over the side of the rim, pushing on its underside with your thumbs or palms. Once you get a section loose, it will be easier to get a good grip for pulling the rest of the tire off the rim.
If you weren’t able to find the puncture while the tire was on the rim, pump some air back into the tire and hold it near your ear to listen for a leak. Even if you can’t hear anything, you may be able to feel the escaping air hitting your face.
2. If you couldn’t locate the puncture, immerse the tire in a pan of water and watch for escaping air bubbles. Once you see, hear, or feel escaping air, search for evidence of a puncture in the tire. Until you actually locate a cut or puncture, you can’t be certain where the problem lies, because air can travel out of a hole in the tube and move several inches inside the tire before emerging.
The most foolproof way of isolating a leak is to clamp off a small section of tire and pump air into the tire. If air escapes from the tire, loosen the clamp and move it along to another section. When no air escapes from the unclamped part, you know the problem lies within the clamped section. Take off the clamp and inspect that section to discover the source of the leak. Make clamps using a couple of pieces of two-by-four. Tighten them around the tire using a large C-clamp or the jaws of a vise (see photo).

Step 2
3. The smaller the pieces of wood used, the more frequently you’ll have to reposition them but the more narrowly you can pinpoint the source of the leak. It’s important to know precisely where the tube needs repair before cutting the stitching, because you want to minimize how much you need to cut (and later restitch).
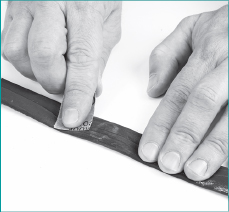
Once you’ve located the puncture, lift up a few inches of base tape in that area (see photo). The base tape covers the tire’s stitches and is bonded to the tire with latex glue. This is a different glue than the type used to mount the tire to the rim. When the stitching is exposed, make a distinct mark across the seam to help you line up the edges of the tire for later restitching.

Step 3
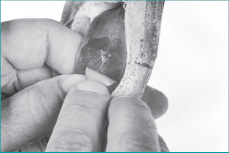
4. Use a sharp knife, razor blade, or (best of all) sewing seam ripper to cut enough stitches to allow you to pull out the section of tube needing repair.

Step 4
5. Pull out that section of tube and roughen the punctured area with fine sandpaper. Spread a layer of patch glue over the area, and let it dry completely. (It’ll lose its glossy appearance, usually after about 5 minutes.)

Step 5
6. Find a patch of the appropriate size, and peel the protective backing from its sticky side. In order to get a good seal, place one edge of the patch on the tube first, and roll the remainder of the patch over.
Step 6
7. Sprinkle a bit of talc over the patched area to prevent the tube from sticking to the tire. Check both inside and outside the tire to locate and remove any remaining foreign material that may repuncture the tube once it’s inflated and back in use. If any threads of the tire casing have been severed, cut a piece of strong canvas, nylon, or old tire casing, and insert it inside the casing over the damaged area. When the repaired tube is inflated, it’ll hold the patch in place. Push the tube back into place inside the tire. Straighten the inner tape over the tube, and pull the edges of the casing together, lining up the two halves of your mark.
8. Restitch the tire using the original holes. (Creating new holes will weaken the casing.) Be sure to begin by overlapping the old thread for several holes on both sides of the repair area. If you’re a talented sewer, you may want to try to duplicate the original thread pattern in the tire. However, a simple overhand stitch will work adequately (see photo). Tubular-tire repair kits provide thread, but any strong thread should work. Some people prefer dental floss to the type of thread found in most kits. Just tie a small knot in the end of your thread as if you were sewing on a button, and tie off the other end when you complete the stitching. Fasten the base tape with liquid latex.

Step 8
9. Carefully scrape dried old glue off your rim as well as you can (you needn’t get it all off). If it’s a new rim, sand it lightly with emery cloth, clean it with acetone or alcohol, and add a layer of glue. If you’ve never put a tubular tire onto a rim before, you may want to practice putting it on without glue first. Here’s how. (Or skip to step 11 for gluing tips.) Set the rim down on a clean floor with the valve hole at the top. Insert the valve through the hole, and beginning at that point, stretch the tire around the rim, working in both directions at once.
10. When you get to the last, difficult section, lift the rim off the floor and simultaneously stretch and roll the final part of the tire over and onto the rim (see photo).
Work your way around the rim, checking to make sure the tire is on straight. When it looks right, inflate it. If the tire was difficult to get on, let it sit for a while, perhaps overnight, to let it stretch a little. Then deflate the tire and remove it from the rim for gluing.
11. Apply a dab of tubular cement between each spoke hole on the rim. Then run a bead of glue all the way around the rim. Apply a lighter coat to the base tape of the tire.
12. Put a small plastic bag or a piece of plastic over your fingers and spread the glue around. After an hour, apply a second coat of glue in the same way.

Step 12
When the second coat is tacky, proceed with the tire mounting. When you set the rim down, be sure the floor is clean, because you don’t want to contaminate the glue (or floor).
Roll the tire onto the rim as you did before. Then spin the wheel and sight the tread to make sure the tire is on straight and that it’s properly centered. If necessary, work it straight with your hands. Partially inflate the tire and put it onto your bike. If everything looks fine, inflate the tire to full pressure and let it sit overnight before using it.
1. Spokes don’t demand a lot of maintenance. Primarily, your job is to make certain they’re properly tensioned. Periodically work your way around each wheel, plucking each spoke to make sure that it’s not loose. You’ll spot a loose spoke both by the way it feels and by the way it sounds when plucked.
Use a spoke wrench to bring a loose spoke up to a level of tension that is similar to that of its neighbors. After you’ve tightened the loose spokes, check the wheel for trueness, and make further adjustments as needed.
Wheel truing is made easier and more precise when it’s done in a truing stand. If you don’t have access to such a stand, use your brake calipers to help you check your wheel, or rest a thumb on a brake pad and sight the gap between the rim and your thumbnail. Sighting between the brake pads or your thumb and the rim will allow you to see whether the wheel needs side-to-side truing (this can also help you determine if the wheel is out of round).
2. When a spoke breaks, it’s best not to ride any farther on the wheel. Instead, push your bike to a place where it’s safe to replace the spoke. If you must ride the bike, first weave the loose spoke end around an adjacent spoke, then ride slowly to your destination.

Step 2
Replace the spoke with one of the same size. If you need a new nipple, roll the tire back, lift up the rubber strip that covers the tops of the nipples (called a rim strip), and take out the old nipple. Drop a new one in its place. Remove the broken spoke, and run the new one through the hub flange in the same direction as the old one.
3. Pull your new spoke through the flange until its curved end is seated, then weave it through the other spokes, following the pattern of the old one. If in doubt, follow the pattern of the second spoke on either side of it.

Step 3
4. Before threading the new spoke into its nipple, apply a small amount of oil to its threads. This will make it easier to thread the spoke into the nipple and will help prevent it from freezing in the nipple over time. Then thread it on and use a spoke wrench to bring it up to tension.
When working on spokes, it’s important to use the correct-size wrench. If the wrench flats on a nipple get rounded off, you’ll have a difficult time adjusting that spoke. Also, before adjusting any of the old spokes, it’s a good idea to spray a little penetrating oil at the points where the spoke enters the nipple and the nipple enters the rim. Rotate the wheel so that the oil will flow down into the threads after you spray it on.
13 COMMON PROBLEMS, SOLVED!
PROBLEM: Every time you fix a flat, the tire goes flat again.
SOLUTION: Check the tube carefully. Are the holes in one area? If they’re on the bottom, the rim strip may be out of position, allowing the tube to get cut by the spokes. If they’re on top, there maybe some small sharp object still stuck in the tire. Find it by running a rag around the inside of the tire, and get it out of the tire. There might also be another hole: Remove the tube, inflate it, and hold it underwater. Any bubbles will lead you to a hole.
PROBLEM: You keep getting pinch flats.
SOLUTION: Put more air in your tires, or install wider tires.
PROBLEM: It’s hard to install the tires because the tube gets in the way.
SOLUTION: Tire installation is easiest if you use a tube that’s narrower than the tire. Switch to either narrower tubes or wider tires.
PROBLEM: You got the tire on but it won’t sit right on the rim.
SOLUTION: Let the air out, wiggle the bad spot around, reinflate to about 30 psi, and roll the bad spot into place with your hands. Then inflate fully. If this doesn’t work, try letting the air out, applying a soapy solution to the tire along the bead, and reinflating.
PROBLEM: The patch won’t stick to the tube.
SOLUTION: Put on enough glue and let it dry completely (about 5 minutes). Never touch the sticky side of the patch with your fingers. Don’t blow on the glue to get it to dry faster, because you may get water on the glue.
PROBLEM: You can’t get air in the tubes on your aero/deep-rimmed wheels.
SOLUTION: Get tubes with long enough valves (they must protrude enough to get the pump on), or get valve extenders. Be sure to leave the Presta valve unscrewed when you’re installing the valve extenders.
PROBLEM: Your tubeless tire loses air slowly.
SOLUTION: Remove the tire and check the rim for foreign matter in the bead channel. A dent or nick in the rim can also cause slow air loss. Aside from rebuilding with a new rim, there is no way to repair this. If the rim is still able to hold a tire, you can use a standard tire and tube on a tubeless rim.
PROBLEM: You finish repairing a tubular tire and find that you’ve created an S shape in the tread.
SOLUTION: You stitched the tire up using the wrong holes. Cut your stitches and try again. Next time, mark the casing so you’ll know which holes to use when restitching.
PROBLEM: You keep breaking spokes.
SOLUTION: Usually this is because the wheel was built with poor-quality spokes. Replace them with better-quality spokes, such as DT Swiss or Wheelsmith stainless steel models.
PROBLEM: It’s always a struggle to install the wheel after removal. The wheel doesn’t seem to want to fit into the frame.
SOLUTION: Remember to place the chain on the same cog it was on when you took the wheel off (usually the smallest cog). If you’re doing that and it’s still difficult, the frame dropouts may be bent, which can make wheel installation a pain. Have a shop check and align them with special tools.
PROBLEM: The wheels won’t stay true.
SOLUTION: True them and make sure that the spoke tension is sufficient and uniform. If the spokes continually loosen, add a round of tension to the spokes, which should stabilize the wheel.
PROBLEM: There’s a creaking sound from the wheels.
SOLUTION: The spokes may have loosened. Tighten them slightly. If they’re tight, the spokes may be moving slightly at the cross, causing the sound. Lubricate each cross of the spokes with light oil, and wipe off the excess.
PROBLEM: The spokes on your radial-spoked wheel (on which the spokes travel directly from the hub to the rim without crossing other spokes) continually loosen.
SOLUTION: Try adding tension to the spokes. If the spokes loosen again, it’s probably because of the spoke pattern. Radial spokes take shocks more directly than spokes that cross others, so they’re more apt to loosen. To keep them tight, loosen all the nipples, apply a light thread adhesive to the nipples, and retension the wheel. Your loosening troubles should cease.

