Controlling Access through Firewall and SELinux
This chapter describes the following major topics:
RHCSA Objectives:
48. Configure firewall settings using firewall-config, firewall-cmd, or iptables
50. Set enforcing and permissive modes for SELinux
51. List and identify SELinux file and process context
52. Restore default file contexts
53. Use boolean settings to modify system SELinux settings
54. Diagnose and address routine SELinux policy violations
Running a system in a networked or an Internet-facing environment requires that some measures be taken to tighten access to the system by identifying the type and level of security needed, and implementing it. Security features such as file and directory permissions, user and group-level permissions, shadow password and password aging mechanisms, and ACLs have been discussed in the previous chapters. This chapter covers firewall and SELinux in fair detail. In the RHCE section of this book, we will be using the knowledge gained in this chapter at an advanced level to modify firewall rules and SELinux settings to allow network services to work with these security services without issues.
Understanding and Managing Firewall
A firewall is a protective layer that is configured between a private and a public network to segregate traffic. There are several types of firewalls, one of which performs data packet filtering. A data packet is formed as a result of a process called encapsulation whereby the header information is attached to a message during the formation of the packet. The header includes information such as source and destination IP addresses, port, and type of data. Based on pre-defined rules, a firewall intercepts each inbound and outbound data packet, inspects its header, and decides whether to allow the packet to pass through. A port is defined in the /etc/services file for each network service available on the system, and is typically standardized across all network operating systems, including RHEL. Some common services and the ports they listen on are: ftp on port 21, ssh on 22, telnet on 23, postfix on 25, http on 80, and ntp on port 123.
RHEL comes standard with a host-based packet-filtering firewall software called iptables that communicates with the netfilter module in the kernel for policing the flow of data packets. Other major usages of iptables are to provide support for Network Address Translation (NAT) and port forwarding, which are explained in detail in Chapter 17 “Working with Firewalld and Kerberos”.
iptables with and without firewalld
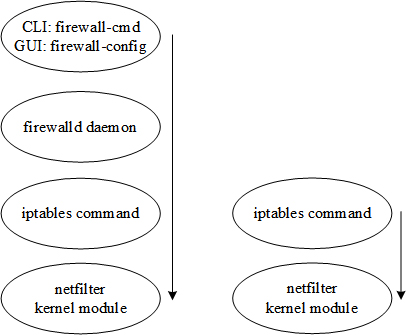
Beginning with RHEL7, the iptables service and firewall rulesets may be configured and managed through a new dynamic firewall service daemon called firewalld. The major advantage is the daemon’s ability to immediately apply the updates without causing a disruption to current network connections, and this can be done anytime. It has eliminated the need to save or apply the changes, reload the rules, restart the service, or reboot the system. These benefits provide us with the flexibility to add and modify firewall rules and activate them on operational systems as and when desired. This service daemon lets us perform management operations at the command line using the firewall-cmd command, graphically using the firewall-config tool, or manually by editing necessary files. See Figure 11-1 for a comparison between how the netfilter module is accessed with and without firewalld.
Knowing that firewalld is a better way of managing iptables on RHEL7, if we still do not want to use it for one or the other reason, we can simply disable it and continue to use the iptables command to manage iptables rules the way we did on previous RHEL versions.
Figure 11-1 iptables with and without firewalld
While iptables without firewalld stores all rules in the /etc/sysconfig/iptables file, iptables with firewalld saves firewall policy rules in the /etc/firewalld/ directory and provides several templates for various services in the /usr/lib/firewalld/ directory. These templates may be copied and modified for new services. In addition, firewalld presents the concept of zones that allow us to define policies based on the trust level for network connections, interfaces, and source IP addresses that are bound to the zone. A zone may include configuration items comprising services, ports, protocols, masquerading, port forwarding, ICMP filters, and rich language rules. The firewalld software package provides several pre-defined zone files in the XML format in the /usr/lib/firewalld/zones/ directory. These zone files include templates for traffic that must be blocked or dropped, and for traffic that is intended for public-facing, internal, external, home, public, trusted, and work-related network traffic. Of these, the public zone is the default and it is activated by default when the firewalld service is started. We may create custom zones to meet our specific requirements.
In the presence of both iptables and firewalld software, only one of the two can be used at a time; they cannot be used simultaneously.
To check whether iptables and firewalld packages are installed on the system, issue the yum command as follows:
# yum list installed | egrep ‘iptables|firewalld’
| iptables.x86_64 | 1.4.21-13.el7 | @anaconda/7.0 |
| iptables-services.x86_64 | 1.4.21-13.el7 | @anaconda/7.0 |
| firewall-config.noarch | 0.3.9-7.el7 | @anaconda/7.0 |
| firewalld.noarch | 0.3.9-7.el7 | @anaconda/7.0 |
The above output indicates the presence of required support on the system for both iptables and firewalld. In case of a missing package for the service that we intend to employ on our system, we need to use the yum command to install it along with any dependent packages that are required for a successful installation and subsequent service operation.
In this chapter, our focus will be on learning the basics of both services, and on familiarizing ourselves with respective administration tools. We will see how these tools are used to add, modify, and delete rules. In the RHCE section of this book, we will discuss firewalld in more detail.
Understanding the iptables Configuration File
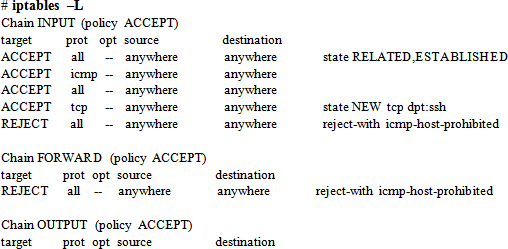
The configuration file for iptables is called iptables and it is located in the /etc/sysconfig directory. This file stores all necessary rulesets that are needed to control the inbound and outbound traffic on the system. The default contents of the file are shown below:
# cat /etc/sysconfig/iptables
*filter
:INPUT ACCEPT [0:0]
:FORWARD ACCEPT [0:0]
:OUTPUT ACCEPT [9:1624]
-A INPUT -m state --state RELATED,ESTABLISHED -j ACCEPT
-A INPUT -p icmp -j ACCEPT
-A INPUT -i lo -j ACCEPT
-A INPUT -p tcp -m state --state NEW -m tcp --dport 22 -j ACCEPT
-A INPUT -j REJECT --reject-with icmp-host-prohibited
-A FORWARD -j REJECT --reject-with icmp-host-prohibited
COMMIT
iptables allows us to define tables containing groups of rules called chains, with each table related to a different type of packet processing. In the output above, one default table called filter is defined (marked with *), which includes three pre-defined chains (INPUT, FORWARD, and OUTPUT), with the INPUT chain containing several rules. Each inbound and outbound packet goes through at least one of these configured chains. Packets destined for the local system use the INPUT chain, packets originating from the local system use the OUTPUT chain, and packets that need to be routed to a different network use the FORWARD chain. Each chain has a policy called target, which can have a value such as ACCEPT, REJECT, DROP, or LOG. The ACCEPT policy allows a packet to pass through, the REJECT policy throws a packet away and sends a notification back, the DROP policy throws a packet away without returning a notification, and the LOG policy sends packet information to the rsyslogd daemon for logging.
We also notice a connection “state” in the file contents above. It determines the state of the incoming connection that is inspected and based on which the firewall restricts the access. Some of the common connection states are NEW, ESTABLISHED, RELATED, and INVALID. The NEW state identifies a packet that is not part of an existing communication, the ESTABLISHED state indicates that the packet is part of an existing communication, the RELATED state signifies a packet that is generated in relation with some other existing communication, and the INVALID state identifies a packet that does not match other states.
The first rule in the configuration file above will continue to accept all inbound connection requests, the second rule will accept incoming ICMP requests, the third rule will accept all inbound connection requests on the loopback interface, the fourth rule will accept all new TCP requests received on port 22, and the last two entries will reject any network packets originating from any source with the icmp-host-prohibited rejection reason sent back to the source system.
It is imperative that we modify the default iptables rules to match our requirements for packet filtering associated with application accessibility.
This file may be customized using a text editor, the iptables command, or the lokkit command (part of the system-config-firewall-base package). The use of the iptables command for rule additions and modifications is more common. RHEL7 does not include the system-config-firewall graphical tool anymore.
Controlling iptables and firewalld Services
The iptables and firewalld services can be started, restarted, and stopped manually. They can also be configured to remain disabled or start automatically at system boot. As noted earlier, either of them can be used at a time. Let’s use the systemctl command to control their actions on server1.
To mark the firewalld service for autostart:
# systemctl enable firewalld
ln -s '/usr/lib/systemd/system/firewalld.service' '/etc/systemd/system/dbus-org.fedoraproject.FirewallD1.service'
ln -s '/usr/lib/systemd/system/firewalld.service' ‘/etc/systemd/system/basic.target.wants/firewalld.service'
To start the firewalld service:
# systemctl start firewalld
To check the status of this service:
# systemctl status firewalld –l
firewalld.service - firewalld - dynamic firewall daemon
Loaded: loaded (/usr/lib/systemd/system/firewalld.service; enabled)
Active: active (running) since Sat 2014-11-08 08:10:31 EST; 1min 27s ago
Main PID: 18228 (firewalld)
CGroup: /system.slice/firewalld.service
└─18228 /usr/bin/python -Es /usr/sbin/firewalld --nofork --nopid
Nov 08 08:10:30 server1.example.com systemd[1]: Starting firewalld - dynamic firewall daemon…
Nov 08 08:10:31 server1.example.com systemd[1]: Started firewalld - dynamic firewall daemon.
To stop this service:
# systemctl stop firewalld
To deactivate this service:
# systemctl disable firewalld
rm '/etc/systemd/system/basic.target.wants/firewalld.service'
rm '/etc/systemd/system/dbus-org.fedoraproject.FirewallD1.service'
To mark the iptables service for autostart:
# systemctl enable iptables
ln -s '/usr/lib/systemd/system/iptables.service' '/etc/systemd/system/basic.target.wants/iptables.service'
To start the iptables service:
# systemctl start iptables
To check the status of this service:
# systemctl status firewalld –l
iptables.service - IPv4 firewall with iptables
Loaded: loaded (/usr/lib/systemd/system/iptables.service; enabled)
Active: active (exited) since Sat 2014-11-08 08:16:59 EST; 23s ago
Process: 18784 ExecStart=/usr/libexec/iptables/iptables.init start (code=exited, status=0/SUCCESS)
Main PID: 18784 (code=exited, status=0/SUCCESS)
Nov 08 08:16:59 server1.example.com iptables.init[18784]: iptables: Applying firewall rules: [ OK ]
Nov 08 08:16:59 server1.example.com systemd[1]: Started IPv4 firewall with iptables.
Now that you have iptables active and firewalld disabled, you will learn and use the iptables service in the next few sub-sections. Following that, you will disable iptables and restart firewalld to work with it.
The iptables command is used to modify the firewall rules on the system in the absence of the firewalld service. This command supports several options, some of which are listed and described in Table 11-1.
| Option | Description |
| –A (--append) | Appends one or more rules to a chain. |
| –D (--delete) | Deletes one or more rules from a chain. |
| –F (--flush) | Flushes a chain or a table. |
| –I (--insert) | Inserts one or more rules in a chain. |
| –L (--list) | Displays currently loaded rules. |
| –N (--new-chain) | Adds a new chain. |
| –R (--replace) | Replaces a rule in a chain. |
| –X (--delete-chain) | Deletes a chain. |
| –d (--destination) | Specifies a destination address. |
| --dport | Specifies the destination port number. |
| –i (--in-interface) | Specifies a network interface to be used for inbound packets. |
| –j (--jump) | Specifies where a packet will jump if it matches a rule. |
| –m (--match) | Specifies a matching name. |
| –o (--out-interface) | Specifies a network interface to be used for outbound packets. |
| –p (--protocol) | Defines a protocol as listed in the /etc/protocols file. |
| –s (--source) | Specifies the source address. |
| –t (--table) | Specifies the type of table. Default is the filter table. |
| –v (--verbose) | Prints verbose output. |
Table 11-1 iptables Command Options
We run the iptables command with the –L flag to list the rules currently in place on the system:
The above output indicates that the INPUT, FORWARD, and OUTPUT chains are currently set to ACCEPT all traffic.
Exercise 11-1: Add and Activate iptables Rules
This exercise should be done on server1.
In this exercise, you will first delete all existing rules and then append rules to the filter table to allow inbound HTTP traffic on port 80, reject outbound ICMP traffic with no return notification, and forward all inbound traffic to the 192.168.0.0/24 network. You will insert a rule to allow the first and subsequent incoming FTP connection requests on port 21 and append a rule to disallow all outgoing connection requests on port 25. You will save these rules in the iptables file and make necessary settings so that these rules are loaded each time we reboot the system. You will restart the iptables service and run the appropriate command to ensure the new rules have taken place.
# iptables –F
# iptables –t filter –A INPUT –p tcp --dport 80 –j ACCEPT
# iptables –A OUTPUT –p icmp –j DROP
# iptables –A FORWARD –d 192.168.0.0/24 –j ACCEPT
# iptables –I INPUT –m state --state NEW –p tcp --dport 21 –j ACCEPT
# iptables –A OUTPUT –m state --state NEW,ESTABLISHED –p tcp --dport 25 \ –j DROP
# service iptables save
iptables: Saving firewall rules to /etc/sysconfig/iptables: [ OK ]
# systemctl enable iptables

The output highlights in bold the presence of the five new rules you have applied in this exercise. You can also view the contents of the iptables file to check the rules.
Exercise 11-2: Add and Remove iptables Rules
This exercise should be done on server1.
In this exercise, you will insert/append rules to the default table to allow inbound traffic on port 90 from 192.168.1.0/24, reject all inbound traffic from 192.168.3.0/24 on eth1 interface, reject outbound ICMP traffic to all systems on 192.168.3.0/24 except for the system with IP 192.168.3.3, forward all inbound traffic from 192.168.1.0/24 to 192.168.2.0/24, and delete the last rule added. You will save these rules in the iptables file and make necessary adjustments to have these rules loaded each time you reboot the system. You will reload the rules and ensure their presence.
# iptables –I INPUT –s 192.168.1.0/24 –p tcp --dport 90 –j ACCEPT
# iptables –A INPUT –s 192.168.3.0/24 –i eth1 –j DROP
# iptables –I INPUT ! –d 192.168.3.3/24 –p icmp –j DROP
# iptables –A FORWARD –s 192.168.1.0/24 –d 192.168.2.0/24 –j ACCEPT
# iptables –D FORWARD –s 192.168.1.0/24 –d 192.168.2.0/24 –j ACCEPT
# service iptables save
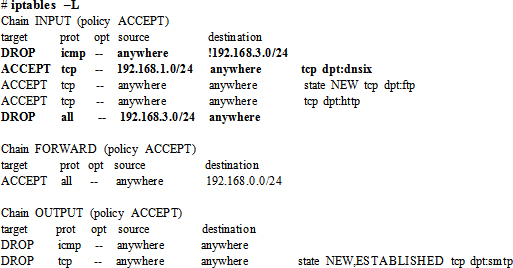
The output highlights in bold the presence of the three new rules you have applied in this exercise. You can also view the contents of the iptables file to check the rules.
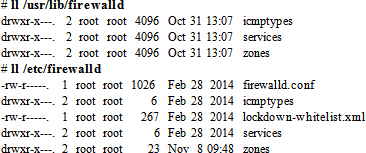
Understanding firewalld Configuration Files
The firewalld service stores firewall rules in XML file format at two different locations: the system-defined rules in the /usr/lib/firewalld directory and the user-defined in /etc/firewalld. The files at the former location can be used as templates for adding or modifying new rules. We simply need to copy the required file to the /etc/firewalld/services directory and make necessary updates. The firewalld service reads the files located in /etc/firewalld and applies the rules defined in them. A listing of both directories is shown below:
A sample rule template for the ssh service is displayed below:
# cat /usr/lib/systemd/services/ssh.xml
<?xml version="1.0" encoding="utf-8"?>
<service>
<short>SSH</short>
<description>Secure Shell (SSH) is a protocol for logging into and executing commands on remote machines. It provides secure encrypted communications. If you plan on accessing your machine remotely via SSH over a firewalled interface, enable this option. You need the openssh-server package installed for this option to be useful.</description>
<port protocol="tcp" port="22"/>
</service>
As we can see, the file has a short and long description for the service, and it also tells us the protocol and port number that it uses.
The firewall-cmd command is a powerful command line tool that is used to create, modify, manage, and remove rules for the firewalld service. This tool can be used to make runtime and permanent changes. It supports several options, some of which are described in Table 11-2.
Table 11-2 firewall-cmd Command Options
With all the --add and --remove options mentioned in Table 11-2, the --permanent switch may be specified to ensure the rule is stored permanently in the /etc/firewalld directory. There are many other options available with firewall-cmd. Some of these options are used in examples in the following sub-sections and more will be introduced in Chapter 17 “Working with Firewalld and Kerberos” in the RHCE section of this book.
In order to practice firewalld operations, you need to stop and deactivate the iptables service on server1 by issuing the following pair of commands:
# systemctl stop iptables
# systemctl disable iptables
rm '/etc/systemd/system/basic.target.wants/iptables.service'
Now activate (enable) and start the firewalld service:
# systemctl enable firewalld
ln -s '/usr/lib/systemd/system/firewalld.service' '/etc/systemd/system/dbus-org.fedoraproject.FirewallD1.service'
ln -s '/usr/lib/systemd/system/firewalld.service' '/etc/systemd/system/basic.target.wants/firewalld.service'
# systemctl start firewalld
Check the running status using either the systemctl or the firewall-cmd command:
# systemctl status firewalld
firewalld.service - firewalld - dynamic firewall daemon
Loaded: loaded (/usr/lib/systemd/system/firewalld.service; enabled)
Active: active (running) since Sat 2014-11-08 21:11:47 EST; 29s ago
Main PID: 8689 (firewalld)
CGroup: /system.slice/firewalld.service
└─8689 /usr/bin/python -Es /usr/sbin/firewalld --nofork…
Nov 08 21:11:47 server1.example.com systemd[1]: Started firewalld …
Hint: Some lines were ellipsized, use -l to show in full.
running
Now we are ready to perform the exercises presented below.
Exercise 11-3: Add and Manage Firewall Rules
This exercise should be done on server1.
In this exercise, you will display the name of the default zone and then add three rules to it. You will first add and activate a permanent rule to allow HTTP traffic on port 80, and then add a runtime rule for traffic intended for TCP port 443 (the HTTPS service). You will add another permanent rule to allow VNC traffic on any TCP port between 5901 and 5910. You will run appropriate commands to confirm your changes, and also display the contents of the default zone file to see the addition of the permanent rule.
1. Determine the name of the current default zone:
# firewall-cmd --get-default-zone
public
2. Add a permanent rule to allow HTTP traffic on its default port:
# firewall-cmd --permanent --add-service=http
success
This command has added the http service name to the default zone file public.xml located in the /etc/firewalld/zones/ directory. When this new rule is activated, it will use the port and protocol defined in the template file /usr/lib/firewalld/services/http.xml.
3. Activate the new rule:
# firewall-cmd --reload
success
4. Add a runtime rule to allow traffic on TCP port 443:
# firewall-cmd --add-port=443/tcp
5. Add a permanent rule for VNC traffic on TCP port range 5901 to 5910, and activate it immediately:
# firewall-cmd --permanent --add-port=5901-5910/tcp ; firewall-cmd --reload
6. List the services and ports to confirm the success of all three changes:
# firewall-cmd --list-services
dhcpv6-client http ssh
# firewall-cmd --list-ports
443/tcp 5901-5910/tcp
7. Issue the iptables command for an additional validation by listing (–L) the current rules in place for the public zone in numeric format (–n):

The above output shows all three allow rules that you have just added. They are all listed under the INPUT chain of the public zone.
8. Display the contents of the default zone file to confirm the addition of both permanent rules:
# cat /etc/firewalld/zones/public.xml
…… . .
<service name="dhcpv6-client"/>
<service name="http"/>
<service name="ssh"/>
<port protocol="tcp" port="5901-5910"/>
</zone>
The firewall-cmd command makes a copy of the affected zone file with .old extension whenever an update is made to the zone.
Exercise 11-4: Modify and Remove Firewall Rules
This exercise should be done on server1.
In this exercise, you will modify the three rules that you added in the previous exercise and then delete two of them. You will remove the permanent rules for both HTTP (port 80) and HTTPS (port 443), and restrict the port range for VNC service to 5901 and 5902. You will run appropriate commands to confirm the changes, and also display the contents of the default zone file to validate the modifications.
1. Remove the permanent rule for HTTP:
# firewall-cmd --permanent --remove-service=http
2. Remove the runtime rule for port 443, and confirm the immediate deletion:
# firewall-cmd --remove-port=443/tcp
# firewall-cmd –list-ports
5901-5910/tcp
Since it was a runtime rule, running the first command above deleted it right away.
3. Remove the permanent rule for ports 5901 to 5910, and add a new permanent rule to restrict VNC to listen only on 5901 and 5902 ports:
# firewall-cmd --permanent --remove-port=5901-5910/tcp
# firewall-cmd --permanent --add-port=5901-5902/tcp
4. Activate the new permanent changes:
# firewall-cmd --reload
5. List the services and ports to confirm the success of all three changes:
# firewall-cmd --list-services
dhcpv6-client ssh
# firewall-cmd --list-ports
5901-5902/tcp
Both outputs reflect the updates.
6. Issue the iptables command for an additional verification:

The above output reflects the updates under the INPUT chain of the public zone.
7. Display the contents of the public zone file to validate the removal, and update to both permanent rules:
# cat /etc/firewalld/zones/public.xml
…… . .
<service name="dhcpv6-client"/>
<service name="ssh"/>
<port protocol="tcp" port="5901-5902"/>
</zone>
Overview of the Firewall Configuration Tool
The Firewall Configuration tool allows us to manage the iptables firewall in a graphical setting. This tool interacts with the firewalld daemon to make changes and updates. The main interface is opened when we execute the firewall-config command in an X terminal window or we select Applications | Sundry | Firewall in the GNOME desktop. See Figure 11-2 for the main screen.
Figure 11-2 Firewall Configuration Tool – Zones Tab
There are two main tabs across the top labeled Zones and Services that allow us to view and manage configuration for zones and services. Both list available zones and services on the left hand side. We can highlight a zone or service to bring up associated details on the right side for viewing or modification.
By default, this tool starts with the runtime mode pre-selected. We can switch the mode to permanent by clicking the drop-down menu and selecting it. A group of icons will appear in the bottom left for us to be able to add a new zone or service, and modify or delete a highlighted zone or service. Note that these functions are only available in the permanent mode. See Figure 11-3 for the icons.
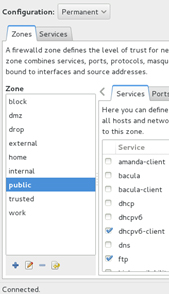
Figure 11-3 Firewall Configuration Tool – Permanent Mode Icons
Under the Zones tab, Figure 11-3, eight categories are available for each zone listed in the left pane. These categories are Services, Ports, Masquerading, Port Forwarding, ICMP Filter, Rich Rules, Interfaces, and Sources. For each selected zone, we can adjust corresponding attributes as desired. The Services category permits or blocks traffic for a service; the Ports category allows us to open a port or a range of ports; Masquerading provides us with the ability to conceal internal IP addresses from the Internet; Port Forwarding enables us to forward traffic destined for one port to another port on the same or remote system; ICMP Filter disallows certain ICMP types from passing through the firewall; Rich Rules enables us to set rich language rules; Interfaces lets us bind interfaces; and the Sources category allows us to bind source addresses.
Under the Services tab, Figure 11-4, three categories are available for each service listed in the left pane; however, we can only modify them if the permanent configuration mode is in effect. These categories are Ports and Protocols, Modules, and Destination. For each selected service, we can adjust corresponding attributes as desired. The Ports and Protocols categories allow us to add a port or a range of ports for TCP, UDP, or some other protocol; Modules lets us add or modify a netfilter helper module; and Destination enables us to place a limit on the service to the specified destination address and type.
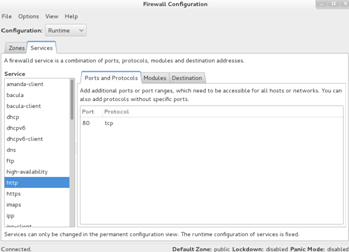
Figure 11-4 Firewall Configuration Tool – Services Tab
The Options menu item at the top of the Firewall Configuration window gives us access to additional functions. It allows us to reload any permanent changes made to the firewall rules, choose a different connection zone, change the default zone, begin dropping every inbound and outbound packet, and disallow unwanted configuration changes by applications and services.
Overview of Security Enhanced Linux
Security Enhanced Linux (SELinux) is an implementation of the Mandatory Access Control (MAC) architecture developed by the U.S. National Security Agency (NSA) in collaboration with other organizations and the Linux community for flexible, enriched, and granular security controls in Linux. MAC is integrated into the Linux kernel as a set of patches using the Linux Security Modules (LSM) framework that allows the kernel to support various security implementations, including SELinux. MAC provides an added layer of protection above and beyond the standard Linux Discretionary Access Control (DAC) security architecture, which includes the traditional file and directory permissions, ACL settings, setuid/setgid bit settings, su/sudo privileges, and so on. MAC limits the ability of a subject (user or process) to access an object (file, directory, file system, device, network interface, port, pipe, socket, etc.) in order to reduce or eliminate the potential damage the subject may be able to cause to the system if compromised due to the exploitation of vulnerabilities in service processes, programs, or applications. MAC controls are fine-grained; they protect other services in the event one of the services is negotiated. For instance, if the FTP server process is compromised, the attacker can only damage the files the hacked process has access to, and not the other processes running on the system or the objects the other processes have access to. To ensure this coarse-grained control, MAC uses a set of defined authorization rules called policy to examine security attributes associated with subjects and objects when a subject tries to access an object, and decides whether or not to permit this access attempt. These attributes are stored in contexts (a.k.a. labels) and are applicable to both subjects and objects.
SELinux decisions are stored in a special cache area referred to as Access Vector Cache (AVC). This cache area is checked each time a process attempts an access to determine whether this access attempt was previously allowed. With this mechanism in place, SELinux does not have to check the policy ruleset repeatedly, thus improving performance.
By default, SELinux controls are enabled at the time of RHEL installation, with the default configuration confining the processes to the minimum privileges that they need to function.
In order to comprehend SELinux, an understanding of some key terms is essential. These terms are used to explain the concepts and SELinux functionality in the remainder of this chapter.
Subject: A subject is any user or process that accesses an object. Some examples include system_u for the SELinux system user and unconfined_u for subjects that are not bound by the SELinux policy. The subject is stored in the first field of the context.
Object: An object is a resource such as a file, directory, hardware device, network interface, port, pipe, or socket that a subject accesses. Some examples include object_r for general objects, system_r for system-owned objects, and unconfined_r for objects that are not bound by the SELinux policy.
Access: An access is an action performed by the subject on an object. Some examples include creating, reading, or updating a file, creating or navigating a directory, and accessing a network port or socket.
Policy: A policy is a defined ruleset that is enforced system-wide and is used to analyze security attributes assigned to subjects and objects. This ruleset is referenced to decide whether to permit a subject’s access attempt for an object or a subject’s attempt to interact with another subject. The default behavior of SELinux in the absence of a rule is to deny the access. Two standard pre-configured policies are available in RHEL and they are referred to as targeted and strict, with targeted being the default policy. This policy dictates that any processes that are targeted run in confined domains and any processes that are not targeted run in unconfined domains. For instance, SELinux runs logged-in users in the unconfined domain and the httpd process in a confined domain by default. Any subject running unconfined is more vulnerable than the one running confined.
Context: A context is a tag that SELinux uses to store security attributes for subjects and objects. The term context may be used interchangeably with the term label. In SELinux, every subject and object has a context assigned to it, which consists of a SELinux user, role, type (or domain), and optional sensitivity level. SELinux uses this information to make access control decisions.
Labeling: Labeling is the mapping between files in a file system with their file contexts.
SELinux User: There are several pre-defined SELinux user identities that exist in the SELinux policy. These user identities are authorized for a particular set of roles. SELinux maps Linux users to SELinux user identities in the policy to allow the Linux users to inherit the restrictions placed on SELinux users. These SELinux users are used in the SELinux context for processes in that session to define what roles and levels they can enter. A Linux user, for instance, will not be able to run the su and sudo commands or the programs located in their home directories if they are mapped to the SELinux user user_u.
Role: A role is an attribute of the Role-Based Access Control (RBAC) security model that is part of SELinux. It defines which subject is allowed to access which domains or types. SELinux users are authorized for roles, and roles are authorized for domains and types. Each subject has an associated role to ensure that the system and user processes are separated. A subject can transition into a new role in order to gain access to other domains and types. Some role examples include user_r for ordinary system users, sysadm_r for system administrators, and system_r for processes that initiate under the system_r role. The role is stored in the second field of the context.
Type and Domain: A type is an attribute of Type Enforcement (TE). It is a group of objects based on uniformity in their security requirements. Objects such as files and directories with common security requirements are grouped within a specific type. Similarly, processes with common security requirements have their own unique types, which are referred to as domains. In other words, a type defines a type for files and a domain for processes. SELinux policy rules outline how types can access each other (whether it be a domain accessing a type, or a domain accessing another domain). Some examples of available SELinux types include user_home_dir_t for objects located in user home directories and usr_t for most objects stored in the /usr directory. The type is stored in the third field of the context.
A domain determines the type of access that a process has. Each process runs confined within a domain. Some examples of the SELinux domain include init_t for the systemd process, firewalld_t for the firewalld process, and unconfined_t for all processes that are not bound by the SELinux policy. The domain type is also stored in the third field of the context.
Type Enforcement: Type enforcement identifies and limits a subject’s ability to access domains for processes and types for files. It references the contexts of the subjects and objects for this enforcement.
Level: A level is an attribute of Multi-Level Security (MLS) and Multi-Category Security (MCS). It is a pair of sensitivity:category values that defines the level of security in the context. A category may be defined as a single value or a range of values such as c0.c4 to represent c0 through c4. In RHEL7, the targeted policy is used as the default, which enforces MCS (MCS only supports s0 sensitivity level; however, it supports a range of 0 to 1023 different categories).
SELinux contexts define security attributes placed on individual subjects and objects. Each context contains a type (or domain) and a security level along with subject and object information. For user accounts, we use the id command with the –Z option to view the context set on our Linux users. The following example shows the command executed for the root account:
# id –Z
unconfined_u:unconfined_r:unconfined_t:s0-s0:c0.c1023
The output indicates that there are no restrictions placed on this user from a SELinux perspective. We get the exact same output if we run this command for user accounts other than root. This entails that all Linux users, including root, run unconfined by default, which gives the users full access to the system with no restrictions placed on them by SELinux. The above output also tells us that root is mapped to the SELinux unconfined_u user and is running as unconfined_r role in the unconfined_t domain with security level 0 in all 1024 categories.
In addition to the unconfined user with unlimited privileges, SELinux includes seven confined user accounts with restricted access to objects. These accounts are mapped to Linux users via SELinux policy to provide them with controlled access by inheriting the restrictions placed on the SELinux users that they are mapped to. This regulated access helps safeguard the system from potential damage that Linux users might inflict on the system.
We can use the seinfo query command to list the available SELinux users; however, we must install the setools-console software package before doing so.
# seinfo –u
Users: 8
sysadm_u
system_u
xguest_u
root
guest_u
staff_u
user_u
unconfined_u
The output shows the eight pre-defined SELinux users. We can now use the semanage command to view the mapping currently in place:

The above output displays Linux users in the first column and the SELinux users they are mapped to in the second column. The next two columns show the associated security level and the SELinux context for the Linux user (the * represents any service). By default, all non-root Linux users are represented as __default__, which is mapped to the unconfined_u user in the policy.
SELinux Contexts for Processes
Similarly, we can also determine the context on processes. We use the ps command for this purpose and we supply the –Z option with it. The following example shows the first two lines from the ps command output:

In the above output, the subject (system_u) provides a SELinux username mapped to the Linux user root; the object is system_r; the domain (init_t) indicates the type of protection applied to the process; and the last field determines the level of security. Any process that is unprotected will run in the unconfined_t domain.
In the same manner, we can spot the context information for files and directories. To this end, we use the ll command with the –Z switch. The following shows the four attributes set on the /etc/passwd file:
# ll –Z /etc/passwd
-rw-r--r--. root root system_u:object_r:passwd_file_t:s0 /etc/passwd
The output indicates the subject (system_u), the object (object_r), the type (passwd_file_t), and the security level (s0) for the passwd file. Here the subject is a SELinux user (system_u) mapped to the Linux user root; the object is a SELinux role (object_r); the type is a SELinux type (passwd_file_t); and the security level (s0) is the level of security as defined in the /etc/selinux/targeted/setrans.conf file. Default contexts for many files are stored in the /etc/selinux/targeted/contexts/files/file_contexts file, which also saves the contexts updated via the semanage fcontext command. This command is part of the policycoreutils-python software package, which must be installed on the system to use it. Contexts for newly created files and directories that are not found in file_contexts are placed in another file named file_contexts.local, which is located in the same directory. Notice the dot next to the public execute permission bit in the first column of the above output. This dot indicates the presence of SELinux context. By default, files created in a directory inherit the context placed on the directory. If a file is moved to another directory, it takes its context with it, which may differ from the destination directory’s context.
SELinux contexts also define security attributes for individual network ports. We use the semanage command to view the context information. The following shows only a few example entries from the long output of this command:
# semanage port –l
| SELinux Port Type | Proto | Port Number |
| http_port_t | tcp | 80, 81, 443, 488, 8008, 8009, 8443, 9000 |
| kerberos_admin_port_t | tcp | 749 |
| kerberos_password_port_t | tcp | 464 |
| kerberos_password_port_t | udp | 464 |
| kerberos_port_t | tcp | 88, 750, 4444 |
By default, SELinux allows services to listen on a restricted set of network ports only. This is evident from the above output that shows the ports HTTP and Kerberos services use.
SELinux allows a process running in one domain to enter another domain to execute an application authorized to run in that domain only, provided a proper rule exists in the policy to support such transition. SELinux defines a permission setting called entrypoint in its policy to control applications that can be used to enter a new domain. In order to understand how transitioning into a new domain works, a basic example is provided below that shows how it works when a Linux user attempts to change their password using the /usr/bin/passwd command.
The passwd command is labeled with the passwd_exec_t type, which we can confirm as follows:
# ll –Z /usr/bin/passwd
-rwsr-xr-x. root root system_u:object_r:passwd_exec_t:s0 /usr/bin/passwd
The passwd command requires access to the /etc/shadow file to modify a user password. The shadow file has a different type shadow_t set on it:
# ll –Z /etc/shadow
----------. root root system_u:object_r:shadow_t:s0 /etc/shadow
The SELinux policy has rules that specifically allow processes running in the passwd_t domain to be able to read and modify the files with the shadow_t type and allow them entrypoint permission into the passwd_exec_t domain. This rule enables the user’s shell process executing the passwd command to switch into the passwd_t domain and update the shadow file.
Let’s open two terminal windows and demonstrate this. In one window, issue the passwd command as user1 and wait at the prompt:
$ passwd
Changing password for user user1.
Changing password for user1.
(current) UNIX password:
In the second window, run the ps command as follows:
# ps –eZ | grep passwd
unconfined_u:unconfined_r:passwd_t:s0-s0:c0.c1023 26103 pts/0 00:00:00 passwd
As we can see, the passwd command process has transitioned into the passwd_t domain in order to change the user password successfully.
Copying, Moving, and Archiving Files with SELinux Contexts
We copy, move, and archive files on a regular basis as part of our day-to-day job responsibilities. With SELinux running, we need to keep certain rules in mind to ensure we maintain proper contexts on files and directories during copy, move, and archive operations using the cp, mv, and tar commands. These rules are:
Booleans are on/off switches that are used by SELinux to determine whether to permit an action. Booleans allow us to immediately activate or deactivate a particular rule in the SELinux policy without the need to recompile or reload it. For instance, the ftpd_anon_write boolean can be turned on to allow anonymous users to be able to upload files. This privilege can be revoked by turning this boolean off. Boolean values are stored in corresponding boolean files located in the /sys/fs/selinux/booleans directory. A sample listing for this directory is provided below:
# ll /sys/fs/selinux/booleans
-rw-r--r--. 1 root root 0 Nov 11 19:47 abrt_anon_write
-rw-r--r--. 1 root root 0 Nov 11 19:47 abrt_handle_event
-rw-r--r--. 1 root root 0 Nov 11 19:47 abrt_upload_watch_anon_write
…… . .
Each file here represents a boolean. We can view their values using the getsebool, sestatus, or semanage command. The getsebool command with the –a option lists all booleans along with their current values:
# getsebool –a
abrt_anon_write --> off
abrt_handle_event --> off
abrt_upload_watch_anon_write --> on
To check the setting of a single boolean, we specify the boolean’s name with the command. For instance, the following shows the current state of the abrt_anon_write boolean:
# getsebool abrt_anon_write
abrt_anon_write --> off
Alternatively, the sestatus command can be run with the –b switch:
# sestatus –b
…… . .
Policy booleans:
| abrt_anon_write | off |
| abrt_handle_event | off |
| abrt_upload_watch_anon_write | on |
| …… . . |
And the semanage command may be used to list all the Booleans, along with a short description for each and their current settings:

A boolean value may be flipped either temporarily or permanently using the setsebool command. The following first enables the abrt_anon_write boolean and then turns it off by simply furnishing “on” or “1” to enable it, or “off” or “0” to disable it:
# setsebool abrt_anon_write 1
# setsebool abrt_anon_write off
The above changes take effect right away without the need to reboot the system, and store a 1 or 0 in the corresponding boolean file in the /sys/fs/selinux/boolean directory; however, they are temporary and the new value will not survive the next reboot.
In order to apply the new value immediately as well as ensure that it is available after the subsequent system reboot, we specify the –P option with the setsebool command. We can also use the semanage command (–m to modify and --1 to enable) for this purpose. The following demonstrates how to turn the abrt_anon_write boolean on using both commands:
# setsebool –P abrt_anon_write on
# semanage boolean –m --1 abrt_anon_write
We can now use the getsebool, sestatus, or semanage command for validation:
# getsebool –a | grep abrt_anon_write
abrt_anon_write --> on
# sestatus –b | grep abrt_anon_write
abrt_anon_write on
# semanage boolean –l | grep abrt_anon_write
abrt_anon_write (on , on) Allow ABRT to modify public files used for public file transfer services.
Managing SELinux involves a number of tasks, including controlling the activation mode, checking status, setting security contexts on subjects and objects, and toggling boolean values. Booleans are covered later in this chapter. RHEL provides a set of commands and a graphical tool called SELinux Manager for performing these operations. The command toolset is spread over multiple packages, such as libselinux-utils, which includes the getenforce, setenforce, getsebool, and matchpathcon commands; policycoreutils, which contains the sestatus, setsebool, and restorecon commands; policycoreutils-python, which consists of the semanage command; and setools-console, which offers commands such as seinfo and sesearch. The graphical tool is part of the policycoreutils-gui package. For viewing SELinux alerts and troubleshooting, RHEL7 provides a graphical tool SELinux Alert Browser, which is part of the setroubleshoot-server package. In order to fully manage SELinux on our system, we need to ensure that all these packages are installed on the system along with their dependencies.
Besides the toolset mentioned above, there are additional commands and graphical tools available for performing specific SELinux administration tasks; however, their use is not as frequent.
SELinux brings with it a number of management commands and two graphical administration tools. Table 11-3 lists and explains some common administration commands.
| Command | Description |
| Context Management | |
| chcon | Changes context on files. Changes do not survive file system relabeling. |
| matchpathcon | Compares a file context to that of the defaults, and reports it. |
| restorecon | Restores default contexts on files by referencing the files in the /etc/selinux/targeted/contexts/files directory. |
| semanage | Modifies context on files and manages policies. Changes survive file system relabeling. |
| Mode Management | |
| getenforce | Displays the current mode of operation. |
| sestatus | Shows SELinux status. |
| setenforce | Sets the operating mode to enforcing or permissive. |
| Policy Management | |
| seinfo | Provides information on policy components. |
| sesearch | Searches rules in the policy. |
| Boolean Management | |
| getsebool | Displays booleans and their current settings. |
| setsebool | Modifies boolean values. |
| Troubleshooting | |
| sealert | The graphical troubleshooting tool. |
| Graphical Management | |
| system-config-selinux | The graphical administration tool. |
Table 11-3 SELinux Administration Command
We will use most of these commands in this and subsequent chapters.
One of the key configuration files that controls the SELinux activation mode and sets its default type is called config and it is located in the /etc/selinux directory. The default contents of this file are displayed below, followed by an explanation:
# This file controls the state of SELinux on the system.
# SELINUX= can take one of these three values:
# enforcing - SELinux security policy is enforced.
# permissive - SELinux prints warnings instead of enforcing.
# disabled - No SELinux policy is loaded.
SELINUX=enforcing
# SELINUXTYPE= can take one of these two values:
# targeted - Targeted processes are protected,
# minimum - Modification of targeted policy. Only selected processes are protected.
# mls - Multi Level Security protection.
SELINUXTYPE=targeted
The SELINUX directive in the file sets the activation mode for SELinux. Enforcing activates it and allows or denies actions based on policy rules. Permissive activates SELinux, but permits all actions. It records all security violations; however, it does not hinder actions being taken. This mode is useful for troubleshooting, and in developing or tuning the policy. The third option is to completely disable it. When activated in the enforcing mode, the SELINUXTYPE directive dictates the type of policy to be enforced. SELinux supports three policies: targeted, minimum, and mls (multi-level security). The targeted policy allows us to modify SELinux restrictions placed on subjects and objects, the minimum policy is a light version of the targeted policy, and the mls policy lets us tighten security at more granular levels. The default policy in RHEL7 is targeted.
At the command prompt, we can issue the getenforce command to determine the current operating mode:
# getenforce
Enforcing
We may alter the SELinux operating state immediately from enforcing to permissive using the setenforce command as follows:
# setenforce permissive (or # setenforce 0)
This change, however, will be lost if the system is rebooted.
To make the mode change persistent across reboots, we edit /etc/selinux/config and set the value of SELINUX to permissive. We can then reboot the system to validate the change.
Switching between enforcing and permissive is easy and can be achieved on the fly. However, disabling SELinux completely requires SELINUX to be set to disabled in the config file and the system must be rebooted.
EXAM TIP: You may switch SELinux to permissive for troubleshooting a non-functioning service. Change it back to enforcing when the issue is resolved.
In the future, if we wish to reactivate SELinux in either the enforcing or the permissive mode, we just need to change the SELINUX directive appropriately in the config file and reboot the system. The reboot will take longer than normal as SELinux will go through the process of relabeling the files.
We can query the running state of SELinux using the sestatus command. This command also displays the location of key directories, effective policy, and activation mode in addition to other information.
# sestatus
| SELinux status: | enabled |
| SELinuxfs mount: | /sys/fs/selinux |
| SELinux root directory: | /etc/selinux |
| Loaded policy name: | targeted |
| Current mode: | enforcing |
| Mode from config file: | enforcing |
| Policy MLS status: | enabled |
| Policy deny_unknown status: | allowed |
| Max kernel policy version: | 28 |
The above output indicates that SELinux is running in enforcing mode and the targeted policy is in effect.
We can invoke the sestatus command with the –v switch to report on security contexts set on files and processes that are listed in the /etc/sestatus.conf file. The default contents of this file are shown below:
# cat /etc/sestatus.conf
[files]
/etc/passwd
/etc/shadow
/bin/bash
/bin/login
/bin/sh
/sbin/agetty
/sbin/init
/sbin/mingetty
/usr/sbin/sshd
/lib/libc.so.6
/lib/ld-linux.so.2
/lib/ld.so.1
[process]
/sbin/mingetty
/sbin/agetty
/usr/sbin/sshd
Let’s run the sestatus command with –v:
# sestatus –v
…… . .
Process contexts:
Exercise 11-5: Modify SELinux Contexts for Users
This exercise should be done on server1.
In this exercise, you will create a Linux user account called user5 with all default settings and ensure that this user is mapped to SELinux user staff_u at the time of its creation. You will verify the mapping for user5. You will map an existing Linux user user4 to SELinux user user_u, and confirm. You will modify the SELinux policy to ensure all future new Linux users automatically receive staff_u mapping at the time of their creation.
# useradd –Z staff_u user5
# echo user123 | passwd --stdin user5
Changing password for user user5.
passwd: all authentication tokens updated successfully.
# semanage login –l | grep user5
user5 staff_u s0-s0:c0.c1023 *
$ id –Z
staff_u:staff_r:staff_t:s0-s0:c0.c1023
# semanage login –a –s user_u user4
# semanage login –l | grep user4
user4 user_u s0 *
# semanage login –m –S targeted –s staff_u –r s0 __default__
# semanage login –l | grep default
__default__ staff_u s0 *
Exercise 11-6: Modify SELinux Contexts for Files
This exercise should be done on server1.
In this exercise, you will change the user and type on the /root/file1 file to user_u and public_content_t, respectively, and verify. You will add this context to the SELinux policy persistently to ensure the file survives file system relabeling in case SELinux support is disabled and then re-enabled. You will modify the user and type for the /root directory to user_u and var_run_t, and then restore the default context back to it.
1. Determine the current context for /root/file1 using the ll command with –Z:
# ll –Z /root/file1
-rw-rw-r--+ root root unconfined_u:object_r:admin_home_t:s0 /root/file1
The output shows the SELinux user (unconfined_u) and type (admin_home_t) for file1.
2. Modify the context on the file to user_u (–u) and public_content_t (–t) using the chcon command in verbose mode:
# chcon –vu user_u –t public_content_t /root/file1
changing security context of `/root/file1'
3. Add the new context to the SELinux policy to ensure that it survives file system relabeling (if SELinux is disabled and then re-enabled). Use the semanage command to add (–a) the file context (fcontext) with the specified user (–s) and type (–t).
# semanage fcontext –a –s user_u –t public_content_t /root/file1
This custom context is stored in the /etc/selinux/targeted/contexts/files/file_contexts.local file.
4. Validate the new context:
# ll –Z /root/file1
-rw-rw-r--+ root root user_u:object_r:public_content_t:s0 /root/file1
5. Modify the user (–u) and type (–t) to staff_u and var_run_t on /root/, and validate:
# chcon –vu staff_u –t var_run_t /root
changing security context of `/root'
# ll –dZ /root
drwxrwx---. root root staff_u:object_r:var_run_t:s0 /root
6. Restore the original context back to the /root directory using the restorecon command, and confirm:
restorecon reset /root context user_u:object_r:var_run_t:s0->system_u:object_r:admin_home_t:s0
# ll –dZ /root
drwxrwx---. root root system_u:object_r:admin_home_t:s0 /root
EXAM TIP: Use the combination of semanage and restorecon commands to add a file context to the SELinux policy and then apply it. This will prevent the context on file to reset to the original value should SELinux relabeling has to occur.
Exercise 11-7: Add a Non-Standard Port to SELinux Policy
In this exercise, you will add a non-standard port to the SELinux policy for the httpd service. For this purpose, you will make appropriate changes in the policy and confirm.
1. List (–l) the ports the httpd service is currently listening on using the semanage command:
# semanage port –l | grep http_port
http_port_t tcp 80, 81, 443, 488, 8008, 8009, 8443, 9000
The output shows that the httpd service is currently listening on eight network ports.
2. Add (–a) port 8010 with type http_port_t (–t) and protocol (–p) tcp to the policy:
# semanage port –a –t http_port_t –p tcp 8010
3. Confirm the addition of the ports:
# semanage port -l | grep http_port
http_port_t tcp 8010, 80, 81, 443, 488, 8008, 8009, 8443, 9000
4. Delete (–d) port 8010 from the policy, and confirm:
# semanage port –d –t http_port_t –p tcp 8010
# semanage port –l | grep http_port
http_port_t tcp 80, 81, 443, 488, 8008, 8009, 8443, 9000
Now, you can configure the Apache web server to use this port for service rather than its default port.
EXAM TIP: Any non-standard port you want to use for any service, make certain to add it to the SELinux policy with a correct type.
Exercise 11-8: Copy Files with and without SELinux Context
In this exercise, you will check the SELinux context on /root/file1. You will copy this file to the /etc directory and observe the change in the context. You will remove file1 from /etc and re-copy it, ensuring that the destination file takes the source file’s context with it.
1. Check the context on /root/file1:
# ll –Z /root/file1
-rw-rw-r--+ root root user_u:object_r:public_content_t:s0 /root/file1
2. Copy file1 to the /etc directory and check the context:
# cp /root/file1 /etc
# ll –Z /etc/file1
-rw-r--r--. root root unconfined_u:object_r:etc_t:s0 /etc/file1
As we can see, the context has changed to the default context of the destination directory.
3. Remove /etc/file1 and copy /root/file1 again to /etc with the --preserve=context option:
# rm –f /etc/file1
# cp --preserve=context /root/file1 /etc
# ll –Z /etc/file1
-rw-r--r--. root root user_u:object_r:public_content_t:s0 /etc/file1
The original context is preserved on the new file after the copy operation has finished.
Overview of the SELinux Administration Tool
The SELinux Administration tool is a graphical tool that enables us to perform a number of configuration and management operations, including setting the default activation mode and disabling it. The main window, as shown in Figure 11-5, appears when we start this tool by running the system-config-selinux command in an X terminal window or we select Applications | Other | SELinux Management in the GNOME desktop.

Figure 11-5 SELinux Administration Tool – Main Window
The SELinux GUI separates the information in eight distinct categories for ease of administration. These categories are listed on the left hand side and they are Status, Boolean, File Labeling, User Mapping, SELinux User, Network Port, Policy Module, and Process Domain. We can click a category to view or modify the specifics. The Status category shows the default and current enforcing modes, and allows us to modify them. It also displays the default policy type. The option “Relabel on next reboot” can be ticked to relabel the files at the following reboot. This is automatically done when SELinux is enabled from the disabled state. The rest of the categories are explained below.
Boolean: Displays whether booleans are active, the modules they are associated with, a short description, and their names. It also allows us to turn a boolean on or off.
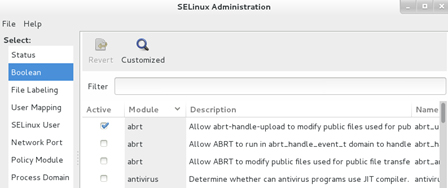
Figure 11-6 SELinux Administration Tool – Boolean
File Labeling: Displays file labels, and allows us to add, modify, and delete them.
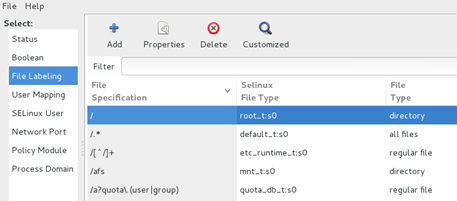
Figure 11-7 SELinux Administration Tool – File Labeling
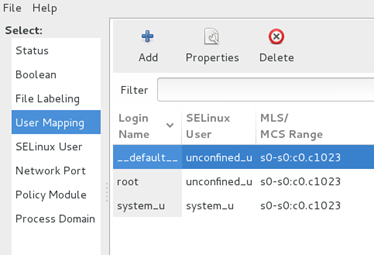
User Mapping: Displays Linux user to SELinux user mappings, and allows us to add, modify, and delete them.
Figure 11-8 SELinux Administration Tool – User Mapping
SELinux User: Displays SELinux users, and allows us to add, modify, and delete them.
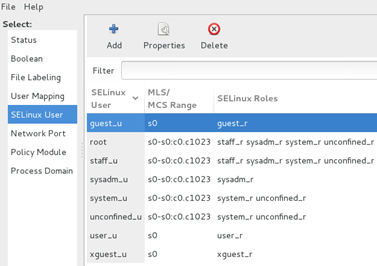
Figure 11-9 SELinux Administration Tool – SELinux User
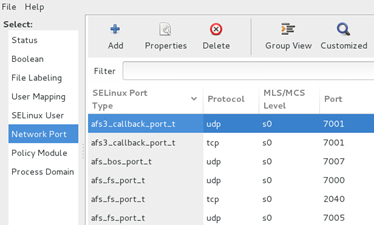
Network Port: Shows SELinux ports and associated protocols, security level, and port numbers, and allows us to add, modify, and delete them.
Figure 11-10 SELinux Administration Tool – Network Port
Policy Module: Displays module names and their versions, and allows us to add or remove modules, and enable module auditing.
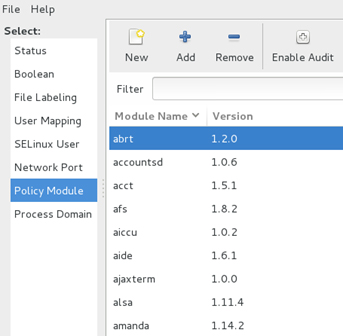
Figure 11-11 SELinux Administration Tool – Policy Module
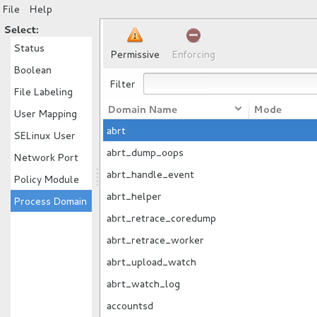
Process Domain: Displays SELinux status, and allows us to switch between permissive and enforcing modes.
Figure 11-12 SELinux Administration Tool – Process Domain
Viewing and Analyzing SELinux Alerts
SELinux generates alerts for system activities when it runs in either enforcing or permissive mode. It writes the alerts to the /var/log/audit/audit.log file if the auditd daemon is running, or to the /var/log/messages file via the rsyslog daemon in the absence of auditd. SELinux also logs the alerts that are generated due to denial of an action and identifies them with a type tag such as AVC (Access Vector Cache) in the audit.log file. It also writes the rejection in the messages file with a message ID and how to view its details.
SELinux denial messages are analyzed and the audit data is examined to identify the potential cause of the rejection. The results of the analysis are recorded, along with recommendations on how to fix it. These results can be reviewed to aid in troubleshooting and recommended actions taken to address the issue. SELinux runs a service daemon called setroubleshootd that performs this analysis and examination in the background. This service also has a client interface called SELinux Troubleshooter (the sealert command) that reads that data and displays it for our assessment. The client tool has both text and graphical interfaces. The server and client components are part of the setroubleshoot-server software package that must be installed on the system prior to using this service.
The following shows a sample allowed record from the /var/log/audit/audit.log file:
type=USER_CHAUTHTOK msg=audit(1415936606.469:2614): pid=22402 uid=0 auid=0 ses=252 subj=unconfined_u:unconfined_r:passwd_t:s0-s0:c0.c1023 msg='op=PAM:chauthtok acct="user3" exe="/usr/bin/passwd" hostname=? addr=? terminal=pts/1 res=success'type=USER_CHAUTHTOK msg=audit(1415936606.469:2615): pid=22402 uid=0 auid=0 ses=252 subj=unconfined_u:unconfined_r:passwd_t:s0-s0:c0.c1023 msg='op=change password id=1010 exe="/usr/bin/passwd" hostname=? addr=? terminal=pts/1 res=success'
And below is a sample denial record from the same file:
type=AVC msg=audit(1415936299.844:2602): avc: denied { create } for pid=22320 comm="passwd" name="nshadow" scontext=unconfined_u:unconfined_r:passwd_t:s0-s0:c0.c1023 tcontext=system_u:object_r:etc_t:s0 tclass=file
A corresponding denial message from the /var/log/messages file:
messages:Nov 13 22:38:21 server1 setroubleshoot: SELinux is preventing /usr/bin/passwd from create access on the file. For complete SELinux messages. run sealert -l 7720f534-79c4-488f-9e8a-56645f070ca1
We get the idea after evaluating the above two messages that the passwd command was prevented from updating the /etc/shadow file in its attempt to change user password. The alert in the messages file also suggests using the sealert command to lookup (–l) the specified ID for details. Let’s run the command as suggested:
# sealert –l 7720f534-79c4-488f-9e8a-56645f070ca1
SELinux is preventing /usr/bin/passwd from create access on the file.
***** Plugin catchall_labels (83.8 confidence) suggests *******************
If you want to allow passwd to have create access on the file, then you need to change the label on $FIX_TARGET_PATH
Do
# semanage fcontext -a -t FILE_TYPE '$FIX_TARGET_PATH'
where FILE_TYPE is one of the following: faillog_t, krb5_host_rcache_t, lastlog_t, passwd_file_t, shadow_t.
Then execute:
restorecon -v '$FIX_TARGET_PATH'
***** Plugin catchall (17.1 confidence) suggests **************************
If you believe that passwd should be allowed create access on the file by default. Then you should report this as a bug. You can generate a local policy module to allow this access. Do allow this access for now by executing:
# grep passwd /var/log/audit/audit.log | audit2allow -M mypol
# semodule -i mypol.pp
Additional Information:
type=AVC msg=audit(1415936299.844:2602): avc: denied { create } for pid=22320 comm="passwd" name="nshadow" scontext=unconfined_u:unconfined_r:passwd_t:s0-s0:c0.c102 tcontext=system_u:object_r:etc_t:s0 tclass=file
type=SYSCALL msg=audit(1415936299.844:2602): arch=x86_64 syscall=open success=no exit=EACCES a0=7fd138db82ea a1=241 a2=1b6 a3=0 items=0 ppid=21897 pid=22320 auid=0 uid=0 gid=0 euid=0 suid=0 fsuid=0 egid=0 sgid=0 fsgid=0 tty=pts1 ses=252 comm=passwd exe=/usr/bin/passwd subj=unconfined_u:unconfined_r:passwd_t:s0-s0:c0.c1023 key=(null)
Hash: passwd,passwd_t,etc_t,file,create
The above SELinux denial was due to the fact that I created that scenario by changing the SELinux type on the shadow file to something random. I then ran the passwd command as root to modify the password for user3. As expected, SELinux denied root write access to the shadow file, and logged the password rejection attempt to both log files. I then restored the type on the shadow file with the restorecon command. I retried changing the password and it worked.
Now, let’s run the client in the GUI mode by either issuing the sealert command with the –b switch in an X window terminal or selecting Applications | Sundry | SELinux Troubleshooter in the GNOME desktop. An interface similar to the one depicted in Figure 11-13 will appear.
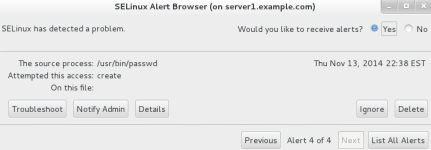
Figure 11-13 SELinux Troubleshooter Client
The figure indicates the presence of four denials and shows the most recent one first. We can list all the alerts by clicking List All Alerts in the bottom right. For each alert, the tool allows us to view troubleshooting suggestions, forward to the administrator, see the complete details, ignore it, or delete it.
In this chapter, we discussed two advanced methods for enhanced system protection: firewall and SELinux. We reviewed the concepts of firewall. We looked at both iptables and firewalld services and understood their configuration files. We studied available commands and options for listing and modifying firewall rules and starting and stopping the firewall. We also learned the graphical tool for firewall management.
We studied the concept and features of SELinux at length. We looked at how security contexts were associated with users, processes, and files, and we viewed and modified the contexts for them. We analyzed the SELinux configuration file that controls its state and defines the policy to be used. We learned several SELinux administrative commands and performed actions such as checking and modifying the activation mode and checking its operating status. We studied SELinux booleans and saw how to modify certain parts of the SELinux policy temporarily and persistently. We looked at the graphical SELinux configuration tool and reviewed each category briefly. Finally, we reviewed the SELinux Troubleshooter program and saw how SELinux related messages were logged.
Answers to Chapter Review Questions
The following labs are useful to strengthen most of the concepts and topics learned in this chapter. It is expected that you perform these labs without any additional help. A step-by-step guide is not provided, as the implementation of these labs requires the knowledge that has been presented in this chapter. Use defaults or your own thinking for missing information.
Insert a rule in the OUTPUT chain to allow UDP traffic to network 192.168.4.0/24 via port 100. Append a rule to the INPUT chain to disallow TCP traffic from network 192.168.3.0/24 via port 101 without sending a notification back to the requester, but allow from 192.168.3.33/24. Insert a rule in the INPUT chain to permit the established ssh communication channels to continue to function and allow for subsequent ssh requests to pass through the firewall as well.
Lab 11-2: Disable and Enable the SELinux Operating Mode
Check and make a note of the current SELinux operating mode. Modify the configuration file and set the mode to disabled. Reboot the system and validate the change. Restore the system to the original SELinux mode and reboot to validate. Measure the time it takes for either reboot.