
Working with Firewalld and Kerberos
This chapter describes the following major topics:
RHCE Objectives:
58. Use firewallD and associated mechanisms such as rich rules, zones and custom rules, to implement packet filtering and configure network address translation (NAT)
60. Configure a system to authenticate using Kerberos
Firewalld is a new way of interacting with iptables rules. It allows the administrator to enter new security rules and activate them during runtime without disconnecting existing connections. It places network interfaces in different zones based on the level of trust for the traffic transmitted through them, thereby providing the administrator the flexibility to activate specific zones only. Network Address Translation is a feature that enables a system on the internal network to access the Internet via an intermediary device. IP masquerading, in contrast, enables more than one system on the internal network to access the Internet via an intermediary device. In either case, the systems’ IP addresses on the internal network are concealed from the outside world, and only one IP address is seen. That one IP address is of the intermediary device.
Kerberos is a client/server authentication protocol that works on the basis of digital tickets to allow systems communicating over non-secure networks to prove their identity to one another before being able to use kerberized network services. Kerberos uses a combination of Kerberos services and encrypted keys for the implementation of secure authentication mechanism on the network.
RHEL7 has introduced an improved mechanism for security rules management called Firewalld (dynamic firewall). One of the primary reasons for adding the support for firewalld in RHEL7 is its ability to activate changes dynamically without disconnecting established connections. Firewalld is managed by a daemon process called firewalld that is responsible for the configuration and monitoring of system firewall rules. The old method of using the iptables command requires the reload of all defined rules, including those that are already in an active and established state, whenever there is a change. Firewalld supports the D-BUS implementation and it brings the concept of network zones to manage the security rules. Everything in firewalld relates to one or more zones. Iptables does not have a daemon process, as it is implemented purely in the kernel space. We can activate either of the two at a time.
Firewalld configuration is stored in the /etc/firewalld directory and can be customized as desired. Its essential code runs in the kernel space interfacing with netfilter to implement the firewall rules. The rest of the code including the daemon is implemented in userland providing full user control over its operations. The userland management tools are the command firewall-cmd and the graphical tool called firewall-config. In addition, it allows us to create and modify zone and service configuration files by hand, and activate them as desired.
In this chapter, we use the firewall-cmd command for demonstration purposes. For details on how to use the graphical firewall-config tool, see Chapter 11 “Controlling Access through Firewall and SELinux”.
Firewalld zones classify incoming network traffic for simplified firewall management. Zones define the level of trust for network connections based on principles such as a source IP or network interface for incoming network traffic. The inbound traffic is checked against zone settings and it is handled appropriately as per configured rules in the zone. Each zone can have its own list of services and ports that are opened or closed. We can create zones with different rulesets. For instance, on a RHEL7 system with multiple network interfaces, we can group interfaces based on pre-defined trust levels and place them into one or more zones that may be activated or deactivated independently as one entity.
Firewalld provides nine zones by default that are illustrated in Figure 17-1. These system-defined zone files are XML-formatted and are located in the /usr/lib/firewalld/zones directory. In contrast, all user-defined zone configuration is stored in separate XML files in the /etc/firewalld/zones directory.
Figure 17-1 Firewalld Default Zone Files
These zones are listed in Table 17-1 are sorted by trust level from untrusted to trusted. We need to select the zone that best suits our network requirements, and then we can tailor it further to meet our specific needs.
|
Trust Level |
Description |
|
Drop |
Drops all inbound connection requests without sending a message back. |
|
Block |
Blocks all inbound connection requests with icmp-host-prohibited message for IPv4 or icmp6-adm-prohibited message for IPv6 sent. |
|
Public |
Allows selected inbound connection requests and disallows the rest. This is the default zone and all network interfaces are assigned to it by default. This zone is suited for use in public places. |
|
External |
Allows selected inbound connection requests with masquerading active. |
|
Dmz |
Allows selected inbound connection requests. This is suited for systems with limited access to their internal network. |
|
Work |
Allows selected inbound connection requests from other corporate systems. |
|
Home |
Allows selected inbound connection requests from other home systems. |
|
Internal |
Allows selected inbound connection requests on internal networks where most systems are trusted. |
|
Trusted |
Allows all inbound connection requests; used on a highly trusted network. |
By default, the public zone is the default zone; however, this designation can be assigned to one of the other eight zones or to a new custom zone. Here are the default contents of the /usr/lib/firewalld/zones/public.xml public zone file:
<?xml version="1.0" encoding="utf-8"?>
<zone>
<short>Public</short>
<description>For use in public areas. You do not trust the other computers on networks to not harm your computer. Only selected incoming connections are accepted.</description>
<service name="ssh"/>
<service name="dhcpv6-client"/>
</zone>
As you can see, the file contains straightforward and self-explanatory information. It indicates that only ssh and DHCPv6 inbound connections are allowed by default.
We can use one of these zone files as a template to create our own custom zone and place it in the /etc/firewalld/zones directory. This custom zone can then be altered with the firewall-cmd command or the graphical firewall-config tool to suit our specific needs.
EXAM TIP: You need to ensure the rules you add are for the right zone.
Each zone on the system may have one or more interfaces assigned to it. When a service request arrives, firewalld checks whether it is already defined in a zone by the IP it is originated from (the source network) or the network interface it is coming through. If yes, it binds the request with that zone; otherwise, it binds the request with the default zone. This allows us to define and activate several zones at a time even if there is only one network interface on the system.
Services are an essential component of firewalld zones. In fact, using services in zones is the preferred method for firewalld configuration and management. A service typically contains a port number, protocol, and an IP address. Service configuration is stored in separate XML files located in the /usr/lib/firewalld/services and /etc/firewalld/services directories for system- and user-defined services, respectively. The configuration files located in the user-defined service directory (/etc/firewalld/services) take precedence over the ones located in the other directory. It is recommended to copy one of the files from /usr/lib/firewalld/services to /etc/firewalld/services, rename it, and use the firewall-cmd command or the graphical firewall-config tool to alter the contents to suit specific needs. Figure 16-2 shows a listing of the files for some of the pre-defined services. These service definitions can be used to permit connections and traffic for particular network services for a zone.

Figure 17-2 Firewalld Services Files
All user-defined and system-defined service configuration is stored in XML files in the /etc/firewalld/services and /usr/lib/firewalld/services directories, respectively.
Network ports in firewalld may also be defined directly without using the service configuration technique, as mentioned in the previous sub-section. In essence, defining network ports does not require the presence of a service or a service configuration file. The same two tools, firewall-cmd and firewall-config, used for zone and service configuration are also used for port configuration.
Direct Interface and Rich Language
Firewalld gives us the ability to pass security rules directly to iptables using the direct interface mode; however, these rules are not persistent. They remain in place only until the firewalld service is restarted or configuration is reloaded. This may cause serious issues in a production environment. To address this problem, firewalld provides the support for a high-level language, called the rich language, that allows us to build complex rules without the knowledge of iptables syntax, and activate them either persistently or for a specified period of time after which they are deleted automatically. The rich language rules are also built and managed with the same two management tools, firewall-cmd and firewall-config.
Rich language uses several elements to set rules and name them. These elements include a source address or range with an appropriate netmask; destination address or range with an appropriate netmask; service name; port number or range; protocol; masquerade (enable or disable); forward-port (destination port number or range to divert traffic to); log and log level; and an action (accept: to grant new connection requests, reject: to disallow requests with a reason returned, or drop: to discard requests without informing the sender).
Network Address Translation and IP Masquerading
Network Address Translation (NAT) refers to the process of altering the IP address of a source or destination network that is enclosed in a datagram packet header while it passes through a device that supports this type of modification. In other words, NAT allows a system on the internal network (home or corporate network) to access external networks (the Internet) using a single, registered IP address configured on an intermediary device (a router or firewall). IP masquerading is a variant of NAT and it allows several systems on the internal network (192.168.0.0) to access the Internet using that single IP (52.29.71.18) of the intermediary device. See Figure 17-3.

With masquerading, requests originated from any of the internal systems appear to the outside world as being originated from the intermediary device with IP 52.29.71.18. The intermediary device stores the IP addresses of the source systems in its cache, along with randomly generated port numbers assigned to them, to keep traffic segregated for each system. The masquerading technique saves us from purchasing official IPs for each system on the internal network.
In order for a RHEL system with the netfilter module loaded in the kernel space, we need at least two configured network interfaces to be able to use masquerading. Masquerading can be activated either persistently or for a specified period of time after which it is deleted automatically. Masquerading is also managed with the same two management tools.
We may have to redirect inbound traffic to a port to access an application servicing on that port on our internal system. This port is defined on the intermediary device (router or the netfilter module on RHEL). For example, to allow external access to the HTTP service listening on port 8080 on an internal system, both internal system IP and port number are defined on the intermediary device to ensure inbound requests are forwarded to the desired destination. This feature is referred to as port forwarding or port mapping.
Firewalld offers a single command called firewall-cmd to view and manage firewall rulesets including those for masquerading and port forwarding. It gives us the ability to enter rules either on a persistent or temporary basis. The persistent rules are recorded in appropriate files and are not activated unless the firewalld service is restarted or instructed to reload the rules from the files. On the contrary, the temporary rules take effect as soon as they are entered; however, they do not survive a service restart or reload, because they are stored in memory. The difference between restarting the service and reloading the rules is that restarting interrupts all established connections, removes all temporary rules in place, and re-activates all persistent rules. On the other hand, reloading does not disturb existing persistent connections, but it discards all temporary rules in place. It also loads new and modified persistent rules that have been defined since the last restart or reload.
The firewall-cmd command has many options to view and manage its own operation, as well as view and administer zones, services, ports, masquerading, port forwarding, and so on. It also provides the ability to use the direct interface and rich language options to enter rules. We will discuss options specific to each of these management tasks in this section.
EXAM TIP: Check /var/log/messages, /var/log/secure, and service-specific log files to identify any issues with a non-functional service. You may want to turn off the firewall during troubleshooting. Do not forget to turn it back on.
To view and manage its own operation, you can use the firewall-cmd command to check the operational state of the service, and reload or restart it. The following demonstrates a few examples.
To display whether the service is running:
# firewall-cmd --state
running
The systemctl command may also be used for this purpose, but it provides more details:
# systemctl status firewalld
firewalld.service - firewalld - dynamic firewall daemon
Loaded: loaded (/usr/lib/systemd/system/firewalld.service; enabled)
Active: active (running) since Wed 2014-12-17 11:59:42 EST; 4 days ago
Main PID: 724 (firewalld)
CGroup: /system.slice/firewalld.service
└─724 /usr/bin/python -Es /usr/sbin/firewalld --nofork –nopid
To restart the service:
# systemctl restart firewalld
To reload the permanent rules without interrupting existing persistent connections:
# firewall-cmd --reload
success
firewalld Command Options for Zone Management
Viewing and managing firewalld zones involves several tasks that can be performed with the firewall-cmd command. There are several options available with the command and are described in Table 17-2.
|
Option |
Description |
|
--get-default-zone |
Displays/sets the default zone for both runtime and persistent configurations. |
|
--get-active-zones |
Displays all active zones. |
|
--get-zones |
Lists all available zones. |
|
--list-all |
Lists details for the default zone. |
|
--list-all-zones |
Lists details for all zones. |
|
--new-zone |
Adds a new zone. |
|
--delete-zone |
Removes a zone. |
|
--permanent |
Used to make a permanent change. Creates or updates appropriate zone files in the /etc/firewalld/zones directory. |
|
--zone |
Used for operations on a non-default zone. |
Table 17-2 Zone Management Options
For each permanent change, the corresponding zone file is updated in the /etc/firewalld/zones directory.
EXAM TIP: Always add firewall rules persistently using the --permanent option with the command.
Exercise 17-1: View and Manage Zones
This exercise should be done on server1.
In this exercise, we will demonstrate the use of various zone management options described in Table 17-2. You will display the default, and summary and details for all active and available zones. You will display details for a specific zone. You will add a new zone called testzone, confirm its creation, and then delete it. You will change the default zone to external and show the directive that is modified with this new setting. Finally, you will set the default zone back to its original value.
1. Display the current default zone setting:
# firewall-cmd --get-default-zone
public
2. Display a list of all active zones along with the interfaces assigned to them:
# firewall-cmd --get-active-zones
public
interfaces: bond0 eth0 eth1 eth2 eth3 eth4 eth5 team0
3. Display details for all active zones:
# firewall-cmd --list-all
public (default, active)
interfaces: bond0 eth0 eth1 eth2 eth3 eth4 eth5 team0
sources:
services: dhcpv6-client ssh
ports: 5901-5902/tcp
masquerade: no
forward-ports:
icmp-blocks:
rich rules:
4. Display a list of all available zones:
# firewall-cmd --get-zones
block dmz drop external home internal public trusted work
5. Display details for all available zones:
# firewall-cmd --list-all-zones
< a long output is generated listing details for all the nine zones currently exist on server1 >
6. Display details for a specific zone:
# firewall-cmd --list-all --zone external
external
interfaces:
sources:
services: ssh
ports:
masquerade: yes
forward-ports:
icmp-blocks:
7. Add a new zone called testzone and show its file contents:
# firewall-cmd --new-zone testzone --permanent
success
# cat /etc/firewalld/zones/testzone.xml
<?xml version="1.0" encoding="utf-8"?>
<zone>
</zone>
8. Remove testzone and confirm the deletion of corresponding file:
# firewall-cmd --delete-zone testzone --permanent
# ll /etc/firewalld/zones
-rw-r--r--. 1 root root 444 Dec 22 12:24 public.xml
-rw-r--r--. 1 root root 409 Dec 22 12:10 public.xml.old
9. Change the default zone to external, and verify:
# firewall-cmd --set-default-zone external
# firewall-cmd --get-default
external
10. The default zone information is recorded in the /etc/firewalld/firewalld.conf file. grep for the DefaultZone directive to confirm the new setting:
# grep –i defaultzone /etc/firewalld/firewalld.conf
DefaultZone=external
11. Reset the default zone value to the public zone and confirm:
# firewall-cmd --set-default-zone public
# firewall-cmd --get-default
public
firewalld Command Options for Service Management
Viewing and managing firewalld services involves several tasks that can be performed with the firewall-cmd command. There are several options available with the command and are described in Table 17-3.
|
Option |
Description |
|
--get-services |
Displays available services. |
|
--list-services |
Lists services for a zone. |
|
--query-service |
Tells whether a service is added. |
|
--add-service |
Adds a service to a zone. |
|
--remove-service |
Removes a service from a zone. |
|
--new-service |
Adds a new service. |
|
--delete-service |
Deletes an existing service. |
|
Used with the add and remove options for persistence. |
|
|
--zone |
Used for operations on a non-default zone. |
Table 17-3 Service Management Options
For each permanent change, the corresponding zone file is updated in the /etc/firewalld/zones directory. For a new service addition or removal, a file is created or removed from the /etc/firewalld/services directory.
Exercise 17-2: View and Manage Services
This exercise should be done on server1.
In this exercise, we will demonstrate the use of various service management options described in Table 16-3. You will display all available services, list all services for the default and internal zones, and query whether the tftp service is available in the default and work zones. You will add a new service called testservice and add it to the work zone. Finally, you will remove this service from the zone and from the system.
1. List all available services:
# firewall-cmd --get-services
amanda-client bacula bacula-client dhcp dhcpv6 dhcpv6-client dns ftp high-availability http https imaps ipp ipp-client ipsec kerberos kpasswd ldap ldaps libvirt libvirt-tls mdns mountd ms-wbt mysql nfs ntp openvpn pmcd pmproxy pmwebapi pmwebapis pop3s postgresql proxy-dhcp radius rpc-bind samba samba-client smtp ssh telnet tftp tftp-client transmission-client vnc-server wbem-https
2. List all services defined in the default (public) and internal zones:
# firewall-cmd --list-services
dhcpv6-client ssh
# firewall-cmd --list-services --zone internal
dhcpv6-client ipp-client mdns samba-client ssh
3. Query whether the tftp service is available in public and work zones:
# firewall-cmd --query-service tftp
no
# firewall-cmd --query-service tftp --zone work
no
4. Create a service template for a new service called testservice and check the file in the /etc/firewalld/services directory:
# firewall-cmd --permanent --new-service testservice
# ll /etc/firewalld/services/testservice*
-rw-r--r--. 1 root root 60 Dec 22 12:49 testservice.xml
5. Modify the testservice.xml file and include the following information:
# vi /etc/firewalld/services/testservice.xml
<?xml version="1.0" encoding="utf-8"?>
<service>
<short>testservice</short>
<description>Custom testservice</description>
<port protocol=”tcp” port=”11111”/>
</service>
6. Add the testservice to the work zone and activate it:
# firewall-cmd --permanent --add-service testservice --zone work
# firewall-cmd --reload
7. List all services for the work zone to confirm the presence and activation of the new service:
# firewall-cmd --list-services --zone work
dhcpv6-client ipp-client ssh testservice
8. Remove the testservice service from the work zone and then delete it from the system:
# firewall-cmd --permanent --remove-service testservice --zone work
# firewall-cmd --permanent --delete-service testservice
9. Reload the rules and list all services for the work zone to verify the deletion:
# firewall-cmd --reload
# firewall-cmd --list-services --zone work
dhcpv6-client ipp-client ssh
firewalld Command Options for Port Management
Viewing and managing firewalld ports involves several tasks that can be performed with the firewall-cmd command. There are several options available with the command and are described in Table 17-4.
|
Option |
Description |
|
--list-ports |
Lists ports added to a zone. |
|
--add-port |
Adds a port to a zone. |
|
--remove-port |
Removes a port from a zone. |
|
--query-port |
Checks whether a port is added to a zone. |
|
--permanent |
Used with the add and remove options for persistence. |
|
--zone |
Used for operations on a non-default zone. |
Table 17-4 Port Management Options
For each permanent change, the corresponding zone file is updated in the /etc/firewalld/zones directory.
Exercise 17-3: View and Manage Ports
This exercise should be done on server1.
In this exercise, we will demonstrate the use of various port management options described in Table 16-4. You will display all ports for the default zone and query whether TCP port 53 is added to the dmz zone. You will add TCP port 53 to the default zone persistently and UDP port range 1000 to 1010 to the work zone temporarily. Finally, you will remove port 53 and port range 1000 to 1010 from respective zones.
1. Display ports defined for the default zone:
# firewall-cmd --list-ports
5901-5902/tcp
2. Query whether TCP port 53 is added to the dmz zone:
# firewall-cmd --query-port 53/tcp --zone dmz
no
3. Add TCP port 53 to the default (public) zone permanently and activate it:
# firewall-cmd --permanent --add-port 53/tcp
# firewall-cmd --reload
4. Add UDP port range 1000 to 1010 to the work zone temporarily:
# firewall-cmd --add-port 1000-1010/udp --zone work
5. Confirm the addition for both of the above:
# firewall-cmd --list-ports
5901-5902/tcp 53/tcp
# firewall-cmd --list-ports --zone work
1000-1010/tcp
6. Remove temporary port range 1000-1010 from the work zone and confirm:
# firewall-cmd --reload
# firewall-cmd --list-ports --zone work
7. Remove port 53 from the default zone permanently and activate the change:
# firewall-cmd --permanent --remove-port 53/tcp ; firewall-cmd --reload
8. Validate the removal:
# firewall-cmd --list-ports
5901-5902/tcp
firewalld Command Options for Using Rich Language Rules
Viewing and managing firewalld rich rules involves several tasks that can be performed with the firewall-cmd command. There are several options available with the command and are described in Table 17-5.
|
Option |
Description |
|
--list-rich-rules |
Lists rich rules added to a zone. |
|
--add-rich-rule |
Adds a rich rule to a zone. |
|
--remove-rich-rule |
Removes a rich rule from a zone. |
|
--query-rich-rule |
Checks whether a rich rule is added to a zone. |
|
--permanent |
Used with the add and remove options. |
|
--zone |
Used for operations on a non-default zone. |
Table 17-5 Rich Language Options
For each permanent change, the corresponding zone file is updated in the /etc/firewalld/zones directory.
Exercise 17-4: Manage Rules Using Rich Language
This exercise should be done on server1.
In this exercise, we will demonstrate the use of various rule management options using the rich language as described in Table 16-4. You will add a persistent rich rule to the default zone and a temporary rich rule to the dmz zone with a twenty-four hour validity. You will list the added rules. Lastly, you will remove both rich rules and confirm.
1. Add a persistent rich rule to the default zone to allow inbound HTTP access from network 192.168.3.0/24. This rule should log messages with a prefix “HTTP Allow Rule” at the info level. Load the new rule.
# firewall-cmd --add-rich-rule 'rule family="ipv4" source address="192.168.3.0/24" \ service name="http" log prefix="HTTP Allow Rule" level="info" accept' \
--permanent
# firewall-cmd --reload
2. Display the code added to the default zone file for this permanent rich rule:
# cat /etc/firewalld/zones/public.xml
…… . .
<rule family="ipv4">
<source address="192.168.3.0/24"/>
<service name="http"/>
<log prefix="HTTP Allow Rule" level="info"/>
<accept/>
</rule>
…… . .
3. Add a temporary rich rule to the dmz zone to reject inbound telnet access from network 192.168.4.0/24. This rule should log messages with a prefix “telnet Access Denied” at the info level and should automatically expire after remain in place for twenty-four hours.
# firewall-cmd --add-rich-rule 'rule family="ipv4" source address="192.168.4.0/24" \ service name="telnet" log prefix="telnet Access Denied" level="info" reject' \
--timeout=”86400” --zone dmz
4. Display both rich rules:
# firewall-cmd --list-rich-rules
rule family="ipv4" source address="192.168.3.0/24" service name="http" log prefix="HTTP Allow Rule" level="info" accept
# firewall-cmd --list-rich-rules --zone dmz
rule family="ipv4" source address="192.168.4.0/24" service name="telnet" log prefix="telnet Access Denied" level="info" reject
5. Remove both rules:
# firewall-cmd --remove-rich-rule 'rule family="ipv4" service name="http" \
source address="192.168.3.0/24" log prefix="HTTP Allow Rule" level="info" accept'\
--permanent
# firewall-cmd --reload
6. Confirm the deletion of both rules:
# firewall-cmd --list-rich-rules
# firewall-cmd --list-rich-rules --zone dmz
firewalld Command Options for Masquerade Management
Viewing and managing firewalld masquerading involves several tasks that can be performed with the firewall-cmd command. There are several options available with the command and are described in Table 17-6.
|
Option |
Description |
|
--add-masquerade |
Adds a masquerade to a zone. |
|
--remove-masquerade |
Removes a masquerade from a zone. |
|
--query-masquerade |
Checks whether a masquerade is added to a zone. |
|
--permanent |
Used with the add and remove options for persistence. |
|
--zone |
Used for operations on a non-default zone. |
Table 17-6 Masquerading Management Options
For each permanent change, the corresponding zone file is updated in the /etc/firewalld/zones directory.
Exercise 17-5: Add and Remove Masquerading
This exercise should be done on server1.
In this exercise, we will use internal and external zones. We assume that the internal zone has eth1 (192.168.0.111) and the external zone has team0 (192.168.2.110) interfaces added. We also assume that the IP of team0 is official and that it acts as the gateway for outgoing requests.
1. Ensure eth1 and team0 are configured correctly, and are already part of internal and external zones, respectively.
2. Add masquerading support to the external zone:
# firewall-cmd --zone external --add-masquerade
3. Query on the external zone to confirm the setting:
# firewall-cmd --query-masquerade --zone external
yes
4. Remove masquerading support from the external zone:
# firewall-cmd --remove-masquerade --zone external
firewalld Command Options for Port Forwarding
Viewing and managing firewalld port forwarding involves several tasks that can be performed with the firewall-cmd command. There are several options available with the command and are described in Table 17-7.
|
Option |
Description |
|
--list-forward-ports |
Lists all forwarded ports for a zone. |
|
--add-forward-port |
Adds a port to a zone to forward traffic to. |
|
--remove-forward-port |
Removes a forwarded port from a zone. |
|
--query-forward-port |
Checks whether a port is set for forwarding in a zone. |
|
--permanent |
Used with the add and remove options for persistence. |
|
--zone |
Used for operations on a non-default zone. |
Table 17-7 Port Forwarding Management Options
For each permanent change, the corresponding zone file is updated in the /etc/firewalld/zones directory.
Exercise 17-6: Add and Remove Port Forwarding
This exercise should be done on server1.
In this exercise, we will enable masquerading on the external zone first and then demonstrate the use of various port forwarding options described in Table 17-7. You will forward inbound telnet traffic to a local port, ftp traffic to a range of ports, smtp traffic to a different IP, and tftp traffic to a port on a different IP permanently. You will activate all the rules and display them. Finally, you will remove all port forwarding rules configured in this exercise.
1. Enable masquerading on the external zone:
# firewall-cmd --zone external --add-masquerade
2. Forward inbound telnet traffic to port 1000 on the same system:
# firewall-cmd --zone external --add-forward-port port=23:proto=tcp:toport=1000 \
--permanent
3. Forward inbound ftp traffic to port range 1001 to 1005 on the same system:
# firewall-cmd --zone external --permanent \
--add-forward-port port=21:proto=tcp:toport=1001-1005
4. Forward inbound smtp traffic to the same port number but to IP 192.168.0.121:
# firewall-cmd --zone external --permanent \
--add-forward-port port=25:proto=tcp:toaddr=192.168.0.121
5. Forward inbound tftp traffic to 192.168.0.121:1010:
# firewall-cmd --zone external --permanent \
--add-forward-port port=69:proto=tcp:toport=1010:toaddr=192.168.0.121
6. Activate the above persistent rules:
# firewall-cmd --reload
7. Display the above rules:
# firewall-cmd --list-forward-port --zone external
port=25:proto=tcp:toport=:toaddr=192.168.0.121
port=21:proto=tcp:toport=1001-1005:toaddr=
port=69:proto=tcp:toport=1010:toaddr=192.168.0.121
port=23:proto=tcp:toport=1000:toaddr=
8. Remove all port forwarding rules added to the external zone:
# for i in `firewall-cmd --zone external --list-forward-port` ; do firewall-cmd \
--zone external --permanent --remove-forward-port $i ; done
9. Reload the firewall rules and confirm deletion:
# firewall-cmd --reload ; firewall-cmd --zone external --list-forward-port
Understanding and Managing Kerberos
The default user authentication scheme employed in RHEL and most other operating systems requires a user to enter their password at each login attempt and at each use of a remote service, such as rlogin, rcp, rsh, telnet, ftp, ssh, NFS, and Samba. This scheme involves the transmission of unencrypted user passwords across unsecure networks, posing a serious security threat.
Kerberos is a network authentication protocol that presents a secure mechanism using a blend of secret-key cryptography and a trusted third party to authenticate users to services running on remote servers. It employs strong encryption and a complex identification algorithm for authentication.
The Kerberos authentication mechanism surrounds a central administration server that generates, issues, and validates digital identities for users and systems within its administrative domain. A user is initially granted a master ticket that is used to identify the user to that central server. When the user needs to access a service that runs on a remote server within the administrative domain, the user’s master ticket is presented to the central server as proof of identity, along with a request to allow access to the remote service. Upon validation of the user’s identity, the central server provides the user with another ticket that is used as an authorization to access that particular remote service. The user forwards this new ticket to the remote service to gain access. Both master and additional tickets are stored locally on the client system. For each subsequent access attempt to this service, the stored service ticket is used for identification and authentication, eliminating the need for user password transmission over the network. All exchange of information between the client and central server, and the client and remote server is transparent from a user perspective.
The Kerberos protocol was developed at the Massachusetts Institute of Technology (MIT). RHEL7 includes the support for version 5 of this protocol, which is the latest. Kerberos uses port 88 for general communication, and port 749 for the administration of Kerberos database via commands such as kadmin and kpasswd. Kerberos may be configured to use either TCP or UDP protocol. The /etc/services file shows the port and protocol information for various services including Kerberos. The following is an excerpt from this file:

The Kerberos ticketing system relies heavily on resolving hostnames and on accurate timestamps to issue and expire tickets. Therefore, it requires adequate clock synchronization and a working DNS server (or an accurate /etc/hosts file) to function correctly.
Several key Kerberos terms need to be comprehended before we go into further detail. They are described below.
Authentication: The process of verifying the identity of a user (or service).
Authentication Service (AS): A service that runs on the Key Distribution Center (KDC) server to authenticate clients and issue initial tickets.
Client: A user or service (such as NFS or Samba) that requests for the issuance of tickets to use network services.
Credentials: A ticket along with relevant encryption keys.
Key Distribution Center (KDC) Database: A database of principals and their corresponding encryption keys.
Key Distribution Center (KDC) Server: A central server, also called a Kerberos server, that runs the Authentication Service (AS) and the Ticket Granting Service (TGS). It stores and maintains the KDC database.
Principal: A verified client (user or service) that is recorded in the KDC database and to which the KDC can assign tickets.
Realm: The administrative territory of a KDC, with one or more KDCs and several principals.
Service Host: A system that runs a kerberized service that clients can use.
Session Key: An encrypted key that is used to secure communication among clients, KDCs, and service hosts.
Service Ticket: An encrypted digital certificate used to authenticate a user to a specific network service. It is issued by the Ticket Granting Service (TGS) after validating a user’s Ticket Granting Ticket (TGT), and it contains a session key, the principal name, an expiration time, etc. A service ticket can be thought of as a visa stamped on a passport (TGT) by the issuing country (TGS) to be allowed to enter a foreign country (network service on a service host).
Ticket Granting Service (TGS): A service that runs on the KDC to generate and issue service tickets to clients.
Ticket Granting Ticket (TGT): An initial encrypted digital certificate that is used to identify a client to TGS at the time of requesting service tickets. It is issued by the AS after validating the client’s presence in the KDC database, and comprises of the client’s hostname and IP, the time of ticket generation, an expiration time, an encrypted session key, etc. A TGT is encrypted using a user’s password, and it is valid for a few hours only, after which it may be renewed transparently and automatically. A TGT can be thought of as a passport that authenticates the holder’s identity and authorizes them to travel to foreign countries.
How Kerberos Authenticates Clients
The Kerberos authentication process can be separated into three parts: an initial stage of getting a TGT (passport), a service stage to obtain a service ticket (visa), and access the service (travel to the visa issuing country). Here is how it works.
A user contacts the AS for initial authentication via the kinit command. The AS asks for the user’s password, validates it, and generates a TGT for the user. The AS also produces a session key using the user’s password. The AS returns the credentials (TGT plus the session key) to the user, which the user decrypts by entering their password. The credentials are saved in the client’s credential cache. The TGT has a limited validity and it is set to expire after a few hours.
Later, when the user needs to access a service running on a remote service host, they send the TGT and the session key to the TGS asking to grant the desired access. The TGS verifies the user’s credentials by decrypting the TGT, and assembles a service ticket for the desired service and encrypts it with the service host’s secret key. It transmits the service ticket to the user along with a session key. The user stores the service ticket in their credential cache. The user presents these credentials to the service host, which decrypts the service ticket with its secret key and validates the user’s identity and the authorization to access the service. The user is then allowed access to the service. During this entire communication process, the user’s password is not transmitted over the network. All communication is encrypted and clients properly authenticated.
Figure 17-4 presents a simple illustration of how the Kerberos authentication mechanism works. It shows how initial communication takes place (1 and 2) between a client (user1 on server1) and the KDC (AS on server2), how a service ticket is requested (3) and issued (4), and finally how the client (user1 on server1) establishes a link with the service (telnetd) on the service host (host1). The Figure shows that all three systems are located within a Kerberos realm called EXAMPLE.COM.
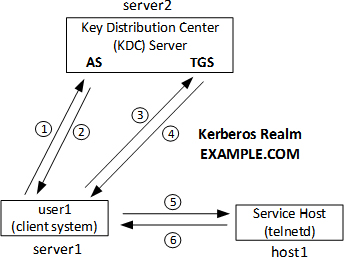
Figure 17-4 Kerberos Authentication Process
Kerberos Packages and Utilities
There are two software packages that provide Kerberos server and client functionality. These packages are krb5-server and krb5-workstation. Additional packages may be auto-selected and auto-loaded during installation to satisfy dependency requirements.
Several tools become available after the Kerberos software is installed. Some of the key client commands are described in Table 17-8.
|
Command |
Description |
|
kinit |
Obtains and caches TGT. |
|
kdestroy |
Destroys tickets stored in credential cache. |
|
klist |
Lists cached tickets. |
|
kpasswd |
Changes a principal’s password. |
|
kadmin |
Administers Kerberos database via the kadmind daemon. |
|
kadmin.local |
Same as kadmin, but performs operations directly on the KDC database. |
We will use some of these commands in this chapter. Check man pages for the others if needed.
Exercise 17-7: Configure a Client to Authenticate Using Kerberos
This exercise should be done on server1.
This exercise assumes that server2 is running Kerberos services (both KDC and admin services) for realm EXAMPLE.COM, the root user is added as an admin principal, DNS is disabled, and the hosts file is updated with appropriate mappings for both servers. It is also presumed that the /etc/ssh/sshd_config file on the Kerberos server has KerberosAuthentication, GSSAPIAuthentication, and GSSAPIDelegateCredentials directives set to yes, and the sshd service restarted. We will use server2 as the service host as well.
In this exercise, you will configure Kerberos client on server1 to authenticate via Kerberos server server2.example.com. You will add server1 principal to the KDC database, and create and store the key file locally on the client. You will modify the ssh client configuration file and activate the use of Kerberos. Finally, you will obtain a TGT for user1 and log in as them to test the configuration.
1. Install the required Kerberos client packages:
# yum –y install krb5-workstation
2. Ensure that the /etc/krb5.conf file has the following directives set. The first three directives disable DNS lookups and set the default Kerberos realm. The next set of directives defines the hostnames for the KDC and admin servers, and the last set of directives sets the mappings between DNS domains and Kerberos realms.
dns_lookup_realm = false
dns_lookup_kdc = false
default_realm = EXAMPLE.COM
[realms]
EXAMPLE.COM = {
kdc = server2.example.com
admin_server = server2.example.com
}
[domain_realm]
example.com = EXAMPLE.COM
.example.com = EXAMPLE.COM
3. Log in as the root principal (assumed to be added as part of Kerberos server setup) and add server1 as a host principal to the KDC database:
# kadmin –p root/admin
Authenticating as principal root/admin with password.
Password for root/admin@EXAMPLE.COM:
kadmin: addprinc –randkey host/server1.example.com
WARNING: no policy specified for host/server1.example.com@EXAMPLE.COM; defaulting to no policy
Principal "host/server1.example.com@EXAMPLE.COM" created.
4. While logged in, extract the principal’s key and store it locally in a keytab file called krb5.keytab in the /etc directory:
kadmin: ktadd –k /etc/krb5.keytab host/server1.example.com
Entry for principal host/server1.example.com with kvno 2, encryption type aes256-cts-hmac-sha1-96 added to keytab WRFILE:/etc/krb5.keytab.
Entry for principal host/server1.example.com with kvno 2, encryption type aes128-cts-hmac-sha1-96 added to keytab WRFILE:/etc/krb5.keytab.
Entry for principal host/server1.example.com with kvno 2, encryption type des3-cbc-sha1 added to keytab WRFILE:/etc/krb5.keytab.
Entry for principal host/server1.example.com with kvno 2, encryption type arcfour-hmac added to keytab WRFILE:/etc/krb5.keytab.
Entry for principal host/server1.example.com with kvno 2, encryption type camellia256-cts-cmac added to keytab WRFILE:/etc/krb5.keytab.
Entry for principal host/server1.example.com with kvno 2, encryption type camellia128-cts-cmac added to keytab WRFILE:/etc/krb5.keytab.
Entry for principal host/server1.example.com with kvno 2, encryption type des-hmac-sha1 added to keytab WRFILE:/etc/krb5.keytab.
Entry for principal host/server1.example.com with kvno 2, encryption type des-cbc-md5 added to keytab WRFILE:/etc/krb5.keytab.
5. Activate the use of Kerberos for authentication:
# authconfig --enablekrb5 --update
6. Edit the /etc/ssh/ssh_config client configuration file and ensure the following two lines are set as shown:
GSSAPIAuthentication yes
GSSAPIDelegateCredentials yes
7. Log in as user1 and execute the kinit command to obtain a TGT from the KDC. Enter the password for user1 when prompted.
$ kinit
Password for user1@EXAMPLE.COM:
8. List the TGT details received in the previous step:

The configuration is complete and you should now be able to log back in to server2 as user1 without being prompted for a password.
Overview of Authentication Configuration Tool for Kerberos Client Setup
The graphical Authentication Configuration tool allows you to configure the Kerberos client service on the system. This tool was previously used in Chapter 12 “Administering Network Interfaces and Network Clients” to configure an LDAP client. This tool may be invoked by running the authconfig-gtk or the system-config-authentication command in an X terminal window or choosing Applications | Sundry | Authentication in the GNOME desktop.

Figure 17-5 Authentication Configuration Tool – Kerberos Authentication Config
Figure 17-5 shows the tool’s interface. It shows the LDAP data in the User Account Configuration section that you entered at the time of setting up an LDAP client in Chapter 12. Choose “Kerberos password” as the Authentication Method for systems in the EXAMPLE.COM realm. Both KDC and Admin services are assumed to be running on server2.example.com. Leave the other two options unchecked unless you have a functional DNS server available and want to resolve hostnames to realms and locate KDCs for realms using the DNS. Click Apply when done.
EXAM TIP: Use the GUI tool to set up a client and check its configurtaion if you experience issues with using commands or modifying files directly.
This chapter covered two important advanced system administration topics: firewalld and Kerberos. We learned the basics of firewalld and its components, and saw how network interfaces are defined in various zones based upon the level of trust. We also looked at how services could be set up and used. The usages of direct and rich languages were discussed. We studied network address translation and IP masquerading, and performed several exercises to strengthen the firewalld concepts learned.
We looked at Kerberos and its benefits, learned its terminology, and saw software packages and various client-side utilities. We studied how this method of authentication worked. We also performed an exercise to demonstrate the setting up of a Kerberos client.
Answers to Chapter Review Questions
The following labs are useful to strengthen the concepts and topics learned in this chapter. It is expected that you perform these labs without any additional help. A step-by-step guide is not provided, as the implementation of these labs requires the knowledge that has been presented in this chapter. Use defaults or your own thinking for missing information.
Lab 17-1: Create a Persistent firewalld Service
Create a firewalld service called labserv on server2 and add it to the internal zone. This service should allow traffic on port range 1546-1549 for both UDP and TCP protocols. Start this service and display details for verification. Make sure that this service is auto-activated at firewalld restarts.
Lab 17-2: Create a Persistent Rich Rule
Create a rich rule in the external zone to allow FTP access from network 192.168.4.0/24. This rule should prefix “FTP Allow Rule” with each logged messages at the warning level. Check appropriate files to confirm the rule addition. Load the new rule and verify with commands.
Lab 17-3: Configure a Kerberos Client
Configure user3 on host1 to authenticate using Kerberos on server2. Create user3 if they do not already exist. Run appropriate commands to test the configuration.