Chapter 1
Getting Started with Windows
To do something useful with your computer and with Windows 10, you need to explore the screen, connect to your network, and learn how to work with apps.

Explore the PC Screen
Before getting to the specifics of working with Windows 10, take a few seconds to familiarize yourself with the basic elements of the screen. These include the desktop, the Start button, and the taskbar. In most cases, the Start button and the taskbar are always visible. If you do not see them, move the mouse pointer to the bottom of the screen.
This section covers the screen you see on a PC. If you are using a Touch PC or a tablet, see the next section, “Explore the Tablet Screen.”

 Desktop Icon
An icon on the desktop represents a program or Windows feature. A program you install often adds its own icon on the desktop.
 Mouse Pointer
When you move your mouse, this pointer moves along with it.
 Desktop
This is the Windows “work area,” meaning that it is where you work with your programs and documents.
 Start Button
You use this button to start programs and launch many of Windows’ features.
 Search Box
You use this box to search for items on your PC or on the Internet.
 Taskbar Icons
You use these icons to launch some Windows features with just a mouse click.
 Taskbar
The programs you have open appear in the taskbar. You use this area to switch between programs if you have more than one running at a time.
 Notification Area
This area displays small icons that notify you about things that are happening on your computer. For example, you see notifications if your printer runs out of paper or if an update to Windows is available over the Internet.
 Time and Date
This is the current time and date on your computer. To see the full date, position the mouse pointer ( ) over the time. To change the date or time, click the time.
Explore the Tablet Screen
If you are using a touch-based PC or a tablet device, Windows 10 will automatically reconfigure the screen into tablet mode, which is designed to make it easier for you to navigate and launch items using touches and other gestures. However, you might find that using this new interface is not easier at first. To get more out of this interface and to learn how to operate your Touch PC or tablet, you need to familiarize yourself with Windows 10’s tablet mode.
Explore the Tablet Screen
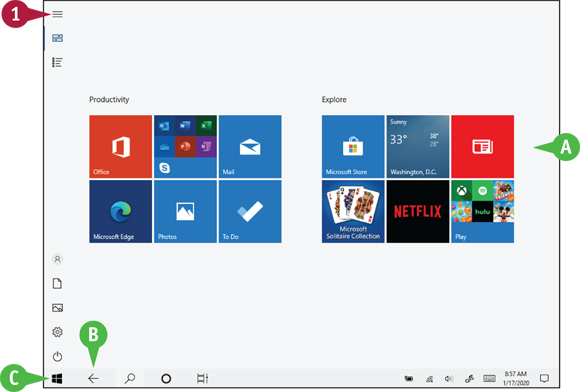
Tablet mode displays the Start screen, which consists of tiles for several common apps.
Note: The tiles you see will likely be different from the ones shown here.
In an app, you can tap Back ( ) to return to either the previous app screen or to the Start screen.
To return directly to the Start screen, you can tap Start ( ).
).
 To see more commands, tap Menu (
 ).
).

Windows displays a menu of commands.
 To hide the commands, tap Menu () again.
To toggle tablet mode on and off, you can tap Action Center ( ) and then tap Tablet Mode.
Start and Close an App
To perform tasks of any kind in Windows, you can use one of the apps installed on your computer. The application you use depends on the task you want to perform. For example, to surf the World Wide Web, you use a web browser application, such as the Microsoft Edge app that comes with Windows. To use an app, you select the one you want to run from the Start menu.
When you are done with an app, you should close it to reduce resources and keep the desktop uncluttered.
Start and Close an App

Start an App
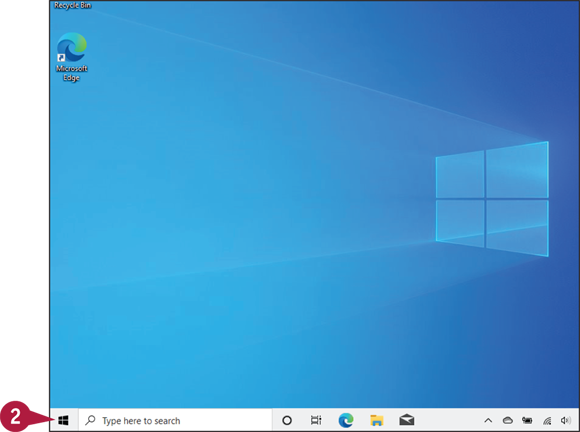
Click Start ().
The Start menu appears.
Common Windows features appear here.
The right side of the Start menu displays tiles for commonly used apps.
The rest of your installed apps appear here.
Click the app you want.

To quickly navigate apps alphabetically, you can click any letter and then click the letter that contains the app you want.
If the app is in a submenu, you can click the submenu and then click the app icon.
The app runs.

Close an App in Desktop Mode
Click Close ( ) or press
  +
+  .
.
Note: If the app asks if you want to save changes, click Yes to ensure you do not lose any work.
Windows closes the app.

Close an App in Tablet Mode
Swipe down from the top edge of the screen.
The app switches from full-screen to a small window.
Drag the app window all the way to the bottom of the screen.
Note: If the app asks if you want to save changes, click Yes to ensure you do not lose any work.
Windows closes the app.
Connect to Your Wireless Network
If you have a wireless access point and your computer supports wireless networking, you can connect to the device to access your network. If the access point is also a router that is connected to the Internet, then connecting to the wireless network gives your computer Internet access, as well.
Most wireless networks are protected with a security key, which is a kind of password. To connect, you need to provide Windows with the key. However, after you connect to the network once, Windows remembers the key and connects again automatically whenever your computer is within range of the network.
Connect to Your Wireless Network

Click Network ( ).
).
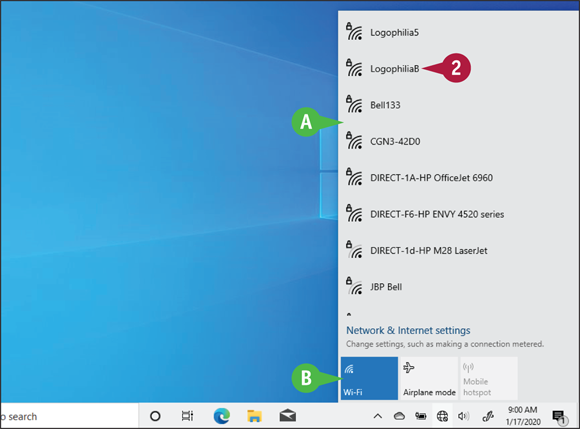
Windows displays a list of wireless networks in your area.
Click your network.
If you do not see the list of wireless networks, you can click Wi-Fi to turn on your computer’s wireless capability.
Note: For home use, the terms wireless and Wi-Fi are synonymous.
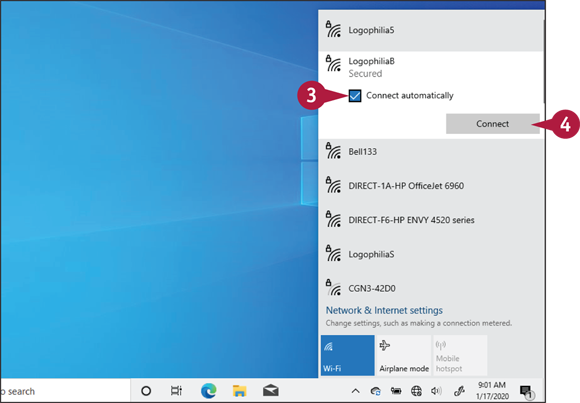
 To have Windows connect to your network automatically in the future, click Connect automatically (
 changes to
  ).
).
 Click Connect.

If the network is protected by a security key, Windows prompts you to enter it.
 Type the security key.
If you want to be certain that you typed the security key correctly, you can temporarily click and hold Display Password Characters ( ).
).
 Click Next.
Windows connects to the network.
The network icon changes from Disconnected () to Connected ( ) to indicate that you now have a wireless network connection.
Put Windows to Sleep
You can make your computer more energy efficient by putting Windows into sleep mode when you are not using the computer. Sleep mode means that your computer is in a temporary low-power mode. This saves electricity when your computer is plugged in, and it saves battery power when your computer is unplugged.
In sleep mode, Windows keeps your apps open. This is handy because it means that when you return from sleep mode, after you sign in to Windows again, you can immediately get back to what you were doing.
Put Windows to Sleep

Click Start ().

The Start menu appears.
Click Power ( ).
).
Click Sleep.
Windows activates sleep mode.
Note: To return from sleep mode, press your computer’s Power button.
Restart or Shut Down Windows
You can restart Windows, which means that it shuts down and starts up again immediately. This is useful if your computer is running slowly or acting funny. Sometimes a restart solves the problem.
Alternatively, when you complete your work, you could shut down Windows. However, do not just shut off your computer’s power because doing so can cause problems: If you have documents with unsaved changes, you may lose those changes; you also could damage one or more Windows system files, which could make your system unstable. Therefore, you should always follow the proper steps when shutting down your PC.
Restart or Shut Down Windows
Shut down all your running programs.
Note: Be sure to save your work as you close your programs.
Click Start ().

The Start menu appears.
Click Power ().
Click a command:
You can click Restart to shut down and then start your computer.
You can click Shut Down to turn off your computer.
Switch to a Microsoft Account
You can get much more out of Windows by using a Microsoft account. When you connect a Microsoft account to your Windows user account, many previously inaccessible Windows features become immediately available. For example, you can use the Mail app to access your email and the OneDrive app to store documents online. You can also download apps from the Microsoft Store, access your photos and documents anywhere online, and even sync your settings with other PCs for which you use the same account.
Switch to a Microsoft Account

Click Start ().

Click Settings ( ).
).

Windows opens the Settings app.
Click Accounts.

The Accounts window appears.
Click Sign in with a Microsoft account instead.
You do not need to use a Microsoft account to use Windows. Instead, you can use a local account, which allows you to log in to your PC, personalize settings, and use most Windows features. With a local account, you cannot install programs from the Microsoft Store if you are using Windows 10 Home. If you are using Windows 10 Pro, you can install only free programs from the Microsoft Store. To install any program from the Microsoft Store, and to synchronize your settings across other Windows devices, you need to switch to a Microsoft account.

The Sign In window appears.
To create a new Microsoft account, you can click Create one and then follow the instructions in the first tip earlier in this section.
Type your email address.
Click Next.
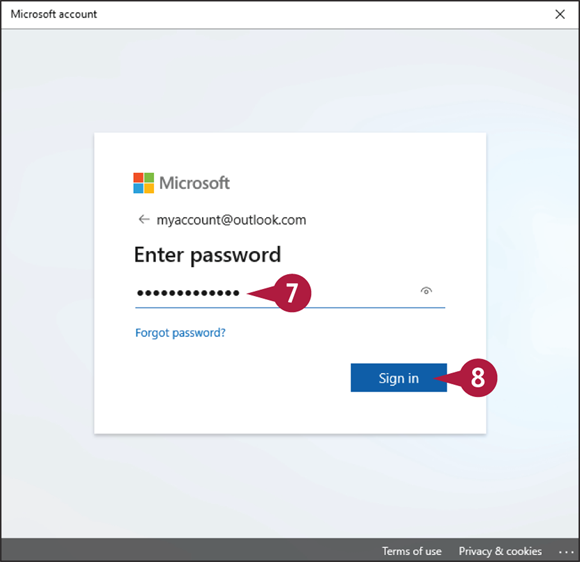
The Enter Password window appears.
 Type your password.
 Click Sign in.
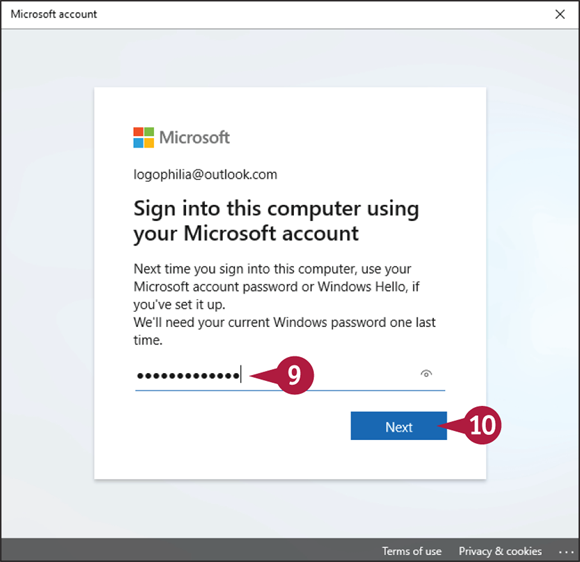
Windows asks you to verify your current account password.
 Type your password.
 Click Next.

Windows asks if you want to use a PIN with your account.
 Click Close (
 ).
).
Note: See the section “Sign In with a PIN” in Chapter 13 to learn how to add a PIN to your account.
Windows connects the Microsoft account to your user account.
The next time you start Windows, you can use your Microsoft account email address and password to sign in.
Install an App
If Windows does not come with an app that you need, you can obtain the app and then install it on your computer. How you start the installation process depends on whether you obtained the app from the Microsoft Store that comes with Windows or you downloaded the app from the Internet. If you purchased the app from a retail store and received a physical copy of the software, you install the app using the CD or DVD disc that comes in the package.
Install an App

Install from the Microsoft Store
Click Start ().
Click Microsoft Store.
Note: You need a Microsoft account to install from the Microsoft Store, as described in the previous section, “Switch to a Microsoft Account.”

The Windows Store appears.
Click Navigation () to browse apps by category, or use the Search box to locate the app you want to install.
Click the app from the results that appear.
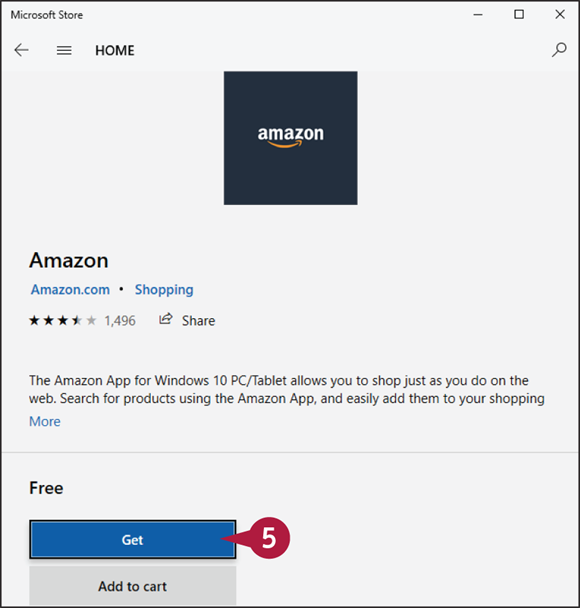
Click Get.
Alternatively, for a free app, you instead have to click the Try for Free button. If the app is not free, click the Buy button, type your Microsoft account password, click Sign in, and then follow the prompts to complete the purchase.
Windows installs the app.

Install a File Downloaded from the Internet
Click File Explorer ( ).
).
Open your Downloads folder.
Note: If you saved the downloaded file in a folder other than Downloads, use File Explorer to find the downloaded file. To view a file with File Explorer, see Chapter 10.
The Downloads folder appears.
Double-click the file.
The software’s installation app begins.
Note: For compressed files, extract the files and then double-click the setup file. See Chapter 10 for more information.
Follow the installation instructions the app provides.
Switch Between Running Apps
If you plan on running multiple apps at the same time, you need to know how to easily switch from one application to another. In Windows, after you start one application, you do not need to close that application before you open another one. Windows supports a feature called multitasking, which means running two or more applications simultaneously. You can switch from one program to another using the taskbar, the keyboard, or the Task View feature. You can also use Task View’s timeline feature to launch a recent activity, such as a file or song.
Switch Between Running Apps

Switch Apps Using the Taskbar
Position the mouse pointer () over the taskbar button of the program you want to switch to.
Windows displays a thumbnail version of the app window.
Click the app’s taskbar button.
Note: A program does not have to be minimized to the taskbar for you to use the program’s taskbar button.

Windows brings the program’s window to the foreground.
Note: You can also switch to another window by clicking the window, even if it is in the background.

Switch Apps Using Task View
In the taskbar, click Task View ( ) or press
  +
+  .
.
Windows displays thumbnails for each running program.
Click the thumbnail of the program you want to switch to.
Windows switches to the program.

Switch Apps Using Your Activity Timeline
In the Task View, scroll the timeline down until you see the activity you want to switch to.
Click the activity.
Windows launches the activity’s app, if it is not open already, and then switches to the activity.
Uninstall an App
If you have an app that you no longer use, you can free up some hard drive space and reduce clutter on the Start screen by uninstalling that app. When you install an app, the program stores its files on your computer’s hard drive, and although most programs are quite small, many require hundreds of megabytes of hard drive space. Uninstalling an app you do not need frees up the hard drive space it uses and removes its tile (or tiles) from the Start screen (if it has any there) and the Apps screen.
Uninstall an App

Uninstall via the Start Menu
Click Start ().
Use the Start menu or the All Apps list to locate the app you want to uninstall.
Right-click the app.
Click Uninstall.

Windows asks you to confirm.
Click Uninstall.
Windows removes the app.

Uninstall via Settings
Type uninstall in the taskbar’s Search box.
Click Add or remove programs.

The Apps & Features window appears.
Click the app you want to uninstall.
Click Uninstall.
Windows removes the app.