There are four basic stitches for bead embroidery: single (or seed) stitch, lazy stitch, back stitch, and couching. There are also edging stitches, fringes, and lots of variations. I use single stitch for dots of color, a combination of couching and back stitch for lines, and lazy stitch only when I want solid areas of beading. The picot edge stitches and fringes are used to add texture and elevation to a piece. As you work with the stitches and learn what they do, you will find your favorites.
Preparing to Bead
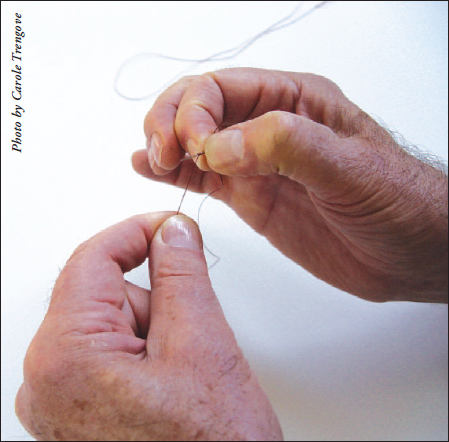
Stretching the Thread
Always stretch your thread before using it. Nymo has a little give, and it is better to release it before starting to bead. If you do not stretch the thread before using it, the weight of the beads will do it for you over time, and the thread will loosen on the surface of your quilt.
Stretching thread
NOTE
With Nymo, you thread the end you’ve just cut from the bobbin (unlike regular sewing machine thread) and knot the other end. This is because of the way the thread is spun. If your thread tangles a lot, try reversing it and knot the other end. If the thread continues to tangle, throw that spool away and try another. Occasionally you get a “bum bobbin.” Thread is the most inexpensive material you use, and life’s too short to fight with thread or drink cheap wine!
Many people have trouble threading needles and, as a consequence, use a very long thread, which can be cumbersome and result in tangling and knotting. This is annoying in the extreme and to be avoided at all costs. You can do several things to facilitate threading. First, always use a freshly cut end to thread through the eye. Cut it cleanly at an angle. Then, after wetting the end, pull it through your thumb and forefinger to give it a chisel shape. Rotate the thread until the sharp edge of the chisel is parallel to the needle’s eye. Hold the needle in your dominant hand, and with the thread held in your other hand, about ½″ in from the end, thread the needle. It helps to hold the eye of the needle and the end of the thread over a plain white surface. You can see both the hole and the end of the thread more clearly. I use the back of a business card or the edge of my bead tray.
NOTE
When threading needles, remember that a needle hole is made with an awl punch; consequently, one side is larger than the other. If you are having trouble threading your needle, turn the needle around.
Knotting the Thread
You will be knotting thread frequently. If you are pulling the knot through the fabric face to bury it, you will want to control the size of the knot. The knot I use is one my sister, Robin, taught me. It is similar to a French knot; some know it as a quilter’s knot. It can be difficult and confusing initially, especially if you are using the wrong portion of the thread or wrapping it in the wrong direction, but once you’ve got it, you’ll really like it.
1. Hold the threaded needle in your dominant hand between your thumb and forefinger. Lay the thread end, the end farthest from the needle, across the needle. Where you lay the thread is where the knot will end up.

Holding threaded needle in dominant hand, lay thread end, end farthest from needle, over needle.
2. Continuing around the needle in the direction of travel, wrap the thread 4 to 5 times around the needle. The number of wraps needed will vary a little depending on the tightness of the weave of the fabric you are pulling the knot through. (This is for a single thread; if using a double thread, wrap 2 or 3 times.)
With your other hand, take hold of the needle tip and, holding tight to the wrapped thread with your thumbnail, pull the needle through your thumb and forefinger and keep sliding the wrap down to the end of the thread. If you lose hold of the wrap, start over.
Remember, where you lay the thread across the needle is where the knot will end up, so if you want a short tail, lay only a short length of thread across the needle. This will always give you a knot of a specific size, and by being careful where you lay the thread over the needle, you won’t have to pick up a pair of scissors and trim the tail before starting. No more spitting on your fingers and winding up with an ill-defined wadded mess somewhere close to the end of the thread.
Wrap thread around needle 4 times; pull needle and following thread through to end.
Burying The Knot
When pulling the knot through the material, the size of the knot is governed by the type of material you are going through. Batiks are printed with dye that penetrates all the way through, and the weave is very tight. A four-wrap knot works best for this. For prints of a looser weave, where the dye or paint sits on the surface, a five-wrap knot would be preferable. When you pull to bury the knot, you may get what looks like a run in the material. In this case, start the threads on the back or leave the knot on the surface and come up from the batting where you wish to start sewing on beads. Tie a pair of overhand knots (see page 32) to anchor the thread, and then trim off the knot.
In pulling the knot through, insert the needle in the cloth face and go through to the batting. Travel in the batting a greater distance than the length of the tail to the spot where you wish to place the first bead. Come up to the surface and gently but firmly pull the thread until the knot “pops” through the surface fabric and into the batting. I like to dip the needle down for a tiny stitch on the back before coming up to the surface. This way the first bead is anchored through to the back. Be careful not to pull the knot all the way through to the back. If you come back later and trim it off, the beads will begin to fall off the surface.
When sewing on larger beads, I like to use a double thread, or if using a single thread, I pass through at least three times. I also do a lot of knot tying on the surface of the piece rather than turn it over and knot on the back.
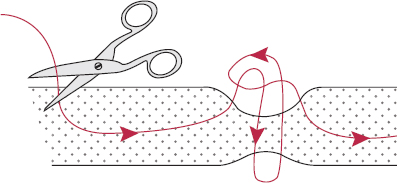
SINGLE OVERHAND KNOT
1. To tie a single overhand knot, bring your needle through the batting and up to the surface of the quilt. Leaving a little slack on the surface, go through all the layers of the quilt sandwich to the back. Come back up to the surface in approximately the same spot where you started and loop through the slack. Pull the thread tight to form a knot on the surface.
2. Put the needle back into the batting and travel to the spot where you want to place your first bead.
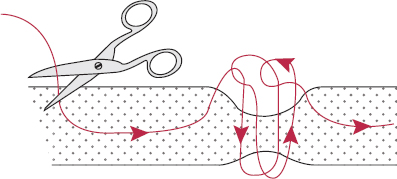
DOUBLE OVERHAND KNOT
1. Begin by following Step 1 of the Single Overhand Knot (above).
2. Again, leave a little slack on the surface and bring the needle all the way to the back of the quilt. Bring the needle back to the front of the quilt and loop through the slack.
3. Pull the thread tight to form a double knot on the surface. Put the needle back into the batting and travel to the spot where you want to place your first bead.
NOTE
Always try to go through all the layers to the back on each side of a large bead. This helps distribute the weight between the front and back when the quilt is hanging. If you are using lots of large beads, the collective weight becomes significant, and if they are not tied through the batting to the back, the piece will not hang as well.