4
Using Basic Stitches to Create Design Elements
Using Single or Seed Stitch
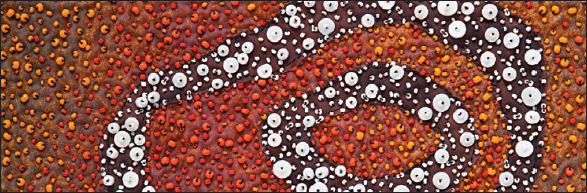
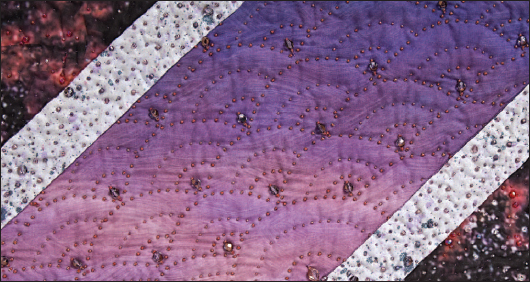
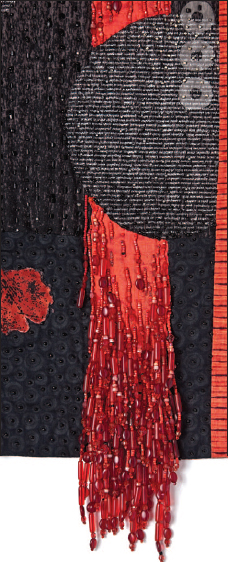
Single or seed stitch (page 34), with all its variations, is the large space filler. It creates a number of textures, quilts areas with the added advantage of a sprinkle of color, and makes subtle lines of dots and dashes that the eye can follow without having to make a long solid line. It’s difficult to isolate a technique and intentionally use just one stitch, although the seed stitch does just that most easily. I came across a beautiful coffee table book of Australian Aboriginal art, and the pictures were beautiful in a strange way. They were constructed of dots and spaces filled with solid color and were very mystical in intent. What I envisioned was a whole series of small quilts in reverse appliqué with large or small beads as the dots. Raven Dreaming was the first piece I did in that style, and I used only the seed stitch—just single beads and two-bead stacks. It is quite amazing how one can change the color value of an area with a layer of dots of another color.
Detail of Raven Dreaming (page 97)
If you have a large bland area and you need to quilt it, single stitch does that nicely. You can add a variety of textures just with the stitch patterns you use between beads. Working back and forth in a zigzag pattern, you can pull up a ridge of fabric that forms a crack or crevice in the stone.
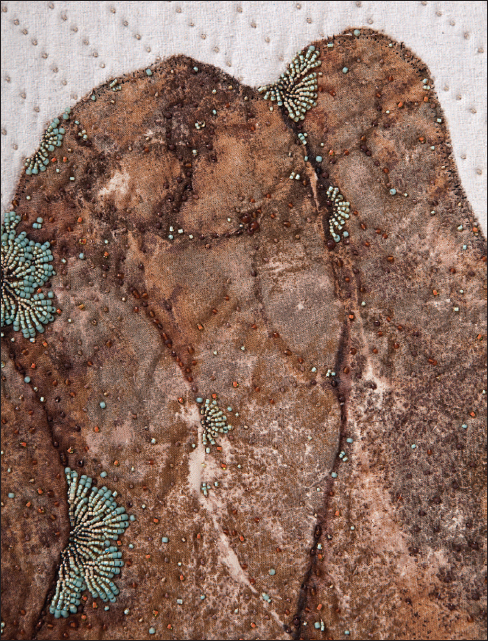
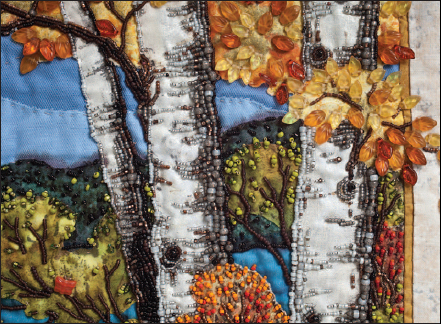
Ridges and dots on stone in Serenity (page 98)
You also can enhance the existing fabric’s design, especially if you are using a print with lots of dots, by using beads of similar colors spread out over the surface. Create the texture of an orange rind with #15 seed beads, just a little darker orange than the orange fabric. Another possible use would be sprinkling white seed beads over the surface of a strawberry—color and texture at the same time!
Centered Squared is an example of using a large photograph printed on fabric. The finished piece is 52″ × 52″, which is a very large area to bead. I had the base design in the center and the seams machine quilted to keep the batting and backing from slipping around and to delineate the design. Working from the center out and leaving the central figure delineated only by the machine stitching outlining him, I beaded the flower that’s radiating out from him with couched lines of mostly clear Iris bugles and seed beads. Then, I moved out into the starry sky behind, where I lightly sprinkled a variety of colors and shapes of seed beads and crystals. There were places where I wanted stitches to continue the quilting but no bead. It’s really very simple to just take a stitch and move on to the next area where you want a bead. The hardest part is remembering not to pick up a bead on your needle.
Dotted sky background in Centered Squared (page 90)
NOTE
Spacing becomes crucial in covering large areas with single stitch. The eye tends to connect the dots, so keeping it random becomes a challenge, especially when you are working with a number of sizes and different colors of beads. I find that working back and forth in parallel lines with most of the beads in place and just a few off works well and covers the space rapidly.
The white banding around the eight-pointed star was more heavily stitched, with lots more color and a wide variety of sizes of beads, from #15 to #6 and with 4mm and 6mm crystals. I was trying to cover the space with quilting and discovered that I was making ridges as I tacked back and forth from edge to edge. I didn’t want ridges, so from there on I tried to be careful not to work in zigzag lines unless I wanted ridges. Stitching large areas with a similar size and color of beads can become boring unless you find that almost Zen state in which your hands pick up beads and place them while part of your brain decides where to go next and which bead to use.
White bands in Centered Squared
There are times when you have a large space you wish to texture and quilt. If you want lines that are not solid but interrupted, you might use a series of dotted lines. The dots in the peach to lavender panels of Centered Squared were an exercise in using seed beads in a running stitch to quilt a large area with a traditional quilting pattern. I drew in the fan lines with a chalk pencil, using a stencil I created, so I could invert the pattern on each side of the points and have continuity of design throughout the whole band of fan shapes. I used a neutral-colored #11 seed bead slightly darker than the fabric to bead the areas.
Fans in Centered Squared (page 90)
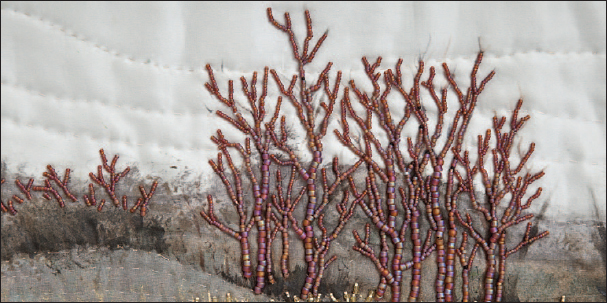
Later, I designed Serenity around the same technique of making dots of beads form lines. After placing the stones and beading them, I drew in the lines of raked gravel with a chalk pencil, using a yardstick to get the perspective correct and to make the lines continuous from the top left to the bottom right, behind the rocks.
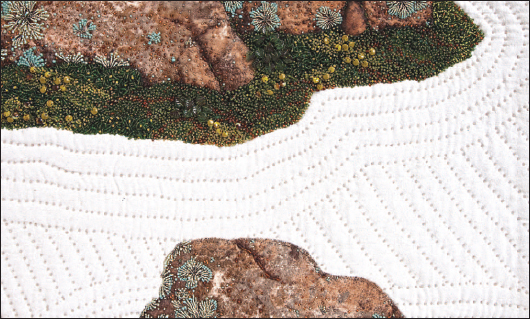
Dotted lines forming furrows in raked gravel in Serenity (page 98)
Using Tall Stacks, Fringes, and Loops
The difference between a tall stack (page 35) and a strand of fringe (page 41) is a matter of semantics and the number of beads. The main difference is that the stack is intended to stand perpendicular to the surface. Fringe is intended to hang down parallel to the surface, keeping in mind that the traditional use of an art quilt is to hang on a wall. Tall stacks, or fringe, if you will, can be used to create the center of a flower or to raise a leaf above the surface of the quilt. The centers at right show a series of stacks topped with a larger anchor bead, with the bases of the stacks closer together than the tops have room for so they all radiate out from the center.
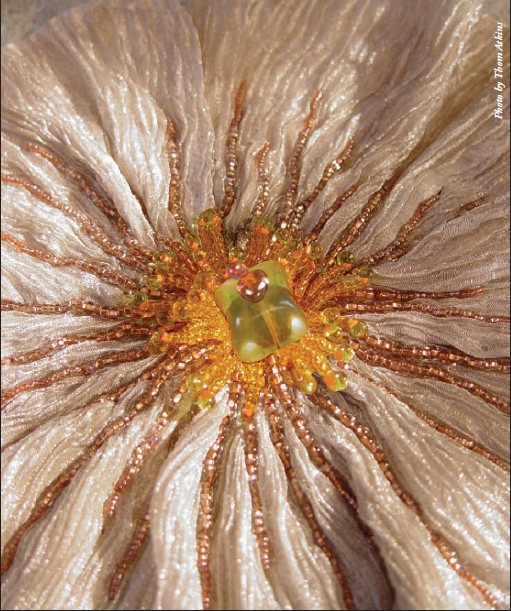
Center of White Poppy
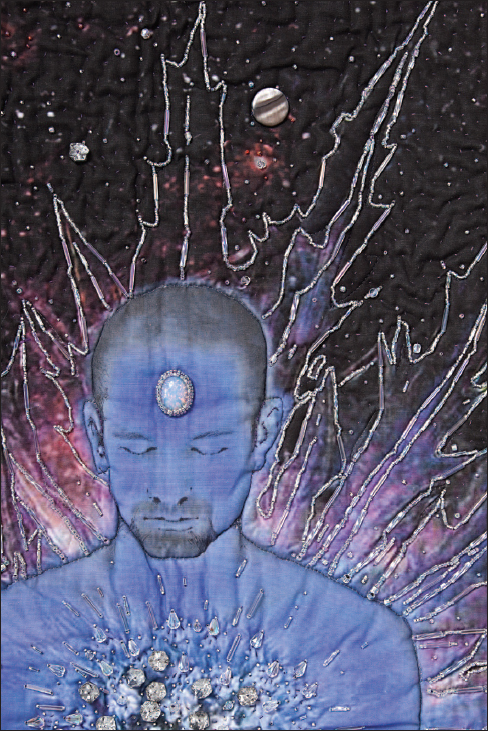
Beaded bezel in Time Is Flying (page 94)
The fringe on a portion of Smoke and Mirrors was intended to look as if the panel of red silk were fraying at the bottom. Starting with strands of fringe at the bottom of the panel, I created more strands as I worked my way up the panel. I shortened the strands of fringe until they merged with the couched lines, so they appeared to grow out of the lines sewn to the surface.
Fringe on left panel of Smoke and Mirrors (page 96)
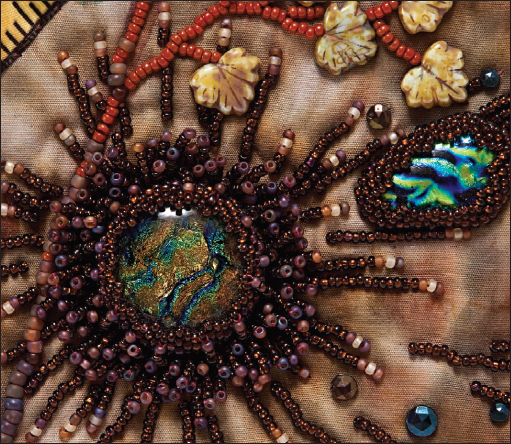
You may want to make a large dense center for a flower or other raised dense area of beads. In the middle of the central poppy of The Blue Miranda, I wanted to raise the ring of purple stamens of the poppy and create a random, solid area of beads. I used loops going every which way. Most of the loops had a bugle bead, frequently not quite in the center of the loop, so the bead was not quite parallel with the surface.
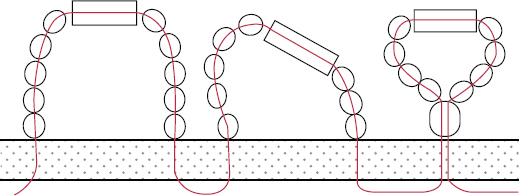
Loops with bugle beads
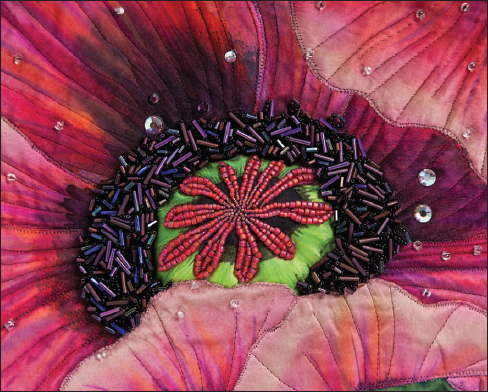
Center of poppy in The Blue Miranda (page 92)
Combining Back Stitch and Couching
Back stitch (page 36) and couching (page 37) both make lines, and I rarely use just one or the other. I’m not sure there is a right or wrong way to go about beading. Whatever works for you is your best way, and with practice, you’ll find your own style. The technique is just a vehicle to put down beads where you want them and be sure they stay there. My style of beading tends to be very organic, moving back and forth from enhancing what is already in the fabric to putting in design elements not found there. Vines would be a good example of putting in elements not found in the fabric. They could be added over the rest of a piece to change the visual texture. When making vines with leaves, you might do a couched main stem and then go back and add little branches with the leaves using back stitch.
Vines with couching and back stitch in Dogwood and Ivy
Bead arrangement for vine
I tend to use couching for long lines when I want to see where the line is going and be able to compose it as I go. I find it easier to make gentle curves with couching, keeping the flow of the line going, rather than breaking it up into a series of short lines. Back stitch is filler for me. It is what I do when I come to the end of a long line and only have a little way to go, or when I want a side branch or stem for a leaf to be tied into a main branch.
Branches in Fall Study
Branches in My Father’s Shadow (page 99)
Another example can be found in the spiderweb in At Risk. Here the main support structure of the web was put in with a combination of couching and back stitch, and then the short lines were added between the main ones, primarily with back stitch.

Spiderweb from At Risk (page 100)
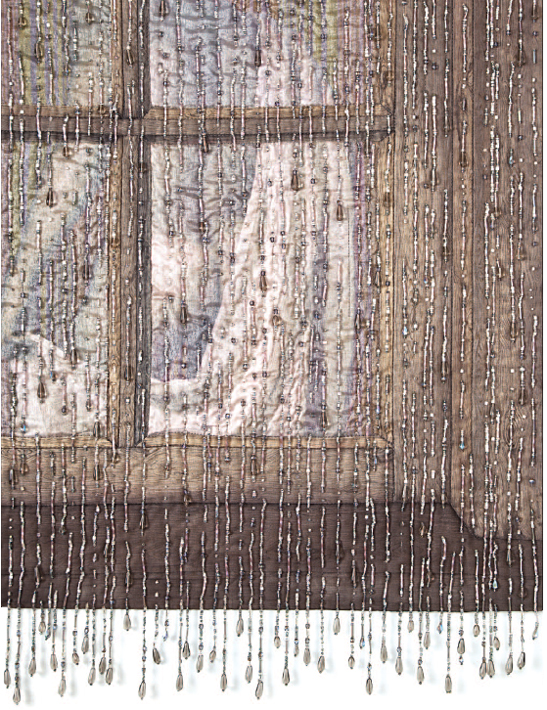
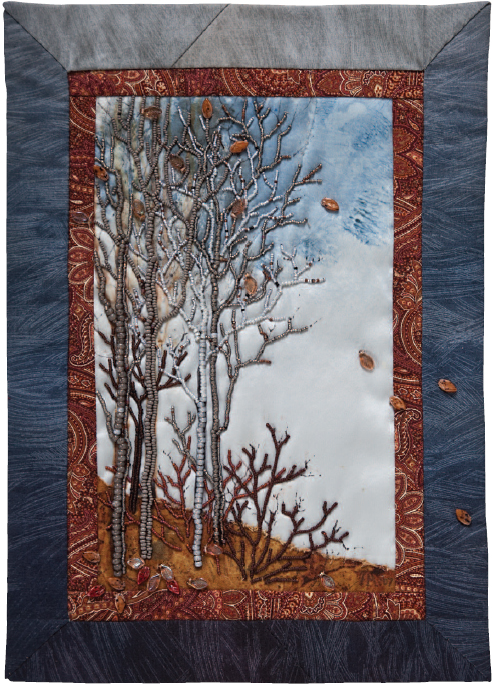
Rain in The Man in the Window (page 101)
Machine-Sewn Lines
Sometimes you want a clean, straight line of beads, either on a line already in the composition or as an added texture. Such was the case with The Man in the Window. I wanted the appearance of being outside, looking at a window while standing in the rain. This meant the rain needed to go over both the window frame and the panes of glass. I assembled the quilt top, added batting and backing, and then machine quilted the mullions of the window and the lines forming the frame. After that, I machine stitched in broken parallel lines over the whole piece, running them right up to the top and bottom edges. When I beaded the rain, I essentially beaded in-the-ditch, using short and long segments to suggest drops and streaks. When I had finished beading, stopping the stitching about ½″ from the approximate edge, I bound the edges and then finished the lines of beads out to the finished edges of the quilt. I added the fringe last, continuing the lines of rain right off the edge of the windowsill by starting the strand in the line sewn to the quilt and continuing down from the edge.
Multiple parallel lines can be used to create a heavier line than you would get from a single line of beads and are usually preferable to a lone line of big beads. (Sometimes even #6 beads are not thick enough to create the desired line; they do not make good lines because the tops and bottoms of the beads are often not parallel to each other.) If I were doing a tree trunk, I would start at one edge with a row of #8 beads and taper this first row by changing to #11 of the same color as I worked my way up the trunk. Then I would perhaps go to a row of #11, in the same color or a slightly different shade, and take that row further up the trunk. I would gradually taper the trunk by dropping a row or merging rows as I got closer to the top. I would continue the process until the trunk reached the appropriate thickness. As the rows are added, the lines of beads should be couched from the side of the line away from the previous line, toward the previous line. Occasionally, couching over both lines keeps them snuggled up to one another.

Tree trunks in My Father’s Shadow (page 99)
Sometimes I may combine short parallel lines of beads with long perpendicular back stitched lines, as in the case of the birch tree trunks in Reflections. Here I started with white “fairy frost” fabric for the trunks; then I put the shadows and bark lines in with beads, giving them dimension and texture at the same time.
Tree trunks in Reflections (page 102)
Augmenting Back Stitch and Couching
I mostly use this stitch to augment back stitch or couching. For example, in the dragon in There Be Dragons Here, I moved freely from back stitch to lazy stitch to couching and back to lazy stitch depending on the length of the line I was beading. In this case, all the information of the dragon’s whiskers and claws was in the printed fabric already. All I had to do was modify some lines slightly and choose the size and color of the bead to cover them. I used lazy stitch (page 38) in the shortest lines, and when they got past five or six beads in length I would couch (page 37) or back stitch (page 36), depending on where I wanted to go next. Designs such as this are predicated on the availability of beads in a number of different sizes (usually #15, #11, and #8) that are all the same or similar color and finish.
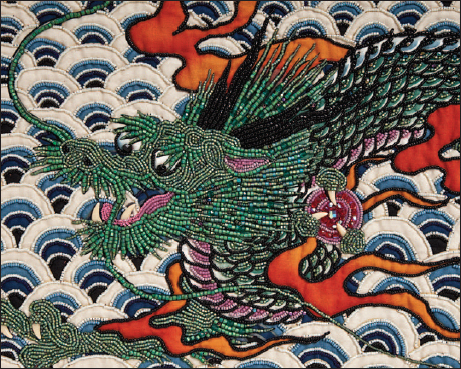
Dragon in There Be Dragons Here (page 67)
Filling in Areas
Lazy stitch is most frequently used to fill in areas to give a dense texture or make broad lines. The ravens’ wings and bodies in The Ravens of Angel’s Crest are an example of filling in a fairly large area almost completely. Some of the lines are couched, but most of the bugle beads are laid in with a lazy stitch. The gloss and iridescence of the raven’s plumage is suggested with a combination of plain black beads and beads with an AB (Aurora Borealis) finish.

Ravens in The Ravens of Angel’s Crest (page 103)
Lazy stitch (page 38) can also be used to create thick lines for borders or to outline objects. The former is illustrated by a section of border in Cats, a small sampler I use as a demo for my Borders and Bezels class. The change in direction is effective, especially if one is easily bored, but be advised: You will find one direction of the angle easier to bead than the other. If the piece is small enough, you can turn it upside down and continue beading the border in the same way.
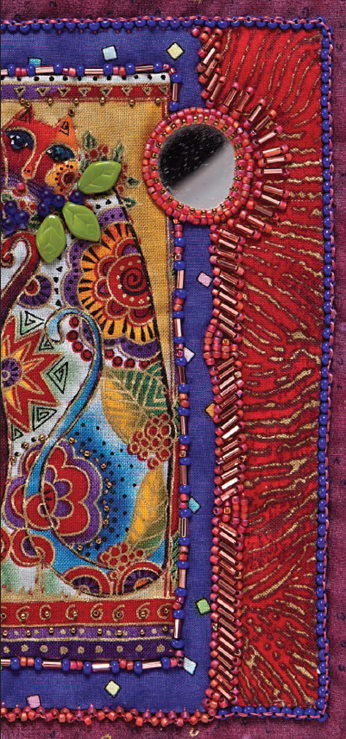
Detail of Cats sampler
It is easier to keep the edges of the rows aligned if you baste or draw chalk guidelines before starting. I had to rip out whole sections of the crocodile outline several times and redraw them with chalk to get all the beads aligned perfectly on the crocodiles found on the borders of Australian Dreamscape.
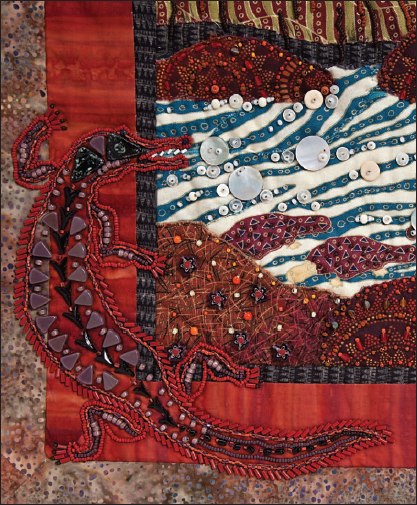
Crocodile in Australian Dreamscape (page 104)
Combining Lazy Stitch and Couching
Australian Aboriginal Meets American Indian is a piece I designed for a demo of beaded bezels for the Road to California show in 2010. I did the soft-edge appliqué face using an Australian print, added batting and backing, and machine stitched the basic lines. I wanted to bead a little of the design before I started putting the mirrors in and found myself using a combination of couching (page 37) and lazy stitch (page 38). If you look closely, you will see which way the beads are lying on the thread and that the long thin lines are couched. The fatter lines, where the beads run perpendicular to the direction of the line, are done in lazy stitch. It was fast and fun to fill in the spaces.

Close-up of Australian fabric without beads
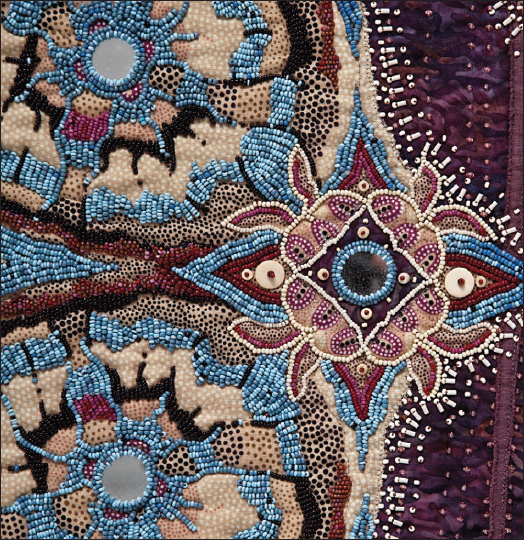
Detail of Australian Aboriginal Meets American Indian (page 105)