We will deal with the use of fringe in more detail in Chapter 4, but suffice it to say that fringes are just long stacks (page 35). They can be attached anywhere and need not be on the edge of a piece.
I usually use a single thread for fringe because a double thread tends to make the strand stiff and inflexible. Working with a single thread is especially important when using pearls in the strand because pearls are notorious for having small holes, and you usually can’t pass through them more than twice, even using a #12 needle.
1. Starting with a single thread, tie a knot and come up from the back of the fabric to where you want the first bead.
2. String the number of beads to the desired strand length. Bypassing the end bead (anchor bead, which can be more than one bead), come back through all the beads.
3. After returning to the fabric through the strand, hold the anchor bead and pull the thread tight. This eliminates the ¼″ or so of excess thread that is sometimes found between the beads and the body of the work. Knot at the fabric and go on to the next strand of fringe.
4. It is important to tie a knot after every strand of fringe. This way, if the thread breaks, or if you do not like that strand and decide to remove it, the strands on either side won’t fall off as well. Beads on the floor are only a good thing as far as the cat is concerned, (and my wife likes the ping, ping they make in the vacuum cleaner).
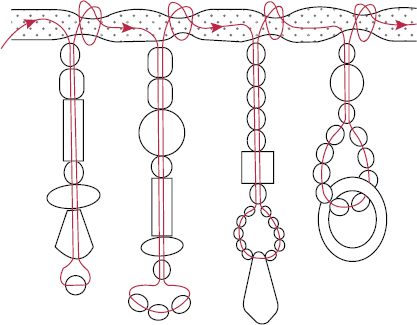
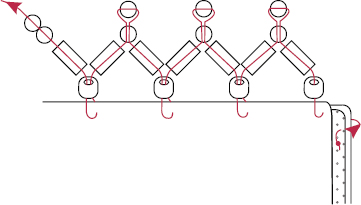
Fringe variations: Note how on some strands many beads are used as an anchor bead unit.

This is my favorite fringe and the one I use most often.

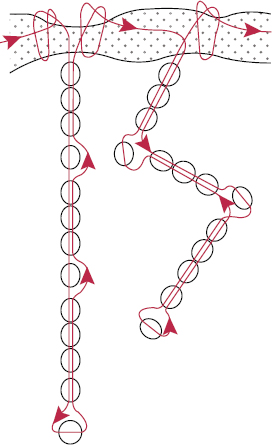
Branching or coral fringe
1. Starting with a single thread, tie a knot, and come up from the back of the fabric to where you want the first bead.
2. Collect beads on the needle until you have the length of strand you want. The last bead (or beads) on the strand is the anchor bead. Bypassing the anchor bead, return through the beads of the main strand to where you want the first branch.
3. Exit the main strand, add the beads for the branch, and, bypassing the anchor bead, return to the main stem.
4. Work your way up the main stem, exiting only where you want another branch, until you get back to the fabric.
Be careful to pull each branch tight to the main stem. If there is excess thread at the top of the main strand, start at the anchor bead at the end of the main strand and work the excess thread all the way up to the top through each branch in order.
(Also Known as Zigzag Fringe)
This is the fringe you make inadvertently when you bypass a bead on the way up from the anchor bead in a single strand of fringe. I rarely use it as a design element, but when kinks happen, it’s nice to know the reason for them and how to do it intentionally if you so desire.
Kinky or zigzag fringe
1. Starting with a single thread, tie a knot and come up from the back of the fabric to where you want the first bead.
2. String a strand of beads to the desired length.
3. Return up the strand, bypassing the anchor bead, and bypass a bead to make a kink at each place in the strand where you desire a kink to happen. The strand must be pulled tight for it to kink. The tighter the thread is pulled, the more acute the angle of the kink. Knot while the thread is pulled to the desired degree of tightness for the kink to remain.
For a vivid demonstration, use a different color of bead where you want kinks in the strand and then bypass those beads on the way back up from the anchor bead at the end of the strand. The different-colored bead should be the “elbow” at each kink.
(Sometimes Called a Single Bead Edge Stitch)
A picot edge is a beautiful way to finish the edge of a small piece, covering the join between the back and the front in lieu of a binding. It also can be used to join two sides of a piece that are right sides out. The thread will show with this variation, so use a color you wish to see against the beads, especially as this stitch requires a double thread.

Single picot or single bead edge
1. Starting with a double thread, bury the knot and come up from the back of the fabric to where you want the first bead, preferably at a corner.
NOTE
For right-handed people, start at a right-hand corner and work to the left. Left-handed people need to reverse the directions and work left to right.
2. Go through to the front, anchoring the thread.
3. Pick up 2 beads and take a shallow stitch (just deep enough to hold the bead in place) through the edge, from back to front.
4. With the needle, go back up through the second bead. This locks the second bead in place.
5. Move over the width of 1 bead from the center of the last bead, pick up another bead, and take another shallow stitch from back to front. Come back up through the bead just added and repeat.
6. When you have gone all the way around a piece, come back up through the first bead and continue to stitch through 2 or more beads to lock the first bead in place and secure the thread.
There are several things to watch for when first starting. They all have to do with spacing.
• If the edge begins to look swaybacked, with the ends pulling in toward the center, the beads are too far apart and are being pulled together at the top.
• If the edge begins to look like a ruffle, the beads are too close together and are jostling each other for space on the edge. You must allow a bead width from the center of the last bead. Crushing beads (Chain-Nose Pliers, page 26) will not serve you well here.
• If the edge tilts toward the face or toward the back, you aren’t taking your stitches straight through, from back to front. If you take a smaller amount of the back edge and more of the front, it will pull the beads to the front. By the same token, if you take more of the back edge than the front, it will pull the row of beads to the back. It is important to keep the depth of the stitch consistent, especially if the thread color shows up against the fabric. This is where those of you who stitch beautifully and evenly will shine. My borders are frequently a bit untidy, but that is consistent with the organic, handmade quality of my pieces and the irregularity of the beads.
• Do not worry if it feels awkward at first. There is such a thing as muscle memory. You will develop a rhythm after you have completed a few inches, and your fingers will know what to do, leaving your mind free to wander or design further.
Variations on Single Picot
When I was just beginning to teach bead embroidery, a student came up to me in a class, complaining that she had done the single picot “all wrong” and that it “looked awful.” She showed me a row of beads lying parallel to the edge instead of perpendicular. I told her that it wasn’t what I had taught, and asked her to please show me what she had done as I liked the new variation she had just invented. She proceeded to do so and here is a single picot variation.

Single picot variation
1. Start with a buried knot on the right-hand corner and pick up 2 beads.
2. Pass down through the top of the second bead and pick up a bead. The direction you pass through the second bead is the only thing you change, but this pulls the bead parallel to the edge.
3. Continue by taking the next stitch a bead width from the center of the last bead. Go through, from back to front, and go down through the bead you just picked up.
NOTE
If you do not like the fact that the beads are parallel to each other but at an angle to the edge, you can pass through all the beads in that section of the edge at least one more time to reinforce and realign them.
This stitch makes a nice lacy edge, looking somewhat like the crocheted edge used on pillowcases or doilies. It is important, however, to use beads that are all of the same width and thickness.
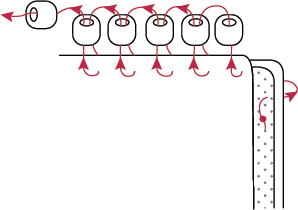
Double picot edge
1. Double picot is similar to single picot (page 44), except you start by picking up 3 beads instead of 2. Come back up through the last bead of the 3 and add 2 more beads.
2. Take a stitch a bead width away, from back to front, and come up through the second bead of the new pair, and so on. The second bead of the first 3, and thereafter the first bead of the new pair, is the travel bead.
It is important to be careful of the spacing. Too far apart and the travel bead will fall between the 2 beads perpendicular to the edge. Too close together and you will start to get a ruffle. It is also important to use beads that are consistent in both length and diameter. I once tore out several inches of a double picot border I had done with vintage faceted jet beads. They were beautiful beads of different sizes, and although they were right for the piece, their irregularity made the edge look sloppy.
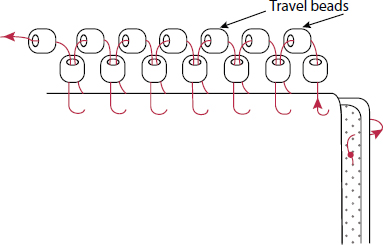
Many variations on this stitch are possible when you change bead size, shape, or color. You also can add more travel beads between the base beads and create a multitude of variations. When you start to widen the space between the base beads of the picot, the spacing becomes crucial. Irregularities will call attention to themselves, and if you are doing more than one row, the irregularities will compound. Tiger Tape, which has regular intervals marked with black hash marks, is useful here to keep the spacing even. The following illustration shows one of my favorite variations.
Multiple picot edge variation
Sewing Beads with Various Hole Placements
As you become more adventuresome in your bead buying, you will encounter beads that need special treatment in order to make them stay in place. Some are easier to sew on than others, but you may find that the bead you want for that particular place is one of the tough ones. Here are some ways of dealing with the vagaries of holes in beads.
Beads with Straight, Lengthwise Holes
Beads with straight, lengthwise holes are the easiest to make stay where you put them because they are secured on each side. Sometimes, when you’re lucky, you’ll find a bead with two parallel holes.

Single and double straight, lengthwise holes
1. To add beads with 2 parallel holes, bring the needle up at A and pass through 1 hole (A to B). Go down to the back and over to come up by the next hole on the same side of the bead (B to C).
2. Go back through the bead (C to D) and through to the back at D.

Two parallel holes
3. Repeat Steps 1 and 2, and then knot to secure the bead in place.

Beads with Vertical Holes
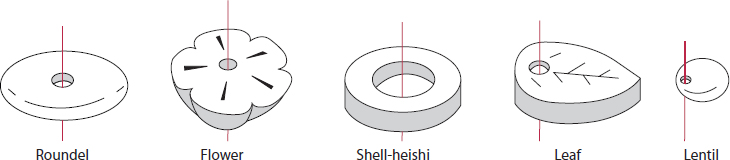
Beads with vertical holes
Beads with holes vertically through them are easy, too. They include roundels, flowers, leaves, sequins, heishi (both seashell and eggshell), bone, stone, buttons, and so on. I frequently use them as bases for stacks, but there are several other treatments depending on the shape of the bead and how you want to use it.
For the leaf shape with a vertical hole in one end, you can use what I call a chicken foot stitch, taking three stitches. The first stitch (A) secures the bead to the cloth. The second (B), to one side of the first, helps stabilize the location and perhaps slightly change the position of the leaf. The third stitch (C) finishes locking the leaf so it will rotate only 60° or so.

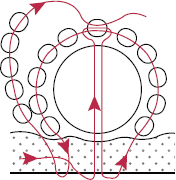
For round beads with multiple rows of small seed beads down the sides, start with a basic stack (page 35). Come back up to one side of the hole through the large bead and figure out how many beads it will take to get from the cloth to the anchor bead. Put that many beads on the thread, pass through the anchor bead, and continue down the other side to the base. Come up to one side of that row and repeat as many times as desired, locking each row in place by a pass through the anchor bead. Handsome flower centers can be made this way.
Sometimes you may have a bead with a vertical hole and want a number of stacks emerging from the center. Start with the first stack, return to the back of the piece, and come up again through the hole in the base bead. Repeat the stack and go back down through the base bead, and so on. You can repeat as many times as you can pass through the hole in the base bead. In this case, the multiple small stacks form the anchor bead.

If you are securing a thick or large round bead, it is a good idea to use seed beads on each side of the bead for the return. This covers the thread up to the bead and down from the bead to the fabric, rather than drawing the fabric up to the level of the hole in the bead. Another way to anchor a large bead is to place it at an angle to the quilt top, adding enough beads to cover the thread.

Returns for large bead

Pulled over at angle
Beads with a Hole through One Side or End

Holes through one side or end
Beads with a hole through one side or end are the most difficult beads to keep in place. They tend to rotate around the thread and are my last choice, unless the color or shape makes them irresistible, in which case I use them. This category includes dewdrops, raindrops, teardrops, lentils, dagger beads, some leaves and flowers, triangles with the hole parallel and close to one side or through one point, and so on. These are the most difficult shape and hole combinations and are to be used only when they are exactly the right shape or color or when no other alternative presents itself. I use what I call a chicken foot stitch to secure them.
1. Come up from the back (A) and pass through the bead. Go down immediately on the other side (B).
2. Come back up a little way from the first stitch (C) and pass back through the hole. Here is where you can finalize the position of the bead by pulling sideways in one direction or the other, thereby rotating the axis of the bead.
3. Go down (D) and come back up on the other side of the first stitch (E); then go through the hole again, going down to the back (F) to secure the stitch and then either coming back through the bead for the fourth time or continuing on to something else.

Hole through one side or end