Fluffy and wool-material flies are difficult to sink, and often require a couple of casts to soak completely and get down to the fish. There is an easy way to solve this problem. If you know that you are going to fish these flies, carry a small zipper-seal plastic bag, add a little water, and soak the flies. Make sure that once you finish fishing you remove the flies from the bag and allow them to dry thoroughly before returning them to your fly box.
Many emerging flies (mayflies, caddis flies, and stone flies) float in the water film, rather than on top of it as do the mature dry spinner forms and the dry flies designed to imitate them. To simulate a struggling fly, take some of your darker colored dry flies and use scissors to trim along the bottom of the fly. That way, the tail, body, and hackle float in the surface, rather than riding high. In essence, you are transforming standard dry flies into flies that float in the surface film as do the specially designed comparaduns.
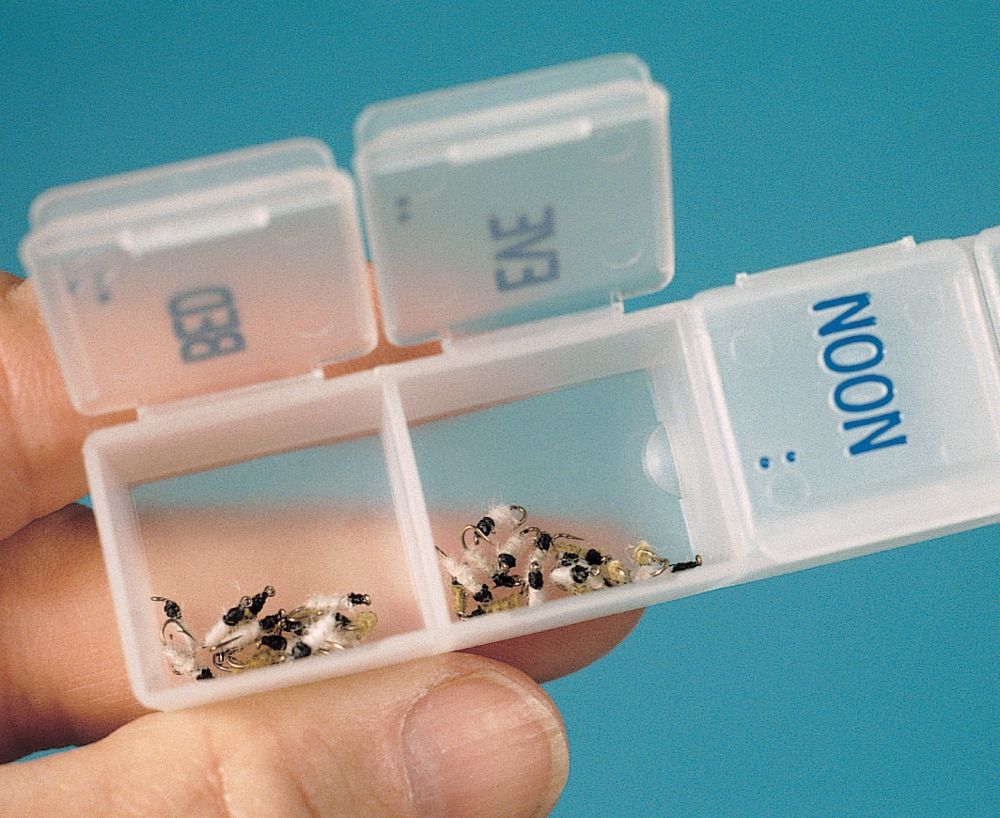
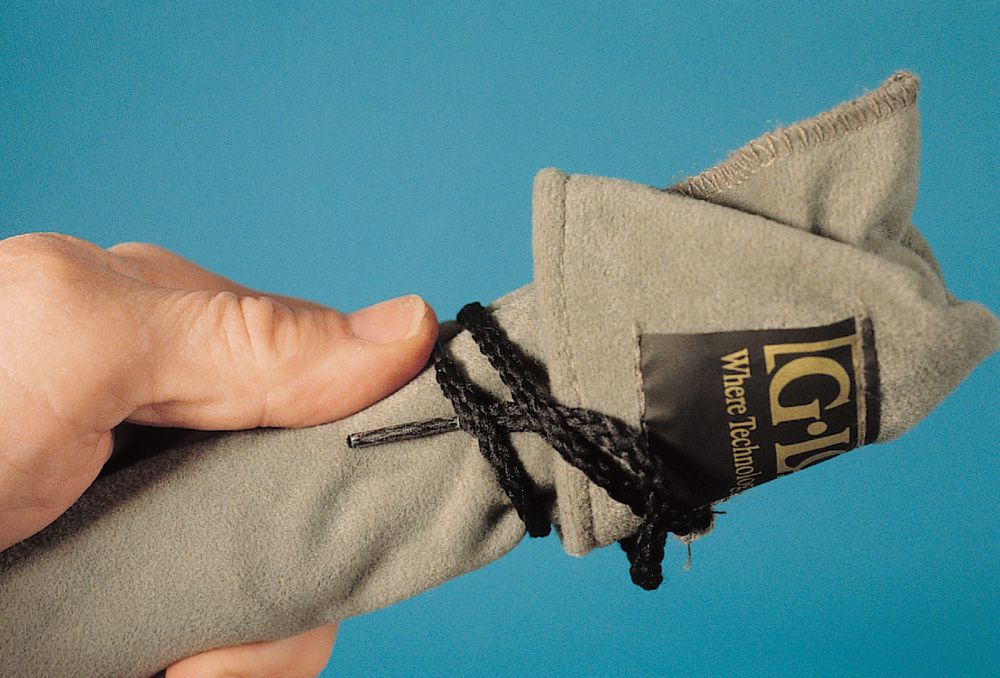
Small flies, size 18 and smaller, have a habit of getting lost, getting mixed up with other flies, or escaping from their compartments in standard fly boxes. To prevent this, use a special box for small flies. Actually, make up several boxes, since the individually lidded compartment pillboxes are best for these small flies.
You can get two styles—one with four compartments for daily dosing, and one with seven compartments for weekly dosing. The big advantage is that each style of box has individual compartments with separate lids, and that lid has internal ridges around all four sides to prevent even the smallest flies from escaping. An added advantage of these is that with only one compartment open at a time, you are less likely to lose flies should you drop the box or the wind gusts unexpectedly.
Unless you tie a fly with a weed guard built in, you can’t add one later—unless you are using large flies. Lure anglers use clear, short lengths of soft plastic that are fitted over the eye of a jig and then threaded onto a hook point to protect it.
Do the same thing with flies by threading your fly tippet through the end of the soft plastic weed guard, tying on the fly, and then rigging the weed guard over the fly point. Since these are not small, this is best with streamer or long-shank flies in about size 6 and larger. You can also use them on popping bugs and sliders. These are available from regular tackle shops and catalog houses—not fly shops.
You can do the same thing by dividing or splitting a clear plastic worm lengthwise into four sections, then cutting to length for use as a weed guard. There is no hole through which to thread the leader, so you have to carry a needle to thread the tippet through the end of the weed guard. An easy alternative is to push the head of the fly through the soft plastic and then tie the leader to the fly.
Weedless flies are not only for weedy situations. They are also great when fishing around snags, through brush piles, over logs, or around docks or any other structure that can hang up a fly. The best weed guard on flies is the double-mono-loop style that covers both sides of the hook and protects it even when snaked on its side over a log.
To use split shot effectively to sink your flies, use several small split shot instead of one or two big split shot. Position the split shot along the leader several inches apart to spread out the weight so that there is less likelihood of bottom snags or rocks catching the weight. This also allows for a more lifelike movement of the fly in the water.
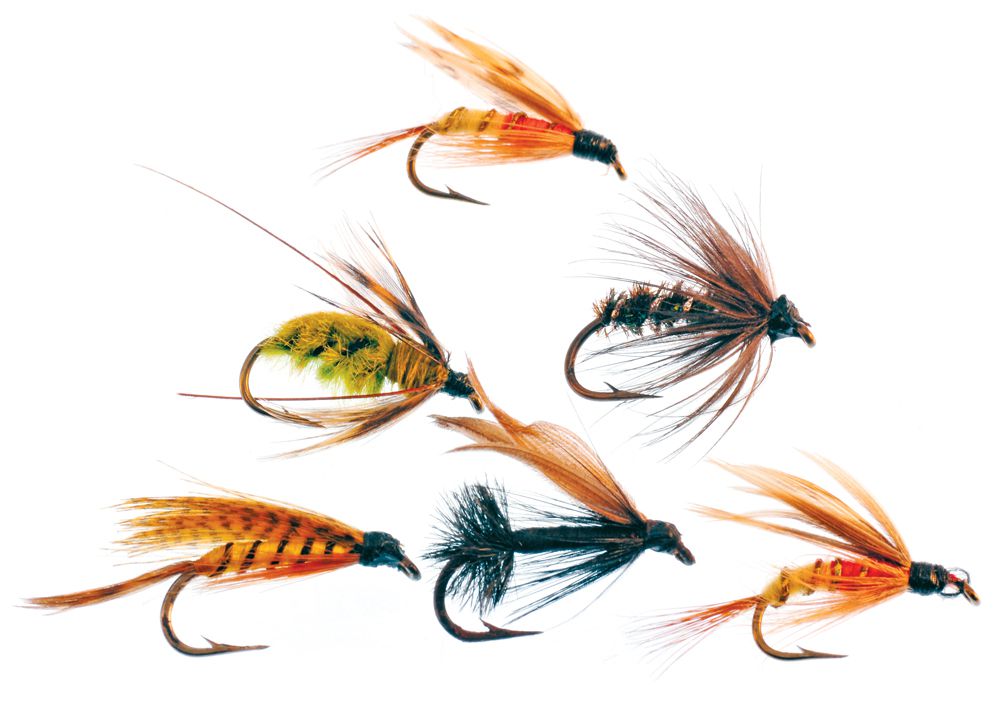
Pick streamers that simulate local baitfish when choosing streamer flies. Thus, for freshwater trout fishing, pick patterns such as the Black Ghost, Black Nose Dace, and White Marabou that simulate dace and small freshwater minnows. For inland striper fishing, pick slab-sided flies that simulate shad that are food for these game fish. For bass and other warm-water fishing, pick fat and dark brown flies such as Muddler Minnows and similar patterns that simulate sculpins and mad toms.
In saltwater, choose large flies such as white and tan Deceivers that simulate mummichogs or killifish, bright-sided patterns that imitate glass minnows or silversides, or very slim, long flies that look like sand lance or eels. Simulating the local baitfish populations is the same as matching the hatch with insects to give the fish what they are used to seeing and eating.
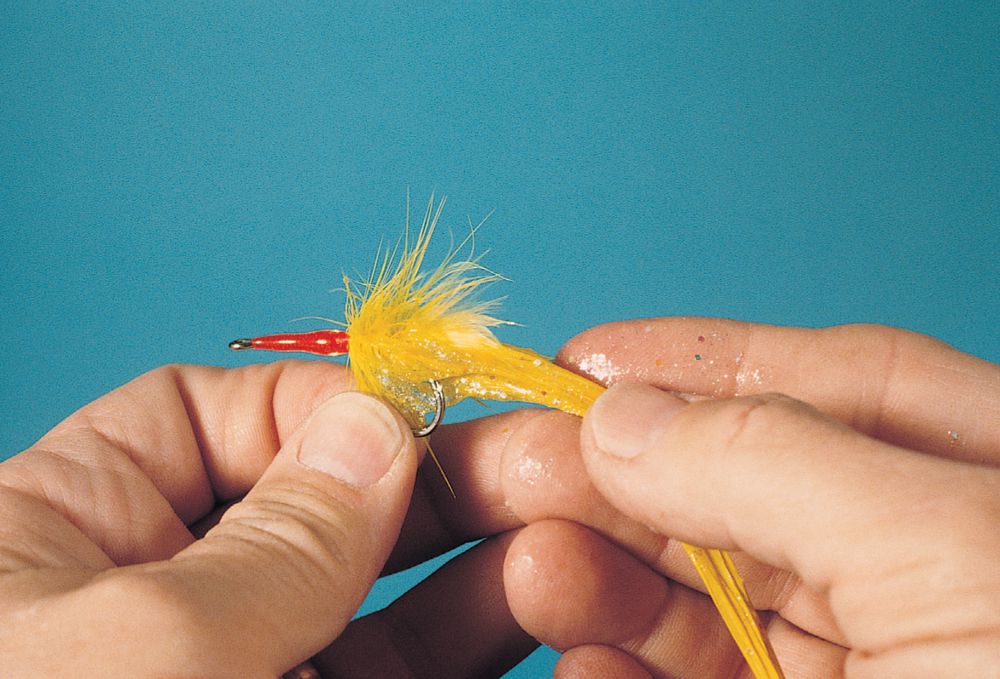
You can add flash easily to any streamer fly while on the water. Carry some of the glitter gel that women use on their bodies for fun and evening wear. Use a small dab rubbed into the wing of any streamer fly to add flash. The gel will wash off as the fly is used, but this also spreads the glitter in the water to simulate scales, thus adding to the attractiveness of the fly. You can also make your own concentrated glitter by mixing fine or coarse glitter from a craft store in a clear gel, such as that used for hair. Store the glitter in a small jar or bottle for instant use in the field. Make sure this is not illegal where you fish.
Even if you do not carry a full field tackle repair kit, it makes sense to carry a spare tip-top, along with a tube of heat-set glue, in your fly vest. That way, if you do unfortunately break a tip section of your rod, you can glue on the spare tip-top and continue fishing. Make sure that the tip-top you carry is a size or two larger than your tip end, since breaking a tapered tip section will require a larger tube than the one mounted on the rod. Carry a few matches or a small lighter to melt the glue, then smear it on the broken rod tip end and slide the spare tip-top in place.
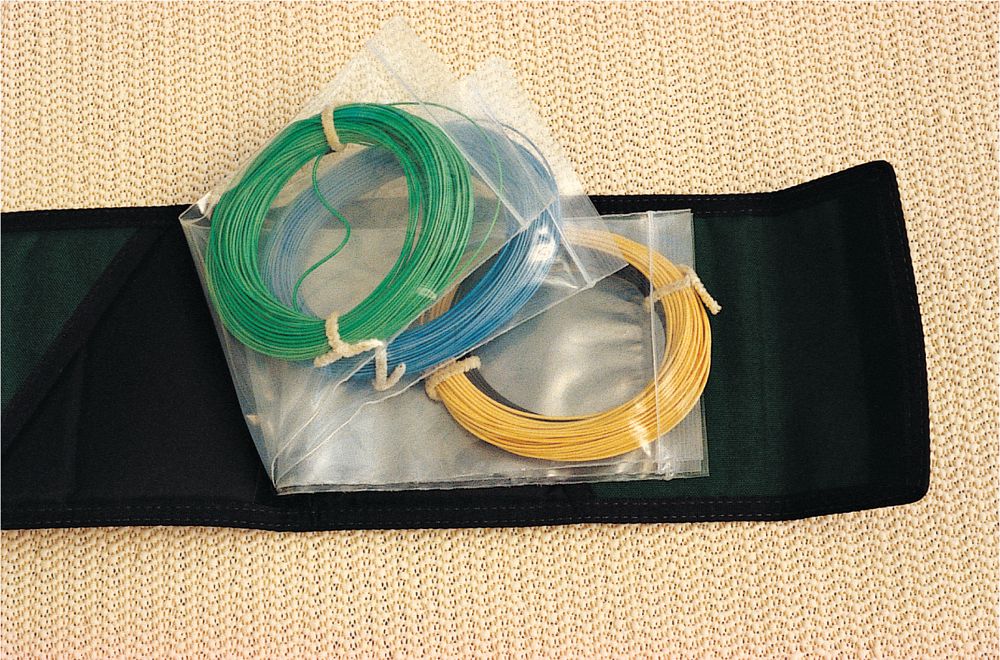
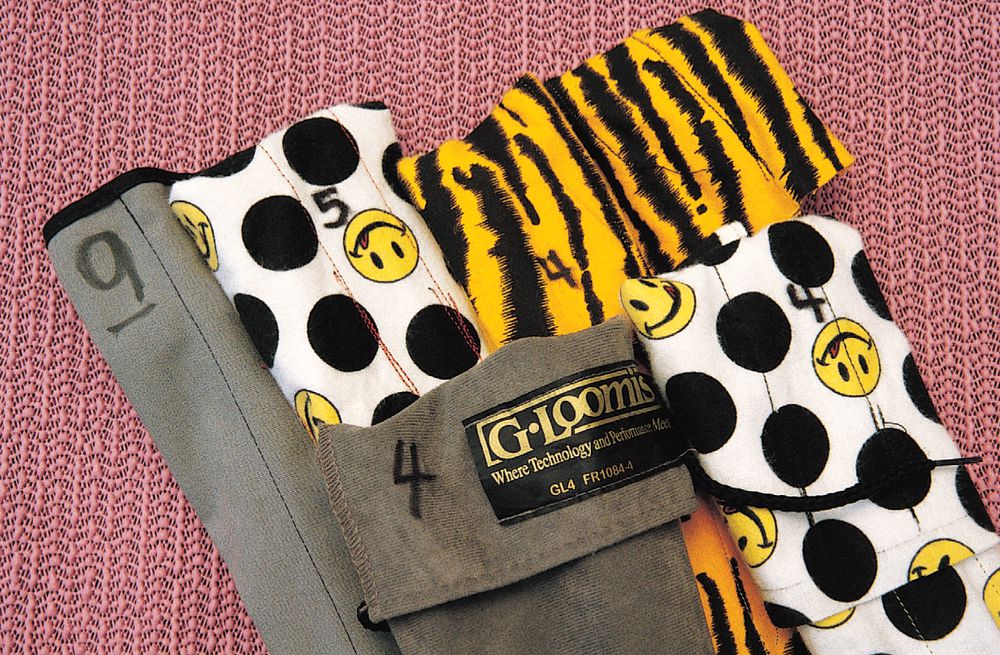
Spare lines are easy to install if you use the loop-to-loop connections of line/backing previously described. But you have to carry them some way. The best way is to coil up each line, use a string-tag label to mark the line weight and other characteristics (the marking system described on page 34 for weight and sink rate should suffice), and store them in a case. Try a nylon-fabric CD case, often available on sale for a few bucks from discount stores. Store each line in a separate plastic sleeve. You can carry up to half a dozen lines in one of these cases. If carrying this on the stream, slip it into the rear pocket on your fishing vest.
To test fly hooks for sharpness, hold the fly in one hand and rest the point on the thumbnail of the opposite hand. Without applying any pressure, pull the fly across the nail. If the fly hook catches in the nail, the point is sharp. If it slides, the hook needs sharpening. Do not use pressure when doing this—you want to see if the fly hook catches without pressure, not drive the hook through your thumbnail!
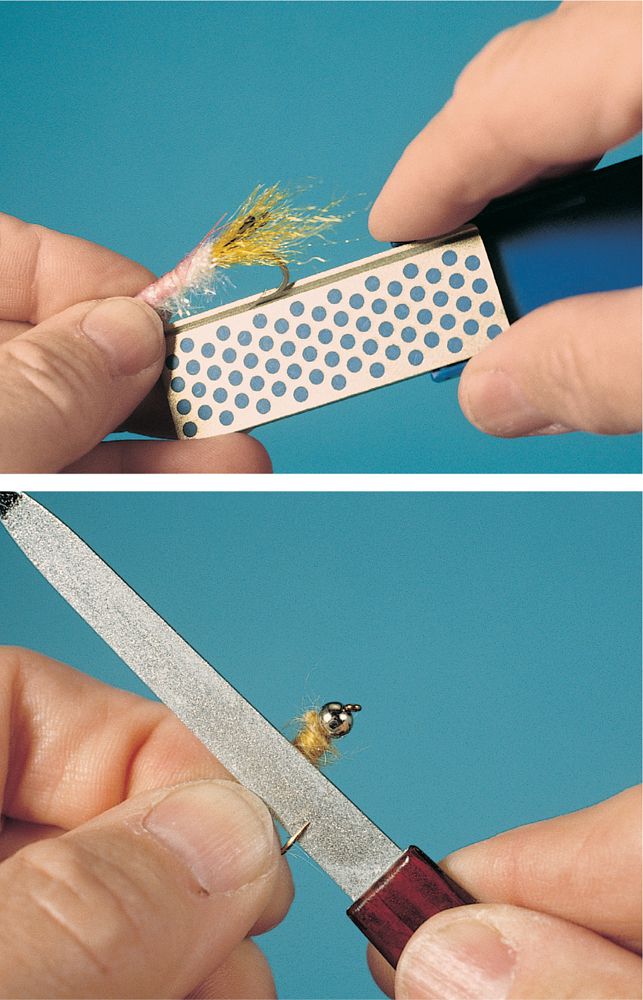
Because they are smaller, fly hooks can sometimes be more difficult to sharpen than hooks used in other fishing circumstances. The best way to sharpen any hook is with a diamond hone. When picking a diamond hone for hook sharpening, pick one that is slim enough or small enough to work on fly hooks.
For very small flies, run the sides of the hook point on the hone, and then touch it up along the bottom area of the point. For larger hooks, run the hone at an angle over the sides of the hook point and then touch it up along the point bottom.
Diamond dust fingernail files, available in drug stores, are easy and inexpensive hook hones for flies. They are very thin, so they can work easily in the gap of fly hooks to triangulate the point. Buy several and keep one in each fishing vest, fanny pack, shoulder pack, leader wallet, or wader pocket. Use these often to touch up flies.
Check your fly hooks for damage while fishing. This is especially true after snagging something, or if your fly ticks something on the backcast. Flies break when they hit rocks. Check for dull flies by touching the point to your thumbnail and sharpening if necessary.
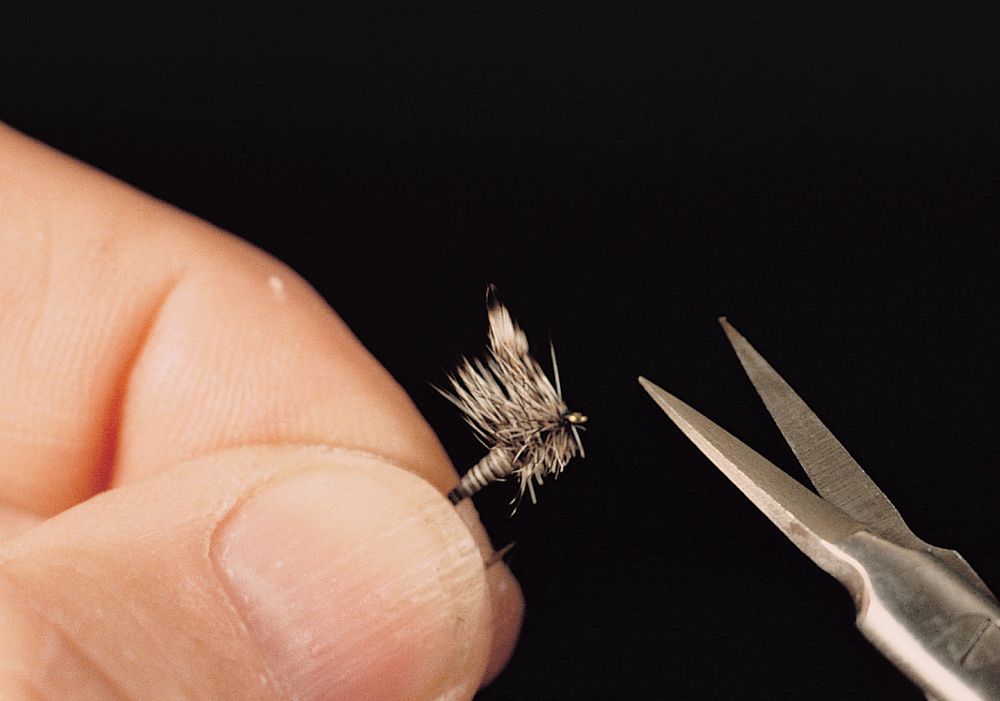
Most flies have a good hook gap—the distance between the shank and the point at which a fish is well hooked. Carefully check flies with full bodies or those with deer-hair-spun bodies, such as many bass bugs. These flies, if the deer hair is incorrectly trimmed, may have enough of a hair body to block part of the gap and prevent good hooking. To correct flies that have a blocked gap, use trimming scissors to cut away materials in the gap area. Make sure you do not cut the fly-tying thread as you do this.

The barbs on hooks designed to keep fish from becoming unbuttoned are not as important as we think. To make unhooking fish easy, pinch the barbs down with pliers. Use a flat-nose pliers held in line or on the axis with the hook point. This also makes it quick and easy to remove a fly should you hook yourself or a companion.
Some fly fishing areas have regulations that require fishing only with barbless hooks. Be sure to check your local regulations before heading out.
Fishing large saltwater flies requires a heavy shock, or bite, leader tippet. To keep a fly and short tippet ready rigged, use one of the two types of snelled hook holders used by saltwater surf anglers when bait fishing. One type is a round plastic tube with notches around the opening at one end (for hooks or flies) and a round rubber flange with cuts at the other to hold the mono snell or fly shock leader. You can use these to hold either wire or heavy mono bite leaders.
The other type of snelled hook holder is a flat bracket with openings for the hooks (flies) at one end, and tension spring clips at the other for the snelled leader loop. You can do the same thing with short bite leaders for fly fishing, forming a loop connection in the end of each bite leader. Possibilities for mono include a perfection loop knot, figure-eight knot, or surgeon’s loop. For saltwater or warm-water fishing, use the above or a crimped-leader sleeved loop in braided wire or haywire twist in monel wire. These are not leader stretchers, but can hold several rigged flies, ready to have the bite leader tied to the tippet.
Fly anglers argue over rattles in flies. Many anglers swear by them, especially when fishing for species such as pike, redfish, stripers, and largemouth bass. They can attract fish, since bait makes noise that attracts game fish. Crayfish, for example, make clicking noises with their claws as they move or when they feel stressed or threatened. In all cases, rattles may not help, but they certainly do not hurt.
Situations where rattle flies shine include fishing deep and fishing in muddy, or murky, water. Often these flies are at their best when visibility is limited. The best way to fish these flies is with a series of slight twitches to cause the rattles to make continuous noise. The best flies are head-weighted so that each twitch throws the rattle to the back of the chamber to make noise and each pause causes the rattle to slide forward as the head of the fly sinks first.
Gel-spun lines are being used more frequently as fly backing, and they offer several advantages for fly fishermen. The braid is similar to the Dacron used for most backing, is very strong for a given diameter, and has little stretch (less than Dacron).
The disadvantage of the gel-spun lines is that most of them are very abrasive and have to be handled carefully. If used wrong, they can cut you; this can be particularly dangerous with line running out of the reel. You cannot hold the line or wrap it around your hand to break off a snag—it will cut you. Used carefully, however, a gel-spun line can offer more line capacity with greater strength backing than Dacron.
Generally, anglers consider 20-pound (9.1-kg) Dacron backing the standard for most fly fishing. Those after big fish (sharks, large tarpon, billfish, or large snook) or fishing in snaggy areas choose 30-pound (13.6-kg) Dacron. Some fly anglers after tuna use 50-pound (22.7-kg) Dacron backing because of the possibility of the tail of a tuna hitting, abrading, and breaking lighter backing. If after fish no larger than 20 pounds (9.1 kg) under normal fishing conditions, choose 20-pound-test (9.1-kg) backing. If after larger fish, choose 30-pound (13.6-kg) Dacron backing.
As mentioned on the previous page, gel-spun lines are an alternative that provides you with stronger backing and increased line capacity.
Need more backing on your fly reel? You can get some by cutting back the rear portion of any weight-forward line that you are using and using the added space for backing. This is easy to do the next time you change lines or do reel maintenance. Note you can only do this with level or weight-forward lines—you do not want to cut back a double-taper line. Cutting back the fly line usually makes little practical difference to your fishing, while adding backing insurance. Most lines are about 90 to 105 feet (27.4 to 32.0 m) long.
If you don’t cast the entire line, it becomes unnecessary bulk on the reel. For example, if your maximum casting range is about 60 feet (18 m), cut back the line to 70 feet (21.3 m) [keep 10 feet (3.0 m) of line for insurance] and use the rest of the reel capacity for backing. Note that you must cut the line from the rear—the running portion only! Then follow the tips for adding any fly line and backing (see Adding Backing to the Reel, above right) to fill the reel properly and completely.
To correctly add backing to the reel, first tie an arbor knot, then place a piece of tape over the loop knot to secure the line to the arbor. Next, secure the reel on a rod and crank the line onto the reel, running the line through a heavy work glove or clean rag. Note that fly reels do not have a level wind as do bait-casting reels, nor the reciprocating shaft of spinning reels, both designed to place the line evenly on the spool.
Use the little finger of your glove/rag hand to control the line and guide it side-to-side on the reel for neat, even spooling. By spooling the line tight on the reel, you reduce the chance that the line will dig into previously spooled layers of line when a fish makes a run, causing a break-off as the line pinches. This system is best for all backing lines and is very important if you are using gel-spun lines for backing.
An alternative to this method is to spool the line on extra tightly, using one of the newer line spooling machines designed for all reels and spools, such as the Cyclone Line Winder from Pure Fishing.
The thicker and stiffer fly line loop can sometimes cause a loop-to-loop connection of Dacron backing and fly line to slip into an ineffective girth hitch, where the Dacron backing loops around itself. To prevent this, run the reel twice through the large backing loop so that there is an extra turn of backing around the fly line to keep the loop-to-loop connection secure.
Drags work differently in different reels. Some manufacturers seal them and, therefore, the drags do not need lubrication or maintenance. Some drags have special washer materials and require special lubricants or must be used “dry.” Many drags have a large cork washer. This creates a braking force when it rubs against the reel spool or a metal plate attached to the spool. You must lubricate these, preferably with neat’s-foot oil. You can get kits for this, like the Abel kit containing sealed metal reservoirs of oil, grease, and neat’s-foot oil.
The best drag setting on a reel is a light drag. Too heavy a drag will break off a fish, since the water resistance of line is often enough drag to keep a fish from coming unbuttoned. One way to check a drag directly off of the reel is to hold the leader in your mouth and pull out line with your lips until you can no longer pull line. This will usually be a drag of 1 or 2 pounds (0.5 or 0.9 kg).
There are several ways to increase drag. One is to palm the reel on those reels (most of them) that have an external palming rim. The next best way is to raise the rod to about a 45-degree angle. This increases the functional drag (not the drag off of the reel) through the friction of the line going through the guides. Note that water resistance on the thick line also creates drag on any run.
Use all three of these methods. An added advantage of raising the rod to 45 degrees is that the limber rod provides insurance against the leader tippet breaking.
Anglers debate about whether to rig reels to retrieve line with the casting hand or the opposing line hand. If you are not after big fish, it doesn’t matter much, provided that you are happy with your rig. Many experts agree that if you are after big fish that run out a lot of line or you are making long casts that require frequent lengthy reel retrieves, it is best to have the reel handle on the “rod casting” side. Thus, for big fish, always set up your reels so that you switch hands to fight the fish and retrieve with the dominant (casting) hand.
Reasons for this include: your dominant hand has more strength for long retrieves; your dominant hand can retrieve in small circles (spinning, with which this is often compared, requires large hand-turning circles); and your dominant hand has finer control if you must use a palming technique to exert drag pressure on the reel. Remember to fish the system with which you are most comfortable.
Fly rod reel seats have knurled locking collets to secure the sliding hood onto the foot of the reel. These are available as up-locking (with the sliding hood and collet nut at the bottom) or down-locking (with the collet nut and threads at the top). The best for most fishing is the up-locking style, since this provides for a slight “extension butt.” This protects the reel from damage when resting the rod on the ground, or allows you to rest the rod against your body to better fight big fish without the reel tangling in your clothing.
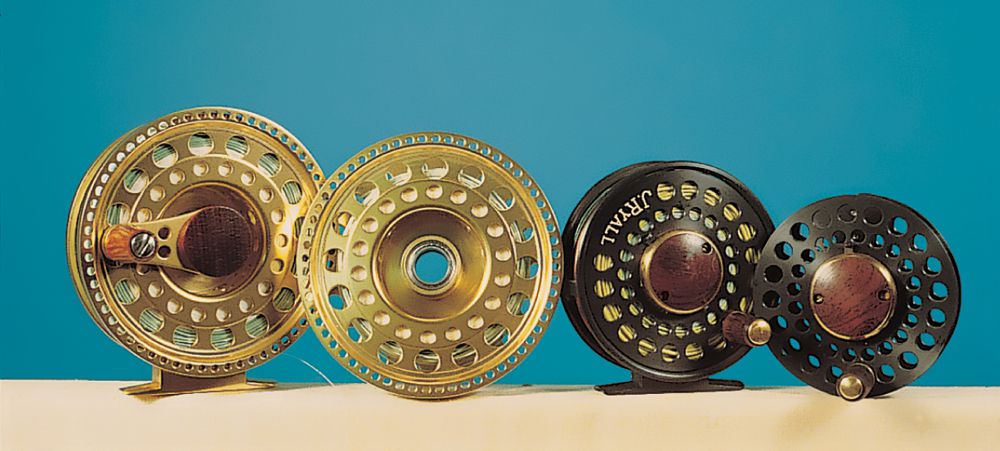
Fly reels come in two basic styles, direct-drive (left) and anti-reverse (right) models. Direct-drive models are just that—the handle is attached to the spool so that turning the handle turns the spool. There is no slippage, no braking action, and no drag as long as you have your hand on the reel handle. Anti-reverse reels have a separate plate or bar to which the handle is attached. The spool slips with the drag setting of the reel when a fish takes line, without the handle turning or moving backward.
Most freshwater and light-tackle inshore anglers use direct-drive reels while some offshore anglers like anti-reverse reels. But reel choice is not that simple. For example, if using a reel set with a very light drag while using a very light tippet, the anti-reverse reel has minimal advantage, since it is easily possible to turn the reel handle as the drag slips without moving or tiring the fish. Thus, the anti-reverse reels are best when using stouter tippets (big game fishing) and heavy drag settings that allow reeling in line when you turn the handle.
If you can’t reel in line, the heavier force required to reel alerts you to this. Direct drive is best for light tippets, but has the disadvantage of the reel handles spinning anytime a big fish takes line. Thus, you have to release the handle on a direct-drive reel when a strong fish takes line or risk a break-off and/or hand injury.

Large-arbor reels are sometimes rated as “better” than conventional reels in that they supposedly retrieve more line with each turn of the handle, retrieve line more quickly, reduce stress, reduce fatigue when reeling, etc. That is true if you are choosing a large-arbor reel that has a larger overall diameter than the reel that you would otherwise use. It is not true if you are buying a large-arbor reel that is the same or very close to the diameter of the conventional reel you are replacing. Pi in physics remains constant, and a large-arbor reel of the same diameter as a conventional reel has no advantages. It only becomes a “reduced-line-capacity” reel. Of course, both reels must have the same spool width to make comparisons equal.
In the past, many fly rods for large fish had long extension butts of up to 6 inches (15.2 cm) in length. These caused more problems than they cured. While they did allow some separation of the fly reel from the angler’s body, they also often caught loops of fly line on the cast, causing break-offs. To prevent this, use an up-locking reel seat with a very short extension butt of no more than 2 inches (5 cm). You still get enough separation of the fly outfit from your body and clothing, but will reduce the risk of catching the fly line.
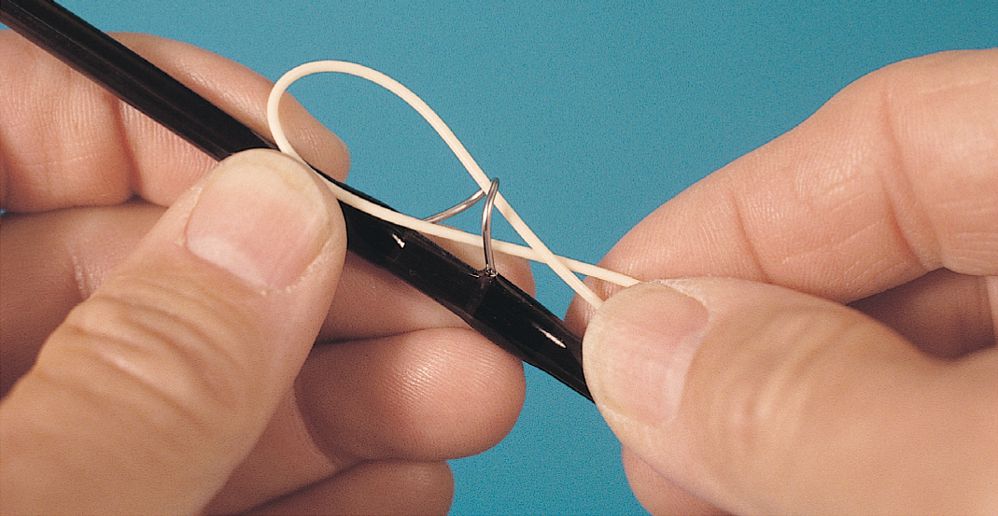
Sometimes, reels will be slightly loose on a reel seat. This can be as a result of the reel seat having too long a barrel for the short reel foot, having thin reel foot ends that are loose under the hoods, or reel feet not wide enough to fill the reel seat hoods. To prevent the resulting reel seat wobble, wrap a rubber band around the non-threaded part of the reel seat barrel. Make sure that you have several turns of the rubber band and that they do not overlap each other. Then, when you slide the reel foot into the fixed hood, the rubber band will create extra pressure and space on the reel seat/reel foot area to keep the reel from sliding around.
If you want a permanent solution, get a wide rubber band and glue one or more sections of it to just the reel seat area where the reel foot touches the reel seat.
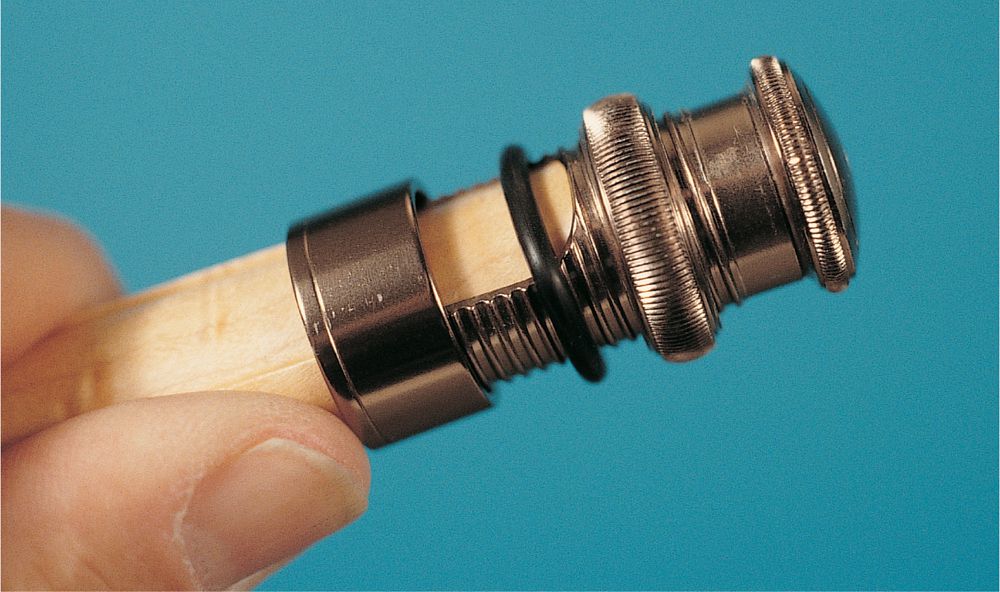
Reels that have a single collet nut and a sliding hood can become loose while fishing. To prevent this, get an O-ring from your hardware store that will stretch over the rod butt and is no larger than the diameter of the collet nut. Slide this in place between the collet nut and the sliding hood. When you tighten the collet nut, the neoprene O-ring creates constant pressure on the hood and nut to prevent slippage and loosening.
Lots of fly reels today are expensive, but a simple way around both the cost and multi-line problem is to buy spare spools for different fishing situations. Spools are less expensive than a new reel and most reels allow easy spool exchange with a flip lever on the front of the spool. Thus, you can change to the line of choice before each trip, or carry a spare spool in your vest to switch from floating to sinking-tip to sinking lines or shooting heads. Just make sure that the spools you buy are an exact fit for the reel, and that the spool holds both the line and necessary backing for the fishing you plan to do.
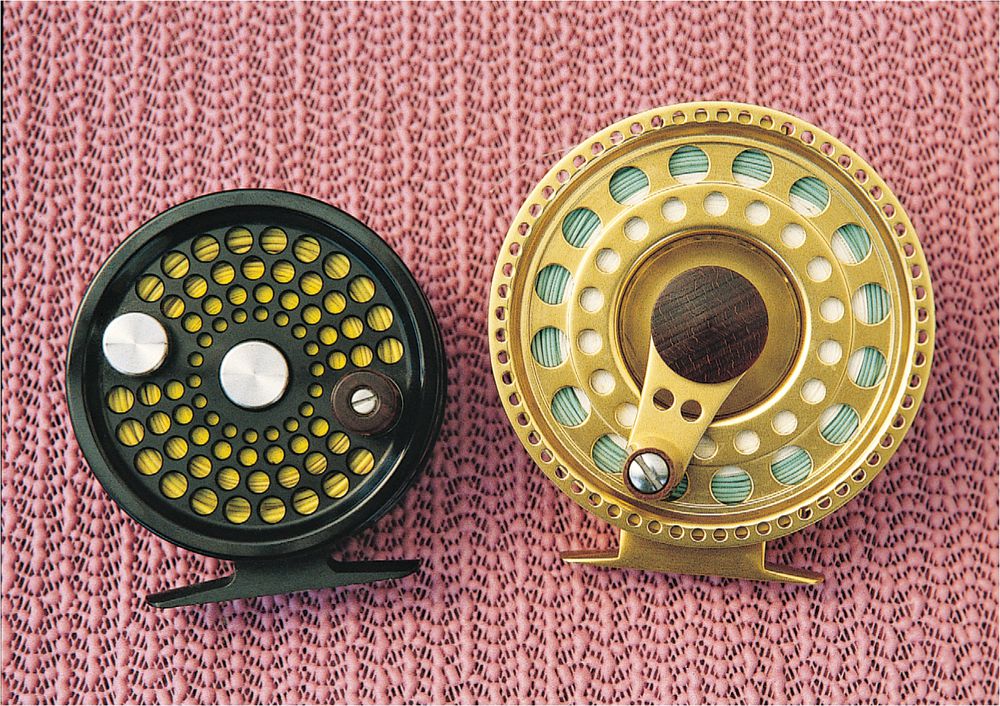
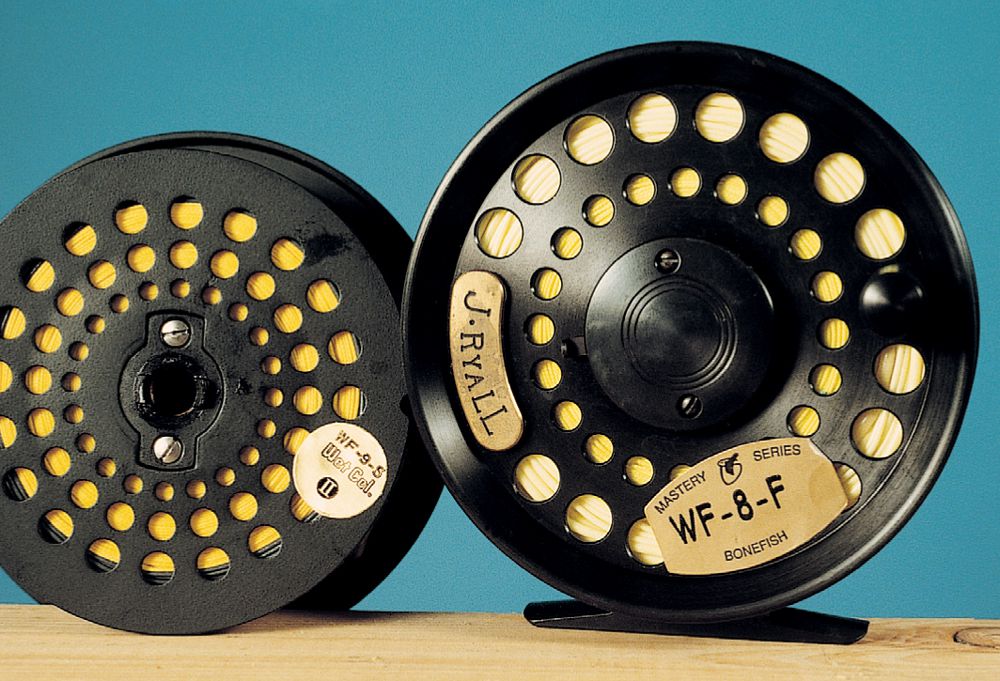
Mark your fly reels with the line size and any other particulars of the line (tropical or cold weather, sink rate, etc.). Do this on the side plate of the reel with a small self-stick label or with a label maker. Protect the label with a covering of clear tape. You also can do this on the outside or the inside of the reel spool. If placing the label on the inside of a spool, make sure that it doesn’t interfere with any of the pawls, gearing, or drag mechanisms of the reel as the spool turns. Many manufacturers sell fly lines with self-stick markers for this purpose.
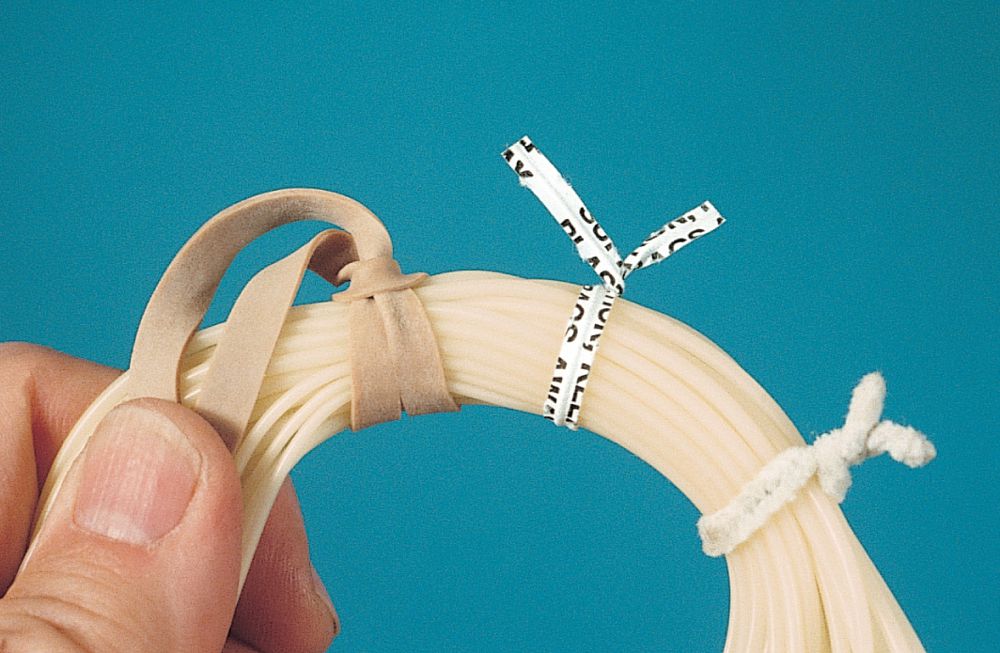
You can control coiled leaders and lines and keep them untangled by several means. One way is to use short twist ties, like those used for trash bags. You can also use chenille-type pipe cleaners, cut in half. A third way is to use rubber bands. By looping a rubber band around the coil and then through itself, you can cinch up the rubber band until it is tight and stays tight on the line/leader coil. For best results, secure at three different spots around the perimeter of the coil. It also helps to label the line or leader so that you know what you have when you use it the next time.
Leaders coil up when stored on the reel or in a leader wallet. To straighten them for fishing, pull on the leader material with your hands or let the leader material slide through your hands as you pull on it. Use tension to create friction through your hands so that the slight heat helps straighten the leader. Make sure that you use less pressure as you progress from the heavy butt section to the lighter taper and tippet. Do not use a rubber patch as was done in the past, since this can create enough heat to harm the mono. Some patches of synthetic rubber also soil the mono. If fishing mono, it helps to store leader coils with a little moisture in a sealed plastic sandwich bag.
An easy way to cut mono leader material is with a nail clipper. To make this simple to use, remove the lever arm and bar from the clipper and use your finger and thumb to press the edges together to cut mono. Strung from a loop of cord, this makes it easy and convenient to cut and adjust leaders and to trim knots. Hang it from a button or “D” ring on your vest.
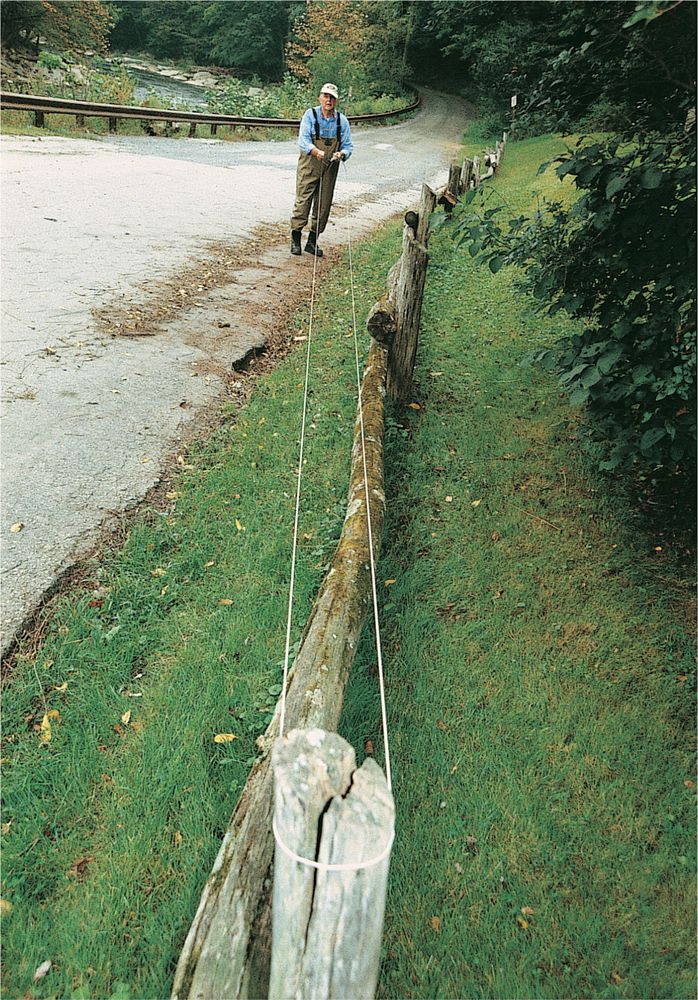
Most fly lines retain some coiling when stripped from the reel for casting. This can impede casting, particularly when shooting line for a long cast. To prepare a line for fishing, stretch it to remove any coiling. This is particularly important in cold weather.
To do this, have an angling buddy hold the loop of line while you hold the end and the reel after you spool out a cast-length of line. Have him or her hold the line at this loop while you pull on both ends. Then return the favor for him with his fly line. If by yourself, loop the line around a tree limb, side mirror mount on your car, or similar structure to pull on the line to remove stretch. Just make sure that any structure used does not have any sharp edges, points, or rough spots that can damage the fly line finish. Round posts or tree limbs are best for this. If all else fails, remove large coils and stretch the line gently but firmly between your hands, a 6-foot (1.8-meter) section at a time. Repeat until you have stretched all the castable line and it is straight for casting.
You don’t want to underfill or overfill your fly reel. But it is difficult to tell how much backing any reel takes if you put the backing on first. To fill a reel properly, first spool on the fly line, front end first, then connect and tie on the backing, and continue to fill the reel with the backing until within about 1/8 inch (3.175 mm) of the spool capacity. Reverse all of this onto another reel of equal or larger capacity. This does not have to be a fly reel; it can be any large spool to hold the line temporarily. Then spool the line again onto another large reel, and finally back onto the original reel. This switching of the line will put the backing on first, followed by the fly line, all with the right amount of line to properly fill your reel.
Run the line through your fly rod by first doubling the line and using this doubled end to thread each guide. That way, if you slip and drop the line, the doubled end catches in the next guide down so that you do not have to completely rethread the rod. Also, once the doubled end clears the tiptop, flipping the rod will pull out the rest of the line and the leader.
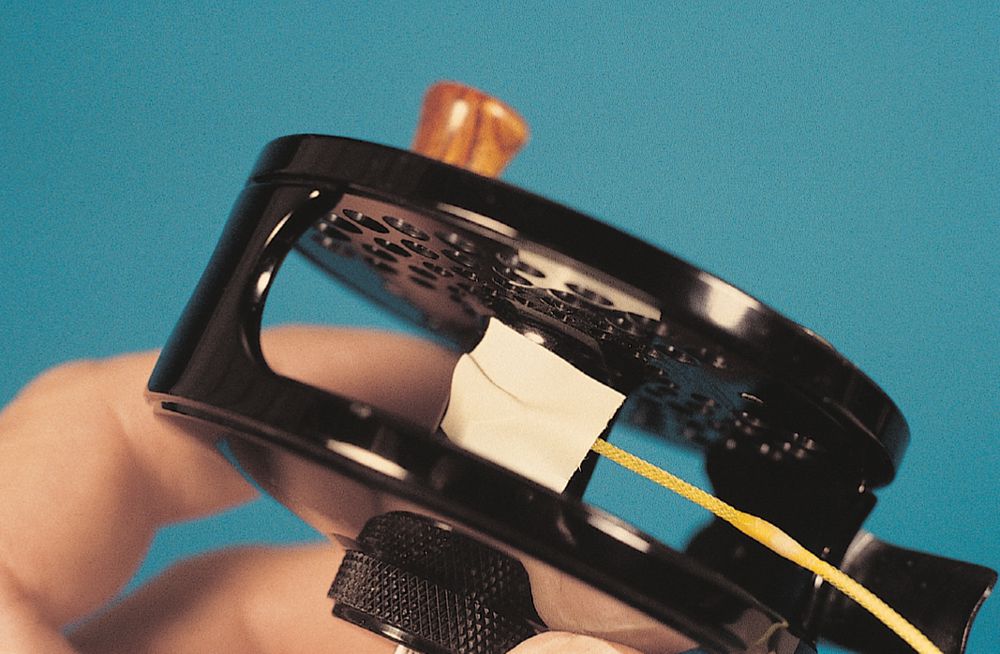
With today’s highly polished reels, the backing arbor knot can slip on the reel if a fish takes enough line to run the end of the backing close to the reel spool arbor. If this happens, the line may slip, making it impossible to retrieve line. To prevent this, run the backing line around the spool arbor twice and then make a slipknot around the standing line with the tag end. Pull tight. Finally, add a small piece of masking tape over the line connection and arbor knot to prevent slippage. The subsequent line wrapped over this piece of tape prevents the tape from coming off or the line from slipping.
To get just under the surface, fish a sinking or lightly weighted fly with a floating line. The floating line will suspend the fly while the lightly weighted fly will sink and fish the upper part of the water column. For this, you can use any floating line and should use a long leader of 71/2 to 9 feet (2.3 m to 2.7 m) or longer. The length and retrieve speed along with the weight of the fly controls the depth of the fly fished.
When picking a fly, make sure that you choose one with only a little weight so that it does not cause the floating line to sink unnecessarily. The best flies are those with only a few wraps of lead on the forward part of the hook shank, or with a metal bead or dumbbell eyes for a little weight. Front weighting the fly helps to give it more movement when you work in a twitching retrieve.
Most shooting lines are sinking style. You can also make your own from lead or lead-free trolling line. Realize that the strength of a lead-core trolling line is in the braided sleeve. To get maximum sink rate of the line, use as light a line as possible, since most lines use the same-diameter lead or non-lead product, and the thinner diameter of the light line creates less water resistance and sinks faster.
To make the line attachment to the running line, fold over the end, wrap it tightly with fly-tying thread, add a whip finish, and seal it with Pliobond or Ultra Flex. Make a similar loop in the front end for attaching a short leader with a loop-to-loop connection. Splice, or tie, a similar larger loop on the end of the braided running line, or make a wrapped, whip-finished loop if using level fly line for the running line. Make a similar loop in the other end of the running line for loop-to-loop attachment to the fly line backing. Spool all the parts on the reel—backing, 100 feet (30.5 m) of running line, and 30 feet (9.1 m) of shooting head—and you are ready to fish.
Because lead is toxic to all living things, many anglers are concerned about using lead fishing products, and more and more states, Canadian provinces, and regulated areas are banning lead in fishing equipment. This ban also often includes brass products, since lead is a component of brass. Most lead in fly fishing tackle is found in lead-core lines used for making sinking shooting heads, in split shot and other sinker choices, in lead wire wrapped onto a hook for weight when tying a fly, and lead dumbbell eyes used for the same purpose.
Substitutes to lead-based products include products of tungsten, bismuth, and tin. Check your local regulations about use of lead, and contact your local fly shop for lead substitutes.
If you don’t want to buy a sinking or sinking-tip fly line but still want to fish deep, there is an easy solution. Use “mini lead heads,” as I call them, which are nothing more than short lengths of lead-core (or non-lead-core) line with a loop in each end to attach into your loop-to-loop system between the line and the leader or in the middle of the leader. If you do attach these in the middle of the leader, you must use loops between your butt leader section and the tapered leader portion. You can buy these mini lead heads (Orvis, Cortland, and Gudebrod, among others, make them) or you can make them using lead-core trolling line. You can also use lead-free trolling line, which is available from several manufacturers, including Gudebrod. The commercial mini lead heads are 2- to 6-feet (0.6- to 1.8-m) long, and have neat braided loops on each end. To make your own, use 27- to 30-pound-test (12.2- to 13.6-kg) lead-core line. Cut the mini head to the length that you want. I like 2-foot-long (0.6-m) lengths, which can be used individually or looped together to make longer lengths for deeper fishing or heavier outfits.
Fold over the ends to make a loop and whip-finish it with fly-tying thread (see Loop-to-Loop Connections on page 31 for details), or make a simple Homer Rhode knot in the end. In either case, seal the knot or the loop wrap with a flexible glue or cement. (See Sealing Fly Line Loops on page 31 for details.)
One simple formula for fly leaders is the 50/30/20 formula, which makes the butt section of the leader 50 percent of the leader length, the tapered portion 30 percent of the length, and the tippet 20 percent of the total length. This means that with a heavy, 10-foot-long (3.0-meter) saltwater leader with a 12-pound-test (5.4-kg) tippet, you would use 5 feet (1.5 m) of 40- to 50-pound-test (18.1- to 22.7-kg) butt section, 3 feet (0.9 m) of tapered section of about 30- to 15-pound-test (13.6- to 6.8-kg), three sections of 1 foot (0.3 m) each of 30-, 20-, and 15-pound-test (13.6-, 9.1-, and 6.8-kg) and 2 feet (0.6 m) of 12-pound-test (5.4-kg) tippet.
Use blood knots for all of these leader section connections. If using a loop-to-loop connection with the line, tie a surgeon’s, figure-eight, or perfection loop knot. All ensure that the loop stays aligned with the leader.
Other factors can be colors of monos, which (when mixed) might alert fish to something unnatural tied to your fly. In standard leader kits, all the monos included are the same brand and type. If you do use different brands of mono, use the stiffer one for the butt section and the limp one for the tippet.
The argument used to be (and sometimes still is) that a double-taper line provides a more delicate presentation of the fly than any of the weight-forward lines. This is not true, although there are a few exceptions. Manufacturers base presentation on the degree or length of the front taper of the line, from the belly to the very short level section at the end. Line manufacturers debate this, citing mass/air-resistance ratios, floating versus sinking lines and their respective diameters, etc., but it basically comes down to front taper length. Many weight-forward lines available today have a front taper that is as long as or longer than that of most double-tapers.
There are exceptions, with the so-called “bass bug tapers” usually having a shorter front taper than that of double-tapers. But with that exception, most weight-forward tapers give you as, or more, delicate a presentation than double-tapers, along with the advantage of the front-weighted belly that makes them easier for distance casting.
The main advantage of a double taper is that you can reverse it when the one end wears out to get double the fishing time from one line. If you never cast long distances, consider this. Otherwise, opt for a weight-forward taper after checking the specs of the respective front tapers of the line brand you choose to make sure that you are getting the line that performs best for your fishing.
We all know that monofilament is impervious to almost anything, except battery acid. Long exposure to sun and heat also degrades it. Avoid products that can impart a scent to the line. (A possible exception is WD-40, which some anglers use to spray lures and baits, stating that it attracts fish.) But fly lines are different in that they are made (most of them, anyway) of a PVC coating over a mono or braided core. The PVC coating is susceptible to some degree of damage from a number of things, including a long list of outdoor and personal products, such as DEET insect repellent, some perfumes, sunscreens, oil, gasoline, fly sinks and floats, alcohol-based products, and petroleum-based demoisturizing agents, such as WD-40.
This last one has always loomed large on the radar screen of fly fishermen, since it seems to make it impossible to spray your reel with this protective petroleum product without hitting the fly line, unless the fly line is removed. Anglers name WD-40 as particularly bad for fly lines—some even suggest it will dissolve lines in short order.
In one test of the reported damaging properties of WD-40, a length of fly line was left soaking in a can of WD-40 for a period of months and checked periodically. After nearly a year in the can, the fly line was found to have stiffened very, very slightly, perhaps a result of the WD-40 removing some of the solvent in the fly line and slightly stiffening the remaining PVC coating. However, the result was still a fly line that could be used with little noticeable effect on the practical fishing properties of the line.
One solution to the problem of protecting fly reels is to spray fly reels with WD-40 and then add the backing and fly line. At the end of each season, strip off the fly line and spray the reel. According to line manufacturers such as Gudebrod and similar petroleum-based products, those products will not affect Dacron line or fly line backing.
Today, fly fishing leaders and tippets are getting simpler. There used to be many formulas for these, but most experts now agree that simple is better. Typically, one simple leader formula of 50 percent butt section, 30 percent tapered section, and 20 percent tippet is right for most cases. And this usually works for any length of leader for different fishing circumstances.
Even level leaders work for most fishing, particularly if you do not need a fine tippet, as for trout. Thus, for bass, pike, carp, and many saltwater species, a single length or 15- to 20-pound test mono works fine as a leader. Tie a loop for line attachment at one end and tie the fly to the other end and you are ready for fishing. Naturally, for some fish such as tarpon you might want a heavy mono end and for pike or musky a short wire leader to prevent cut-offs.
Fluorocarbon for leaders has had a lot of hype, but for the most part it is not necessary for much fishing. Fluorocarbon is less visible in the water, has more abrasion resistance, does not weaken by absorbing water, sinks faster, and is stiffer. It also has a lower tensile strength per diameter, thus reducing the purported advantage of less visibility if you need a certain tensile strength leader or tippet. It is stiffer and thus more difficult to use when tying knots and for fly movement in the water. For fishing deep, fluorocarbon does sink faster, which is an advantage, but a disadvantage when fishing on top. The cost of fluorocarbon is also higher, and it does not break down as mono does if lost as litter.
One way to minimize drag in any fly fishing situation is to use a very long, fine tippet. Make sure that you are using very flexible tippet and leader material that can drift with the current and not stiffen to cause the fly to drag. By using a long tippet, you have the maximum flexibility possible to prevent drag from affecting the fly. By using the finest tippet you dare, you have minimal possible chance of the fish sighting your leader or you and the maximum flexibility in the tippet section.
This same solution applies when sight-fishing in very shallow water for fish like bonefish and permit and on some clear river trout situations.
Striking a fish when using a very light tippet may break the tippet if you are not careful. To guard against this, use a “slip strike.” For this, don’t hold on to the line when you strike. Instead, allow the line to slip through your fingers and rod guides as you make a striking twitch with the rod. This exerts enough pressure on the hook to bury it in the fish, while allowing the line to slip so that you do not overtax the leader and break the tippet. It is a simple technique that takes some time to get used to by allowing the line to slip or slide as you twitch the rod on a strike. Practice this, since it seems foreign to our natural tendency to set the hook with a hard strike.
If you use a heavy shock leader of mono tied with a clinch knot against the fly, the fly may have little action as a result of the stiff mono. To give the fly action, use a loop knot. The best is the Homer Rhode loop knot, which is simple to tie with heavy mono. It does not have the best knot strength, but when used with a heavy shock or bite leader, this makes no difference. The advantage is that the fly can swing, swim, twitch, and suspend independently of the heavy mono bite leader to have maximum action in the water.
Wire leaders are needed when fishing for toothy critters, such as pike, muskie, barracuda, bluefish, and the like. An easy way to attach a fly to a braided wire leader is to thread the wire through the fly eye, then around the wire and back through the formed loop in the opposite direction. Tighten by pulling the tag end of the wire. This also makes it easy to replace flies, since you can back out the tag end, remove the fly, add a new fly, and repeat the tie without cutting the knot. Just make sure that you use this only with standard braided wire.
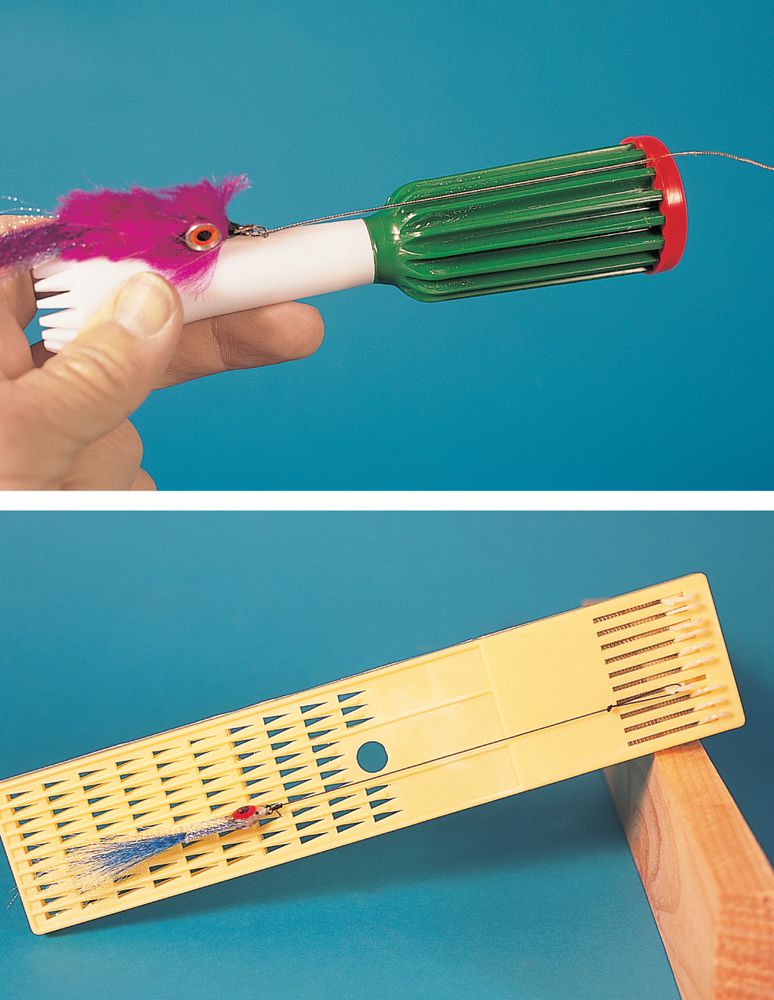
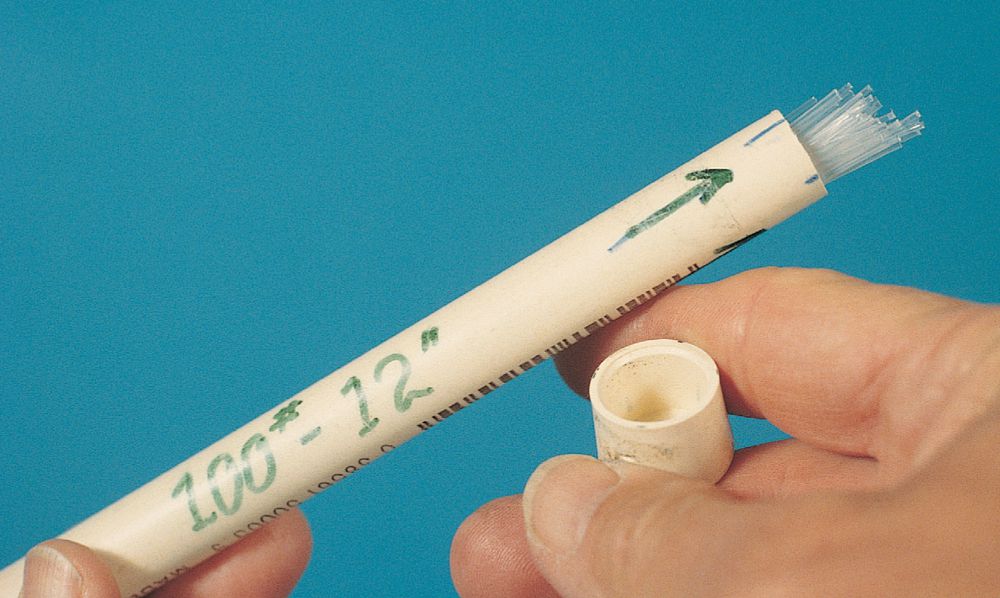
To store mono in 50- to 200-pound-test (22.7- to 90.7-kg) lengths for shock tippets, make a leader section case. For this, get a length of 1/2-inch (13-mm) PVC pipe, glue and cap one end, and buy a second slip-on friction cap for the other end. Make the case about 1/2 inch longer than the lengths of mono stored. Use a permanent felt-tip marker to mark the pound-test measurement of the mono stored inside and the length of the leader material. Mark the slip-on cap end so you know which end to remove.
For some fishing (tarpon and big snook), you will need a heavy shock or bite leader between the fly and the tippet. Something from about 50- to 200-pound-test (22.7- to 90.7-kg) is standard. The problem is that when fishing, it is almost impossible to stretch this heavy leader material to make it straight. One solution is to cut a board the length you want the leader sections, and notch it at both ends. Wrap the chosen mono tightly around the board lengthwise. Then “cook” the mono for a few minutes in a pot of boiling water.
If you do not have a big enough pot, make a dipping tank from a length of 2-inch (5-cm) PVC pipe, glued and capped at one end. Secure this upright, add the mono-wrapped board, and pour in the boiling water. (If holding the PVC, use a funnel to pour the water and hold it with a potholder to prevent burns.) Allow the mono to sit in the boiling water for a few minutes, then remove the mono board and immediately place it in ice-cold water.
The boiling water “relaxes” the mono into a stretched, straight length, while the cold water “sets” it in this state. Once the mono is set, remove it from the cold water, cut off the ends where it went around the board, and save it in straight lengths to use as a shock tippet.
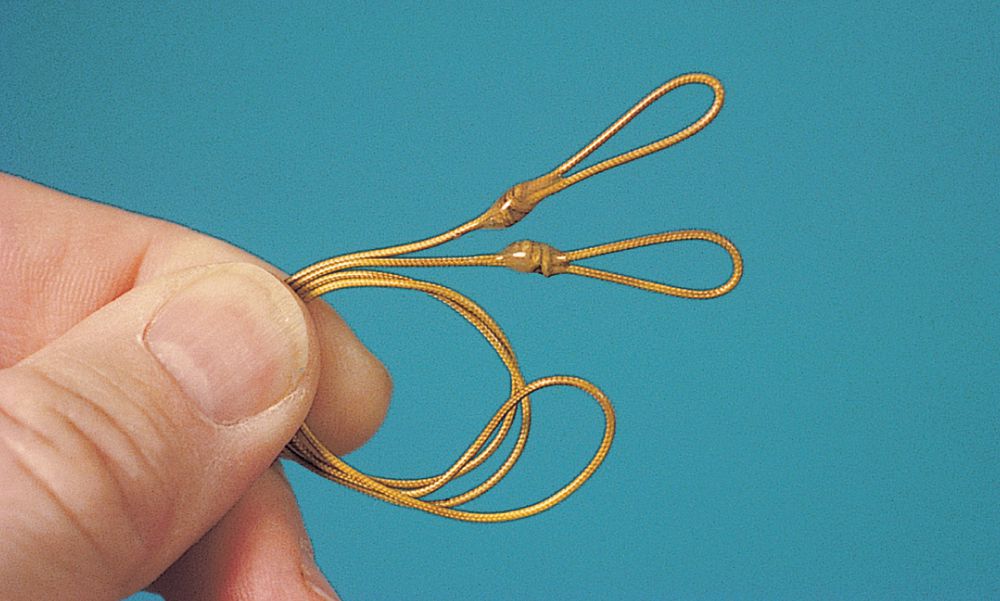
Nail knots used to be very popular for line and leader or backing connections. Today, consider the advantages of the loop-to-loop connection. If you have a spliced or knotted loop in your backing, a loop in each end of your fly line, and a loop in your leader butt, you can easily change anything, anytime you wish. This allows you to change lines from a floating to sinking or sinking-tip while fishing, to change complete leaders, or to add some mini lead heads between the line and the leader to help sink the fly.
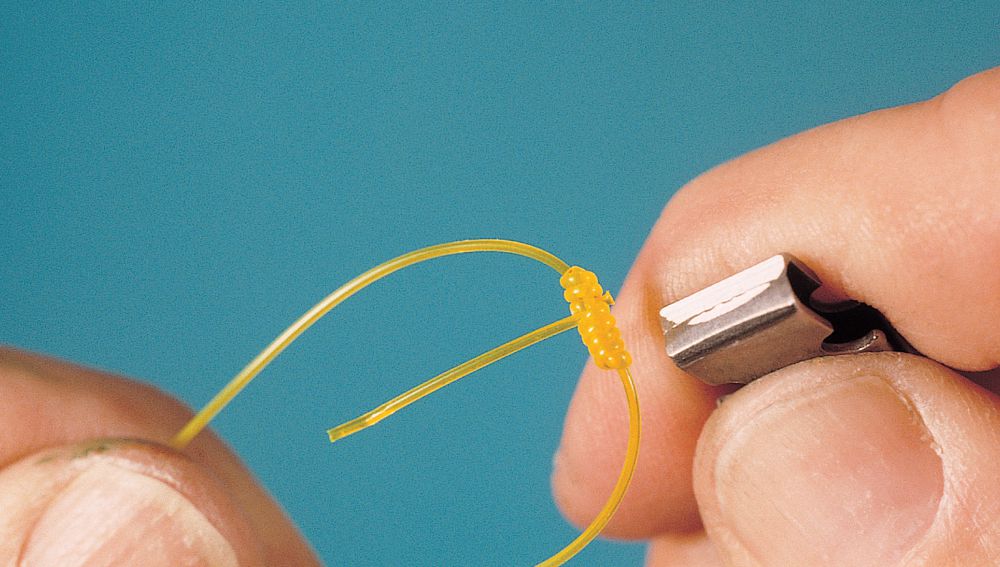
There are many ways to do this, including braided loop sleeves, tied-on mono loops, etc., but the best way to add a loop in your fly line is to fold over and wrap the end of the line itself. This eliminates other weak links in the chain. To do this, fold over the end of the fly line, hold the folded end with some fly-tying thread on a bobbin, and twirl the bobbin around the folded line while holding the loop end with the other hand. After wrapping the loop with fly-tying thread, make a whip finish in the line to complete it. Clip the excess thread and then seal the wrap with flexible glue, such as Ultra Flex, as described in the next tip.
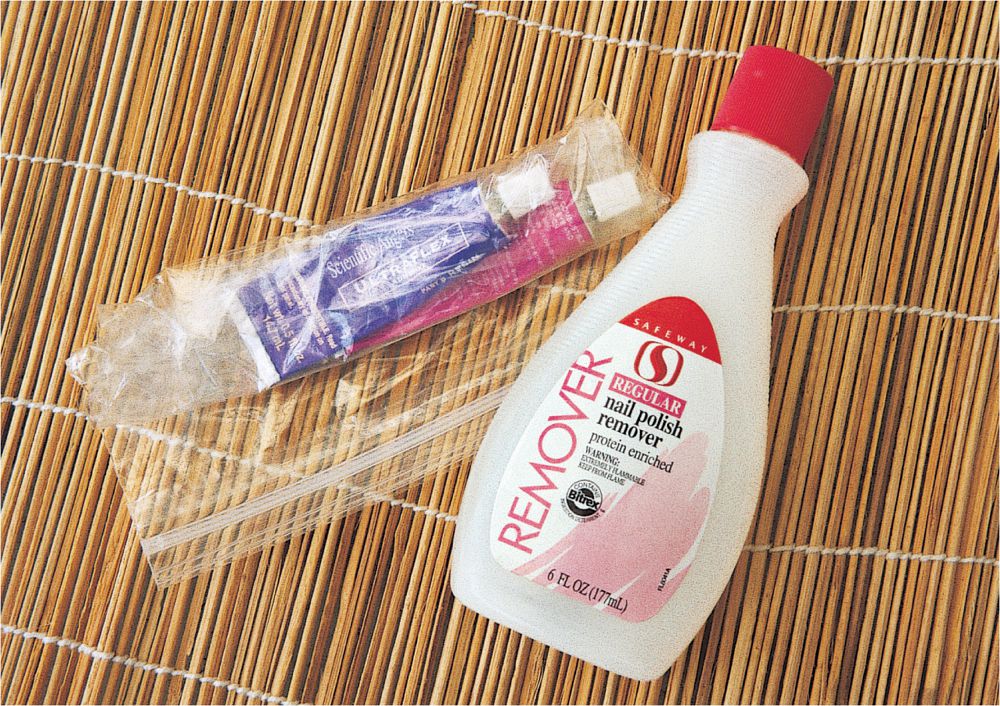
Seal fly line loops to protect them by using flexible glue, such as Pliobond, Ultra Flex, or similar flexible cement. If the glue is too thick, consider diluting it with a solvent. Check the label for the correct thinning solvent or call the manufacturer (most manufacturers list a toll-free number on the glue container that you can call for information). Once the glue is diluted to the proper consistency, apply it to the wrapped section of the fly line only, using a bodkin or small disposable brush. If you are using the popular Ultra Flex to seal your fly line loops, you can use acetone fingernail polish remover for dilution. It is similar to MEK (methyl ethyl ketone), the basic solvent for this glue.
The Turle knot is an old knot, but still a good one for tying your leader tippet to your fly. Anglers most often use Turle knots with dry flies, but you should only use it with flies tied on hooks with turned-up or turned-down eyes. This is because the leader goes through the eye of the hook with the knot tied around the hook shank/head of the fly in back of the eye. Thus, tying this on a straight eye hook results in the leader tippet adversely kinked up or down.
When tying knots and pulling them up securely, make sure that you trim the knot properly. To do this, use nippers or nail clippers to cut the tag end of the line close to the knot. The cutters on most pliers are seldom good for this, since they often do not allow close cutting. If you leave an extended tag end, the knot is no stronger, and you’ll catch more algae or cause a sinking leader to float longer. Remember, tighten securely, and then trim closely.
“Wind knots” are overhand knots that occur in fly leaders while casting. While we call them wind knots, really they are the result of poor casting (perhaps a gust of wind now and again) that causes the leader to wrap and knot around itself. If the wind knot is loose, it is easy to untie it, straighten the leader, and keep on fishing. If the knot is tight, break or cut it and retie the leader, using a five-turn blood knot. Trim the knot ends closely. A tip from Chuck Edghill is to use two hook points (two flies) to pull apart a loosened knot.
When you pull a knot tight in monofilament, it creates friction. Friction creates heat, which can be damaging to line and knot strength. To prevent this, and to ensure tight and secure knots, lubricate the loose knot with saliva, and then pull the knot tight. This both lubricates the knot to prevent friction and heat and also allows you to pull the knot very tight. Also, experts say saliva masks odors that might scare fish.
Years ago, Scientific Anglers introduced a line that had a slightly swollen area for several inches at the point where you should pick up the line for the next backcast. The purpose was to give fly anglers a tactile signal where to pick up a given fly line off the water for the next cast. While it was designed with the beginner or inexperienced fly angler in mind, it was handy for any angler. This great idea remains in the Scientific Anglers’ beginners Headstart lines with the Telecast bump, but you can do the same thing on any fly line using one of two methods.
One method is to mark the fly line for an inch or two (2.5 to 5 cm) along this “sweet spot,” using a permanent felt-tip marker. While it is not tactile, you can see this marked part of the line coming into the guides to signal when to pick up for the next cast. The other method is to tie a long nail knot around the line at this spot using 10- to 20-pound-test (4.5-to 9.1-kg) mono. Clip the tag ends short. You can feel this pick-up point as the line runs through your hands. To determine this spot, rig your rod complete with a practice fly (no hook) and practice over water to find the best spot to pick up the line considering your fishing and casting ability. Then mark the line at this point.
Do this with each outfit, since it varies with the weight and type of line used. You can also combine these methods, marking the line for a visual signal as well as wrapping it with mono for a tactile signal, or combine both with a wrap of bright fluorescent mono. You can do this only on floating or sinking-tip lines, since sinking lines must be retrieved most of the way in and pulled out of the water to make an aerial roll cast.

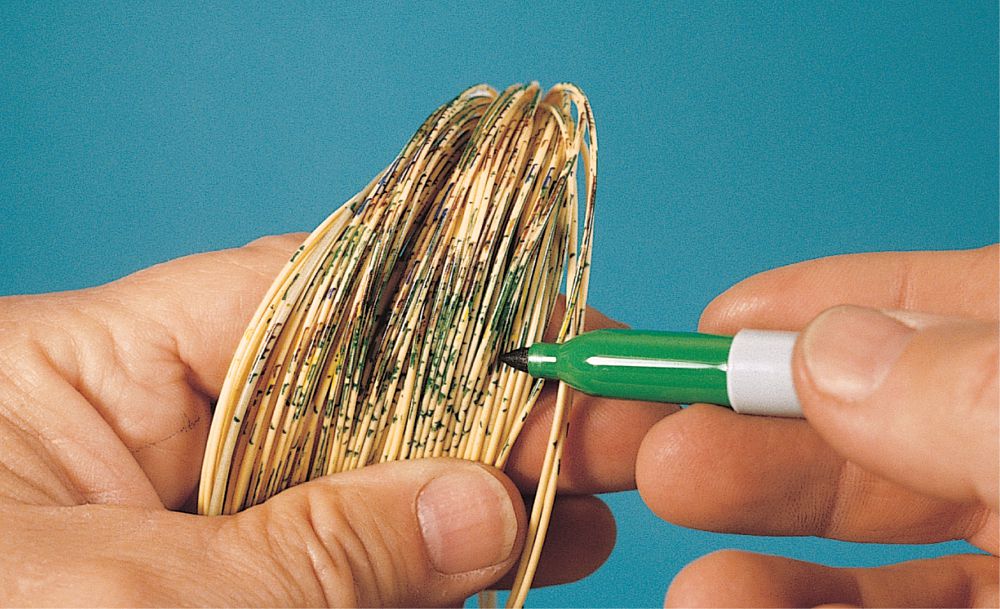
To keep track of which fly line is on which reel, mark all your fly lines. This is particularly important to prevent line mix-up if you use the loop-to-loop connection system. Do this with a system of small marks (bands) to indicate “1,” and a wider mark or band to indicate “5.” That way, you can mark all lines simply and easily. One wide mark and three small marks is an 8-weight line, a 3-weight line will be three small marks, and a 12-weight line will be two wide marks and two small marks. Do this by using a permanent black felt-tip marker on light colored line and mark a few inches from the line end.
Use a razor to split lengthwise the felt tip on a wide felt-tip marker (about 1/4-inch/6-mm) width, then secure or have someone hold the marker while you rotate the line in the slot to mark it. Make two marks close together and then connect them to make the wide “5” mark.
To mark the line weight of sinking or sinking-tip lines (which are usually black or very dark) or any dark line, use bright or white fabric paint. This thick paint is water-based acrylic, but it becomes waterproof when cured for 24 hours. Mark the lines the same way you would mark floating lines with the wide and narrow bands for “5” and “1” respectively. The marking diminishes in time but is easy to restore using the same steps above.
It goes without saying that trout spook easily. They even spook with the solid color of fly line in the water. To camouflage your line, strip it from the reel, wrap it around your hand or a large box (a cereal box is ideal), and then randomly mark the line with different-color, permanent felt-tip markers. Good colors are black, green, brown, blue, gray, and tan. Neatness does not count here, since any random coloring keeps the line from looking like a straight stick of color and thus makes it less visible to fish.

Aluminum rod tubes are great for protecting your rods, but the caps are easily lost. To prevent this, tie the cap to the top of the rod tube. There are two ways to do this. One is to use heavy mono, nylon cord, or scrap fly line to tie securely around the top of the rod tube, then extend the end of the cord through the hole in the middle of the cap and tie a knot to prevent the cord from pulling through the hole. If the hole is too large for a knot, add a small bead or button to the cord before making the knot.
You can also drill a small hole in the top side of the rod tube (remove the rod first, for obvious reasons!). Drill a hole in the center of the cap (if it lacks one) and then thread cord through the two holes, knotting as shown to keep the cap in place and attached to the tube.
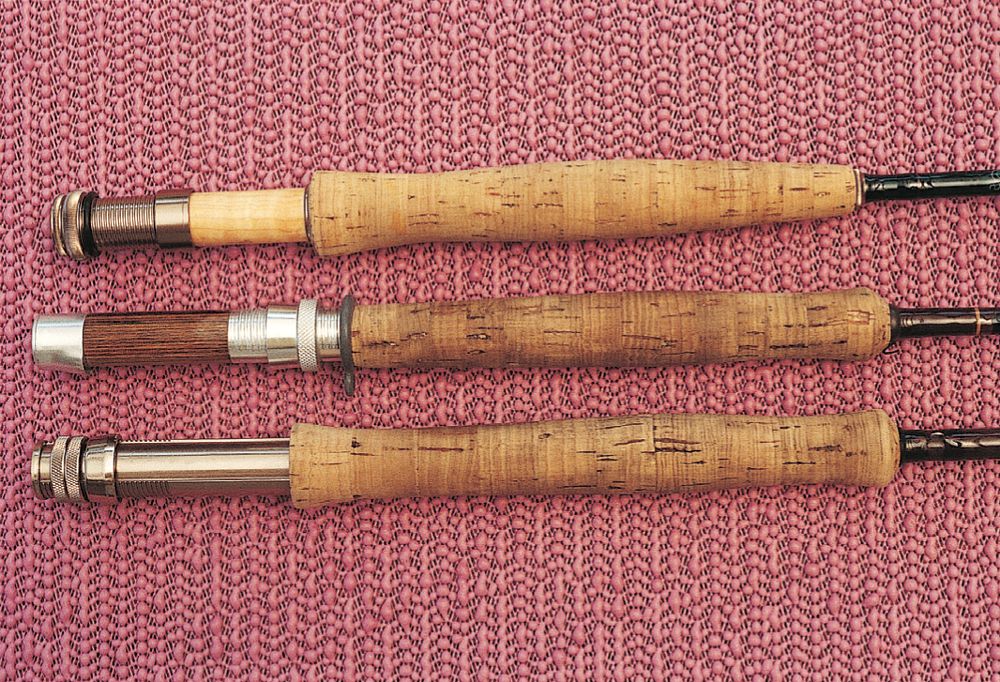
When buying a fly rod, make sure that the grip is comfortable. If you want a certain brand of rod, you may not have a choice, but if you are open to several brands, there are options. While cigar-shaped grips are popular for most small rods, some rod companies use a Half Wells grip, with the Half Wells put on in reverse so that the thin tapered end is at the front. This makes the rod more aesthetically pleasing, but far less functional. And form should follow function.
Many rod manufacturers use the same reversed Half Wells on larger rods. This is wrong, since anything over a size 6-weight rod, or any rod that you use for long casts, should have a Half Wells put on correctly (swelled end at the front) or fitted with a Full Wells (swollen at both ends). This swollen end makes a good thumb rest and makes it easier to punch out a long cast than with a cigar grip, reversed Half Wells, or other slim grip.
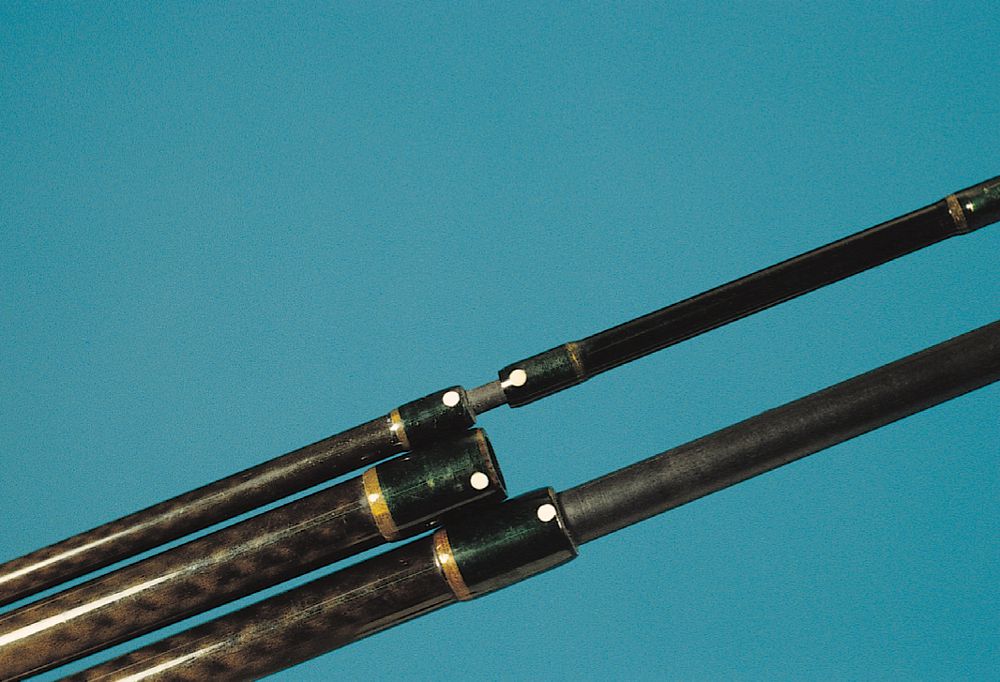
Many rod manufacturers make similar-size fly rods on the same blank and then through an external grinding process adjust the blank weight and action to the desired line weight. This makes it almost impossible to ever get the right rod sections back together if you mix up several three- or four-piece travel rods of the same brand. To prevent mix-up of rod sections, mark each section with a dot of colored paint that can help line up the guides as well as identify the rod sections.
Use different-color dots for different rods and double dots if you have a lot of rods and run out of colors. For best results, use a waterproof enamel, lacquer, or acrylic-based paint. To mark the rod, touch a pin or finishing nail head to the paint, and then touch it to the rod at the ferrule location and in line with the rod guides.
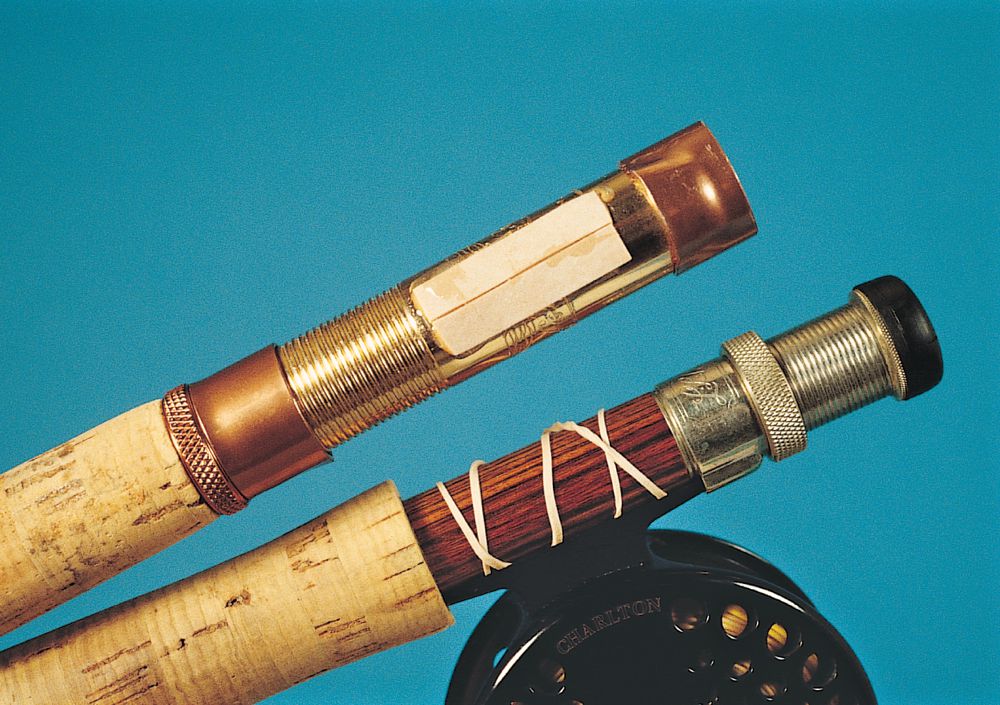
Why have a fly rod bag when the rod came with a rod case? More and more rods come in cases that have attached partition bags—that is, they are part of the case and do not come out, as did the separate bags in aluminum cases of the past.
Many fly rod bags from manufacturers have a tie cord at the top; some also have a tie cord in the middle. If you use these, make sure that you tie loosely to prevent the rod from bending or warping during storage in the rod tube. Use a very loose bowknot in these situations or just wrap the ends of the cord around the top of the bag after folding over the end flap.
You can buy fly rod bags or you can make your own. I make them from remnants of flannel cloth sold inexpensively at fabric stores.
Be sure to buy enough material to make the style and number of bags that you want. If you are working with three- or four-piece rods, you can get by with 1 yard (0.9 m) to make several bags. If you have two-piece 9- to 10-foot (2.7- to 3.0-meter) rods [half the rod measures 41/2 to 5 feet (1.4 to 1.5 m)], you will need 2 yards (1.8 m) of material, unless the material is wide enough. Fifty-four inches (137.2 cm) is about the maximum width of most materials and some are only 36 inches (91.4 cm) wide.
To make a bag, fold over a piece of cloth to make the bag the right length and diameter for your rods. For four-piece rods, 9 feet (2.7 m) long, make the bag about 10 inches by 32 inches (25.4 cm by 81.3 cm). For two-piece, 9-feet-long (2.7-m) rods, make bags 5 inches (12.7 cm) wide by 59 to 60 inches (149.9 to 152.4 cm) long. The extra length in each of these allows the top flap to fold over. The width varies on these cases, since travel rods require four slots; two-piece rods require only two slots. Make the bags wider on rods that have extra-large grips, extension butts, or large stripping guides.
Mark all rod bags, commercial or homemade, with pertinent information. You might choose to mark the line weight, rod length, brand, or something else. Mark the bag at the top flap with a permanent felt-tip marker. With black or very dark bags, sew on a strip of white cloth and mark the cloth with the information. This helps when getting ready for any trip to prevent taking the wrong rod and not realizing it until too late. You don’t want to pull out your 3-weight when getting to Alaska expecting to find a 10-weight for big king salmon.
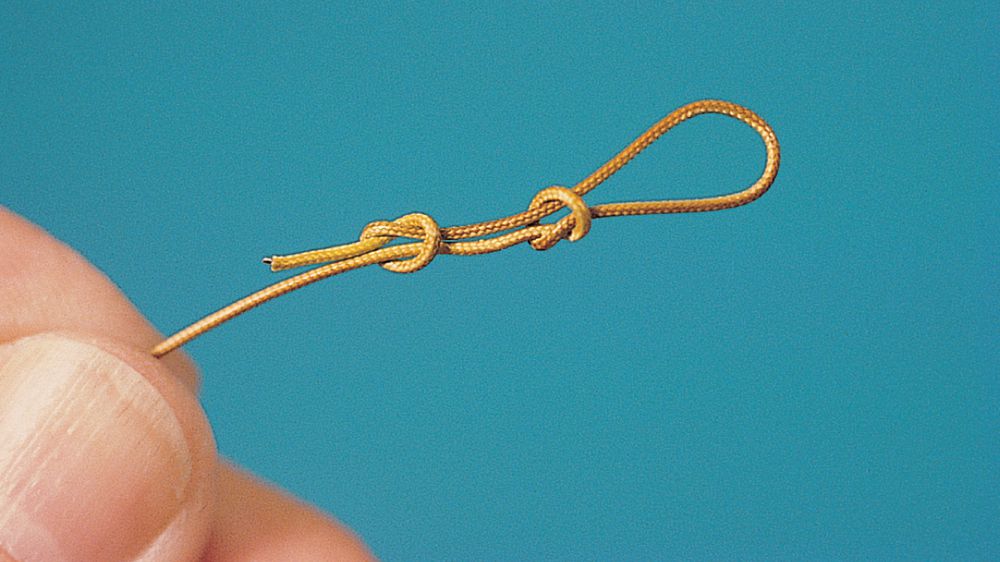
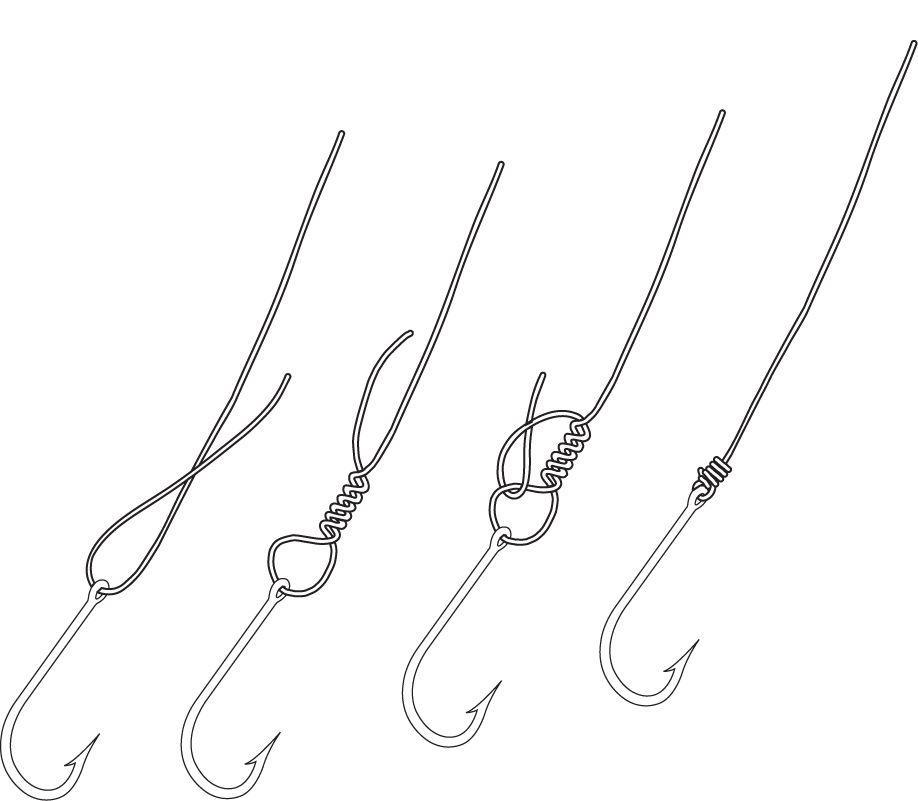
It is far better to know a few knots very well than to try to learn all the knots in the knot book yet have difficulty tying most of them. For most fly fishing, you need only a few knots. These include the following:
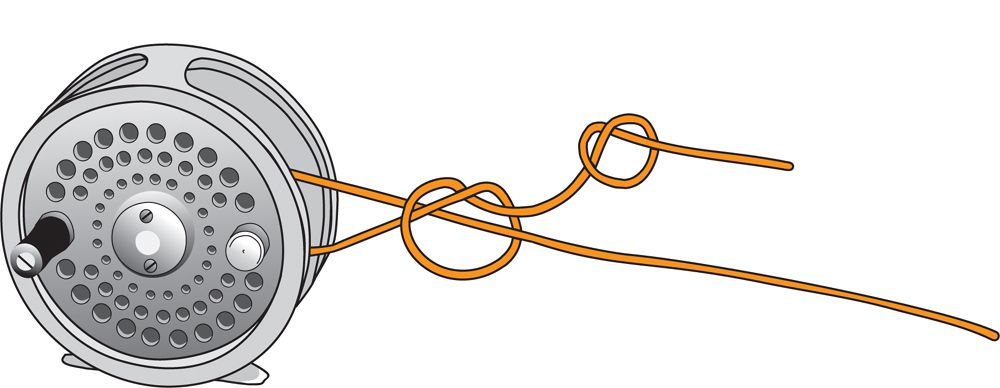
 a simple arbor knot to attach the line to the reel;
a loop added to a fly line for loop-to-loop connections;
a nail knot for the line/leader connection, if you are not using the loop-to-loop method;
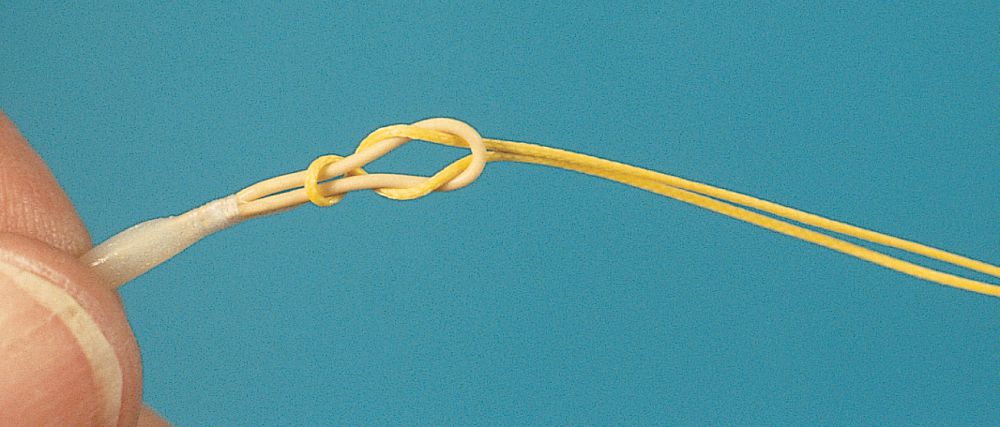
a mono loop knot for leader ends (with loop-to-loop connections), such as the perfection loop knot, figure-eight loop knot, or surgeon’s loop knot;
a blood knot to make and retie leader sections;
a fly-eye knot, such as a Palomar or improved clinch knot;
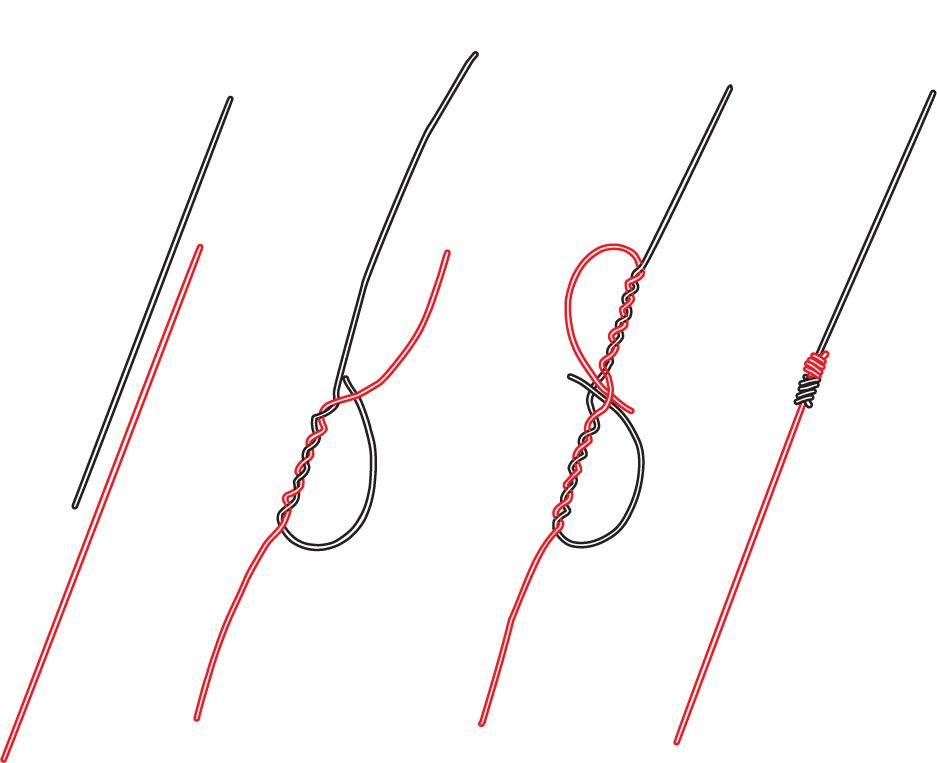
a Bimini to make a long loop in your backing if not tying directly to the fly line.
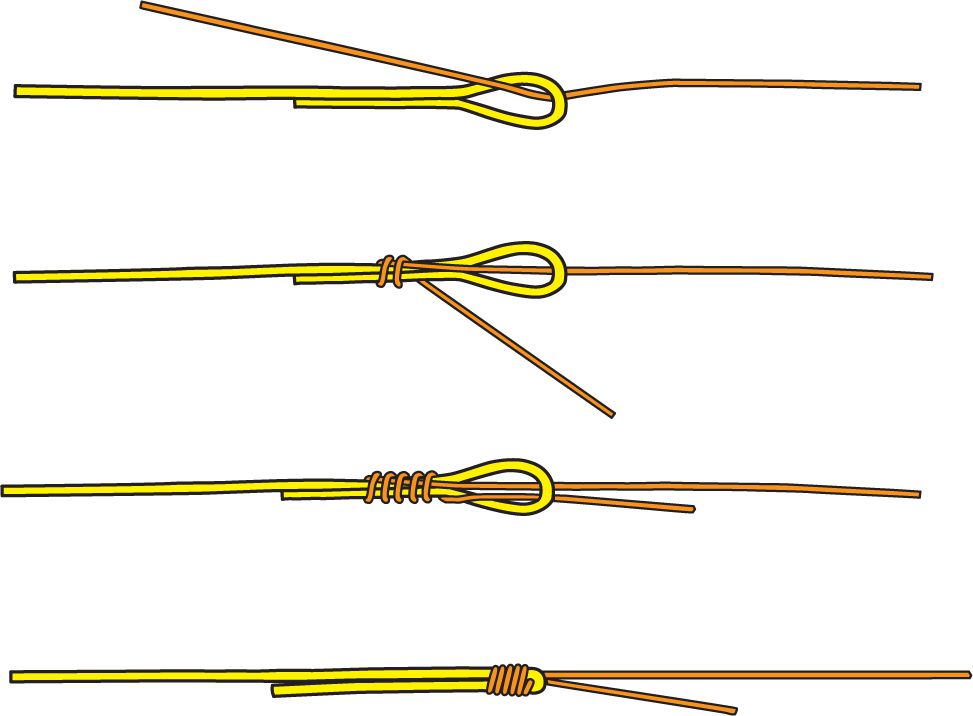
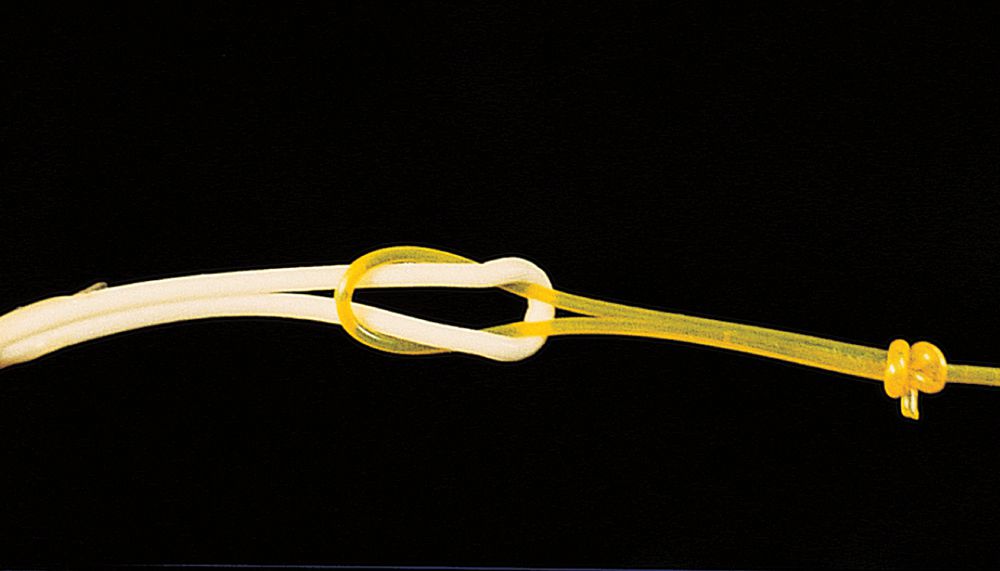
Albright knot
Arbor knot
Blood knot
Improved clinch knot
If you do specialized fly fishing using wire or fishing the tropics, it also helps to know the following:
a figure-eight knot for braided wire when fishing for toothy fish, such as bluefish, barracuda, and pike;
an Albright, for tying a heavy bite leader to a light tippet section or backing to a fly line; and
a Homer Rhode loop knot for tying heavy bite mono to a fly.
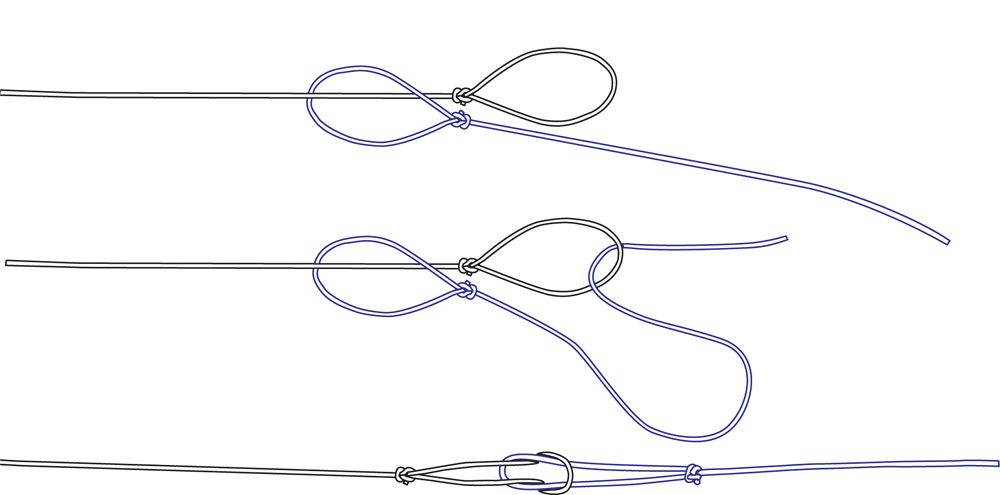
Loop-to-loop connection

Perfection loop
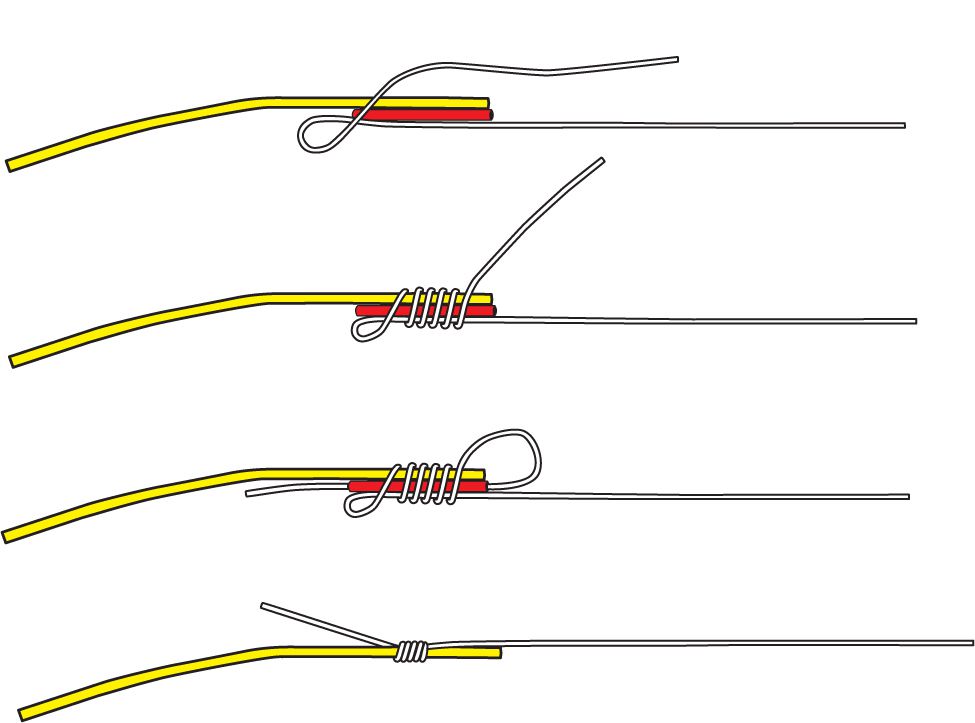
Nail knot