Chapter 20
Creating Your Own Commands
In This Chapter
 Creating new commands
Editing custom commands
Using the Command Browser
Deleting commands
Dragon Professional Individual is a great productivity tool along with its other virtues. In this chapter, you see how to save time when you compose emails, reports, and other materials. “How?” you ask. Get your Dragon Professional Individual assistant to type all the boilerplate text you normally have to type over and over again!
By working with the Command tools built into the program, you can have your Dragon Professional Individual assistant furiously type in all the text you want by stating a simple command. If everything in life was that simple, you would have time to finish all the great literature you keep promising to read.
In this chapter, I introduce you to the auto-text command feature that makes setting up frequent text in Dragon Professional Individual easier. It also allows you to more easily add variable fields to set up auto-texts that may help you fill out a form in which only the fields change.
Creating Commands That Insert Text and Graphics
If you tried counting all the voice commands in Dragon Professional Individual’s vocabulary, you would be amazed at the final tally. They are the commands that Dragon Professional Individual comes with: the built-in commands and the Natural Language Commands. Even though Dragon provides hundreds, you will still want to add some that are specific to you, either in your job or in your personal life.
For example, if you have a long address that you need to put into your business emails, you can create a command to do it. If you have more than one signature for your emails, you can create them, too. How about several paragraphs? It’s kind of fun to see how many you can create to save time. Just don’t get too carried away!
Creating a new command
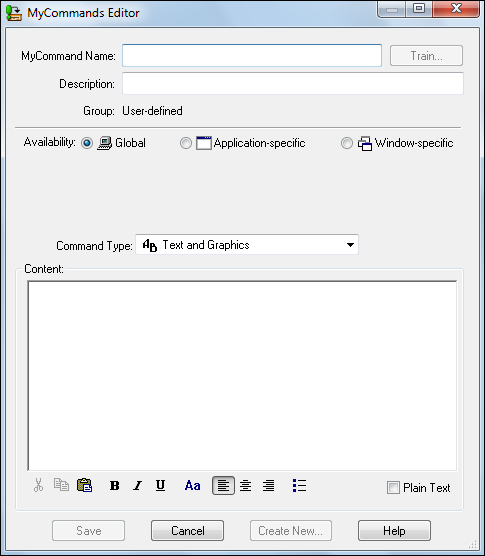
Adding a new command is easy using the MyCommands Editor, shown in Figure 20-1. Fill in the dialog boxes and click Save. But, before getting started, you need to ask yourself an important question. “In what application will I use this command?” Consider the following choices:
- Global: If you want to use the same command when working in different applications, you create a Global command.
- Application-specific: If you plan to use the command in a particular application, like Microsoft Word, you create an Application-specific command.
- Window-specific: If you’re going to use the command in a specific window, like your email program, you create a window-specific command.
If you’re ready with that answer, you’re ready to create a command. From the DragonBar, choose Tools ⇒ Add New Command. Then follow these steps:
Type (or say) the new command name where prompted.
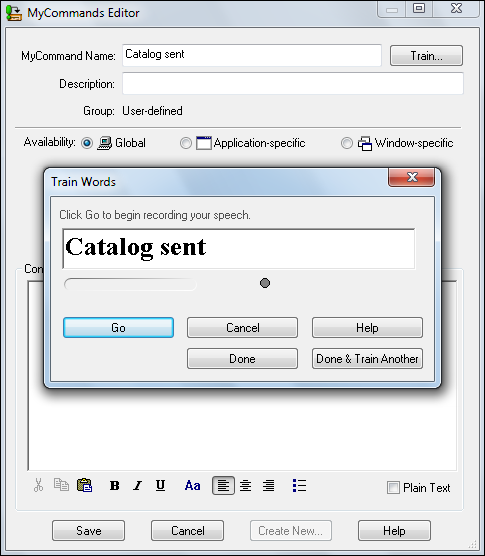
In this example, I call it Catalog Sent.
It’s best if you name the command something distinctive that you can remember. You may also want to format it using title caps or all caps so that you can spot it easily.
Click the Train button so that your command will be recognized easily.
A Train Words screen pops up, as shown in Figure 20-2, so that you can dictate the name.
- Click Go.
- Speak the command as you would normally.
Click Done.
 Leave the Group as User-Defined.
If you choose, you can enter a description in the Description box.
Below that, where you see Availability, select the radio button for the type of command you create. (See the beginning of this section for Global, Application-specific, and Window-specific.)
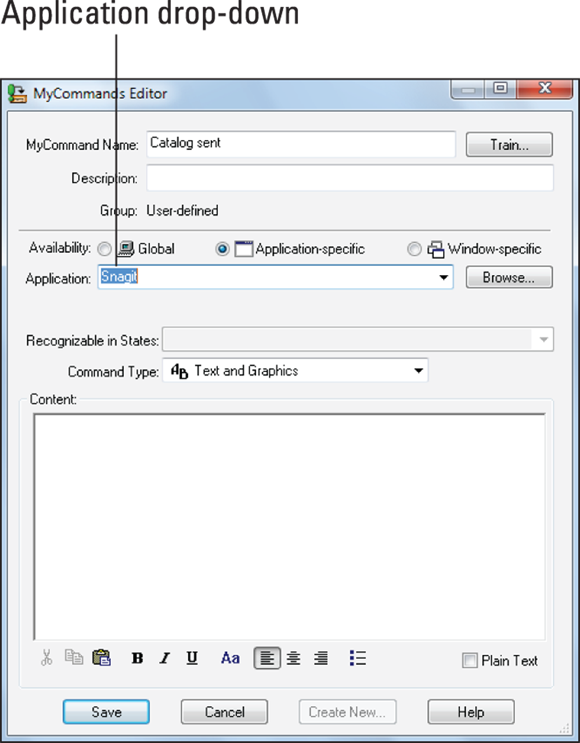
For this example, choose Application-specific.
You see a drop-down menu with a prompt box to type in your open application (or say it) or click the Browse button to select the application from your hard drive.
Type the application name.
Leave the Command Type as Text and Graphics.
Type or dictate the content into the large dialog box.
For this example, I dictated: “Thanks for your request. We are sending our catalog overnight for your review. We hope this will give you a clear understanding about the value of our products.”
You can also cut and paste boilerplate text into the window of the dialog box or highlight it and say, “Make That A Command.” Dragon Professional Individual will automatically pop open the Command Editor and paste it in.
Select the Plain Text check box.
Putting a check mark in this check box lets the program know that you want the content to pick up any formatting you are already working with in Word.
If you format it while creating the command, don’t select this box.
Click Save.
You did it! You created a new command. Now every time you want to insert that paragraph in your email, you can do it by saying, “Catalog Sent.”
 Test your new command right after you save it. You don’t want to find out that you made a mistake when you’re in the heat of dictation.
Adding an auto text command
In case you’re wondering, you can use the command you just created with any combination of other commands and dictation. For example, you can dictate a second paragraph on-the-fly that pertains to that specific addressee. In the same email or document, you can put in additional commands, like your signature or address. You can mix and match them to customize it.
Nuance has also added a great new feature that will make you even more productive when using your commands. It’s the ability to use a variable in your auto-text command.
So how can you use it? Earlier in the chapter, in “Creating a new command,” you see how to create a new command and dictate its contents so that you don’t have to retype the same text over and over. Now you can put a variable in an auto-text command and use it on the fly.
You can use this function to do such tasks as fill out specific fields in form letters or invoices. Follow these steps:
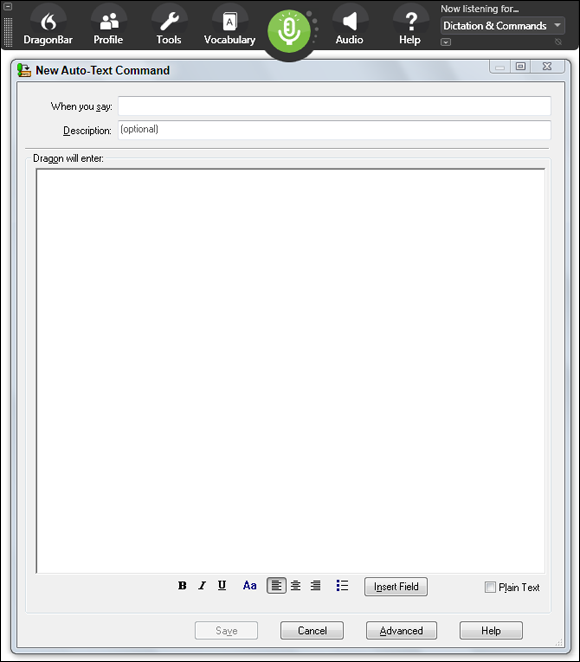
Choose Tools ⇒ Add New Auto-Text.
You are presented with a New Auto-Text Command screen, shown in Figure 20-3.
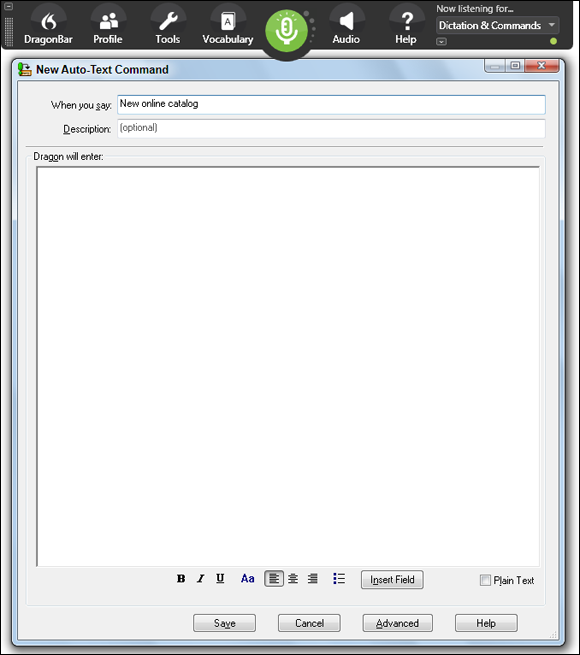
Say or type the name of the command in the When You Say dialog box.
Choose a name. In this example, I entered New Online Catalog, as shown in Figure 20-4.
After you have put in the name, dictate your message. Then position your cursor where you want to insert the variable.
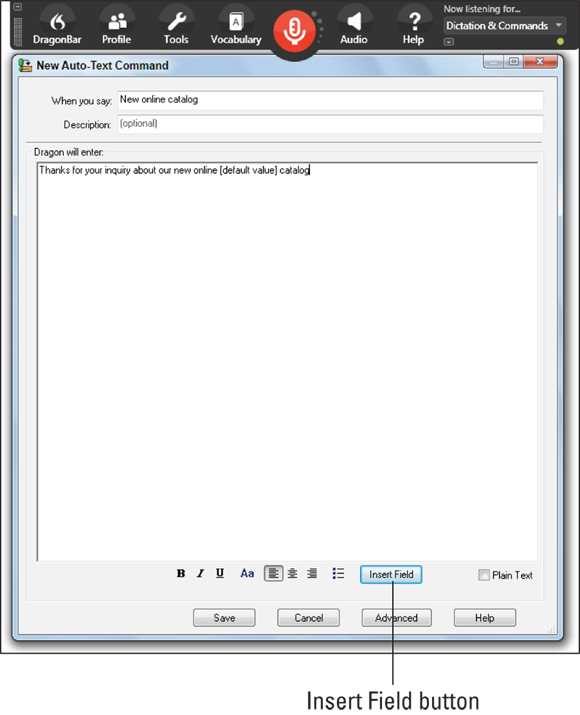
Click the Insert Field button.
The field is now inserted as a default value, as shown in Figure 20-5.
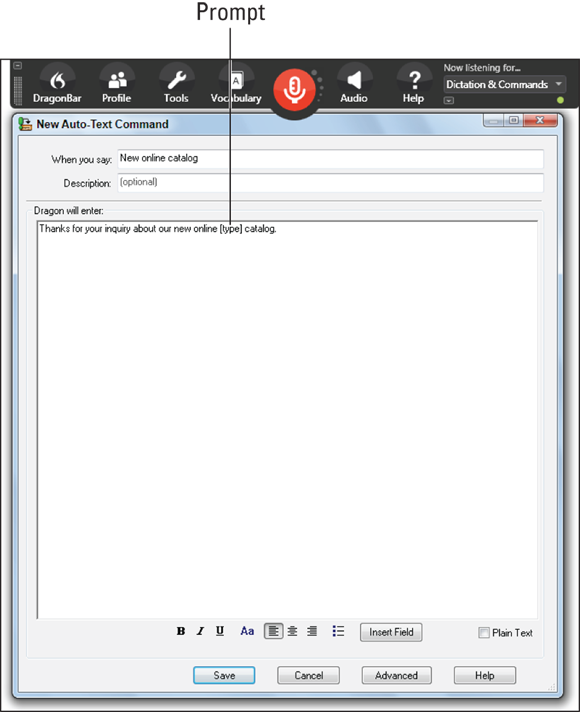
Replace “[default value]” with a prompt for the variable that you will insert, as shown in Figure 20-6.
In this example, I inserted the word type to prompt me to put in the type of catalog I am sending. In this case, I would say “engineering” as the type.
Click save.
When you use that command in the future, you will be able to dictate that variable.
Creating commands for new applications
When you create a command, you have to decide what type of command it will be — Global, Application-specific, or Window-specific. But what if you are using a program that hasn’t been introduced to your Dragon Professional Individual assistant? You need to have them meet! That process is a snap. Follow these steps:
- Open the application you want to use.
- From the DragonBar, choose Tools ⇒ Add New Command.
- At the MyCommands Editor dialog box, fill in the name of the new command.
When you reach the Availability section, select the Application-specific radio button.
The name of your new application will be listed in the box, as shown in Figure 20-7.
Continue to create the new command and remember to select that application from the Command Browser if you want to edit it.
Introducing the Command Browser
After you create a command, you can edit it with the Command Browser. Don’t be intimidated when you open the Command Browser screen. It looks like there is a lot going on. But it’s easy to use once you know what you’re looking for. (See Chapter 17 for more on the Command Browser.) Look around the Command Browser to make it less scary to browse.
Locating commands using the Keyword Filter
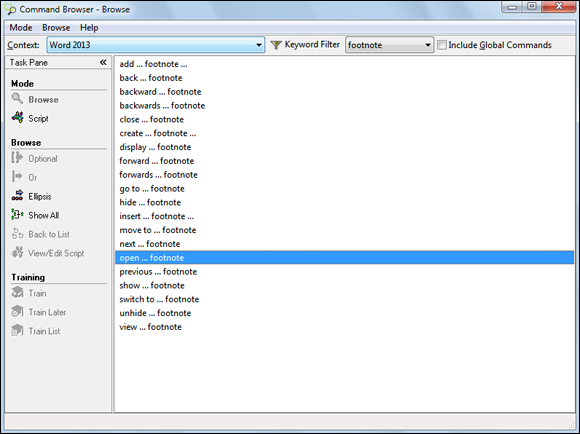
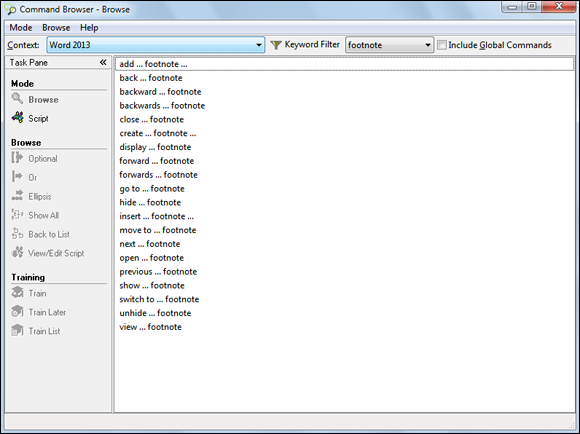
Just like searching on the web, you can find commands in the Command Browser by using keywords. The Keyword Filter makes it easy to find the actual command for a function you would like to perform. For example, if you want to locate a footnote in your Word document, your first inclination might be to say, “Find Footnote.” When you look in the Keyword Filter, you find the correct command for that action is, “Open The Footnote,” as shown in Figure 20-8. Then you know that you should type that exact phrase in the dialog box. This is a good way to find exactly what you want. Of course, you can also use the Dragon Learning Center to find commands.
To use the Keyword Filter to find commands, do the following:
Choose Tools ⇒ Command Browser from the DragonBar.
Look at the Context box in the upper-left corner and make sure you are in the application that applies to this command.
Use the drop-down menu to pick the application.
Select the Keyword Filter menu option next to the Context box.
The Keyword Filter box pops open and you see the list of words along the left side.
Type in words that contain the command you are looking for.
In this example, type Footnote into the Choose Word dialog box.
- (Optional) After you type in a word(s), click the Add button so that the word is placed on the right side under the current list of filter words.
Click Done.
The Command Browser displays all the commands that pertain to the word footnote as shown in Figure 20-9. Now you can choose and use the right one!
Cloning a command to create another
Because you are in a time-saving mood, how about using the command you just created to create another one with a modification? You don’t want to start all over again. The Command Browser is a bit different from the Command Editor. Instead of dictating information, you select the command name from a list. To launch the Command Browser, do the following:
Choose Tools ⇒ Command Browser.
You are presented with a big list of commands. Scroll down the list until you find the exact name of your command. Check the Context dialog box to be sure you are in the right type of command. In this case, you need to be in Microsoft Word to edit the command you created for Word. In this example, it is Catalog Sent. See Figure 20-10.
- Say or click the name of the command.
Make sure that you are in Script mode and then choose New Copy.
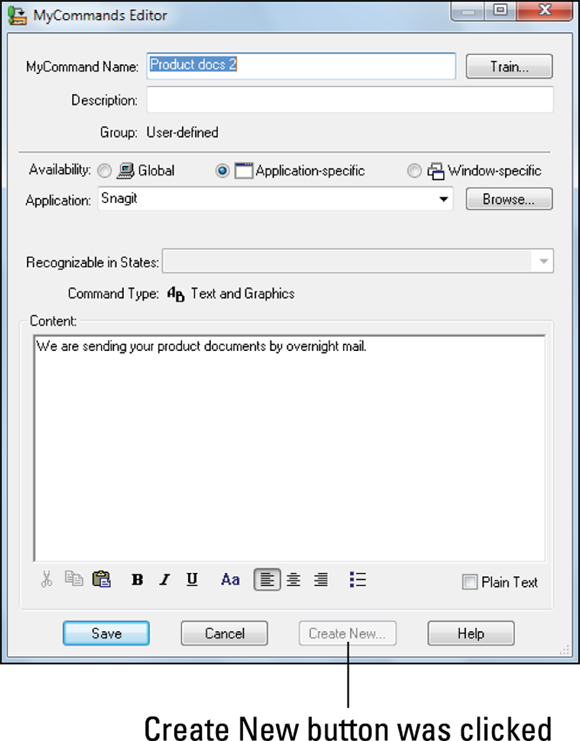
The Command Editor pops up with the command information you created. You can use the Create New button at the bottom of the dialog box. In this example, you use the Create New command as the basis for a new command.
Click the Create New button.
Notice that the name is incremented by one. For example, if the name was “Catalog Sent,” the new one becomes “Catalog Sent 2.” You can modify the contents of the command and change the name to something else more memorable. In this example, I changed the MyCommand Name to “Product Docs” and edited the text accordingly by changing “Catalog Sent” to “Product Docs,” as shown in Figure 20-11.
Click Save.
You now have a new command based on an earlier one, without having to start from scratch.
Inserting graphics into commands
If you can stand even more timesaving, look at how you can insert a graphic with a command. To get started, find a graphic that you want to insert into documents. This could be maps, scanned images, and so forth. For this example, I use a logo:
- Copy your logo from your files using Windows, right-click Copy, or say, “Select That” and then say, “Copy That.”
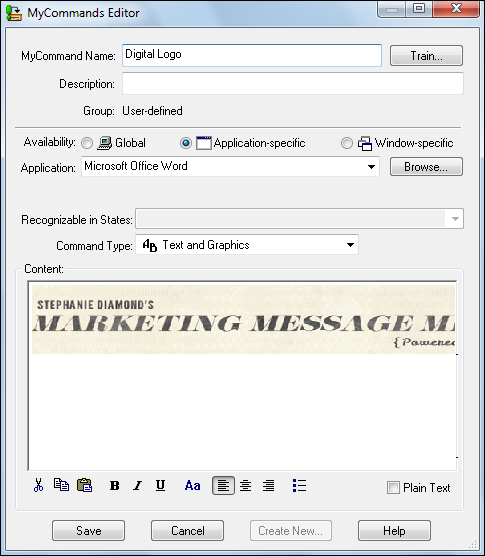
To create a new command, follow Steps 1 through 6 from the earlier “Creating a New Command” section and choose a memorable name.
In this example, call it “Digital Logo.”
When you are at the open window, paste the logo into the window by saying, “Paste That,” as shown in Figure 20-12.
- Click Save.
Test the logo command you made by opening a document and saying, “Insert Digital Logo.”
The logo should be pasted into your document.
If you are pasting a very large graphic into the window, it helps to first enlarge the window into which you are pasting the graphic, so that you can see the whole item you are pasting.
Deleting commands
If you find you have created a command that doesn’t save time or that confuses you, delete it. (Just be sure you want to delete it because you can’t get it back. You’ll need to create it again.) To delete a command, do the following:
- Choose Tools ⇒ Command Browser.
- Click the Script button under Mode on the left side of the screen.
- Use the drop-down Grammar box to select the application your command is in.
- Click on the name of the command you want to delete.
- Choose the Delete menu item on the left side.
Click Yes to confirm that you want to delete it.
Your command is deleted.
Even if you don’t use them, you can’t delete built-in commands.