Chapter 11: Finishing Techniques
When you complete the knitting stage of a project, it’s time to move on to finishing. Finishing involves weaving in all the loose ends hanging off your knitting, blocking your pieces to the correct measurements, and putting the project together by sewing seams. Although most knitters prefer knitting to finishing, mastering tidy finishing techniques will ensure that you are happy with your completed projects.
Weave In Ends
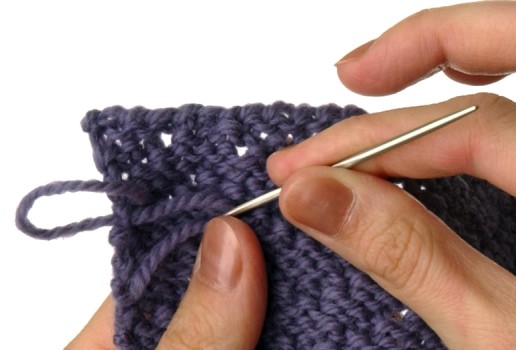
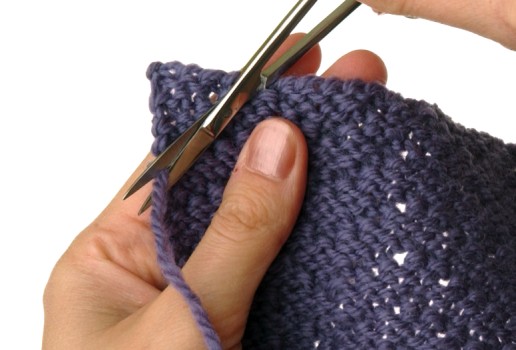
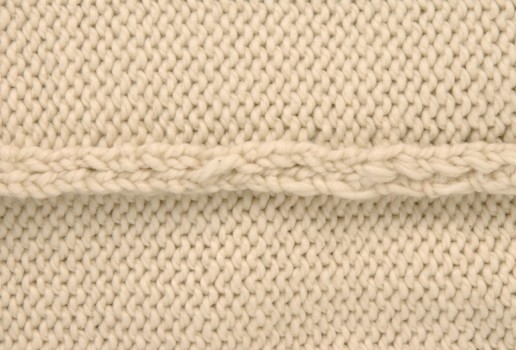
Weaving in ends is what you do to get rid of all the loose yarns dangling from your knitting. The instructions so far have said to leave ends no shorter than 6 inches. You need at least that length to weave in an end properly.
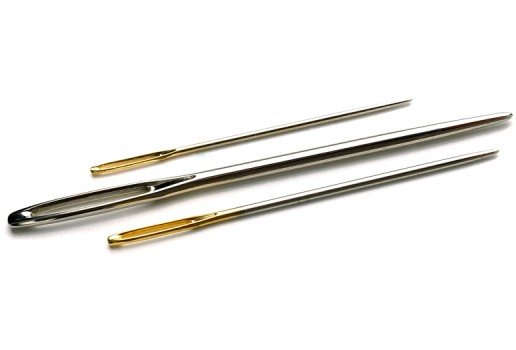
To weave in ends, you need a pair of scissors and a tapestry needle that is appropriate for the thickness of yarn you are using. You can weave in ends across the work or vertically up the side of the work.
How to Weave In Ends Up the Side
1. With the wrong side facing, thread a tail of yarn through a tapestry needle.
2. Bring the tapestry needle in and out from back to front up the side of the knitting.
3. After you have woven in the end 2 to 3 inches, cut it close to the work, taking great care not to cut your knitting.
How to Weave In Ends Across the Back
1. With the wrong side facing, thread the tail of yarn through the tapestry needle.
2. Weave the tapestry needle in and out of the backs of the stitches in a straight diagonal line for 2 to 3 inches.
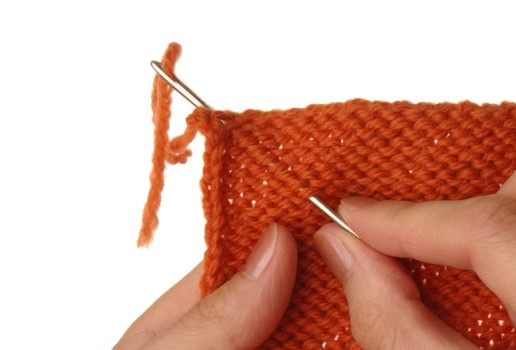
3. Weave the tapestry needle in and out of the backs of the stitches in the opposite direction, right next to the first diagonal line, for about 1 inch.
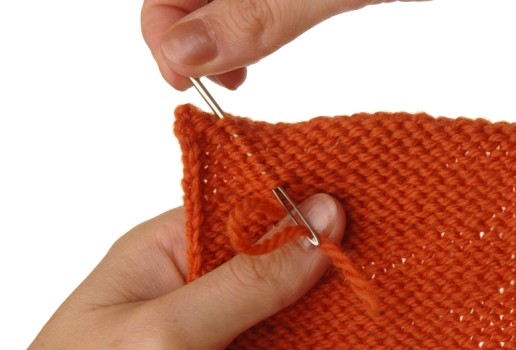
4. Cut the yarn end close to the work, taking great care not to cut your knitting.

NOTE: You can lightly stretch your knitting to pull the yarn end farther into the work to conceal it.
Block Your Knitting
Blocking is a wonderful fixer of imperfections. It involves moistening knitted pieces, shaping them to the correct measurements, and allowing them to dry so that they hold the proper shape.
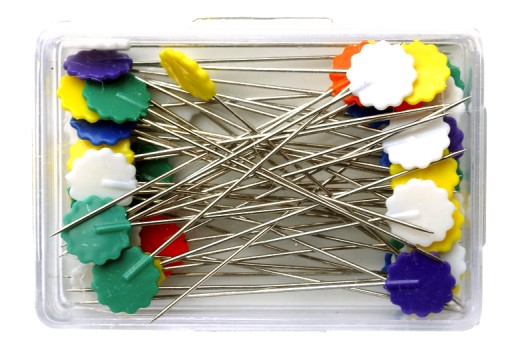
To block a project, you need a padded surface that is big enough to lay your largest piece of knitting flat, a set of long, rustproof pins, and a measuring tape. For wet blocking, you need a clean spray bottle; for steam blocking, you need a steam iron or hand steamer.
Wet Blocking
Wet blocking involves wetting your knitted pieces thoroughly. You can wet the pieces by immersing them in a basin of water or you can pin them to their proper measurements first and then wet them with a spray bottle. Before wet blocking, read your ball band to ensure that washing in water is safe for your yarn. Wet blocking is best for wool blends, some synthetics, and hairy yarns like angora and mohair. It works wonders on textured and cable knits.
1. Lay a knitted piece flat on a padded surface. Pin only at enough points to hold the piece straight for the time being.
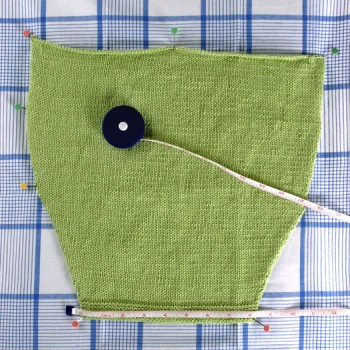
2. Measure the knitted piece to ensure that it has the dimensions that the pattern specifies. Adjust the pins to match the measurements.
NOTE: Do not stretch and pin ribbing at cuffs and hems unless the pattern indicates to do so. After ribbing is stretched and blocked, it is no longer elastic.
3. When the measurements are correct, pin the piece all around.
4. Wet the piece thoroughly with a spray bottle.

5. Allow the piece to dry; remove the pins.
6. Repeat steps 1–5 for all pieces of your project. Sew seams when all pieces are completely dry.
Steam Blocking
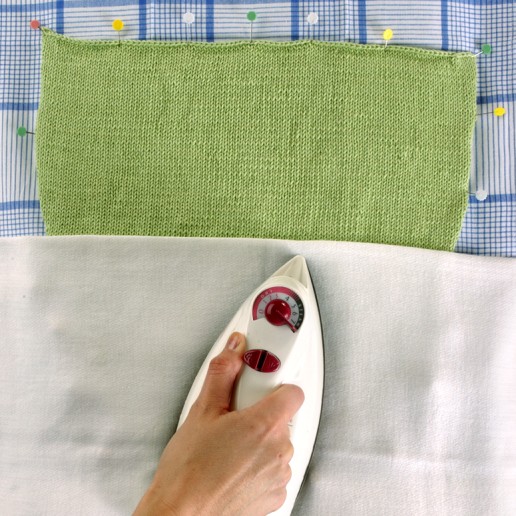
Steam blocking involves using a steam iron or hand steamer. You can get fast results with steam blocking because the drying time is shorter than with wet blocking. Again, you need to check your ball band’s care instructions to ensure that it is safe to apply steam to your yarn and at what temperature. Steam blocking is best for wool, cotton, cashmere, and alpaca. The key to steam blocking is not to press the knitting with the iron but to run the iron lightly above the knitting to steam it. Lay a light cloth, such as a pillowcase, over the piece to be blocked; this will protect your work from the high heat and any potential staining.
1. Lay a knitted piece flat on a padded surface. Pin only at enough points to hold the piece straight for the time being. (See middle on the previous page.)
2. Measure the knitted piece to ensure that it has the dimensions that the pattern specifies. Adjust the pins as necessary to match the measurements and to make the piece even.
NOTE: Do not stretch and pin ribbing at cuffs and hems unless the pattern indicates to do so. After ribbing is stretched and blocked, it is no longer elastic.
3. When the measurements are correct, pin the piece all around.
4. Cover the piece with a light cloth. (You can dampen the cloth with a spray bottle, if desired.) Slowly and gently, run the iron over the entire piece, excluding ribbing, taking care not to press or distort the knitting.
5. Allow the piece to dry and then remove the pins.
6. Repeat steps 1–5 for all pieces of your project. Be sure that all the pieces are completely dry before sewing the seams.
Sew Seams
There are numerous ways to sew seams. Some seams are best for shoulders, while others are preferable for vertical seams or certain stitch patterns. Taking time and care when sewing blocked pieces together is well worth the effort.
You sew seams with a tapestry needle and with the main color yarn used to knit the project. When knitting with novelty yarns, sew seams with a matching plied yarn that calls for the same care instructions as the main yarn.
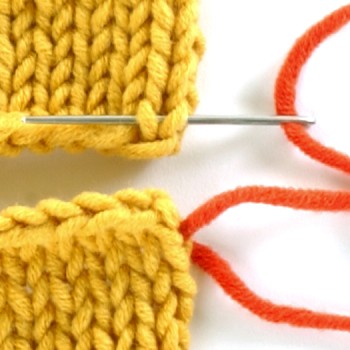
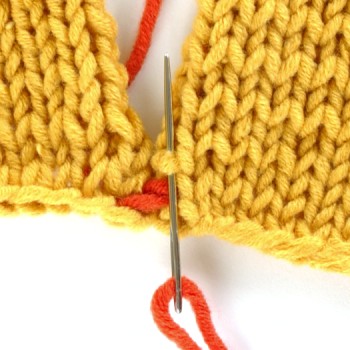
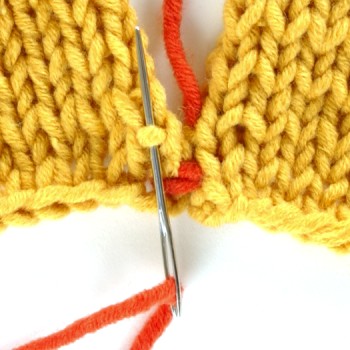
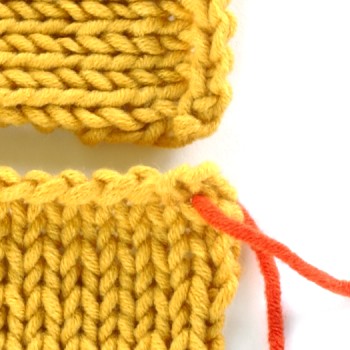
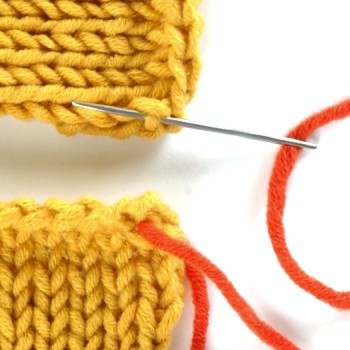
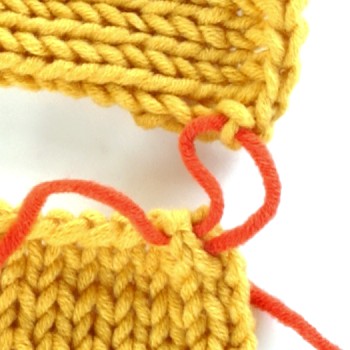
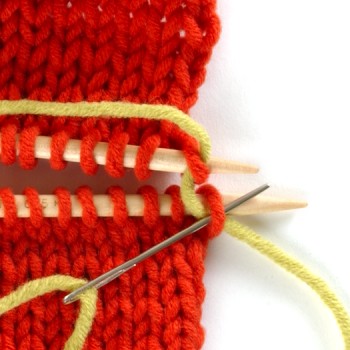
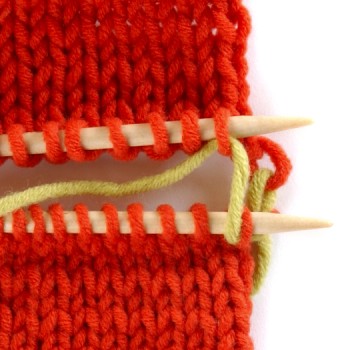
Invisible Horizontal Seam
This seam joins horizontal edges invisibly.
1. Thread a tapestry needle with enough yarn to sew the seam.
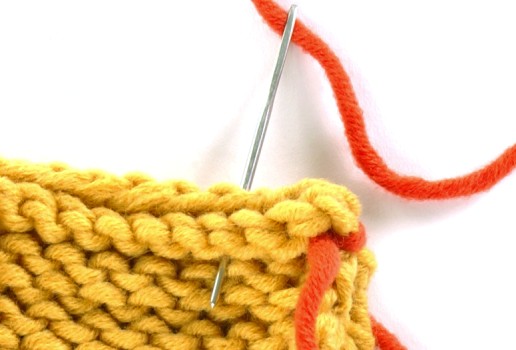
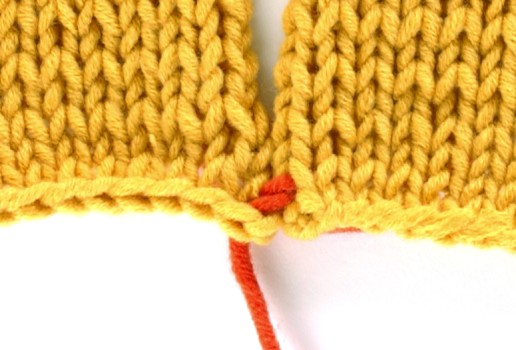
2. Line up the right sides of the bound-off edges. Insert the needle from the back through the middle of the first stitch of the lower piece, leaving a 6-inch tail.
3. Use the needle to pick up the two loops (the V) of the corresponding stitch on the upper piece. Pull the yarn through.
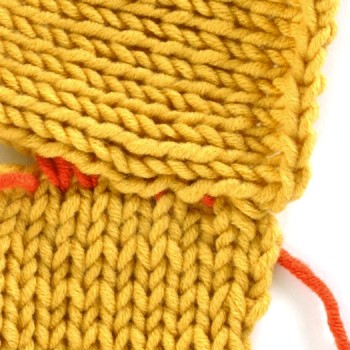
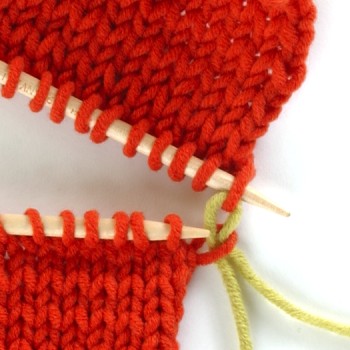
Step 2–3
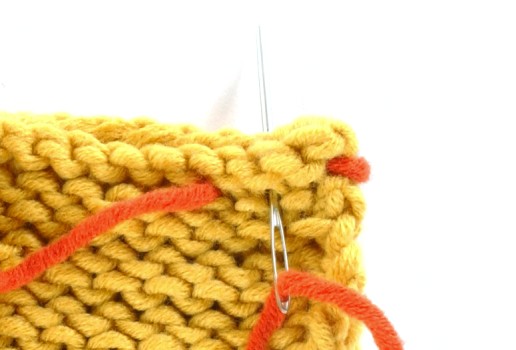
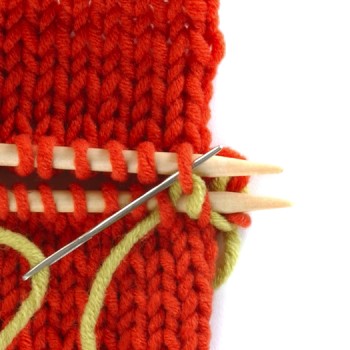
4. Bring the needle across the seam to the next stitch on the lower piece and use it to pick up the loops (the upside-down V), threading it through all the way.
Step 4
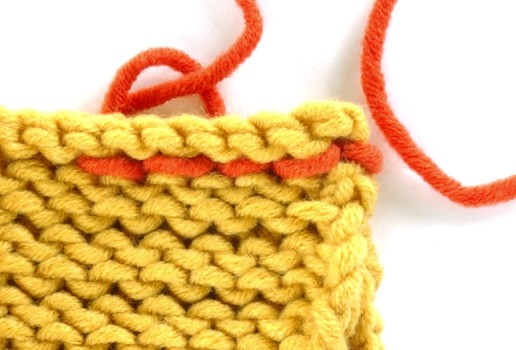
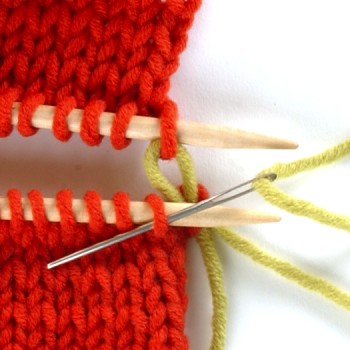
5. Rep steps 3 and 4 across the seam, pulling the yarn lightly every couple stitches to neaten it.
Step 5
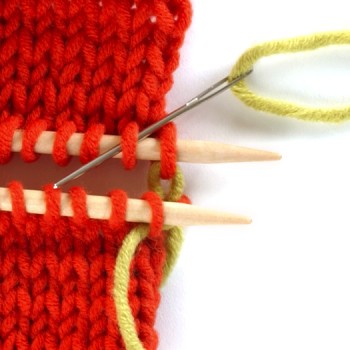
6. Weave in the loose ends.
NOTE: A contrast color yarn was used for illustrative purposes. Be sure to sew your seams with the same yarn used to knit the pieces.
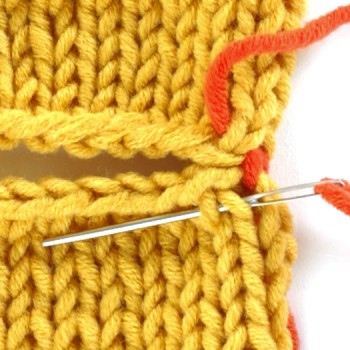
Backstitch Seam
You can use this firm seam almost anywhere in constructing a project. You work it with the right sides of the pieces facing each other, so that they are inside out. Work it about 1 stitch in from the edge.
1. Thread a tapestry needle with a long enough strand of yarn to sew the seam and leave a 6-inch tail.
2. Place the pieces together, with the right sides facing each other and the seam edge lined up. Secure the edge stitches by bringing the needle through both thicknesses from back to front at the right edge, 1 stitch down from the bound-off stitches. Do this twice and pull the yarn through.
3. Insert the needle through both thicknesses, from back to front, about 2 stitches to the left, and bring the yarn through.
Step 2–3
4. Insert the needle from front to back, about 1 stitch in to the right, and pull the yarn through.
Step 4
5. Bring the needle ahead 2 stitches to the left and insert it from back to front.
6. Repeat steps 4 and 5 across the seam until you reach the end, taking care to insert the needle at the same depth each time.
7. Weave in the loose ends.
NOTE: A contrast color yarn was used to sew the seam for illustrative purposes. Be sure to sew your seams with the same yarn used to knit the pieces.
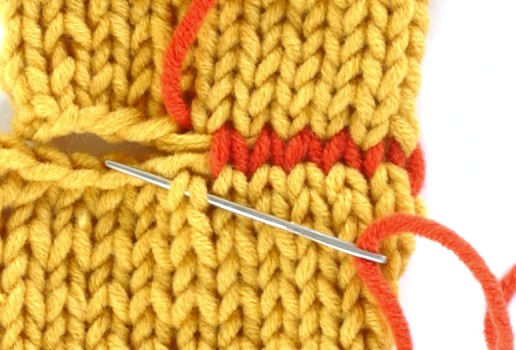
Invisible Vertical Seam
This seam works beautifully for sweater sides and underarm seams. It lays flat and is invisible.
1. Thread a tapestry needle with a long enough strand of yarn to sew your seam and leave a 6-inch tail.
2. With the right sides up, line up the vertical edges exactly. Sew 1 stitch at the base of the seam to join the pieces: Insert the needle from back to front through the space between the first and second stitches on the lower-right corner of the left piece, pulling yarn through until only about 6 inches remains; insert the needle from front to back between the first and second stitches in the lower-left corner of the right piece; bring the needle back through the same spot on the left piece again. Pull the yarn through snugly.
Step 2
3. Find the horizontal bar of yarn between the first and second stitches. Insert the needle under this horizontal bar, 1 stitch up from the joining stitch, on the right piece. Pull the yarn through.
Step 3
4. Insert the needle under the horizontal bar between the first and second stitches, 1 stitch up from the joining stitch, on the left piece. Pull the yarn through.
Step 4
5. Insert the needle under the next horizontal bar up on the right side and then under the corresponding bar on the left side. Continue in this manner, alternating from side to side, to the end of the seam.

Step 5
6. Weave in the loose ends.
NOTE: A contrast color yarn was used to sew the seam for illustrative purposes. Be sure to sew your seams with the same yarn used to knit the pieces.
Invisible Vertical-to-Horizontal Seam
This seam is excellent for joining a bound-off edge to a side edge, as in joining a sleeve cap to an armhole.
1. Thread a tapestry needle with a long enough strand of yarn to sew your seam and leave a 6-inch tail.
2. With the right sides facing, line up the bound-off edge and the side edge.
3. Insert the needle from back to front through the V of the first stitch on the right side of the lower piece, below the bound-off edge, and pull the yarn through until about 6 inches remain.
Step 3
4. Insert the needle on the other side of the join—directly across from the same point on the vertical piece—under one of the bars between the first and second stitches on the horizontal piece. Pull the yarn through.
Step 4
NOTE: Because you are matching rows to stitches in this join, and because there are usually more rows per inch than stitches, you need to pick up two of the bars on the horizontal piece every other stitch or so to keep the seam even.
5. Bring the yarn across the join and pick up the loops that make the point of the upside-down V of the next stitch on the vertical piece, pulling the yarn through, trying to imitate the size of each stitch in the knitted piece.
Step 5
6. Continue alternating back and forth between the upper and lower pieces until you finish the seam.

Step 6
7. Weave in the loose ends.
NOTE: A contrast color yarn was used to sew the seam for illustrative purposes.
Graft Seams
Kitchener Stitch, good for joining unshaped shoulders and toes of socks, involves grafting open stitches to another open row of stitches. The result looks like a row of stockinette stitch.
Kitchener Stitch
To prepare to join edges with Kitchener stitch, put each set of stitches onto a knitting needle.
1. Using yarn that matches your knitting, thread a tapestry needle with a strand that is roughly twice the length of the seam.
2. Lay both pieces of knitting on a table, with the wrong sides down and the needles running parallel to each other, with the tips facing to the right.
3. Insert the tapestry needle into the first stitch on the lower needle as if to purl; pull the yarn through until a tail about 6 inches remains. Leave the stitch on the needle.
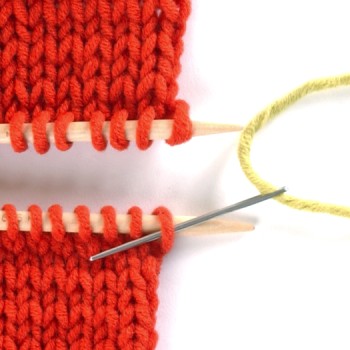
4. Insert the tapestry needle into the first stitch on the upper needle as if to knit and pull the yarn through snugly, leaving the stitch on the needle.
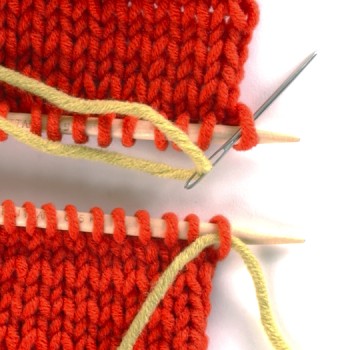
5. Insert the tapestry needle into the first stitch on the lower needle again, this time as if to knit (a); then slip this stitch off the needle (b).
Step 5A
Step 5B
NOTE: A contrast color yarn was used for illustrative purposes. Be sure to sew your seams with the same yarn used to knit the pieces.
6. Insert the tapestry needle into the next stitch on the lower needle as if to purl. Leave the stitch on the needle.
7. Insert the tapestry needle into the first stitch on the upper needle again, this time as if to purl (a); then slip this stitch off the needle (b).
Step 7A
Step 7B
8. Insert the tapestry needle into the next stitch on the upper needle as if to knit. Leave the stitch on the needle.
9. Repeat steps 5–8 until all the stitches have been completed.
Remember: On the lower needle, the first insertion is as if to purl, the second is as if to knit, and then the stitch comes off; on the upper needle, the first insertion is as if to knit, the second is as if to purl, and then the stitch comes off.
NOTE: Another grafting method is the three-needle bind-off.
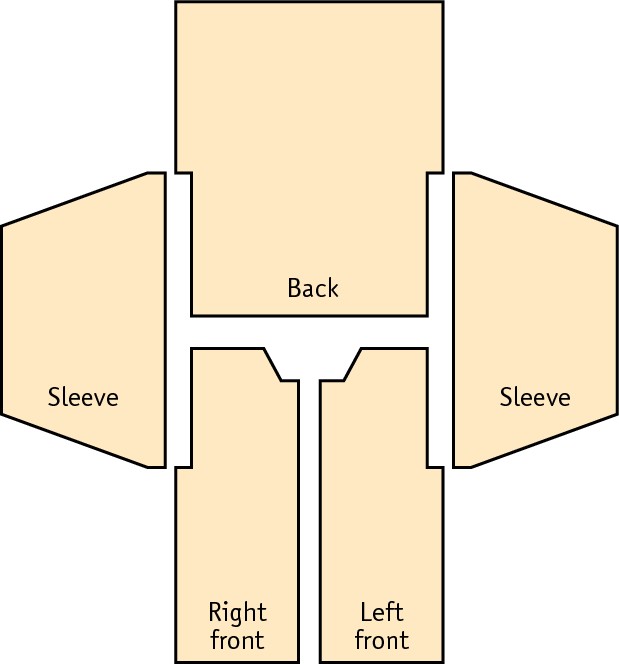
Assemble a Sweater
Now that you are familiar with several different ways to attach knitted pieces to each other, you can assemble a simple sweater. How a sweater is made—whether it is knit in the round or on straight needles, how the sleeves are created, whether it is a cardigan or a pullover—determines not only how it is put together but also the order in which the pieces are assembled.
Order of Assembly
Generally, sweaters that are knit flat in pieces are joined in this order:
1. Join the front(s) to the back at the shoulders.
2. Attach the sleeves.
3. Sew the side and underarm seams.
Use long straight pins to pin pieces together before seaming. You can neaten up seams by lightly steaming with an iron.
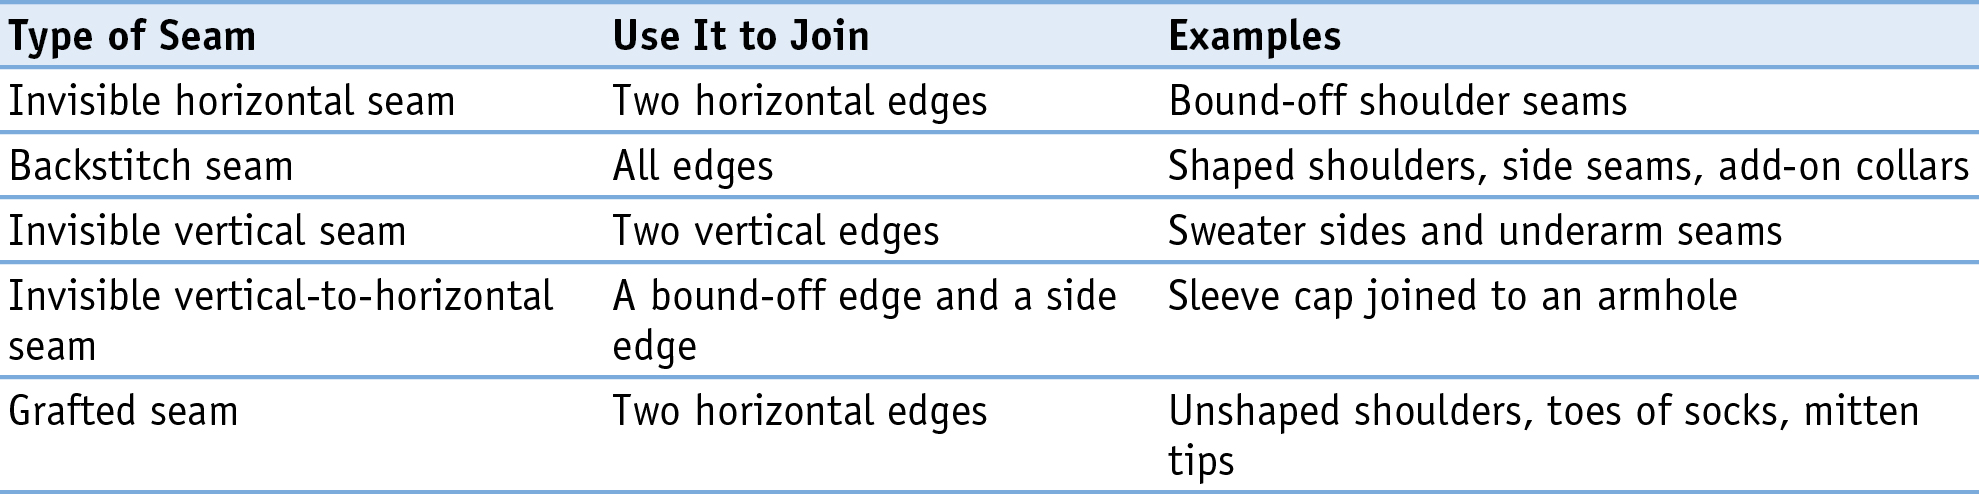
Which Seam Technique for Which Part?
Sometimes knitting instructions specify the best seaming technique for a given join. If no specific technique is indicated, you can always safely use the backstitch seam for the shoulders, whether they are shaped or not. If the shoulders are not shaped, you can try using the invisible horizontal seam or the three-needle bind-off. The invisible vertical seam is an excellent choice for side and underarm seams. The table below provides some guidance on which seams work best for joining different parts of a project.
Attaching Sleeves
There are many different ways to shape armholes and sleeve caps. The type of armhole shaping always determines the sleeve cap shaping. After blocking all pieces, working the edging on the neck, and joining and pressing the shoulder seams, you can attach the sleeves. Find the center of the sleeve cap by folding the sleeve in half lengthwise and then mark the center with a pin. After pinning the center of the sleeve cap to the shoulder seam, with the right sides facing each other, you can pin the rest of the sleeve cap to the armhole, lining up the sleeve cap shaping with the corresponding armhole shaping. Then you can sew the sleeve in place.

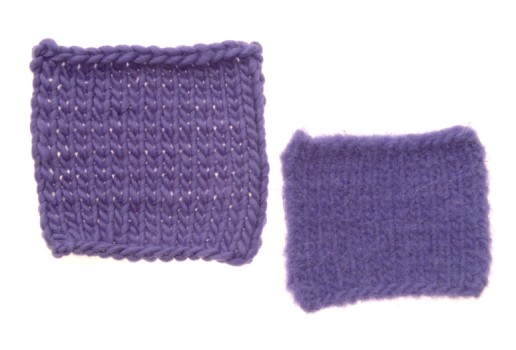
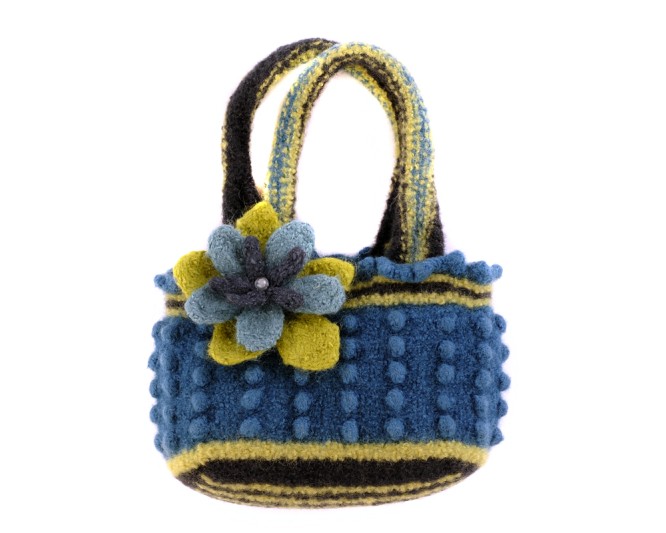
Felting
The felting process involves exposing a piece of knitting to moisture, heat, and friction in order to shrink it and transform it into a dense, firm, and very strong fabric. Felting requires a carefree attitude because the outcome is not always predictable.
How Felting Works
You may have accidentally felted a sweater by washing it in the machine in hot water. When you expose something knit in wool or another animal fiber to wet heat and agitate it, it is likely to shrink and become matted. The fibers open up and become interlocked, creating the dense fabric of felt.
Felting is not an exact science; it’s more like a science experiment. Many variables can affect the outcome: water temperature, water hardness, how much agitation occurs, how the fibers were treated before felting, what the fiber blend is, how long the fibers are exposed to heat and moisture, and the amounts of soap and water used. Be prepared for any outcome and be willing to experiment.
The Best Yarns for Felting
The best yarns for felting are 100% wool or other animal fibers, such as alpaca, angora, mohair, and llama. You can also try using blends of these fibers. (Superwash wools have been treated so that they will not shrink, so don’t use them.) Synthetics are not good felters, but you can try to felt a wool/synthetic blend, as long as it isn’t more than 10% to 15% synthetic.
Fibers that have been bleached, such as bright whites, and bright colors that have been treated with bleach to take the dye are also not always the best for felting. It is not recommended to use different yarn types in the same felted piece because they will felt differently. And you need to be careful when felting together multiple colors as they can bleed. No matter what yarn you choose, you should felt a knitted swatch first to get a sense of whether and how it will work.
Equipment Needed for Felting
Felting is easiest and fastest when done in a washing machine. If you don’t have a washing machine, you can felt in a bucket or in a bathtub or sink. Don’t use a front-loading machine, though, as you must open the machine to check on your item every few minutes.
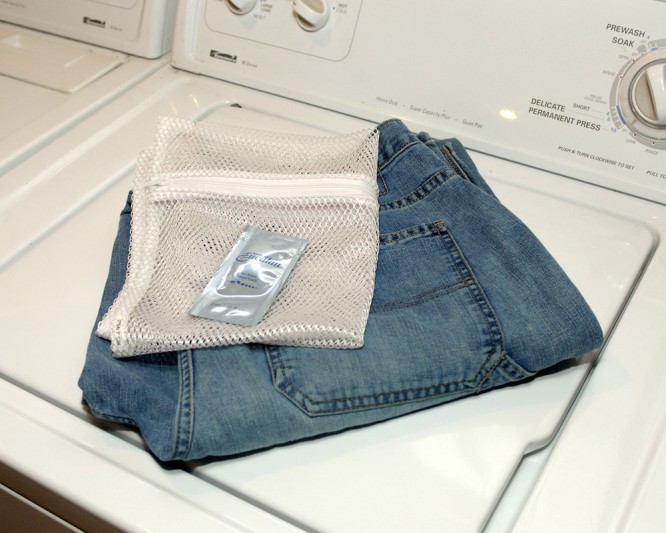
A zippered mesh laundry bag or pillowcase will protect your washer from the wads of fuzz that come off in the felting process. You also need bleach-free laundry soap, or mild dish soap if you’re felting by hand. A tablespoon is plenty. Because agitation and friction are key factors in felting, a pair of jeans, a canvas sneaker, or a couple of old tennis balls to throw in the machine with your item can speed the process, too.
How to Knit for Felting
You need to knit the item you want to felt larger than you want it to be—to account for shrinkage—and to knit it at a loose gauge, using needles that are 2 mm larger than the size specified for the yarn. For example, if your yarn calls for a size 6 (4 mm) needle, you’d knit your item with a size 10 (6 mm) needle. A tightly knit fabric can end up too rigid, but only experimentation with swatches will tell.
Experiment with Swatches First
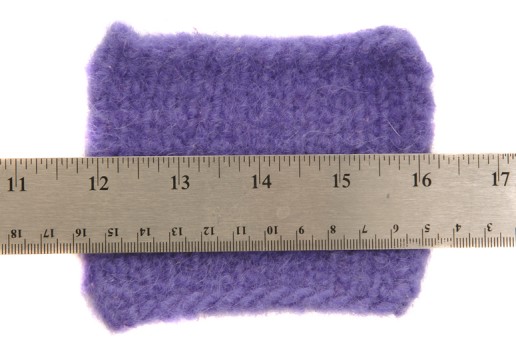
Felting is unpredictable. However, you can get at least some sense of the outcome beforehand by swatching. So before you spend the time knitting something that is twice the size you want it to be, test felt a swatch in the same yarn first. Be sure to measure the swatch before and after to get a sense of how much shrinkage occurs when you felt it. If you follow a pattern written for felting and use the same materials suggested, you’ll likely be delighted with the bit of magic you’ve performed.
TIP
Fun with Felted Swatches
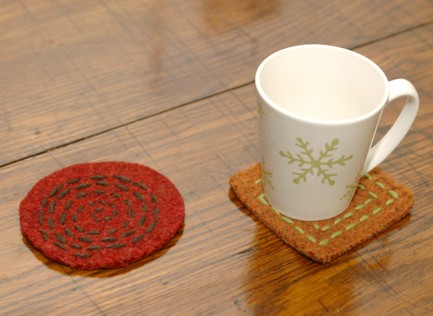
Before you venture into a large felting project, experiment with swatches knit in different animal fibers and varied stitch patterns. You can use the swatches later as coasters. Cut them into interesting shapes or embellish them with embroidery after felting for a more finished look.
If a swatch is large enough, you can whipstitch it onto the outside of a felted bag as a pocket. To make a great baby toy, sew six same-size swatches together to form a cube and stuff it with cotton balls or polyester filling.
How to Felt Using a Washing Machine
After you have loosely knit your item to size based on your felted test swatch, weave in the ends and sew all the seams.
1. Place the knitted item into a zippered pillowcase or lingerie bag and close.
NOTE: You’ll keep the knitted item in the zippered bag through the whole process, except to check it during the cycle.
2. Set the washer to the warm or hot wash/cold rinse cycle (small load), start filling the washer, and add approximately 1 tablespoon mild dish soap.
3. When the washer is almost done filling, add a canvas sneaker or a couple old tennis balls and the zippered bag containing your knitted item.
4. After the machine begins the wash cycle, stop it and check your item every so often to see how it’s doing. (At the very beginning, don’t worry if it looks as though it’s grown.)
5. Stop when the item looks felted or when the wash part of the cycle is through, whichever comes first. The knitted item should have a dense feel, and the stitches should be barely visible, if visible at all. If the project is felted enough at this point, go to step 7.
6. If the item is not felted enough after one wash cycle (not including rinse and spin), put it through the wash cycle again, as many times as needed, until it is.
7. Put the newly felted item back into the washer and let it rinse and spin. The cool water locks the fibers and rinses the soap. Spinning removes excess water.
8. Take the item out of the washer and form it to the desired shape while it is still wet. Stuff the item with plastic bags to help shape it, if appropriate, and set it on a towel to air dry.
How to Felt by Hand
Although felting is easiest and fastest when done using a washing machine, you can also felt in a bucket or in a bathtub or sink. This method is not recommended for large knitted items.
After you have loosely knit your item to size based on your felted test swatch, weave in the ends and sew all the seams.
1. Fill a bucket, sink, or bathtub partway with hot or very warm water and add 1 tablespoon mild dish soap.
2. Add your knitted item to the water and agitate it with your hands or a wooden spoon.
NOTE: When felting by hand, there is no need to put your knitted item into a zippered pillowcase or lingerie bag.
3. Keep checking to see if it has felted. Some yarns felt quickly, and others take a couple tries.
4. Stop when the item looks felted. It should have a dense feel, and the stitches should be barely visible, if visible at all. If the item is felted enough at this point, go to step 6.
5. If the item is not felted enough and the water is cooling, gently squeeze the excess water from (do not twist or wring) the item and refill the sink or tub with hot water and soap. Agitate the item in the water again. Do this as many times as needed until the item is felted enough.
6. Rinse the item in cool water. Gently squeeze out the excess water and roll the item in a towel to get even more water out.
7. Form your item to the desired shape while it is still wet. Stuff it with plastic bags to help shape it, if appropriate, and set it on a towel to air dry.