Chapter 2: Basic Techniques
A knitted fabric is made up of many stitches. In this chapter, you will learn the basics: how to get your first row of stitches on the needle as well as how to knit and purl those stitches using a variety of methods. After you master knit and purl stitches, you will learn how to join new yarn so that you won’t have to stop when your yarn runs out. Finally, you will find out how to bind off, which is what you do to remove your stitches from the needle when you’re done.
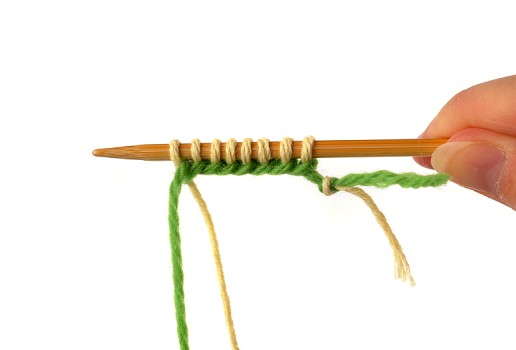
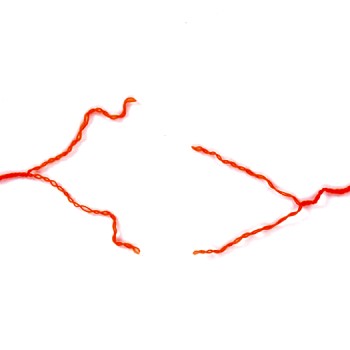
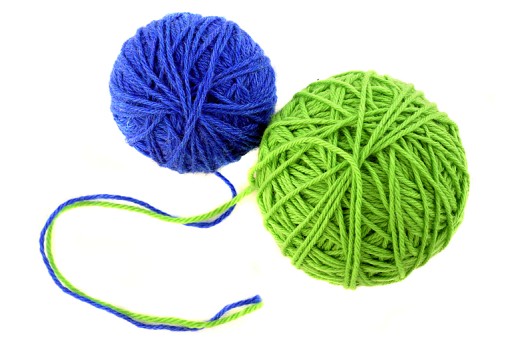
Knit with a Double Strand of Yarn
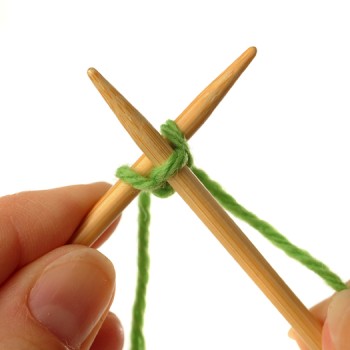
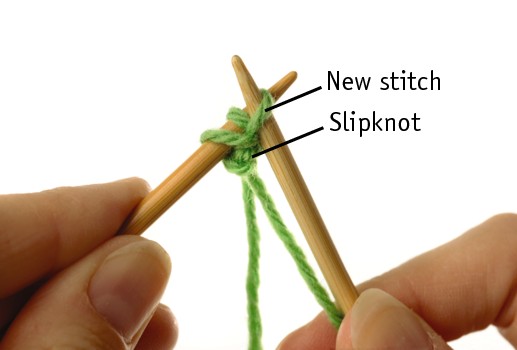
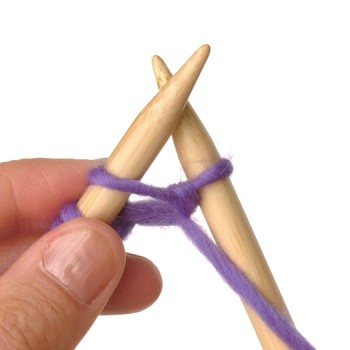
Make a Slipknot
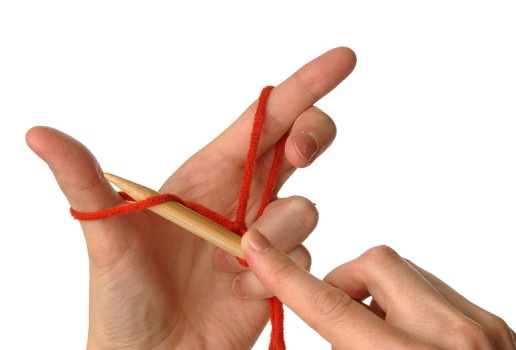
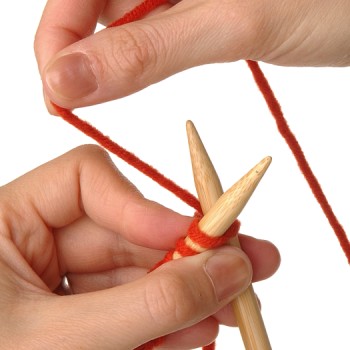
The time has come to pick up your needles and learn to knit. You need a ball of worsted weight or bulky yarn and a pair of needles in the size that the yarn’s ball band calls for. When you have those things, you are ready to put your very first stitch—a slipknot—onto your needle. You have probably made a slipknot before, but there’s a special method for putting one onto your knitting needle.
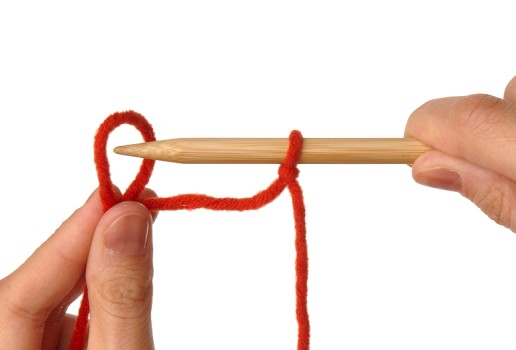
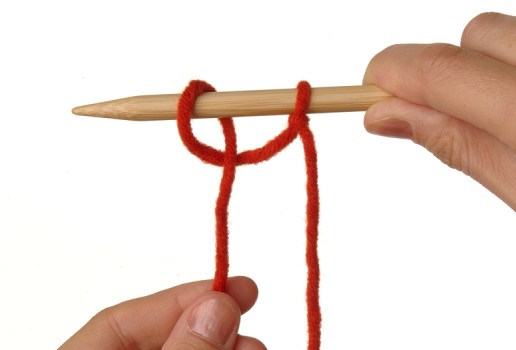
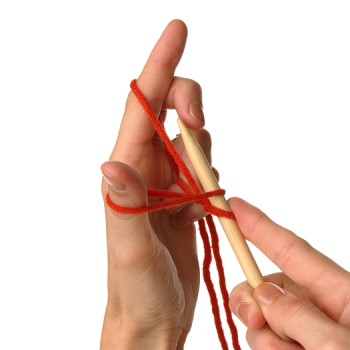
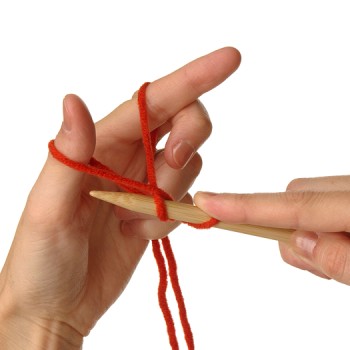
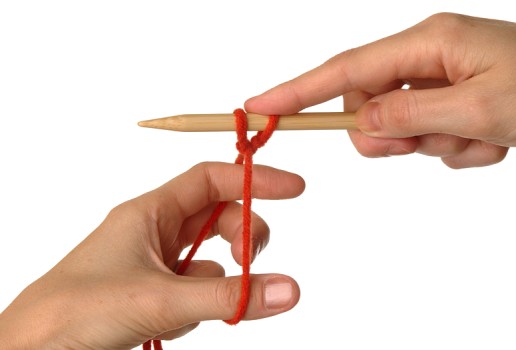
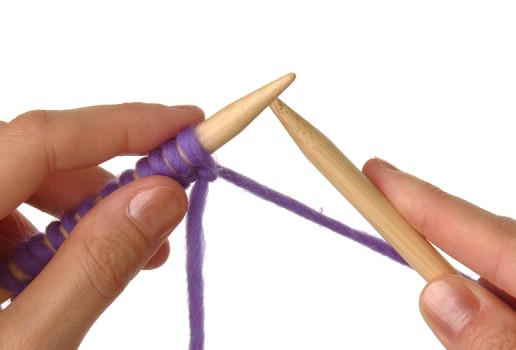
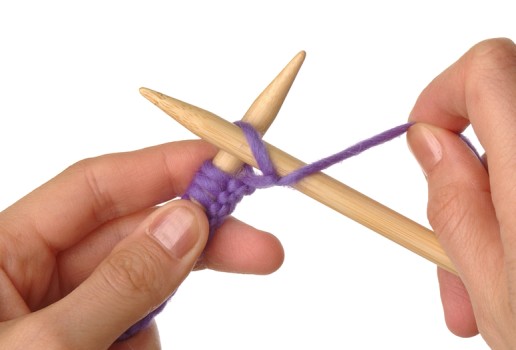
How to Make a Slipknot
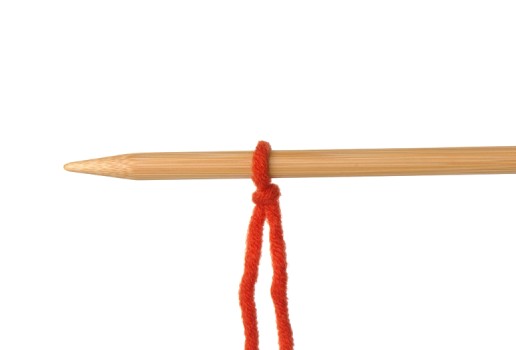
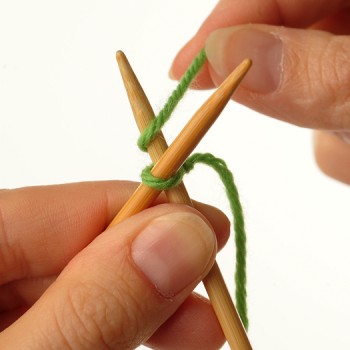
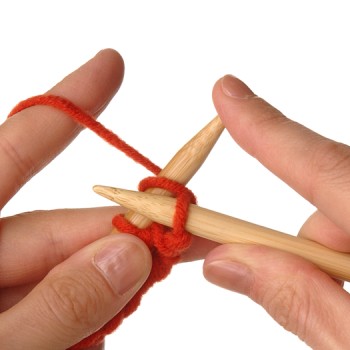
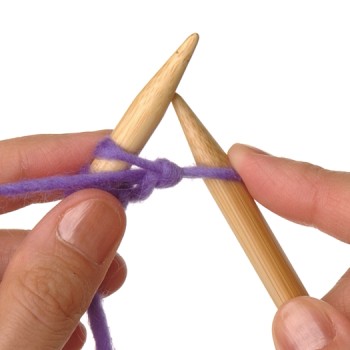
1. Starting about 10 inches in from the end of your yarn, make a loop.
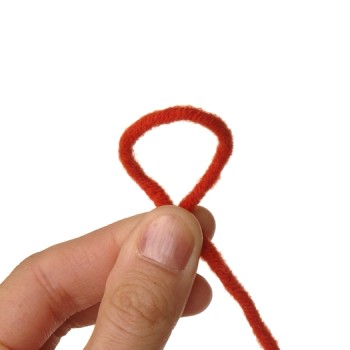
2. Pull the working yarn (the yarn coming from the ball) behind the loop as shown. Insert the needle underneath the working yarn and pull it up through the loop.

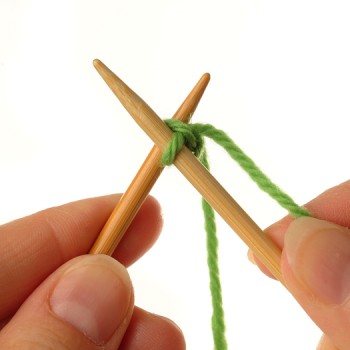
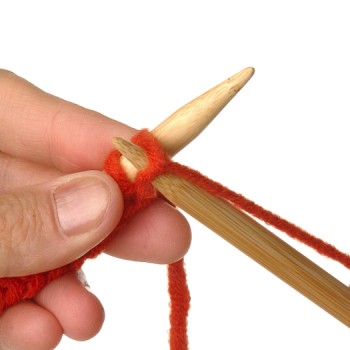
3. Pull the ends of the yarn so that the slipknot sits snugly on the needle.
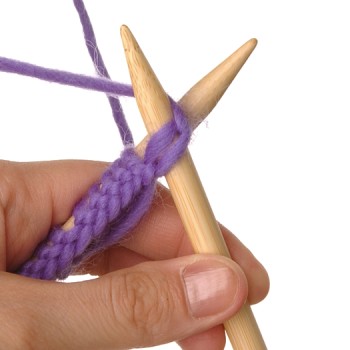
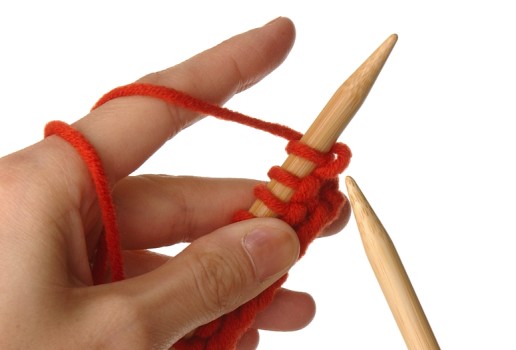
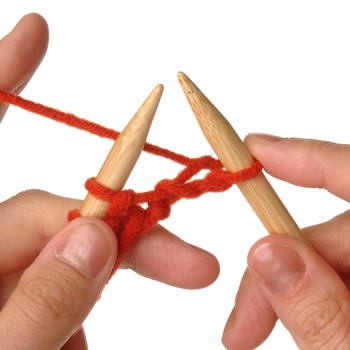
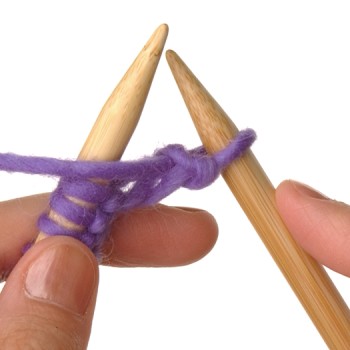
Cast On
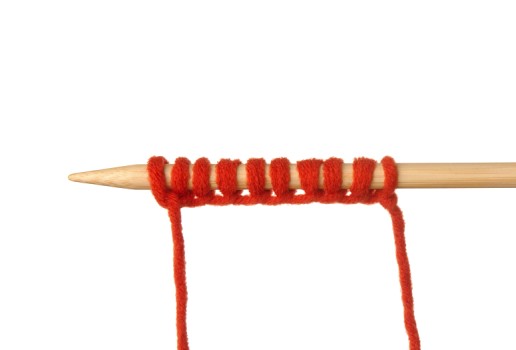
Casting on is what you do to get a foundation row of stitches on your needle so that you can start to knit. There are many cast-on methods, each with different results. Take care not to cast on too tightly, or your edge will have no elasticity.
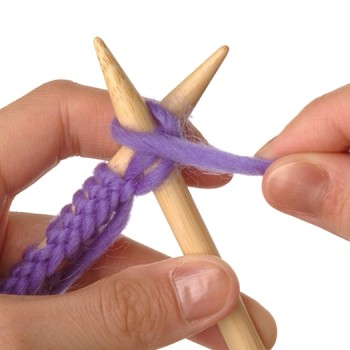
Backward-Loop Cast-On
This method of casting on is the easiest and quickest, so it’s good for beginners. It doesn’t, however, create a very tidy edge. It is also referred to as the simple cast-on method.
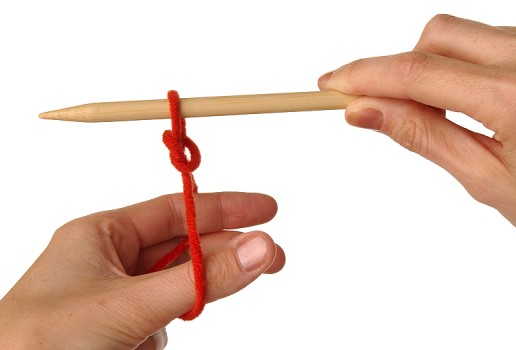
1. With the needle with the slipknot on it in your right hand and the working yarn in your left, make a loop with the working yarn, then give the loop a twist so the working yarn is on the right and the back of the loop is on the left.
2. Place the loop onto the needle with your left hand and then pull the working yarn to tighten.
3. Repeat steps 1 and 2 until you have the desired number of stitches on the needle.
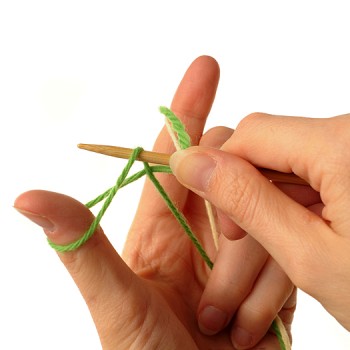
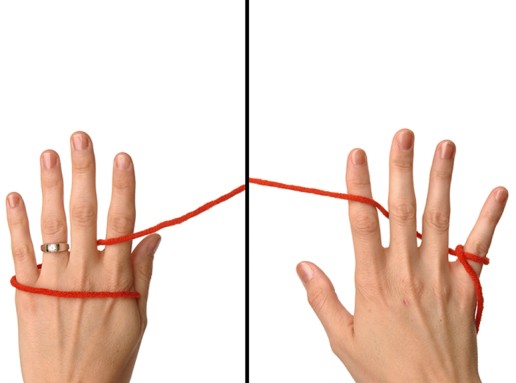
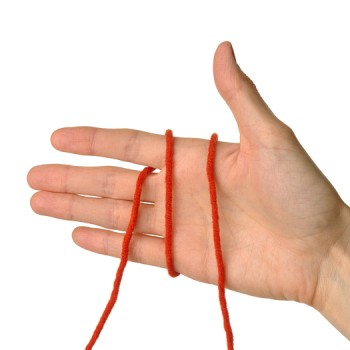
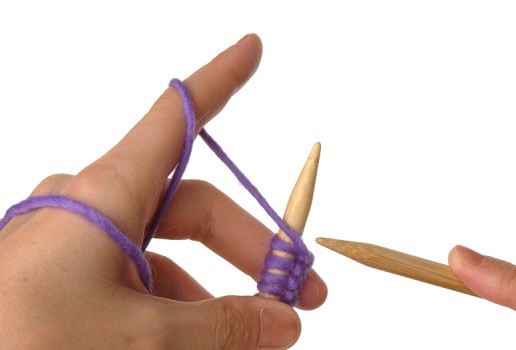
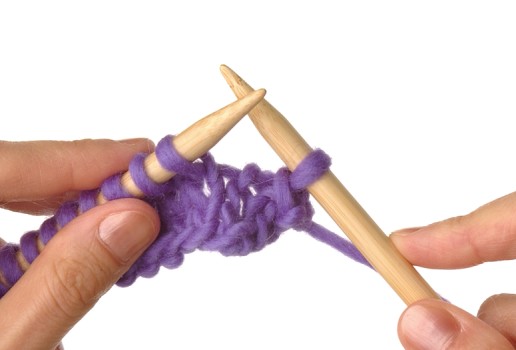
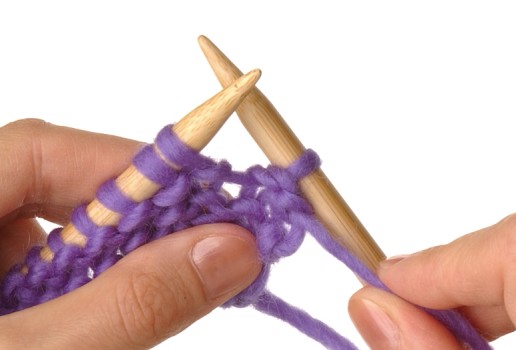
Long-Tail Cast-On
You may think that this method of casting on stitches looks complicated, but once you master it, it’s very quick and easy. This method creates a neat, elastic edge.
1. Put a slipknot on your needle, leaving a tail that’s the equivalent of 1 inch per stitch you plan to cast on plus a few more inches. (So if you plan to cast on 12 stitches, leave a tail that’s about 15 inches long.)
2. Hold the yarn with the tail wrapped over your thumb and the working yarn over your forefinger, grasping both ends with your pinky and ring finger in the center of your palm.
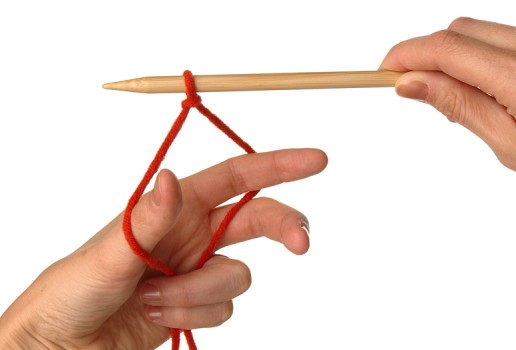
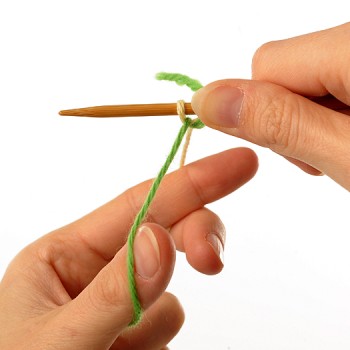
3. Lower the needle to create a V.
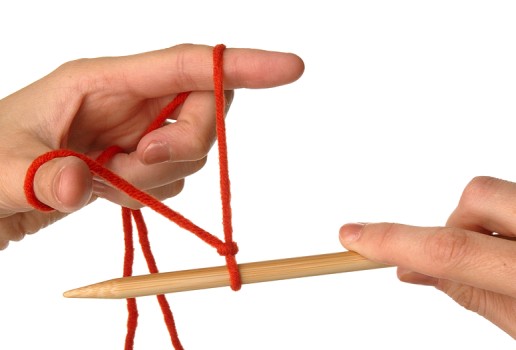
NOTE: Holding the slipknot in place with your right forefinger can prevent the stitch from slipping off the needle.
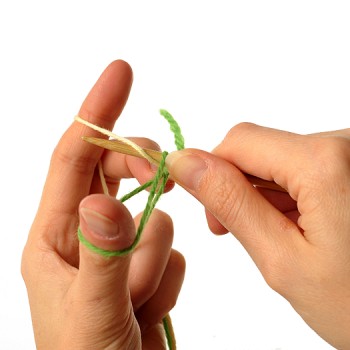
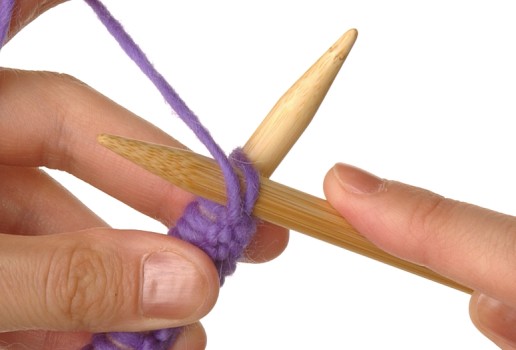
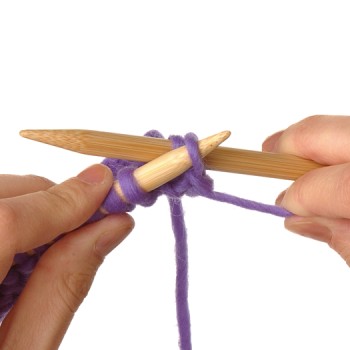
4. Insert the needle up and under the yarn that is looped around the outside of your thumb.
5. Move the needle to the right and use it to grab the yarn from the nearest side of your forefinger (a); then pull it through the loop around your thumb (b).
Step 5A
Step 5B
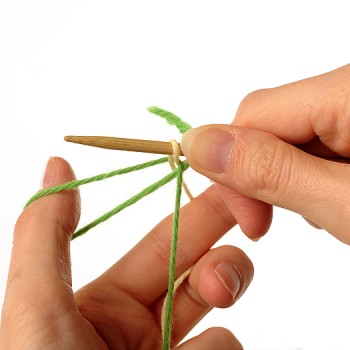
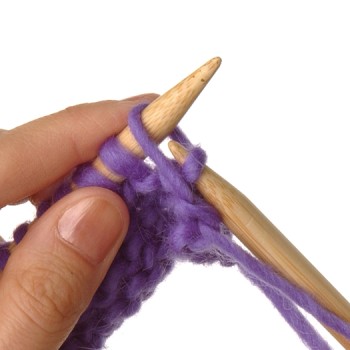
6. Once the yarn is pulled through the loop between your thumb and needle, drop the loops from your thumb and forefinger and pull both ends of the yarn to tighten the stitch on the needle.
You have just cast on 1 stitch.
7. Repeat steps 2–6 until you have cast on the desired number of stitches.

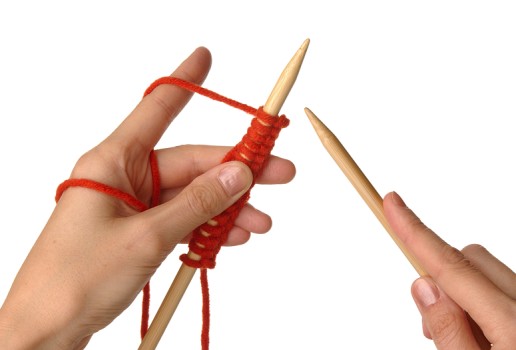
Knit Cast-On
The knit cast-on produces an elegant elastic edge, so it’s good for most anything—sweaters, hats, socks, and scarves, to name a few. You start with a slipknot on your left needle and then use the right needle to work the stitch as if you’re going to knit it, but instead of taking it off the needle, you place the new stitch back onto the left needle.
1. Put a slipknot on your needle. Holding this needle in your left hand and the empty needle in your right hand, insert the right needle into the stitch from front to back, as if to knit.
2. Wrap the working yarn around the tip of the right needle and pull up a loop, as when knitting a stitch.
3. Do not slip the stitch off the needle. Transfer the new stitch to the left needle by inserting the left needle into the stitch then sliding the right needle out.

4. Pull the working yarn to tighten.
5. Repeat steps 1–4, placing each new stitch to the right of the previously cast-on stitch until you have the desired number of stitches on the left needle.
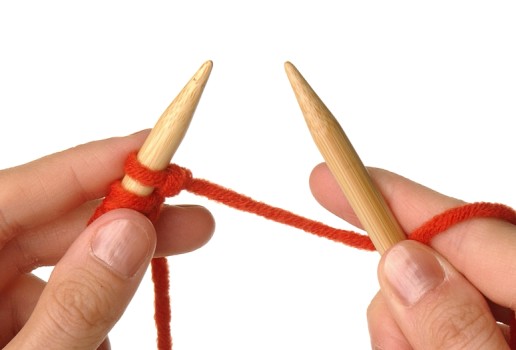
Cable Cast-On
The cable cast-on is performed like the knit cast-on, except that the needle is inserted between two stitches before the loop is pulled up. It produces an attractive rope-like edge on both sides of the knitting. It is not as elastic as the knit cast-on, but is good for buttonholes and non-ribbed edgings. Use a different cast-on if you require a flexible edge.
1. Perform steps 1–4 of the knit cast-on. You should now have 2 stitches on your needle—the slipknot and 1 new stitch.
2. Insert the right needle between the 2 stitches, and not into their loops. Wrap the working yarn around the tip of the right needle (a). Now pull up a loop, as you would when knitting a stitch (b).

Step 2A
Step 2B
3. Leaving the initial 2 stitches on the needle, use the right needle to place the pulled-up loop onto the left needle.
4. Repeat steps 2 and 3, placing each new stitch to the right of the previously cast-on stitch until you have the desired number of stitches on the left needle.
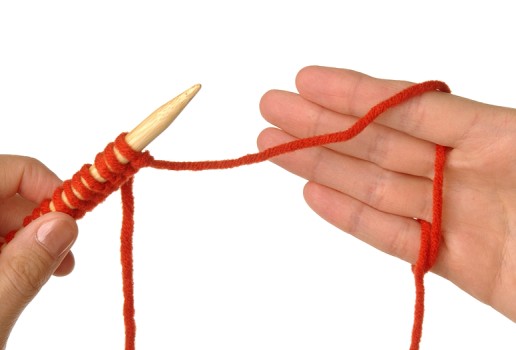
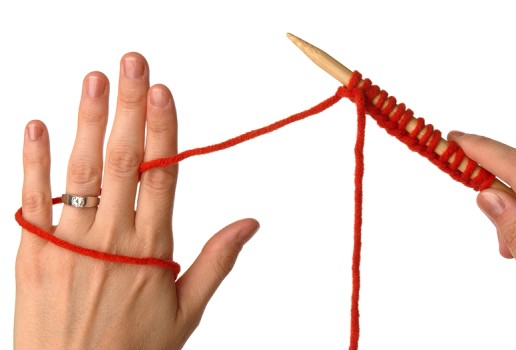
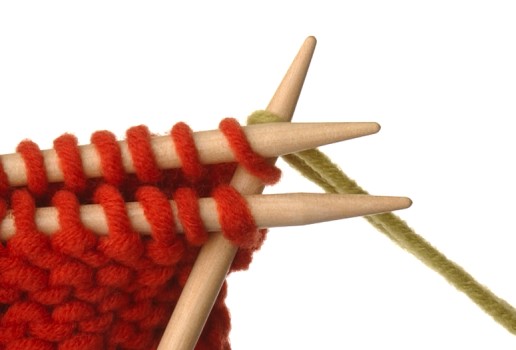
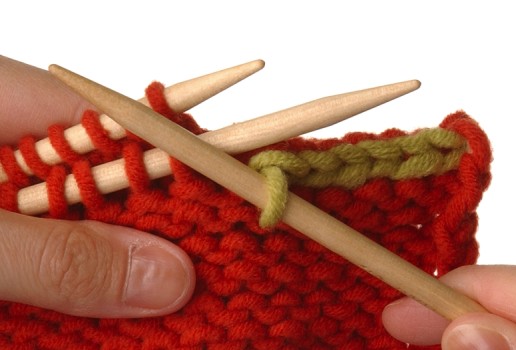
Provisional Cast-On
You use the provisional, or open, cast-on when you want to be able to access the cast-on edge as “live” stitches to be worked later. For example, you might want to work a lacy border or add a peplum or hem to your lower edge. The provisional method is worked very much like the long-tail cast-on, only you need a length of scrap yarn—something strong yet slippery, like mercerized cotton.
In the instructional photos for the provisional cast-on, the working yarn is yellow and the waste yarn is green.
1. Cut a length of scrap yarn equal to 1" per stitch you need to cast on, plus a few inches extra. For example, to cast on 30 stitches, use a 36" length of scrap yarn. Tie the end of the scrap yarn to the end of the working yarn.
2. Holding the yarns and a needle in your right hand, hold the knot against the needle with your thumb.
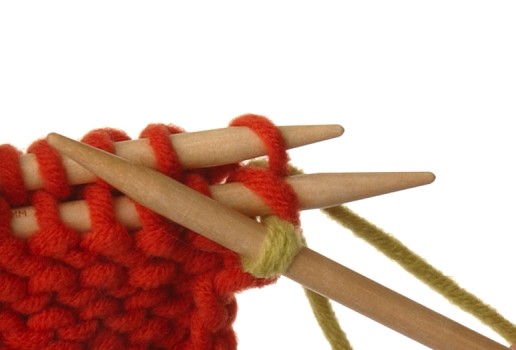
3. Take the yarns in your left hand, holding them as you would for the long-tail method, with the waste yarn around your thumb and the working yarn over your forefinger, grasping both ends with your pinky and ring finger in the center of your palm.

Step 3
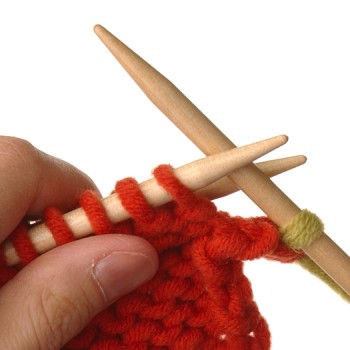
4. Work as you would with the long-tail method, inserting the needle up and under the waste yarn that is looped around the outside of your thumb (a), and then move the needle to the right and use it to grab the working yarn from the nearest side of your forefinger (b).
Step 4A
Step 4B
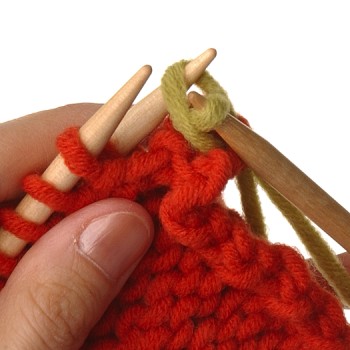
5. Pull the working yarn through the loop between your thumb and the needle.
Step 5
6. Drop the loops from your thumb and forefinger and pull both ends of the yarn to tighten the stitch on the needle.
Step 6
You have just cast on 1 stitch.
7. Repeat steps 4–6 until you have cast on the desired number of stitches. Then continue knitting your project with the working yarn.
Step 7
8. When you need the stitches to be “live” again, carefully snip the waste yarn from each stitch and slip the freed stitches onto a needle as you go.
Hold Needles and Yarn
Some people knit holding the yarn in their right hand, which is called the English method, while others hold it in their left hand, which is called the Continental method. Try both methods and experiment to see which suits you. The most important thing is to be relaxed and comfortable.
Holding Needles and Yarn for the English Method
1. Holding the needle with the stitches on it in your left hand, wind the working yarn in a loop around your pinky, under your two middle fingers, and over the forefinger of your right hand.
2. Hold the empty needle (called the working needle) in your right hand while keeping the working yarn wound through your fingers to maintain even tension.

Holding Needles and Yarn for the Continental Method
1. Holding the needle with the stitches on it in your right hand, wind the working yarn around the back of your hand, under your pinky and two middle fingers, and over the forefinger of your left hand.
2. Take the needle with the stitches on it back into your left hand, keeping the working yarn wound through your fingers to maintain even tension, and hold the working (empty) needle in your right hand.
FAQ
When I wind the yarn around my fingers as described, it feels loose and awkward. Is there another way to hold the yarn?
Yes, there are infinite ways. If it feels too loose, or if wrapping the yarn around your pinky is awkward, try wrapping the yarn over your palm instead. The important thing is to be comfortable and to have the yarn flow easily through your fingers. Many knitters make up their own way of holding the yarn.
Knit: English Method
Now that you know how to cast on stitches and hold your yarn and needles, you can try actually knitting. Many knitters use the English method and hold the yarn with the right hand. (You don’t have to be right-handed to use this method.)
It’s a good idea to start with a small number of stitches (10–15) on your needles. You will want to count your stitches after every row to make sure you haven’t dropped or added any accidentally.
How to Knit Using the English Method
1. Hold the needle with the cast-on stitches on it in your left hand and hold the working (empty) needle in your right hand, with the working yarn wound around the fingers of your right hand.
2. Holding the yarn in back of both needles, insert the right needle into the front of the first stitch on the left needle.

Your needles will form an X, with the right needle behind the left needle.
3. Holding the crossed needles between your left thumb and forefinger, bring the working yarn around the right needle from back to front (a) and then bring it down between the two needles (b).
Step 3A

Step 3B
4. Pull the right needle toward the front, bringing the new loop of yarn you just wrapped around it through the stitch on the needle (a), and slip the old stitch off the left needle (b).
Step 4A
Step 4B
You now have 1 stitch on the right needle—your first knit stitch.
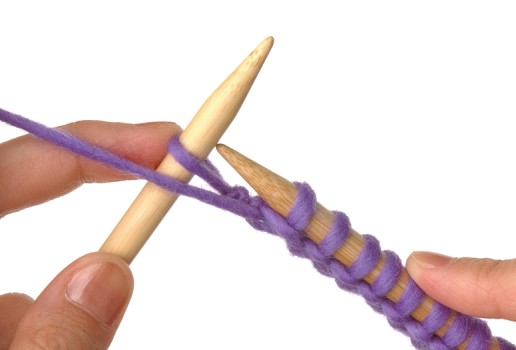
5. Repeat steps 2–4 for each remaining stitch, until all the new stitches are on the right needle.
When you have knit all the stitches from the left needle, you have completed one row of knitting.
6. Switch the needle with the stitches on it to your left hand and repeat steps 2–5 for each row.
Purl: English Method
When you have mastered the knit stitch with the English method, you are ready to try the purl stitch. Purling is the opposite of knitting. You hold the needles the same way as for knitting, but you keep the yarn in front of the needles instead of at the back.
How to Purl Using the English Method
1. Hold the needle with the cast-on stitches on it in your left hand and hold both the working (empty) needle and the working yarn in your right hand.
2. Holding the yarn in front of both needles, insert the right needle from back to front (that is, from right to left) into the first stitch on the left needle.
Your needles will form an X, with the right needle in front of the left needle.
3. Hold the crossed needles between your left thumb and forefinger and bring the yarn behind the right needle, or between the crossed needles (a); then wrap the yarn around the right needle in a counterclockwise direction (b).
Step 3A
Step 3B
4. Pull the right needle toward the back, bringing the new loop of yarn you just wrapped around it through the stitch on the needle (a); then slip the old stitch off the left needle (b).
Step 4A

Step 4B
You now have 1 stitch on the right needle—your first purl stitch.
5. Repeat steps 2–4 for each remaining stitch, until all the new stitches are on the right needle.

When you have purled all the stitches from the left needle, you have completed one row of purling.
6. Switch the needle with stitches on it back to your left hand and repeat steps 2–5 for each row.
Knit: Continental Method
Now you can try knitting using the Continental method, in which you hold the yarn and control tension with your left hand. Don’t worry if you’re right-handed, though: Both right-handed and left-handed Europeans have been knitting this way for centuries.

How to Knit Using the Continental Method
1. Hold the needle with the cast-on stitches on it in your left hand and hold the working (empty) needle in your right hand, with the working yarn wound around the fingers of your left hand.
2. Insert the right needle into the front of the first stitch on the left needle, holding the yarn in back of both needles.
Your needles will form an X, with the right needle behind the left needle.
3. Use your left forefinger to wrap yarn around the right needle from front to back.
NOTE: This is a small, quick motion involving primarily the left forefinger. You can help it along by grabbing the yarn with the right needle at the same time.
4. Pull the right needle toward the front, bringing the new loop of yarn you just wrapped around it through the stitch on the needle (a), and slip the old stitch off the left needle (b).
Step 4A
Step 4B
You now have 1 stitch on the right needle—your first knit stitch.
NOTE: You may want to use your right forefinger to keep the wrapped strand from slipping off the tip of the needle at step 4 (a).
5. Repeat steps 2–4 for each remaining stitch, until all the new stitches are on the right needle.

When you have knit all the stitches from the left needle, you have completed one row of knitting.
6. Switch the needle with the stitches on it to your left hand and repeat steps 2–5 for each row.
Purl: Continental Method
When you purl using the Continental method, you hold the yarn and control tension with your left hand while holding yarn in front of the needles. This makes it easier to move the yarn from the front of the needles to the back of the needles in the same row. When you mix knitting and purling in the same row (ribbing or other combination stitches), you really see the difference.
How to Purl Using the Continental Method
1. Hold the needle with the cast-on stitches on it in your left hand and hold the working (empty) needle in your right hand, with the working yarn wound around the fingers of your left hand.
2. Holding the yarn in front of both needles, insert the right needle from back to front (that is, from right to left) into the first stitch on the left needle.
The needles will form an X, with the right needle in front of the left needle.
3. Use your left forefinger to wrap the yarn around the right needle from front to back, between the needles, and back to the front of the right needle.

NOTE: This is a small, quick motion involving flicking your left forefinger down, bringing the yarn between the needles and then back up, and creating a loop on the right needle.
4. Pull the right needle toward the back, bringing the new loop of yarn you just wrapped around it through the stitch on the needle (a); then slip the old stitch off the left needle (b).
Step 4A
Step 4B
You now have 1 stitch on the right needle—your first purl stitch.
NOTE: You may want to use your right forefinger to keep the wrapped strand from slipping off the tip of the needle at step 4 (a).
5. Repeat steps 2–4 for each remaining stitch, until all the new stitches are on the right needle.
When you have purled all the stitches from the left needle, you have completed one row of purling.
6. Switch the needle with stitches on it back to your left hand and repeat steps 2–5 for each row.
Join New Yarn
Have you run out of yarn yet? If not, there will come a time when you run out or want to change color. At that time, you’ll need to know how to join a new ball of yarn.
How to Join New Yarn
At the Beginning of a Row
It’s best to join a new ball of yarn at the beginning of a row. That way, you can sew your loose ends into a seam or an edge. When your first ball of yarn has length remaining that is less than four times the width of your knitting, it’s time to change to a new ball. At that point, finish your row and cut off the old yarn, leaving a 6-inch tail.
1. Tie a 6-inch end from your new ball snugly onto the tail of the old yarn.
2. Taking care not to confuse the new working yarn with the tied end, work across the row as usual.
NOTE: When you finish your project, you can untie the knot and weave in the ends to hide them.
In the Middle of a Row
Sometimes you have no choice but to join a new yarn in the middle of a row—like when you’re knitting in the round or working on a color pattern that changes in the middle of a row. Make sure you have at least 6 inches of the old yarn left to weave in later and that the tail of the new yarn is at least 6 inches long.
1. Work the next stitch using the new yarn; knit if it should be a knit stitch or purl if it should be a purl stitch.
2. After you complete the row, tie the two ends together somewhat loosely so that they don’t become unraveled.
NOTE: When you finish your project, you can untie the knot and weave in the ends to hide them.
How to Splice New Yarn
Splicing works with yarn that is made up of more than one strand of fiber twisted together. It works well for mid-row joins and doesn’t create a knot in the back, but it takes some skill to master.
1. Untwist the ends of the old and new yarn for 3 inches; divide the plies into two clumps for each yarn.
2. Twist one clump of strands from the old yarn together with one clump of strands from the new yarn. Continue working the row as usual with the new yarn. You can weave in the loose plies later.
Slip a Stitch
Knitting instructions sometimes tell you to slip a stitch. This usually means you move the stitch from the left needle to the right needle, without knitting or purling it. Slipped stitches are often used in decreases, textured stitch patterns, heel flaps, and edge stitches. You also slip stitches when you need to simply transfer stitches from one needle type to another. Stitches can be slipped knitwise or purlwise.
How to Slip a Stitch Knitwise
When you slip a stitch knitwise, leave the working yarn at the back, as you do when knitting, unless the pattern specifies otherwise. Slipping a stitch knitwise twists the stitch; so knitting instructions usually specifically state to slip the stitch knitwise if that is required.
1. Insert the right needle from front to back (knitwise) into the next stitch on the left needle.
2. Without knitting the stitch, slip it from the left needle to the right needle.
How to Slip a Stitch Purlwise
When you slip a stitch purlwise, leave the working yarn at the front, as you do when purling, unless the pattern specifies otherwise. Slipping a stitch purlwise maintains the proper placement of the stitch on the needle. If knitting instructions do not indicate how to slip the stitch, you should slip it purlwise.
1. Insert the right needle from back to front (purlwise) into the next stitch on the left needle.
2. Without purling the stitch, slip it from the left needle onto the right needle.
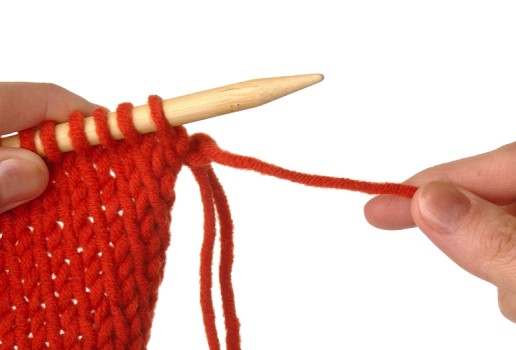
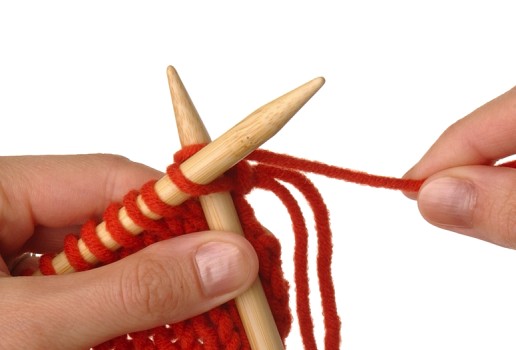
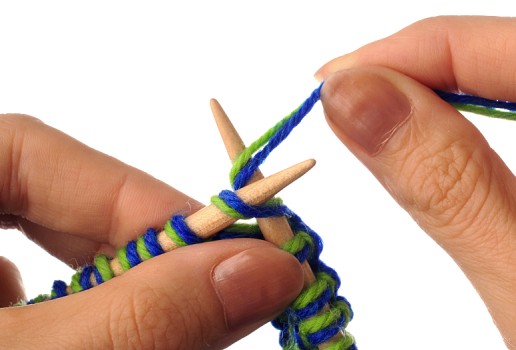
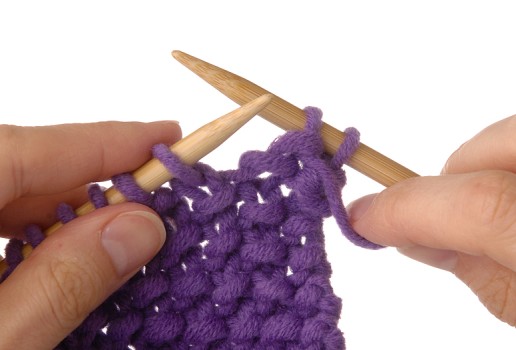
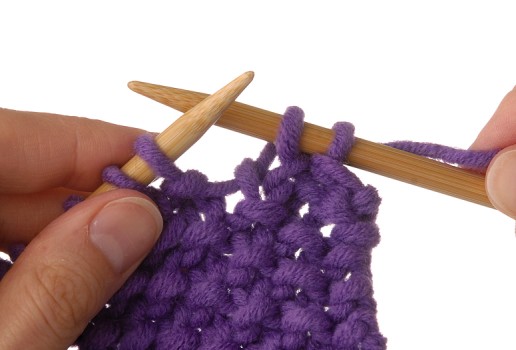
Knit with a Double Strand of Yarn
Sometimes you want to knit with two strands of yarn at the same time: Your knitting pattern might call for it, or you might want to substitute a double strand of a thin yarn that you have on hand for a thicker yarn required by a particular pattern. It’s easy to do.
How to Knit with a Double Strand of Yarn
If you have only one ball of the yarn you want to knit double, you can pull ends from both the inside of the ball and the outside and hold them together; or you can wind the yarn into two balls and hold together a strand from each ball. When you knit with a double strand of yarn, you do everything—casting on, knitting, and purling—as you would with a single strand of yarn, only you hold both strands together as if they’re one and knit or purl both strands at the same time.
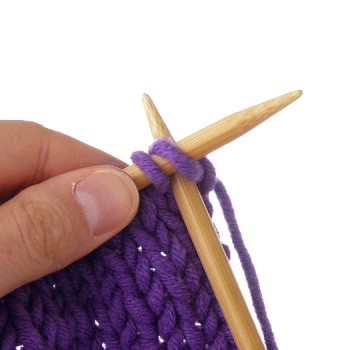
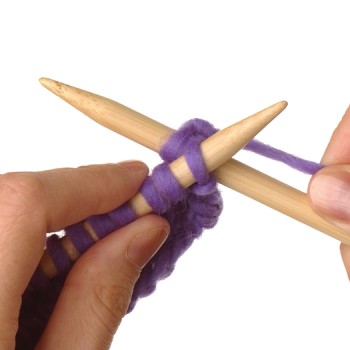
Bind Off
Binding off is what you do when you want to get your stitches off the needle permanently, without allowing them to unravel. You may bind off at the very end of a project to finish it, or you may shape your garment’s armholes or neck by binding off a few stitches here and there. New knitters often bind off so tightly that the finished edge has no elasticity. If your bound-off edge seems too tight, try using a larger needle to bind off than you use to knit the fabric.
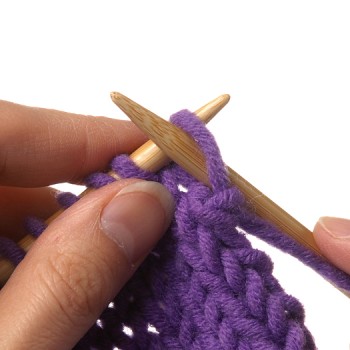
How to Bind Off Knitwise
This method is the most frequently used, and it is the easiest bind-off. You use it to bind off knit stitches. Remember to keep it loose.
1. On the bind-off row, knit until you have 2 stitches total on the right needle; then insert the left needle into the front of the first stitch knit on the right needle (that is, the rightmost stitch).
Step 1
2. Pull the first stitch over the second knit stitch and off the right needle.

Step 2
You have bound off 1 stitch knitwise, and you have 1 stitch on the right needle.
3. Repeat steps 1 and 2 until you have bound off the desired number of stitches.
Step 3
4. Cut the working yarn, leaving a long enough tail to weave in later, and pull it through the last loop on the needle.
How to Bind Off Purlwise
This method is just like the knit bind-off, except you purl instead of knit. You use it to bind off purl stitches.
1. On the bind-off row, purl until you have 2 stitches total on the right needle; then insert the left needle into the front of the first stitch purled on the right needle (that is, the rightmost stitch).
Step 1
2. Pull the first stitch over the second purled stitch and off the right needle.
Step 2
You have bound off 1 stitch purlwise, and you have 1 stitch on the right needle.
3. Repeat steps 1 and 2 until you have bound off the desired number of stitches.
Step 3
4. Cut the working yarn, leaving a long enough tail to weave in later, and pull it through the last loop on the needle.
FAQ
What do I do when I have bound off all stitches and have only 1 left on the right needle?

When you have completed your bind-off and you have only 1 stitch remaining on the right needle, cut your working yarn, leaving a tail at least 6 inches long. Thread this tail through the last stitch and pull tight.
How to Bind Off in Pattern
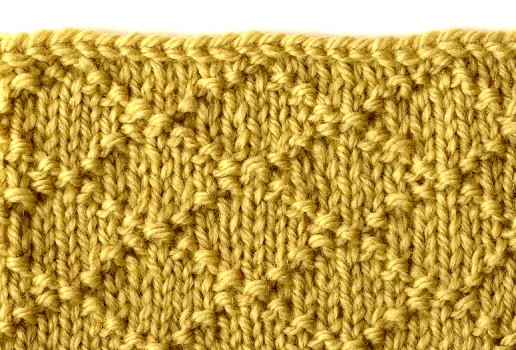
Binding off in pattern means continuing your stitch pattern and binding off simultaneously. Your finished project will have a refined look, and your ribbings will remain elastic. As an example, here is how to bind off in seed stitch (see Seed Stitch).
1. Knit 1, purl 1. You now have 2 stitches on the right needle.
2. Insert the left needle into the front of the first stitch (the knit stitch) on the right needle.
3. Pull the first stitch over the second stitch (the purl stitch) and off the right needle.
You have now bound off 1 stitch in pattern, and you have 1 purl stitch on the right needle.
4. Knit the next stitch on the left needle.
5. Insert the left needle into the front of the first stitch (the purl stitch) on the right needle.
6. Pull the first stitch over the second stitch (the knit stitch) and off the right needle.
You have now bound off 2 stitches in pattern, and you have 1 knit stitch on the right needle.
7. Continue working the seed stitch pattern and binding off as you go.
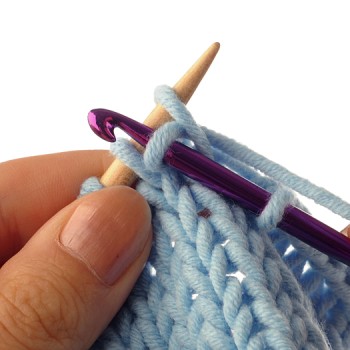
Crochet Bind-Off
Most knitting patterns do not specify a crochet bind-off, but this method is useful when you want a flexible bound-off edge, particularly when working with less elastic yarns, such as cotton, linen, silk, and mohair. Choose a crochet hook that is the same size as your knitting needles, and try it out on one of your practice swatches.
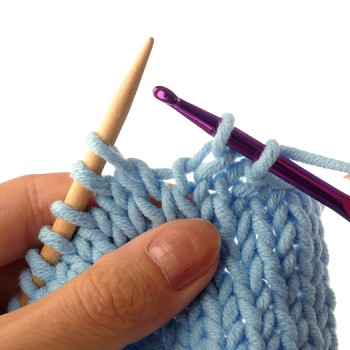
1. Holding the needle with stitches on it in your left hand, insert the crochet hook as if to knit into the first stitch on the needle.
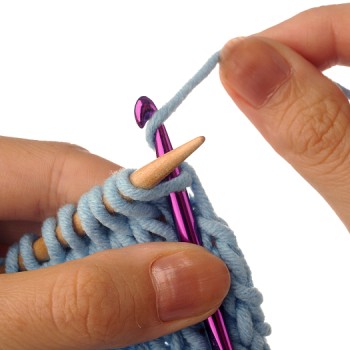
Step 1
2. Wrap the working yarn over the hook from back to front, and pull the loop from back to front through the stitch on the needle, allowing the first stitch on the needle to fall off.
Step 2
3. Repeat steps 1 and 2 in the next stitch on the needle.
Step 3
4. Pull the left loop on the hook through the right loop on the hook (a). One stitch left on the hook (b).
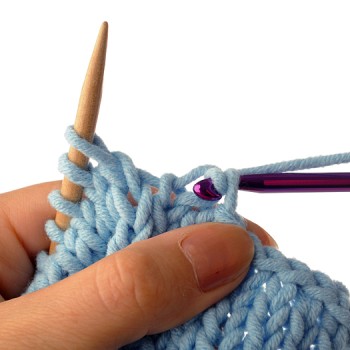
Step 4A
Step 4B
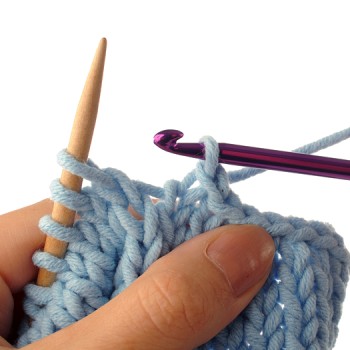
5. Repeat steps 3 and 4 across the row.
6. Cut the working yarn, leaving a long enough tail to weave in later, and pull it through the last loop on the crochet hook.
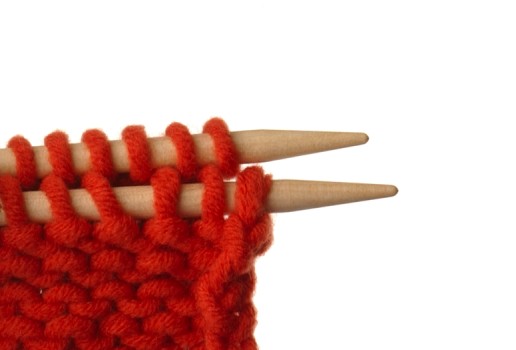
Three-Needle Bind-Off
You can use this method to join a seam by binding off two sets of stitches together. To prepare to join edges with the three-needle bind-off, you need to put each set of stitches onto a knitting needle and have handy a third knitting needle. If one of the sets of stitches has the working yarn still attached, you can use that to knit the seam; otherwise, you can use a piece of the same yarn you used to knit the pieces. The Striped Sweater uses this technique to join the shoulder seams.
1. Hold the needles parallel, with the right sides of your knitting facing each other, as shown.
2. Insert a third knitting needle into the first stitch on the front needle as if to knit and then into the first stitch on the back needle as if to knit. Wrap the working yarn around the tip of the third needle as you would to knit.
3. Bring the loop through the first stitch on the back needle, just as you would to knit, and then bring the same loop all the way through to the front of the first stitch on the front needle as well.
4. Slip both old stitches off the parallel needles, just as you would to knit them.
Step 4
You should now have 1 stitch on the third needle.
5. Repeat steps 2–4. There should now be 2 stitches on the right needle.
6. Pass the first stitch on the right needle (that is, the rightmost stitch) over the second to bind off.
Step 6
7. Continue knitting together the corresponding stitches from each needle and binding off as you go until only 1 stitch remains on the right needle.
8. Cut the yarn, leaving a 6-inch tail, and pull the tail through the last stitch to secure.
NOTE: A contrasting color yarn was used to create the seam here for illustrative purposes. In general, you’ll want to work your seams with the same yarn used to knit the pieces.