Chapter 15: More Knitting Projects
The knitting projects in this chapter include some techniques that are just beyond the beginner level but are certainly not too difficult for you to handle. These projects offer a good opportunity to try your hand at cables, Fair Isle, textured stitches, beaded knitting, and more involved shaping and finishing techniques. Certain procedures may be difficult to visualize from the instructions alone, but don’t give up on a pattern before you’ve actually put stitches on needles and tried some of the techniques yourself.
Men’s Cabled Sleeveless Pullover
Striped Sweater and Hat for Babies and Kids
Women’s Pullover with Big Cable
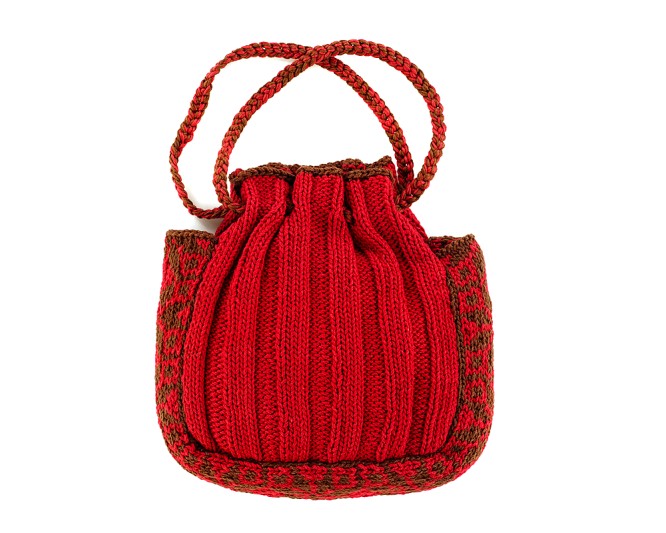
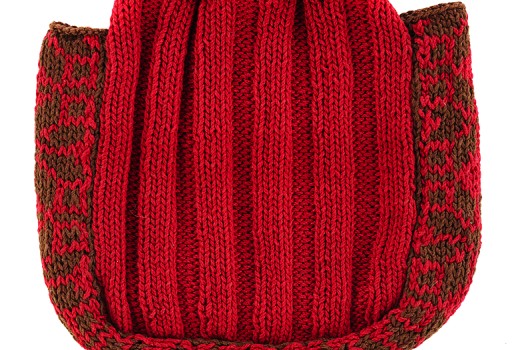
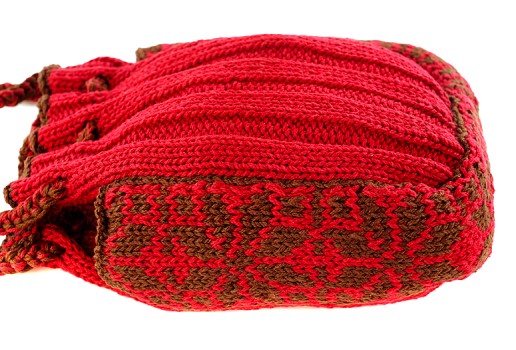
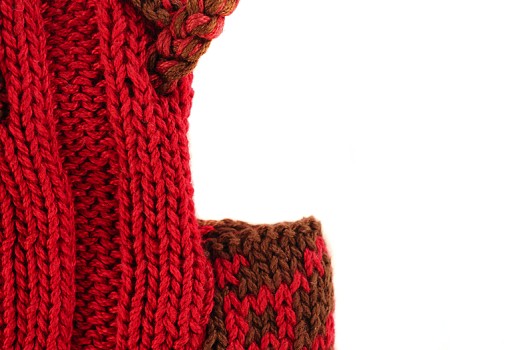
Ribbed and Fair Isle Bag
This fun-to-knit bag is made up of two ribbed panels held together by a Fair Isle gusset. It’s a good project for practicing color stranding without complicated shaping. The handles are long strips of reverse stockinette stitch that you allow to curl in order to create the tubular effect.
Specifications
Size
81⁄2 inches wide × 3 inches deep × 91⁄2 inches high, not including handles
Materials
2 balls each elann.com’s Super Cable Aran (100% mercerized cotton, 93 yd./50 g ball) in red #3919 (A) and brown #7382 (B)
Size 7 (4.5 mm) needles
Tapestry needle
Gauge
18 stitches and 24 rows over stockinette stitch on size 7 (4.5 mm) needles
Pattern Stitches
Ribbing Stitch for Front and Back Panels (46 Sts)
Row 1 (RS): K5, p4, *k4, p4; rep from * to last 5 sts, k5.
Row 2 (WS): P5, k4, *p4, k4; rep from * to last 5 sts, p5.
Rep rows 1 and 2 for ribbing stitch.
Reverse Stockinette Stitch (rev st st) for Handles
Row 1 (RS): Purl.
Row 2: Knit.
Rep rows 1 and 2 for rev St st.
How to Make the Ribbed and Fair Isle Bag
Front and Back Panels (Make Two Alike)
1. With size 7 needles and A, CO 46 sts.
2. Work in ribbing st until piece measures 8 inches from beg, ending with a WS row.
3. Next row—work eyelets (RS): K3, yo, k2tog, *p4, k2, yo, k2tog; rep from * to last st, k1.
4. Continue with ribbing pattern as established until panel measures 91⁄2 inches from beg, ending with a WS row.
5. Cut yarn and change to yarn B.
6. Next row (RS): Knit.
7. BO purlwise in B.
Fair Isle Gusset
1. With size 7 needles and B, CO 19 sts.
Fair Isle Pattern for Gusset

2. Join A. Beg with row 1 and using both A and B, work Fair Isle pattern from chart for 127 rows (eight 16-row reps, less 1 row on last rep), ending with row 15 of chart. Cut yarn A.
NOTE: See Learn Fair Isle Knitting for Fair Isle techniques.
3. Next row (WS): Using B, purl.
4. BO knitwise.
Handles (Make Two Alike)

1. With size 7 needles and B, CO 85 sts.
2. Beg with a purl row, work 6 rows rev St st.
3. BO purlwise.
Finishing
1. Weave in ends.
2. Lightly steam to block pieces, if desired.
3. Center gusset strip on base of back panel and pin all around. Sew seam with RS tog, reinforcing the top corners with a few extra stitches.
4. Rep step 3 for front panel.
5. Beg at outer eyelets, weave handle ends from RS to WS through first eyelet, from WS to RS through second eyelet, and from RS to WS through third eyelet, so that the two handle ends meet at the middle on the WS. Sew handle ends tog. Rep for second handle.
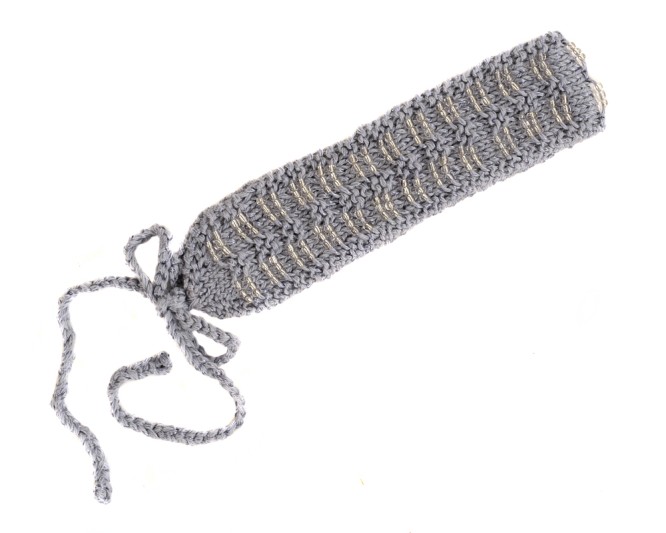
Beaded Headband
If you’re ready to embellish your knitting with sparkling beads, this is the project for you. Using less than a single skein of yarn and a handful of beads, the headband works up so quickly that you’ll want to make two or three to give as gifts.
Specifications
Sizes
One size
Materials
1 ball elann.com’s Luna (55% viscose/45% cotton, 106 yd./50 g skein) in Moonstone #3706
Size 6 (4 mm) needles
300 size 06 silver-lined glass seed beads
Beading needle and sewing thread
Tapestry needle
Size F (3.75 mm) or G (4 mm) crochet hook
Gauge
21 stitches and 28 rows to 4 inches over stockinette stitch on size 6 (4 mm) needles
Pattern Stitches
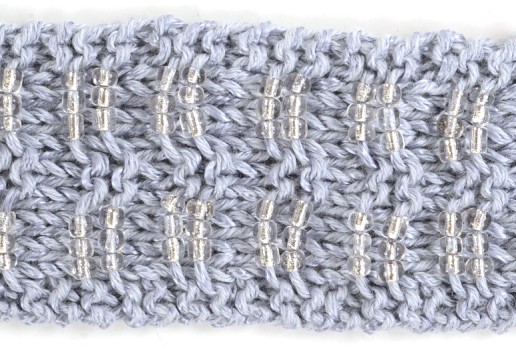
Beading Pattern (12 sts)
NOTE: See Knit with Beads for beaded knitting instructions.
Rows 1, 3, and 5 (WS): Purl.
Rows 2 and 4 (RS): P2, *slide 3 beads along working yarn until you hit the right needle, sl3 with yarn held in front (wyif), p2; rep from * once.
NOTE: Slipping the stitches with the yarn holding the beads held in front creates one beaded swag.
Row 6: P2, k8, p2.
Rep rows 1–6 for beading pattern.
How to Make the Beaded Headband
Headband
1. Sl beads onto your yarn, using beading needle and thread.
NOTE: See FAQ to see how this is done.
2. CO 6 sts.
NOTE: No beads are used for the first 8 rows.
3. Row 1 (WS): Purl.
4. Row 2 (RS): P2, knit to last 2 sts, p2.
5. Row 3: Purl.
6. Row 4: P2, m1, knit to last 2 sts, m1, p2—8 sts.
7. Rep rows 3 and 4 twice—12 sts.
8. Beg with row 1, work beading pattern until band measures approx 17 inches, ending with row 5.
9. Next row (RS): P2, k2tog, knit to last 4 sts, k2tog, p2—10 sts.
10. Next row (WS): Purl.
11. Rep last 2 rows twice, ending with a WS row—6 sts.
12. Next row (RS): P2, k2, p2.
13. BO purlwise.
Ties (Make Two Alike)
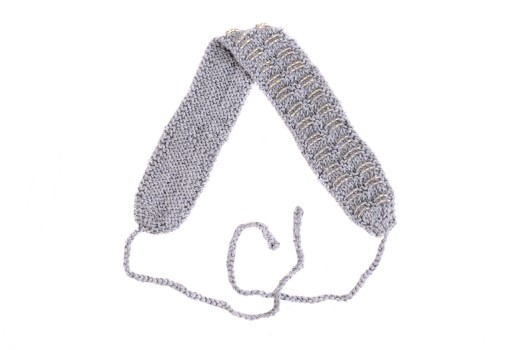
1. Using crochet hook, attach double strand of yarn to tip of headband and chain for 10 (10, 12, 12) inches.
2. Pull yarn through last loop and thread through tapestry needle. Weave end back into chain to conceal.
Finishing
1. Weave in ends.
2. Gently steam on WS to neaten, if desired.
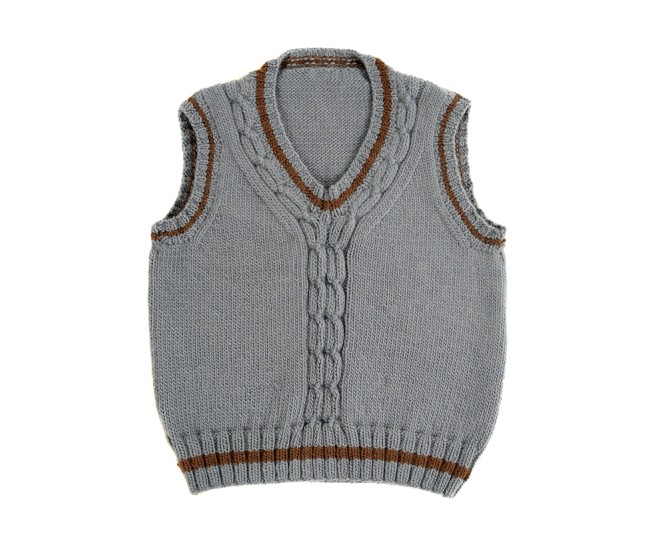
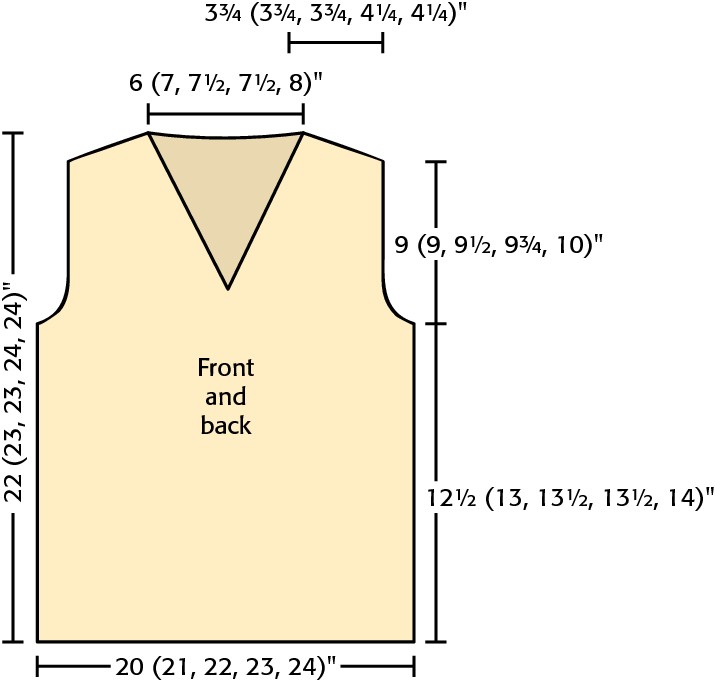
Men’s Cabled Sleeveless Pullover
This classic men’s sleeveless pullover is a good project for practicing cables, shaping techniques, and picking up stitches for the neck and armbands. And there are only two seams to sew—at the shoulders—because the pullover is worked in the round up to the armholes. From there, you divide the stitches in half and work the back and front separately.
Specifications
Sizes
XS (S, M, L, XL)
Finished chest circumference: 38 (42, 44, 46, 48) inches
Back length: 25 (261⁄2, 27, 271⁄2, 28) inches
Materials
4 (4, 5, 5, 6) skeins Valley Yarns Berkshire (85% wool/15% alpaca,141 yd./100 g skein) in Stone Blue #38 (MC) and 1 skein in brown #8 (CC)
Size 8 (5 mm) 30- or 36-inch circular needle
Size 9 (5.5 mm) 30- or 36-inch circular needle
Size 8 (5 mm) 16-inch circular needle for working armbands
3 same-color stitch markers, 1 different-color stitch marker
Cable needle
Row counter, if desired
Tapestry needle
Gauge
16 stitches and 22 rows over stockinette stitch on size 9 (5.5 mm) needles
Pattern Stitches
Ribbing Stitch
All rnds/rows: *K2, p2; rep from * to end of rnd/row.
Cable Panel (18 sts)

Worked in the round:
Rnds 1, 2, and 4–10: P2, *k2, p2; rep from * to second cable panel marker.
Rnd 3: *P2, sl next 4 sts onto cn and hold at front of work, k2 from left needle, sl the 2 purl sts from cn back onto left needle, place the cn with 2 knit sts at back of work, p2 from left needle, k2 from cn; rep from * once, p2.
Rep rnds 1–10 for cable panel worked in the round.
Worked flat in rows:
Rows 1, 5, 7, and 9 (RS): P2, *k2, p2; rep from * to second cable panel marker.
Rows 2, 4, 6, 8, and 10: K2, *p2, k2; rep from * to cable panel marker.
Row 3: *P2, sl next 4 sts onto cn and hold at front of work, k2 from left needle, sl the 2 purl sts from cn back onto left needle, place the cn with 2 knit sts at back of work, p2 from left needle, k2 from cn; rep from * once, p2.
Rep rows 1–10 for cable pattern worked flat in rows.
NOTE: When cable panel divides in half at start of v-neck, work all rows over 9 sts as written above, except in row 3, omit the direction “rep from * once” and end with p1 instead of p2 on one side (left) and begin with p1 instead of p2 on right side.
How to Make the Cabled Sleeveless Pullover
The sleeveless pullover is worked in the round up to the armholes, at which point the work is divided and worked back and forth in rows.
Lower Body
1. With size 8 circular needle and MC, CO 160 (168, 176, 184, 192) sts. Place different-color marker to note beg/end of rnd, and join in rnd.
2. Work ribbing stitch for 6 rnds. Cut MC.
3. Join CC and knit 1 rnd.
4. Work ribbing stitch in CC for 3 rnds. Cut CC.
5. Rejoin MC and knit 1 rnd.
6. Work ribbing stitch for 6 rnds. Change to size 9 circular needle.
7. Rnd 1—place markers and beg cable patt: K80 (84, 88, 92, 96), place first marker to indicate side seam; k31 (33, 35, 37, 39), place second marker to mark beg of cable panel on pullover front; work rnd 1 of cable panel over next 18 sts, place third marker to mark end of cable panel; k31 (33, 35, 37, 39) sts, slip different-color marker at end of rnd.
8. Rnd 2: K80 (84, 88, 92, 96), sl marker, k31 (33, 35, 37, 39), sl marker, work rnd 2 of cable panel over next 18 sts, sl marker, k31 (33, 35, 37, 39) sts to different-color marker at end of rnd.
9. Continue as established, working vest in St st while maintaining the 18 sts between markers on pullover front in cable panel until pullover measures 151⁄2 (16, 17, 171⁄4, 171⁄2) inches from CO edge.
Upper Body: Back
1. Divide back and front and shape armholes: BO 6 (6, 7, 7, 8) sts, knit to first marker, turn and put the 80 (84, 88, 92, 96) unworked sts for front (with cable panel) onto spare needle to be worked later.
NOTE: The pullover is worked back and forth in rows—still using the circular needle—from this point, starting with the back. Make a note of last cable row worked.
2. Next row (WS): BO 6 (6, 7, 7, 8) sts, purl to end of row—68 (72, 74, 78, 80) sts.
3. Next row (RS): K2, ssk, knit to last 4 sts, k2tog, k2—66 (70, 72, 76, 78) sts.
4. Next row: Purl.
5. Rep last 2 rows six times—54 (58, 60, 64, 66) sts.
6. Continue without further shaping until armholes measure 9 (9, 91⁄2, 93⁄4, 10) inches, ending with a WS row.
7. Shape shoulders: BO 7 (7, 7, 8, 8) sts beg next 2 rows, then 8 (8, 8, 9, 9) sts beg next 2 rows—24 (28, 30, 30, 32) sts.
8. BO rem back neck sts.
Upper Body: Front
1. Sl the 80 (84, 88, 92, 96) sts for front back onto size 9 needle, ready to beg a RS row.
2. Maintaining cable panel over center 18 sts, beg shaping armholes as for back: BO 6 (6, 7, 7, 8) sts beg next 2 rows—68 (72, 74, 78, 80) sts.
NOTE: From here, the cable panel separates into two 9-st panels that run alongside the v-neck shaping.
3. Next row—divide neck and continue armhole shaping (RS): K2, ssk, knit to marker, work cable panel over next 9 sts (see note under Cable Panel), turn; sl rem 34 (36, 37, 39, 40) sts for right upper front onto holder or spare needle to be worked later.
NOTE: You should now have 33 (35, 36, 38, 39) sts on the needle for the left front.
4. Next row (WS): Work cable panel over first 9 sts, sl marker, purl to end of row.
5. Next row—beg neck shaping and continue armhole shaping (RS): K2, ssk, knit to 4 sts before marker, k2tog, k2, sl marker, work cable patt over last 9 sts—31 (33, 34, 36, 37) sts.
6. Rep last 2 rows five times—21 (23, 24, 26, 27) sts.
7. Rep step 4 once more, ending with a WS row.
8. Next row—continue shaping neck only (RS): Knit to 4 sts before marker, k2tog, k2, sl marker, work cable panel over last 9 sts—20 (22, 23, 25, 26) sts.
9. Next row (WS): Work cable panel over first 9 sts, sl marker, purl to end of row.
10. Rep last 2 rows to 15 (15, 15, 17, 17) sts.
11. Work without further shaping, maintaining 9-st cable panel at neck edge, until armhole measures 9 (9, 91⁄2, 93⁄4, 10) inches, ending with a WS row.
12. Next row (RS): BO 7 (7, 7, 8, 8) sts, work in patt to end of row—8 (8, 8, 9, 9) sts.
13. Next row (WS): Purl.
14. BO rem sts.
15. Sl the 34 (36, 37, 39, 40) sts for right upper front onto size 9 needle, ready to work a RS row.
16. Next row (RS): Work cable panel over first 9 sts, sl marker, knit to last 4 sts, k2tog, k2—33 (35, 36, 38, 39) sts.
17. Next row (WS): Purl to marker, sl marker, work cable panel over last 9 sts.
18. Next row—beg neck shaping and continue armhole shaping (RS): Work cable panel over first 9 sts, sl marker, k2, ssk, knit to last 4 sts, k2tog, k2—31 (33, 34, 36, 37) sts.
19. Rep last 2 rows five times—21 (23, 24, 26, 27) sts.
20. Rep step 17 once more, to end with a WS row.
21. Next row—continue to shape neck only (RS): Work cable panel over first 9 sts, sl marker, k2, ssk, knit to end of row—20 (22, 23, 25, 26) sts.
22. Next row (WS): Purl to marker, sl marker, work cable panel over last 9 sts.
23. Rep steps last 2 rows to 15 (15, 15, 17, 17) sts.
24. Work without further shaping, maintaining 9-st cable panel at neck edge, until armhole measures 9 (9, 91⁄2, 93⁄4, 10) inches, ending with a RS row.
25. Next row (WS): BO 7 (7, 7, 8, 8) sts, work in patt to end of row—8 (8, 8, 9, 9) sts.
26. Next row (RS): Work in cable patt to end of row.
27. BO rem sts.
Finishing
1. Weave in ends.
2. Block pullover to measurements shown in Step 1 but do not block ribbing.
3. Sew shoulder seams.
4. Work armbands: Beg at base of armhole with RS facing, use 16-inch size 8 circular needle and MC to pick up and knit 38 (38, 40, 41, 42) sts evenly to shoulder seam, then pick up and knit same number of sts back down to base of armhole—76 (76, 80, 80, 84) sts total.
5. Place marker, join sts in rnd, and work in ribbing stitch for 2 rnds. Drop MC.
6. Join CC and knit 1 rnd, then work 1 rnd B in ribbing stitch. Cut CC.
7. Pick up MC and knit 1 rnd, then work 2 rnds in ribbing stitch. BO in rib patt.
8. Rep steps 4–7 for second armband.
9. Work neckband: With RS facing and beg at base of V on right front, use longer size 8 needle and MC to pick up and knit 36 (36, 38, 39, 40) sts up to right shoulder seam, then pick up and knit 24 (28, 28, 30, 32) sts along back neck, then 36 (36, 38, 39, 40) sts back down left front neck to base of V—96 (100, 104, 108, 112) sts.
NOTE: Neckband is worked back and forth in rows.
10. Work ribbing stitch for 2 rows. Drop MC.
11. Join CC, purl 1 row, then work 2 rows ribbing stitch. Cut CC.
12. Pick up MC, knit 1 row, then work 2 rows ribbing stitch. BO in rib patt.
13. Overlap left front neckband edge over right front neckband edge at base of V and sew in place.
14. Weave in rem ends.
15. Lightly steam pullover again, including seams, but taking care not to block the elasticity out of the edgings.
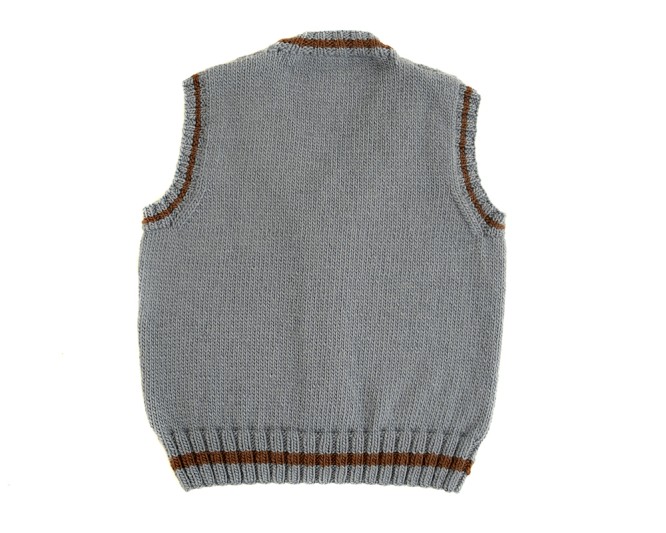
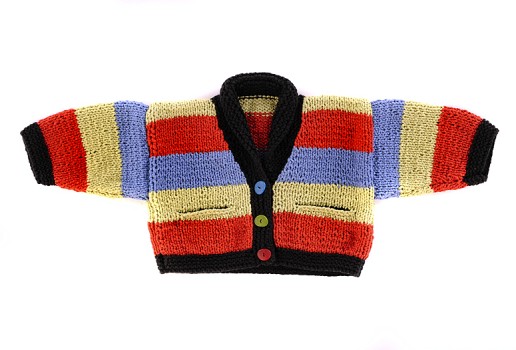
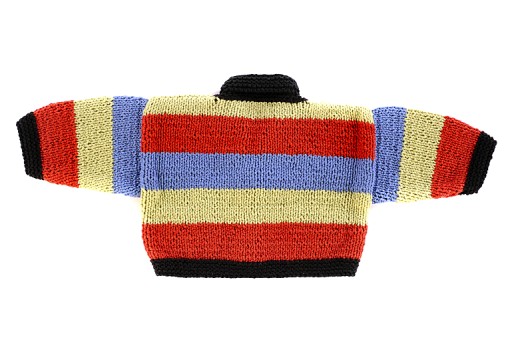
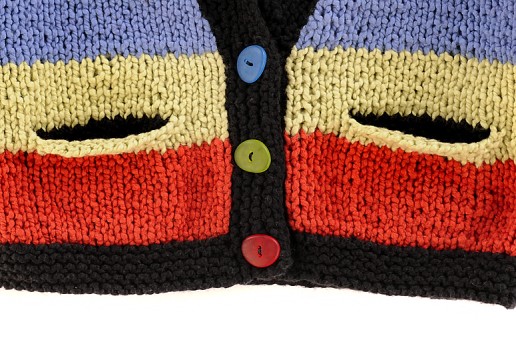
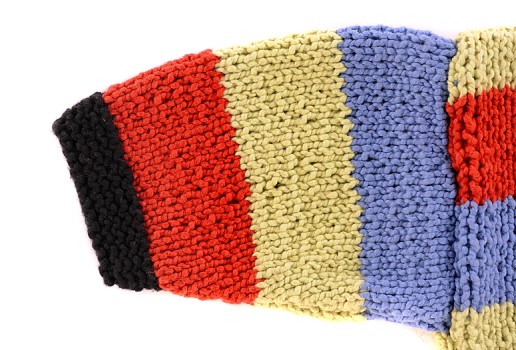
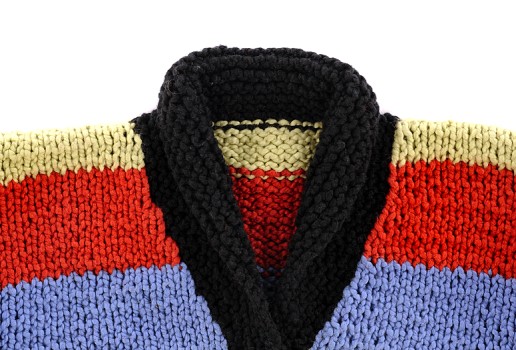
Striped Sweater and Hat for Babies and Kids
Knit in a simple stripe pattern, this sweater has minimal shaping. Inset pockets and an easy-to-work shawl collar provide a little challenge—which you should be up for at this point. The matching hat has you working color segments in intarsia but without a lot of the fuss.
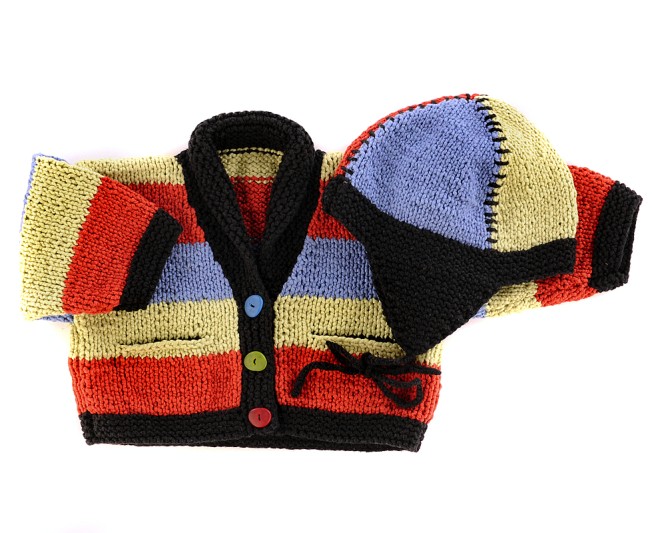
The instructions here include sizes ranging from 6 months to 10 years.
Specifications
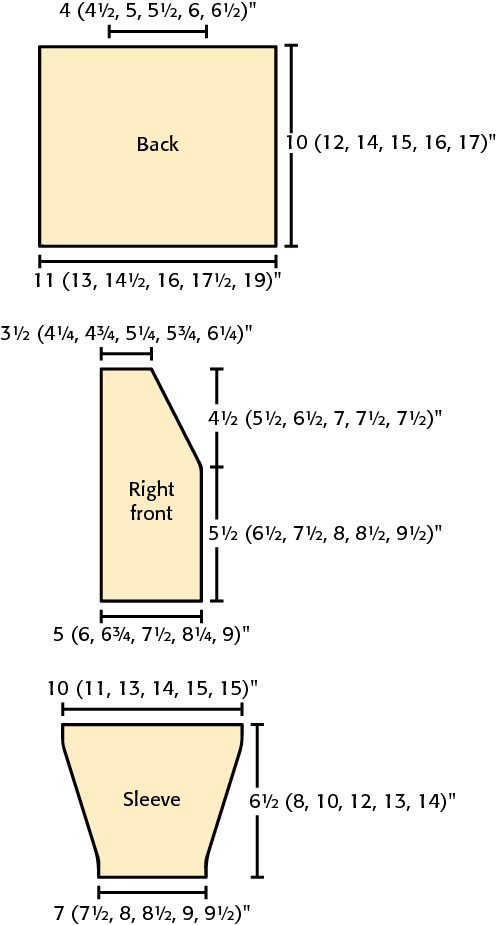
Sizes (See pattern schematic on next page)
Sweater: 6 mos. (1–2 yrs., 3–4 yrs., 5–6 yrs., 7–8 yrs., 9–10 yrs.)
Finished chest circumference: 22 (26, 29, 32, 35, 38) inches
Back length: 10 (12, 14, 15, 16, 18) inches
Sleeve length: 61⁄2 (8, 10, 12, 13, 14) inches
Hat circumferences: XS (S, M, L)
Brim circumferences: 151⁄2 (17, 181⁄2, 20) inches
Gauge
18 stitches and 24 rows to 4 inches over stockinette stitch on size 7 (4.5 mm) needles
Materials
2 (2, 2, 3, 3, 4) balls Mission Falls 1824 Cotton (100% cotton, 84 yd./50 g ball) in Chili #207 (A), 1 (2, 2, 3, 3, 3) ball(s) in Lemongrass #305 (B), 1 (1, 2, 2, 2, 3) balls in Sky #403 (C), and 1 (1, 1, 2, 2, 2) balls in Ebony #100 (D)
Size 6 (4 mm) needles
Size 7 (4.5 mm) needles
Size 6 (4 mm) circular needle, at least 20 inches long, for working trim
5 stitch holders
Size 6 (4 mm) double-pointed needles (for grafting shoulder seams)
Row counter, if desired
Tapestry needle
Three 5⁄8- to 3⁄4-inch buttons for the first three sizes; five 5⁄8- to 3⁄4-inch buttons for the remaining three sizes
Size G (4–4.25 mm) crochet hook
Pattern Stitches
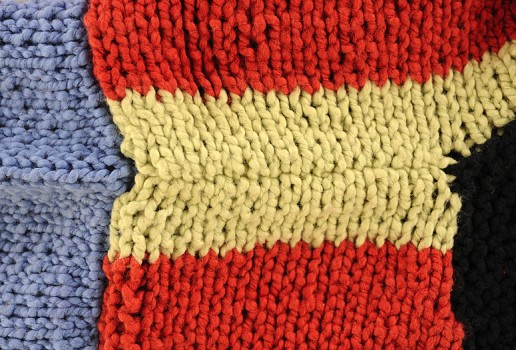
Stripe Pattern
Over stockinette stitch, work stripe patt as follows:
12 rows in A
12 rows in B
12 rows in C
Rep these 36 rows for stripe patt.
NOTE: If you don’t want to have to weave in so many ends, you can carry the yarns alternately up the side as you go (see Make Horizontal Stripes, step 2).
SSK (Left-Slanting) Decrease
Sl first st as if to knit and then sl next st as if to knit. Insert left needle into front of slipped sts and knit them together.
K2tog TBL (through back of loop)
Insert the right needle from front to back into the back of the next 2 sts on the left needle. Knit the 2 sts together as 1 st.
P2tog TBL
Insert the right needle from back to front into the back of the next 2 sts on the left needle. Purl the 2 sts together as 1 st.
How to Make the Striped Sweater
Back
1. With size 6 needles and D, CO 50 (58, 66, 72, 78, 86) sts.
2. Knit 8 (8, 10, 12, 12, 12) rows.
3 .Change to size 7 needles and A, and, beg with a knit row, work in St st and stripe patt for 41⁄2 (51⁄2, 61⁄3, 63⁄4, 71⁄4, 73⁄4) stripes—approx 10 (12, 14, 15, 16, 17) inches from beg.
4. Put first 16 (19, 22, 24, 26, 28) sts on spare needle or holder for one shoulder, put center 18 (20, 22, 24, 26, 30) sts on holder for neck, and put rem 16 (19, 22, 24, 26, 28) sts onto third holder for second shoulder, leaving a long enough tail to graft shoulder tog later.
Pocket Linings (Make Two Alike)
1. With size 7 needle and D, CO 11 (12, 13, 15, 16, 17) sts.
2. Work in St st for 21⁄2 (23⁄4, 3, 31⁄4, 31⁄2, 33⁄4) inches. Put sts onto holder.
Left Front
1. With size 6 needles and D, CO 22 (27, 30, 34, 37, 40) sts.
2. Knit 8 (8, 10, 12, 12, 12) rows.
3 .Change to size 7 needles and A, and, beg with a knit row, work in St st and stripe patt until you have completed 15 (15, 17, 17, 19, 19) rows of stripe patt (not including garter st hem).
4. Place pocket (WS): P5 (7, 8, 9, 10, 11), BO 11 (12, 13, 15, 16, 17) sts, purl to end of row.
5. Next row (RS): K6 (8, 9, 10, 11, 12), k11 (12, 13, 15, 16, 17) sts from holder for pocket lining with RS facing, k5 (7, 8, 9, 10, 11).
6. Continue working stripe patt until left front measures 51⁄2 (61⁄2, 71⁄2, 8, 81⁄2, 91⁄2) inches from beg, ending with a WS row.
7. Shape neck (RS): Knit to last 2 sts, k2tog—21 (26, 29, 33, 36, 39) sts.
8. Dec 1 st at the end of every fourth row (as established in step 7) 4 (7, 5, 9, 10, 11) times—17 (19, 24, 24, 26, 28) sts.
9. Dec 1 st at the end of every eighth row 1(0, 2, 0, 0, 0) time(s)—16 (19, 22, 24, 26, 28) sts.
10. Cont without further shaping until left front is same length as back and ends with the same number of rows.
11. Put shoulder sts onto spare needle or holder for later.
Right Front
1. Work as for left front through step 3.
2. Place pocket (WS): P6 (8, 9, 10, 11, 12), BO 11 (12, 13, 15, 16, 17) sts, purl to end of row.
3. Next row (RS): K5 (7, 8, 9, 10, 11), k11 (12, 13, 15, 16, 17) sts from holder for pocket lining with RS facing, k6 (8, 9, 10, 11, 12).
4. Work from here until piece measures 51⁄2 (61⁄2, 71⁄2, 8, 81⁄2, 91⁄2) inches from beg, ending with a WS row.
5. Shape neck (RS): Ssk, knit to end of row—21 (26, 29, 33, 36, 39) sts.
6. Dec 1 st at beg of every fourth row 4 (7, 5, 9, 10, 11) times.
7. Dec 1 st at beg of every eighth row 1 (0, 2, 0, 0, 0) time(s)—16 (19, 22, 24, 26, 28) sts.
8. Cont without further shaping until right front is same length as back and ends with the same number of rows.
9. Put shoulder sts onto spare needle or holder for later.
Sleeves (Make Two Alike)
1. With size 6 needles and D, CO 31 (34, 36, 38, 40, 43) sts.
2. Work in garter stitch (knit every row) for 1 (1, 2, 2, 3, 3) inches.
3. Change to size 7 needles and A and work first 2 rows stripe patt.
NOTE: You might want to use a row counter to keep track of inc rows.
4. Next row—begin sleeve shaping (RS): Inc 1 st each end of row—33 (36, 38, 40, 42, 45) sts.
5. Inc 1 st each end every fourth row 5 (5, 9, 9, 13, 9) times, maintaining stripe patt—43 (46, 56, 58, 68, 63) sts.
6. Inc 1 st each end every eighth row 1 (2, 1, 2, 0, 3) time(s), maintaining stripe patt—45 (50, 58, 62, 68, 69) sts.
7. Work without further shaping until sleeve measures approx 61⁄2 (8, 10, 12, 13, 14) inches from beg, end with at least 3 rows of one stripe.
8. BO firmly but not tightly, using same color as final stripe.
Graft Shoulder Seams
Before working the trim, you need to join the shoulders. Use the three-needle bind-off method to graft shoulder seams, as described here. (See Three-Needle Bind-Off for more information.)
1. With RS tog, place the 16 (19, 22, 24, 26, 28) sts from the left front shoulder onto a size 6 dpn and do the same for the 16 (19, 22, 24, 26, 28) sts from the left back shoulder; then hold the needles parallel to one another.
2. Insert a third dpn into the first st on the first needle as if to knit, then into the first st on the second needle as if to knit, and knit the 2 sts as 1 st, using the same color yarn as the sts on the needles.
3. Rep step 2; there should now be 2 sts on the right needle.
4. Pass the first st on the right needle over the second and off.
5. Rep steps 3 and 4, knitting the corresponding sts of each shoulder together and binding off as you go, until 1 st rem on the right needle.
6. Cut yarn, pull it through the last st, and secure.
7. Rep steps 1–6 for the right shoulder.
Work Trim
The button band, collar, and buttonhole band are worked simultaneously in garter stitch, using a long circular needle so that you can pick up all the stitches. The shawl collar is shaped with a simple version of short-rowing (see Shape with Short Rows) that doesn’t involve wrapping stitches. For these short rows, you simply knit partway across the row, turn, and work back in the other direction. This way, you widen the trim only for the length of the shawl collar.
1. With size 6 circular needle and D, beg with RS facing at lower edge of right front, pick up and k20 (24, 28, 30, 32, 34) sts up right front to beg neck shaping, then pick up and knit 21 (25, 29, 31, 33, 35) sts up to shoulder seam, then k18 (20, 22, 24, 26, 30) sts from holder for back neck, then pick up and knit 21 (25, 29, 31, 33, 35) sts down left neck, then pick up and knit 20 (24, 28, 30, 32, 34) sts down to lower left edge—100 (118, 136, 146, 156, 168) sts total.
2. Knit 1 (1, 1, 3, 3, 3) rows.
3. Row 1 (RS)—beg shawl collar shaping: K68 (80, 91, 98, 105, 114), turn.
4. Row 2: K36 (42, 46, 50, 54, 60), turn.
5. Row 3: K38 (44, 48, 52, 56, 62), turn.
6. Row 4: K40 (46, 50, 54, 58, 64) turn.
7. Continue shaping collar as established, completing an additional 2 sts at end of each short row, until you get to 60 (70, 82, 86, 94, 100) sts, turn.
8. Next row (RS): Knit. (This takes you to the hem of the left front.)
9. Next row (WS): Knit. (This takes you to the right front hem.)
NOTE: If you are making the sweater for a girl, work buttonhole row as specified in step 10 and skip step 11. If the sweater is for boy, skip step 10 and work the buttonhole row as specified in step 11.
10. Work buttonhole row/girls’ sweater: K2 (2, 2, 2, 2, 3), *yo, k2tog, k6 (8, 10, 11, 5, 5)*; rep from * to * 1 (1, 1, 1, 3, 3) time(s), yo, k2tog, knit to end of row.
11. Work buttonhole row/boys’ sweater: K80 (94, 108, 116, 124, 135), *k2tog, yo, k6 (8, 10, 11, 5, 5)*; rep from * to * 1 (1, 1, 1, 3, 3) time(s), k2tog, yo, k2 (2, 2, 2, 2, 3).
12. Knit 3 rows.
13. BO loosely knitwise.
Finishing
1. Weave in ends, except for those that can be used to sew seams.
2. Attach sleeves: With RS tog, pin sleeve caps to armholes, with shoulder seam centered, and backstitch in place.
3. Lightly steam entire sweater on WS to block, including seams and pocket linings.
4. Sew side and sleeve seams, using the backstitch seam or invisible vertical seam (see Invisible Vertical Seam).
5. Whipstitch pocket linings in place (see Whipstitch). Steam again.
6. Sew buttons opposite buttonholes, using thread to match D.
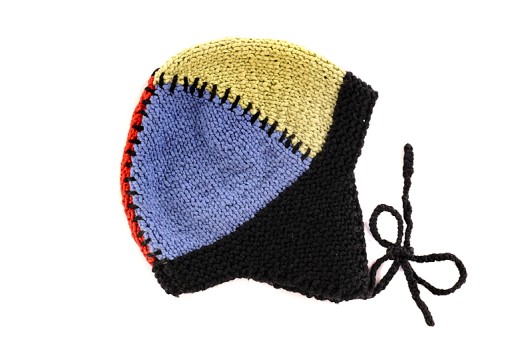
How to Make the Matching Hat
You work the hat back and forth in rows and then sew the back seam. You start by knitting the ear flaps and then work them into the garter stitch brim. From there, you knit the color segments, which are gradually narrowed to shape the crown of the hat.
Ear Flaps (Make Two Alike)
1. With size 6 needle and D, CO 4 sts.
2. Knit 2 rows.
3. Next row—begin ear flap shaping (RS): K1, m1, knit to last st, m1, k1—6 sts.
4. Knit 3 rows.
5. Rep last 4 rows 5 (6, 7, 8) times—16 (18, 20, 22) sts.
6. Knit 3 rows.
7. Cut yarn, leaving a 6-inch tail, and sl sts to holder.
Hat Body
1. With size 6 needle and D, CO 8 (9, 10, 11) sts, k16 (18, 20, 22) sts from holder for first ear flap, CO 21 (21, 24, 24) more sts using knit cast-on (see Knit Cast-On), k16 (18, 20, 22) sts from holder for second ear flap, CO 8 (9, 10, 11) more sts using knit cast-on—69 (75, 84, 90) sts.
2. Knit 8 (10, 10, 12) rows. Cut yarn D, leaving a tail.
3. Beg color block segments (RS): K23 (25, 28, 30) in A, k23 (25, 28, 30) in B, k23 (25, 28, 30) in C.
4. Next row (WS): P23 (25, 28, 30) in C, p23 (25, 28, 30) in B, p23 (25, 28, 30) in A, twisting yarns together at color changes to prevent holes.
NOTE: See Try Intarsia for more on intarsia knitting.
5. Rep last 2 rows 4 (4, 6, 6) times more, taking care to twist yarns on WS when changing color to prevent holes.
6. Shape crown (RS): Using A, k2tog tbl, k19 (21, 24, 26), k2tog; change to B, k2tog tbl, k19 (21, 24, 26), k2tog; change to C, k2tog tbl, k19 (21, 24, 26), k2tog—63 (69, 78, 84) sts.
7. Work 3 rows without shaping, maintaining color segments.
8. Next row (RS): Using A, k2tog tbl, k17 (19, 22, 24), k2tog; using B, k2tog tbl, k17 (19, 22, 24), k2tog; using C, k2tog tbl, k17 (19, 22, 24), k2tog—57 (63, 72, 78) sts.
9. Work 3 rows without shaping, maintaining color segments.
10. Next row (RS): Dec in each color segment as set—51 (57, 66, 72) sts.
11. Next row (WS): Purl, maintaining color segments.
12. Dec at the beg and end of each color segment every RS row 4 times (dec 6 sts total per dec row)—27 (33, 42, 48) sts.
13. Next row (WS): Using C, p2tog, p5 (7, 10, 12), p2tog tbl; using B, p2tog, p5 (7, 10, 12), p2tog tbl; using A, p2tog, p5 (7, 10, 12), p2tog tbl—21 (27, 36, 42) sts.
14. Dec at the beg and end of each color segment every row (with k2tog and k2tog tbl on RS and p2tog and p2tog tbl on WS) 2 (3, 5, 6) times—9 (9, 6, 6) sts.
15. Next row: K3tog (p3tog, p2tog, k2tog) in C; k3tog (p3tog, p2tog, k2tog) in B; k3tog (p3tog, p2tog, k2tog) in A—3 sts.
16. Cut yarn A, leaving a long enough tail to sew back seam, pull through rem sts, and tighten.
Ties (Make Two Alike)
1. Using 4 mm crochet hook and D, attach yarn to tip of earflap and chain for 10 (10, 12, 12) inches.
2. Pull yarn through last loop and thread through tapestry needle. Weave end back into chain to conceal.
Finishing
1. Sew back seam.
2. Weave in ends.
3. Use D threaded in a tapestry needle to sew straight lines across color breaks up to top of hat, as pictured.
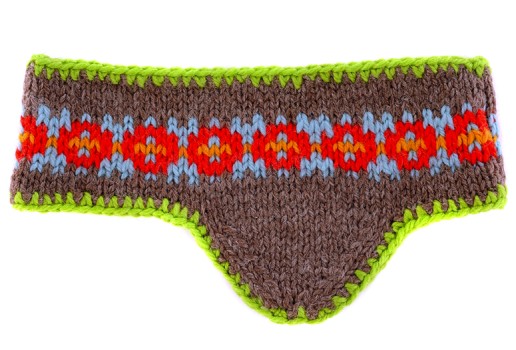
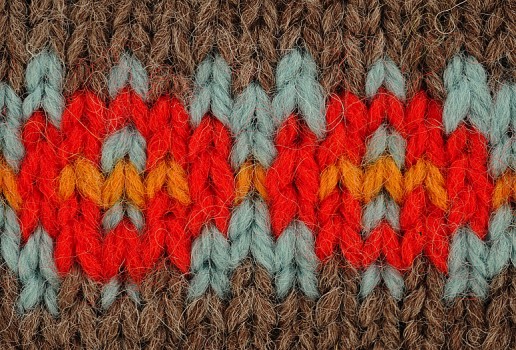
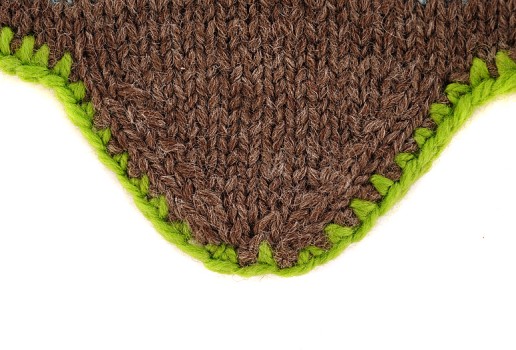
Fair Isle Winter Headband
This small vintage-look wool headband is packed with lessons for you: It has shaping for the ear coverings, a Fair Isle stripe in four colors, and crochet trim. Try new color schemes and make headbands for the whole family.
Specifications
Sizes
Circumference: 17 (18, 191⁄2, 201⁄2) inches
Materials
1 skein each Brown Sheep Nature Spun (100% wool/245 yd./100 g skein) in gray tweed (A), light blue (B), red (C), gold (D), and lime green (E)
NOTE: This project is great for using up leftover yarn. The yarn specified comes in high-yardage skeins—much more than you need for this project—so search through your stash for yarn that matches the gauge before buying.
Size 6 (4 mm) needles
Stitch holder
Tapestry needle
Size F (3.75 mm) crochet hook
Gauge
20 stitches and 24 rows to 4 inches over stockinette stitch on size 6 (4 mm) needles
Pattern Stitches
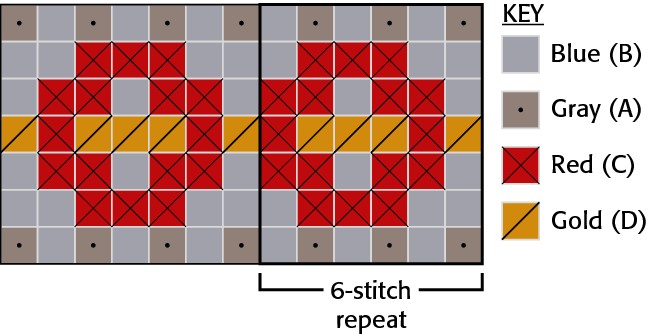
Fair Isle Chart
How to Make the Fair Isle Winter Headband
Headband
1. With A, CO 85 (91, 97, 103) sts.
2. Beg with a knit row, work 8 rows St st.
3. Beg with row 1, work all 7 rows of Fair Isle patt from chart. Cut all yarns except A.
4. Beg with a purl row, work 3 rows St st in A.
5. Next row (RS): BO 10 (10, 11, 11) sts, work next 17 (19, 20, 21) sts and then sl them onto holder, BO 31 (33, 35, 39) sts, knit to end of row.
6. Next row (WS): BO 10 (10, 11, 11) sts, purl to end.
7. Beg with a knit row, work 2 rows St st on first earflap.
8. Next row—beg shaping flap (RS): *K2, skp, knit to last 4 sts, k2tog, k2.
9. Next row (WS): Purl.
10. Rep last 2 rows until 7 (9, 10, 9) sts rem, ending with a WS row.
11. Next row (RS): *K2tog; rep from *, end k1 (1, 0, 1)—4 (5, 5, 5) sts.
12. Next row (FIRST SIZE ONLY): K2tog twice, pass first st on right needle over second—1 st.
13. Next row (ALL OTHER SIZES): K2tog twice, past first st on right needle over second, k1, pass first st on right needle over second—1 st.
14. Cut yarn, pull through rem st, and tighten.
15. Sl the 17 (19, 20, 21) sts for second earflap onto needle, ready to work a RS row.
16. Rep steps 7–14 for second earflap.
Finishing
1. Weave in ends.
2. Lightly steam to neaten and block.
3. Sew back seam.
4. With crochet hook and E, and beg at back seam, single crochet around perimeter of headband and steam again.
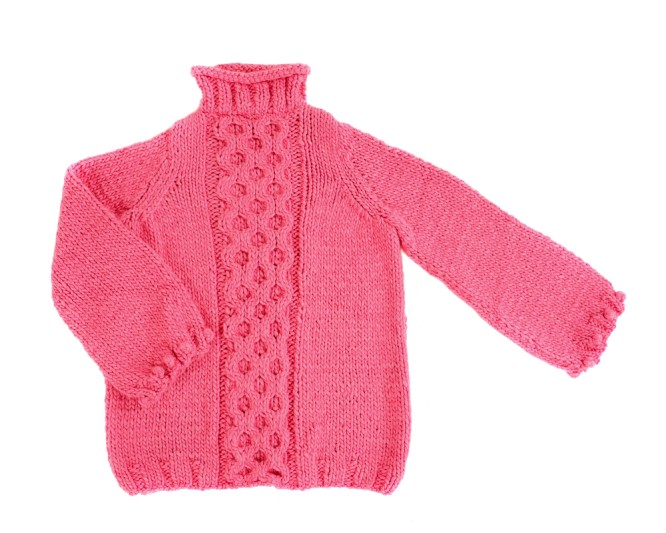
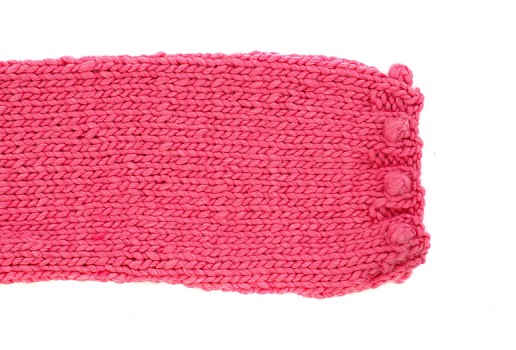
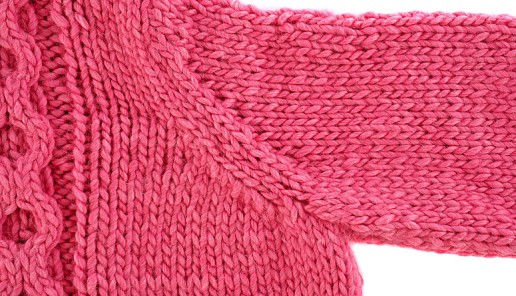
Women’s Pullover with Big Cable
Knit in soft super-bulky yarn, this pullover is fun and quick to knit. Plus, you’ll like the way the thick yarn magnifies the honeycomb cable that runs up the center of the pullover. It’s not a complicated cable to create, and as most of the sweater is worked in stockinette stitch, it’s a great project for someone new to cables.
Specifications
Sizes
S (M, L)
Finished chest circumference: 44 (52, 62) inches
Back length: 27 (28, 29) inches
Sleeve length: 18 (181⁄2, 19) inches
NOTE: This sweater is meant to have an oversized fit.
Gauge
9 stitches and 13 rows over stockinette stitch on size 15 (10 mm) needles
Materials
10 (11, 12) balls Reynolds Blizzard (65% alpaca/35% acrylic, 66 yd./100 g hank) in pink #641
Size 13 (9 mm) needles
Size 15 (10 mm) needles
Size 13 double-pointed needles or 16-inch circular needle
2 stitch markers
Cable needle
Row counter, if desired
2 large stitch holders
Tapestry needle
Pattern Stitches
Bobble Rib for Sleeves (mult of 5 sts plus 2)
Rows 1 and 5 (RS): P2, *k3, p2; rep from * to end of row.
Rows 2 and 4 (WS): K2, *p3, k2; rep from * to end of row.
Row 3—bobble row: P2, *k1, mb (k into front, back, front, back, and front of next st), k1, p2; rep from * to end of row.
Rep rows 1–5 for bobble rib.
Honeycomb Cable Panel (20 sts)
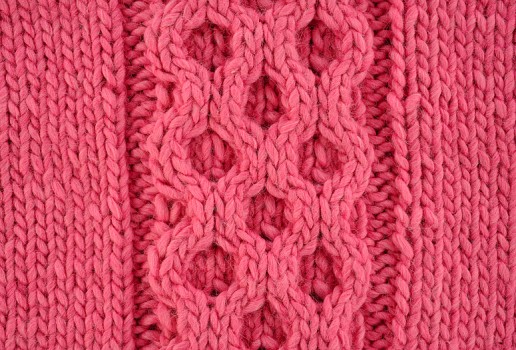
Row 1 (RS): P2, k16, p2.
Rows 2, 4, 6, and 8 (WS): K2, p16, k2.
Row 3 (cable row): P2, *sl next 2 sts to cn and hold at back, knit the next 2 sts from left needle, knit the 2 sts from cn; sl next 2 sts to cn and hold at front, knit next 2 sts from left needle, knit the 2 sts from cn; rep from * once, p2.
Row 5: P2, k16, p2.
Row 7 (cable row): P2, *sl next 2 sts to cn and hold at front, knit next 2 sts from left needle, knit the 2 sts from cn; sl next 2 sts to cn and hold at back, knit next 2 sts from left needle, knit the 2 sts from cn; rep from * once, p2.
Rep rows 1–8 for honeycomb cable panel.

How to Make the Sweater
Back
1. With size 13 needles, CO 50 (60, 70) sts.
2. Row 1 (RS): [P2, k3] three (four, five) times across first 15 (20, 25) sts, place marker, work row 1 of cable panel over next 20 sts, place marker, [k3, p2] three (four, five) times across rem 15 (20, 25) sts.
3. Row 2 (WS): [K2, p3] three (four, five) times across first 15 (20, 25) sts, sl marker, work row 2 of cable panel over next 20 sts, sl marker, [p3, k2] three (four, five) times across rem 15 (20, 25) sts.
4. Cont as established, working 20-st cable panel centered between markers with ribbing on either side, for 4 more rows.
5. Change to size 15 needles.
6. Next row (RS): K15 (20, 25), sl marker, work row 7 of cable panel, sl marker, k15 (20, 25).
7. Next row (WS): P15 (20, 25), sl marker, work row 8 cable panel, sl marker, p15 (20, 25) sts.
8. Cont as established, working cable panel centered between markers with St st on either side, until back measures 19 inches from beg, ending with a WS row.
9. Beg armhole shaping: BO 3 (4, 5) sts beg next 2 rows—44 (52, 60) sts.
10. Next row (RS): K2, ssk, work in patt as established to last 4 sts, k2tog, k2—42 (50, 58) sts.
11. Next row (WS): P2, p2tog, work in patt established to last 4 sts, ssp, p2—40 (48, 56) sts.
12. Rep last 2 rows three (four, five) times—34 (40, 46) sts.
13. Rep step 10—32 (38, 44) sts.
14. Next row (WS): Purl to marker, sl marker, work cable panel as established, sl marker, purl to end of row.
15. Rep last 2 rows one (two, three) time(s)—30 (34, 38) sts.
16. Work without further shaping, maintaining patt as set, until back measures 26 (27, 28) inches from beg, ending with a WS row.
17. Shape shoulders: Maintaining cable patt, BO 2 (2, 3) sts beg next 4 rows, then BO 2 (3, 3) sts beg foll 2 rows—18 (20, 20) sts.
18. Next row (RS): BO all sts in patt.
Front
1. Work as for back until front measures 26 (27, 28) inches from beg, ending with a WS row.
NOTE: At this point, you should have 30 (34, 38) sts on needles for front. The neck and shoulders are shaped one side at a time.
2. Next row (RS): BO 2 (2, 3) sts, knit to marker, p2tog, BO center 16 sts—1 cable st rem on right needle—p2tog, pass the rem cable st over the p2tog, sl marker, knit to end of row. You should now have 4 (6, 7) sts for left shoulder and 6 (8, 10) sts for right shoulder. Put left shoulder sts on holder while you work the right shoulder only.
3. Next row (WS): BO 2 (2, 3) sts, purl to marker, k1—4 (6, 7) sts.
4. Next row (RS): Ssk, knit to end of row—3 (5, 6) sts.
5. Next row (FIRST SIZE ONLY): BO 2 sts, purl to end of row—2 sts. Skip to step 7.
6. Next row (SECOND AND THIRD SIZES ONLY): BO (2, 3) sts, purl to last 2 sts, p2tog—3 sts.
7. Next row (ALL SIZES): Knit.
8. BO rem 2 (3, 3) sts.
9. Sl the 4 (6, 7) left shoulder sts back to size 15 needle and rejoin yarn to left neck edge, ready to work a WS row.
10. Next row (WS): K1, purl to end of row.
11. Next row: BO 2 (2, 3) sts, knit to last 2 sts, k2tog—1 (3, 3) sts.
12. Next row (SECOND AND THIRD SIZES ONLY): P2tog, purl to end of row—2 sts.
13. BO rem 1 (2, 2) sts.
Sleeves (Make Two Alike)
1. With size 13 needle, CO 37 (42, 47) sts.
2. Beg with row 1, work bobble rib for sleeves for 5 rows.
3. Change to size 15 needles and beg with a purl row, work in St st for 9 rows.
NOTE: You might want to use a row counter from this point to keep track of decrease rows. Decrease rows are worked as follows: K2, ssk, knit to last 4 sts, k2tog, k2.
4. Next row—beg sleeve shaping (RS): K2, ssk, knit to last 4 sts, k2tog, k2—35 (40, 45) sts.
5. Cont in St st, dec 1 st each end as established in step 4 every 12th row one (one, two) time(s)—33 (38, 41) sts.
6 .Continue without further shaping until sleeve measures 171⁄2 inches from beg, ending with a WS row.
7. Begin sleeve cap shaping: BO 3 (4, 5) sts beg next 2 rows—27 (30, 31) sts.
8. Next row (RS) K2, ssk, knit to last 4 sts, k2tog, k2—25 (28, 29) sts.
9. Next row: Purl.
10. Rep last 2 rows six (seven, seven) times, ending with a WS row—13 (14, 15) sts.
11. BO 2 sts beg next 2 rows, then BO 2 (2, 3) sts beg foll 2 rows—5 (6, 5) sts.
12. BO rem sts.
Finishing
1. Weave in ends.
2. Block pieces to measurements shown.
3. Sew shoulder seams using backstitch seam or the invisible horizontal seam (see Sew Seams for seaming techniques).
4. Pick up sts for neckband: Beg at right shoulder seam with RS facing, use size 13 circular needle or dpns to pick up and k18 (20, 20) sts across back neck to left shoulder seam, pick up and k6 sts down left front neck shaping to beg of BO front neck sts, pick up and k16 sts across BO cable sts, and pick up and k6 sts up right front neck to right shoulder—46 (48, 48) sts.
5. Place marker and join sts in rnd.
6. Next rnd: Knit, increasing 2 (0, 0) sts (1 at each shoulder seam)—48 (48, 48) sts.
7. Next rnd—work neckband: *K2, p2; rep from * to end of rnd.
8. Rep last rnd until neckband measures 3 inches. Work in St st (knit every rnd) for an additional 11⁄2 inches. BO loosely knitwise using size 15 needle.
9. Center sleeves on shoulder seams, set in and pin in place, and sew sleeves onto sweater using a combination of the vertical-to-horizontal seam and the invisible horizontal seam.
10. Lightly steam seams.
11. Sew side and sleeve seams using the invisible vertical seam (see Invisible Vertical Seam).
12. Weave in rem ends.
13. Steam entire sweater, including seams, again.
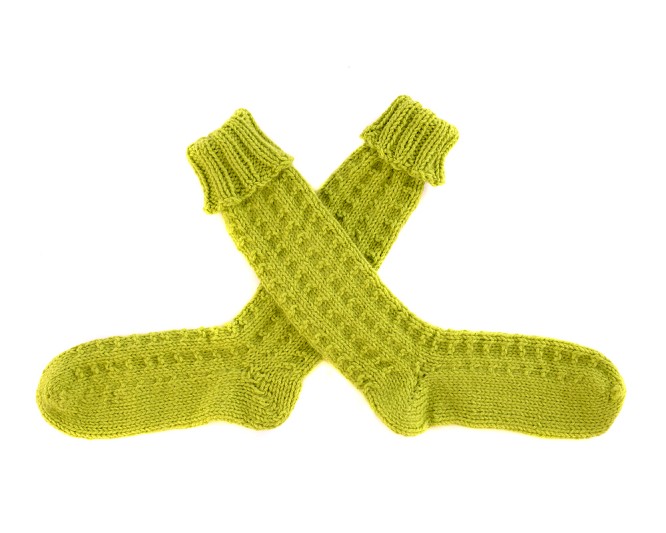
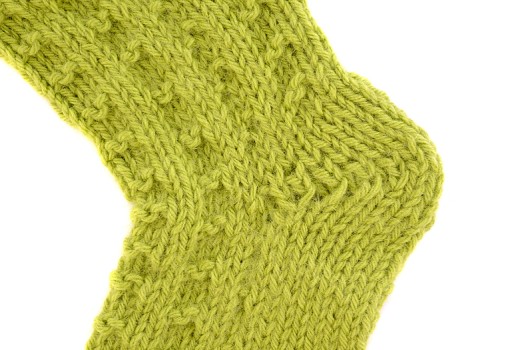
Toe-Up Socks
Although it’s not as common as the top-down method, you can make socks from the toe up. Setting up the toe stitches takes a little ingenuity, but once you master it with the first sock, the second will come easily. The benefit of working socks this way is that you can try them on as you go and customize the fit more easily and accurately than with the top-down method.
Specifications
Sizes
Approximate foot circumference: 8 inches
Materials
2 hanks Classic Elite Lush (50% angora/50% wool, 124 yd./50 g hank) in Granny Smith #4481
Size 8 (5 mm) double-pointed needles
1 split-ring marker to fit your needle size
Tapestry needle
Row counter, if desired
Gauge
16 sts and 20 rounds to 4 inches in stockinette stitch on size 8 needles
Pattern Stitches
Instep and Leg Pattern
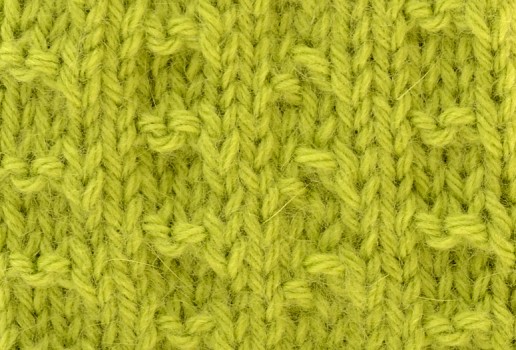
Rnd 1: *K3, p2, k3; rep from * to end of rnd.
Rnds 2 and 4: Knit.
Rnd 3: *P1, k6, p1; rep from * to end of rnd.
How to Make the Socks
Make two of these fun toe-up socks exactly the same.
Make the Toe

1. Using 1 dpn, CO 20 sts. Do not divide sts onto 3 or 4 dpn or work in the round yet.
2. Row 1: *Sl1, k1; rep from * to end of row.
3. Row 2: Rep row 1.
4. Divide the sts between two dpns: Holding the dpn with the sts on it in your left hand and two more dpns in your right hand, alternately slip the knit stitches onto one needle and the sl sts onto the other needle until you have 10 sts parallel to each other on each of the two dpns. Place a marker onto the needle opposite the working yarn, for beg of rnd. Now you are ready to shape the toe.
NOTE: The toe is worked in the round, with stitches held on two dpns, using a third dpn as the working needle. Be sure to start with the knit side out, bumpy side in.
5. Rnd 1: *K1 (to join rnd), m1, knit to last st on first needle, m1, k1; on second needle, k1, m1, knit to last st, m1, k1—24 sts.
6. Rnd 2: Knit.
7. Rep last 2 rnds until you have 32 sts.
Make the Foot
1. Using three dpns, divide the sts so that 16 sts are on the first needle and 8 sts each are on the second and third needles.
NOTE: The first 16 sts of the rnd are the instep sts.
2. Work the stitch pattern over the 16 instep sts and knit the rem 16 sts for sole until sock is approx 2 inches shorter than the desired foot length.
3. Arrange the sts to prepare for heel shaping: Put the first 16 stitches, for the instep, onto a holder or loose strand of scrap yarn. Place the rem 16 sts for the heel onto a second needle.
Make the Heel
The short-row heel is worked back and forth in rows.
1. Row 1: K15, bring yarn to front, sl1 purlwise to right needle, turn.
2. Row 2: Sl1 (the unworked st from the last row) purlwise wyif to right needle, purl to last st, bring yarn to back, and sl1 to the right needle, turn.
NOTE: You have now wrapped 1 st on each end.
3. Row 3: Sl1 wyib, knit to the st before the wrapped st, bring yarn to front, sl1 purlwise to right needle, turn.
4. Row 4: Sl1 wyif, purl to the st before the wrapped st, bring yarn to back, sl1 to the right needle, turn.
5. Rep rows 3 and 4 until you have 5 wrapped sts on each end and 6 unwrapped sts in the middle, ready to work a RS row.
6. Next row—beg back of heel: Sl1 to complete wrap, knit to the first wrapped st, [insert the right needle knitwise into both the wrap and the wrapped st, knit the wrap and the wrapped st as 1 st], bring yarn to front of work, sl1 (the next wrapped st), turn. (This last slipped st will now have 2 wraps.)
7. Next row: Sl1 (the st with 2 wraps), purl to the first wrapped st, [insert the right needle from back to front through the back loop of the wrap, lift the wrap, and place it onto the left needle with the wrapped st, purl the wrap and the st as 1 st], bring yarn to back, sl1.
8. Rep last 2 rows but pick up both wraps and knit or purl them together with their accompanying st, until you have worked all sts and have 16 unwrapped sts and are ready to beg a knit row.
9. Knit across the heel sts once more so that you’re ready to rejoin the rnd.
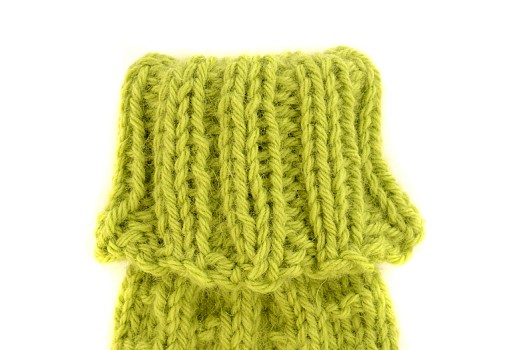
Make the Leg and Cuff
1. Sl 8 heel sts onto a second dpn. Place the instep sts back onto a dpn. Join rnd and again begin working all 32 sts in patt from where you left off in the rnd.
NOTE: If a gap occurs where the heel and instep sts meet, pick up 1 st between the two. Then decrease back to 32 sts in the next rnd.
2. Work until sock leg is 4 inches for an ankle sock, 6 inches for a midcalf sock, or 81⁄2 inches for a knee sock, minus the cuff.
3. Next rnd—work cuff: P1, k2, *p2, k2; rep from * to last st, p1.
4. Rep last rnd until cuff measures approx 4 inches.
5. Last rnd: P1, *k2, CO 1 st using backward–loop CO, p2, M1; rep from * to last 3 sts, k2, M1, p1—47 sts.
NOTE: For an even looser cuff edge, use a needle two or three sizes larger for the bind-off.
6. BO loosely in rib patt, except sl each M1 as you BO instead of working it.
Finishing
1. Weave in ends.
2. Block socks using sock blockers to match the size of your socks, or, if your yarn’s care instructions allow, lightly steam to block, taking care not to block ribbing.