Chapter 13: Decorative Details
Personalize your knitting projects with decorative touches. Besides adding pompoms to hats, fringe to scarves, or tassels to blankets and pillows, you can embroider and crochet directly onto your knitting. This chapter covers some basic finishing touches and embellishments that come up frequently in knitting patterns, as well as a few special techniques.
Knit Fancy Borders and Edgings
Make Pompoms
Pompoms add a finishing touch to hats, scarves, and other projects. They are easy to make, and you can make them using one color or many.
How to Make a Pompom
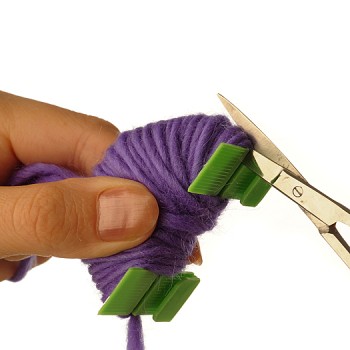
The following method creates a loose pompom that can be left with loopy ends. You need a pair of scissors, yarn, and flexible cardboard (shirt cardboard works well).
1. Cut a piece of cardboard into a rectangle the same width as the size you want your pompom to be. (So, for a 3-inch pompom, cut a piece of cardboard that’s 3 inches wide.)
2. Wrap the yarn around the cardboard about 50 times.
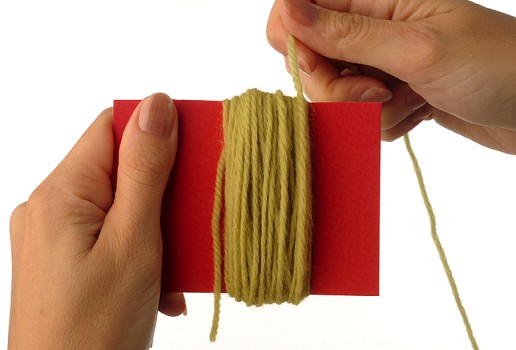
NOTE: Thin yarn requires more wraps than thick yarn.
3. Carefully remove the cardboard from the wrapped yarn.
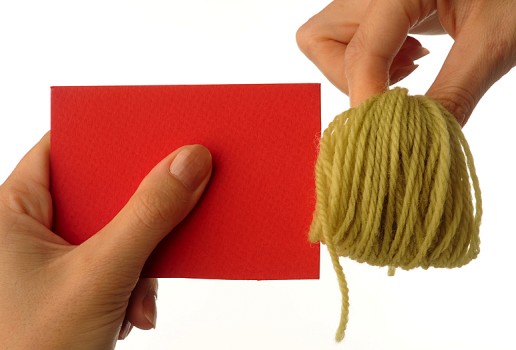
4. Wrap a 12-inch strand of yarn tightly around the center of the yarn loops twice, and then tie it in a firm knot.

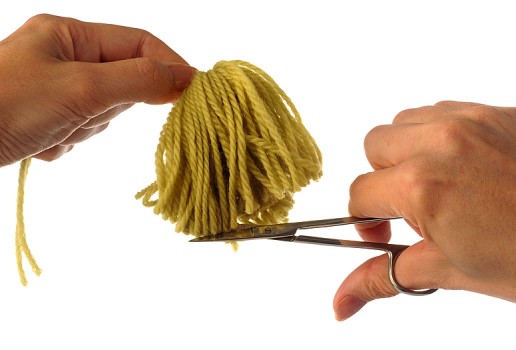
5. Cut the loops and fluff up the pompom to even it out.
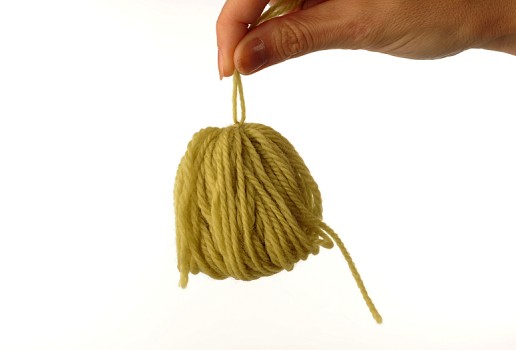
NOTE: You can leave the ends uncut for a loopy pompom.
6. Use the tie ends to sew the pompom to your knitting.
TIP
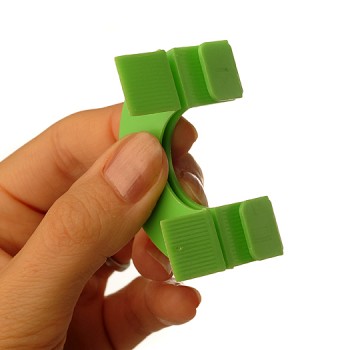
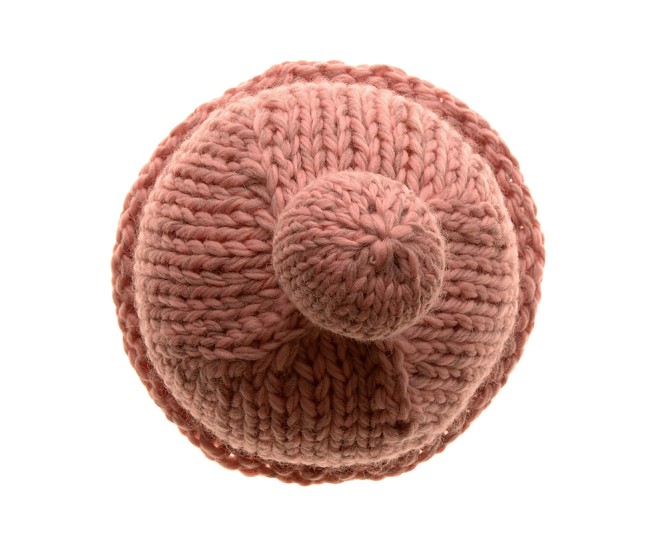
Perfect Pompoms
You can buy a pompom maker from your local yarn shop or craft store. Most come in a set with three or four sizes ranging from small 1-inch pompom makers to large 3- or 4-inch pompom makers like the ones shown here. You won’t have to fuss with cut cardboard, and you’ll have firm, round, velvety pompoms every time.
Make Tassels
You can embellish pillows, baby blankets, hats, sashes, and scarves with tassels. They are very easy to make, and, like pompoms, can be made in one color or in two or more colors.

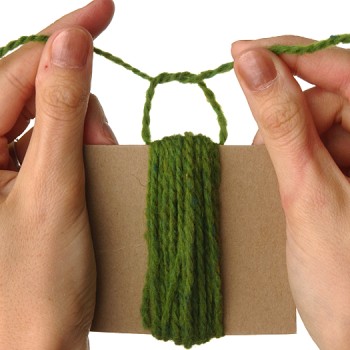
To make a tassel, you need a piece of rigid cardboard, a pair of scissors, a tapestry needle, and yarn.
How to Make a Tassel
1. Cut the cardboard into a rectangle that is the same length you want your tassel to be. (So, for a 6-inch-long tassel, cut a piece of cardboard that’s 6 inches long.)
2. Wrap the yarn around the cardboard to the desired thickness.
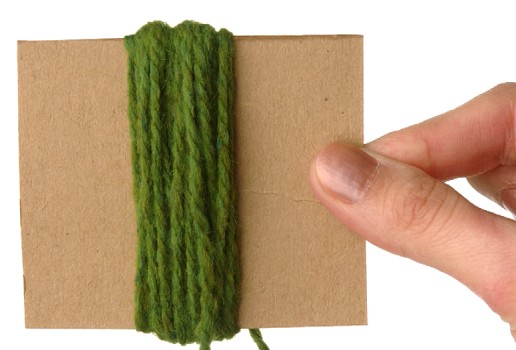
NOTE: Thin yarn requires more wraps than thick yarn.
3. Thread a tapestry needle with a 12-inch strand of the same yarn used for the tassel and insert the needle between the cardboard and the wrapped strands. Pull the yarn all the way through.
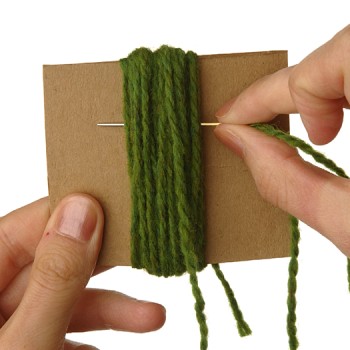
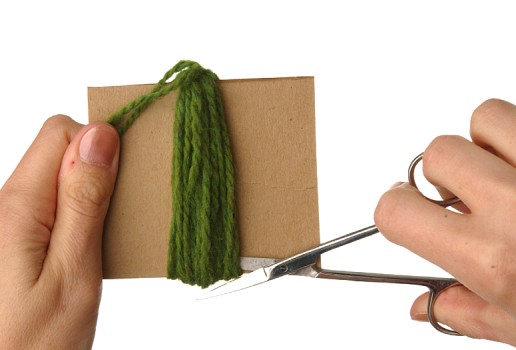
4. Separate the tapestry needle from the yarn and tie the strand’s ends together tightly in a knot at the top edge of the cardboard to secure the tassel.
5. Insert scissors between the wrapped strands and the cardboard at the opposite end from the tied end and cut the tassel free along the bottom edge of the cardboard.
6. Wrap a 10-inch strand of yarn around the tassel a few times, about 1⁄2 inch down from the tied end; then tie the ends tightly in a knot.
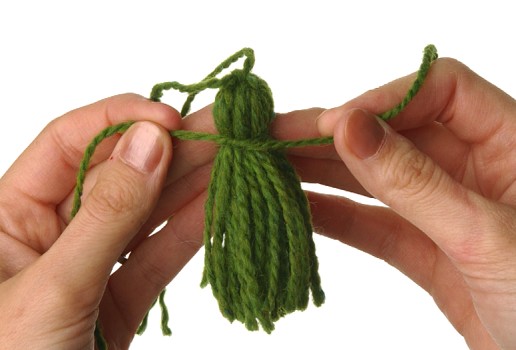
NOTE: You can use the same color yarn or an accent color for step 6.
7. Conceal the yarn ends from step 6 by threading them through a tapestry needle and inserting the needle back into the tassel near the top. Pull the tapestry needle out at the tassel end.
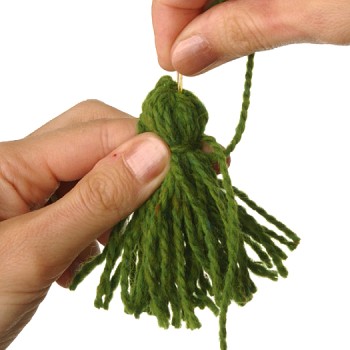
8. Trim the tassel ends to neaten them.
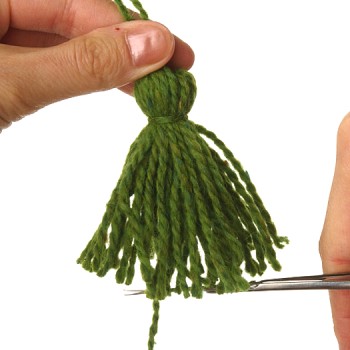
9. Use the tail coming out of the top of the tassel to sew it onto your knitting project.
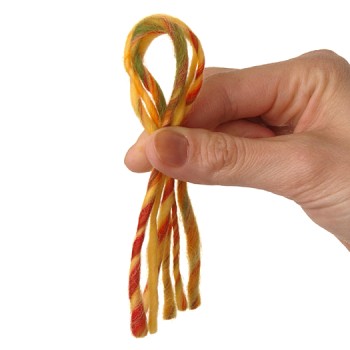
Add Fringe
Fringe works well on scarves, throws, sweater hems, wraps, and ponchos. You can make fringe with all kinds of yarn. Combining two or more different colors or types of yarn to make fringe can have a lovely effect, so experiment by holding various yarn odds and ends together to see how they look.

To make fringe, you need yarn, a pair of scissors, and a crochet hook. Fringe can use up a fair amount of yarn, so make sure you have enough before you begin.
How to Add Fringe
Fringe made of thick yarn requires fewer strands of yarn than fringe made with thin yarn. Experiment with different thicknesses to see what works best for your particular project.
1. Determine how long you want your final fringe to be. Then cut yarn to double that length, plus 1 inch extra for the knot.
2. Hold the strands together, with the ends matched up, creating a loop at the top.
3. Hold your knitting with the right side facing you. Insert the crochet hook from front to back into the upper-right corner, just below the cast-on row.
4. Use the crochet hook to take hold of your loop of folded strands.
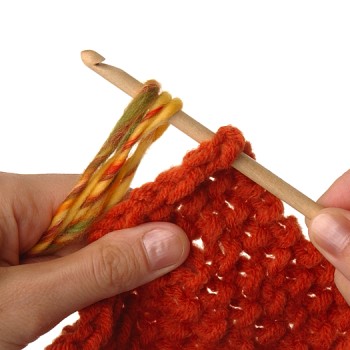
5. Use the crochet hook to pull the loop of strands through from back to front.
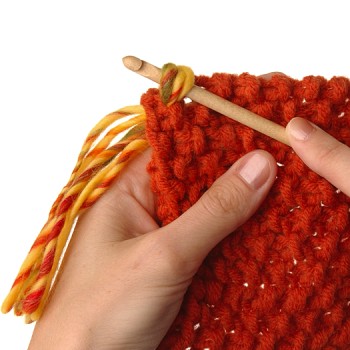
6. Grab the fringe ends with the hook and pull them through the loop and tighten.
7. Repeat steps 2–6 across the edge of your knitting to complete the fringe.
8. When you have finished attaching the fringe, trim it with scissors so that it is even.

Knit a Cord
You can knit tubular cords and put them to all sorts of decorative uses. Knitted cords make excellent bag handles; they can also be looped and configured to make linear appliquéd designs and floral hat toppers. Or, instead of adding fringe to scarf ends, you can attach knitted cords.

Knitting a cord is like knitting in the round on a tiny scale. You need two double-pointed needles suitably sized for your yarn.
How to Knit a Cord
1. Cast on 5 or 6 stitches onto one of your dpns (double-pointed needles).
2. Knit across the stitches but do not turn your work.

3. Push the stitches back to the other end of the dpn, so you’re ready to work a right side row again. Insert the second dpn into the first stitch to knit as usual, firmly pull the working yarn from the end of the row, and knit.
NOTE: Beginning the row (round, actually) by pulling the yarn from the opposite end closes the tube.
4. Repeat steps 2 and 3 until the cord is the desired length. Bind off or cut the yarn and pull it through all the stitches to tighten.
Decorate with Embroidery
After you have blocked your knitting, you can decorate it with embroidery stitches. Embroidered edgings add color and a homespun look to casual knits, baby blankets, and scarves. Embroidered motifs look best on flat stitch patterns. You can use yarn or embroidery floss to embroider on your knitting.
Embroidery Stitches
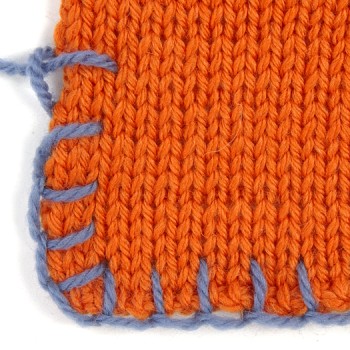
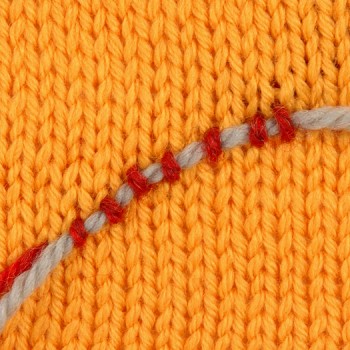
Whipstitch
Whipstitch is one of the easiest and most basic stitches you can use.
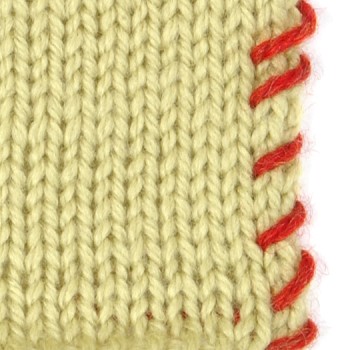
1. Thread a tapestry needle. Tie a knot in the yarn end about 6 inches up from the bottom. Bring the threaded needle up through the knitting from back to front, until the knot stops it.
2. Bring the tapestry needle in and out from back to front up the side of the knitting.
3. When you’re finished, pull the yarn through to the wrong side, knot it, and weave in the loose ends.
Blanket Stitch
Blanket stitch adds a rustic feel to sweaters, blankets and edgings.
1. Thread a tapestry needle. Tie a knot in the yarn end about 6 inches up from the bottom. Bring the needle through at the edge of your knitting from back to front, pulling the yarn through until the knot stops it.
2. Moving right to left, insert the needle at the desired depth into the edge and bring it out again to the front, as shown, taking care that the needle tip overlaps the yarn coming out of the starting point.
3. Repeat step 2 along the edge of your knitting to create blanket stitch. When you are done, weave in the loose ends.
Duplicate Stitch
This stitch duplicates the knit stitch—the V—right on top of it to create motifs that look knit in.
1. Thread a tapestry needle. Bring the needle through the knitting at the hole just below the V that you want to duplicate. Pull the yarn through, leaving a 6-inch tail.
2. Insert the needle from right to left under both loops of the V above the stitch you want to duplicate; pull the yarn through all the way.
3. Reinsert the needle into the hole below your stitch—the same hole that the needle came through in step 1—and bring it out again below the next stitch to be worked, all in one movement.
4. Repeat steps 2 and 3 to create duplicate stitch. When you are done, weave in the loose ends.
Couching Stitch
For the couch stitch, you lay yarn or thread onto your fabric in the shape or design you want and whipstitch it in place with a second, thinner, yarn or thread. It results in colorful, playful outlines.
1. Begin by arranging the thicker thread on your knitting in the shape or line you want it to ultimately be.
2. Whipstitch it in place, using a needle threaded with a thinner yarn.
3. When you are done, weave in the loose ends.
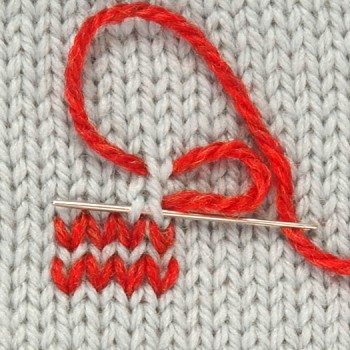
French Knot
French knots add a three-dimensional effect.
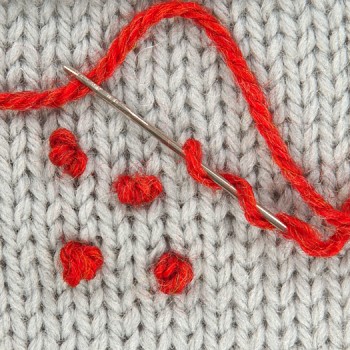
1. Thread a tapestry needle. Tie a knot in the yarn 6 inches up from the end. Bring the needle through the knitting from back to front, pulling through until the knot stops it.
2. Grasp the yarn about 1 inch above the point where it came out and wind the yarn around the tip of the needle three times, moving from the eye of the needle to the tip, as shown.
3. Still grasping the wound yarn, reinsert the needle right next to the point where it came out and pull it through all the way to the back to create the knot.
Crochet Edgings
You don’t have be a crochet expert to finish your knitting with simple crochet edgings or chains. A crochet edge neatens and firms up unstable or curling edges; it also adds colorful or eye-catching detail to a plain-looking piece of knitting.
To crochet, you need yarn and a crochet hook that is the correct size for the yarn you’re using.
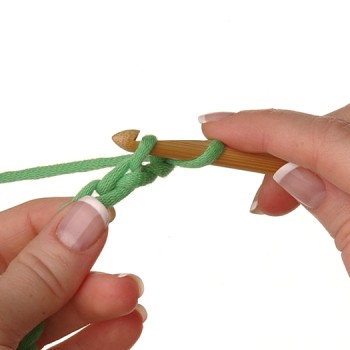
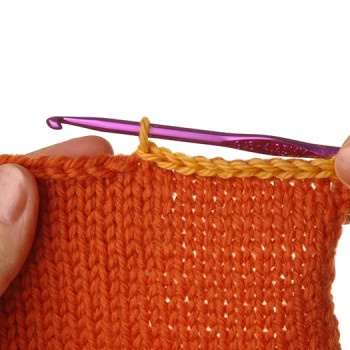
How to Crochet a Chain
Chain stitch in crochet is the equivalent of casting on: It creates the foundation row of stitches from which to work. When you’re working crochet directly onto your knitting, you don’t necessarily need this foundation row. However, knowing how to work a chain will enable you not only to make decorative cords but also to incorporate button loops and picot trim into your crochet edgings.
Crochet instructions generally indicate working chain stitch with the abbreviation ch followed by the number of chain stitches to make (instructions to chain 3 read ch3).
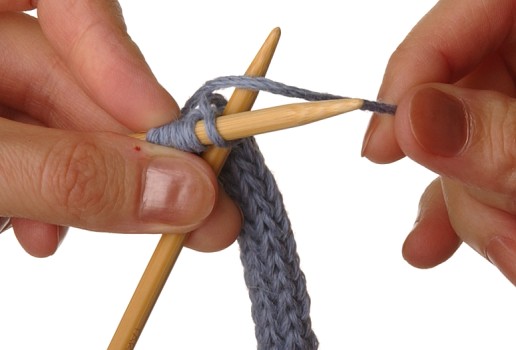
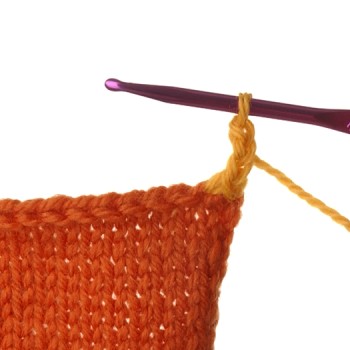
1. Make a slipknot, leaving a 6-inch tail. Insert a crochet hook of an appropriate size for the yarn into the slipknot.
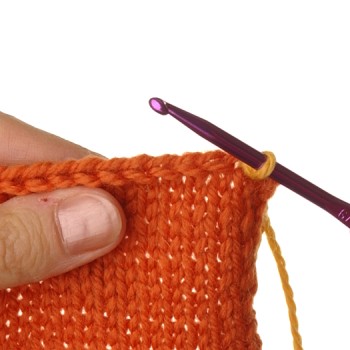
2. Wrap the working yarn around the crochet hook from back to front (creating a yarn over loop) so that the hook catches the yarn.
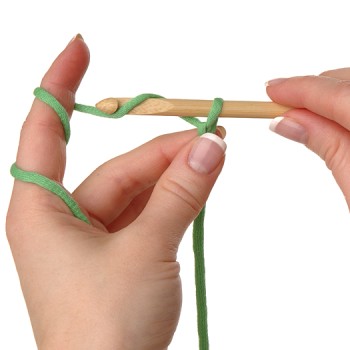
Step 2
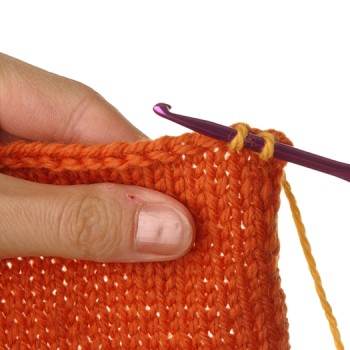
3. Holding the working yarn in your left hand and the hook in your right, pull the yarn over loop on the hook through the slipknot.
You have made 1 loop in a chain.
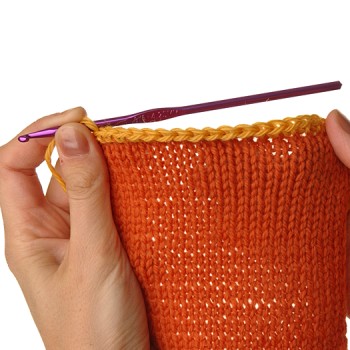
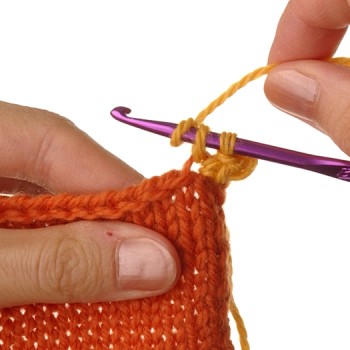
4. Repeat steps 2 and 3 until the chain is the desired length. Cut the yarn, leaving a 6-inch tail, and pull it snugly through the last loop to finish the chain.
Step 4
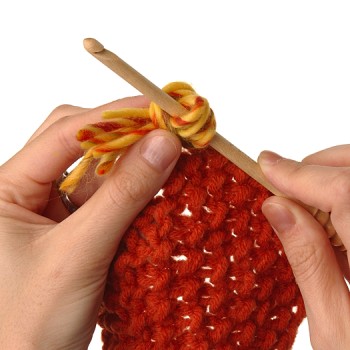
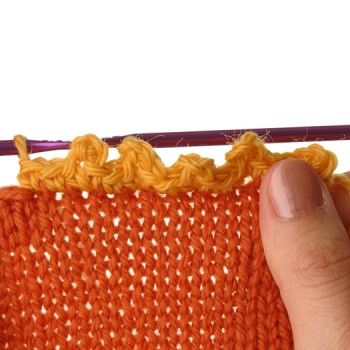
Slip Stitch Edging
You can slip stitch along an edge as a decorative touch, or as a base row underneath a second row of crochet. You work this edging from right to left.
Crochet instructions indicate slip stitch with the abbreviation sl st followed by the number of slip stitches to make.
1. Choose a crochet hook that is one or two sizes smaller than the needles used for your knitting. Insert the hook into your knitting at the right corner of the edge.
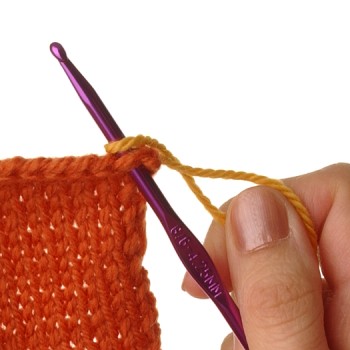
2. Loop the yarn around the hook (yarn over) and pull the loop through.
3. Insert the crochet hook into the next stitch of the knitting, yarn over again, and pull the loop through both the knitting and the loop on the hook from step 2.
You should now have 1 loop remaining on the hook.
4. Repeat step 3 across the edge. Cut the yarn and pull it snugly through the last loop to finish the edging.
NOTE: If a crochet edge is causing your knitting to flare and stretch, try a smaller hook or try skipping a stitch on the knitting every so often. If the edge is too tight, try a larger hook or try crocheting with a looser touch.
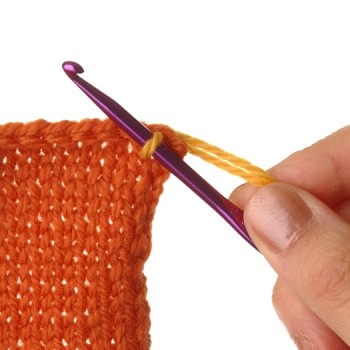
Single Crochet Edging
Single crochet provides a neat, firm edge that is a little more substantial than a slip stitch edge. You work this edging from right to left.
Crochet instructions indicate single crochet with the abbreviation sc followed by the number of single crochet stitches you should make.
1. Choose a crochet hook that is one or two sizes smaller than the needles used for your knitting. Insert the hook into your knitting at the right corner of the edge.
2. Loop the yarn around the hook (yarn over) and pull the loop through.
3. Working from the front, yarn over and pull a new loop through the first loop.
4. Insert the crochet hook into the next stitch to the left on the knitting, yarn over, and pull a new loop through.
You should now have 2 loops on the crochet hook.
5. Yarn over the crochet hook again and pull this new loop through both loops already on the hook.
6. Repeat steps 4 and 5 across the edge. Cut the yarn and pull it snugly through the last loop to finish the edging.
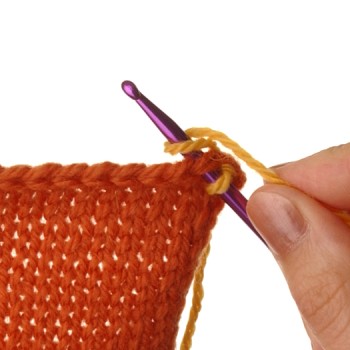
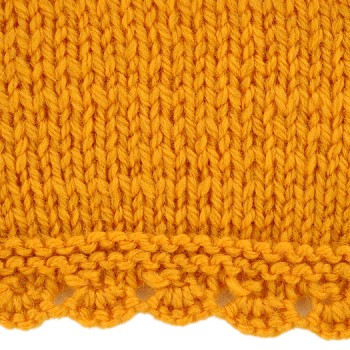
Picot Edging
Crocheting a picot edging makes a fancy edge that looks great on feminine sweaters and baby knits.
1. Choose a crochet hook that is one or two sizes smaller than the needles used for your knitting. Insert the hook into your knitting at the right corner of the edge.
2. Work 1 single crochet (see Single Crochet Edging).
3. Chain 3 (or 4, if desired) (see steps 2 and 3 of How to Crochet a Chain).
4. Insert the crochet hook back into the same stitch, yarn over, and bring up a loop.
5. Yarn over again and pull the loop through both loops on the hook.
6. Single crochet 2 (into the next 2 stitches, moving left).
7. Repeat steps 3–6 across the edge to create picot edging. Cut the yarn and pull it snugly through the last loop to finish the edging.
NOTE: To create more space between picots, you can single crochet 3 or 4 times at step 6.
Knit Fancy Borders and Edgings
Sometimes a plain sweater needs to be dressed up a little. You can work a fancy ruffle or border at the edge to add that accent to your knitting. The following ruffles, borders, and edgings are all easy to create. You can work them in the same color as your knitting or in an accent color.
How to Make Ruffles
Basic Ruffle
For this ruffle, you need to start with twice the number of stitches as there are in the main part of your knitting. For example, if you are knitting the back of a sweater over 60 stitches, you cast on 120 stitches for this ruffle. You work this basic ruffle over an even number of stitches.
1. CO twice the number of sts that you want to end up with.
2. Work in St st to the desired length of the ruffle, ending with a purl row.
3. K2tog across the entire row. You end up with half the number of sts you cast on.
NOTE: You can work three rows of garter stitch to reinforce the decrease row.
Curly Ruffle
This fun ruffle looks great on baby blankets and little girls’ sweaters. You need to cast on four times the number of stitches you want to end up with, minus 3. For example, if you want to end up with 60 stitches, you cast on 237 stitches to create a curly ruffle. You work this border on a multiple of 2 stitches plus 1.
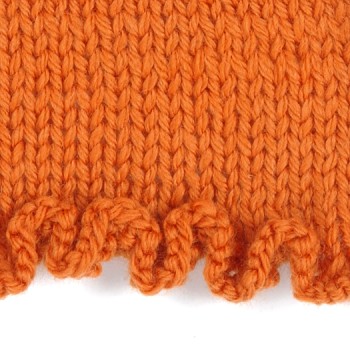
1. Row 1 (RS): K1, *k2, pass the first of these 2 sts over the second and off the needle; rep from * to end of row.
2. Row 2 (WS): P1, *p2tog; rep from * to end of row.
NOTE: You can work the ruffle on smaller needles if you want it to be tighter.
How to Make Borders
Bobbled Border
This border creates a nice three-dimensional edge; work it on a multiple of 6 stitches plus 5 using the mb (make bobble) technique.

1. Row 1 (WS): Knit.
2. Row 2 (RS—bobble row): K2, *mb, k5; rep from * to last 3 sts, mb, k2.
3. Rows 3–5: Knit.
Mini Scallops
This edging adds a delicate touch. You work this border on a multiple of 5 stitches plus 2.
1. Row 1 (RS): K1, yo, *k5, [pass the second, third, fourth, and fifth sts over the first st and off], yo; rep from * to last st, k1.
You now have a multiple of 2 sts plus 3 on your needle.
2. Row 2 (WS): P1, *[p1, yo, k1 tbl] all in next st, p1; rep from * to end of row.
You now have a multiple of 4 sts plus 1 on your needle.
3. Row 3: K2, k1 tbl, *k3, k1 tbl; rep from * to last 2 sts, k2.
4. Rows 4–6: Knit.
Easy Pointed Border
This border creates a series of diagonally biased points. You make the border as long as the edge you need to attach it to and then sew it on. To create it, cast on 6 stitches.
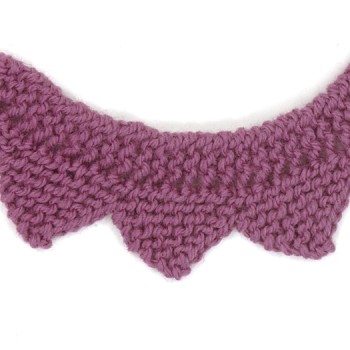
1. Row 1 (RS): K3, yo, k3—7 sts.
2. Rows 2, 4, 6, 8, and 10 (WS): Knit.
3. Row 3: K3, yo, k4—8 sts.
4. Row 5: K3, yo, k5—9 sts.
5. Row 7: K3, yo, k6—10 sts.
6. Row 9: K3, yo, k7—11 sts.
7. Row 11: K3, yo, k8—12 sts.
8. Row 12: BO 6 sts, k5—6 sts.
9. Rep rows 1–12 until the edging is the desired length. BO all stitches.
Knit with Beads
Knitting beads directly into your work is an embellishment that can have varied effects. You can create elegant purses and eveningwear by knitting delicate glass beads with fine yarns, or you can create a more casual look by knitting wooden beads into a thick, sturdy, natural-looking yarn. Since beading has grown in popularity, you can find a wide selection of beads at large craft stores. Be sure that your beads and yarn have compatible care instructions.
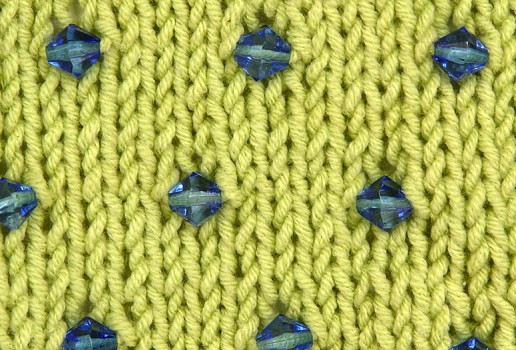
How to Knit with Beads
To knit with beads, you must thread all the beads directly onto your ball of working yarn before beginning to knit. You need to make sure that the beads you’re using are suited to your yarn visually and in terms of size. The beads should slide along the yarn with ease. This beaded sample is worked on the right side of stockinette stitch.
1. Thread the end of the working yarn into a sewing needle that is small enough to fit through the hole in the bead. Thread all the beads you will need onto the working yarn, sliding them down toward the yarn ball.

2. Cast on stitches and work your knitting pattern’s instructions.
3. When you get to the point on a right side row where you’re ready to add a bead, bring the working yarn to the front, between your needles.
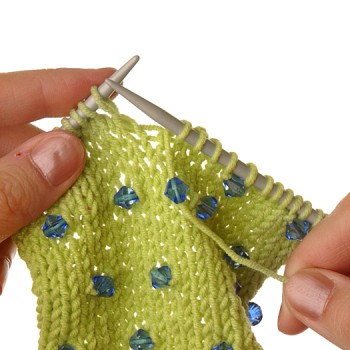
4. Slide the first bead up the yarn so that it rests snugly against the last knit stitch.
5. Use the tip of the right needle to slip the next stitch on the left needle knitwise to the right needle.
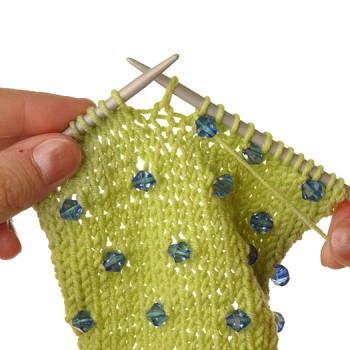
6. Bring the working yarn to the back, adjust the bead so that it is placed where you want it, and knit the next stitch snugly to hold the bead firmly in place.
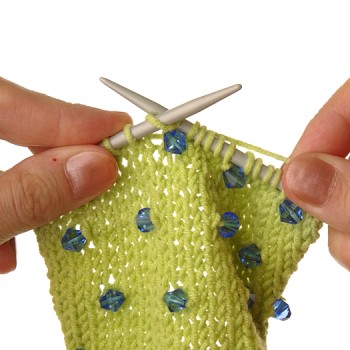
You have beaded 1 stitch.
FAQ
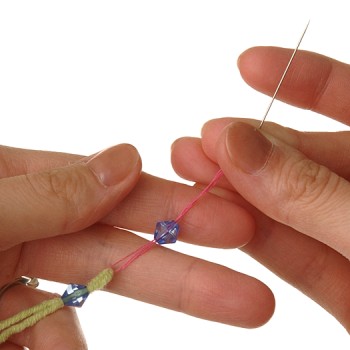
I want to use very small beads but am finding it hard to get a threaded needle through the hole. Is there another method I can use to thread the beads onto the yarn?
Yes, as long as your yarn is not so thick that it can’t be threaded into the hole of the bead at all. To thread tiny beads onto fine yarn, you can use a beading needle threaded with thin thread to bring your yarn through the hole. Simply loop the thread around a fold in your yarn and then insert both ends of the thread into the eye of the needle. Slide the bead over the needle and then pull the needle, the thread, and the yarn through the bead hole.
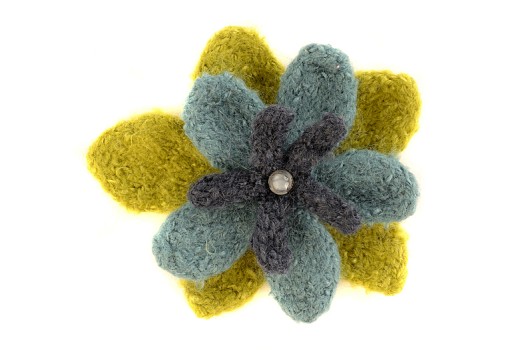
Make a Felted Flower
A felted flower adds a feminine touch to hats, bags, sweaters, slippers—you name it. You can also attach a pin to the back of the flower and use it to adorn a jacket or sew an elastic hair band onto the back to create a fun hair accessory.
The instructions that follow are for just one type of flower, but you can find instructions for all kinds of knitted flowers and then felt those, too.
How to Make a Felted Flower
To make a felted flower, you need three colors of yarn that is 90%–100% wool, alpaca, or some blend of animal fiber (but not superwash yarn). Thin yarns will make small flowers; thick yarns will make larger flowers. Use needles that are a couple sizes larger than your yarn recommends.
1. Using Color A, CO 3 sts.
2. Row 1 (RS): Slip 1, knit into the front and back of the next st, knit to end of row—4 sts.
3. Row 2 (WS): Slip 1, purl into the front and back of the next st, purl to end of row—5 sts.
4. Rep rows 1 and 2 three times—11 sts.
5. Beg with a knit row, work 4 rows St st.
6. Next row (RS): [Ssk] twice, k3, [k2tog] twice—7 sts.
7. Next row (WS): P1, p2tog, p1, p2tog, p1—5 sts.
8. Cut yarn but leave rem sts on needle, pushing them to the end for later.
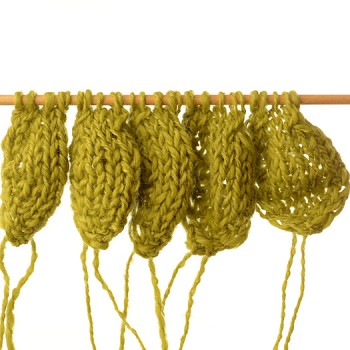
9. Rep steps 1–8 four more times, until you have a total of five petals side-by-side on the needle—25 sts.
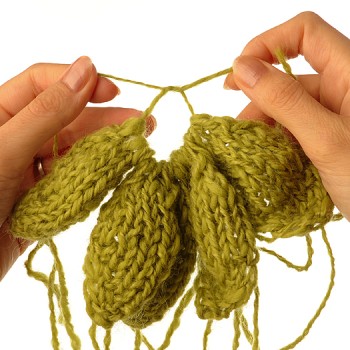
10. Rejoin Color A and knit across all sts to join the petals.
11. Cut yarn, leaving a 12-inch tail. Thread tail through the sts and pull tight to cinch the center of the flower together. Set aside.
12. Using Color B, CO 3 sts.
13. Work as for the first set of petals through step 3.
14. Rep rows 1 and 2 twice—9 sts.
15. Beg with a knit row, work 4 rows St st.
16. Next row (RS): [Ssk] twice, k1, [k2tog] twice—5 sts.
17. Next row (WS): [P2tog], p1, [p2tog]—3 sts.
18. Cut yarn but leave rem sts on needle, pushing them to the end for later.
19. Rep steps 12–18 four more times, until you have a total of five smaller petals on the needle—15 sts.
20. Rejoin Color B and knit across all sts to join the petals; then rep step 11. Set aside.
21. Using Color C, CO 7 sts.
22. Knit 2 rows.
23. BO 6 sts, leaving 1 st on the right needle.
24. Using the backward-loop method (see Backward-Loop Cast-On), CO 6 sts. Switch the needle back to your left hand, ready to knit.
25. Rep steps 22–24 four times and then rep step 23 once more, leaving 1 st on the right needle.
26. Cut yarn, leaving a 10-inch tail. Thread the tail into a tapestry needle, pull it through the last stitch, and stitch along the bases of each of these smallest petals to form a star. Cinch tight and secure.
27. Weave in loose ends.
28. Felt all three sets of petals according to the felting instructions; shape and air dry.
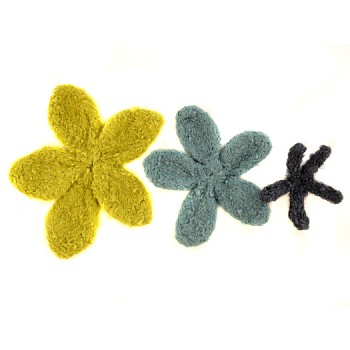
29. When the petals are dry, lay them together in order from largest to smallest, as shown. Sew together at the center, using strong matching thread or embroidery floss.
30. Embellish the center with a button, bead, or French knot.

Make a Knitted Ball
A knitted ball makes a playful accent for hats, scarves, and pillows. You can sew it directly onto your knitting or first sew it to a knitted or twisted cord and then attach it to your project so it dangles. To make a knitted ball, you need a set of double-pointed needles several sizes smaller than your yarn ball recommends and some cotton balls or polyester filling.
1. CO 8 sts and divide among 3 dpns (double-pointed needles), leaving a 6-inch tail.
2. Join rnd and, using a fourth dpn, knit into the front and then the back of every st—16 sts.
3. Knit 3 rnds.
4. Next rnd: K1, m1 *k2, m1; rep from * to last st, k1—24 sts.
5. Knit 5 rnds, or until ball is about the length you want it to be. This will vary according to yarn thickness.
6. Next rnd: *K2tog; rep from * to end of rnd—12 sts.
7. Rep last rnd—6 sts.
8. Cut yarn, leaving a 6-inch tail. Pull the tail through the remaining sts, cinch tight, and secure.
9. Stuff the cotton balls or bits of polyester through the hole at the CO end until the ball is firm.
10. Thread the CO tail through a tapestry needle and weave it in and out along the CO edge. Cinch tight and secure.
NOTE: You can also use the CO end to sew the ball to your knitted item.
11. Weave in the end at the top, pulling it down through the center of the ball and trimming it to neaten up the top.
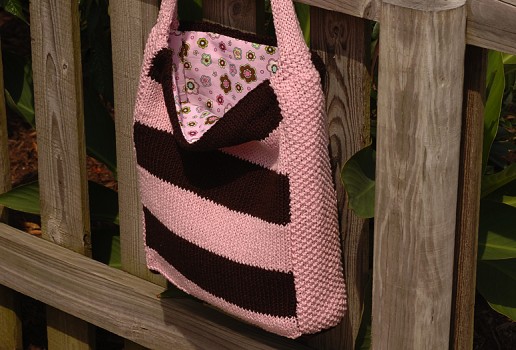
Line a Knitted Bag
Lining a knitted bag is easy. The lining will protect your knitting and enable the bag to safely hold all kinds of items. Choose a lining fabric that complements your yarn colors. These instructions are designed for rectangular flat and gusseted bags.
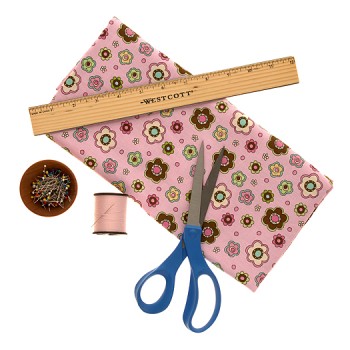
Specifications
Materials
Fabric for lining
Interfacing, if a more rigid lining is desired
Scissors or pinking shears
Pins
Ruler or tape measure
Sewing machine (optional)
Needle and thread
NOTE: To add an additional lining of thick interfacing between the knitted fabric and the lining fabric, cut the interfacing as you do the lining fabric, hold it together with the corresponding lining pieces, and sew as instructed.
How to Make the Lining
Flat Rectangular Bag Lining
1. Cut a piece of lining fabric twice the height of your bag +2" by the width of your bag +1".
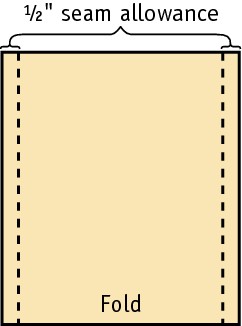
2 .Fold the fabric in half with RS facing each other along the width. Pin the sides together.
3 .Using a sewing machine or a needle and thread, sew side seams, leaving a 1⁄2-inch seam allowance on each side.
4 .Insert the lining into the bag, WS tog, so that the fold is touching the bottom and the side seams run along the bag’s sides.
5 .Reach down into the bag and tack the corners in place. Then tack along each side seam twice, about one-third and two-thirds of the way up.
NOTE: This will keep the lining from pulling down the top of the bag when you put things in it.
6 .Fold over the top edge of the lining all the way around so that the folded edge runs neatly along the top edge of the bag, about 1⁄2 inch down from the edge. Pin in place.
7 .Using a needle and thread, neatly whipstitch (see Whipstitch) the folded top edge of the lining to the bag.
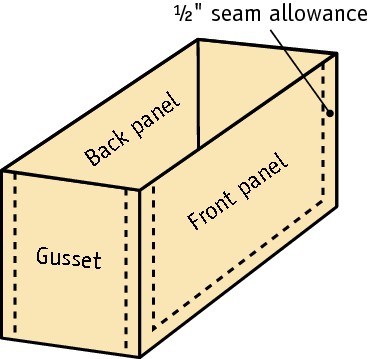
Gusseted Rectangular Bag Lining
1 .Cut two pieces of lining fabric that are 1 inch longer and wider than your front and back panels (to allow for 1⁄2-inch seam allowance).
2 .Cut a piece of lining fabric that is 1 inch wider than your bag’s gusset and 1 inch longer than the entire gusset-base-gusset length.
3 .Pin the long edges of the gusset/base strip around three edges (the gusset sides and base) of the panels, with RS facing each other.
4 .Using a sewing machine or a needle and thread, sew seams along pinned edges, leaving 1⁄2-inch seam allowance.
5 .Insert the lining into the bag with WS together, matching up corners and seams.
6 .Reach down into the bag and tack the corners in place. Then tack along each side seam twice, about one-third and two-thirds of the way up.
NOTE: This will keep the lining from pulling down the top of the bag when you put things in it.
7 .Fold over the top edge of the lining all the way around so that the folded edge runs neatly along the top edge of the bag, about 1⁄2 inch down from the edge. Pin in place.
8 .Using a needle and thread, neatly whipstitch (see Whipstitch) the folded top edge of the lining to the bag.