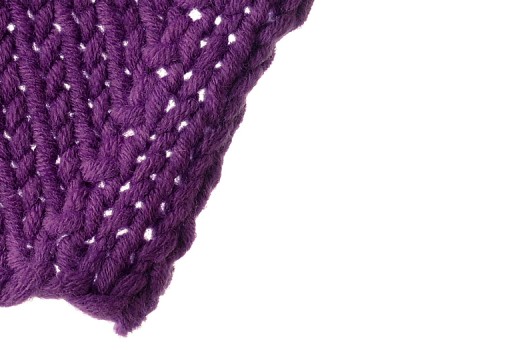
Chapter 4: Shaping
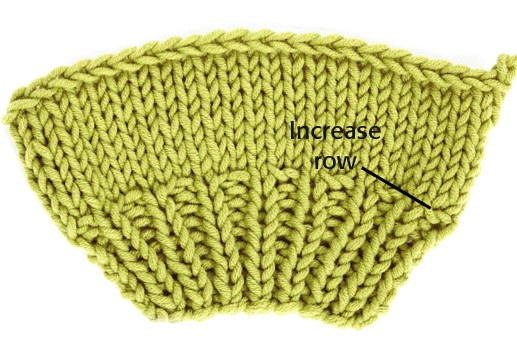
Now that you have learned some basic techniques, such as combining knit and purl stitches to create interesting patterns, you’re ready to learn about increasing and decreasing to shape your knitting beyond just a rectangle. It’s not hard, and once you master a few increase and decrease methods, you’ll be able to make a sweater. Take some time to experiment.
Increase 1 Stitch
To make your knitting wider, you need to increase—or add—a stitch or stitches. There are many types of increases, each with a different appearance or purpose.
Keeping track of when to increase is easier when you do it on the same side (usually the front side) every time, and you can better see how it will look when finished. It is also a good idea to perform increases 1 or 2 stitches in from the beginning or end of a row so as not to create an uneven edge.
Bar Increase
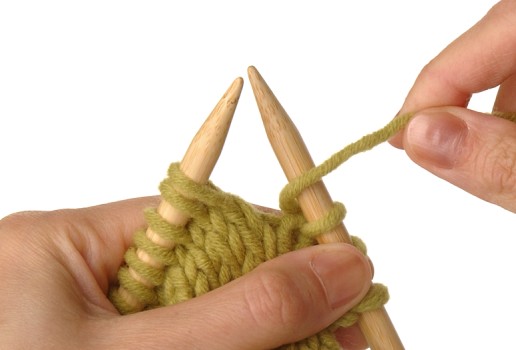
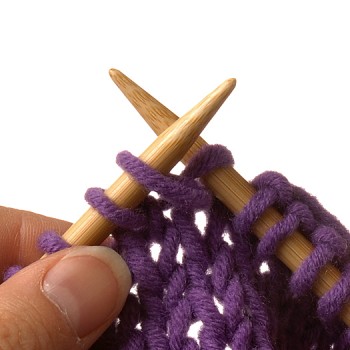
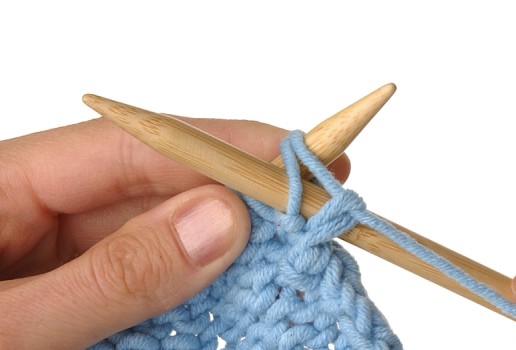
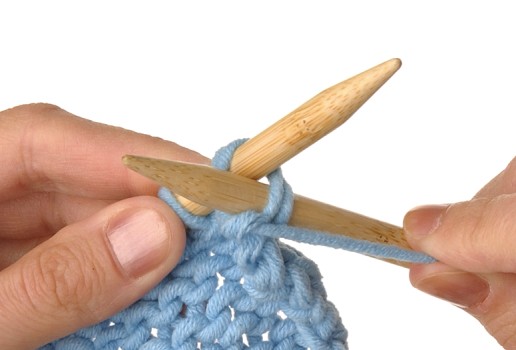
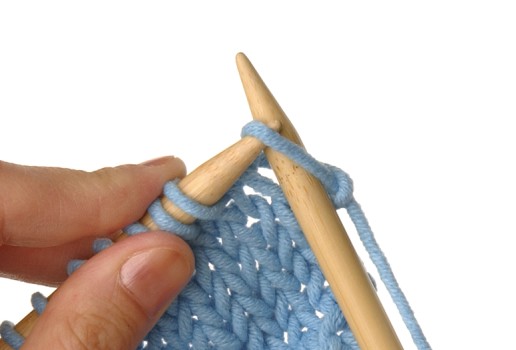
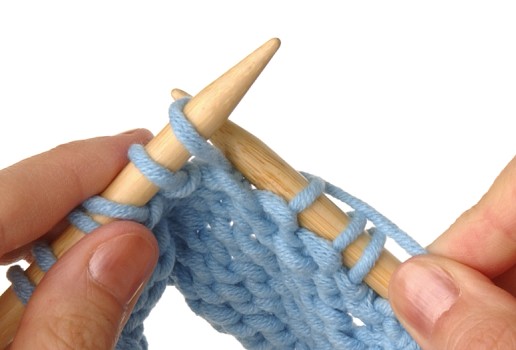
The bar increase—also called KFB, because you knit into the front and the back of the same stitch—creates a horizontal bar of yarn. You should knit 1 or 2 stitches at the beginning of the row before making a bar increase.
1. Insert the right needle into the next stitch and knit it, but don’t bring the old stitch off the left needle (a); insert the right needle into the back of the same stitch and knit it again (b).
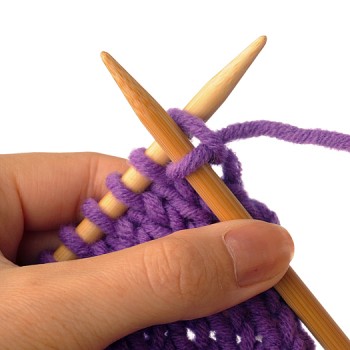
Step 1A
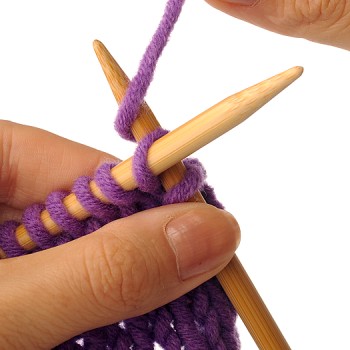
Step 1B
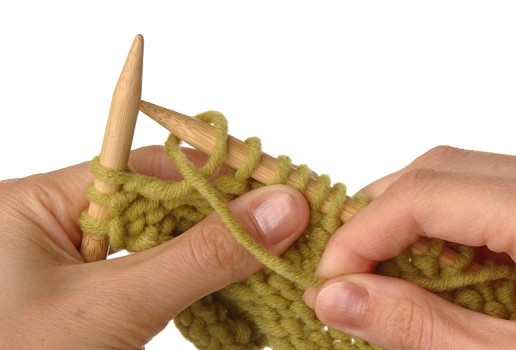
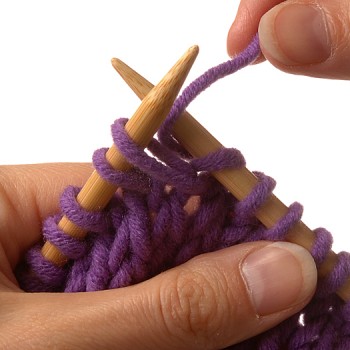
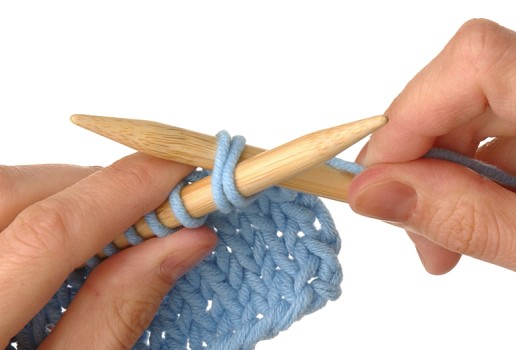
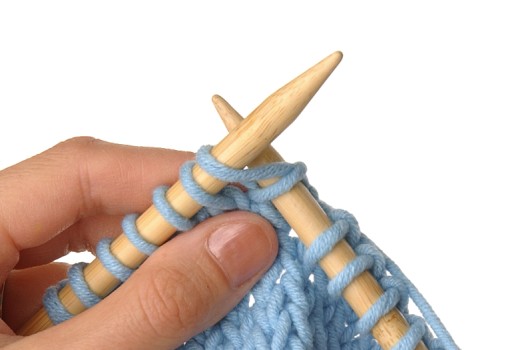
2. Bring the stitch you knit into twice off the left needle.
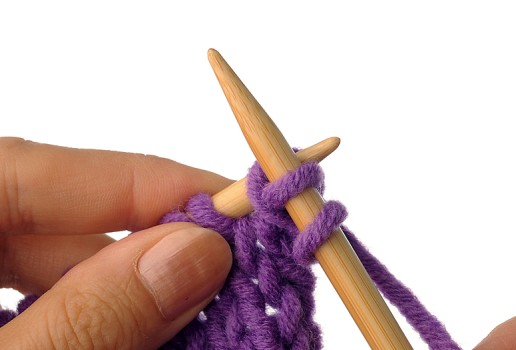
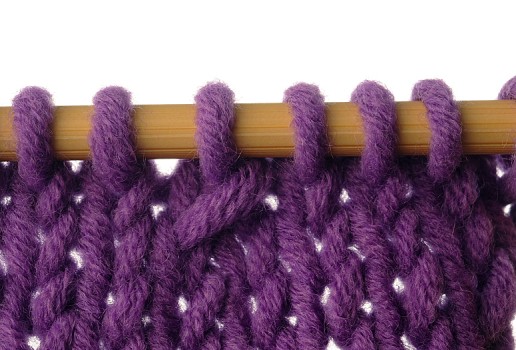
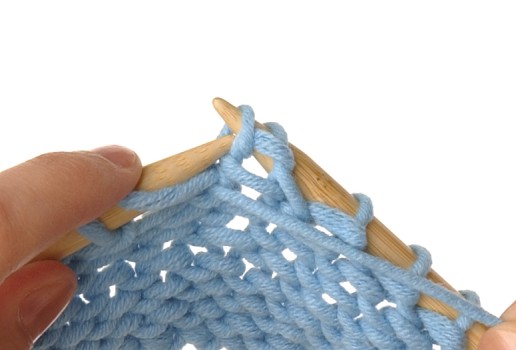
You should have 2 new stitches on the right needle: one made from knitting into the front, and one made from knitting into the back of the same stitch.
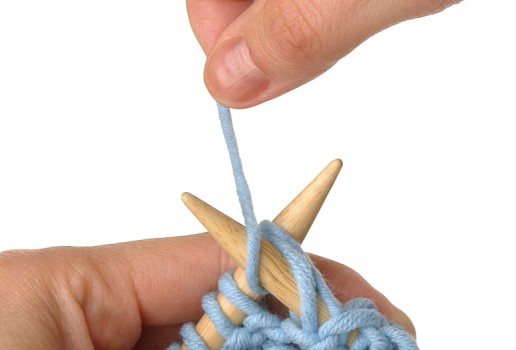
Yarn Over
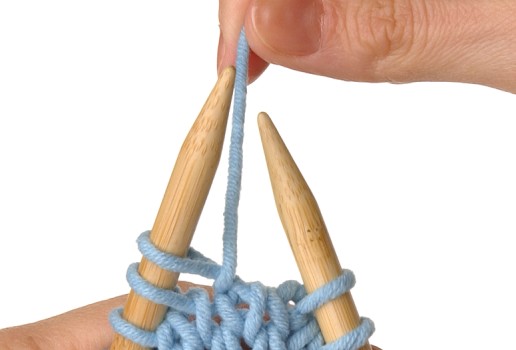
Yarn over, abbreviated yo, is an increase that is often used for decorative increases and lacy patterns because it makes a hole.
Yarn Over with Knit Stitch
1. To do a yarn over before a knit stitch, bring the working yarn between the needles to the front of the work and lay it over the right needle from front to back.
2. Knit the next stitch.
Laying the yarn over the right needle creates another stitch. On the next row, just knit it or purl the new stitch as usual.
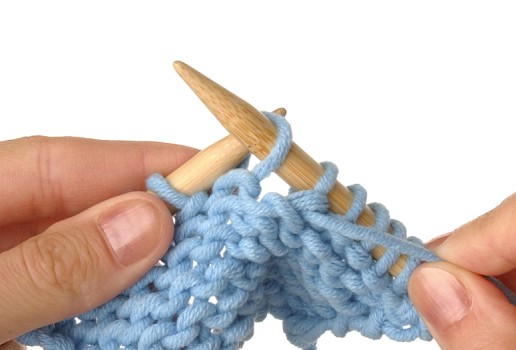
Yarn Over with Purl Stitch
1. To do a yarn over before a purl stitch, bring the working yarn between the needles to the front of the work, wrap it over and under the right needle, and back to the front to be ready to purl.
2. Purl the next stitch.
Laying the yarn over the right needle creates another stitch. On the next row, just knit or purl the new stitch as usual.
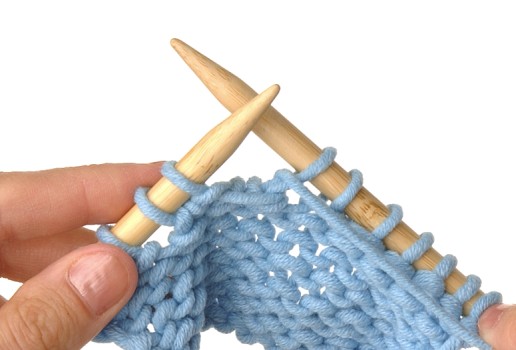
Finished Yarn Over Increase
After you work a couple of rows, you will see the hole that the yarn over created.

NOTE: If a pattern says to yarn over twice, three times, or more, simply continue wrapping the yarn around the right needle as many times as directed.
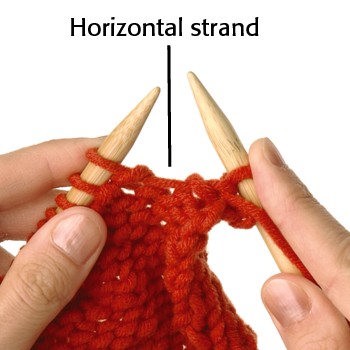
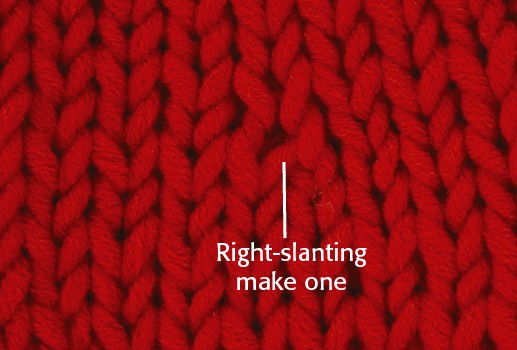
Make One: Right Slanting
The make one increase involves lifting the horizontal strand between 2 stitches onto the left needle and then knitting it. This version slants to the right, but is barely visible.
Right-Slanting Make One with Knit Stitch (m1r)
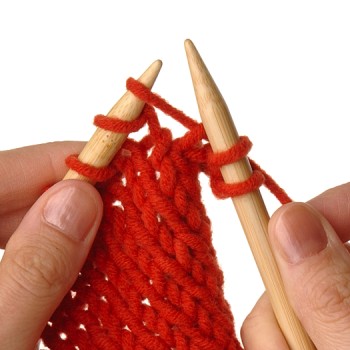
1. Before a knit stitch, use the left needle to pick up the horizontal strand from back to front between the last stitch worked on the right needle and the next stitch to be worked on the left needle.
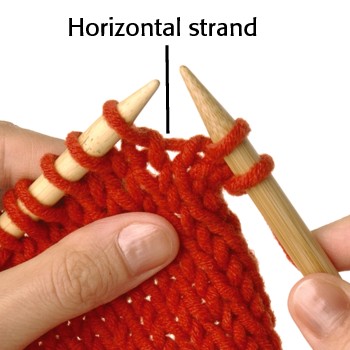
m1r
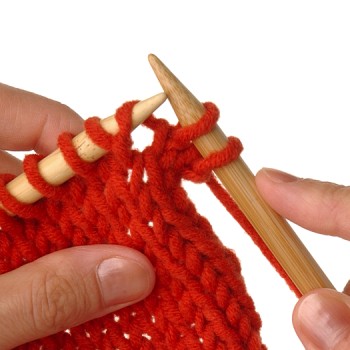
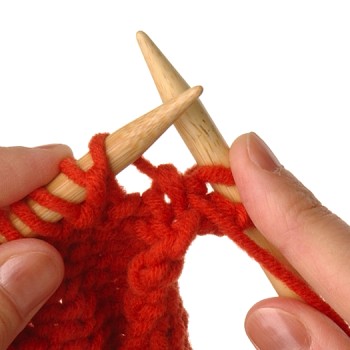
2. Insert the right needle into the front of the strand and knit it.
Right-Slanting Make One with Purl Stitch (m1p)
1. Before a purl stitch, use the left needle to pick up the horizontal strand from back to front between the last stitch worked on the right needle and the next stitch to be worked on the left needle.
m1p
2. Insert the right needle into the front of the strand and purl it.
Finished Right-Slanting Make One Increase
After you work a few rows, you can see how this make one increase slants to the right.
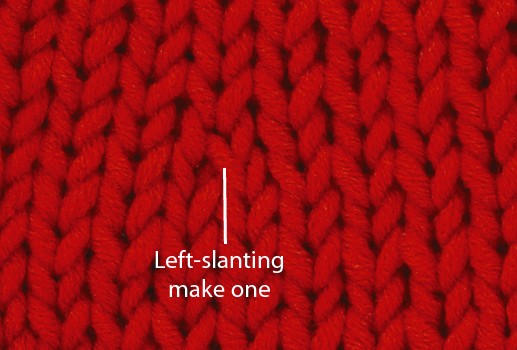
Make One: Left Slanting
A left-slanting make one is just like a right-slanting make one, except the horizontal strand is picked up from front to back.
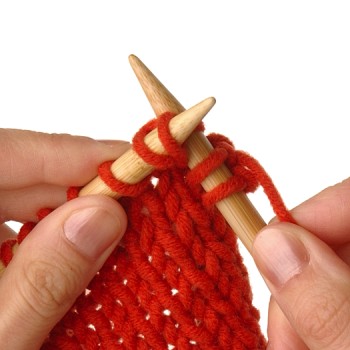
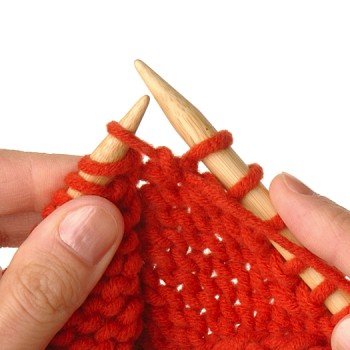
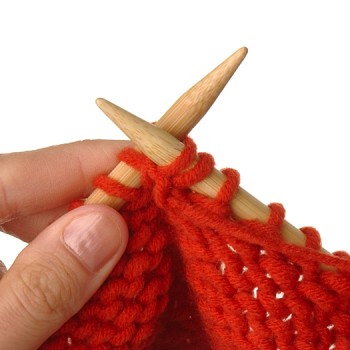
Left-Slanting Make One with Knit Stitch (m1l)
1. Before a knit stitch, pick up the horizontal strand with the left needle from front to back between the last stitch worked on the right needle and the next stitch to be worked on the left needle.
m1l
2. Insert the right needle into the back of the loop and knit it.
Left-Slanting Make One with Purl Stitch (m1lp)
1. Before a purl stitch, pick up the horizontal strand with the left needle, from front to back.
m1lp
2. Insert the right needle into the back of the loop from back to front and purl it.
Finished Left-Slanting Make One Increase
After you work a few rows, you can see how this make one increase slants to the left.
Lifted Increases
The lifted increase is a good all-around increase that works well for shaping just about any knitted item. It can be worked on either the knit side or the purl side.
Lifted Increase: Knit Side (li)
1. Insert the right needle from front to back into the back loop of the stitch below the next stitch on the left needle.
NOTE: Access the back of the stitch below the next stitch on the left needle, rotating the left needle toward you so that the backs of the knit stitches are visible.
2. Wrap the working yarn around the tip of the needle as you would to knit a stitch and pull the loop through.
3. Knit the next stitch.
Lifted Increase: Purl Side (li)
1. Insert the right needle purlwise into the loop of the stitch below the next stitch on the left needle.
2. Wrap the working yarn around the tip of the needle as you would to purl a stitch and pull the loop through.

3. Purl the next stitch.
Increase Multiple Stitches
Sometimes you need to increase more than 1 or 2 stitches across a row, or you need to increase 2 stitches at a time to shape your knitting in a symmetrical way.
How to Increase Multiple Stitches
Double Bar Increase
This increase is called a double bar increase because you use the bar increase method twice in one row to shape symmetrically. It is usually done over an odd number of stitches, on the front side of a piece of knitting, and in the center of a row. For a refresher on bar increases, see Bar Increase.

1. Knit across to the stitch before the center stitch (known as the axis stitch) and then work a bar increase.
2. Work a second bar increase into the axis stitch. Knit to the end of the row.
Even though the second increase is worked on the axis stitch, the bar appears after it.
Double Make One Increase
This increase is similar to the double bar increase in that you increase 1 stitch on either side of an axis stitch, but it is less visible. It is also worked on the front side of a piece of knitting, over an odd number of stitches. For a refresher on make one increases, see Make One: Right Slanting.

1. Knit across to the axis stitch. Perform a right-slanting make one increase, using the horizontal strand between the last stitch worked and the axis stitch.
2. Knit the axis stitch.
3. Perform a left-slanting make one increase using the horizontal strand between the axis stitch and the next stitch to be worked on the left needle. Knit to the end of the row.
Double Yarn Over Increase
The double yarn over increase is similar to the two previous double increases in that you work increases on either side of an axis stitch. For a refresher on basic yarn overs, see Yarn Over.
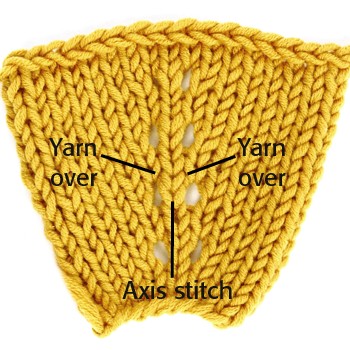
1. Knit across to the axis stitch. Perform a yarn over.
2. Knit the axis stitch.
3. Perform another yarn over. Knit to the end of the row.
Increasing Multiple Stitches Evenly Across a Row
Some patterns ask you to increase a certain number of stitches evenly across a row. This is called for when the knitting needs to become substantially wider quickly rather than gradually. Use whichever increase method is best suited to your stitch pattern.
1. To figure out how to increase a certain number of stitches evenly across a row, start by adding 1 to the number of stitches that need to be added.
2. Divide the number obtained in step 1 into the number of stitches on your needles. The result of this division is the number of stitches you should work between increases across the row. (For example, if you have 30 stitches on your needle and you are asked to increase 5 stitches evenly across, then you knit 5 stitches, increase 1, knit 5, and so on.)
3. If the result of your equation is not exact, approximate and work fewer or more stitches between some of the increases. The most important thing is to spread the correct number of increases across the row as evenly as possible.
Cast-On Increase
For some garments you need to increase multiple stitches at one or both ends of a piece of knitting. In this case, you cast on the number of increases called for, using the backward loop cast-on method (see Backward-Loop Cast-On).
1. Before knitting the row, cast on the number of stitches required in front of the stitches already on the needle.
2. Work the row as directed, beginning with the newly cast-on stitches.

NOTE: If the instructions call for increasing stitches at both ends of a row, you cast on that number of stitches at the beginning of the next two rows because you can’t cast on at the end of a row.
Decrease 1 Stitch
When you need to make your knitting narrower, you decrease stitches. There are several methods for decreasing, each with different effects. Take some time to practice the different methods so you can see how they transform your knitting.
Knit 2 Together/Purl 2 Together
These are two of the most commonly used decreases. The knit 2 together is performed with knit stitches, and the purl 2 together with purl stitches. They both slant somewhat to the right on the front side of a piece of knitting and can be used at any point in a row.
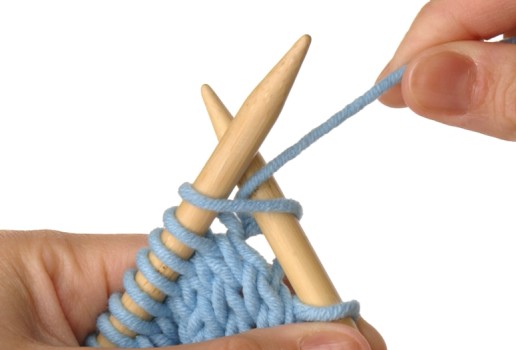
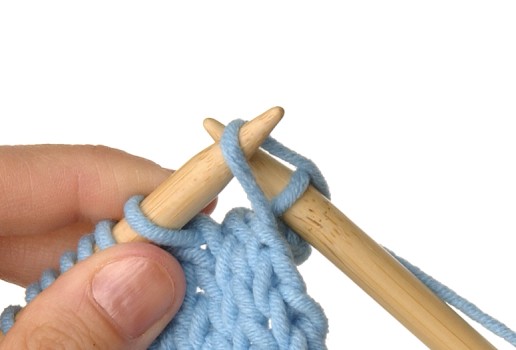
Knit 2 Together (k2tog)
1. Insert the right needle into the front of the next 2 stitches on the left needle as if to knit.
2. Wrap the yarn around the right needle and knit the 2 stitches as 1 stitch.
Purl 2 Together (p2tog)
1. Insert the right needle into the front of the next 2 stitches on the left needle as if to purl.
2. Wrap the yarn around the right needle and purl the 2 stitches as 1 stitch.
Knit or Purl 2 Together Through Back of Loop
These are similar to the regular knit 2 together and purl 2 together decreases, only in this case, the 2 stitches are worked together through the back of the loops, abbreviated tbl, instead of through the front. Both result in a left-slanting decrease on the front side of a piece of knitting.
Knit 2 Together Through Back of Loop
1. Insert the right needle from front to back into the back of the next 2 stitches on the left needle.
2. Knit the 2 stitches together as 1 stitch.
Purl 2 Together Through Back of Loop
1. Insert the right needle from back to front into the back of the next 2 stitches on the left needle.
2. Purl the 2 stitches together as 1 stitch.
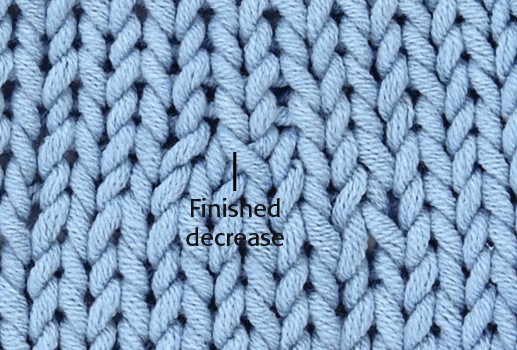
Finished Decrease
A knit 2 together or a purl 2 together decrease results in shaping that slants to the right (a) on the front side of a piece of knitting. A knit 2 together through back of loop or a purl 2 together through back of loop decrease results in shaping that slants to the left (b) on the front side of a piece of knitting.

Step A

Step B
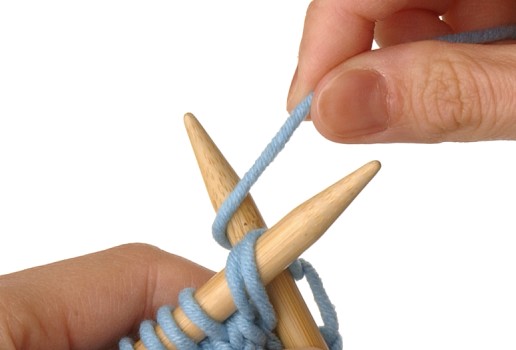
Slip, Slip, Knit
Practically invisible, this decrease, abbreviated ssk, is worked on the front side and slants to the left. If you want to shape your knitting on both sides symmetrically, you can begin a row with a slip, slip, knit and end the row with a knit 2 together.
1. Insert the right needle from front to back (knitwise) into the front of the next stitch on the left needle and slip it onto the right needle.
2. Repeat step 1.
You have slipped 2 stitches from the left needle to the right needle.
3. Insert the left needle from left to right into the fronts of both slipped stitches and then knit them as 1 stitch.
You can see that the slip, slip, knit decrease slants subtly to the left.
Slip 1, Knit 1, Pass Slipped Stitch Over
This decrease, worked on the front side of a piece of knitting, slants quite visibly to the left. It is also sometimes referred to as slip, knit, pass and abbreviated skp.
1. Insert the right needle from front to back (knitwise) into the front of the next stitch on the left needle and slip it onto the right needle.
2. Knit the next stitch from the left needle.
3. Insert the left needle into the front of the slipped stitch and bring the slipped stitch over the knit stitch and off the needle.
You can see that the slip 1, knit 1, pass slipped stitch over decrease slants markedly to the left.

Slip 1, Purl 1, Pass Slipped Stitch Over
This decrease, worked on the purl side, slants quite visibly to the right on the knit side.
1. Insert the right needle from back to front (purlwise) into the front of the next stitch on the left needle and slip it onto the right needle.

2. Purl the next stitch from the left needle.
3. Insert the left needle into the front of the slipped stitch and bring the slipped stitch over the purl stitch and off the needle.

You can see how this decrease looks on the knit side.
Decrease Multiple Stitches
You may want to decrease more than 1 stitch at a time over one row. Your instructions might call for decreasing many stitches across a row, which results in a gathered look; or you may need to decrease 2 stitches in tandem over a series of rows, for more gradual shaping.
How to Decrease Multiple Stitches
Decreasing Multiple Stitches across One Row
Some instructions may direct you to decrease a certain number of stitches evenly across a row.
1. To figure out how to decrease a certain number of stitches evenly across a row, divide the number of stitches you have on your needles by the number you need to decrease.
2. Subtract 2 from the result, and that is the number of stitches you need to work between decreases. (For example, if you have 30 stitches on your needles and you are asked to decrease 10 stitches evenly across, you will knit 1 stitch, work the decrease over the next 2 stitches, knit 1 stitch, and so on.)
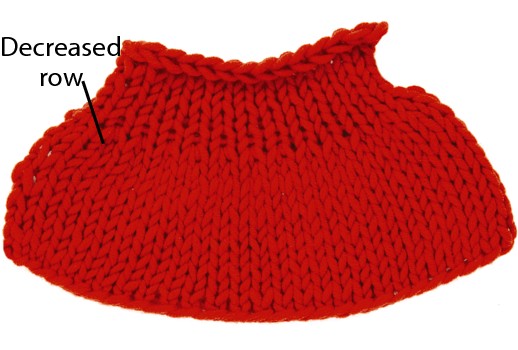
This example illustrates what decreasing the number of stitches by half looks like.
Knit or Purl 3 Together
Knit 3 together and purl 3 together, abbreviated k3tog and p3tog, are the easiest double decreases and are good for decreasing more stitches quickly. The resulting stitch is chunky looking and slants visibly to the right.
1. To knit 3 together, insert the right needle into the front of the next 3 stitches (knitwise) on the left needle.
2. Wrap the yarn around the right needle and knit the 3 stitches as 1 stitch.
You have just decreased 2 stitches.
NOTE: Work the purl 3 together double decrease in the same manner as the purl 2 together, only purl 3 stitches together.
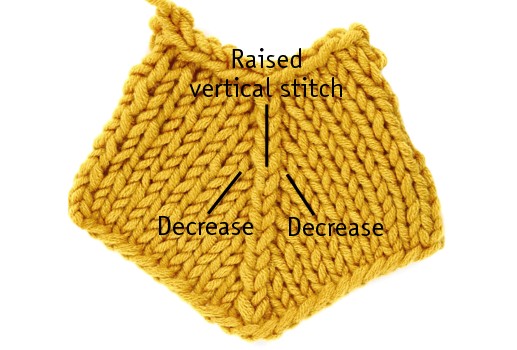
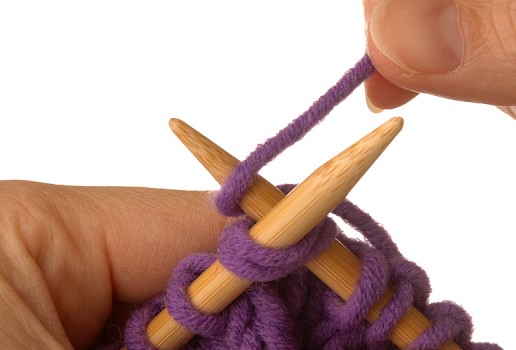
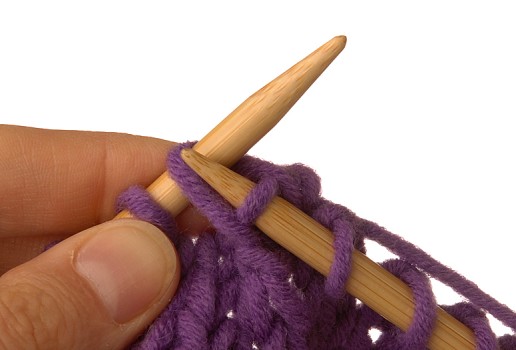
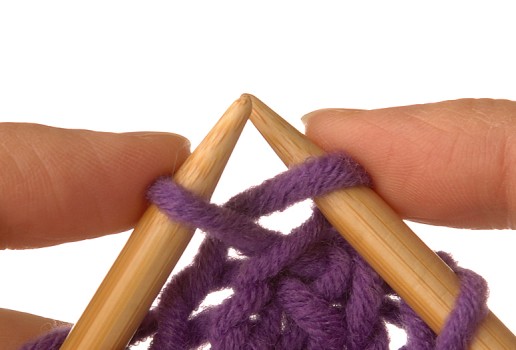
Double Vertical Decrease
This double decrease results in symmetrical shaping with a raised vertical stitch in the center. It is worked on the right side and is sometimes called slip 2, knit 1, pass 2 slipped stitches over, and abbreviated s2kp.
1. Insert the right needle into the next 2 stitches on the left needle as if to knit them together and then slip them off the left needle and onto the right needle.
2. Knit the next stitch from the left needle.
3. Use the left needle to pick up both slipped stitches at the same time and pass them over the knit stitch and off the right needle.

You have now decreased 2 stitches.
You can see here how the double vertical decrease looks when performed over a progression of rows. The purl rows are worked without decreasing.
Left-Slanting Double Decrease
This double decrease, also called slip 1, knit 2 together, pass slipped stitch over and abbreviated sk2p, is good for symmetrical shaping. It looks a bit neater than the knit 3 together decrease, but it does slant visibly to the left on the knit side. You work it on the knit side.
1. Insert the right needle from front to back (knitwise) into the front of the next stitch on the left needle and slip it onto the right needle.
2. Knit the next 2 stitches on the left needle together.
3. Insert the left needle tip into the slipped stitch and left it up and over the knit 2 together stitch and off the right needle.
You now have decreased 2 stitches.
Right-Slanting Double Decrease
This double decrease slants to the right and is good for symmetrical shaping. What is unusual about it is that a stitch is passed over on the left needle. You work it on the knit side.
1. Insert the right needle from front to back (knitwise) into the front of the next stitch on the left needle and slip it onto the right needle.
2. Knit the next stitch and then pass the slipped stitch over the knit stitch and off the right needle.
You have now decreased 1 stitch.
3. Slip the decreased knit stitch from the right needle back to the left needle.

Step 3
4. Insert the right needle into the front of the second stitch on the left needle (as if to purl), and pass it over the decreased knit stitch and off the left needle.
Step 4
5. Slip the decreased knit stitch from the left needle back to the right needle.
You have now decreased 2 stitches.
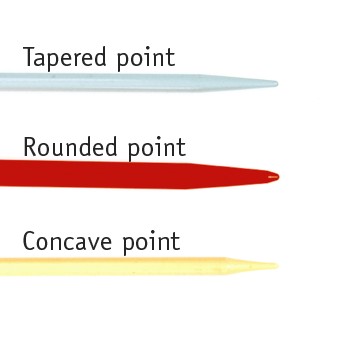
TIP
The Best Needle for the Job
Many of these decreases call for slipping stitches and passing stitches over. You have probably noticed that there are different needle tip shapes: tapered, round, and concave. Round-tipped needles are good for knitting bulky single-ply yarns because they are less likely to split the strand, but they’re not the best choice for slipping stitches and passing stitches over. For the decreases and increases presented in this chapter, concave tips that can really get under a stitch and hold onto it are best. But if you don’t have concave tipped needles, tapered are the next best choice.
Shape with Short Rows
Often used to shape sock heels, bonnets, and stuffed toys, short row shaping involves working a series of partial rows—instead of decreasing or increasing stitches—to create curved or slanted edges.
How to Shape with Short Rows: Knit Side
Short rows eliminate the uneven stair steps that occur when binding off a series of stitches over a few rows, so they are an excellent choice for shaped shoulders and necklines.
1. Work across the row to the point where your instructions tell you the work should be turned. Keeping the working yarn at the back of the work, slip the next stitch from the left needle—as you would to purl—to the right needle.
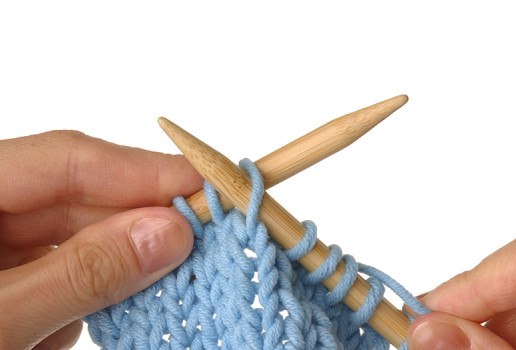
2. Bring the working yarn between the needles to the front of the work.
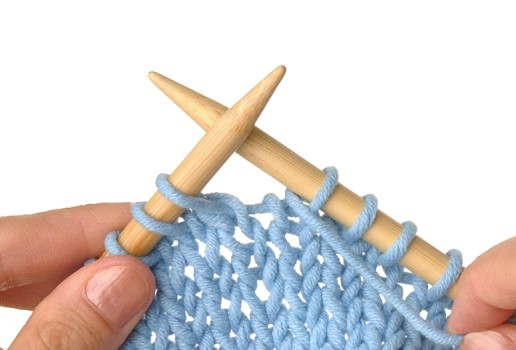
3. Slip the same stitch you slipped in step 1 back to the left needle.
4. Bring the working yarn to the back of the work, thereby wrapping the slipped stitch.
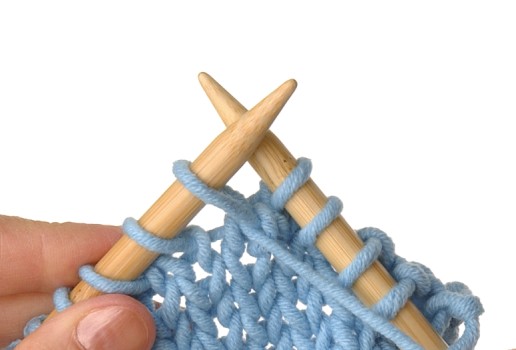
5. Turn your work so that you’re ready to work the wrong side.
TIP
Preventing Holes When Shaping with Short Rows
Short rows involve working partway across a row, turning the work to the other side, working back partway, and repeating this process until you have achieved the desired shaping. To prevent holes from appearing at the turning points, you slip and wrap the turning stitches as shown here.
How to Shape with Short Rows: Purl Side
1. Work across the row to the point where the work should be turned. Keeping the working yarn at the front of the work, slip the next stitch from the left needle—as you would to purl—to the right needle.
2. Bring the working yarn between the needles to the back of the work.
3. Slip the same stitch you slipped in step 1 back to the left needle.
4. Bring the working yarn to the front of the work, thereby wrapping the slipped stitch.

How to Hide Short-Row Wraps
After you complete a short row, hide your wraps so that your work looks tidy.
Hiding Short-Row Wraps on the Knit Side
1. On the knit side, work to the point where the wrap is.
2. Insert the right needle knitwise under both the wrap and the wrapped stitch.
3. Knit the wrap and the wrapped stitch as 1 stitch.
Hiding Short-Row Wraps on the Purl Side
1. On the purl side, work to the point where the wrap is.
2. Insert the right needle from back to front through the back loop of the wrap. Lift the wrap and place it onto the left needle with the wrapped stitch.
3. Purl the wrap and the wrapped stitch as 1 stitch.
After you complete your short-row shaping, you can bind off or continue your pattern as established.
NOTE: Shoulders that have been shaped with short rows can be sewn together invisibly (see Invisible Horizontal Seam). If the stitches have not been bound off, the shoulders can be grafted together for a seamless look (see Three-Needle Bind-Off).