Golf coaches are often saddled with problems that are not usually found in the coaching of other sports. For example, you may be faced with setting and following a variety of local directives for the teaching, practice, and playing of golf. Your facilities may range from excellent to virtually nonexistent. You may find yourself having to answer to a lot of bosses, from the athletic director to the local golf professional. When athletic budgets are trimmed, the so-called minor or non-revenue-producing sports are usually the first to feel the pinch. In spite of these drawbacks, golf is alive and growing as a high school interscholastic sport.
Proper planning and scheduling can help eliminate or lessen the effects of these problems. You must also develop good communication with your players, their parents, your school administrators, and the local golf professional.
At your district coaches’ meeting, be sure to get your fellow coaches’ names, work and home phone numbers, e-mail addresses, and any other pertinent information. As the season progresses, if possible, get the names of their team members as well. There are countless reasons for you to have this information. Things happen. For obvious reasons, such as rain, schedule conflicts, illness, and similar unpredictable circumstances, you must always be prepared to adjust for a last-minute crisis.
DEVELOPING A TRAINING SCHEDULE
As soon as you have determined the dates and places of your matches, you should prepare your team’s training schedule relative to those dates. If you are fortunate enough to have an assistant coach or a student manager, your assistant can help monitor your team’s practice and training schedule. Be sure to develop a written practice schedule that you can post and hand out.
If you want your team members to practice more, you need to find additional practice facilities. Approach local driving ranges and other practice ranges with an orderly and definitive schedule for your use of the facilities. A carefully organized practice schedule goes a long way in getting permission from the driving range managers and owners. You need to develop a schedule that allows all team members the opportunity to play and therefore improve.
As early in the season as possible, introduce your team members to strength conditioning, nutritional guidance, and a time management program to assist in their development. More and more each year, I find my students far more capable of accomplishing goals because they are better prepared. If there is a need for medical screening, proof of insurance, or parental permission forms, you should coordinate these measures with your school’s athletic director.
During the actual competitive season, have your travel squad play and work on drills as much as possible. Those team members who will be participating at the regional and state levels should have additional practice and training requirements. The instructional and training information in the following chapters will assist you in developing these specific training and practice schedules. Your plan should also include postseason activities, such as get-togethers, reading assignments, and fund raisers.
Time Management
I have talked to numerous high school golf coaches and players about time management and practice sessions. Many coaches simply have their team members play nine holes and then ask them, “What did you shoot?” In my opinion, this approach is a waste of time.
At Fairless High School, we divide the team into three groups for practice. Group 1 will go to the range with the head coach. Group 2 will go to the putting green with an assistant coach. Group 3 will play five or six holes. Each group will rotate.
On the range, players follow the same process. Grips are constantly checked along with alignment. We begin by stretching and then wedge play. There is one question that is constantly asked: “Where are you aiming?” Players also are required to hit the clubs they normally hit on the par-3s. We finish with the driver and aim at different targets, so alignment is always being stressed.
On the putting green, there are always three or four drills out of the 25 or 30 we do by the end of the season. Players do these drills for at least 10 minutes apiece, so they putt for at least a half hour each night.
When we play holes after school or in practice, we always play the championship tees and never touch the golf ball until it is on the putting surface.
We also have a contest on the par-3s we play every now and then. The player who hits the worst shot to the par-3 must carry the other players’ bags to the next tee.
When we have finished the rotation, we have been at practice approximately two hours. When a player goes and plays nine holes, it takes about two hours. Players typically will have hit 20 to 30 shots from tee to green and will have putted 15 to 20 times. Under our format, they will have hit at least a large bucket of golf balls with the coach present, will have putted at least 60 to 100 putts with a coach present, and still will have played five or six holes.
Ken Youngman, Fairless High School, Navarre, Ohio
DETERMINING SKILL LEVELS
It is very important to identify your team members’ individual skill levels early in the season. You’ll find skill level descriptions in the instruction section of this book.
I encourage you to begin every practice schedule with a 20-minute drill evaluation. This session allows you to see each player’s skill level on a daily basis. Once the team recognizes that you conduct evaluations on a regular basis, they begin preparing for these little exams. Remember to keep these skill sessions fun as well as effective. These 20-minute sessions can take the form of chipping, pitching, and putting contests.
The short game exam beginning on page 43 should be conducted at the beginning, middle, and end of each season. Not only does the exam assist you as the coach in measuring your team members’ abilities, but advance knowledge of the test also encourages team members to practice so that they’ll be prepared.
The Short Game Exam is broken into two parts: part I covers putting and part II covers chipping, pitching, and sand play. If you want to give your students more instruction in these areas, you can use the Short Game Exam to set up workshops. The lessons, or workshops, that follow are based on the Short Game exam. This same lesson format is used in chapter 6. (Chapter 6 also contains short game lessons. Choose which lessons best fit your students’ abilities.)
These workshops are designed to give you a way to create productive practice time during the season. Unfortunately not all teams have the opportunity to work in the most desirable conditions. Make whatever modifications you feel are necessary to reach your students and work within your resources.
Putting Workshop
Equipment and Setup
1. Make enough copies of the Short Game Exam for each student to have one copy.
2. Ask the golf professional at your course if you can mark off the section of the practice green where you will be conducting the workshop. If the golf professional agrees, rope off the area of the practice green you will need or put up a “Clinic in Session” sign.
3. Set up stations on the practice green. Use tees to mark where students should putt from and which hole they should putt to.
4. Obtain some face tape for the sweet spot section of the exam.
5. Each student will need five balls and a putter.
Motivation
Before beginning the workshop, review putting technique with your students and go over the part I instructions of the Short Game Exam. Demonstrate each station for the students. Be thorough—field questions and use your own thoughts and experiences to communicate the importance of putting.
Procedure
1. Divide students into groups of two or three, depending on the number of students. Each student will keep score for another student on his or her team.
2. Each station should take 10 to 15 minutes to complete. Each team starts at a different station, then teams rotate through all the stations.
3. Talk with students during the workshop, helping them correct technique errors.
4. Only work through the putting section (part I) of the Short Game Exam. These scores will be added to the scores from the next workshop to give students a “short game handicap.”
Evaluation
After the workshop, talk to students about proper alignment and the feel for distance on the putting green. Encourage students to set up stations during their own practice time to work on their problem areas.
Chipping, Pitching, and Sand Play Workshop
Equipment and Setup
1. Students will need their copies of the Short Game Exam with their scores from the putting workshop. Students need their preferred clubs for fringe chipping (anything from a 6-iron to a wedge), their pitching wedges, and their sand wedges.
2. Ask the golf professional at your course if you can mark off the section of the practice green, driving range, and practice bunker where you will be conducting the workshop. If the golf professional agrees, rope off the area of the practice green, driving range, and practice bunker you will need or put up a “Clinic in Session” sign.
3. Obtain a few buckets of balls.
4. Set up the chipping station, 20- and 30-yard targets on the driving range, and the practice bunker.
Motivation
Before beginning the workshop, review chipping, pitching, and sand play technique with your students and go over the part II instructions of the Short Game Exam. Discuss drive-in and float-in shots and review grip, alignment, and preshot routine. Explain the need to “take sand and finish” on bunker shots and that the priority is simply to get out. Demonstrate each station for the students.
Procedure
1. Divide students into teams of four or five, depending on the number of students. Each student will keep score for another student on his or her team.
2. Each station should take 20 to 25 minutes to complete. Each team starts at a different station, then teams rotate through all the stations.
3. Talk with students during the workshop, helping them correct technique errors.
4. Only work through the chipping, pitching, and sand play section (part II) of the Short Game Exam. These scores will be added to the scores from the putting workshop to give students a “short game handicap.”
Evaluation
After the workshop, talk to students about brushing the grass for best contact. Discuss the absence of wrist action in the chipping motion and the “some to none” swing used for pitching. Encourage students to set up stations during their own practice time to work on their problem areas.
![]()
The following exam will test the most important aspects of scoring. Studies have proven that nearly 65% of strokes on the golf course are taken inside 100 yards. It also is widely accepted that if you cannot make the proper swinging and turning motion for a 50-yard pitch, you should not expect to be consistent with anything longer. NAGCE recommends building the swing from the hole out to the tee. Becoming a short game master is the first step in raising your game to the next level.
Part I Putting
Short Putts
Instructions: Attempt five straight, level putts from each distance. Give yourself 1 point for each putt made.

Sweet Spot
Instructions: Put a strip of face tape on your putter face. Attempt five straight, level putts from each distance. Measure the distance between the outside marks on the tape to see how tight your putts grouped around the sweet spot. Give yourself 20 points for 1/4 inch, 10 points for 1/2 inch, 5 points for 3/4 inch, and 0 points for 1 inch. Be careful not to drag the ball with the putter. This may mark the tape.

Ramp and Channel Putts
Instructions: Attempt five straight, level putts from each distance. Give yourself 1 point for each putt made.

Instructions: Putt five balls from each distance. Give yourself 1 point for each putt made.

Specific Distance
Instructions: Putt five balls from each distance. From 10 feet, give yourself 1 point if the ball goes in or if it is no more than 18 inches past the hole (5 points possible). From 15 feet, give yourself 2 points if the ball goes in or if it is within a 2-foot circle around the hole (10 points possible). From 20 feet, give yourself 3 points if the ball goes in or if it is within a 3-foot circle around the hole (15 points possible). There are 30 total points possible.

Part II Chipping, Pitching, and Sand Play
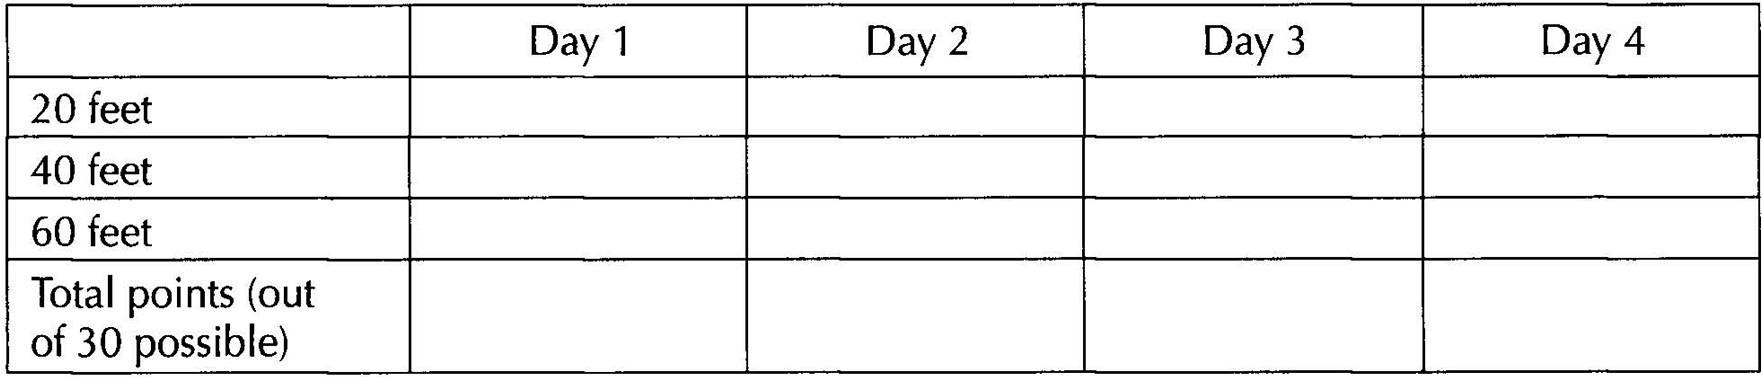
Apron/Collar Chip
Instructions: The club selection is yours. Hit five shots from each distance. From 20 feet, give yourself 1 point if the ball is within 3 feet of the hole (5 points possible). From 40 feet, give yourself 2 points if the ball is within 4 feet of the hole (10 points possible). From 60 feet, give yourself 3 points if the ball is within 10 feet of the hole (15 points possible). There are 30 total points possible.
Instructions: Attempt five shots from each distance using the specified shot. A drive-in shot is used when there is plenty of green to work with, and you are able to pitch the ball with maximum ground time and minimum air time. A float-in shot is used when there is a hazard or other obstacle between you and the pin, and you must stop the ball immediately after it lands. Give yourself 5 points for each shot if the ball is within 10 feet of the hole. There are 100 total points possible.

Sand Play
Instructions: Hit five shots from two distances, for 10 total shots. Give yourself 2 points for each ball that is within 4 feet of the hole. Give yourself 1 point for each ball that is within 6 feet of the hole. Give yourself 10 bonus points if no balls are left in the bunker and none ended up over the green.

Scoring

Based on your points, this would be your short-game handicap:
Touring pro |
225 to 260 points |
1 to 4 handicap |
200 to 224 points |
5 to 9 handicap |
175 to 199 points |
10 to 14 handicap |
150 to 174 points |
15 to 19 handicap |
125 to 149 points |
20+ handicap |
124 points or less |
![]()
ACQUIRING EQUIPMENT
You’ll generally acquire any needed equipment through the golf personnel at your home course. You should support that professional whenever possible. If no political considerations dictate where you purchase your golf balls, bags, shirts, gloves, etc., you can obtain all of these items plus much more through your membership in NAGCE.

While golf is primarily an individual sport, the team structure predominates at the high school level. This is actually a bonanza for the coach because you can stress both individual and team play, providing a better learning experience for the players. High school golfers should be taught to function first as team members and then as individual competitors. Use the goal-setting worksheet in figure 5.1 to track team and individual goals, or develop your own method.
Few would argue against the notion that winning is more fun than losing. Yet losing is a part of life and must be dealt with, both on and off the course. It is possible to lose with grace and to accept victory with humbleness. Perhaps no sport demonstrates these attributes better than golf, through both its heroes and its everyday participants. You should zealously work to guard this tradition of chivalrous demeanor in our sport. In fact, you should absolutely require proper conduct of your student golfers.
Within the team structure, your goal and that of your players should be to improve each person’s game. Your players can strive for swing perfection, but with the understanding that this particular goal can never be attained. That is, ironically, one of golf’s unique attractions.
HANDLING THE DETAILS
Many facets of being a coach do not include the actual coaching process. For example, some or all of the following items may fall under your responsibility:
• Physical exams
• Insurance
• Budget
• Transportation
• School absences
• Grade maintenance
• Equipment
• Safety
A good coach handles administrative details in a proper and efficient manner. Be sure to know and follow your school district’s guidelines and regulations. Make players, parents, assistant coaches, and others involved with the team aware of any district regulations that apply.
RECRUITING PLAYERS
The level of student interest in golf depends directly on the particular environment in which the students grow up. Is there a golf course or golf courses nearby? Do kids grow up in families that play golf? Are junior programs available during the summer months? What is the community impression of the game? All these factors have a bearing on the quantity and quality of potential players available to a golf program.
Some coaches find it necessary to “sell” the game to selected students in order to get a team started. (Of course, dedicated and enthusiastic golf coaches constantly sell the game.) Conversely, other coaches face constraints; for example, facility availability may limit the number of students that a team can carry.
Sometimes attracting interested students is as simple as putting up a notice on the school’s bulletin board or making an announcement. Sometimes it takes more effort: personally recruiting individuals, putting up posters, writing an article for the school newspaper, running a one-day promotional golf clinic, etc.
FINDING THE GOLF COURSE
School districts and golf operations have thousands of different arrangements for facility use. One team may be allowed to play and practice on a course only once or twice per week, while another team may have unlimited use of a course. Some districts pay thousands of dollars for course use while others pay nothing. Regardless of your situation, you should consider certain guidelines for success when you deal with a golf course and its personnel.
Advise your players of the rules of the course, including any dress code, well in advance of the first practice session. Give students specific guidelines to follow.
Respect for Others
You, your staff, and your students should treat the club golf professional and course manager with respect. I certainly recommend calling them by their proper names—for example, “Mr. Smith.” Team members should obey their directions as though the coach were speaking.
Your team also must treat other adult golfers with respect. The team is often using the course at the discretion of the club and its members. Students should give priority to club members and other adults, both on the course and on the grounds.
Respect for the Grounds
Establish guidelines at the onset for the use or non-use of the clubhouse and locker rooms. Severely restricting use of these areas is better than risking the loss of privileges altogether.
Your team members’ behavior on the course should be flawless. Teach them how to replace divots, fix ball marks, and make every effort to take the best possible care of the course. Temper tantrums and club throwing should draw your immediate wrath. Student golfers must be made to understand that they represent, first, the coach and, second, the school. Hold them accountable for their actions at all times.
You and your team might endear yourselves to the course management by participating in some form of work on the course. For example, one team in Oregon always spends a minimum of one full day, from dawn to dusk, helping to aerate the greens. It is hard, dirty work for the students and coaches, but it reaps definite rewards. The young golfers obtain a first-hand opportunity to experience some of the effort that goes into course maintenance. They come away with a new perspective of the game. The owner and operators of the course are grateful for the help and, as a result, that particular team is very welcome at their course. Everyone benefits!

