Chapter 2
HTML
 Understand differences between HTML and XHTML
 Learn HTML for EPUB
 Practice XHTML in EPUB files
XHTML
When viewing EPUB documents, the material displayed on the reading system is from Extensible Hypertext Markup Language (XHTML). When creating, editing, or enhancing EPUBs, understanding XHTML is very important.
If you do not know XHTML or know only a little, don’t worry. Playing around with a few EPUB files and making changes can help you learn it quickly. Keep in mind the scope of the various EPUB components is quite a bit to take in. Simply learn each chapter before moving on to another one.
NOTE
Chapter 3 builds on the skills learned in Chapter 2. Make sure you have a fair understanding of this chapter before moving on to Chapter 3.
What Is XHTML?
The Extensible Hypertext Markup Language is a form of Extensible Markup Language (XML). As you’ll see, XHTML appears similar to XML since both are markup languages. One way to look at it is that XML describes the data, while XHTML describes how the data will appear. For example, XML may describe data as a book title, and XHTML describes the title is bold.
The format you will use with XHTML is as follows:
Tags may have no attributes, or may have a lot, and any number of them may be used.
With XML, every tag and possible attributes are contained within the less than (<) and greater than (>) symbols. Most tags will have an end tag to show the element has ended, while others are self-closing. Ending a tag requires a forward slash (/). Self-closing tags need no data, such as line break, which has the tag name of br. The break tag looks like this:
A quick sample of an end tag is the paragraph tag, which shows a paragraph’s beginning and ending. The tag is a <p> and it looks like this:
You can easily see where the paragraph starts and ends, as well as the content of the paragraph. An element consists of everything from the beginning to the end tag.
What’s the Difference Between HTML and XHTML?
The tags used are all the same, but XHTML has stricter rules for the tags and attributes. With XHTML, all tags must be closed and each element nested within another element must end before the outermost one. For example, if we include bold words (<b>) within a paragraph (<p>), the bold element must close first as shown:
It cannot be
Also, attributes must be lowercase with values in quotes, whereas in HTML, the case and quotes don’t always matter.
Finally, XHTML needs a header to indicate the file is XHTML. HTML does not require a header, but may have one. The header portion tells programs using the file, such as web browsers, that the file is XHTML. The XHTML header is as follows:
XHTML has other requirements that do not affect EPUB files, so keep in mind that as long as you understand HTML, XHTML won’t be too radically different.
OPS XHTML Types
In Chapter 1, we covered information on the Open Publication Structure (OPS). The OPS is the portion of the EPUB displayed to the reader. If you look back at Table 1-5 in Chapter 1, you can see a list of the acceptable XHTML modules and the elements within each one.
Be prepared, because now we are going into the details of those tags and all available attributes.
NOTE
Not all reading devices are identical. Be aware that some tags and attributes may work on some devices and not on others. Some may not look the same either. Go to the McGraw-Hill website at www.mhprofessional.com/EPUB and download the EPUB tester file. It is an EPUB that you can place on your reading device to allow you to see how each tag on your device appears. You can also view the code in Sigil for each tag as you read for a better understanding of the coding.
Structure
The structure tags set up the whole XHTML page. These tags make up the framework of the file.
There are four tags in the structure module:
 html
html head
head title
title body
bodyhtml
The <html> tag contains all the elements within the XHTML file. Any attributes in the <html> tag are inherited by all elements with the XHTML document. When using these attributes, keep in mind that these affect everything within this file.
The XHTML file is split into two sections: the head and the body (discussed next). The sections are as follows:
Table 2-1 lists the attributes available for the <html> tag.
Table 2-1 <html> Attributes
Keep in mind that you can use no attributes, all of them, or just some of them. Use only what is required so problems do not arise within the EPUB because of conflicting information.
id The id is an attribute that can have a unique value within all the XHTML files within the EPUB. No two id attributes can be the same; this is very important. The value cannot be blank, but must have one or more characters. The first character must be a letter (a–z) and followed by numbers, hyphens, underscores, or periods. The value is case-sensitive when referenced by an anchor (<a>).
If we have an XHTML file that is Chapter 1 of a book, we can place the following within the document:
If a table of contents is made for the EPUB, then the listing for Chapter 1 in the table of contents can be linked to the individual file. This works well when each chapter is its own XHTML file.
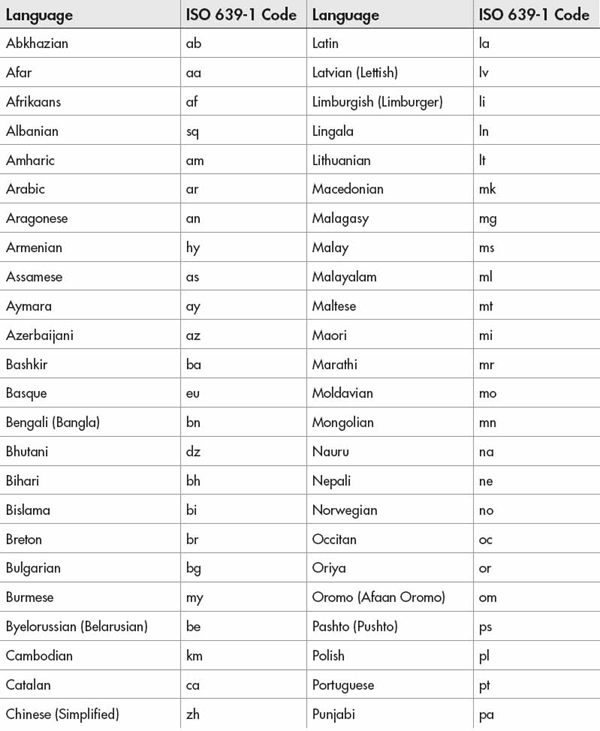
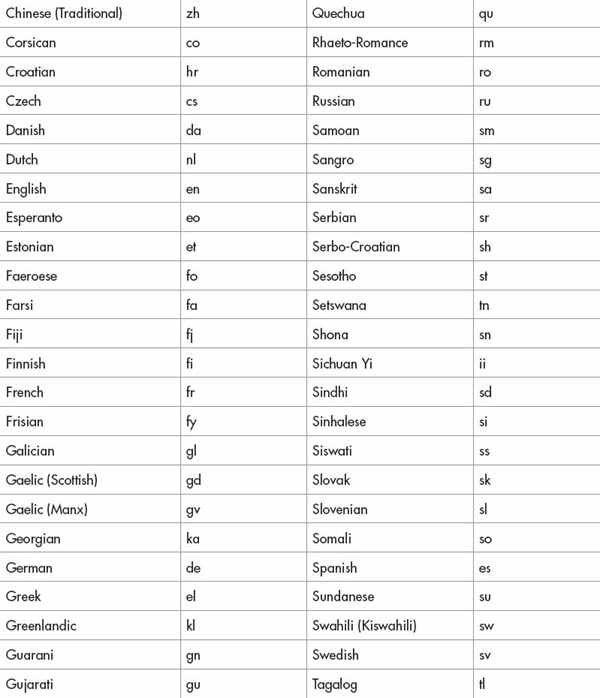
lang Within an EPUB, the reader device should check each XHTML document to determine the language. If the device finds no language attribute, the reading system should check any XML files processed within the document. If nothing is found, the final place to determine the language is from the Open Packaging Format (OPF) file (see Chapter 6).
If an EPUB were to have a default language of French, the attribute would appear as follows:
version This attribute is not part of the <html> tag. Rather, it precedes the <html> tag at the beginning of the XHTML file and specifies the version of the current HTML file. Since most pages are XHTML, the line needed in each XHTML file is
The version comes before the <html> tag at the beginning of the XHTML file.
xmlns An XML namespace for the XHTML document can be specified. Some documentation may say it is required, but the default of xmlns=“http://www.w3.org/1999/xhtml” is used if the attribute is left out.
You will see later in this chapter as we look at and create sample EPUB files that Sigil automatically places the default XML namespace for you. For example:
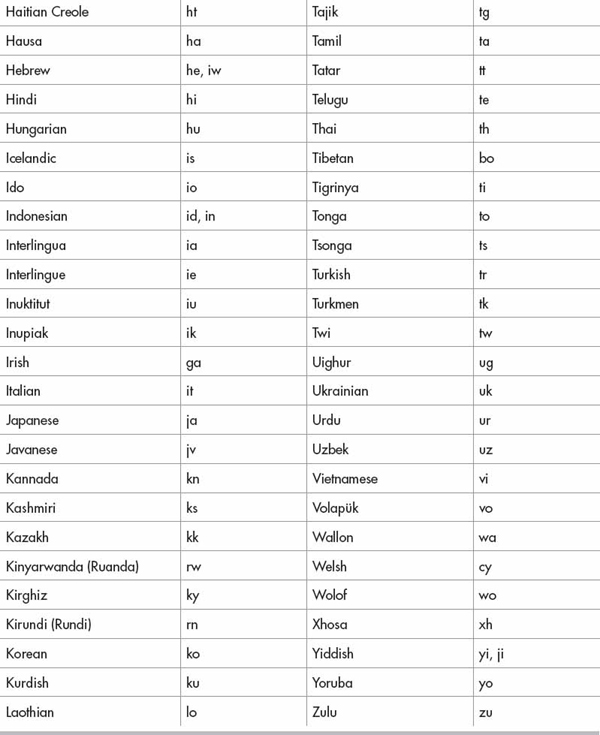
xml:lang If your XHTML file will be treated as an XML file, then you may use the xml:lang attribute. The codes used are the same listed in Table 2-2. If you specify the lang attribute, it is best practice to also specify the xml:lang as well. See the following for the French language:
head
The <head> tag contains all the elements within the first section of the XHTML file called head. Elements within the XHTML head portion inherit any attributes in the <head> tag, as discussed in the previous “html” section.
Keep in mind that within the head section of the file, there must be a <title> element, covered a little later in the chapter. In addition, none of the information in the head section is displayed by the reading system.
The attributes available for the <head> tag are listed in Table 2-3.
Table 2-3 <head> Attributes
Keep in mind that you can use no attributes, all of them, or some of them. Use only what is required so problems do not arise within the EPUB due to conflicting information.
dir The optional dir attribute specifies the direction of the text. It can be left-to-right (ltr) or right-to-left (rtl). By default, the text direction will be used based on the reading device, but these can be overridden.
For example, if we have an XHTML document that will display text in English, the direction would be left-to-right. In this case, the <head> tag would be:
id The id is an attribute that can have a unique value within all the XHTML files within the EPUB. No two id’s can be the same; this is very important. The value cannot be blank, but must have one or more characters. The first character must be a letter (a–z) and followed by numbers, hyphens, underscores, or periods. The value is case-sensitive when referenced by an anchor (<a>).
If we have an XHTML file that is Chapter 1 of a book, we can place the following within the document:
If a table of contents is made for the EPUB, then the listing for Chapter 1 in the table of contents can be linked to the individual file. This works well when each chapter is its own XHTML file.
lang Within an EPUB, the reader device should check each XHTML document to determine the language. If no language attribute is found, the device should check any XML files that have been processed within the document. If nothing is found, the final place to determine the language is from the OPF file (see Chapter 6).
The various language codes are shown in Table 2-2.
If an EPUB were to have a default language of Italian, for example, the attribute would appear as follows:
xml:lang If your XHTML file will be treated as an XML file, then you may optionally use the xml:lang attribute. The codes used are the same listed in Table 2-2. If you specify the lang attribute, it is best practice to also specify the xml:lang. See the following for the Italian language:
title
The <title> tag specifies the title of the XHTML document. Keep in mind that this tag is required, but it can be blank. The EPUB title displayed on the reading device is not taken from this tag. The contents of the tag will have no bearing on the EPUB or be visible to the reader unless they view the XHTML files.
Table 2-4 lists the attributes available for the <title> tag.
Table 2-4 <title> Attributes
id The id is an attribute that can have a unique value within all the XHTML files within the EPUB. No two id’s can be the same; this is important. The value cannot be blank, but must have one or more characters. The character must be a letter (a–z) and followed by numbers, hyphens, underscores, or periods. The value is case-sensitive when referenced by an anchor (<a>).
If we have an XHTML file that is Chapter 2 of a book, we can place the following within the document:
If a table of contents is made for the EPUB, then the listing for Chapter 2 in the table of contents can be linked to the individual file. This works extremely well when each chapter is its own XHTML file.
lang Within an EPUB, the reader device should check each XHTML document to determine the language. If no language attribute is found, the device should check any XML files that have been processed within the document. If nothing is found, the final place to determine the language is from the OPF file (see Chapter 6).
The various language codes are shown in Table 2-2.
If an EPUB were to have a default language of Russian, the attribute would appear as follows:
xml:lang If your XHTML file will be treated as an XML file, then you may use the xml:lang attribute. The codes used are the same listed in Table 2-2. If you specify the lang attribute, it is best practice to also specify the xml:lang. See the following for the Russian language:
body
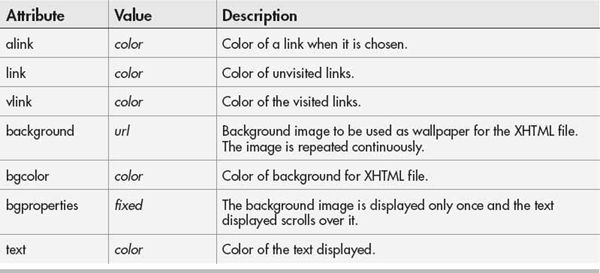
The <body> tag contains all the elements within the second section of the XHTML file called body. The body section contains the elements that display the text that appears on the reading device. The body section is the true heart of the publication. The attributes available for the <body> tag are listed in Table 2-5.
Table 2-5 <body> Attributes
NOTE
Tables with grayed rows are deprecated in HTML 5.0. The attributes can be found in Cascading Style Sheets (CSS) or at least emulated by CSS (see Chapter 3). The attributes are listed in case you come across them in an EPUB.
Text
The text tags will usually make up most of the XHTML tags in a document. These tags are the heart of the EPUB. There are 24 tags in the text module:
 Headers (h1, h2, h3, h4, h5, h6)
 p
p div
div span
span br
br blockquote
 pre
pre address
 code
code kbd
kbd samp
samp var
var cite
cite dfn
dfn q
q abbr
abbr acronym
 em
em strong
Headers (h1, h2, h3, h4, h5, h6)
The header tags are used to start chapters and indicate titles. Text that is similar in function to a title and that needs to stand out should be a header. The headers are larger and bolder than normal text. The size ranges from the largest (h1) to the smallest (h6).
Headers are also used in Sigil to create a table of contents that a reading device can use to allow a reader to maneuver through a book, discussed in Chapter 5.
The attributes available for the header tags are listed in Table 2-6.
Table 2-6 <header> Attributes
p
The paragraph tag, <p>, is used to signify the beginning and ending of a paragraph. The attributes available for the paragraph tag are listed in Table 2-7.
div
The division tag, <div>, is used to select elements and assign them a style using CSS. The <div> tag can include as many other tags as needed, even of different types. Table 2-8 lists the attributes available for the division tag.
Table 2-8 <div> Attributes
span
The <span> tag is used to select a portion of another tag, such as a paragraph, and apply a style to that portion.
br
The <br /> tag is used as a line break and can appear in the center of a paragraph or outside one. The attribute available for the <br /> tag is listed in Table 2-9.
id The id is an attribute that can have a unique value within all the XHTML files within the EPUB. No two id’s can be the same; this is important. The value cannot be blank, but must have one or more characters. The first character must be a letter (a–z) and followed by numbers, hyphens, underscores, or periods. The value is case-sensitive when referenced by an anchor (<a>).
If you include a break between lines and you want to add a link to go to it, you use the following:
blockquote and q
When one or more paragraphs will contain quoted text, the text can be out in paragraph tags and enclosed in <blockquote> tags. The tag should automatically include the quotation marks, so these are not placed within the <p> tags.
When a short quotation is used and the quote remains part of a paragraph, use <q> and not <blockquote>. Remember the <q> tag adds quotation marks.
The attribute available for the <blockquote> and <q> tags is listed in Table 2-10.
Table 2-10 <blockquote> and <q> Attribute
cite The cite attribute is used to specify the source of the quoted material. However, the reading device doesn’t display the cited URL. The cite attribute is for those who may look at the XHTML code within the EPUB file. A sample blockquote would be as follows:
A quote tag looks like this:
pre
Preformatted text is text that is displayed in a fixed-width font. A fixed-width font is one where each character has the same width as all the other characters. The <pre> tag also keeps all spaces and line breaks. XHTML normally drops extra spaces and only preserves one; but in <pre>, multiple spaces are preserved. For example:
address
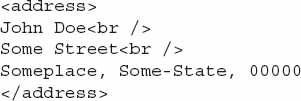
The <address> tag is used to indicate the text is contact information, such as a physical address. Most reading devices will display the address in italics and add a line break before and after the address tags.
The following example shows a physical address:
code
The <code> tag is used to show the specified text is computer code. The code is displayed as a fixed-width font, like addresses, and may be a smaller font.
The following shows a code example:
kbd
The <kbd> tag is used to show that specific keys on the keyboard are pressed. The text is displayed as a fixed-width font.
The following shows a keyboard example:
samp
Sometimes you may need to show sample output from code. The <samp> tag allows you to do this, and the code is a small, fixed-width font.
The following shows an output sample:
var
When variables are used and need to be noted as such, the <var> tag is used. The variable will be italicized.
The following shows a variable sample:
cite
If a citation is made, then the cite tag displays the text in italics. The following shows a cited example:
dfn
When a definition is used, the word or words being defined should be marked. In this case, the <dfn> tag will be displayed in italics. If a device doesn’t render the <dfn> tag properly, you can use CSS to make it appear as you wish.
The following shows a definition example:
abbr and acronyms
Including both abbreviations and the full unabbreviated text can take up a lot of space in a document. An abbr tag can be used instead and assigned the full unabbreviated text. On a web browser, a user can place the mouse over the abbreviation, and a text box will appear with the unabbreviated text in it. Most reading devices will not do this, though. Be aware if your specific reading device renders the <abbr> tag properly.
Similar to abbreviations, including acronyms and the text they represent can take up a lot of space in a document. Like with abbreviations, on a web browser, a user can place the mouse over the acronym and a text box will appear with the full text in it.
Most reading devices will not do this, though. Be aware if your specific reading device renders the <acronym> tag properly.
NOTE
Download the EPUB tester file from the McGraw-Hill website and place the file on your device. Go to the page on the <abbr> tag and see how it works on your device.
The attribute available for the <abbr> and <acronym> tags is listed in Table 2-11.
Table 2-11 <abbr> and <acronym> Attribute
title The title attribute is used to specify the meaning of the abbreviation that shows up in a browser when the mouse is hovered over the abbreviation. Be aware that some devices do not support this feature.
An <abbr> example follows:
An <acronym> example is shown next:
em
The emphasis tag will place emphasis on a word or group of words by displaying it in italicized text. For example:
strong
The strong tag gives the indicated word or words emphasis by displaying it in bold. For example:
Hypertext
The hypertext tag is used to define a link to allow access to other text or information. There is one tag in the hypertext module: a.
a
A link or hyperlink is text or an image that, when selected, moves you to the place to which the link points. The link can refer to another page, a specific place on another page, or a specific place on the same page.
To go to another page, use the href attribute as shown:
To go to a specific place on another page, an id attribute needs to be set up and the href lists the other page, then a pound sign (#), followed by the unique ID name. For example:
To go to a specific spot in the current page, use the following:
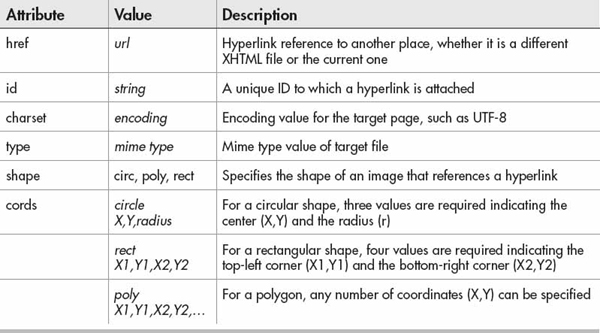
The attributes used with the <a> tag are listed in Table 2-12.
Table 2-12 <a> Attributes
href The reference to the hyperlink in an EPUB will be to another XHTML file or a place within the current file. Some books that have a section of all the footnotes will have a hyperlink from the word or phrase to the footnote entry. The footnote entry will have a link back to the relevant hyperlink, as shown in the example:
The link in the footnote section would look like the following:
If the first example is part of Chapter 1 (called chapter-1.xhtml) and the link has an ID of Link-25, we can link back to it using that ID. The hyperlink is going to a file called Footnotes.xhtml and specifically to an ID called F25. Notice how the link is a superscript (discussed later in this chapter).
The second example is in a file called Footnotes.xhtml with an ID of F25. The link to Chapter-1 and ID Link-25 will take the reader back to the referring hyperlink. By setting it up this way, the reader does not need to maneuver around the EPUB page by page. Footnotes do not need to be placed in the same document. Footnotes may not even appear on the same page the reader is reading. Reading devices allow for font sizes to be changed, so the text on the display may not always be the same.
If the IDs were removed from the example, the reader would be taken to the beginning of the footnotes. When selecting the first example, the reader would then have to scroll down through the pages to find the specific entry needed. When the second hyperlink was chosen, they would be taken back to the beginning of Chapter-1, where they would have to scroll down to find where they had stopped reading.
id The id identifies the specific spot to which the link (href) is referencing. The id is only needed when the link points to a specific spot within a document. Within each XHTML file, the id’s must be unique. If two id’s are identical, the link will take the reader to the first link. An <a> tag can have both an href and an id, as shown:
charset The hyperlink may refer to a file that does not have the same encoding as the current file. The link may specify the encoding of the linked file as follows:
NOTE
Be aware that with some reading devices the filenames for the XHTML files are case-sensitive. If the file is called Footnotes.xhtml, you cannot put footnotes.xhtml in the href statement. It must be Footnotes.xhtml.
type The file type linked to can be specified by its media type. Chapter 1, Table 1-6, and Table 1-7 covered the various media types. For instance, if a reference is made to a picture, a hyperlink can be set to show a JPG file:
shape Text is not the only way to use a hyperlink. Sometimes an image is used as a hyperlink, such as a picture of a button. Three options can be used to specify the shape: rectangle (rect), circle (circ), and polygon (poly).
As an example, let’s assume a square button is used as a link to another file; the code would be as follows:
In this case, the button that is displayed by the image tag (<img>), which is covered later, is a rectangle. When the button is selected, the MonaLisa.jpg file is shown.
coords If an image is to be split up into sections, you can specify coordinates for each hyperlink. The three ways to do this are rectangle, circle, and polygon. Unlike the previous example, you use the object tag (<object>), covered later.
The coordinates for a rectangle are the top-left corner (X1,Y1) and then the bottom-right corner (X2,Y2). If a rectangle is 200 pixels wide and 100 pixels tall, for example, to split the button into two equal sections, you would use the following:
The <map> tag is covered later, but you can see the two cords attributes. The first one starts at the top left (1,1) and ends in the center bottom of the button at (100,100). If this area is selected, a picture of the Mona Lisa appears. If the area of the right half of the image is selected (101,1)-(200,200), then an image of David is shown.
When a circle section is used, the coordinates are the center of the circle (X,Y) and then the radius of the circle (R). So the coordinates of a circle that has a center at point (50,50) and a radius of 30 would be as follows:
If a polygon is used, a set of as many points needed is listed, as shown:
In the previous example, the coordinates would be a big X in a box with a dimension of 100 pixels by 100 pixels. If someone clicked on the X, a picture of Mona Lisa would appear.
List
The list section is a set of tags used to create bulleted lists of items. There are six tags in the list module:
 ol
ol ul
ul li
li dl
dl dt
dt dd
ddol
An ordered list displays items in a specific order, such as a set of directions to get to a specific location. The items must be done in the order given or you will not arrive at your destination.
Table 2-13 lists the attributes used with the <ol> tag.
Table 2-13 <ol> Attributes
ul
An unordered list is used when the order of the items doesn’t matter. For example, a shopping list may have no order and usually doesn’t require it.
The attribute used with the <ul> tag is listed in Table 2-14.
Table 2-14 <ul> Attribute
li
When using an ordered or unordered list, there must be items within it. The list items, indicated by <li>, create the list itself. Once a list is designated as either ordered or unordered and the style type is set, the list can be created.
For example, consider this partial list of books by Jules Verne:
dl, dt, dd
The definition list is used for items such as glossaries. The list is contained by the <dl> tag. The defined term is noted by the <dt> tag and a description of the term is in the <dd> tags.
An example of using a definition list to define EPUB is as follows:
Object
The object section is a set of tags used to embed objects into the document, which is different from a link. As previously discussed in the “Hypertext” section, a link can be selected to go somewhere else in the EPUB. If you wanted to have a picture or some object appear at a specific place in the text, you would use an object and not a link.
There are two tags in the object module:
 object
 param
paramobject
The <object> tag can be used to embed images instead of the <img> tag, which is discussed later in this chapter. For EPUB 3, audio and video can be embedded into the XHTML file as an object.
NOTE
Be aware that some reading devices may not handle the object tag, so the img tag may be preferable.
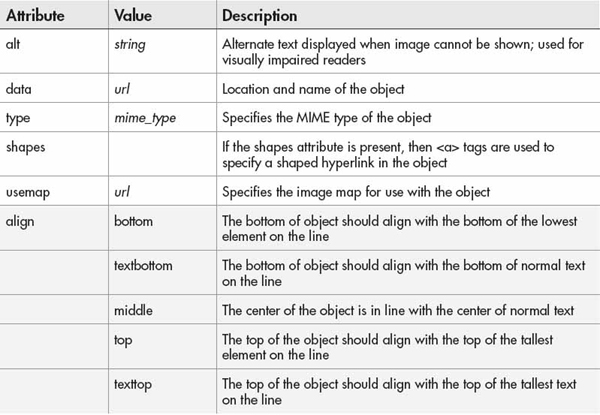
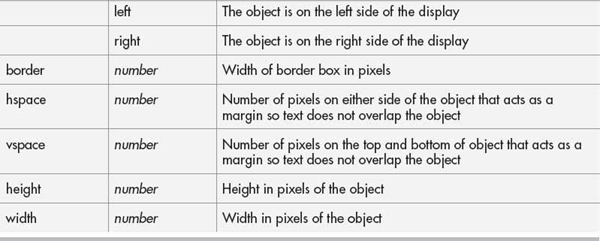
The attributes for the <object> tag are listed in Table 2-15.
Table 2-15 <object> Attributes
alt The alt attribute gives a description of the object that should be displayed when the image cannot be shown. For visually impaired readers, this descriptive text is usually read to describe the object being embedded. The description can be as precise as you wish to make it.
data The value of the data attribute specifies the object, as you can see from the previous examples in the “Object” section. An example of an SVG image is similar, as shown:
type The type of file being embedded by the data attribute can be specified by its media type. Chapter 1, Table 1-6, and Table 1-7 listed the various media types. For instance, an embedded JPG image is illustrated by the following:
shapes If an object has hyperlinks and anchors associated with one or more shaped areas, the shapes attribute must be used. Once the attribute is specified, then the <a> tags are used before the end object tag to reference the shapes. For more information, see the <a> tag in the “Hypertext” section in this chapter.
In this example, the attribute is given as: shapes=“shapes” for the objects tag.
usemap The usemap attribute is needed on an object with anchors and hyperlinks to specify a map name. The name starts with a pound sign (#) and is used in the map tag name attribute without the pound sign to join the object and coordinates for the hyperlinks.
param
The <param> tag can be used to pass parameters to embedded objects that work as controls. For instance, the parameter can be passed to an audio control to play an audio file. The parameters allowed are dependent on the object itself, so documentation for the embedded object should be consulted for proper parameter values and attributes.
Presentation
The presentation tags are used to present the text in various ways. There are seven tags in the presentation module:
 b
b big
big small
small sub
sub sup
sup tt
tt hr
hrb
The bold element is used to display text in bold lettering. There are no attributes for the bold element. An example follows:
big
The <big> tag changes text to at least one font size larger than the normal text. The size it becomes will vary depending on the reading system.
The <big> tag has no attributes, as shown:
small
Similar to the <big> tag, the <small> tag reduces the text by at least one font size, depending on the reading system.
The small tag has no attributes, as shown:
sub
Occasionally subscripts are needed. The <sub> tag has no attributes. An example follows:
sup
Superscripts can be handy for counting and addresses. The <sup> tag has no attributes. An example follows:
tt
The teletype tag is used to emulate teletype text. The text is displayed in a fixed-width font, sometimes called monospace. The tag is rarely used and can be emulated with CSS, as discussed in Chapter 3.
An example follows:
hr
In some books or other publications, a horizontal line or rule is useful to separate sections. Horizontal rules can be manipulated with a few types of attributes, as listed in Table 2-16.
Table 2-16 <hr> Attributes
NOTE
Even though the <hr> tag has attributes, it has no closing tag.
Edit
The edit tags are used to show edited material when numerous people are working on a publication. There are two tags in the edit module:
 del
del ins
insdel and ins
If text has been removed from the publication, the del tag will show a line through the text. The insert tag shows text that has been inserted to correct a deletion if needed and is shown as underlined. Both tags have the same two attributes available (see Table 2-17).
Table 2-17 <del> and <ins> Attributes
cite When some text has been deleted or inserted, the cite attribute points to a document that shows why the text was changed. For example, if an acronym is incorrectly identified, the website can be cited showing the correct acronym.
datetime The datetime attribute shows when the change was made. The format is YYYY-MM-DDThh:mm:ssTZD. There should be four digits for the year, two for the month, and two for the day. The date is then followed by a T, which is necessary, then followed by two digits for the hour on the 24-hour clock, two digits for the minutes, and two for the seconds. Finally, there is a Z showing Zulu or Greenwich Mean Time. An example follows:
Bidirectional Text
The bidirectional text tag is used to specify the direction that the text should be displayed. Not all languages are read from left to right. There is one tag in the bidirectional text module: bdo.
bdo
The bidirectional override tag is used to specify the direction of the text. There is one attribute available for the tag, shown in Table 2-18.
Table 2-18 <bdo> Attribute
The <bdo> tag is usually used when embedding text from a different language. However, there are other uses, as shown:
Table
The table tag is used to create tables in your publication. There are ten tags in the table module:
 table
table tr
tr td
td th
th thead
thead tbody
tbody tfoot
tfoot caption
 col
col colgroup
table
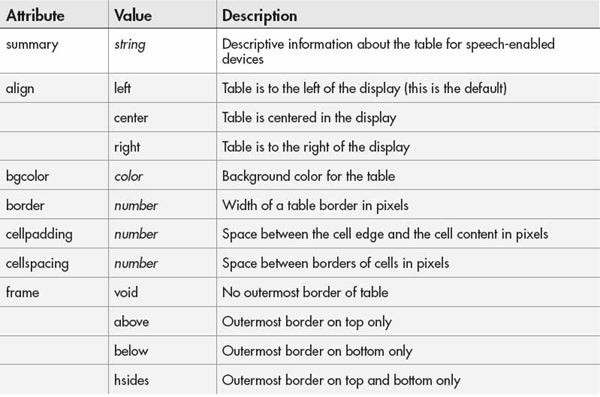
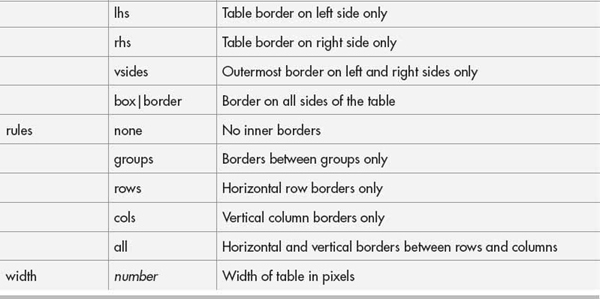
The table tag is used to contain the contents of the table. The table is made up of a header, body, and footer. Generically, the table can consist of only the table rows. The table tag has nine attributes, as listed in Table 2-19.
Table 2-19 <table> Attributes
summary For the visually impaired, text information can be read to them by a device with speech capability. With tables, the device will read the text listed in the summary attribute.
tr
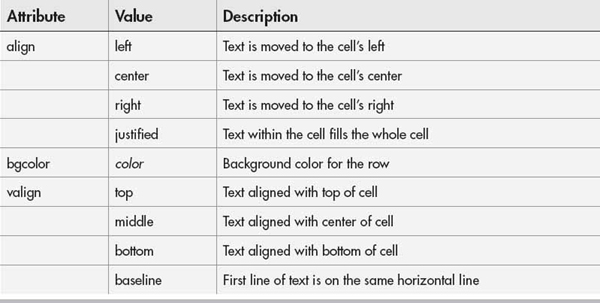
The table row tag is used to contain the data fields that will make up a row of cells for the table. Of course, the <tr> tags are contained within the <table> tags, as previously discussed. The <tr> tag is used for regular rows of data, while the <th> tag is for table headings. (The <th> tag will be covered next.) The <tr> tag has three attributes, listed in Table 2-20.
Table 2-20 <tr> Attributes
td and th
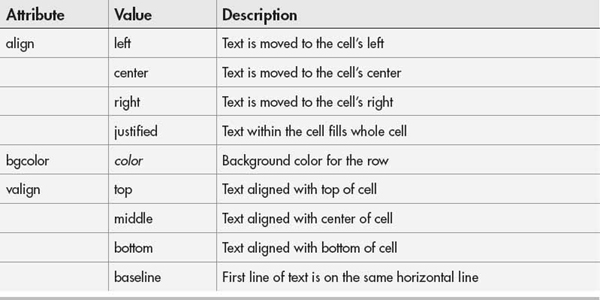
The table data tag (<td>) is used to designate a single cell of text, while the table header tag (<th>) is for the column headers. By default, the data cells are left-aligned in normal text. The headers are bold and horizontally centered by default. These two tags signify different cell types, but have the same attributes. The attributes for the <td> and <th> tags are listed in Table 2-21.
Table 2-21 <td> and <th> Attributes
thead, tbody, tfoot
Tables may not always be set up with a table header, body, and footer. By using these tags, it is easier to manipulate the look of the table’s sections.
NOTE
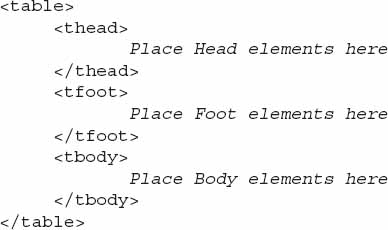
The order of the three tags are <thead>, then <tfoot>, then <tbody>.
The layout is as follows:
The <thead>, <tfoot>, and <tbody> tags have two attributes (see Table 2-22).
Table 2-22 <thead>, <tfoot>, and <tbody> Attributes
caption
Some tables need a caption to specify what the table represents. Where the caption is placed is managed by its single attribute (see Table 2-23), which appears directly after the opening table tag.
Table 2-23 <caption> Attribute
col and colgroup
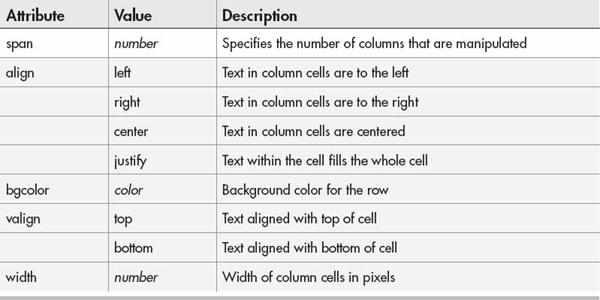
The <col> and <colgroup> tags are used to specify attributes on whole columns instead of individual cells. The <col> tag can be used individually or with <colgroup>. The tags have the same attributes shown in Table 2-24, but may be supported differently on various devices.
Table 2-24 <col> and <colgroup> Attributes
span When attributes need to be specified for a certain number of columns, the span attribute is used to tell how many columns are affected. If span is not used, then the <col> tag only manipulates one column. A separate <col> tag can be used for each column even if the attributes are the same. The tags are placed after the <table> tag but before the <tr> tags. For instance, if the first two columns were supposed to be yellow and the third blue, the following code could be used:
If <colgroup> were to be used, it would be as shown:
Image
The image tag is used to embed images into the publication. This is useful for showing covers, pictures, maps, etc. There is one tag in the image module: img.
img
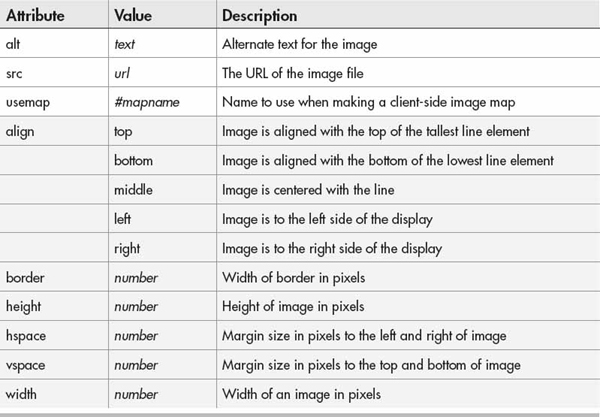
The <img> tag is used either to insert an image into the text or to display it by itself. EPUB 2 supports JPG, GIF, PNG, and SVG images. More details are given about the various formats in Chapter 4. Table 2-25 shows the image attributes.
Table 2-25 <img> Attributes
NOTE
SVG images require a height and width value to match the image size. Otherwise, the image may be displayed with scroll bars. The SVG image will not shrink or enlarge as other image files do when the height and width are changed. Sometimes it may be best to only specify height or width but not both. In the case of an SVG image, however, both should be specified.
alt The alt attribute is used to specify alternate text that is displayed when an image cannot be shown. The alternate text is also used for systems that read the content out loud for visually impaired people. The <alt> attribute is required for the image tag. An example follows:
src The source image is the path and filename of the image itself. The src attribute is required for the tag.
usemap The usemap attribute is needed on an image with anchors and hyperlinks to specify a map name. The name starts with a pound sign (#) and is used in the map tag name attribute without the pound sign to join the object and coordinates for the hyperlinks.
Client-Side Image Map
The client-side image map tags are used to specify portions of an image to use as a hyperlink. There are two tags in the client-side image map module:
 area
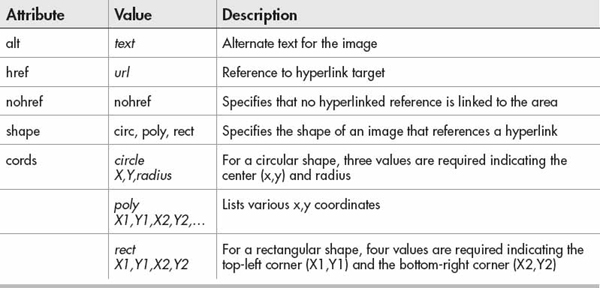
area map
maparea
The area tag is used to signify coordinates that are clickable in an image. There are six attributes for the area tag, as shown in Table 2-26.
Table 2-26 <area> Attributes
alt The alt attribute is used to specify alternate text that is displayed when an image cannot be shown. The alternate text is also used for systems that read the content out loud for visually impaired people. The <alt> attribute is required for the area tag. An example follows:
href The hyperlink reference designates the URL to go to when the specified area is selected. As with other targets within the publication, the link can go to a different XHTML file or to the same XHTML file within the EPUB. If a specific place within the target page is used, it must be preceded by a pound (#) sign, as shown in the example. Usually, specifying a web address in the href attribute should not be done.
nohref Usually, the areas of an image or object will be hyperlinked to a reference point. Some areas could be left with no “hotspot”—that is, no hyperlink. For consistency, every section can be set up, and for the sections with no links, use the nohref attribute. Later, if the section does need a hyperlink, the area is already defined and the nohref can be changed to href.
shape Three options can be used to specify the shape: rectangle (rect), circle (circ), and polygon (poly). In the following example, we have a smiley face that has a hyperlink set up as the left eye. The shape is a polygon with given coordinates and a reference to a place within the document. The polygon can have numerous coordinates, always an even number since one is the X value and the other is the Y value.
coords If an image is to be split up into sections, then you can specify coordinates for each hyperlink. The three ways to do this are by rectangle, circle, or polygon.
The coordinates for a rectangle are the top-left corner (X1,Y1) and then the bottom-right corner (X2,Y2). When a circle section is used, the coordinates are the center of the circle (X,Y) and then the radius of the circle (r). If a polygon is used, a set of the required points is needed, as shown in the example:
map
The map attribute is used to connect the coordinates with the image or object. The connection is made by specifying a name for the usemap attribute and then using the same name for the name attribute. The one attribute is shown in Table 2-27.
Table 2-27 <map> Attribute
name The map name is identical with the usemap name, but without the pound (#) sign. Within the beginning and ending map tags, the coordinates are given for each hyperlinked section, as shown in this example:
Meta Information
The meta information tag is used to place data about the publication within the EPUB file. There is one tag in the meta information module: meta.
meta
The meta tags are not necessary and usually are not used. The metadata is contained within the OPF file covered in Chapter 6. Any metadata contained within the XHTML file can usually be removed when it is already within the OPF. There are two attributes for the meta tag, shown in Table 2-28.
Table 2-28 <meta> Attributes
name and content The name attribute is used to specify a metadata name, such as author, description, etc. The content is the value given to the name, as shown in the example:
NOTE
The metadata is not viewable except in an EPUB editor. The metadata that is displayed to a reader on a reading device is contained in the OPF.
Style Sheet
The style sheet tag is used to specify the Cascading Style Sheet (CSS) rules to apply to a specified tag. There is one tag in the style sheet module: style.
style
The style attribute is used to define a style to apply to the XHTML file. The style tag is used in the <head> section of the XHTML file. Styles can be defined for specific XHTML tags. Each XHTML file can have numerous styles for the various tags, as shown in the example:
In this case, the <h1> header will be red and the paragraphs (<p>) will be green. The CSS styles will be covered in Chapter 3, and linking an external style sheet is covered next in the “Link” section. The <style> tag has two attributes, as shown in Table 2-29.
Table 2-29 <style> Attributes
type The type attribute is used to specify the MIME type of the style sheet. It is set to text/css, as shown in the following example:
Link
The link tag is used to link to an external document; for an EPUB, this is a CSS. There is one tag in the link module: link.
link
The link tag is placed in the <head> section at the beginning of the XHTML file. The best practice for a CSS is to place all the specific styles in a file and link the external sheet to the XHTML file. Multiple style sheets can be created, with none to all linked to an XHTML file. The CSS styles are covered in the next chapter. Table 2-30 lists the four attributes for the link tag.
Table 2-30 <link> Attributes
charset The linked document may be a file that does not have the same encoding as the current file. The character set may be as follows:
href A reference is made to the external resource—in this case, the CSS file. An example is shown:
rel The relationship of the linked resource is a required attribute. It may not seem necessary, but it must exist. The value will be stylesheet to indicate what the CSS is to the current file.
type The MIME type of the CSS file will be text/css. The type attribute should be placed on all link tags.
Base
The base tag is used to specify a directory within the EPUB that will be considered a root. All directory paths given will be based on the specified root. There is one tag in the base module: base.
base
When specifying references from the many tags, a base directory can be specified as the root. If, for instance, the Images directory was specified as the base, then all image references would only require a filename. All other references to files outside of the Images directory would require paths originating from the Images directory, not the current folder.
The base tag is placed in the <head> tags and has one attribute, listed in Table 2-31.
Table 2-31 <base> Attribute
href The hypertext reference (href) is the folder that is to be the root directory for all href attribute values. The reference is initially based on the current location when the href attribute is made. For instance, the Images directory is in the parent folder (..), then the Images folder (/Images).
After this, an image file can be referenced as if the current folder were the Images folder, as shown:
Practice
Probably the best way to get used to the XHTML tags is to use them. Download the EPUB tester.epub file from the McGraw-Hill website and look around in it using Sigil.
NOTE
Sigil should be installed on your system as described in Chapter 1. If you skipped Chapter 1, go back and install it, as well as 7-Zip.
You can download free EPUB files from www.ManyBooks.net and look through these books. It will be easier to learn XHTML as well as Sigil this way. Get accustomed to using Sigil and viewing the XHTML code; it will be an indispensable tool.
Figure 2-1 shows Sigil’s toolbar and specifically two main buttons: Book View and Code View. The Book View is used to view the EPUB in book mode (how it should look on an EPUB device). The Code View shows the EPUB as XHTML code. Switch between the two using f2 as you make changes to see what happens.
Figure 2-1 SIGIL’s toolbar
 Understand differences between HTML and XHTML
 Understand differences between HTML and XHTML
 Learn HTML for EPUB
 Practice XHTML in EPUB files


 html
html head
head title
title body
body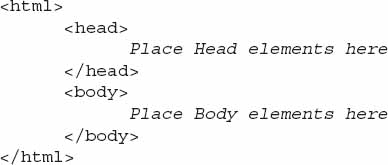





 Headers (h1, h2, h3, h4, h5, h6)
 p
p div
div span
span br
br blockquote
 pre
pre address
 code
code kbd
kbd samp
samp var
var cite
cite dfn
dfn q
q abbr
abbr acronym
 em
em strong






 ol
ol ul
ul li
li dl
dl dt
dt dd
dd


 object
 param
param


 b
b big
big small
small sub
sub sup
sup tt
tt hr
hr


 del
del ins
ins


 table
table tr
tr td
td th
th thead
thead tbody
tbody tfoot
tfoot caption
 col
col colgroup








 area
area map
map