Chapter 8
EPUB 3
 Learn the differences between EPUB 2 and 3
 Understand the new navigation file
 Set up cover images
 Learn MathML
 Understand fixed layouts
 Learn how to embed audio and video
 Cover the ability to synchronize voice and text
 Look into Flash
EPUB 2 has been updated to include new features in the third version, called EPUB 3. For the most part, everything you’ve learned so far still applies to EPUB 3. The changes are mainly additions to allow for new features.
Differences Between EPUB 2 and EPUB 3
Everything you learned up to this point on EPUB 2 is still useful for EPUB 3. The main thing that has been dropped between EPUB versions is the Navigation Center eXtended (NCX) file. The NCX file can be removed from an EPUB 3 file, or it can remain for backwards compatibility.
Removing the NCX file cannot be done in Sigil. If the NCX file is deleted, Sigil will create a new one. It is best to delete it from your compression program. Once deleted, do not forget to remove the NCX line in the Open Packaging Format (OPF) file that lists the NCX in the <manifest>.
You may want to leave the NCX file in in case someone loads the file on an older EPUB 2 device. In this case, most of the information should be bypassed and allow a device to read the information generated by the XHTML code (if anything is generated).
Another difference is the MathML support. MathML is supported under EPUB 2, but it has its flaws. EPUB 3 works better with MathML.
Viewing EPUB 3 Files
The best way to view EPUB 3 files and get the most features supported is to use Readium. Readium is an EPUB 3 viewer created by the International Digital Publishing Forum (IDPF) that runs on Google Chrome and Chromium.
First, you need to install Chrome or Chromium on your system. From Chrome or Chromium, go to www.Readium.org and select Install From Chrome Web Store. Once the extension is installed, you can add EPUB 2 and EPUB 3 files to your Readium library.
When opening an EPUB file in Readium, you may notice in the Library view that the title, author, and EPUB version are listed. Everything up to this point should show “ePUB 2.0.” To change the value to 3.0, the version=“2.0” in the OPF <package> tag should be changed to “3.0.”
New Navigation File
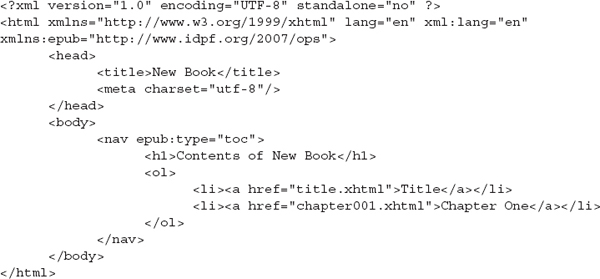
The new navigation file is basically set up as an ordered list (remember that from Chapter 2?). It is an XHTML file containing an order list of each chapter. The file is similar to the following:
The <manifest> entry in the OPF should appear as follows:
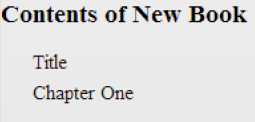
The properties=“nav” shows it is used for navigation, like the NCX, and the filename can be anything you choose with an XHTML extension. The header should include the EPUB XML namespace: xmlns:epub=“http://www.idpf.org/2007/ops. The namespace allows the use of <nav epub:type=“toc”>. As you saw in the previous example, the contents within the <nav> section showed up in the table of contents. Make sure the links to each file are valid using <a href= “ ”>.
Figure 8-1 Sample navigation
Cover Image
Cover images appear when scrolling through your library, and each reading device manages cover images differently. It’s simple to set up cover images in Sigil.
An XHTML file must be created that contains only the image file used for the cover. This can be done in Sigil and saved. Once the image and XHTML file are present in the EPUB, then the OPF needs to be edited.
The first section to add an entry to is the <metadata>, as shown:
Within the <manifest> section, the entry for the XHTML and image file need to be edited as shown:
Finally, the <spine> section of the OPF needs the following:
The IDs, cover and coverimage are case-sensitive and can be any unique names you wish. See any sample file from this chapter for ideas.
NOTE
Setting up the cover image can be done in EPUB 2 files as well, but keep in mind that every device handles cover images differently. Some require the image file to be named the same as the EPUB (except the extension) and placed in the same directory.
MathML
Mathematics Markup Language (MathML) is used to display math and chemical formulas in an EPUB. This can be useful for math and chemistry textbooks that require proper displaying of formulas.
It is possible to create a tag that uses two arguments but each argument consists of only one element. For example, to show a fraction of 1 over x, the code would look like this:
The <mrow> is used to create one argument from many. If the fraction were 1 + x over 5 – x, the code would be:
Each section is placed into an <mrow> making it one argument. Placing the 1 + x in an <mrow> makes it a single argument.
For an item with 1* arguments, such as <msqrt>, the code would be:
Here the x + 3 is a single argument, which is what is required for the square root tag.
The tags should be self-explanatory, except the ⁢. When two values are multiplied together, such as 3 and x to get 3x, the invisible multiplication needs to be placed between them as shown:
NOTE
If you use <mfenced>, the section between the two tags should be in an <mrow>. If <mrow> is not used, then a comma can appear between each child element within the <mfenced>.
For examples of MathML, see the c08-01.epub file (which you can download from www.mhprofessional.com/EPUB). The file also contains an example of a new navigation file called toc.xhtml.
Fixed Layouts
With EPUB 2, text is considered reflowable—that is, it changes as the text size changes. The book also changes as it is read on different devices, which may use different fonts, have a different size display screen, etc. The text will reorder itself as needed to just as most websites do on different browsers and screen sizes.
In EPUB 3, the layout can now be set to a fixed layout where a page will appear the same no matter what device it is on.
The first thing you need to do is set up a viewport in each XHTML file. An entry needs to be added to the <head> section as shown:
For the specific XHTML file, the display coordinates are now (0, 0) in the top-left corner and (1893, 2689) in the lower-right corner. The viewport setting does not change the resolution of your display; it only renumbers the existing values. If an image is displayed on the screen that has dimensions of 1893 ×2689 (in pixels), the image fills the whole screen instead of going out of the display area. The width and height values can be set larger or smaller than the actual display size.
NOTE
If each viewport will be a different size, such as in a comic book–style EPUB, then the dimensions can be set into the XHTML file. If an application such as Pixresizer is used to change all image sizes to the same size, then the viewport can be set in the CSS.
If the CSS is used to set the viewport, then each XHTML file needs to be linked to the CSS and an entry needs to be added as follows:
All XHTML files attached to the CSS style sheet will be set to the same viewport size. Table 8-2 shows other properties available for the CSS viewport.
Table 8-2 CSS @viewport Properties
If needed, some settings can be done in CSS as well as in the XHTML file in case the reading system supports only one method.
In the OPF, an XML namespace needs to be added to the <package>:
The namespace allows the use of rendition: with various properties to manipulate the viewport, as shown in Table 8-3.
Table 8-3 Rendition: Properties
These settings are located in the OPF in the <metadata> section as shown:
In the example, the pages are prepaginated, or set as whole pages. This is especially useful for EPUBs dealing mainly with images or items that must fit on a single page.
The page orientation is set to portrait, so the pages are in a portrait orientation. The spread is set to none, which should prevent two pages from being displayed at once. The none setting may not work on all devices.
Another setting is the page spread, shown in Table 8-4.
Table 8-4 Page-Spread Settings
The page-spread properties allow for a page to be specifically a left or right page when two pages are displayed at once. Page-spread-center should make a page appear alone (that is, it may not be centered) in a two-page display. Some devices may not manage this property properly.
The settings are placed in the OPF spine as follows:
NOTE
If a page must be displayed alone, set it as the same side as the image before and after it, such that all three are page-spread-left.
For an example file, see c08-02.epub, which is a full-screen comic book.
Embedding Audio and Video
Audio and video files can be embedded into the EPUB just as fonts can be embedded. The files can then be played at specific points, with or without reader intervention.
Audio Files
Audio files are specified by the EPUB 3 standard to be an MP3 or MP4 (AAC LC).
NOTE
Converting files to MP4 using Advanced Audio Codec with Low Complexity (AAC LC) will be covered in the section on SMIL.
A listing of media types is shown in Table 8-5, including the audio and video formats. The table is not an exhaustive list and will be changed as the EPUB 3 standard is changed and enhanced.
To embed an audio file using Sigil, right-click the Audio Folder and select Add Existing Files. Choose the audio files you need to add to your EPUB and select Open. The file is now embedded in the EPUB and must be set up in the XHTML file to be played.
NOTE
When an MP4 audio file is used, it must be the Advanced Audio Codec with Low Complexity (AAC LC).
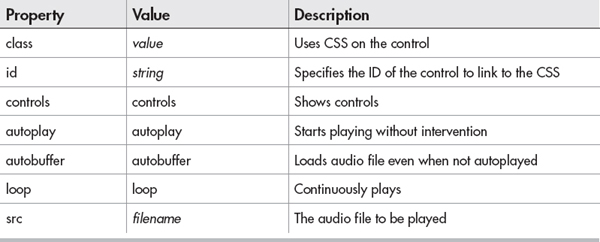
To set up an audio file within the XHTML file, you use the <audio> tag as shown in Table 8-6.
Table 8-6 <audio> Attributes
To play an example audio file named sample.mp3 with visible controls, no autoplay, no autobuffer, and no looping, use the following code:
The example shows the class set to audio1, and an entry in CSS can be used to change its visual effects, as shown in Figure 8-2.
NOTE
The id attribute can be used and the CSS entry would start with #id_name. For example, if the id=“song1”, then the CSS entry would start with #song1.
Notice the untagged line, “This device does not support audio playback.” Naturally, the line is displayed if the device does not support audio playback, but it can be changed as needed. The line should be included when using audio tags in case the file is loaded on a device that either does not support audio or does not support a particular format. In this case, the audio may have multiple fallbacks to assure an included format is supported. Instead of placing the “src” in the <audio> tag, <source> tags are used.
In this example, the device will first try to play the MP3 file, then the MP4 file, and finally the OGG file. If none of the three are supported, then the message is displayed.
Autoplay, autobuffer, and loop are used similar to “controls.” The attribute is placed within the tag followed by an equal sign and the attribute again in quotes, as shown:
NOTE
Do not place invisible audio controls in an EPUB that is set to autoplay and loop since this may annoy the reader.
NOTE
The <audio> tag can be set up in SIGIL, but cannot be played from within SIGIL.
Video Files
For video files, the IDPF does not specify which formats should be supported. Most of the video formats are device dependent, so you may want to check the formats supported by the device for which you are making EPUB files.
NOTE
If you want to support a wide range of devices and reading systems, stick with MP4.
Look back at Table 8-5 for the various media types for video files.
Embedding video files is the same as embedding an audio file, except in Sigil, the video file will be saved to the Video folder.
To play an example video file named sample.mp4 with visible controls, no autoplay, no autobuffer, and no looping, use the following code:
The example shows the class set to video1, and an entry in CSS can be used to change its visual effects, as shown in Figure 8-3.
NOTE
The id attribute can be used, and the CSS entry would start with #id_name. For example, if the id=“clip1”, then the CSS entry would start with #clip1.
To set up a video file within the XHTML file, you use the <video> tag as shown in Table 8-7.
Table 8-7 <video> Attributes
Most of the attributes are the same as with the <audio> tag, except for height, width, and poster. Height and width are self-explanatory since they have been used in many other XHTML tags discussed in Chapter 2. Poster is a URL (“../Images/”) to an image (see Figure 8-4), which is shown when the video is stopped so the box is not empty. The following code demonstrates:
NOTE
Be sure the video window matches the ratio of the poster and the video dimensions so the two fit properly within the video window. If needed, use Pixresizer or a similar application to change the poster dimensions to match the video resolution.
Fallback video files are created the same way as the <audio> fallbacks.
For <audio> and <video> samples, see c08-03.epub.
NOTE
The <video> tag can be set up in Sigil, but cannot be viewed from within Sigil.
Synchronized Multimedia Integration Language
Synchronized Multimedia Integration Language (SMIL—pronounced “SMILE”) is used to synchronize audio with text so the EPUB can read to you. It can be useful in teaching people to read because the words, sentences, and paragraphs can be highlighted as the text is being read.
NOTE
The process of setting up an EPUB with SMIL can be challenging. As with other things in this book, it takes practice.
The best way to start is with Sigil. Like with all EPUB 3 files, start by creating everything you can with Sigil and create the EPUB 2 part of the file. By creating the XHTML, CSS, images, and fonts and embedding the audio and video, you will have completed the majority of the work. You can also validate everything in Sigil to make sure your code is up to the standards. Of course, you may receive errors about audio and video not being referenced, but you can ignore this since you’ll add the code later.
Creating Narrative Files Without a Microphone
If you do not have a microphone, you can use the program Balabolka to create audio files. Balabolka reads text files (as well as HTML and EPUB) using computer voices and can create an audio (MP3) file of what is read. If needed, you can buy add-on voices from various companies to work with Balabolka (SAPI4 or SAPI5).
Once an audio file is made, you’ll need to listen to it and follow along with the text to be sure the word pronunciation is correct. If not, you can change the text within Balabolka so it sounds correct. Re-create the audio file and use it as a narration file. The next step is to label the sections as needed (discussed later in this chapter).
Audacity can do quite a bit with audio, but you really only need the basic functions. Once the program is started, there is a control bar, shown in Figure 8-5, which controls the basic recording and playback.
Figure 8-5 Audacity recording controls
Select record (the circle) and start your narration. Press stop (the square) when done. It is best to always save the project so you can go back and manipulate things if needed. Figure 8-6 shows an example of a narration in Audacity. Once your narration is completed to your satisfaction, the timing needs to be determined.
Figure 8-6 Audacity narration
To select areas of the audio file, use the selector tool as shown in Figure 8-7. The top tool is the selector tool, and the bottom is the magnify tool. The magnify tool allows you to enlarge the wave forms, which does not affect your audio, to be able to select parts easier. Use the play button (the triangle) to play the selection and make sure you selected only the part you need. When the selection is done, press ctrl-b to label it and give it a name that enables you to know what it is. Once all of the sections are labeled, as shown in Figure 8-8, you can start the next step.
Figure 8-7 Audacity selector and magnify tools
Figure 8-8 Labeled Audacity file
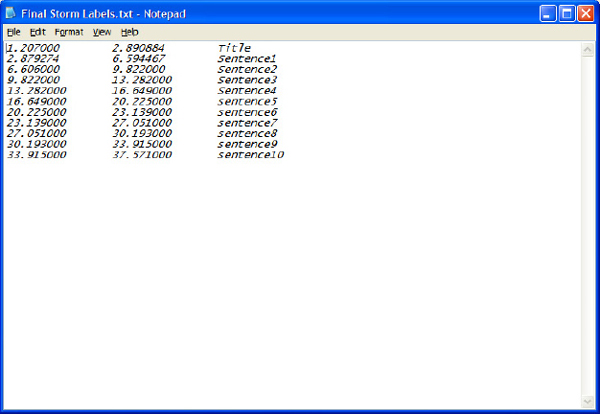
Select Files and then Export Labels. Select where you want the file saved and give it a name. A sample output is shown in Figure 8-9.
Figure 8-9 Sample label output
Export the audio file to MP4 or M4a formats and save it. In your EPUB file, you need to place all audio files in the Audio folder (or whatever folder name you want). Open the EPUB in your compression program to set up the SMIL files.
SMIL File
Figure 8-10 Sample SMIL File
The SMIL file is an XML file that lists the XHTML file to which the audio file is connected as shown:
The XHTML file is located in the Text folder and named final-storm.xhtml. The first section we are looking at has an ID of title. The text at title coincides with the audio file final-storm.mp4 between the sections at 1.207 seconds (clipBegin) and 2.880 seconds (clipEnd).
The <audio> tag shows the ‘src’ file (notice it uses the ‘..’ while the <text> tag does not). If clipBegin is not specified, the default is the beginning (0.000 seconds), and if clipEnd is missing, the default is the end of the audio file.
The section is within a <par> tag. The <par> tag is for parallel, and a <seq> tag does exist, for sequence. The <seq> tags do not need to be used if the <par> tags are used, and vice versa, but the <seq> tags are not used for narration. Each XHTML file and audio file should be placed into separate SMIL files, as shown in the sample EPUB file c08-04.epub.
NOTE
Only use the <par> tags. If the <par> tags are replaced with <seq> tags, the narration will not work.
OPF File
Changes need to be made to the OPF file to accommodate SMIL. The following is a sample:
Notice there is no <DOCTYPE> entry, which Sigil tends to place in the XHTML file (the DOCTYPE should not be used in EPUB 3 files).
One main point to notice is the media duration, as shown:
The first line defines the duration of the audio file portion being used for the overlay associated with the path_overlay file. The second is for the final_overlay file, and the third is the glad_overlay file. The fourth line is the overall duration of all the overlays added together. The fifth line is the name of the narrator. The information is metadata that may or may not be used by the reading system. The final line is the name CSS uses to “highlight” the XHTML file for the appropriate times during the audio playback. The CSS portion is the main reason for the time synchronization (see the sample file c08-04 .epub for synchronization examples).
The time synch can be for whole paragraphs, sentences, or words. The timing can be as granular as you want to make it, as shown in the sample c08-04.epub.
Another main area for SMIL is the OPF <manifest> section, specifically these two lines:
The <item> for the XHTML entry has an attribute media-overlay, which has a value that matches the ID of the SMIL file. The SMIL file has an ID that is used in the XHTML media-overlay to which it is connected. The ID is also used in the <metadata> media:duration line.
XHTML Files
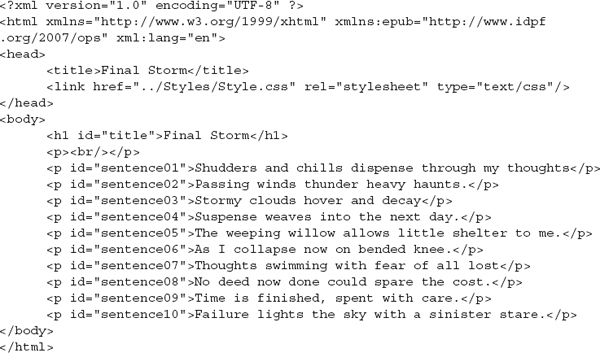
An example of an XHTML is shown here:
Nothing too important here, except the id of each section should coincide with the #name used in the SMIL file. Notice the id can be from a header, paragraph, span, or other tags.
NOTE
Make sure that all id values are unique within an XHTML file, or SMIL will not work. Also make sure that each SMIL entry has an associated id (the id is case-sensitive).
CSS File
The final section is the CSS to which the XHTML file is linked. Only one entry needs to be set to manage the highlighting done to the XHTML text displayed, as shown:
Instead of changing the background color, any CSS settings may be used, such as borders, outlines, colors, bold, underline, etc.
The name used comes from the OPF <metadata> section as follows:
NOTE
The -epub-media-overlay-active name can be changed to any valid CSS name, but needs to be the same in the CSS style sheet.
Putting It All Together
Now SMIL may seem a bit jumbled, but let’s try to put this together. First look at Figure 8-11, and then we’ll cover each section of code.
Figure 8-11 The big picture (SMIL)
In the OPF, the XHTML is connected to the SMIL file as shown:
The duration of each audio file is set, as well as all of them together:
The name of the narrator is specified:
Finally, the CSS class name is specified for the highlighting:
Next, the XHTML has every line to be highlighted specified by a unique id as shown:
The third area of SMIL is the actual SMIL file, which connects an XHTML file (and an id) with an audio file and the timing. Listed are two sections:
The XHTML file is listed with the id as highlighted. The next line lists the audio file connected with the XHTML file and its specified start and stop times for the clip.
Finally, there is the CSS entry to match the listing in the OPF. The entry can be manipulated with any CSS style to highlight the specified text being narrated, as shown:
NOTE
Do not forget the period in front of the style name in the CSS file.
SMIL Problems
With many files involved in the SMIL setup, many things can go wrong. Look over the previous section “Putting It All Together,” and compare it to your file sections. If you still have problems, consider the following:
 Make sure your audio file actually plays audio.
 Check all of the filenames in the OPF and SMIL (EPUB 3 is case-sensitive).
 Check that the id names in the XHTML file match the names in the SMIL file.
 Make sure the XHTML and SMIL files are connected in the OPF.
 Check that the CSS style name matches the one in the OPF.
 Be sure the XHTML files are linked to the CSS file.
Text to Speech
At the time of the writing of this book, text to speech (TTS) has not been supported. Hopefully, it will be supported within an EPUB 3 device or reading system in the near future.
According to the IDPF standard, the basic setup is similar to SMIL. The difference is that the <audio> tags are removed from the SMIL files along with the duration settings in the OPF (leave the <meta property=“media:active-class”>-epub-media-overlay-active</meta> line for CSS interaction). Of course, the audio files in the OPF will not be needed since the reading system will supply the narration audio.
NOTE
When the TTS is implemented, this book can be revised to include the appropriate information, as it may be different from what has been suggested.
Flash Animation
The Flash file is embedded into the Misc folder, or whichever folder you want, just as you embed fonts, images, sound, and audio files.
Once the Flash file is in the EPUB, the OPF needs to be checked to verify that the media-type is correctly set to application/x-shockwave-flash.
To place the file into the XHTML file, the <object> and <param> tag are used, as was covered in Chapter 2.
The <object> tag lists the source file in the data attribute. The type is listed again with the type attribute. The width attribute gives the value of the width of the window in which the Flash file is viewed.
NOTE
For most items like this and the <video> tag, either width or height can be used and the other dropped. The one dropped should be similar to auto and will keep the aspect ratio of the original window size.
The <param> tag is used to show that the file is a movie, set to loop continuously and play automatically.
 Learn the differences between EPUB 2 and 3
 Learn the differences between EPUB 2 and 3
 Understand the new navigation file
 Set up cover images
 Learn MathML
 Understand fixed layouts
 Learn how to embed audio and video
 Cover the ability to synchronize voice and text
 Look into Flash









 Make sure your audio file actually plays audio.
 Check all of the filenames in the OPF and SMIL (EPUB 3 is case-sensitive).
 Check that the id names in the XHTML file match the names in the SMIL file.
 Make sure the XHTML and SMIL files are connected in the OPF.
 Check that the CSS style name matches the one in the OPF.
 Be sure the XHTML files are linked to the CSS file.

