DIPS
Toasted Corn and Black Bean Salsa
Whipped Cashew Dip with Roasted Red Peppers and Olives
Whipped Cashew Dip with Chipotle and Lime
Whipped Cashew Dip with Sun-Dried Tomatoes and Rosemary
SNACKS
Spicy Sesame-Ginger Kale Chips
Barbecue-Spiced Roasted Chickpeas
Spanish-Spiced Roasted Chickpeas
Chewy Granola Bars with Hazelnuts, Cherries, and Cacao Nibs
Chewy Granola Bars with Walnuts and Cranberries
Popcorn with Warm Spices and Garlic
Popcorn with Spicy Cinnamon Sugar
Tomato, Olive, and Basil Skewers 
Smoky Shishito Peppers with Espelette and Lime
Shishito Peppers with Fennel Pollen, Aleppo Pepper, and Lemon
Shishito Peppers with Mint, Poppy Seeds, and Orange
Buffalo Cauliflower Bites with Vegan Ranch Dressing
TOPPED, STUFFED, AND FILLED
Bruschetta with Artichoke Hearts and Basil
Bruschetta with Smashed Minty Peas, Chili, and Lemon Zest
Crispy Polenta Squares with Olives and Sun-Dried Tomatoes
Cashew Ricotta Tartlets with Celery-Olive Topping
Cashew Ricotta Tartlets with Tomato-Basil Topping
Butternut Squash Tartlets with Almonds, Pomegranate, and Mint
Stuffed Grape Leaves with Currants and Pine Nuts
RECIPE EXTRAS
FAST (45 minutes or less total time)
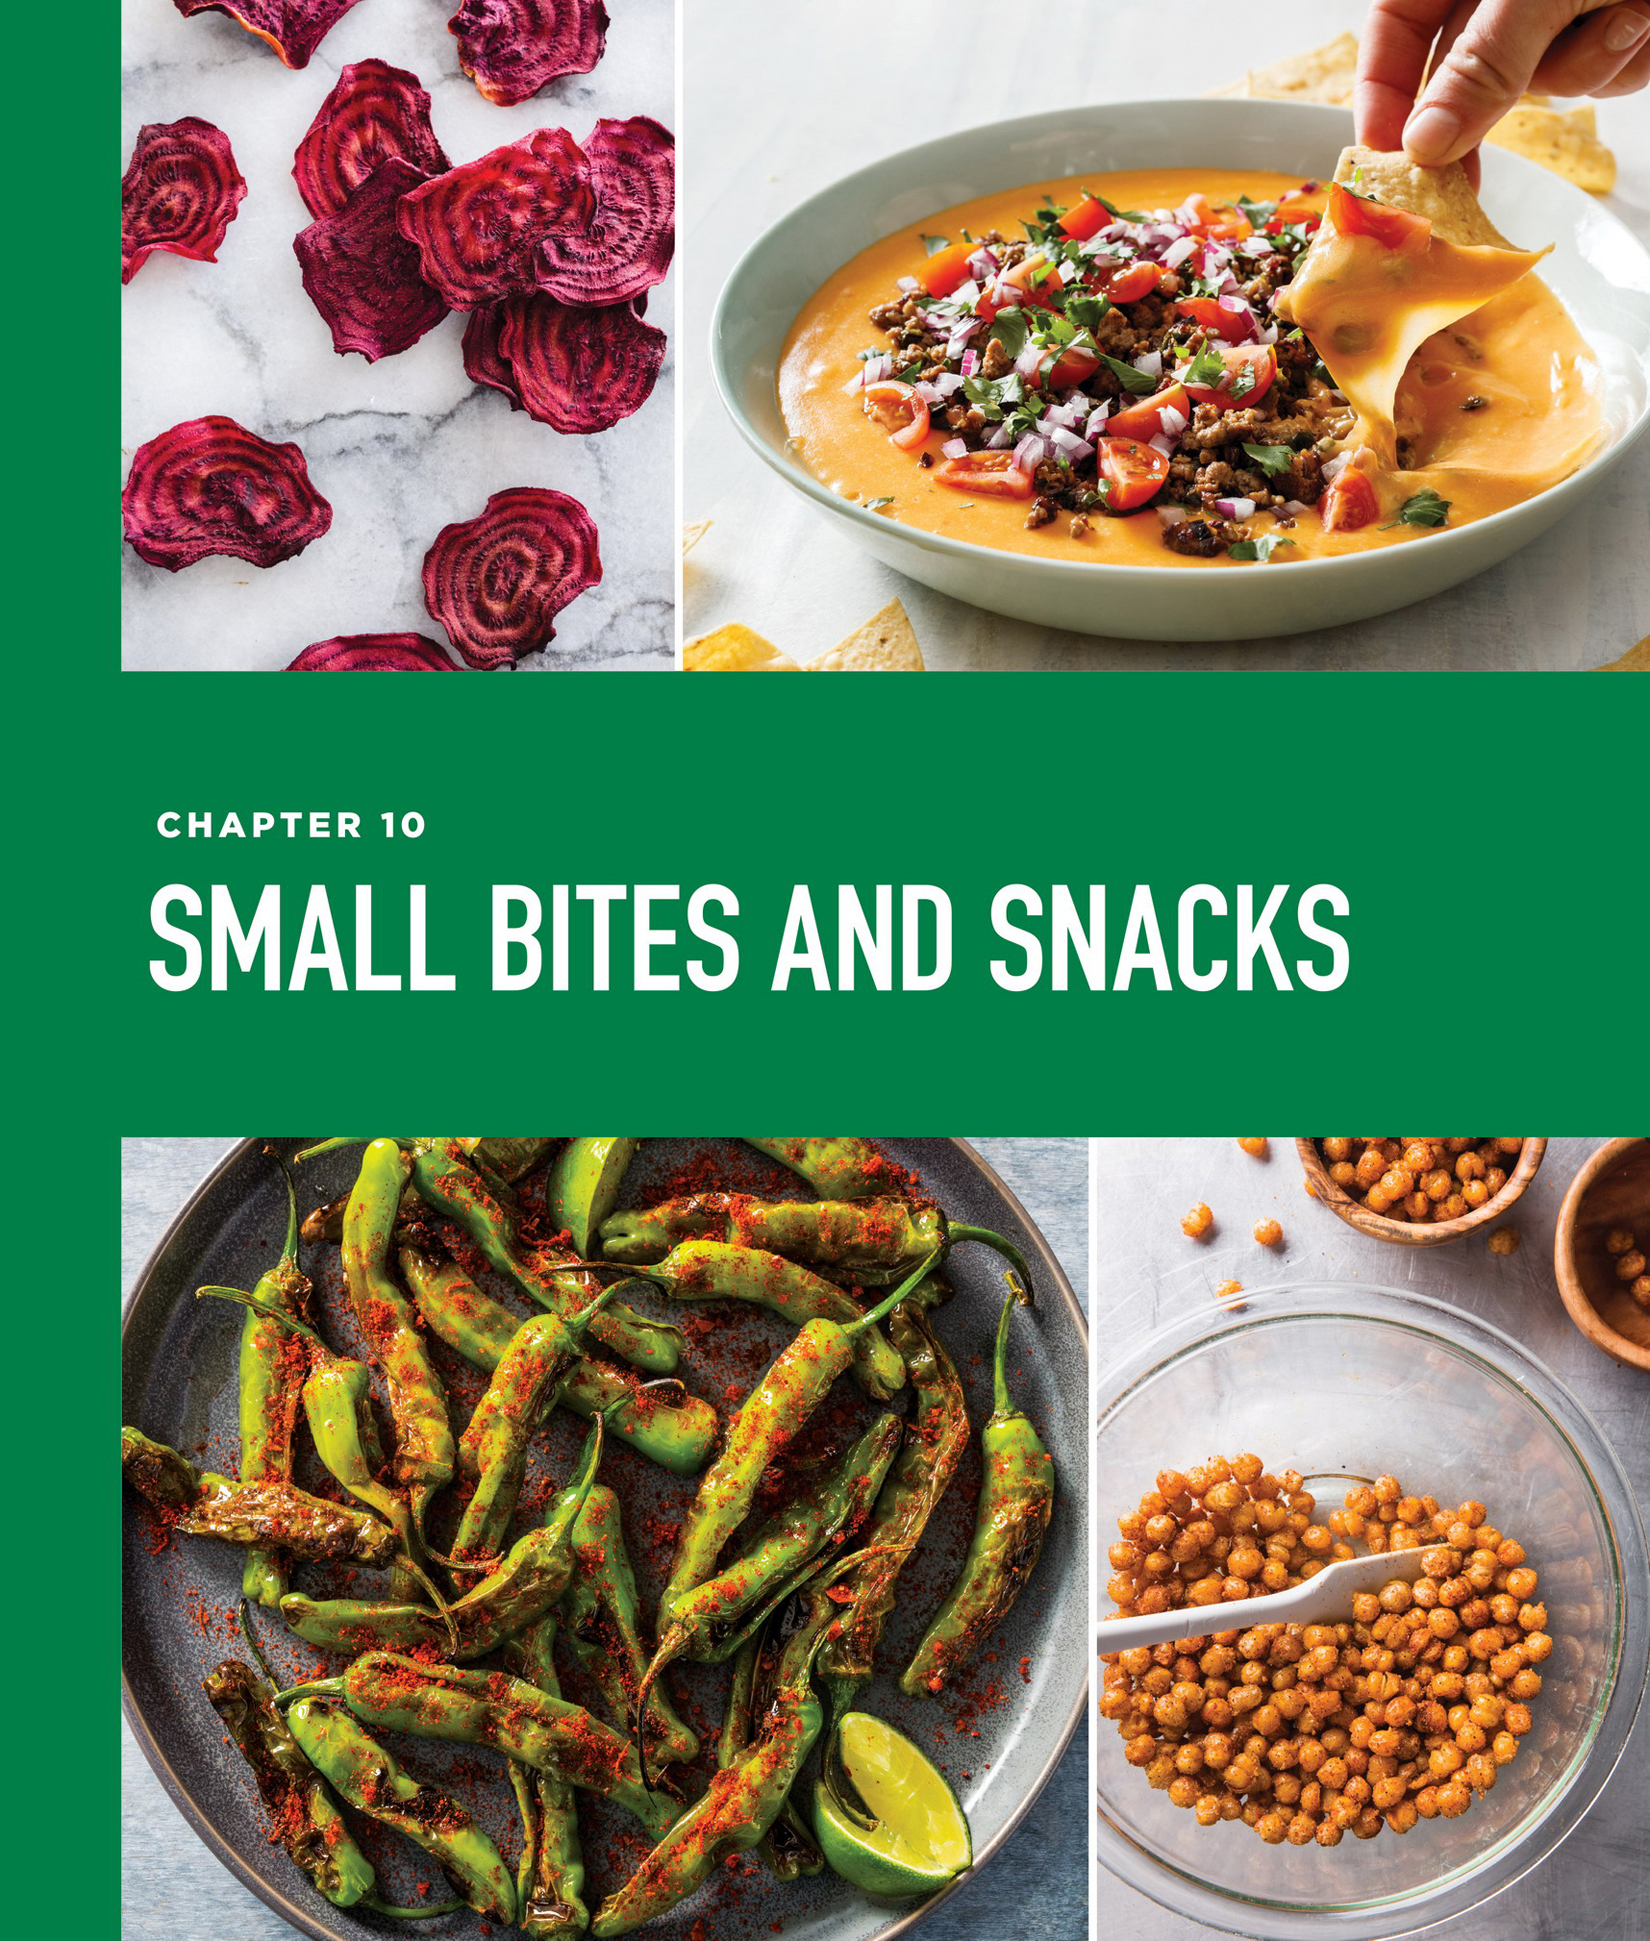
Photos: Beet Chips; Meaty Loaded Nacho Dip; Spiced Roasted Chickpeas; Smoky Shishito Peppers with Espelette and Lime

Serves 8 (Makes 2 cups)
Why This Recipe Works Vegetables can be used to make hummus just like beans. While we love traditional chickpea hummus, we thought it would be fun to create a new rendition that turned hummus on its head, keeping the hallmark flavorings (tahini, olive oil, garlic, and lemon juice) but switching out the legumes for a vegetable. So in their place, we turned to earthy, vibrant sweet potatoes. We aimed to bring out the sweet potatoes’ flavor by figuring out the best cooking method as well as the ideal balance of complementary ingredients. To keep things speedy, we opted to microwave rather than bake the sweet potatoes—after all, dip shouldn’t take more than an hour to make. Happily, microwaving the potatoes resulted in flavor that was nearly as intense as when we roasted them. Just ¼ cup of tahini was enough to stand up to the spuds without overwhelming the hummus. To round out the flavor of the hummus, we added warm spices: paprika, coriander, and cumin. The addition of chipotle and a clove of garlic curbed the sweetness and accented the spices, while some lemon juice brought the flavors into focus. We liked this hummus so much we developed a variation with another root vegetable: earthy-floral parsnips.
1 pound sweet potatoes, unpeeled
¼ cup tahini
3 tablespoons extra-virgin olive oil, plus extra for drizzling
¾ cup water
2 tablespoons lemon juice
¾ teaspoon table salt
1 garlic clove, minced
1 teaspoon paprika
½ teaspoon ground coriander
¼ teaspoon ground cumin
¼ teaspoon chipotle chile powder
1 tablespoon toasted sesame seeds (optional)
1. Prick sweet potatoes several times with fork, place on plate, and microwave until very soft, about 12 minutes, flipping potatoes halfway through microwaving. Let potatoes cool for 5 minutes. Combine tahini and oil in small bowl.
2. Slice potatoes in half lengthwise and scoop flesh from skins; discard skins. Process sweet potato, water, lemon juice, salt, garlic, paprika, coriander, cumin, and chile powder in food processor until completely smooth, about 1 minute, scraping down sides of bowl as needed. With processor running, add tahini mixture in steady stream and process until hummus is smooth and creamy, about 15 seconds, scraping down bowl as needed. Season with salt and pepper to taste.
3. Transfer hummus to bowl, cover with plastic wrap, and let sit at room temperature until flavors meld, about 30 minutes. Drizzle with oil and sprinkle with sesame seeds, if using. Serve. (Hummus can be refrigerated for up to 5 days; stir in 1 tablespoon warm water to loosen if necessary before serving.)
VARIATION
Look for tender, thin parsnips; large parsnips can taste bitter.
Substitute 1 pound parsnips, peeled and cut into 1-inch lengths, for sweet potatoes. Microwave parsnips in covered bowl until tender, about 10 minutes. Transfer parsnips to food processor and proceed with recipe.
Serves 10 (Makes 2½ cups)
Why This Recipe Works Bean dips are often offered as the healthy alternative on a party spread, but they tend to disappoint unless they are loaded with cheese. We wanted to create a dairy-free bean dip that was healthy but still had our guests coming back for more, so we took it in a Mediterranean direction. We processed cannellini beans with just enough extra-virgin olive oil for richness and binding, along with a shallot, lemon juice, and water. We stirred in water-packed jarred artichokes, which gave our dip a nicely chunky texture. Some lemon zest and parsley further brightened our zesty dip. Be sure to puree the beans to a smooth texture before stirring in the artichokes.
1 (15-ounce) can cannellini beans, rinsed
3 tablespoons extra-virgin olive oil
1 shallot, minced
1 tablespoon water
1½ teaspoons grated lemon zest plus 1½ tablespoons juice, divided, plus extra juice for seasoning
1 garlic clove, minced
½ teaspoon table salt
⅛ teaspoon pepper
Pinch cayenne pepper, plus extra for seasoning
9 ounces jarred artichoke hearts packed in water, rinsed, patted dry, and chopped fine
1 tablespoon minced fresh parsley or mint
Process beans, oil, shallot, water, lemon zest and juice, garlic, salt, pepper, and cayenne in food processor until smooth, about 30 seconds, scraping down sides of bowl as needed. Transfer dip to medium serving bowl and stir in artichokes and parsley. Cover and refrigerate until flavors meld, about 1 hour. Season with extra lemon juice and cayenne to taste before serving. (Dip can be refrigerated for up to 2 days; bring to room temperature before serving.)
Serves 8 (Makes 2 cups)
Why This Recipe Works When roasted, eggplant turns creamy and soft, making it the perfect base for the beloved Middle Eastern dip baba ghanoush. Before roasting the eggplants, we pricked their skin to encourage moisture to evaporate and to prevent the skin from splitting open, then roasted them whole in a very hot oven until the flesh was meltingly tender. To avoid a watery dip, we scooped the hot pulp into a colander to drain before putting it into the food processor with the other ingredients. We kept the flavorings true to tradition: lemon juice, olive oil, garlic, and tahini. A drizzle of olive oil and a sprinkle of parsley finished our baba ghanoush. In addition to serving as a dip, this makes a great sandwich spread (or filling). Look for eggplants with an even shape for this recipe, as bulbous eggplants won’t cook evenly.
2 eggplants (1 pound each), pricked all over with fork
2 tablespoons tahini
2 tablespoons extra-virgin olive oil, plus extra for serving
4 teaspoons lemon juice
1 small garlic clove, minced
¾ teaspoon table salt
¼ teaspoon pepper
2 teaspoons chopped fresh parsley
1. Adjust oven rack to middle position and heat oven to 500 degrees. Place eggplants on aluminum foil–lined rimmed baking sheet and roast, turning eggplants every 15 minutes, until uniformly soft when pressed with tongs, 40 minutes to 1 hour. Let eggplants cool for 5 minutes on sheet.
2. Set colander over bowl. Trim top and bottom ¼ inch of eggplants, then halve eggplants lengthwise. Using spoon, scoop hot pulp into colander (you should have about 2 cups pulp); discard skins. Let pulp drain for 3 minutes.
3. Transfer drained eggplant to food processor. Add tahini, oil, lemon juice, garlic, salt, and pepper. Pulse mixture to coarse puree, about 8 pulses. Season with salt and pepper to taste.
4. Transfer to serving bowl, cover tightly with plastic wrap, and refrigerate until chilled, about 1 hour. Season with salt and pepper to taste, drizzle with extra oil to taste, and sprinkle with parsley before serving. (Dip can be refrigerated for up to 24 hours; bring to room temperature before serving.)

Serves 6 to 8 (Makes about 2 cups) 
Why This Recipe Works Everyone loves buttery avocados, as healthful as they are rich. For a supercharged guac that would never become tired on a party spread, we incorporated pomegranate seeds and pepitas for a lively interplay of flavors and textures. First, we minced our seasonings to a paste to ensure that the flavors would be evenly distributed. Mashing three diced avocados with a whisk until cohesive but still chunky gave our guacamole the perfect creamy yet rustic texture. We combined the pomegranate seeds and pepitas with scallions and cilantro leaves and scattered the mixture over the top. The result was a creamy guacamole punctuated with pops of bright fruit and earthy crunch. For more spice, mince the ribs and seeds from the chile with the other ingredients. A mortar and pestle can be used to process the aromatics.
3 tablespoons pomegranate seeds
2 scallions, sliced thin
2 tablespoons roasted pepitas
2 tablespoons fresh cilantro leaves plus 2 tablespoons chopped
2 tablespoons finely chopped onion
1 serrano chile, stemmed, seeded, and chopped fine
¼ teaspoon grated lime zest plus 5 teaspoons juice, divided
1 teaspoon kosher salt
3 ripe avocados, halved, pitted, and cut into ½-inch pieces
1 plum tomato, cored, seeded, and minced
1 teaspoon extra-virgin olive oil
1. Combine pomegranate seeds, scallions, pepitas, and cilantro leaves in bowl.
2. Chop onion, chile, and lime zest with salt until very finely minced and homogeneous. Transfer to second bowl and stir in 1½ tablespoons lime juice. Add avocado and, using sturdy whisk, mash and stir mixture until well combined with some ¼- to ½-inch chunks remaining. Stir in tomato and chopped cilantro and season with salt to taste.
3. Toss pomegranate-pepita mixture with oil and remaining ½ teaspoon lime juice. Transfer guacamole to serving bowl and top with pomegranate-pepita mixture. Serve.

1. Strike pit with chef’s knife. Twist blade to remove pit. Use wooden spoon to knock pit off blade.
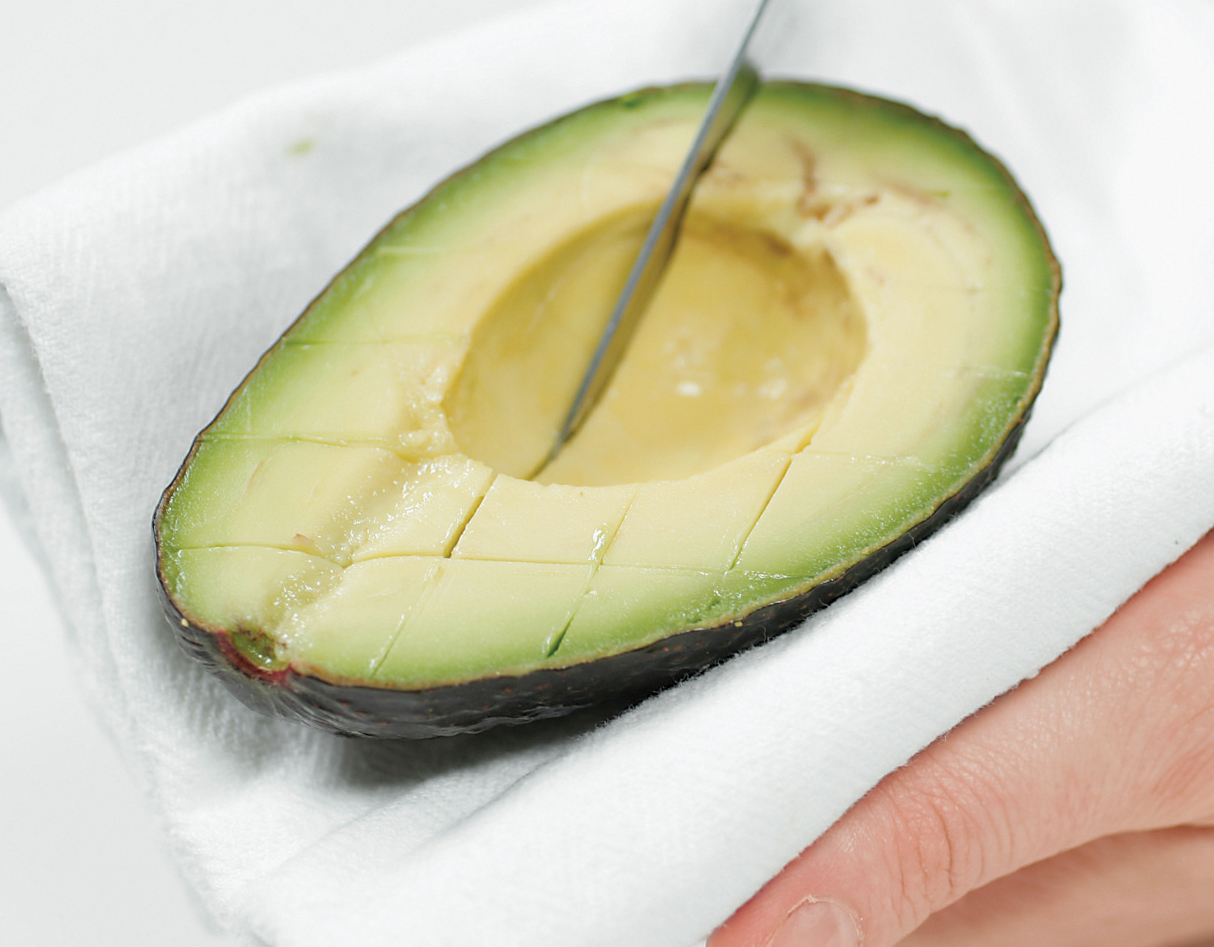
2. Secure avocado half with dish towel and use paring knife to make ½-inch crosshatch slices into flesh without cutting into skin.
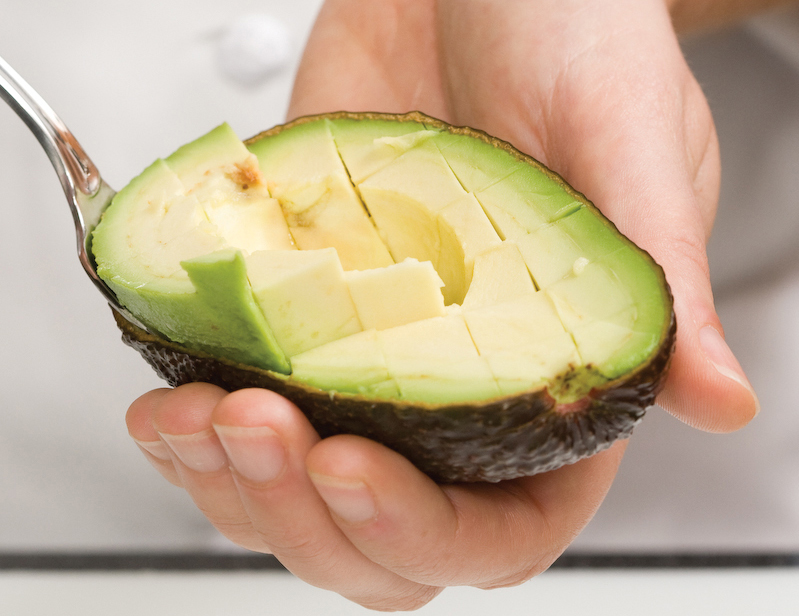
3. Insert spoon between skin and flesh to separate them. Gently scoop out avocado cubes.
Serves 12 (Makes about 3 cups)
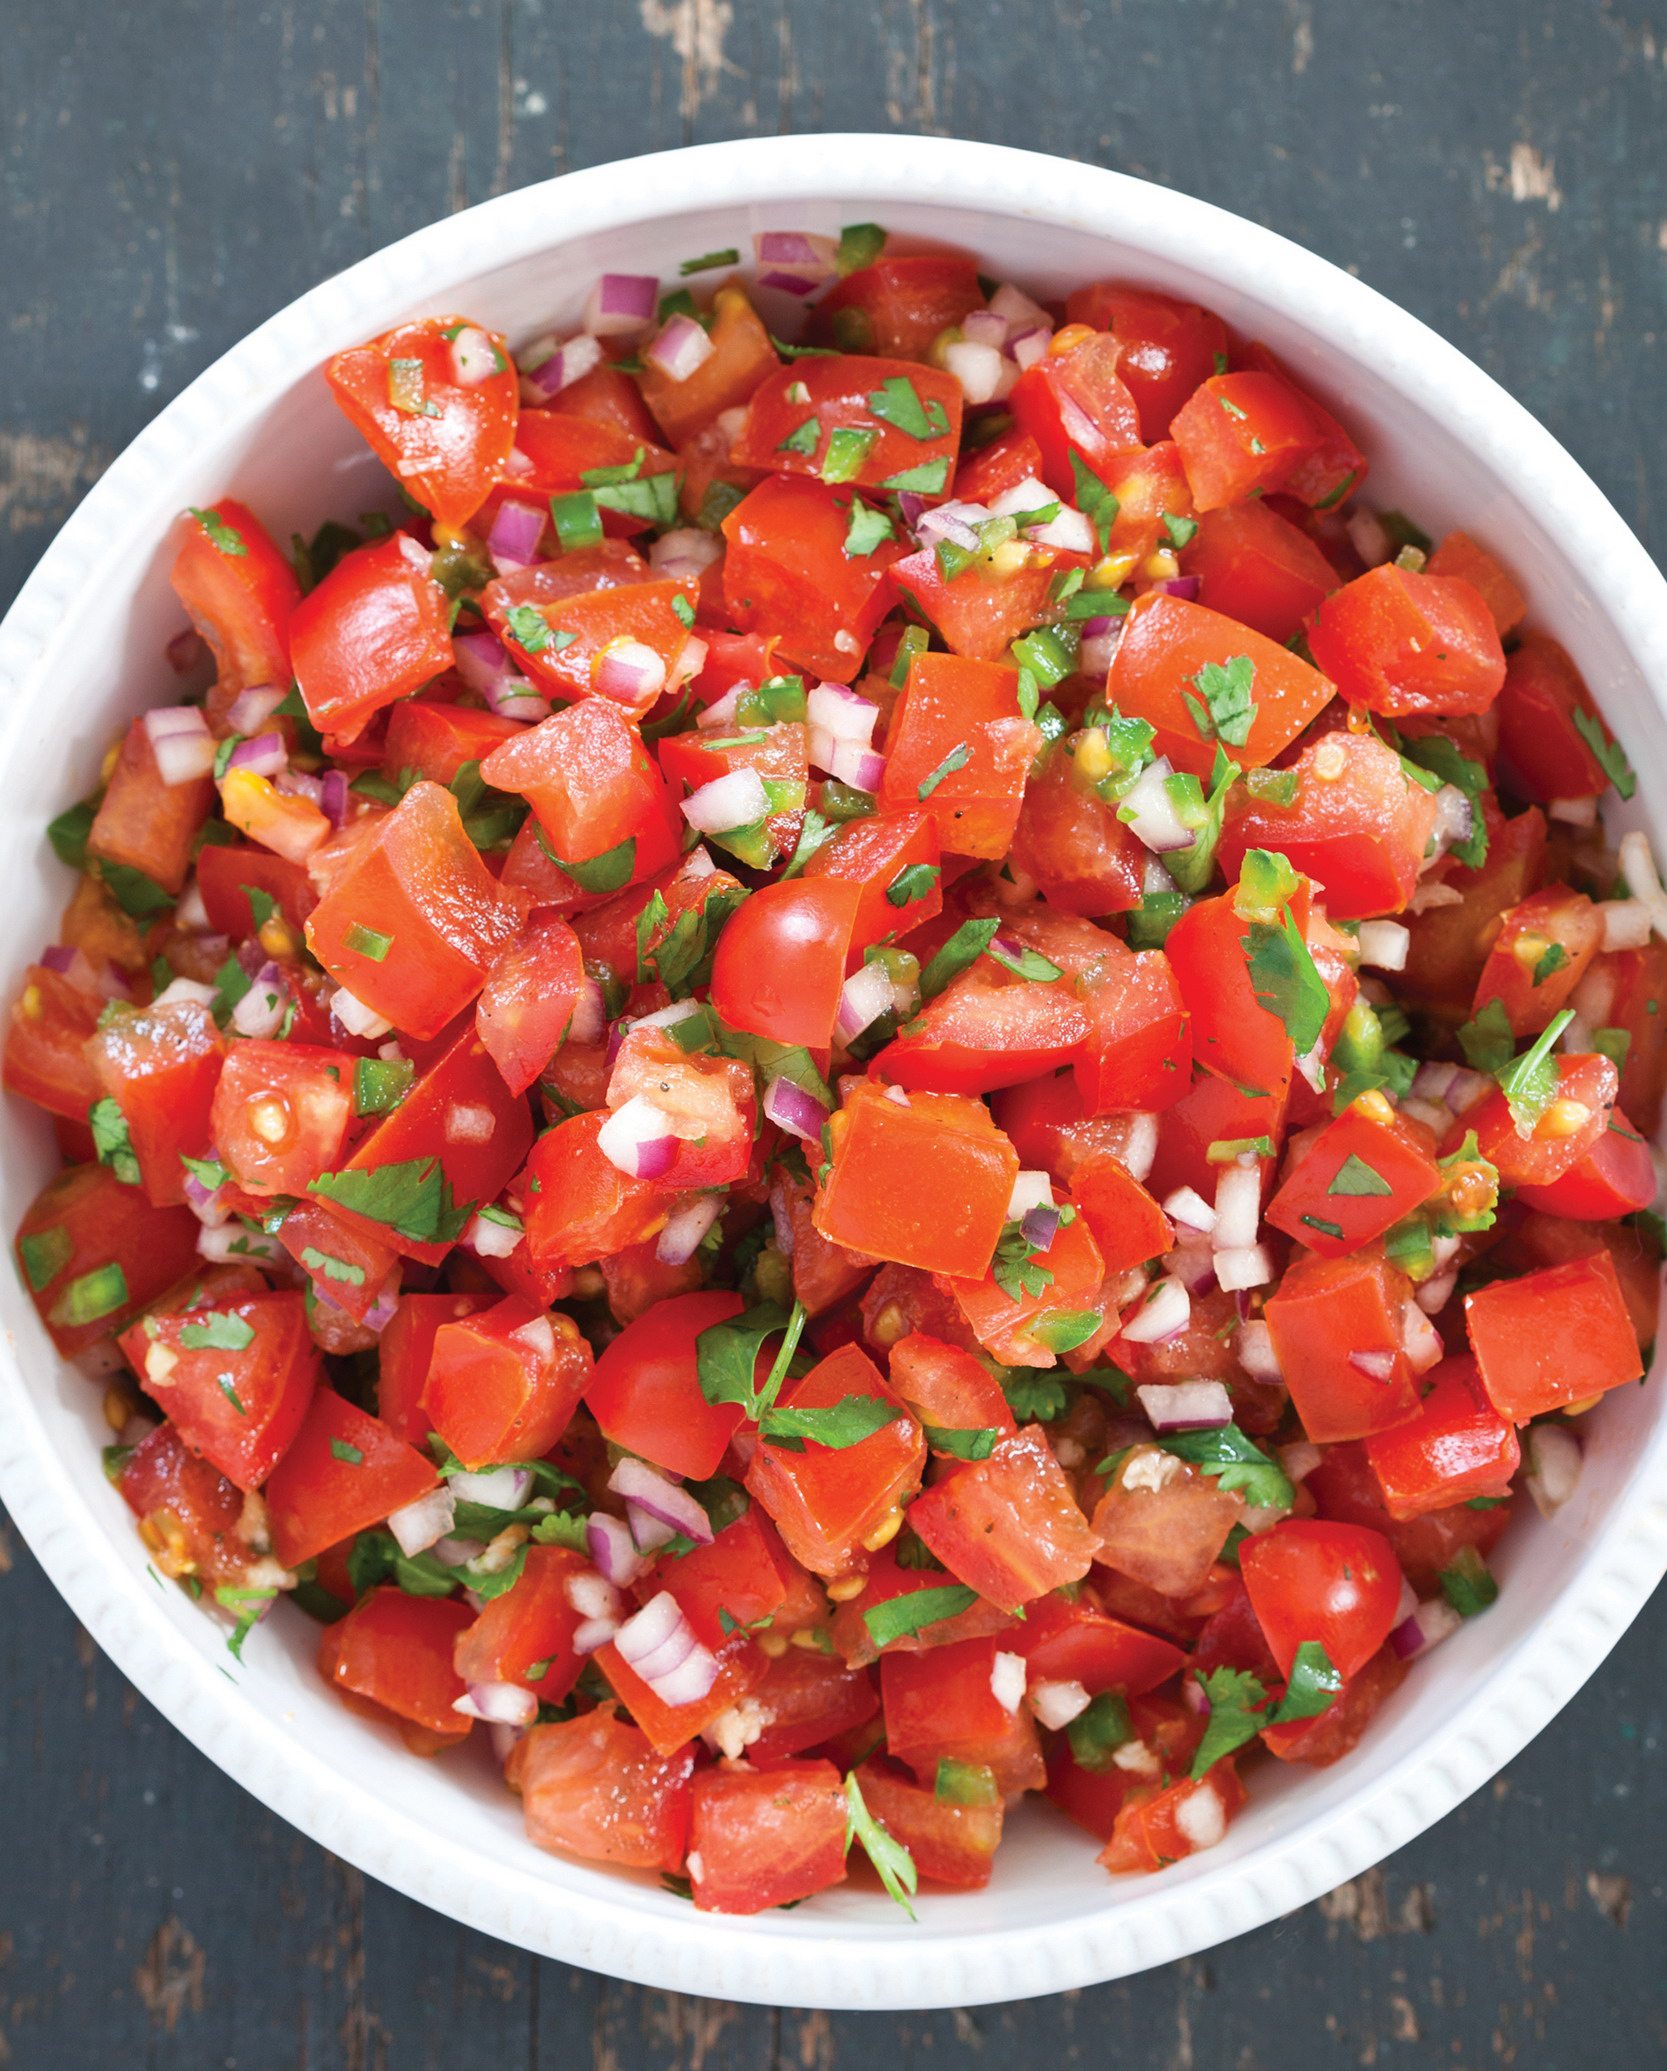
Why This Recipe Works A fresh, chunky salsa emphasizing the tomatoes is a simple but great accompaniment to a big bowl of tortilla chips. To solve the problem of watery salsa, we diced the tomatoes and let them drain in a colander. This put all our tomatoes, regardless of ripeness or juiciness, on a level playing field. Next, we chose red onion over yellow or white for its pretty color and milder flavor, and jalapeño chile for its slight vegetal flavor and moderate heat. Lime juice lent some acidity and tasted more authentic (and better) than vinegar or lemon juice. We found that the best, and simplest, way to combine the ingredients was to layer each chopped ingredient on top of the tomatoes while they drained. Once the tomatoes were ready, we gave the mixture a few stirs before finishing the salsa with the lime juice, salt, pepper, and sugar. The amount of sugar and lime juice you will need depends on the ripeness of the tomatoes. To make this salsa spicier, add the seeds from the chile. The salsa can be made 2 to 3 hours in advance; add the lime juice, salt, and sugar just before serving.
1½ pounds tomatoes, cored and cut into ½-inch pieces
½ cup finely chopped red onion
¼ cup chopped fresh cilantro
1 large jalapeño chile, stemmed, seeded, and minced
1 small garlic clove, minced
2 teaspoons lime juice, plus extra to taste
½ teaspoon table salt
Pinch pepper
Sugar
1. Place tomatoes in colander set over large bowl and let drain 30 minutes. As tomatoes drain, layer onion, cilantro, jalapeño, and garlic on top.
2. Shake colander to drain excess tomato juice. Discard juice, wipe out bowl, and transfer tomato mixture to bowl. Stir in lime juice, salt, and pepper. Season with sugar and extra lime juice to taste before serving.
Serves 8 (Makes about 2 cups)
Why This Recipe Works When you’re in the mood for a different kind of salsa, try this tomato-free one (which is still chock-full of vegetables). In addition to serving it with tortilla chips, you can pile this satisfying salsa onto rice or even use it as a taco filling. The combo of fresh toasted corn kernels and chopped red bell pepper gives the salsa bright color and contrasting vegetable flavor, and the black beans bring hearty texture and protein, while jalapeño, scallion, and garlic add pops of spicy intensity. In keeping with the Mexican theme, we rounded out this salsa with lime juice, cilantro, and cumin. Do not substitute frozen corn for the fresh corn here. Be sure to use a nonstick skillet when toasting the corn. To make this salsa spicier, add the seeds from the chile.
1½ tablespoons extra-virgin olive oil, divided
1 ear corn, kernels cut from cob
1 red bell pepper, stemmed, seeded, and chopped fine
¾ cup canned black beans, rinsed
½ jalapeño chile, stemmed, seeded, and minced
1 scallion, sliced thin
2 garlic cloves, minced
2 tablespoons lime juice, plus extra for seasoning
2 tablespoons minced fresh cilantro
½ teaspoon ground cumin
¼ teaspoon table salt
⅛ teaspoon pepper
1. Heat 1½ teaspoons oil in 10-inch nonstick skillet over medium-high heat until shimmering. Add corn and cook, stirring occasionally, until golden brown, about 4 minutes.
2. Transfer corn to medium serving bowl and stir in remaining 1 tablespoon oil, bell pepper, beans, jalapeño, scallion, garlic, lime juice, cilantro, cumin, salt, and pepper. Cover and refrigerate until flavors meld, about 1 hour. Season with extra lime juice to taste before serving. (Salsa can be refrigerated for up to 2 days; bring to room temperature before serving.)
Serves 10 (Makes 2½ cups)
Why This Recipe Works This highly seasoned dip is packed with vibrant carrot flavor. To really bring out the fruity-earthy flavor qualities of the carrots, the addition of a little spicy heat in the form of habanero chiles worked wonders. Cooking the carrots in a saucepan over an initial blast of heat quickly broke down their cell walls and released their sugars. To maintain their brilliant color, we avoided browning and instead added water after the initial cooking, simmering the carrots until perfectly tender. We tossed in some Moroccan-inspired spices that stood up well to the intensely sweet carrot flavor, and minced habanero chile provided a surprise kick (use one or two depending on your preference). Processing the mixture at the end produced a smooth, spreadable dip that’s reminiscent of hummus. With a healthy drizzle of olive oil and some crunchy pepitas on top, this is an unexpected but simple dip that’s a definite crowd-pleaser. To make this dip spicier, add the seeds from the chile.
3 tablespoons extra-virgin olive oil, divided, plus extra for serving
2 pounds carrots, peeled and sliced ¼ inch thick
½ teaspoon table salt
1–2 habanero chiles, seeded and minced
2 garlic cloves, minced
¾ teaspoon ground coriander
¾ teaspoon ground cumin
¾ teaspoon ground ginger
⅛ teaspoon chili powder
⅛ teaspoon ground cinnamon
⅓ cup water
1 tablespoon white wine vinegar
1 tablespoon roasted, salted pepitas
1 tablespoon minced fresh cilantro
1. Heat 1 tablespoon oil in large saucepan over medium- high heat until shimmering. Add carrots and salt and cook until carrots begin to soften, 5 to 6 minutes. Stir in habanero, garlic, coriander, cumin, ginger, chili powder, and cinnamon and cook until fragrant, about 30 seconds. Add water and bring to simmer. Cover, reduce heat to low, and cook, stirring occasionally, until carrots are tender, 15 to 20 minutes.
2. Transfer carrots to bowl of food processor, add vinegar, and process until smooth, scraping down sides of bowl as needed, 1 to 2 minutes. With processor running, slowly add remaining 2 tablespoons oil until incorporated. Transfer to serving bowl, cover, and refrigerate until chilled, 30 minutes to 1 hour. Season with salt and pepper to taste. Sprinkle with pepitas and cilantro and drizzle with extra oil. Serve.
Serves 8 (Makes 2 cups)
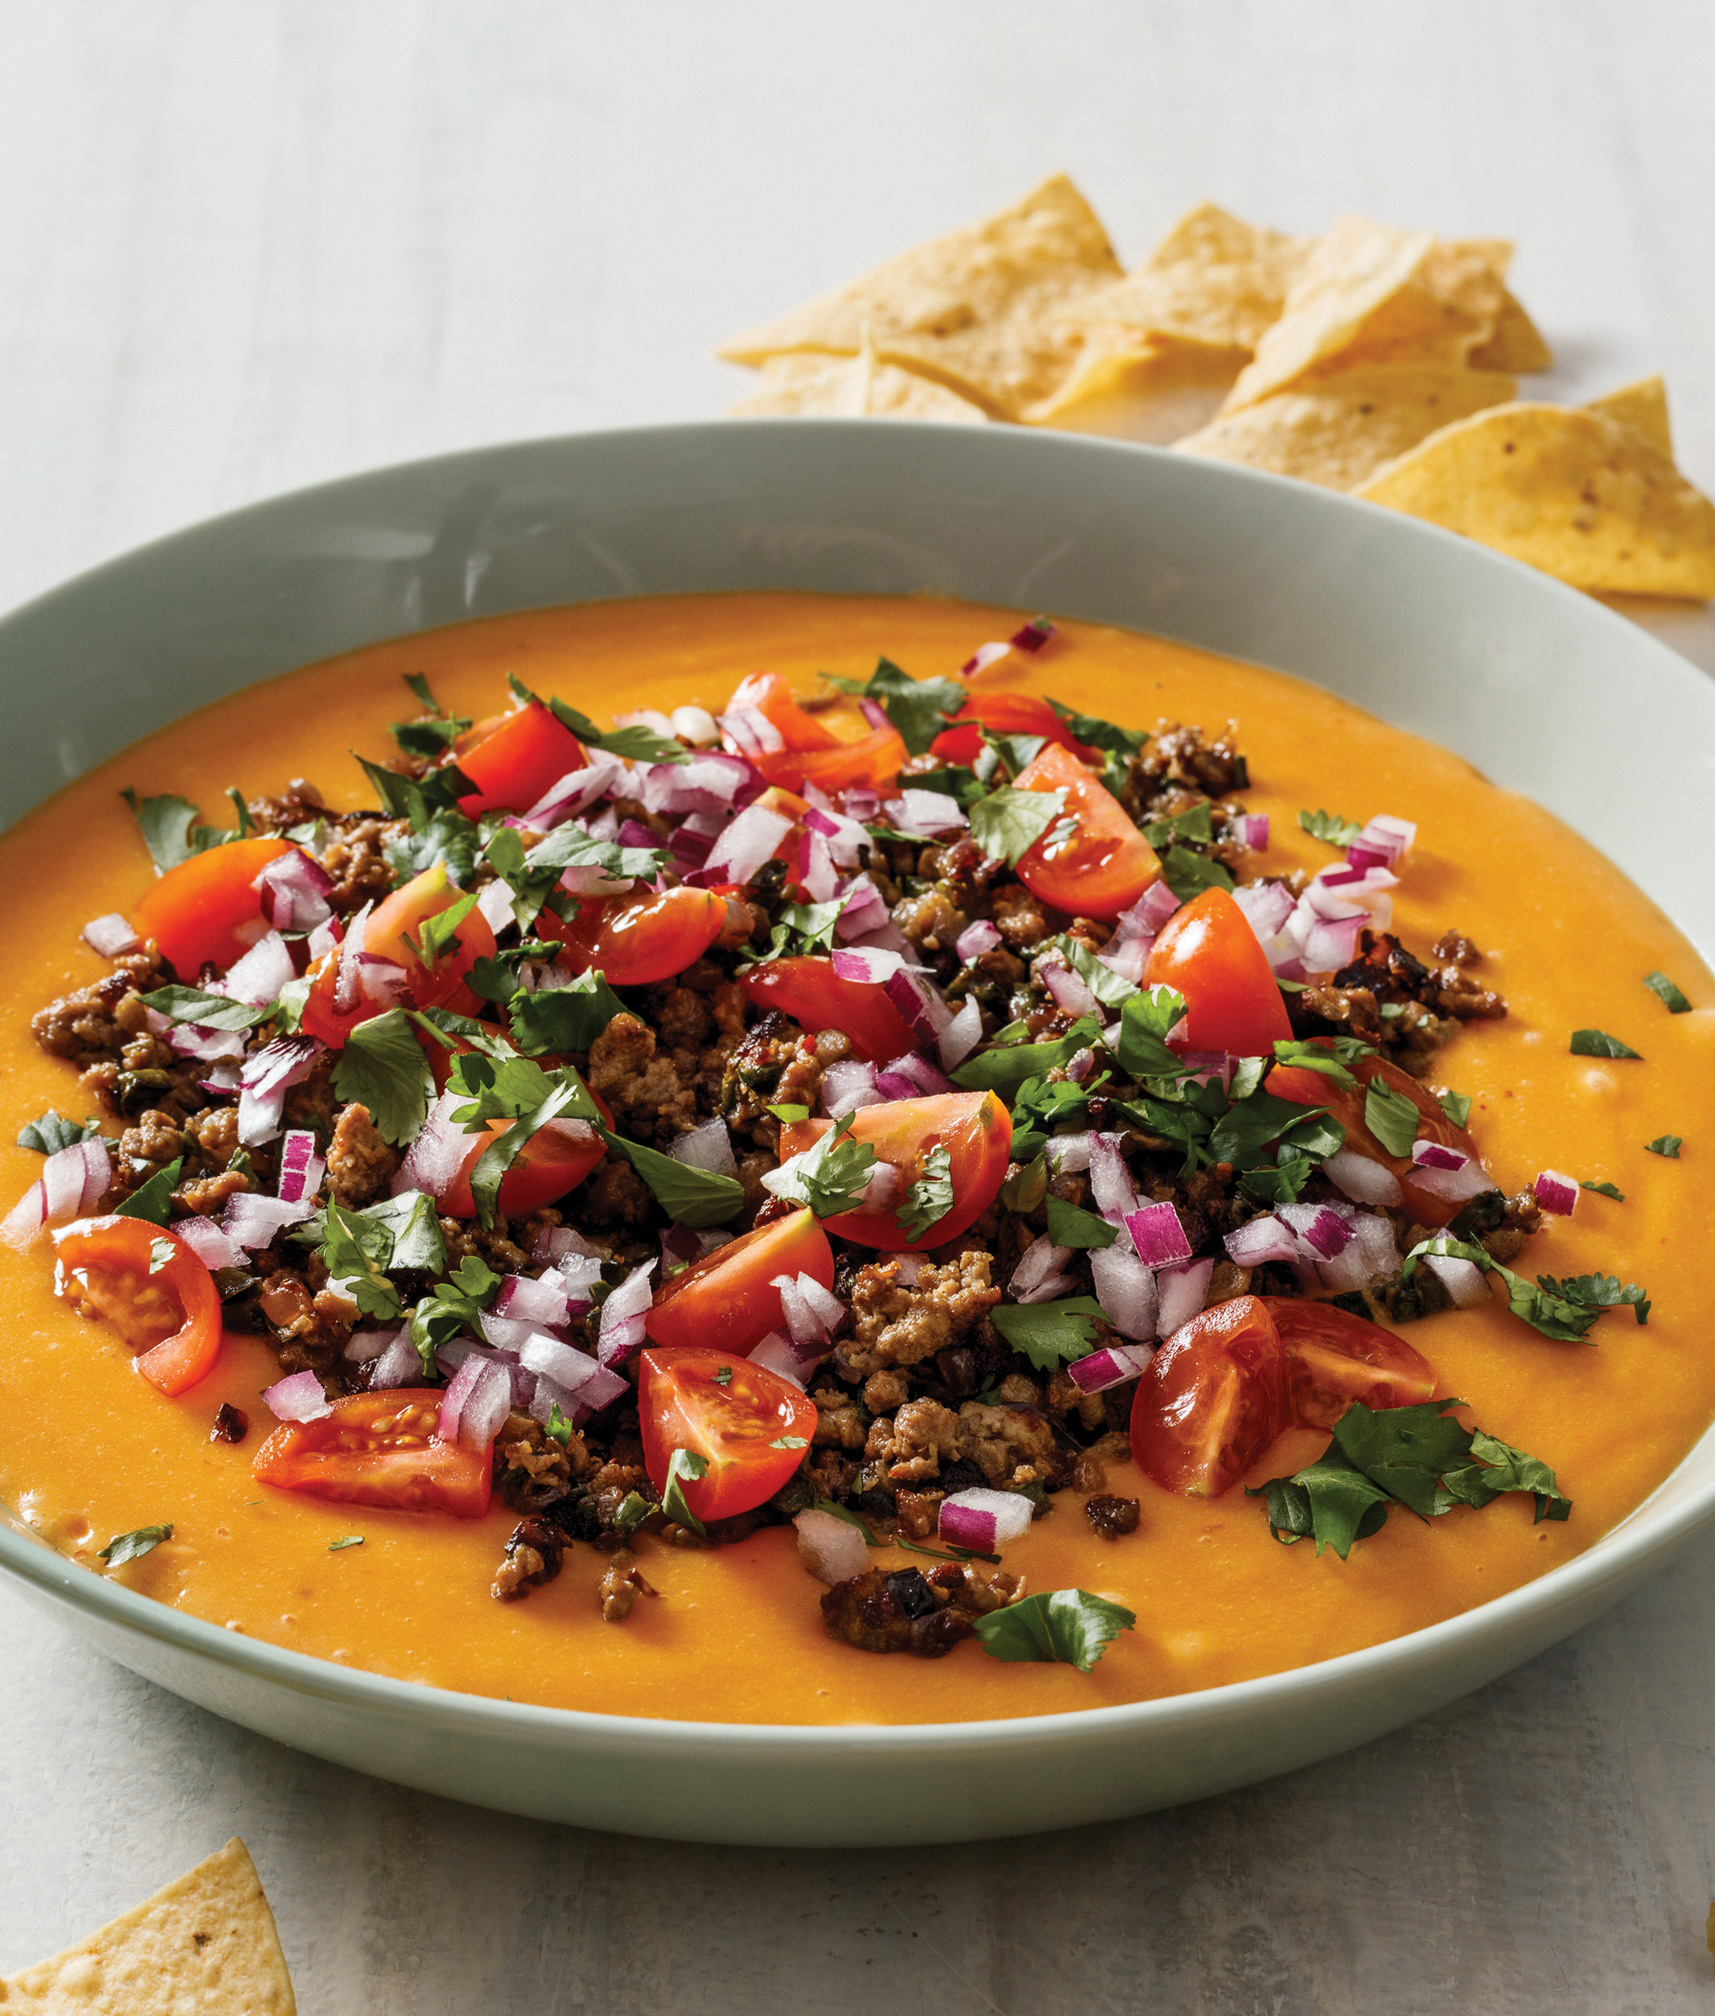
Why This Recipe Works Creamy, gooey, and tangy, this dip is downright cheesy and meaty in every way, except it doesn’t contain dairy cheese or meat! We experimented with the familiar cast of characters used to develop cheese-like sauces—including cashews, nutritional yeast, and miso—but tasters were distracted by their textures and flavors. The most neutral ingredient we found was potato, and we had a breakthrough when we broke a cardinal kitchen rule: We whirred boiled potatoes in the blender at high speed to release as much of their starch as possible. While this would make awful mashed potatoes, the sticky mixture was ideal for a cheese-like sauce. We blended in carrot for color, chipotle chile for smoky spiciness, nutritional yeast for funky flavor depth, and vegetable oil for richness and fluidity and ended up with a flavorful, ultracreamy yellow-orange dip. To top it off in style, we sautéed poblano pepper, onion, garlic, and spices and added plant-based beef to crumble and brown. We loved the dip garnished with chopped red onion, tomatoes, and fresh cilantro, but you can also finish with chopped avocado, fresh or pickled jalapeños, sliced scallions, or Quick Sweet-and-Spicy Pickled Red Onions (this page). Serve with tortilla chips or crudités. To rewarm cooled dip, microwave, covered, in 30-second bursts, whisking at each interval and thinning with water as needed, or rewarm on the stovetop, whisking occasionally, and thinning with water as needed.
12 ounces russet potatoes, peeled and cut into 1-inch pieces
1 small carrot, peeled and cut into ½-inch pieces (⅓ cup)
3 tablespoons vegetable oil, divided
1½ tablespoons nutritional yeast
1½ teaspoons distilled white vinegar
1 teaspoon minced canned chipotle chile in adobo sauce, divided
1⅛ teaspoons table salt, divided
⅛ teaspoon mustard powder
1 small red onion, chopped fine, divided
⅓ cup minced poblano chile
1 garlic clove, minced
⅛ teaspoon ground cumin
⅛ teaspoon ground coriander
4 ounces plant-based beef (this page)
2 ounces cherry or grape tomatoes, quartered
2 tablespoons chopped fresh cilantro
1. Bring 2 quarts water to boil in medium saucepan over high heat. Add potatoes and carrot and cook until tender, about 12 minutes; drain well. Combine cooked vegetables, ⅓ cup water, 2 tablespoons oil, nutritional yeast, vinegar, ½ teaspoon chipotle, 1 teaspoon salt, and mustard powder in blender. Pulse until chopped and combined, about 10 pulses, scraping down sides of blender jar as needed. (You will need to stop processing to scrape down sides of blender jar several times for mixture to come together.) Process mixture on high speed until very smooth, about 2 minutes. Season with salt and pepper to taste.
2. Meanwhile, heat remaining 1 tablespoon oil in 10-inch nonstick skillet over medium-high heat until shimmering. Add two-thirds of onion, poblano, and remaining ⅛ teaspoon salt and cook until softened and lightly browned, 5 to 7 minutes. Stir in garlic, cumin, coriander, and remaining ½ teaspoon chipotle and cook until fragrant, about 30 seconds. Add plant-based beef and cook, breaking up meat with wooden spoon, until lightly browned, 3 to 5 minutes.
3. Transfer dip to serving bowl and top with plant-based beef mixture. Sprinkle with tomatoes, cilantro, and remaining onion. Serve.
VARIATION
To rewarm cooled dip, follow instructions for rewarming Loaded Nacho Dip.
Omit plant-based beef, cherry tomatoes, and cilantro. Cook all of onion with poblano mixture in step 2. After cooking garlic, cumin, and coriander in step 2, transfer poblano mixture to serving bowl and stir in potato mixture to combine. Serve. (Nacho dip can be refrigerated for up to 24 hours.)
Serves 8 (Makes 2 cups)
Why This Recipe Works A big bowl of this creamy, flavorful nut-based dip will be as crowd-pleasing at your next party as any dairy-based dip. Cashews were the ideal starting point: Soaked and pureed, they turned creamy and neutral-tasting. We found that we needed to soak the raw cashews for at least 12 hours; any less, and the dip turned out grainy. Next, we turned to a variety of simple pantry ingredients to amp up the flavor of the dip. Tasters loved the mildly smoky flavor of roasted red peppers with the briny, salty depth of chopped kalamata olives. A bit of olive oil and lemon juice boosted the flavor further and thinned the dip to a perfect consistency. Some parsley, stirred in with the olives after processing, provided welcome freshness. Since our dip had come together so quickly and easily, we decided to create two flavorful variations, one using smoky chipotle chile powder, tangy lime juice, and fresh cilantro, and another with sweet sun-dried tomatoes and earthy fresh rosemary. You can substitute an equal amount of slivered almonds for the cashews; however, the dip will have a slightly coarser consistency.
1½ cups raw cashews
½ cup jarred roasted red peppers, rinsed, patted dry, and chopped
3 tablespoons extra-virgin olive oil
3 tablespoons lemon juice
¾ teaspoon table salt
½ teaspoon pepper
1 garlic clove, minced
½ cup minced fresh parsley
½ cup pitted kalamata olives, chopped
1. Place cashews in bowl and add cold water to cover by 1 inch. Let sit at room temperature for at least 12 hours or up to 24 hours. Drain and rinse well.
2. Process soaked cashews, red peppers, 3 tablespoons water, oil, lemon juice, salt, pepper, and garlic in food processor until smooth, about 2 minutes, scraping down sides of bowl as needed.
3. Transfer cashew mixture to bowl, stir in parsley and olives, and season with salt and pepper to taste. Cover with plastic wrap and let sit at room temperature until flavors meld, about 30 minutes. Serve. (Dip can be refrigerated for up to 5 days; stir in 1 tablespoon warm water to loosen dip if necessary before serving.)
VARIATIONS
Whipped Cashew Dip with Chipotle and Lime
Omit red peppers and olives. Add ½ teaspoon chipotle chile powder and ½ teaspoon ground cumin to processor with soaked cashews and increase water to 6 tablespoons in step 2. Substitute ¼ cup lime juice (2 limes) for lemon juice and ⅓ cup minced fresh cilantro for parsley.
Whipped Cashew Dip with Sun-Dried Tomatoes and Rosemary
Omit red peppers and parsley. Add 2 teaspoons minced fresh rosemary to processor with soaked cashews and increase water to 6 tablespoons in step 2. Substitute ½ cup finely chopped oil-packed sun-dried tomatoes for olives.

Serves 4 (Makes 1 cup)
Why This Recipe Works Traditionally made by pureeing nuts, bread, and olive oil to create a velvety-smooth dip without dairy, Turkish tarator is a rich accompaniment to pita wedges, Falafel (this page), or other meze platter foods. We made the base by mashing torn pieces of white bread and water into a paste. We then pulsed this in the blender with nuts, olive oil, lemon juice, and garlic. A pinch of cayenne contributed welcome heat. With our simple method in place, we turned to choosing our dip’s flavor profile. Many traditional recipes call for hazelnuts, but our research turned up versions made with almonds, walnuts, and pine nuts. We tried all four nuts and found that they worked quite well, so use whichever you prefer. No matter the nut, toasting was essential, since it brought out deep flavor complexity and created a welcome contrast with the lemon and garlic.
1 slice hearty white sandwich bread, crusts removed, torn into 1-inch pieces
¾ cup water, plus extra as needed
1 cup blanched and skinned almonds, toasted
¼ cup extra-virgin olive oil
2 tablespoons lemon juice, plus extra as needed
1 small garlic clove, minced
½ teaspoon table salt
⅛ teaspoon pepper
Pinch cayenne pepper
1. With fork, mash bread and water together in bowl into paste. Process bread mixture, almonds, oil, lemon juice, garlic, salt, pepper, and cayenne in blender until smooth, about 2 minutes. Add extra water as needed until sauce is barely thicker than consistency of heavy cream.
2. Season with salt, pepper, and extra lemon juice to taste. Serve at room temperature. (Dip can be refrigerated for up to 2 days; bring to room temperature before serving.)
Serves 8 (Makes 2 cups)
Why This Recipe Works Traditional muhammara is a sweet-smoky blend of roasted red peppers, toasted walnuts, pomegranate molasses, and spices popular in Turkish and Syrian cuisine. A true multi-use recipe bursting with flavor, it makes a delicious dip, a spread for sandwiches, and even a sauce for roasted vegetables. Our simple version incorporates beets, which gives the already veggie-packed mixture a splendid color and earthier flavor. We tested several methods of preparing the beets, steering away from roasting to minimize kitchen time. Some tasters loved the flavor and texture imparted by raw grated beets, but for optimal creaminess we found that microwaving grated beets softened them just enough to blend into the mixture while preserving their bright, fresh flavor. Some recipes thicken muhammara with bread, but we opted for protein-rich walnuts to do the job. Jarred roasted peppers added smokiness without any hassle. A touch of pomegranate molasses gave the dip its hallmark sweet yet slightly bitter flavor. If you can’t find pomegranate molasses, you can make your own (recipe follows). You can use the large holes of a box grater or a food processor fitted with a shredding disk to shred the beets.
8 ounces beets, trimmed, peeled, and shredded
1 cup jarred roasted red peppers, rinsed and patted dry
1 cup walnuts, toasted
1 scallion, sliced thin
2 tablespoons extra-virgin olive oil, plus extra for drizzling
2 tablespoons pomegranate molasses
2 teaspoons lemon juice
¾ teaspoon table salt
½ teaspoon ground cumin
⅛ teaspoon cayenne pepper
2 tablespoons minced fresh parsley
1. Microwave beets in covered bowl, stirring often, until beets are tender, about 4 minutes. Transfer beets to fine-mesh strainer set over bowl and let drain for 10 minutes.
2. Process drained beets, peppers, walnuts, scallion, oil, pomegranate molasses, lemon juice, salt, cumin, and cayenne together in food processor until smooth, about 1 minute, scraping down sides of bowl as needed.
3. Transfer mixture to serving bowl. Season with salt to taste. Drizzle with extra oil to taste, and sprinkle with parsley before serving. (Dip can be refrigerated for up to 3 days; bring to room temperature before serving.)
Makes ⅔ cup
If you over-reduce the syrup in step 2, you can slowly whisk in warm water as needed to measure ⅔ cup.
2 tablespoons water
1 tablespoon sugar
4 cups unsweetened pomegranate juice, divided
2 teaspoons lemon juice
1. Stir water and sugar in medium saucepan until sugar is completely moistened. Bring to boil over medium-high heat and cook until sugar begins to turn golden, 2 to 3 minutes, gently swirling saucepan as needed to ensure even cooking. Continue to cook until sugar begins to smoke and is color of peanut butter, about 1 minute. Off heat, let caramel sit until mahogany brown, 45 to 60 seconds. Carefully swirl in 2 tablespoons pomegranate juice until incorporated; mixture will bubble and steam. Slowly whisk in remaining pomegranate juice and lemon juice, scraping up any caramel.
2. Bring mixture to boil over high heat and cook, stirring occasionally, until tight, slow-popping bubbles cover surface and syrup measures ⅔ cup, 30 to 35 minutes. Let cool slightly, then transfer to container and continue to cool to room temperature. (Pomegranate Molasses can be refrigerated for up to 1 month.)
A well-thought-out platter of crudités can be a beautiful and versatile centerpiece for plant-based entertaining. For perfect crudités, you simply need to prep fresh vegetables properly: Some vegetables must first be blanched and then shocked in ice water; others benefit from being cut in a particular manner. To store crudités, refrigerate raw vegetables wrapped in damp paper towels in a zipper-lock bag and blanched vegetables in an airtight container for up to two days.
Asparagus To remove tough, fibrous ends of asparagus, bend thick end of each stalk until it snaps off. Blanch asparagus for 30 to 60 seconds.
Broccoli and Cauliflower Cut broccoli and cauliflower florets into bite-size pieces by slicing down through stem. Blanch broccoli and cauliflower (separately) for 1 to 1½ minutes.
Carrots and Celery Slice both celery and peeled carrots lengthwise into long, elegant lengths rather than short, stumpy pieces.
Endive Gently pull off leaves one at a time, continuing to trim root end as you work your way toward heart of endive.
Green Beans Line beans up in a row and trim off inedible stem ends with just 1 cut. Blanch beans for 1 minute.
Peppers Slice off top and bottom of pepper and remove seeds and stem. Slice down through side of pepper, unroll it so that it lies flat, then slice into ½-inch-wide strips.
Radishes Choose radishes with green tops still attached so that each half has a leafy handle for grasping and dipping. Slice each radish in half through stem.
Bring 6 quarts water and 2 tablespoons table salt to boil in large pot over high heat. Cook vegetables, 1 variety at a time, until slightly softened but still crunchy at core, following times given for individual vegetables above. Transfer blanched vegetables immediately to bowl of ice water until completely cool, then drain and pat dry.

Serves 4
Why This Recipe Works Store-bought versions of kale chips typically try to mimic potato chips: that is, they’re deep fried and loaded with salt. We didn’t want to try to mimic a greasy potato chip; rather, we wanted to create a light-as-air vegetable chip that would remain crispy from cooking right through to consumption. We discovered three keys to getting them to the perfect texture. First, we started with completely dry leaves, blotted between dish towels after washing to make sure no water was left clinging to them. Next, we baked the kale on wire racks to allow the oven air to circulate above and beneath the leaves. Finally, we used a long cooking time and low oven temperature to mimic the effects of a food dehydrator. Tossed with olive oil and seasoned with crunchy kosher salt, these ultracrisp kale chips were a super-satisfying snack. Our variations offer a ranch seasoning as well as an Asian-inspired combination. We prefer to use Lacinato kale in this recipe, but curly-leaf kale can be substituted; chips made with curly-leaf kale will taste a bit chewy at the edges and won’t keep as well. We prefer the larger crystal size of kosher salt here; if using table salt, reduce the amount by half.
12 ounces Lacinato kale, stemmed and torn into 3-inch pieces
1 tablespoon extra-virgin olive oil
½ teaspoon kosher or flake sea salt
1. Adjust oven racks to upper-middle and lower-middle positions and heat oven to 200 degrees. Set wire racks in 2 rimmed baking sheets. Dry kale thoroughly between dish towels, transfer to large bowl, and toss with oil and salt.
2. Arrange kale on prepared racks, making sure leaves overlap as little as possible. Bake kale until very crisp, 45 minutes to 1 hour, switching and rotating sheets halfway through baking. Let kale chips cool completely before serving. (Chips can be stored in airtight container for up to 1 day.)
VARIATIONS
Combine 2 teaspoons dried dill, 1 teaspoon garlic powder, and 1 teaspoon onion powder with salt before tossing with kale.
Spicy Sesame-Ginger Kale Chips
Substitute 1 tablespoon sesame oil for olive oil. Combine 2 teaspoons toasted sesame seeds, 1 teaspoon ground ginger, and ¼ teaspoon cayenne pepper with salt before tossing with kale.
MAKING KALE CHIPS

1. Stem kale, then tear leaves into rough 3-inch pieces.

2. Wash and dry kale using salad spinner, then dry thoroughly between dish towels. Transfer to large bowl and toss with oil and seasonings.

3. Bake on prepared racks until very crisp, 45 minutes to 1 hour, switching and rotating sheets halfway through baking.
Serves 2
Why This Recipe Works A snack chip made from beets has become another popular healthful alternative to potato chips, but we were skeptical about getting truly crisp results without any special equipment. Indeed, many of the recipes we tested produced chips that were leathery and floppy or overcooked and bitter. We knew that crisp chip texture depended on extracting as much moisture as possible from the beets. To do this without overcooking the chips, we tried lightly salting the raw beets to draw out some water—and it worked, extracting almost 2 tablespoons. To cook them, we first tried microwaving, which is a popular alternative to frying, but the process was inconsistent at best: The difference between perfection and burnt was mere seconds. So we took a cue from our kale chip method and slow-baked our beets in a 200-degree oven. It took a couple of hours but was hands-off and produced chips with a concentrated beet flavor, light crunch, and deep color. Be careful to not let the beet chips turn brown, as they will become bitter. Thinly sliced beets are key to crispy beet chips—use a mandoline, V-slicer, or the slicing disk on a food processor.
1 pound beets, peeled, trimmed, and sliced 1/16 inch thick
½ teaspoon table salt
1. Adjust oven racks to upper-middle and lower-middle positions and heat oven to 200 degrees. Set wire racks in 2 rimmed baking sheets and spray with canola oil spray. Combine beets and salt in colander set over bowl and let drain for 25 minutes. Pat beets dry with paper towels.
2. Arrange beet slices on prepared racks, making sure slices overlap as little as possible. Bake beets until shrunken slightly and crisp throughout, 2 to 3 hours, switching and rotating sheets halfway through baking. Let beet chips cool completely before serving. (Beets will continue to crisp as they cool). (Chips can be stored in airtight container for up to 2 weeks.)
Serves 12
Why This Recipe Works Our nori chips are ethereally light in texture and delicately crisp. To create this great chip with fresh-from-the-sea flavor, we focused on a few simple elements. First, we tested various oven temperatures and times and found that a moderately hot oven consistently produced the best chips. A low oven temperature resulted in floppy chips (even with a longer time), while a high temperature produced and unpleasantly burnt taste. To highlight the clean nori flavor, we added only sesame seeds, which toasted nicely while the chips baked, and salt. Vegetable oil brushed on the chips pulled double duty, helping the sesame seeds to adhere while helping to further crisp up the chips. For a sturdier chip, we folded the nori sheets to double their thickness; water brushed between the folded sheets kept them together. Finally, we cut each sheet into uniform strips. After a few minutes in the oven, these toasty dark green treats were ready to enjoy. You can use either toasted or untoasted nori sheets for this recipe.
10 sheets nori
1¼ teaspoons vegetable oil
5 teaspoons sesame seeds
1. Adjust oven racks to upper-middle and lower-middle positions and heat oven to 350 degrees. Line 2 rimmed baking sheets with parchment paper. Working with 1 nori sheet at a time, brush bottom half liberally with water. Fold top half toward you and press firmly until sealed. Brush top of folded nori with ⅛ teaspoon oil, sprinkle with ½ teaspoon sesame seeds, and season with kosher or flake sea salt to taste. Cut nori into 1-inch strips.
2. Arrange nori strips in single layer, spaced evenly apart on prepared baking sheets. Bake until nori is very crisp and sesame seeds are golden, about 8 minutes, switching and rotating sheets halfway through baking (nori strips should be dark and shriveled slightly). Let cool completely on sheets, 8 to 10 minutes. Serve. (Chips can be stored in airtight container for up to 1 week.)
Serves 12
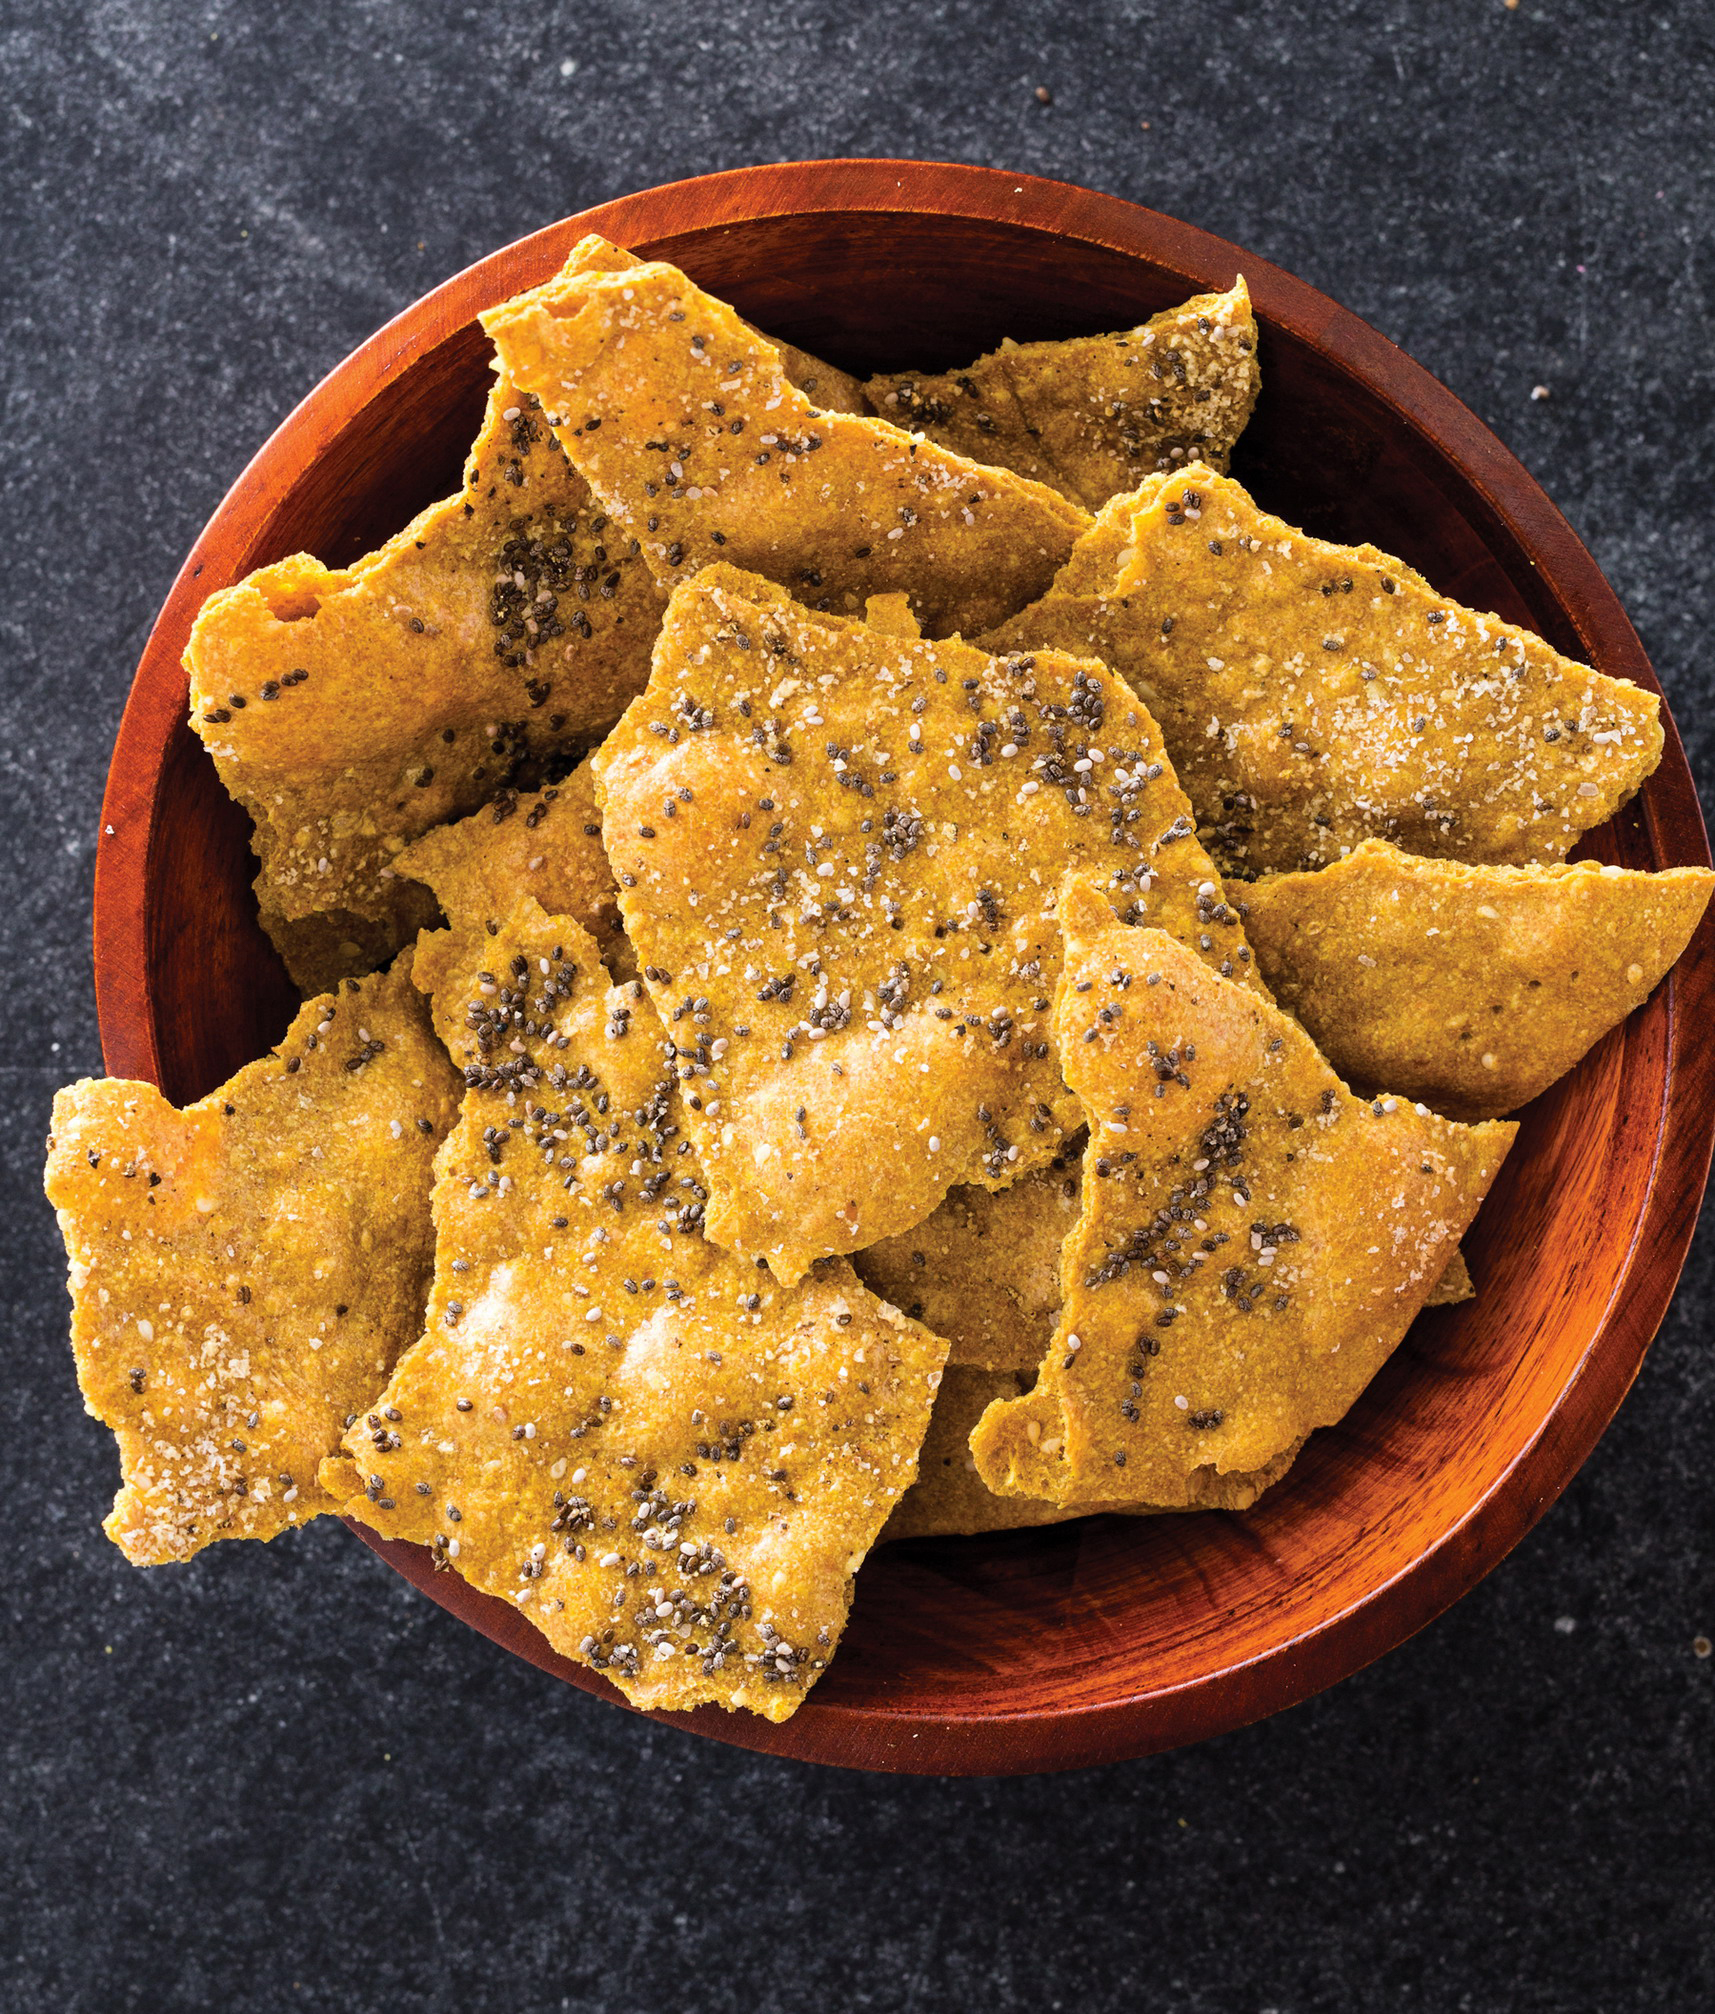
Why This Recipe Works While many store-bought crackers are free of animal products, they are also loaded with refined flours, saturated fat, preservatives, and excess salt or sugar. For a crisp, flavorful, whole-grain cracker, we chose as a starting point the Mediterranean lavash cracker, typically made with a mix of white, wheat, and semolina flours. For our version, we preferred using all whole-wheat flour. To boost their plant power and give them texture and flavor, we added omega-3-rich flaxseeds and sesame seeds to the dough along with a touch of turmeric for its warm flavor. We let the dough rest for an hour to make it easier to roll out, then rolled it between sheets of parchment paper. We pricked it with a fork to prevent air bubbles, brushed it with olive oil, and sprinkled it with chia seeds, sea salt, and pepper. Finally, we baked the giant crackers until deep golden brown and let them cool before breaking them up. We prefer golden flaxseeds for their milder flavor, but brown flaxseeds can be used. We prefer the larger crystal size of sea salt or kosher salt for sprinkling on the crackers; if using table salt, reduce the amount by half.
3 cups (16½ ounces) whole-wheat flour
2 tablespoons ground golden flaxseeds
2 tablespoons sesame seeds
1 teaspoon ground turmeric
¾ teaspoon table salt
1 cup warm water
⅓ cup extra-virgin olive oil, plus extra for brushing
2 tablespoons chia seeds, divided
2 teaspoons flake sea salt or kosher salt, divided
1. Using stand mixer fitted with dough hook, mix whole-wheat flour, ground flaxseeds, sesame seeds, turmeric, and table salt together on low speed. Gradually add water and oil and knead until dough is smooth and elastic, 7 to 9 minutes. Turn dough out onto lightly floured counter and knead by hand to form smooth, round ball. Divide dough into 4 equal pieces, brush with oil, and cover with plastic wrap. Let rest at room temperature for 1 hour.
2. Adjust oven racks to upper-middle and lower-middle positions and heat oven to 400 degrees. Roll 1 piece of dough (keep remaining dough covered with plastic) between 2 large sheets of parchment paper into 15 by 11-inch rectangle (about ⅛ inch thick). Remove top sheet of parchment and slide parchment with dough onto baking sheet. Repeat with second piece of dough and second baking sheet.
3. Using fork, poke holes in doughs at 2-inch intervals. Brush each dough with 1½ teaspoons oil, then sprinkle each with 1½ teaspoons chia seeds, ½ teaspoon sea salt, and pepper to taste. Press gently on seeds and seasonings to help them adhere.
4. Bake crackers until golden brown, 15 to 18 minutes, switching and rotating sheets halfway through baking. Transfer crackers to wire rack and let cool completely. Let baking sheets cool completely before rolling out, brushing, topping, and baking remaining 2 pieces of dough. Break cooled crackers into large pieces and serve. (Crackers can be stored in airtight container for up to 2 weeks.)
Serves 6
Why This Recipe Works Tossed with an appealing spice mix, roasted chickpeas have a crisp, airy texture that makes them a most poppable (and healthy) snack—or salad topper or roasted vegetable accompaniment or hummus garnish. Chickpeas are used throughout India, so a version with spices from the region—coriander, turmeric, allspice, and cumin—seemed appropriate. We achieved crispiness by first micro-waving the chickpeas for about 10 minutes to burst them open at the seams so they released interior moisture. We then baked them in a 350-degree oven. To prevent burning, we crowded them toward the center of the pan near the end of roasting. We finished with our dusting of spices and liked the result so much that we came up with two variations. You will need a 13 by 9-inch metal baking pan for this recipe; a glass or ceramic baking dish will result in uneven cooking.
2 (15-ounce) cans chickpeas
3 tablespoons extra-virgin olive oil
2 teaspoons paprika
1 teaspoon ground coriander
½ teaspoon ground turmeric
½ teaspoon ground allspice
½ teaspoon ground cumin
½ teaspoon sugar
⅛ teaspoon table salt
⅛ teaspoon cayenne pepper
1. Adjust oven rack to middle position and heat oven to 350 degrees. Place chickpeas in colander and drain for 10 minutes. Line large plate with double layer of paper towels. Spread chickpeas over plate in even layer. Microwave until exteriors of chickpeas are dry and many have ruptured, 8 to 12 minutes.
2. Transfer chickpeas to 13 by 9-inch metal baking pan. Add oil and stir until evenly coated. Using spatula, spread chickpeas into single layer. Transfer to oven and roast for 30 minutes. Stir chickpeas and crowd them toward center of pan. Continue to roast until chickpeas appear dry, slightly shriveled, and deep golden brown, 20 to 40 minutes. (To test for doneness, remove a few paler chickpeas and let cool briefly before tasting; if interiors are soft, return to oven and test again in 5 minutes.)
3. Combine paprika, coriander, turmeric, allspice, cumin, sugar, salt, and cayenne in small bowl. Transfer chickpeas to large bowl and toss with spice mixture to coat. Season with salt to taste. Let cool fully before serving, about 30 minutes. (Chickpeas can stored in airtight container for up to 7 days.)
VARIATIONS
Barbecue-Spiced Roasted Chickpeas
Omit allspice and cumin. Increase sugar to 1½ teaspoons. Substitute 1 tablespoon smoked paprika for paprika, garlic powder for coriander, and onion powder for turmeric.
Spanish-Spiced Roasted Chickpeas
Omit turmeric, allspice, and sugar. Decrease coriander to ½ teaspoon and cumin to ¼ teaspoon. Substitute 1 tablespoon smoked paprika for paprika.
Serves 8 (Makes about 2 cups)
Why This Recipe Works Like Spiced Roasted Chickpeas (this page), protein-rich spiced nuts are a great cocktail snack and also make a wonderful gift when packaged in an attractive container. They’re satisfying and easy to prepare and are more healthful and less expensive than packaged seasoned nuts. This version has a sweet-salty flavor profile from the orange zest, fennel seeds, and salt. The variation takes the almonds in a spicier Southwestern direction with cumin, chipotle chile powder, and garlic. Watch the nuts carefully during toasting, as they go from golden and fragrant to burnt very quickly.
1 tablespoon extra-virgin olive oil
1 teaspoon grated orange zest
1 teaspoon fennel seeds
1 teaspoon table salt
¼ teaspoon pepper
2 cups raw whole almonds
Adjust oven rack to middle position and heat oven to 350 degrees. Combine oil, orange zest, fennel seeds, salt, and pepper in bowl. Toss almonds with oil mixture until well coated, then spread into single layer on rimmed baking sheet. Bake, stirring often, until fragrant and lightly browned, about 10 minutes. Transfer almonds to serving bowl and let cool completely before serving. (Almonds can be stored at room temperature for up to 1 week.)
VARIATION
Spicy Chipotle Almonds
Substitute 1 teaspoon ground cumin, ¾ teaspoon chipotle chile powder, and ½ teaspoon garlic powder for orange zest and fennel seeds.

Serves 24 (Makes 24 bars)
Why This Recipe Works Most store-bought granola bars contain far too much sugar and lots of filler ingredients; and they are soft and mushy rather than pleasingly chewy. They’re also prone to falling apart—not a plus if you’re eating them on the go, as so many of us do with granola bars. For bars that were wholesome, satisfyingly chewy, and neat to eat, we combined toasted oats, nuts, and seeds with a mixture of pureed apricots, brown sugar, oil, and water and pressed the mixture firmly into a baking pan before baking it. Small chunks of dried fruit provided pops of bright flavor and extra chew, while airy rice cereal provided a crisp texture that lightened the bars. The nuts, seeds, and fruit can be swapped out according to your preference to make bars that suit a variety of tastes (see the variations for a couple of our favorites). Be sure to use apricots that are soft and moist, or the bars will not hold together well. Avoid using extra-thick rolled oats here.
1½ cups blanched hazelnuts
2½ cups (7½ ounces) old-fashioned rolled oats
1 cup raw sunflower seeds
1 cup dried apricots
1 cup packed (7 ounces) brown sugar
¾ teaspoon table salt
½ cup vegetable oil
3 tablespoons water
1½ cups (1½ ounces) crisped rice cereal
1 cup dried cherries
½ cup cacao nibs
1. Adjust oven rack to middle position and heat oven to 350 degrees. Make foil sling for 13 by 9-inch baking pan by folding 2 long sheets of aluminum foil; first sheet should be 13 inches wide and second sheet should be 9 inches wide. Lay sheets of foil in pan perpendicular to each other, with extra foil hanging over edges of pan. Push foil into corners and up sides of pan, smoothing foil flush to pan. Lightly spray foil with vegetable oil spray.
2. Pulse hazelnuts in food processor until finely chopped, 8 to 12 pulses. Spread hazelnuts, oats, and sunflower seeds on rimmed baking sheet and toast until lightly browned and fragrant, 12 to 15 minutes, stirring halfway through toasting. Reduce oven temperature to 300 degrees.
3. While oat mixture is toasting, process apricots, sugar, and salt in food processor until apricots are very finely ground, about 15 seconds. With processor running, add oil and water. Continue to process until homogeneous paste forms, about 1 minute. Transfer paste to large, wide bowl.
4. Add warm oat mixture to bowl and stir with rubber spatula until well coated. Add cereal, cherries, and cacao nibs and stir gently until ingredients are evenly mixed. Transfer mixture to prepared pan and spread into even layer. Place 14-inch sheet of parchment or waxed paper on top of granola and press and smooth very firmly with your hands, especially at edges and corners, until granola is level and compact. Remove parchment and bake granola until fragrant and just beginning to brown around edges, about 25 minutes. Transfer pan to wire rack and let cool for 1 hour. Using foil overhang, lift granola out of pan. Return to wire rack and let cool completely, about 1 hour.
5. Discard foil and transfer granola to cutting board. Using chef’s knife, cut granola in half crosswise to create two 6½ by 9-inch rectangles. Cut each rectangle in half to make four 3¼ by 9-inch strips. Cut each strip crosswise into 6 equal pieces. (Granola bars can be stored at room temperature for up to 3 weeks.)
VARIATIONS
Chewy Granola Bars with Walnuts and Cranberries
Omit cacao nibs. Substitute walnuts for hazelnuts and pulse until finely chopped, 8 to 10 pulses. Substitute chopped dried cranberries for cherries.
Omit hazelnuts, cherries, and cacao nibs. Toast 1 cup raw pepitas, ¼ cup sesame seeds, and ¼ cup chia seeds with oats in step 2. Increase cereal to 2 cups.
Serves 14 (Makes 14 cups)
Why This Recipe Works You might think that popcorn isn’t popcorn without a generous drizzle of butter, but we’re here to prove that notion wrong. This universally popular snack is just as munchable made with olive oil. Looking for the healthiest way to make popcorn, we discovered an interesting trick: You can actually cook popcorn on the stovetop without any fat at all. Just adding a small amount of water to the pot along with the kernels was enough to do the trick. But we didn’t want to abandon a classic popcorn profile altogether, so we found that a modest amount of olive oil and salt tossed with the popcorn before serving gave us just the flavor we craved. The garlicky variation and the cinnamon-sugar variation will also both keep you reaching into the bowl for more. When cooking the popcorn, be sure to keep the lid on tight and shake the pot vigorously to prevent scorching.
1 tablespoon water
½ cup popcorn kernels
2 tablespoons extra-virgin olive oil
½ teaspoon table salt
½ teaspoon pepper
Heat Dutch oven over medium-high heat for 2 minutes. Add water and popcorn, cover, and cook, shaking frequently, until first few kernels begin to pop. Continue to cook, shaking vigorously, until popping slows to about 2 seconds between pops. Transfer popcorn to large serving bowl and toss with oil, salt, and pepper. Serve.
VARIATIONS
Popcorn with Warm Spices and Garlic
Heat oil, 2 teaspoons garlic powder, ½ teaspoon ground coriander, and ½ teaspoon ground cumin in small skillet over medium-low heat until fragrant, about 1 minute; toss spiced oil with popcorn, salt, and pepper.
Popcorn with Spicy Cinnamon Sugar
Substitute vegetable oil for olive oil and omit pepper. Heat oil, 2 tablespoons sugar, 1 teaspoon cinnamon, and ½ teaspoon ground chile powder in 8-inch skillet over medium-low heat until warm and fragrant, about 1 minute. Toss spiced oil with popcorn and salt.
Serves 8 (Makes 24 skewers)
Why This Recipe Works Meaty kalamata olives replace mini mozzarella balls in these elegant, flavor-packed mini skewers that require no cooking and can be made ahead for serving al fresco to guests while you’re firing up the grill on a warm evening. We made a dressing with lemon, garlic, mustard, and fennel seeds and tossed halved grape tomatoes and the olives in the dressing. We then skewered them on toothpicks along with fresh, anise-y basil leaves (which were complemented by the fennel in the dressing), creating an hors d’oeuvre that was far more than the sum of its parts. You will need about 24 sturdy wooden toothpicks for this recipe; avoid using very thin, flimsy toothpicks here. Placing a halved tomato, with its flat side facing down, on the bottom of the toothpick is a clever way to stand the skewers upright on a serving platter. Once assembled, the skewers can be held at room temperature for up to 4 hours.
¼ teaspoon grated lemon zest plus ½ tablespoon juice
1 small garlic clove, minced
¼ teaspoon Dijon mustard
⅛ teaspoon fennel seeds, chopped
⅛ teaspoon table salt
⅛ teaspoon pepper
3 tablespoons extra-virgin olive oil
8 ounces grape tomatoes, halved
½ cup pitted kalamata olives
½ cup fresh basil leaves
1. Whisk lemon zest and juice, garlic, mustard, fennel, salt, and pepper together in large bowl. Whisking constantly, drizzle in oil. Gently stir in tomatoes and olives.
2. Skewer ingredients onto toothpicks in this order: tomato half, olive, basil leaf (folded if large), and tomato half with flat side facing down. Stand skewers upright on serving platter, drizzle with some of remaining dressing, and serve.

Serves 4 to 6
Why This Recipe Works Mild little chile peppers, fried until blistered, that you pick up by the stems and pop into your mouth whole fly out of the kitchen wherever trendy bar snacks are sold. Shishitos are what you usually find at Asian restaurants; they are the Japanese cousin to Spain’s Padrón chiles, which are common at tapas restaurants. These bright-tasting, citrusy, mild green chiles are thin-skinned and crisp-textured and totally craveable. Restaurants often deep-fry the whole shishitos, but we’ve found that cooking them in a small amount of oil works just as well. They are delicious simply salted, but we’ve also offered three variations: two that amp up the chiles with dried ground peppers, and a third that adds a touch of herbal sweetness with dried mint and orange zest. We prefer the larger crystal size of flake sea salt or kosher salt for sprinkling on the peppers, but you can use regular table salt instead. It’s said that only one in 10 shishito peppers is truly spicy, so happy hunting!
2 tablespoons vegetable oil
8 ounces shishito peppers
Heat oil in 12-inch skillet over medium-high heat until just smoking. Add peppers and cook, without stirring, until skins are blistered, 3 to 5 minutes. Using tongs, flip peppers and continue to cook until blistered on second side, 3 to 5 minutes. Transfer to serving bowl, season with flake sea salt or kosher salt to taste, and serve.
VARIATIONS
Smoky Shishito Peppers with Espelette and Lime
Combine 1 teaspoon ground dried Espelette pepper, 1 teaspoon smoked paprika, ½ teaspoon flake sea salt or kosher salt, and ¼ teaspoon grated lime zest in small bowl. Sprinkle over peppers in serving bowl. Serve with lime wedges.
Shishito Peppers with Fennel Pollen, Aleppo, and Lemon
Combine 1 teaspoon Aleppo pepper, 1 teaspoon fennel pollen, ½ teaspoon flake sea salt or kosher salt, and ¼ teaspoon grated lemon zest in small bowl. Sprinkle over peppers in serving bowl. Serve with lemon wedges.
Shishito Peppers with Mint, Poppy Seeds, and Orange
Combine 1 teaspoon dried mint, 1 teaspoon poppy seeds, ½ teaspoon flake sea salt or kosher salt, and ¼ teaspoon grated orange zest in small bowl. Sprinkle over peppers in serving bowl. Serve with orange wedges.
Serves 8 to 10
Why This Recipe Works As we tested our way through various vegan bruschetta toppings, this combination of tangy, tender jarred artichoke hearts with our funky, punchy vegan Parmesan substitute—brightened with a hefty dose of aromatic fresh basil—was a runaway hit. (For a vegetarian version, it’s as simple as swapping in dairy Parmesan for the plant-based variety.) A food processor quickly transformed our ingredients into a rustic, spreadable mixture that stayed in place on top of our garlic-scented toasted bread. For an elegant finish, we sprinkled on vegan Parmesan substitute and chopped fresh basil along with a generous drizzle of extra-virgin olive oil. We prefer jarred whole baby artichoke hearts, but you can substitute 6 ounces frozen, thawed and patted dry.
1 cup jarred whole baby artichoke hearts packed in water, rinsed and patted dry
3 tablespoons chopped fresh basil, divided
¼ cup Vegan Parmesan Substitute (this page) or grated dairy Parmesan cheese, divided
2 tablespoons extra-virgin olive oil, plus extra for drizzling
2 teaspoons lemon juice
¼ teaspoon table salt
¼ teaspoon pepper
Pulse artichoke hearts, 2 tablespoons basil, 3 tablespoons vegan Parmesan substitute, oil, lemon juice, salt, and pepper in food processor until coarsely ground, 6 to 8 pulses, scraping down sides of bowl as needed; season with salt and pepper to taste Spread artichoke mixture evenly over toasts, then sprinkle with remaining 1 tablespoon basil and remaining 1 tablespoon vegan Parmesan. Drizzle with extra oil to taste. Serve.
Serves 8 to 10
Toast the bread just before assembling the bruschetta.
1 (10 by 5-inch) loaf country bread with thick crust, ends discarded, sliced crosswise into ¾-inch-thick pieces
1 garlic clove, peeled
Extra-virgin olive oil
Adjust oven rack 4 inches from broiler element and heat broiler. Arrange bread in single layer on aluminum foil–lined baking sheet. Broil until bread is deep golden and toasted on both sides, 1 to 2 minutes per side. Lightly rub 1 side of each toast with garlic (you will not use all of garlic). Brush with oil and season with salt to taste.
Chiles don’t just make foods hot; they also add nuanced layers of flavor to a dish. And if they’re mild, they can be dishes on their own, as with the Blistered Shishito Peppers (this page). Since everyone’s taste buds are different (one person can enjoy Scotch bonnets while another can’t even go near jalapeños), let your preferences be your guide. Here’s a quick primer.
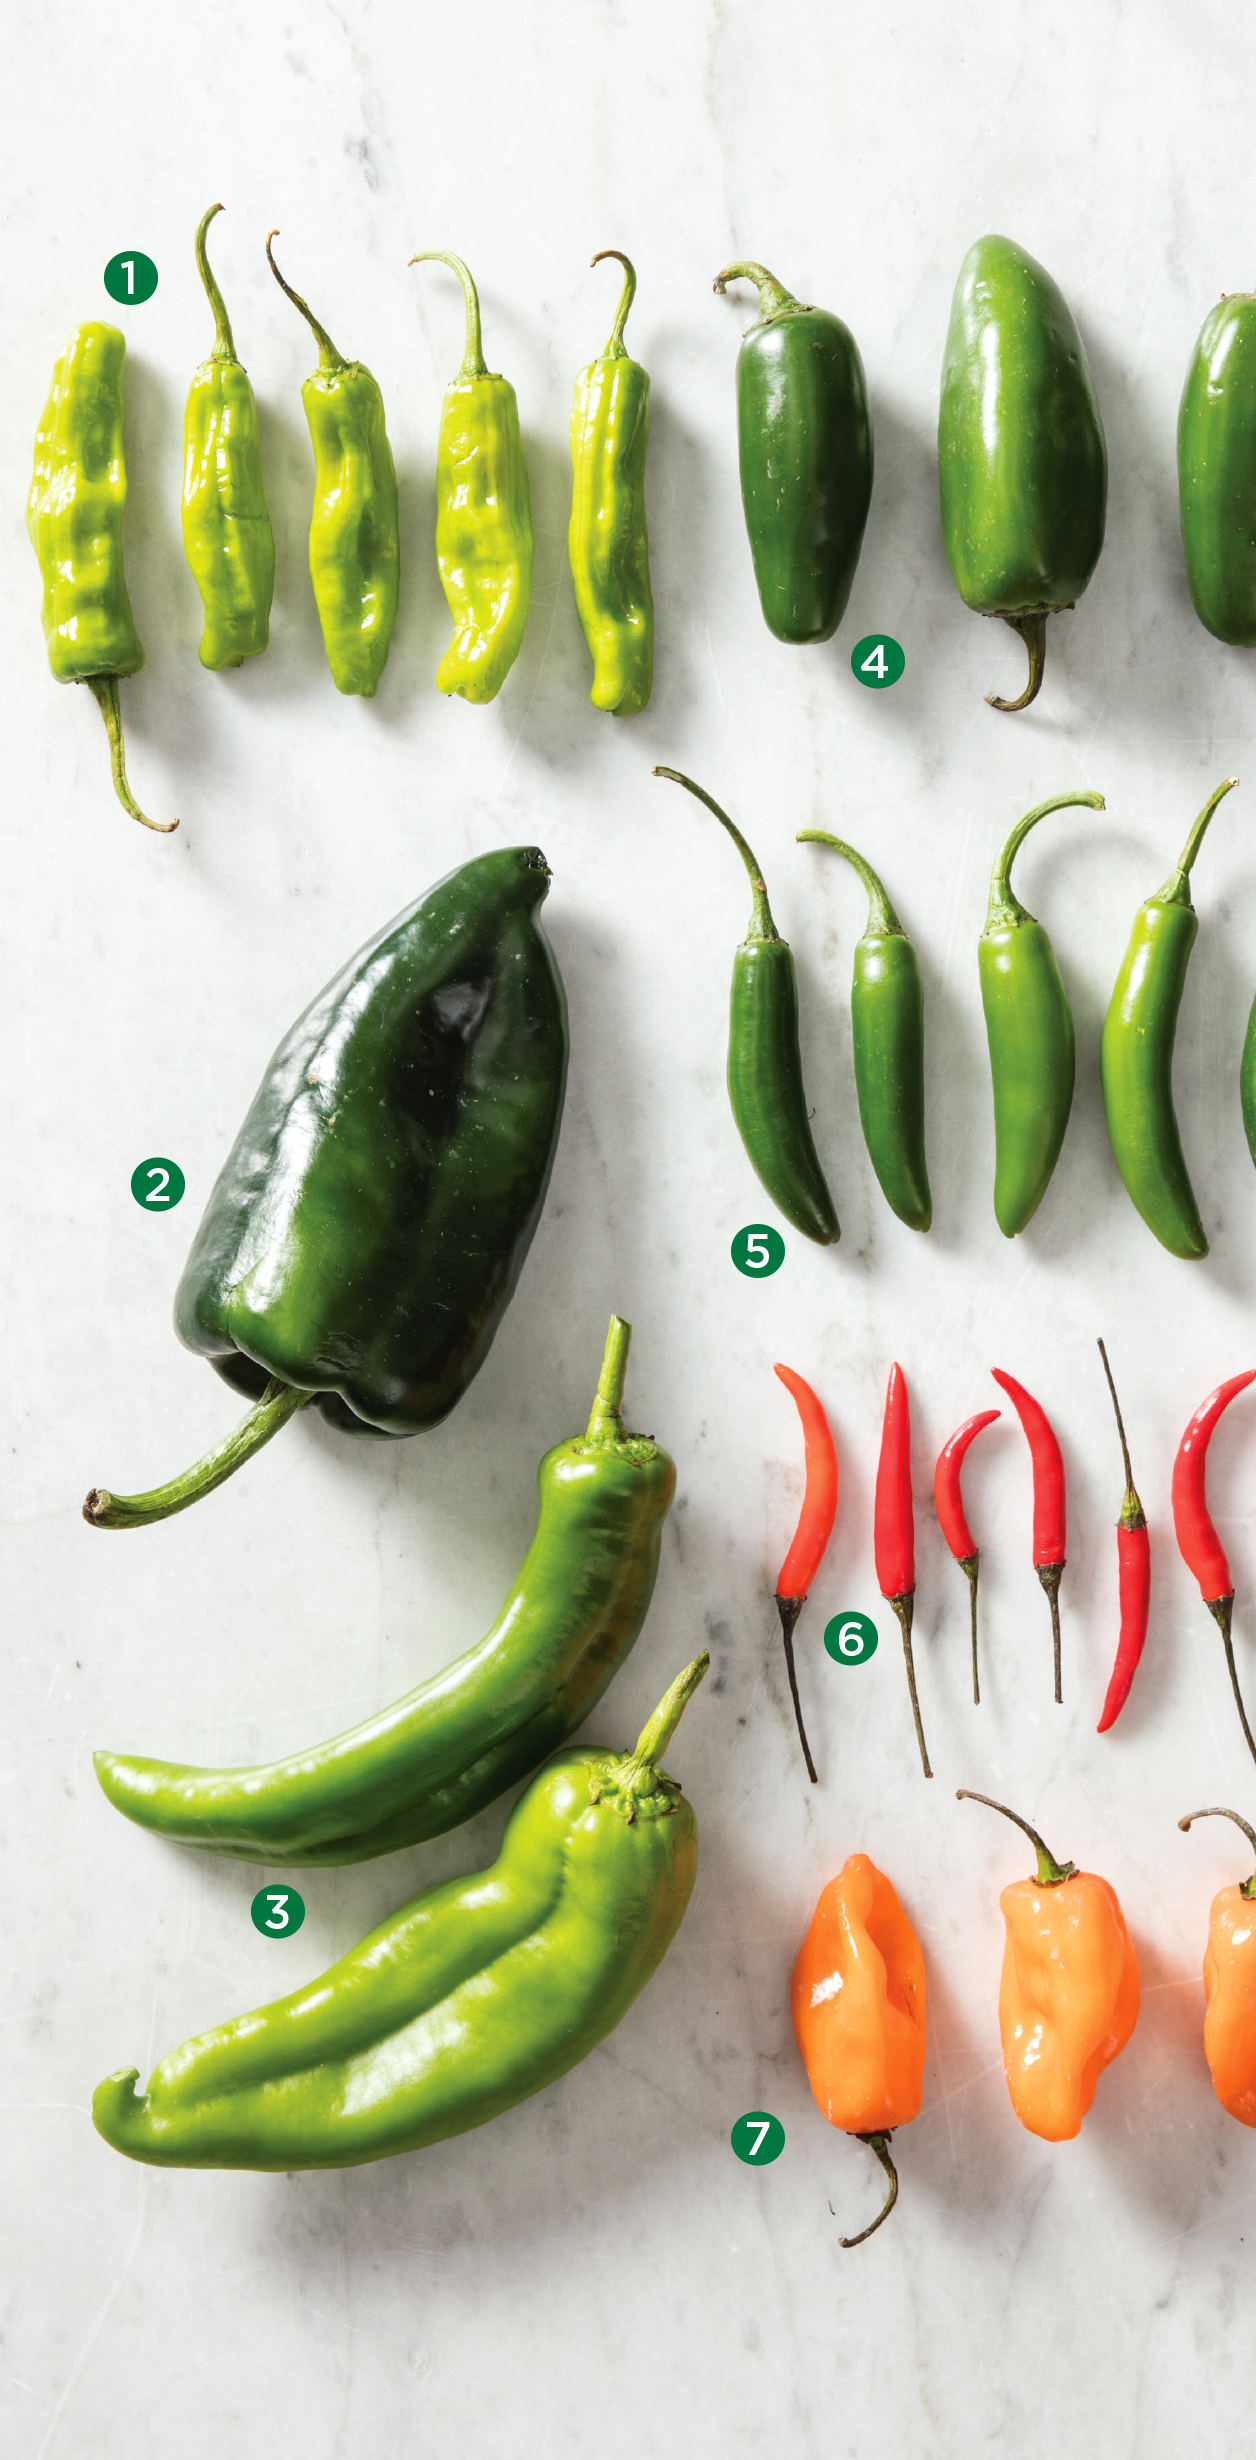
Shishitos are very mild medium-size Japanese chiles that are long, skinny, and shiny bright green, with a grassy, citrusy flavor. Substitute Padrón chiles. Heat: 
Poblanos are mild, large, triangular chiles that are green to red-brown in color, with a crisp, vegetal flavor. Substitute Anaheim chiles. Heat: 
Anaheims are mild to medium-hot large chiles that are long and skinny, yellow-green to red, and mildly tangy and vegetal. Substitute poblanos. Heat: 
Jalapeños are medium-hot small green or red chiles that are smooth and shiny, with a bright, grassy flavor. Substitute serranos. Heat: 
5 Serranos
Serranos are medium-hot small dark green chiles with a bright, citrusy flavor. Substitute jalapeños. Heat: 
Thai chiles are hot, bright red or green, narrow, and petite, with a clean flavor similar to black peppercorns. Substitute a half-dose of habaneros. Heat: 
7 Habaneros
Habaneros are very hot, bulbous, bright orange to red, deeply floral, and fruity. Substitute a double dose of Thai chiles. Heat: 

Guajillos are mild to medium-hot, with a fruity flavor and subtle natural smokiness. Substitute anchos or pasillas. Heat: 
2 Anchos
Anchos are mild to medium-hot. These dried poblanos have deep, earthy flavors that evoke chocolate, coffee, raisins, and licorice. Substitute mulatos or pasillas. Heat: 
Chipotles are medium-hot. These dried, smoked jalapeños have charred wood, tobacco, and barbecue flavors balanced by subtle sweetness. Substitute anchos. Chipotles are also available canned in tangy red adobo sauce. Heat: 
New Mexican chiles are medium-hot, with a sweet, earthy flavor reminiscent of roasted red peppers, tomatoes, and cherries. Substitute guajillos or cascabels. Heat: 
Calabrian peperoncini are hot, tiny, and a bit smoky, with a mildly fruity flavor. They are available as flakes and whole. Arbol chiles are a better substitute than regular red pepper flakes. Heat: 

Serves 8 to 10
Why This Recipe Works Sweet, delicate peas mashed with baby spinach, pungent mint, and bright lemon zest makes a simple and delightfully unexpected topping for bruschetta. The topping seemed simple enough, but early versions we tried fell flat with pasty consistency and underwhelming flavor. To ensure the best texture, we cooked the peas on their own until just tender. A quick whiz in the food processor along with some key additions—spinach for body and deeper green vegetal flavor, mint for unbeatable freshness and aroma, lemon zest and red pepper flakes for zing, olive oil for richness, and just enough water to tie it all together—gave us just the right balance of flavors and textures. A bit of flake sea salt made for an elegant and punchy finish. Be careful not to overprocess the peas. They can go from smashed to pureed in seconds. If you don’t have almonds, you can substitute any toasted nut, or top with Vegan Parmesan Substitute (this page) or grated or shaved dairy Parmesan.
8 ounces frozen peas
¼ cup water
1 cup baby spinach
2 tablespoons chopped fresh mint
2 tablespoons extra-virgin olive oil, plus extra for drizzling
1 teaspoon grated lemon zest
½ teaspoon red pepper flakes, divided
¼ teaspoon table salt
¼ teaspoon pepper
1 recipe Toasted Bread for Bruschetta (this page)
2 tablespoons sliced almonds, toasted
1. Bring peas and water to simmer in medium saucepan over medium heat. Cover, reduce heat to medium-low, and cook until peas are tender, 8 to 10 minutes. Transfer peas (and any remaining water) to food processor. Add spinach, mint, oil, lemon zest, ¼ teaspoon pepper flakes, salt, and pepper and pulse until coarsely ground, 8 to 10 pulses; season with salt and pepper to taste.
2. Spread pea mixture evenly over toasts, then sprinkle with almonds and remaining ¼ teaspoon pepper flakes. Sprinkle with flake sea salt, if desired, and drizzle with extra oil to taste. Serve.
Serves 12 (Makes 24 squares)
Why This Recipe Works With their crispy crust and creamy interior, bite-size polenta squares serve as an excellent base for a hearty appetizer that goes beyond the usual things-on-bread recipes. And to make these elegant little bites even more convenient for serving a crowd, we started with instant polenta. After cooking the polenta on the stovetop, we poured it into a loaf pan and let it firm up in the refrigerator. Once firm, it was easy to slice into bite-size squares. Broiling the polenta on a preheated baking sheet proved to be the best (and most hands-off) method for achieving a nicely browned exterior. We topped the crispy squares with a quick tapenade of sun-dried tomatoes and kalamata olives, brightened with a dash of red wine vinegar. A sprinkle of basil added the perfect herbal and aesthetic finishing touch. Be sure to use instant or quick-cooking polenta; traditional polenta will not work in this recipe.
2 tablespoons plus 1 teaspoon extra-virgin olive oil, divided
4 garlic cloves, minced
½ teaspoon minced fresh rosemary
2 cups water
½ teaspoon table salt
½ cup instant polenta
¼ teaspoon pepper, divided
⅓ cup pitted kalamata olives, chopped fine
⅓ cup oil-packed sun-dried tomatoes, patted dry and chopped fine
½ teaspoon red wine vinegar
1 tablespoon minced fresh basil
1. Line 8½ by 4½-inch loaf pan with parchment paper and lightly coat with vegetable oil spray. Cook 4 teaspoons oil and three-quarters of garlic in 8-inch nonstick skillet over low heat, stirring often, until garlic is golden and fragrant, about 10 minutes. Off heat, stir in rosemary; set aside.
2. Bring water to boil in large saucepan. Reduce heat to low and stir in salt. Slowly add polenta while whisking constantly in circular motion to prevent clumping. Continue to cook, stirring often, until polenta is soft and smooth, 3 to 5 minutes. Off heat, stir in oil-garlic mixture and ⅛ teaspoon pepper.
3. Pour polenta into prepared pan, smooth top, and let cool to room temperature, about 2 hours. Wrap pan tightly in plastic wrap and refrigerate until polenta is very firm, at least 2 hours or up to 24 hours.
4. Combine olives, tomatoes, vinegar, remaining 1 tablespoon oil, remaining garlic, and remaining ⅛ teaspoon pepper in bowl; set aside.
5. Run small knife around edge of polenta, then flip onto cutting board; discard parchment. Trim polenta loaf as needed to create uniform edges. Cut loaf in half lengthwise, then cut each strip crosswise into 6 pieces. Slice polenta pieces in half to form ¼-inch-thick squares. (You should have 24 squares.)
6. Adjust oven rack 3 inches from broiler element. (If necessary, set overturned rimmed baking sheet on oven rack to get closer to broiler element.) Place rimmed baking sheet on rack and heat broiler for 10 minutes. Carefully remove sheet from oven. Spray vegetable oil spray evenly on hot sheet and arrange squares in single layer. Broil polenta until spotty brown and crisp, 8 to 10 minutes. Transfer polenta to serving platter, top each square with olive mixture, sprinkle with basil, and serve.
MAKING POLENTA SQUARES

1. Cut trimmed loaf in half lengthwise, then cut each strip crosswise into 6 pieces.
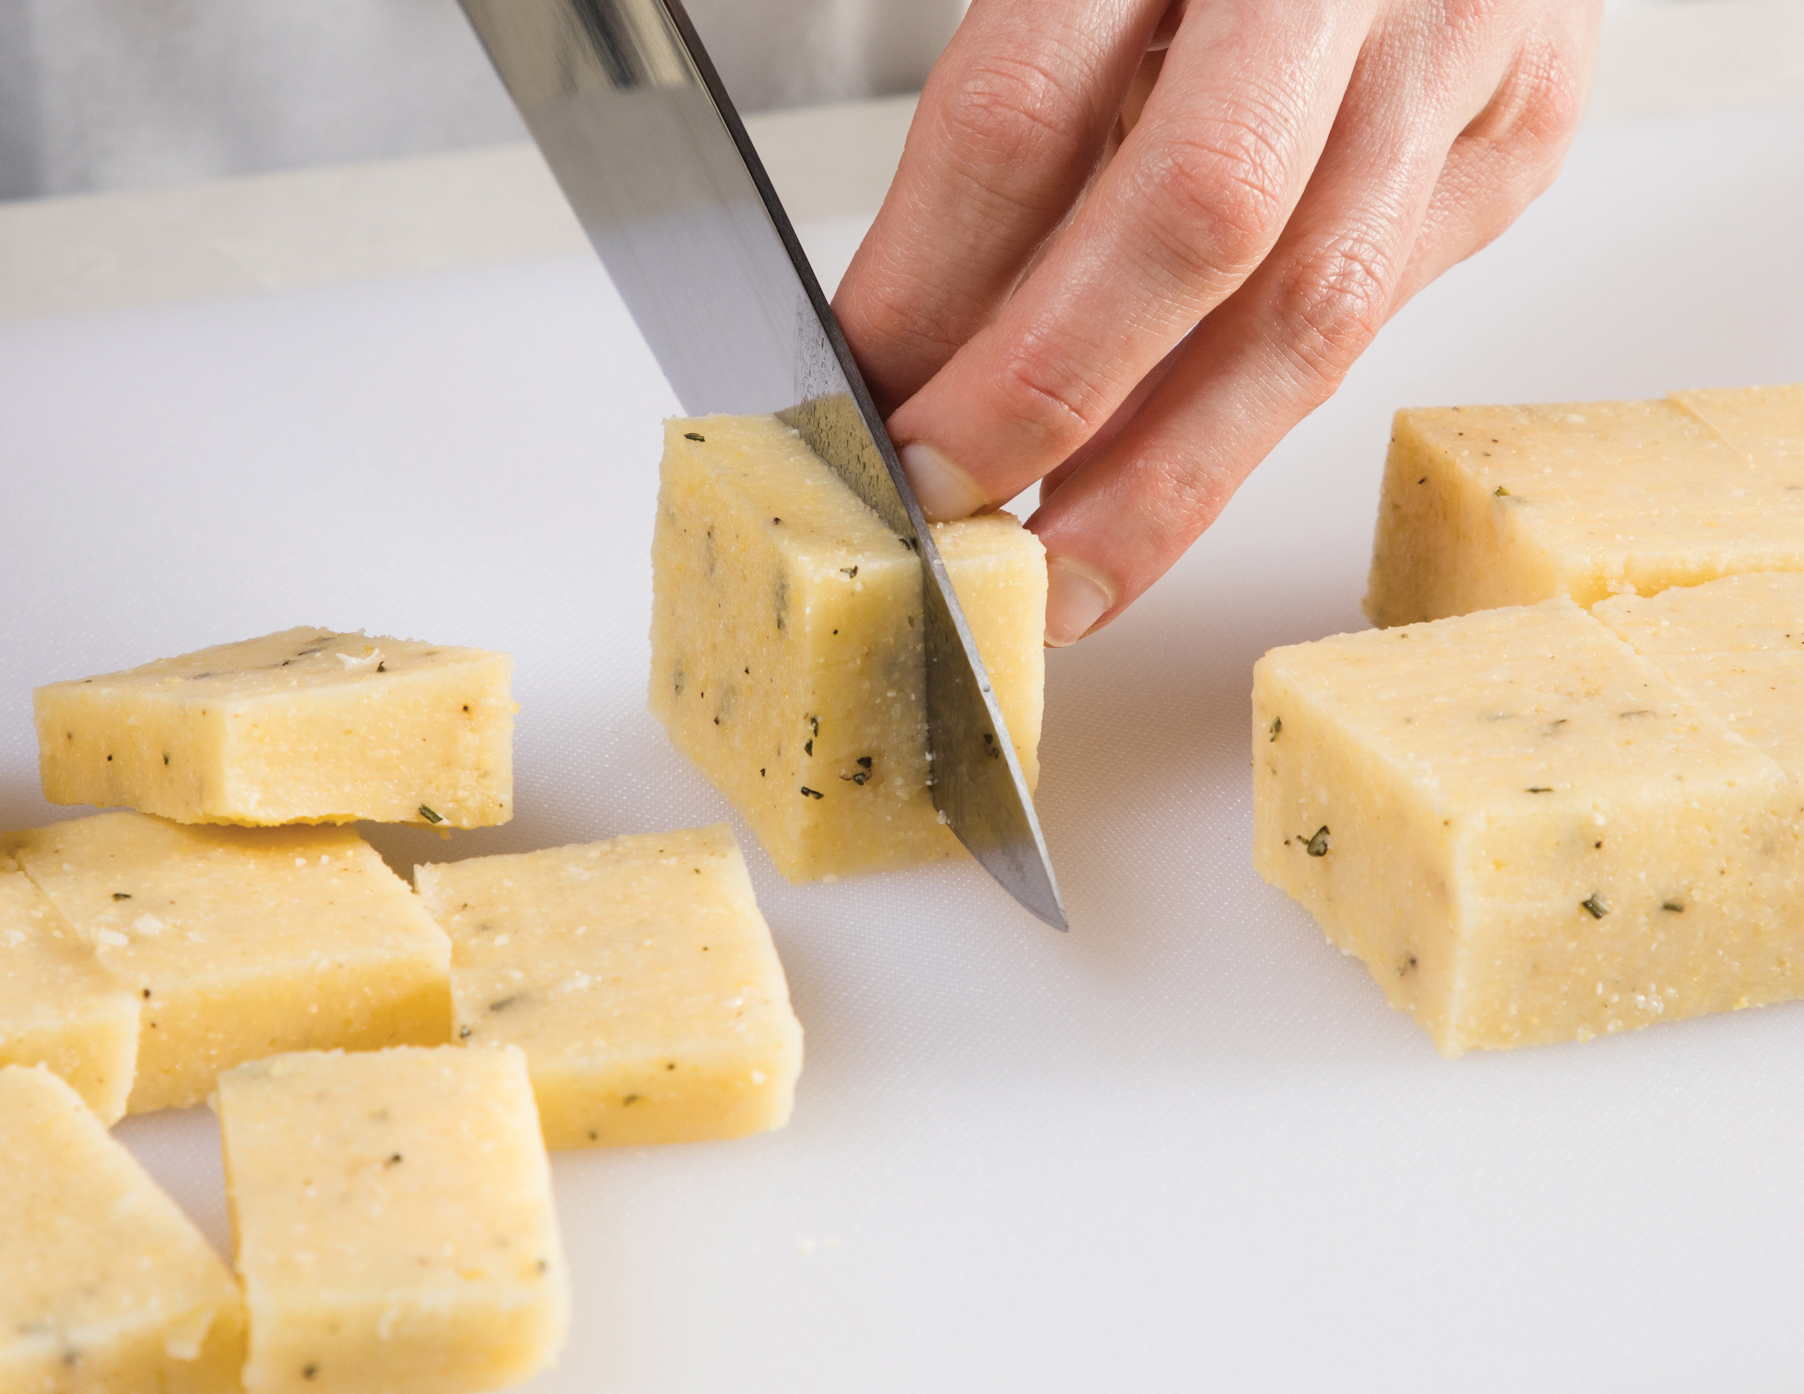
2. Slice polenta pieces in half to form ¼-inch-thick squares.
Serves 6 to 8 (Makes 24 stuffed mushrooms)
Why This Recipe Works Mushrooms are loaded with umami, so it’s no deception to say that these stuffed mushrooms are impressively meaty bites loaded with great savory flavor. To get rid of excess moisture before stuffing, we roasted the mushrooms gill side up until their juice was released and they were browned; we then flipped them gill side down to let the liquid evaporate and the mushrooms brown. To create the filling, we chopped the mushroom stems in the food processor and sautéed them with garlic, shallot, and wine. Our Vegan Parmesan Substitute bound the filling together (dairy Parm also works), and a final hit of acidity from lemon juice brightened the earthy, savory flavor. We stuffed our mushroom caps, sprinkled on a panko topping, and baked them to golden-brown finger-food perfection. You can substitute cremini mushrooms for the white mushrooms.
2 tablespoons panko bread crumbs
7 tablespoons Vegan Parmesan Substitute (this page) or grated dairy Parmesan cheese
3 tablespoons extra-virgin olive oil, divided, plus extra for drizzling
24 large white mushrooms (1¾ to 2 inches in diameter), stems removed and reserved
¼ teaspoon table salt
¼ teaspoon pepper, divided
1 small shallot, minced
2 garlic cloves, minced
¼ cup dry white wine
1 teaspoon minced fresh thyme
1 teaspoon lemon juice
1 tablespoon minced fresh parsley
1. Adjust oven rack to middle position and heat oven to 425 degrees. Line rimmed baking sheet with aluminum foil. Combine panko, 1 tablespoon vegan Parmesan substitute, and 1 tablespoon oil in bowl; set aside.
2. Toss mushroom caps with 1 tablespoon oil, salt, and ⅛ teaspoon pepper and arrange gill side up on prepared sheet. Bake until mushrooms release their moisture and shrink in size, about 15 minutes. Flip caps and continue to bake until well browned, about 5 minutes; remove from oven and set aside.
3. Meanwhile, pulse reserved mushroom stems, shallot, garlic, and remaining ⅛ teaspoon pepper in food processor until finely chopped, 10 to 14 pulses. Heat remaining 1 tablespoon oil in 10-inch nonstick skillet over medium heat until shimmering. Add stem mixture and cook until golden brown, about 5 minutes. Stir in wine and cook until evaporated and mixture is thickened slightly, about 2 minutes. Transfer to bowl and stir in thyme, lemon juice, and remaining 6 tablespoons Parmesan.
4. Flip mushroom caps gill side up. Divide stuffing evenly among caps, then sprinkle evenly with panko mixture. Bake until stuffing is warmed through and topping is deep golden brown, about 10 minutes. Transfer to serving platter, drizzle with extra oil to taste, and sprinkle with parsley. Serve.

Serves 4 to 6
Why This Recipe Works Deemed “better than wings” by our tasters, these tangy, spicy, munchable cauliflower bites will be the new star of your game day table. For a flavorful, ultracrisp coating that would hold up under the buffalo sauce, a mixture of cornstarch and cornmeal gave us the ideal exterior. But because cauliflower is not naturally moist (like chicken), the mixture didn’t adhere; so we dunked the florets in canned coconut milk first, which had the right viscosity. We got decent results when we baked our bites, but we absolutely flipped over the crackly crust and tender interior we achieved through frying. An herby ranch dressing was a cooling foil to the kick of the bites. We used Frank’s Red Hot Original Cayenne Pepper Sauce, but other hot sauces can be used. Use a Dutch oven that holds 6 quarts or more for this recipe.
Buffalo Sauce
¼ cup refined coconut oil
½ cup hot sauce
1 tablespoon packed dark brown sugar
2 teaspoons cider vinegar
Cauliflower
1–2 quarts peanut or vegetable oil
¾ cup cornstarch
¼ cup cornmeal
½ teaspoon table salt
¼ teaspoon pepper
⅔ cup canned coconut milk
1 tablespoon hot sauce
1 pound cauliflower florets, cut into 1½-inch pieces
1 recipe Vegan Ranch Dressing (recipe follows)
1. For the buffalo sauce Melt coconut oil in small saucepan over low heat. Whisk in hot sauce, brown sugar, and vinegar until combined. Remove from heat and cover to keep warm; set aside.
2. For the cauliflower Line platter with triple layer of paper towels. Add oil to large Dutch oven until it measures about 1½ inches deep and heat over medium-high heat to 400 degrees. While oil heats, combine cornstarch, cornmeal, salt, and pepper in small bowl. Whisk coconut milk and hot sauce together in large bowl. Add cauliflower; toss to coat well. Sprinkle cornstarch mixture over cauliflower; fold with rubber spatula until thoroughly coated.
3. Fry half of cauliflower, adding 1 or 2 pieces to oil at a time, until golden and crisp, gently stirring as needed to prevent pieces from sticking together, about 3 minutes. Using slotted spoon, transfer fried cauliflower to prepared platter.
4. Return oil to 400 degrees and repeat with remaining cauliflower. Transfer ½ cup sauce to clean large bowl, add fried cauliflower and gently toss to coat. Serve immediately with dressing and remaining sauce.
Makes about ½ cup
We strongly prefer our favorite vegan mayonnaise, Just Mayo, or our homemade Vegan Mayonnaise (this page).
½ cup plant-based mayonnaise or egg-based mayonnaise
2 tablespoons plain plant-based yogurt or dairy yogurt
1 teaspoon white wine vinegar
1½ teaspoons minced fresh chives
1½ teaspoons minced fresh dill
¼ teaspoon garlic powder
⅛ teaspoon table salt
⅛ teaspoon pepper
Whisk all ingredients in bowl until smooth. (Dressing can be refrigerated for up to 4 days.)
Serves 4 to 6 (Makes 15 tartlets)
Why This Recipe Works These elegant, delectable hors d’oeuvres combine the satisfying creaminess of ricotta—either our homemade Cashew Ricotta (this page) or dairy ricotta—with an exquisitely perfumed mixture of crunchy celery, briny black olives, and aromatic fresh marjoram. What’s more, they’re so easy to make, you may be tempted to skip the party and whip up a batch as a light meal for two. For ease of preparation, we started with store-bought mini phyllo cups, which we crisped briefly in the oven before filling them with ricotta that we brightened with a combination of lemon zest, olive oil, salt, and pepper. Making the topping was simply a matter of combining and lightly seasoning our trio of ingredients. Once filled and topped, these tartlets were ready for the festivities! For our variation, we chose a classic Italian flavor profile of tomatoes and basil to complement our ricotta. We found that a standard (2.1-ounce) box of frozen mini phyllo cups contains 15 pieces. Use two teaspoons to distribute the filling among the phyllo cups. We prefer the tender inner ribs and leaves of the celery heart in this recipe. If you can’t find fresh marjoram, you can substitute fresh oregano or parsley. If using dairy ricotta in this recipe, do not use fat-free ricotta; we prefer the rich flavor of whole-milk ricotta, but part-skim ricotta can be substituted.
¼ cup minced celery
2 tablespoons pitted kalamata olives, chopped
1 tablespoon minced fresh marjoram or oregano
1 tablespoon extra-virgin olive oil, divided, plus extra for drizzling
15 frozen mini phyllo cups
½ cup Cashew Ricotta (this page) or whole-milk dairy ricotta
1 teaspoon grated lemon zest
⅛ teaspoon table salt
⅛ teaspoon pepper
1. Adjust oven rack to middle position and heat oven to 350 degrees. Combine celery, olives, marjoram, and 1 teaspoon oil in bowl; season with salt and pepper to taste and set aside.
2. Arrange phyllo cups on rimmed baking sheet and bake until golden and crisp, 3 to 5 minutes; transfer to wire rack to cool completely.
3. Whisk ricotta, lemon zest, salt, pepper, and remaining 2 teaspoons oil together in bowl. Divide ricotta mixture evenly among cooled phyllo cups then top with celery mixture. Drizzle with extra oil to taste. Serve.
VARIATION
Cashew Ricotta Tartlets with Tomato-Basil Topping
Substitute 1 cored, seeded, and chopped tomato for the celery, 1 minced small shallot for the olives, and shredded fresh basil for the marjoram.
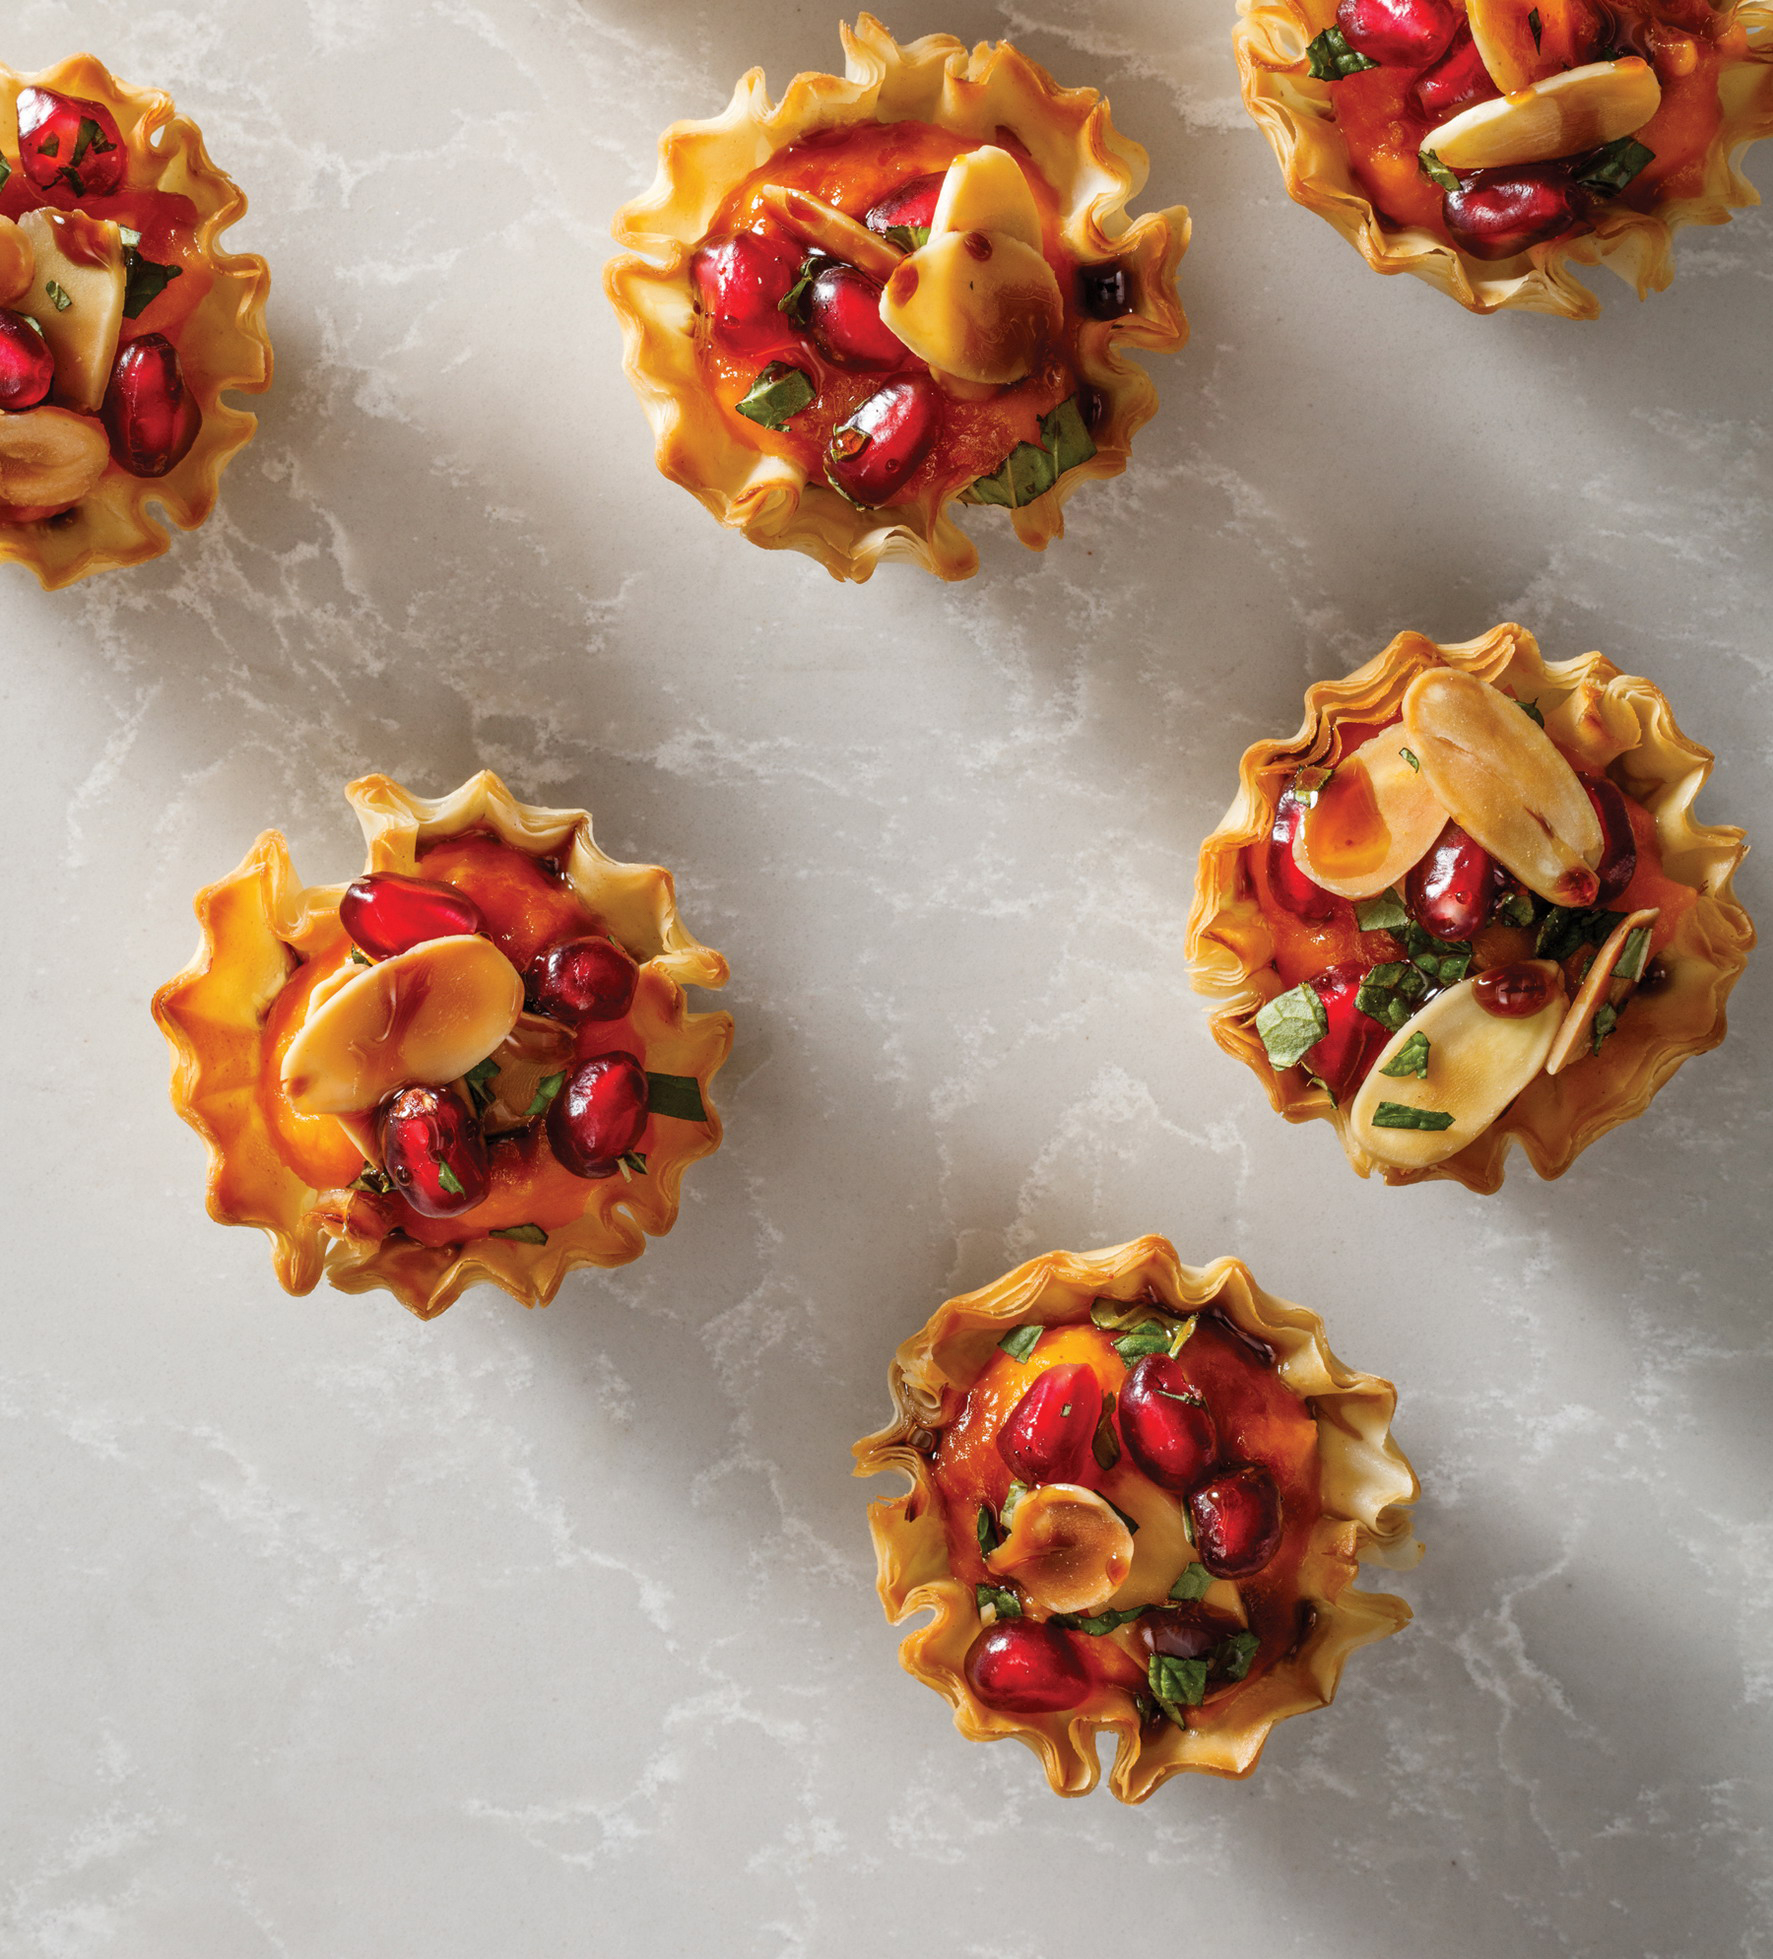
Butternut Squash Tartlets with Almonds, Pomegranate, and Mint
Serves 4 to 6 (Makes 15 tartlets)
Why This Recipe Works An enticing and beautiful addition to any party spread, these exquisite little tartlets—like our cashew ricotta tartlets (this page)—are a cinch to make and require only a handful of carefully balanced elements. We started with store-bought mini phyllo cups, which we crisped briefly in the oven before filling with a delicately sweet and smoky, ultravelvety butternut squash puree. (Steaming the squash in the microwave yielded a puree in less than 15 minutes!) For the topping, we combined bright, juicy pomegranate seeds with toasty sliced almonds and fresh mint, and we finished with a drizzle of tangy, bittersweet pomegranate molasses and smooth, rich olive oil. We found that a standard (2.1-ounce) box of frozen mini phyllo cups contains 15 pieces. Use two teaspoons to distribute the filling among the phyllo cups. If you can’t find pomegranate molasses, you can make your own (this page).
2 tablespoons sliced almonds, toasted
2 tablespoons pomegranate seeds
1 tablespoon chopped fresh mint
1 pound butternut squash, peeled, seeded, and cut into 1-inch pieces (3½ cups)
1 tablespoon extra-virgin olive oil, plus extra for drizzling
½ teaspoon table salt
¼ teaspoon smoked paprika
15 frozen mini phyllo cups
Pomegranate molasses
1. Adjust oven rack to middle position and heat oven to 350 degrees. Combine almonds, pomegranate seeds, and mint in bowl; season with salt and pepper to taste and set aside.
2. Microwave squash in covered bowl, stirring occasionally, until tender, 10 to 12 minutes; drain well. Process squash, oil, salt, and paprika in food processor until smooth, about 30 seconds, scraping down sides of bowl as needed; season with salt and pepper to taste and set aside to cool slightly.
3. Arrange phyllo cups on rimmed baking sheet and bake until golden and crisp, 3 to 5 minutes; transfer to wire rack to cool slightly. Divide squash mixture evenly among phyllo cups then top with almond mixture. Drizzle with pomegranate molasses and extra oil to taste. Serve warm or at room temperature.
Serves 12 (Makes 24 stuffed leaves)
Why This Recipe Works Although they can include meat, stuffed grape leaves (known in Greece as dolmathes) are traditionally a naturally vegan dish, made with rice, herbs, lemon, and other ingredients. We love them served as small bites, but they also make a great hearty addition to salads. To develop a foolproof recipe, we started with the leaves themselves. Not wanting to be restricted by seasonality, we chose to use jarred grape leaves. Since the jarred leaves were packed in brine, we needed to figure out a way to tame their flavor before using them; blanching them briefly in boiling water did the trick. As for the filling, tasters preferred the slight stickiness of short-grain rice to the texture of long-grain rice. Parcooking the rice ensured that it would cook to the perfect doneness as the rolled leaves simmered. We cooked the stuffed grape leaves in a skillet since they fit nicely in a single layer; a bit of lemon juice added to the steaming water gave the leaves citrusy flavor. Lining the bottom of the skillet with the extra, unused grape leaves ensured that the stuffed leaves were not in direct contact with the heat, preventing scorching. We’ve had good luck using Peloponnese and Krinos brand grape leaves. Larger grape leaves can be trimmed to 6 inches, and smaller leaves can be overlapped to achieve the correct size. Take care when handling the grape leaves; they can be delicate and easily tear. Long-grain rice can be substituted for short-grain in this recipe, but the filling will not be as cohesive.
1 (16-ounce) jar grape leaves
2 tablespoons extra-virgin olive oil, plus extra for serving
1 large onion, chopped fine
½ teaspoon table salt
¾ cup short-grain white rice
⅓ cup chopped fresh dill
¼ cup chopped fresh mint
1½ tablespoons grated lemon zest plus 2 tablespoons juice
1. Reserve 24 intact grape leaves, roughly 6 inches in diameter; set aside remaining leaves. Bring 6 cups water to boil in medium saucepan. Add reserved grape leaves and cook for 1 minute. Gently drain leaves and transfer to bowl of cold water to cool, about 5 minutes. Drain again, then transfer leaves to plate and cover loosely with plastic wrap.
2. Heat oil in now-empty saucepan over medium heat until shimmering. Add onion and salt and cook until softened and lightly browned, 5 to 7 minutes. Add rice and cook, stirring frequently, until grain edges begin to turn translucent, about 2 minutes. Stir in ¾ cup water and bring to boil. Reduce heat to low, cover, and simmer gently until rice is tender but still firm in center and water has been absorbed, 10 to 12 minutes. Off heat, let rice cool slightly, about 10 minutes. Stir in dill, mint, and lemon zest.
3. Place 1 blanched leaf smooth side down on counter with stem facing you. Remove stem from base of leaf by cutting along both sides of stem to form narrow triangle. Pat leaf dry with paper towels. Overlap cut ends of leaf to prevent any filling from spilling out. Place heaping tablespoon filling ¼ inch from bottom of leaf where ends overlap. Fold bottom over filling and fold in sides. Roll leaf tightly around filling to create tidy roll. Repeat with remaining blanched leaves and filling.
4. Line 12-inch skillet with single layer of remaining leaves. Place rolled leaves seam side down in tight rows in prepared skillet. Combine 1¼ cups water and lemon juice, add to skillet, and bring to simmer over medium heat. Cover, reduce heat to medium-low, and simmer until water is almost completely absorbed and leaves and rice are tender and cooked through, 45 minutes to 1 hour.
5. Transfer stuffed grape leaves to serving platter and let cool to room temperature, about 30 minutes; discard leaves in skillet. Drizzle with extra oil before serving.
VARIATION
Stuffed Grape Leaves with Currants and Pine Nuts
Omit dill and lemon juice. In step 2, add 1½ teaspoons ground allspice and ¼ teaspoon ground cinnamon to cooked onions, and add ¼ cup toasted pine nuts and ¼ cup currants to cooled rice. Increase water in step 4 to 1⅓ cups.
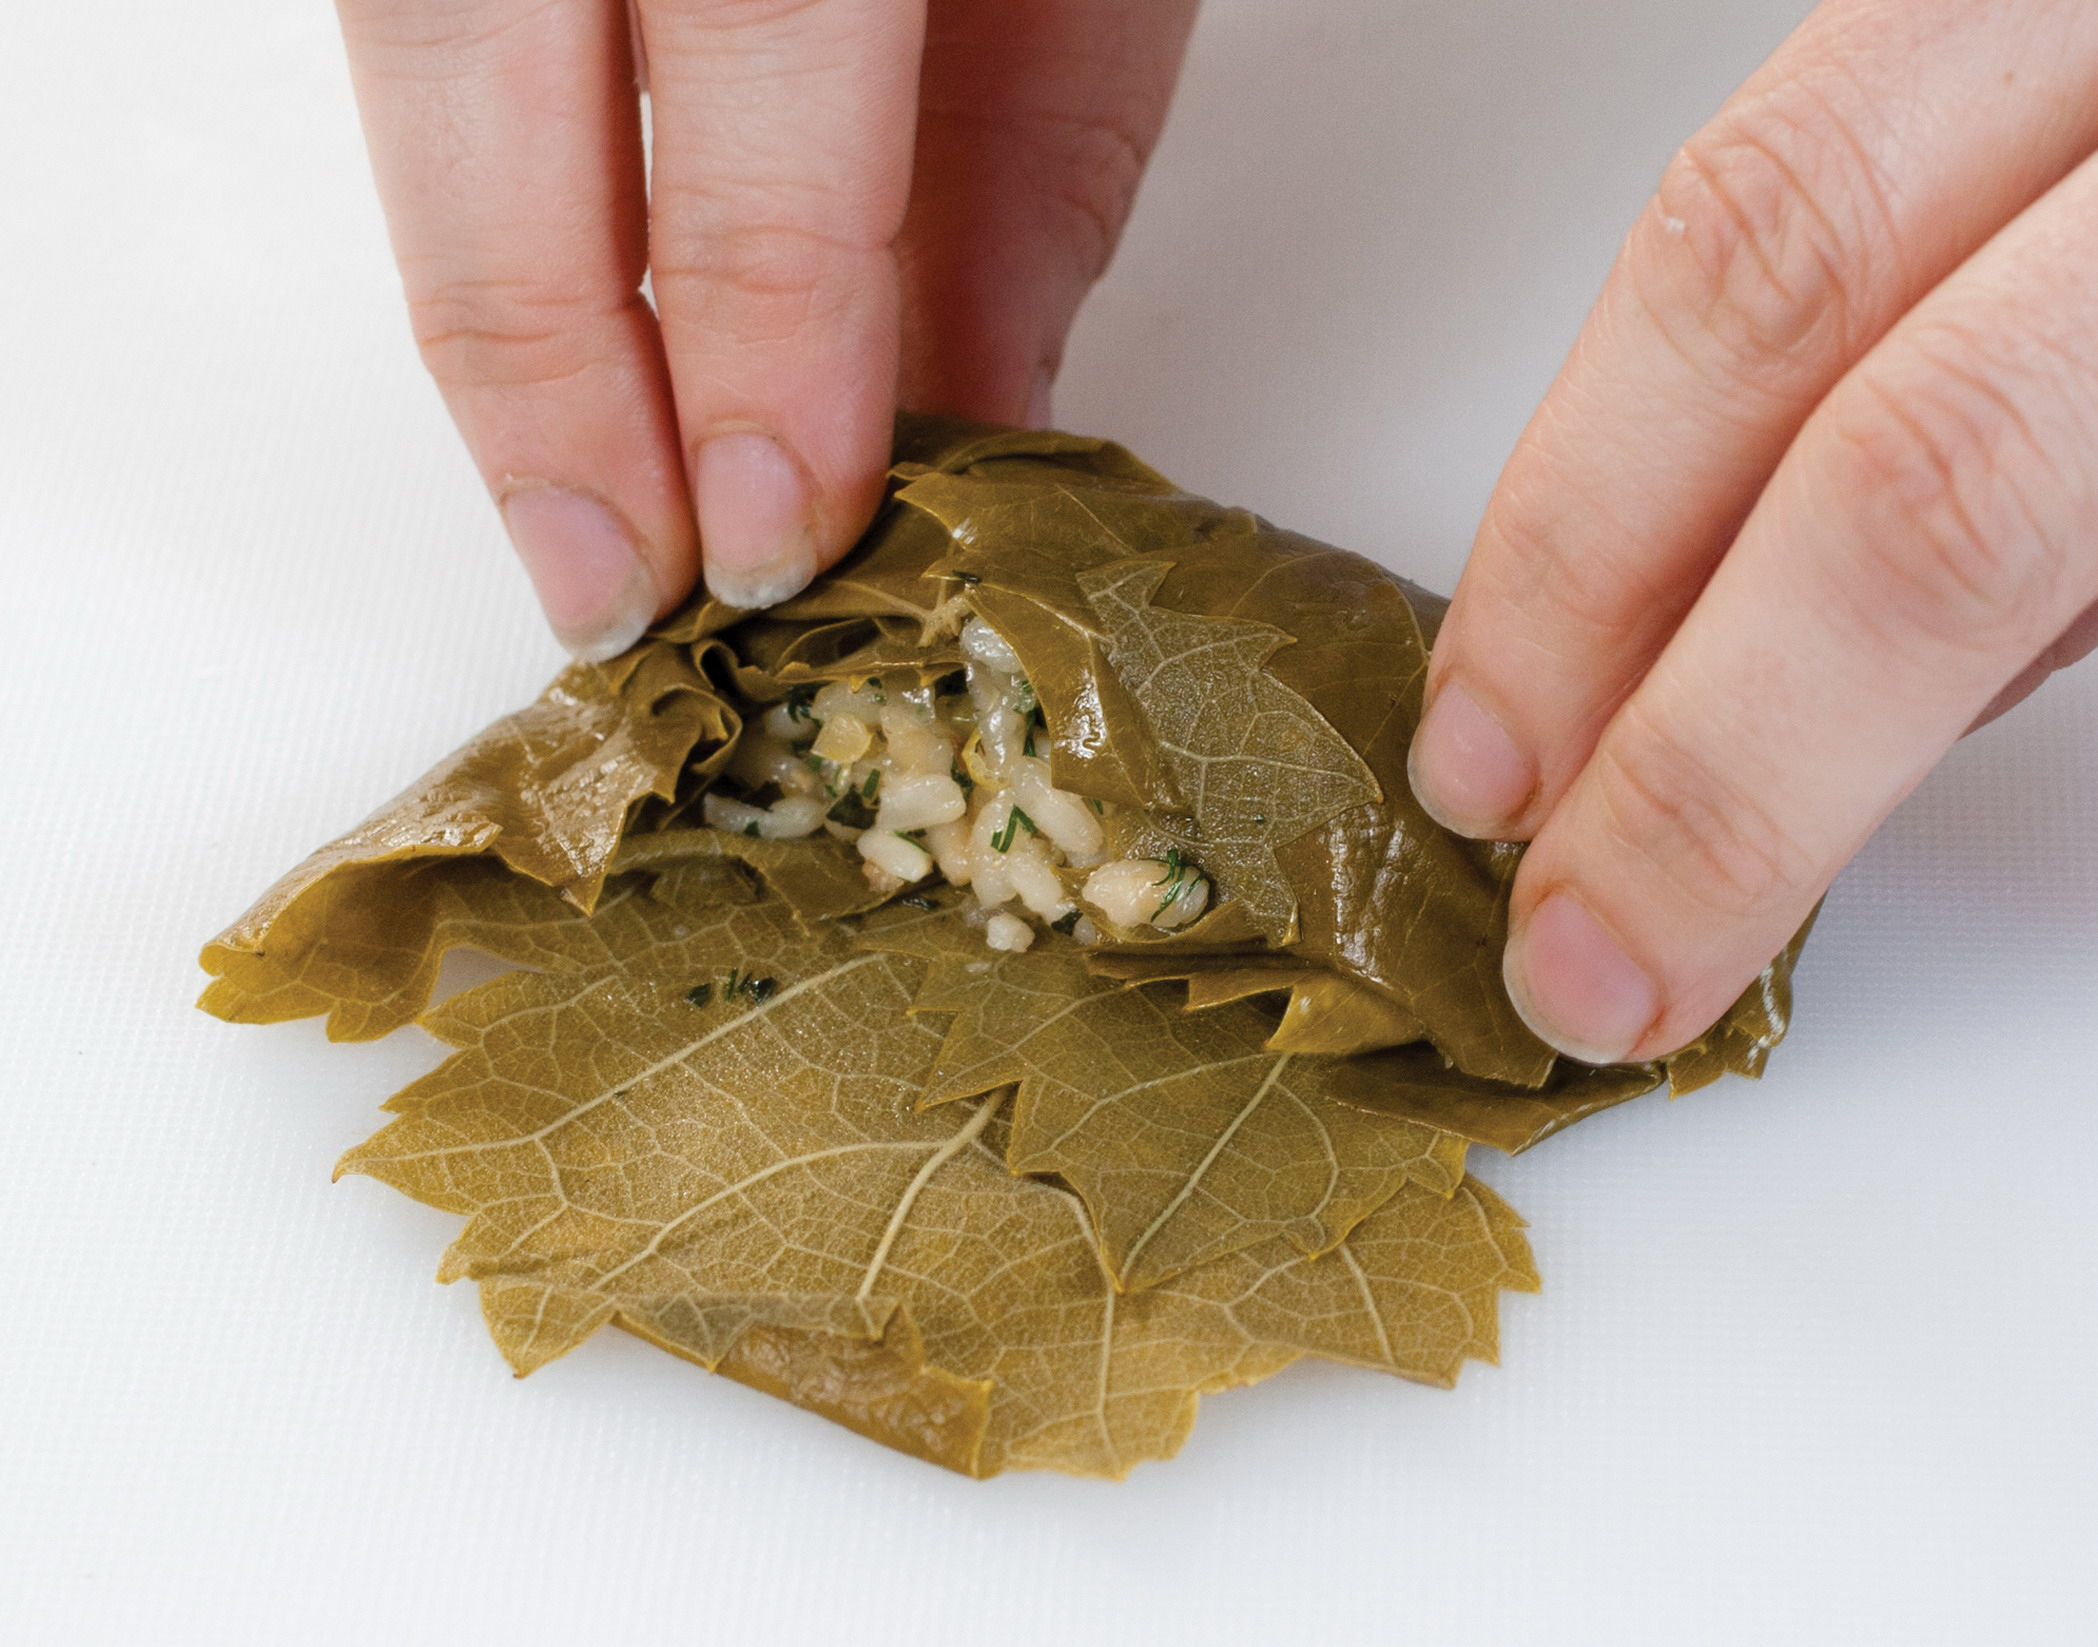
ASSEMBLING GRAPE LEAVES
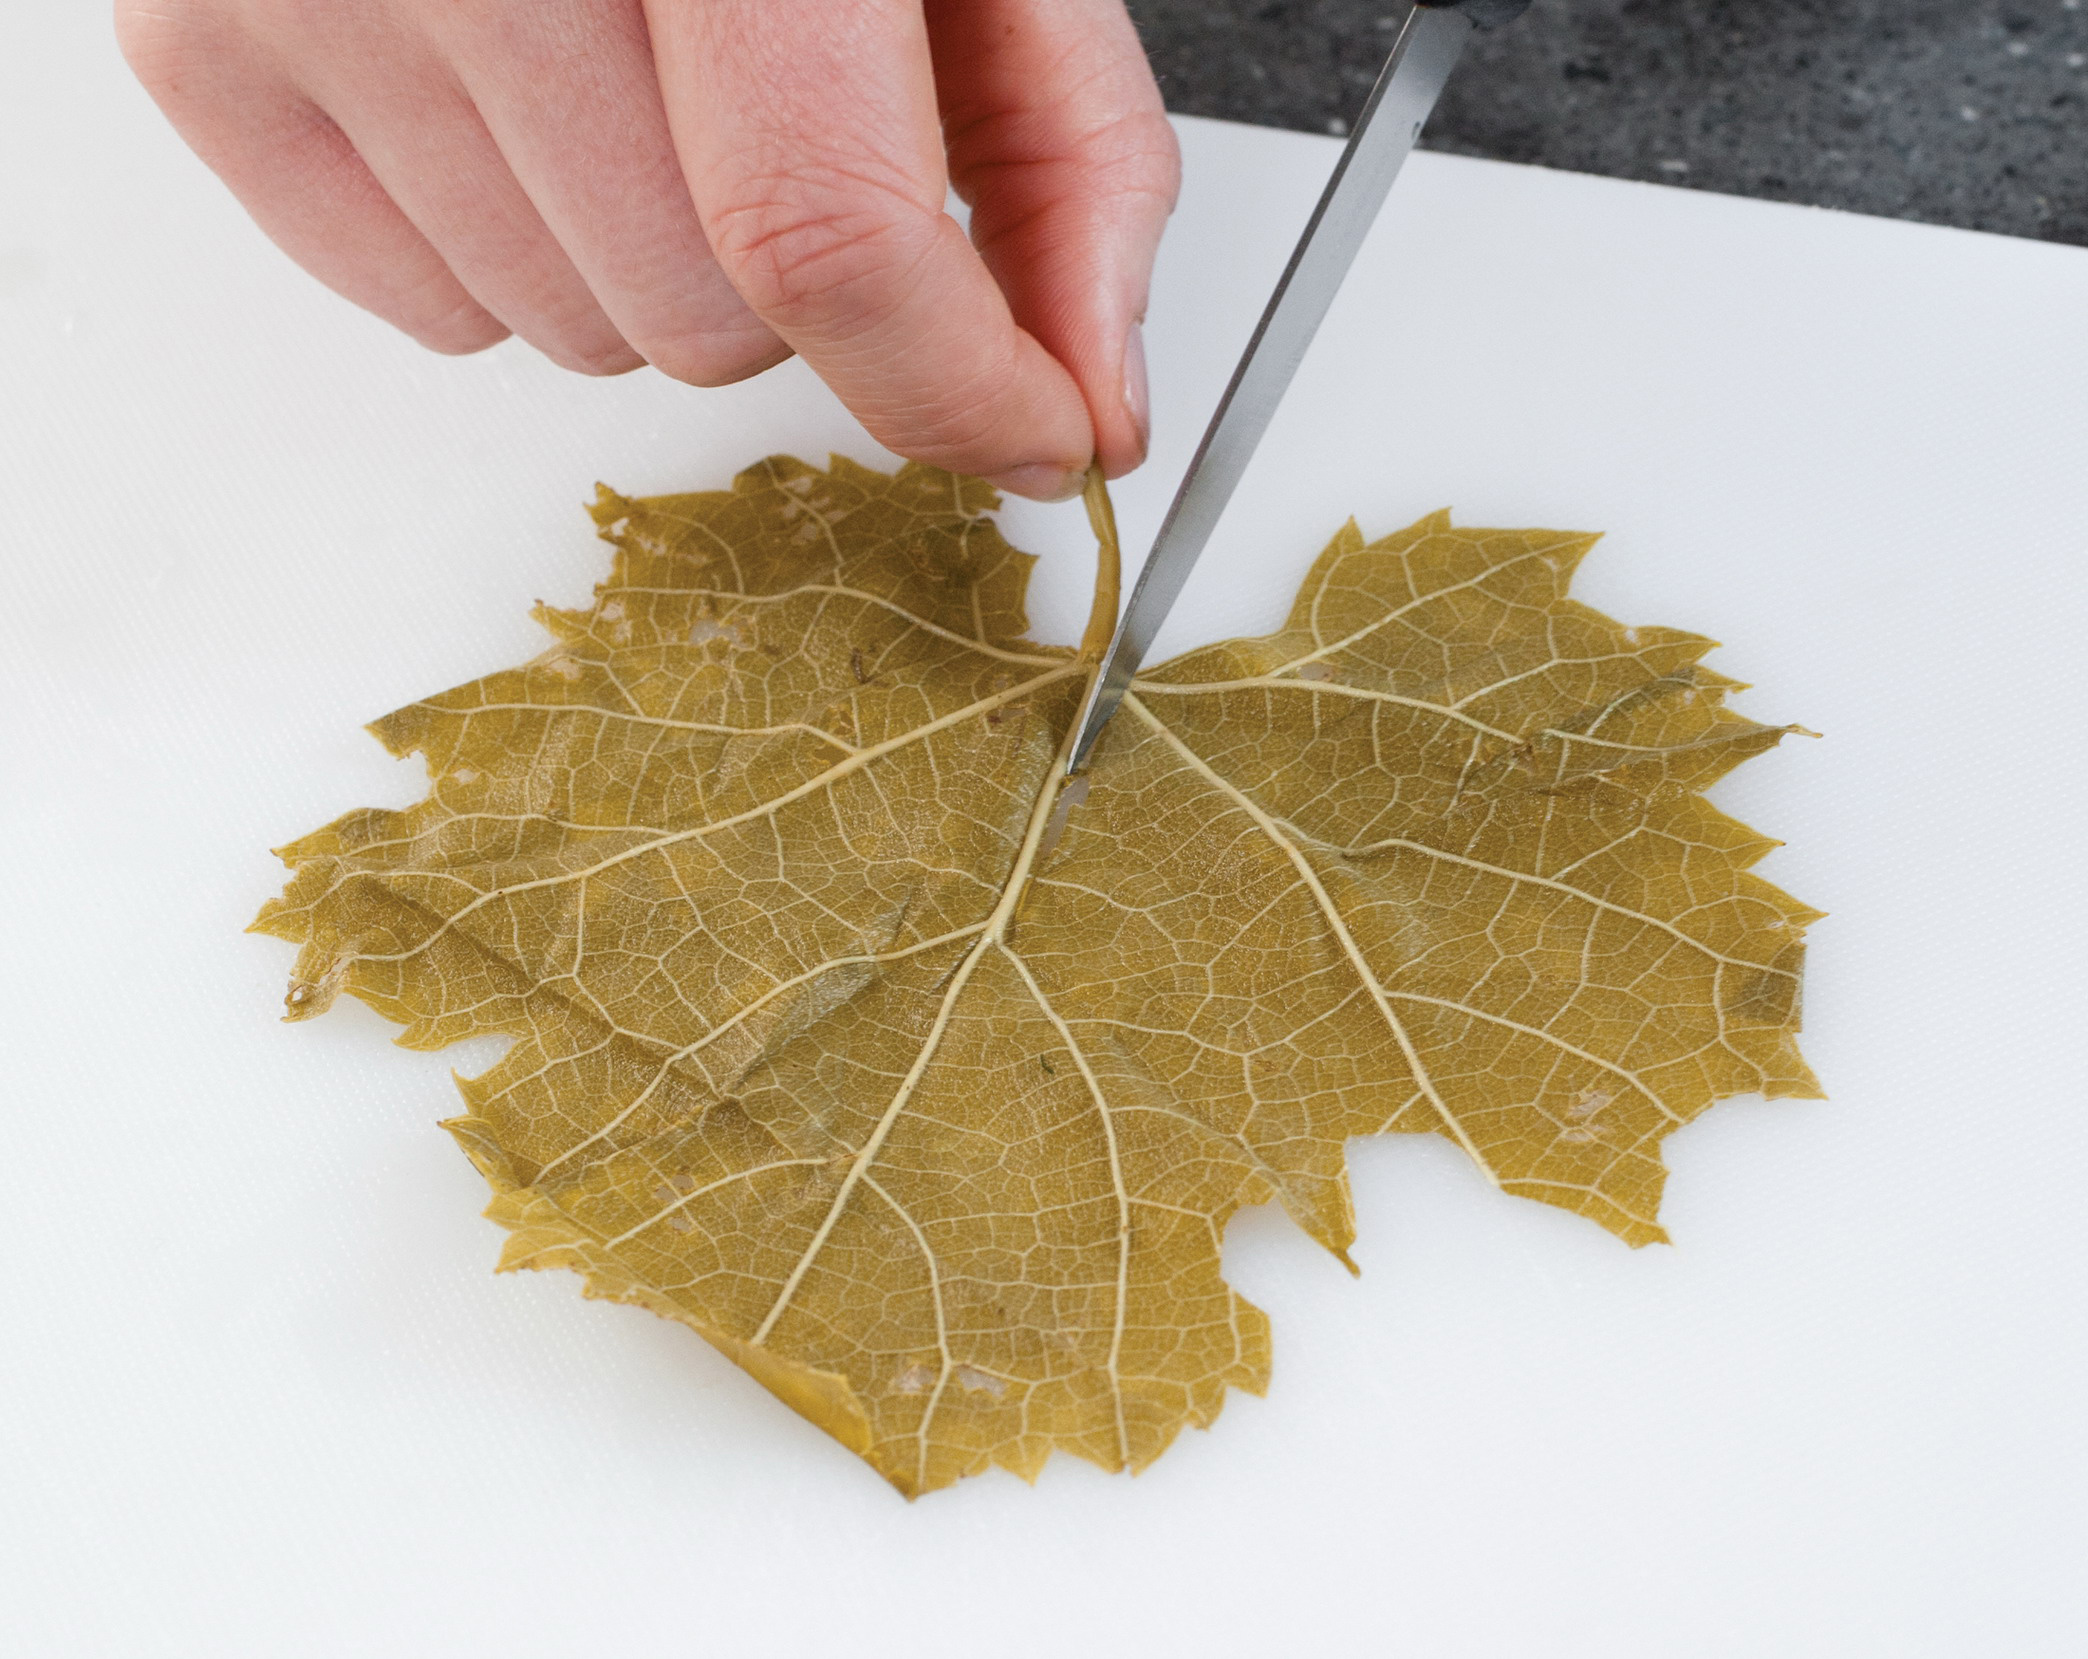
1. Place 1 leaf, smooth side down, on counter. Remove any thick stem from base of grape leaf by cutting along both sides of rib to form narrow triangle.

2. Overlap ends of leaf to prevent any filling from spilling out.
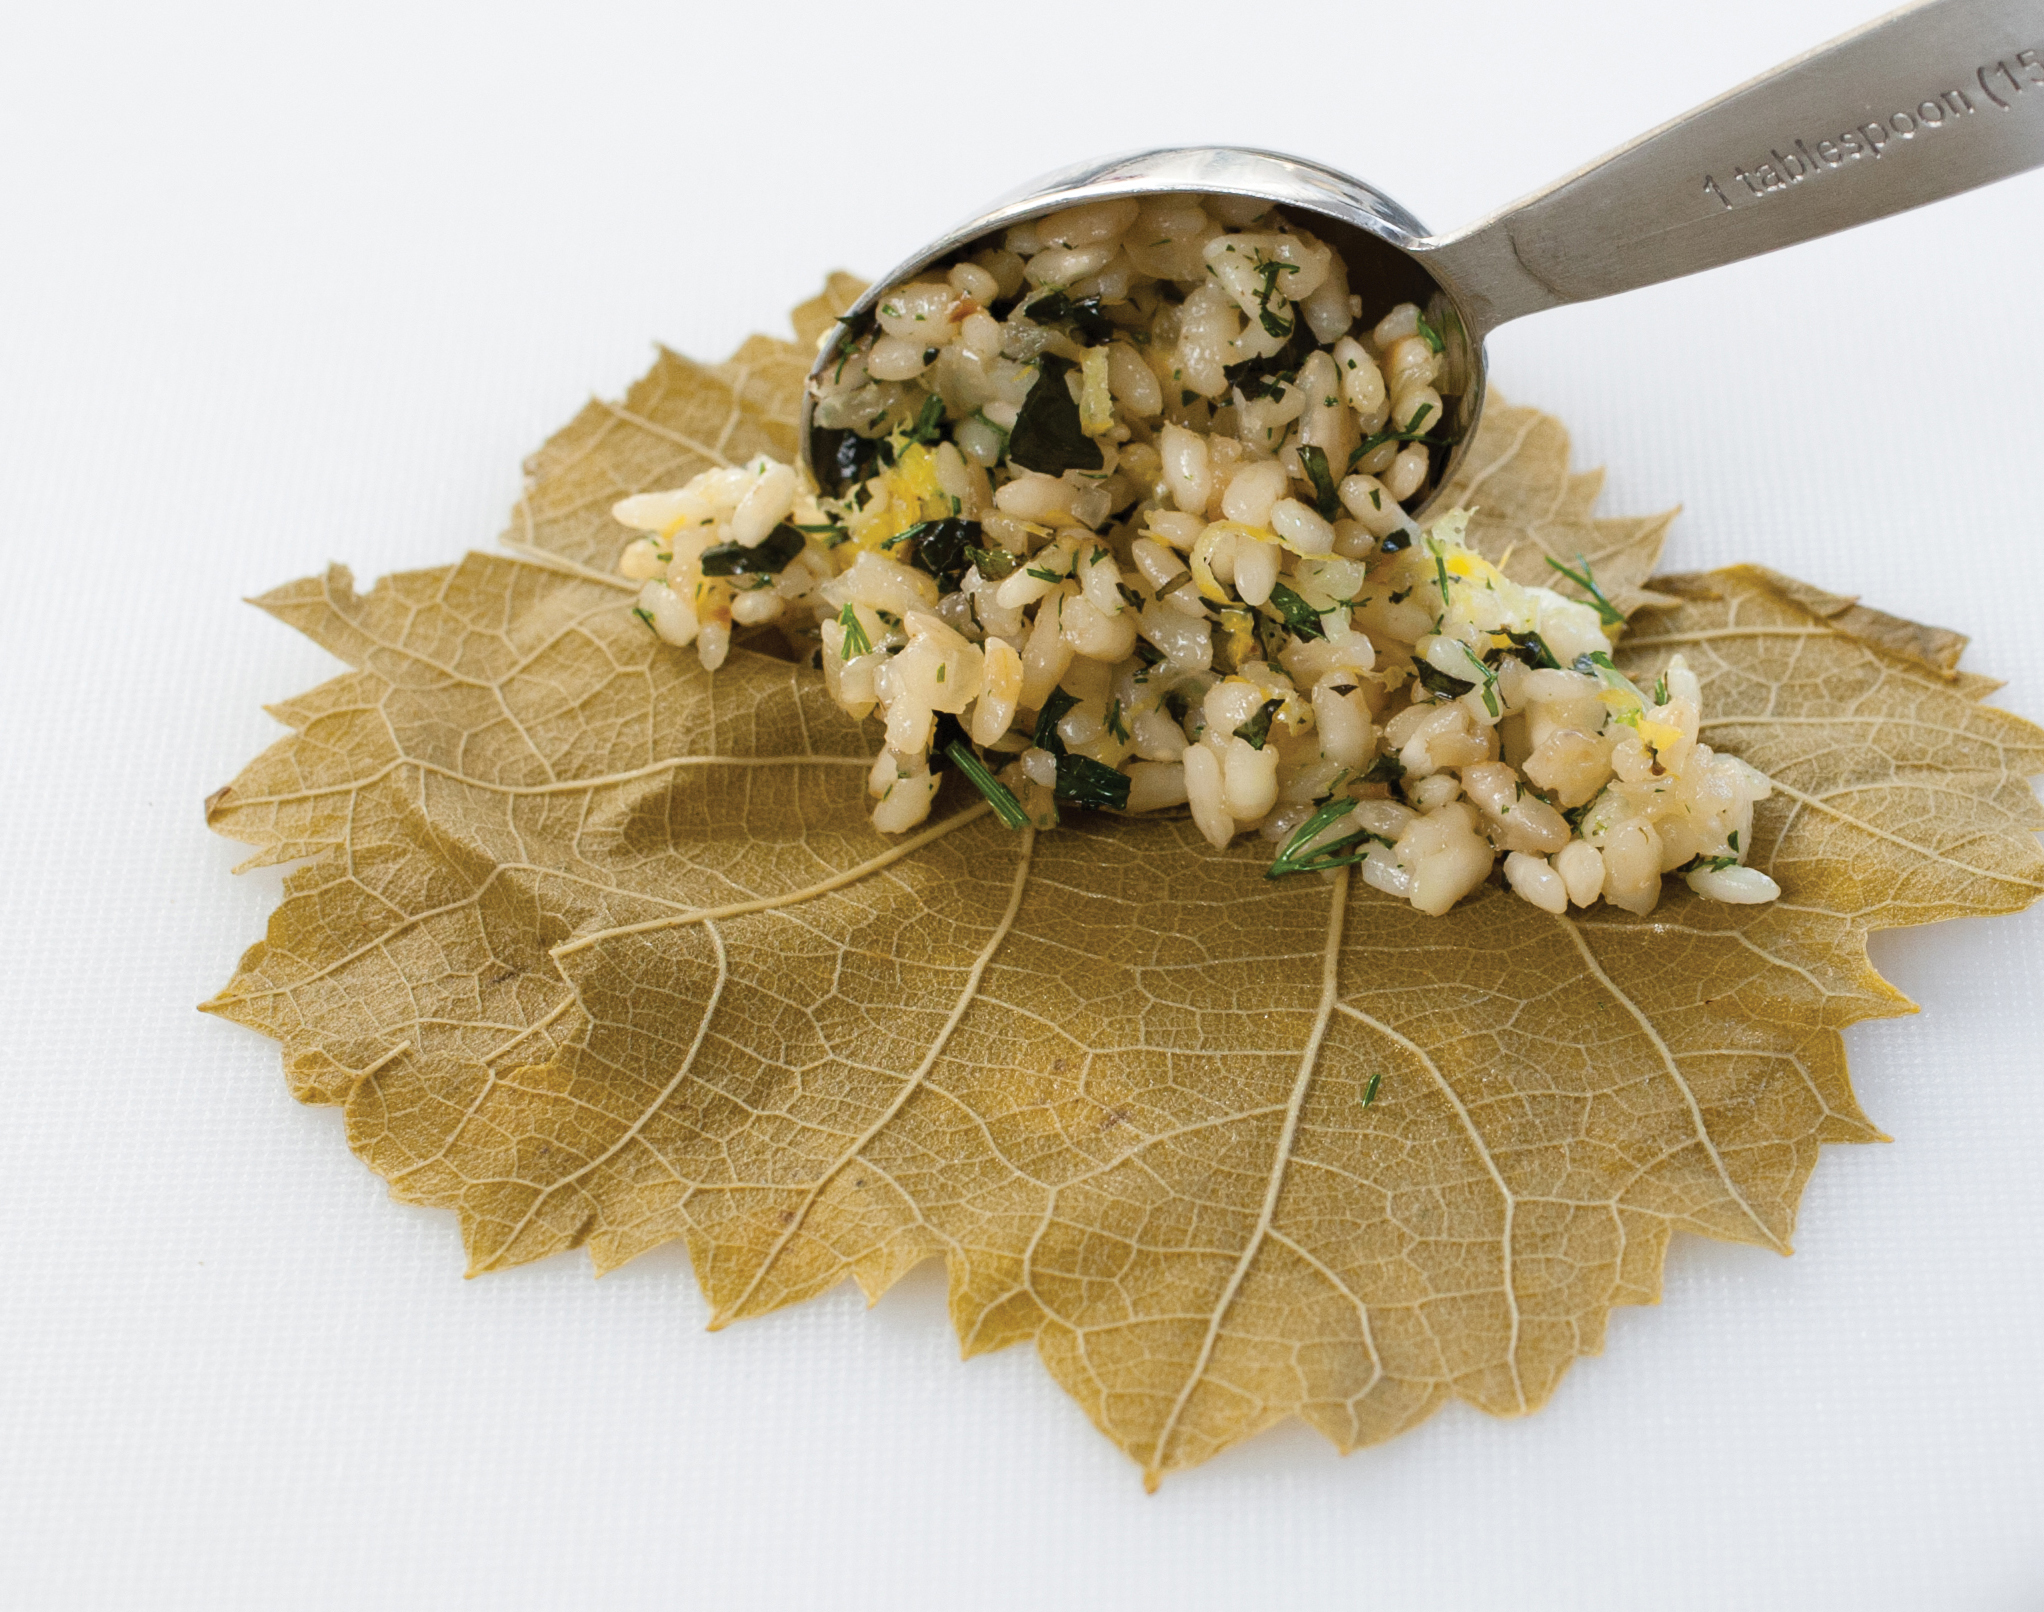
3. Place 1 heaping tablespoon filling ¼ inch from bottom of leaf where ends overlap.
4. Fold bottom over filling and fold in sides. Roll leaf tightly around filling to create tidy roll. Repeat with remaining filling and reserved leaves.