Basic Recipes
Stock
Broth and bannocks, broth and bread. A quick and common meal for everyone from crofters to castle inhabitants throughout Outlander, as well as the real world. Stock was an essential kitchen staple for hundreds of years, when everything was homemade, food supplies were often stretched, and nothing was ever wasted. Especially the bones.
Culinarily speaking, there is a difference between stock and broth. Stock is made from bones and a few aromatics, while broth is stock that has been seasoned with salt and spices, and possibly enriched with meat, to make it deliciously drinkable all on its own. Because we use it primarily as a base for soup and sauces, we use stock rather than broth in Outlander Kitchen.
No matter what animal’s bones it is made from, meat and poultry stock can be divided into two broad types: white and brown. A white stock is made from raw bones and has almost no color, while a richly colored brown stock is made from bones roasted with tomato paste.
Ideally, white stock is used in cream soups, light sauces, and anywhere else where a neutral color is desired, like Slow-Cooked Chicken Fricassee. Brown stock finds its home in dark soups and stews such as Jenny’s Hare Pie, pan sauces and gravies, and in mugs, seasoned to taste for sipping. In reality, for most recipes, you can use white and brown stock interchangeably, depending on what you have on hand.
Whether from bird, beast, or vegetable, follow these rules to concoct the perfect pot of stock.
• For a crystal-clear stock, trim all the bones of excess skin, fat, and meat and cover them with cold water. After the initial boil of the bones, keep the stock at a slow simmer and skim it regularly with a slotted spoon. Never cover a stock with a lid, nor stir it.
• A generally acceptable ratio of bones to water for stock is 50% bones by weight. For example, to make 2 quarts of stock, you need about 2 pounds of bones.
• Avoid disturbing the bones and vegetables in the bottom of the pot and keep the liquid clear by ladling the finished stock through a strainer lined with several layers of cheesecloth.
• Cool your freshly made stock quickly to avoid food-borne illness. Pour the hot liquid into a glass or metal container, and immerse that in another container or sink filled with ice or cold water. Refrigerate immediately when cooled.
• NEVER SALT A STOCK. When you use your stock in a soup or sauce, or serve it, steaming in mugs for those coming out of the cold, that is the time to season it with salt and maybe a little freshly cracked pepper.
Hot Broth at Castle Leoch
(Brown Chicken Stock)
“Ye need not be scairt of me,” he said softly. “Nor of anyone here, so long as I’m with ye.” He let go and turned to the fire.
“You need somethin’ hot, lass,” he said matter-of-factly, “and a bit to eat as well. Something in your belly will help more than anything.” I laughed shakily at his attempts to pour broth one-handed, and went to help. He was right; food did help. We sipped broth and ate bread in a companionable silence, sharing the growing comfort of warmth and fullness.
Finally, he stood up, picking up the fallen quilt from the floor. He dropped it back on the bed, and motioned me toward it. “Do ye sleep a bit, Claire. You’re worn out, and likely someone will want to talk wi’ ye before too long.”
—Outlander, chapter 4, “I Come to the Castle”
The pure liquid nutrition of homemade stock or broth is infinitely superior to anything you can buy in the store—zero salt and additives, but rich with protein to fortify even the most exhausted time travelers.
To serve as is, heat to boiling and season with salt and pepper, or use as the base for any number of soups, stews, and sauces, including Ragoo’d Pork.
Makes about 2 quarts
Ingredients
2 pounds (900 grams) raw chicken bones, trimmed of skin and fat
1 medium onion, chopped (see Knife Skills)
1 small carrot, chopped
1 celery stalk, chopped
1 tablespoon tomato paste
2 bay leaves
2 fresh thyme sprigs
6 fresh parsley sprigs
6 whole peppercorns
Method
Move a rack to the middle rung and heat the oven to 400°F.
Arrange the bones in a single layer in a roasting pan, and roast until they begin to brown, about 20 minutes. Add the onions, carrots, and celery to the pan and toss well. Use a pastry brush or spoon to spread the tomato paste onto the bones and vegetables. Roast for another 15 minutes, or until the vegetables are just beginning to brown.
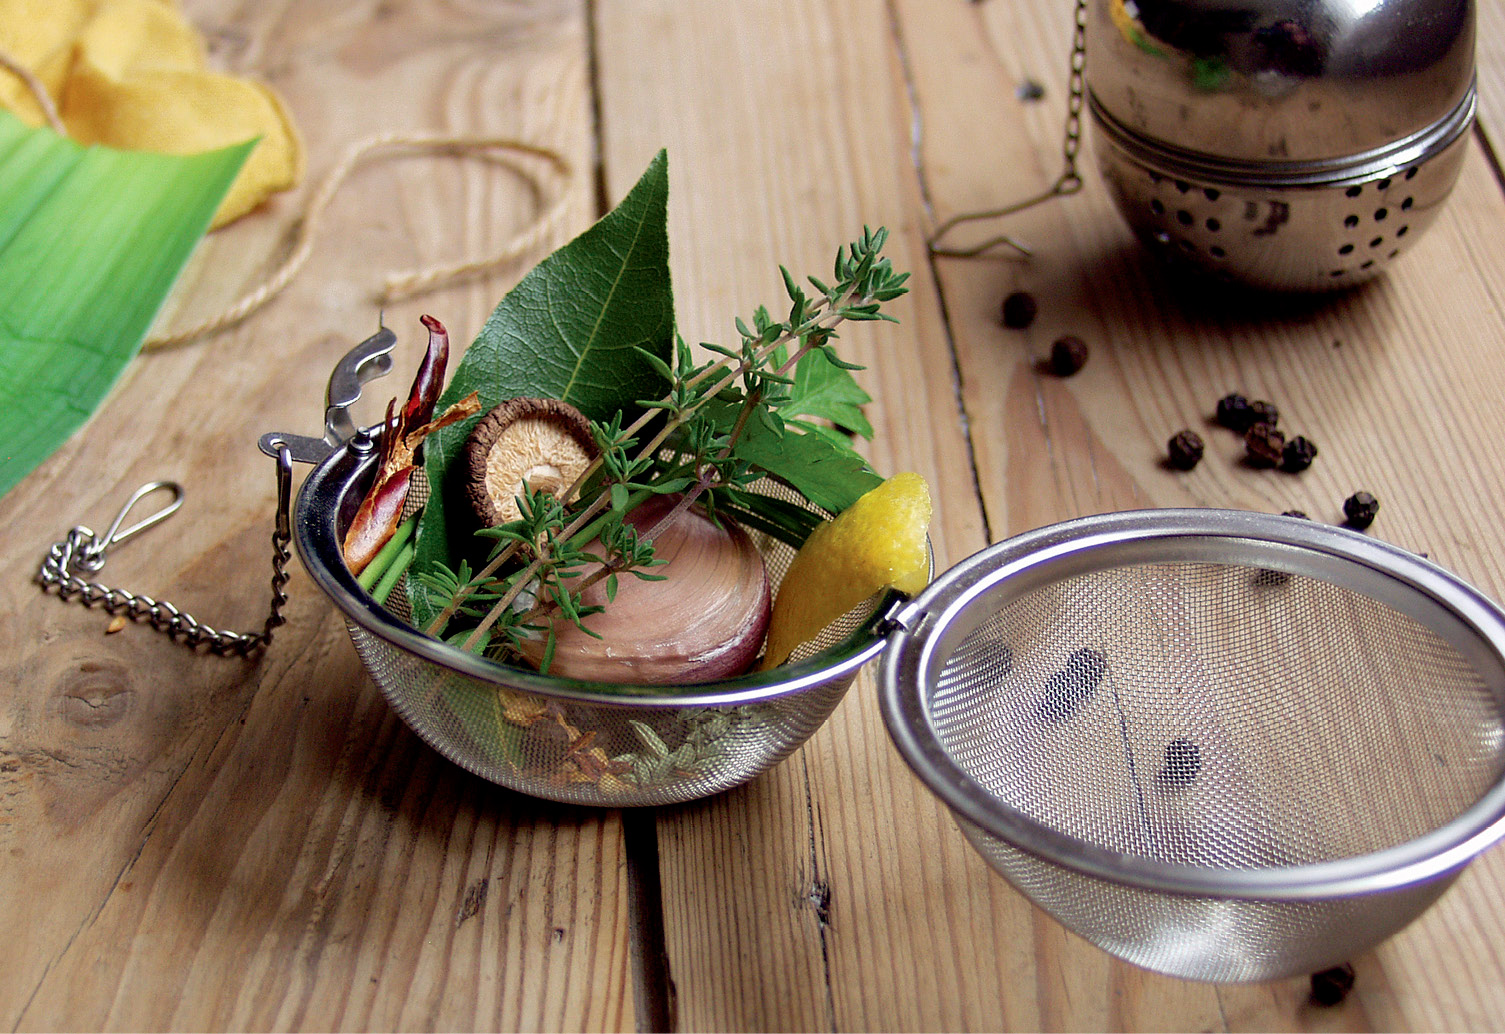
Meanwhile, make a bouquet garni. Wrap the bay leaves, thyme, parsley, and peppercorns in a square of cheesecloth and tie with string, or enclose the items in a large tea ball.
Use a slotted spoon to transfer all the bones and veggies (and a minimum of the fat) into a stockpot. Add 2 quarts cold water, plus more, if necessary, to cover the bones by 2 inches. Bring to a boil over high heat, and immediately reduce the heat to low for a slow simmer.
Skim the surface of the stock with a slotted spoon to remove impurities and fat. Add the bouquet garni to the pot and continue to cook at a slow simmer, uncovered, for 2 hours. Skim and top up the water as needed to keep the bones and veggies well covered. Do not stir.
Ladle the finished stock through a strainer lined with several layers of dampened cheesecloth or a clean cotton or linen dishcloth into a glass or metal container. Gently press on the solids to extract all the liquid.
Cool quickly, refrigerate overnight, and discard the hardened fat from the surface of the cold stock before storing in the fridge up to 5 days. Freeze up to 6 weeks.
Notes
• Chicken necks and backs make a rich, full-bodied stock. For an extra-delicious and nutritious boost of gelatin, include a few chicken feet too.
• To use cooked poultry carcasses in this recipe, brush the bones and vegetables with the tomato paste and roast for 15 minutes before continuing with the recipe.
• To make brown beef stock, replace the chicken bones with the same weight of beef bones and increase the initial roast time to 30 minutes before adding the vegetables and tomato paste. Simmer the beef bones for 6 to 8 hours to extract the maximum richness and flavor.
Murphy’s Beef Broth
(White Beef Stock)
“Wot, not the broth, too?” Murphy said. The cook’s broad red face lowered menacingly. “Which I’ve had folk rise from their deathbeds after a sup of that broth!”
He took the pannikin of broth from Fergus, sniffed at it critically, and thrust it under my nose.
“Here, smell that, missus. Marrow bones, garlic, caraway seed, and a lump o’ pork fat to flavor, all strained careful through muslin, same as some folks bein’ poorly to their stomachs can’t abide chunks, but chunks you’ll not find there, not a one!”
—Voyager, chapter 41, “We Set Sail”
Use this pale nectar, full of flavor and body, as the base for lightly colored soups and sauces that will heal a weary body and soothe a tired soul, such as Kale Brose with Bacon.
Makes about 1 gallon
Ingredients
5 pounds (2.3 kilograms) beef bones, trimmed of fat
2 garlic cloves, halved
1 tablespoon caraway seeds
2 bay leaves
12 whole peppercorns
1 large onion, chopped (see Knife Skills)
1 medium carrot, chopped
2 celery stalks, chopped
Method
In a stockpot, cover the bones with cold water and bring to a boil over high heat. After the water has boiled rapidly for 2 minutes, drain. Rinse the bones clean with cold water. Return the bones to the stockpot, cover with 1 gallon cold water, plus more, if necessary, to cover the bones by 2 inches, and bring to a boil over high heat.
Meanwhile, make a bouquet garni. Wrap the garlic, caraway seeds, bay leaves, and peppercorns in a square of cheesecloth and tie with string, or enclose the items in a large tea ball.
Reduce the heat to low and skim the surface of the stock with a slotted spoon to remove impurities and fat. Add the onions, carrots, celery, and bouquet garni. Simmer gently for 6 to 8 hours, skimming the surface of the stock occasionally and topping up the water as needed to keep the bones and veggies well covered. Do not stir.
Ladle the finished stock through a strainer lined with several layers of damp cheesecloth, or a clean, damp cotton or linen dishcloth, into a glass or metal container. Gently press on the solids to extract all the liquid.
Cool quickly, refrigerate overnight, and discard the hardened fat from the surface of the cold stock. Store, covered, in the refrigerator up to 5 days, or in the freezer up to 6 weeks.
Notes
• The richest beef stock is made from knuckle, shank, and long leg bones full of marrow. Use marrow bones cut to 2- or 3-inch lengths for maximum richness and flavor.
• To make white chicken stock, replace the beef bones with the same weight of raw chicken bones (necks, backs, and feet are best) and reduce the simmering time to 2 hours.
“When you make bashed neeps,” I said, “be sure to boil the tops along with the turnips. Then save the pot liquor and give it to the children; you take some too—it’s good for your milk.”
Maisri Buchanan pressed her smallest child to her breast and nodded solemnly, committing my advice to memory. I could not persuade most of the new immigrants either to eat fresh greens or to feed them to their families, but now and then I found opportunity to introduce a bit of vitamin C surreptitiously into their usual diet—which consisted for the most part of oatmeal and venison.
—Drums of Autumn, chapter 70, “The Gathering”
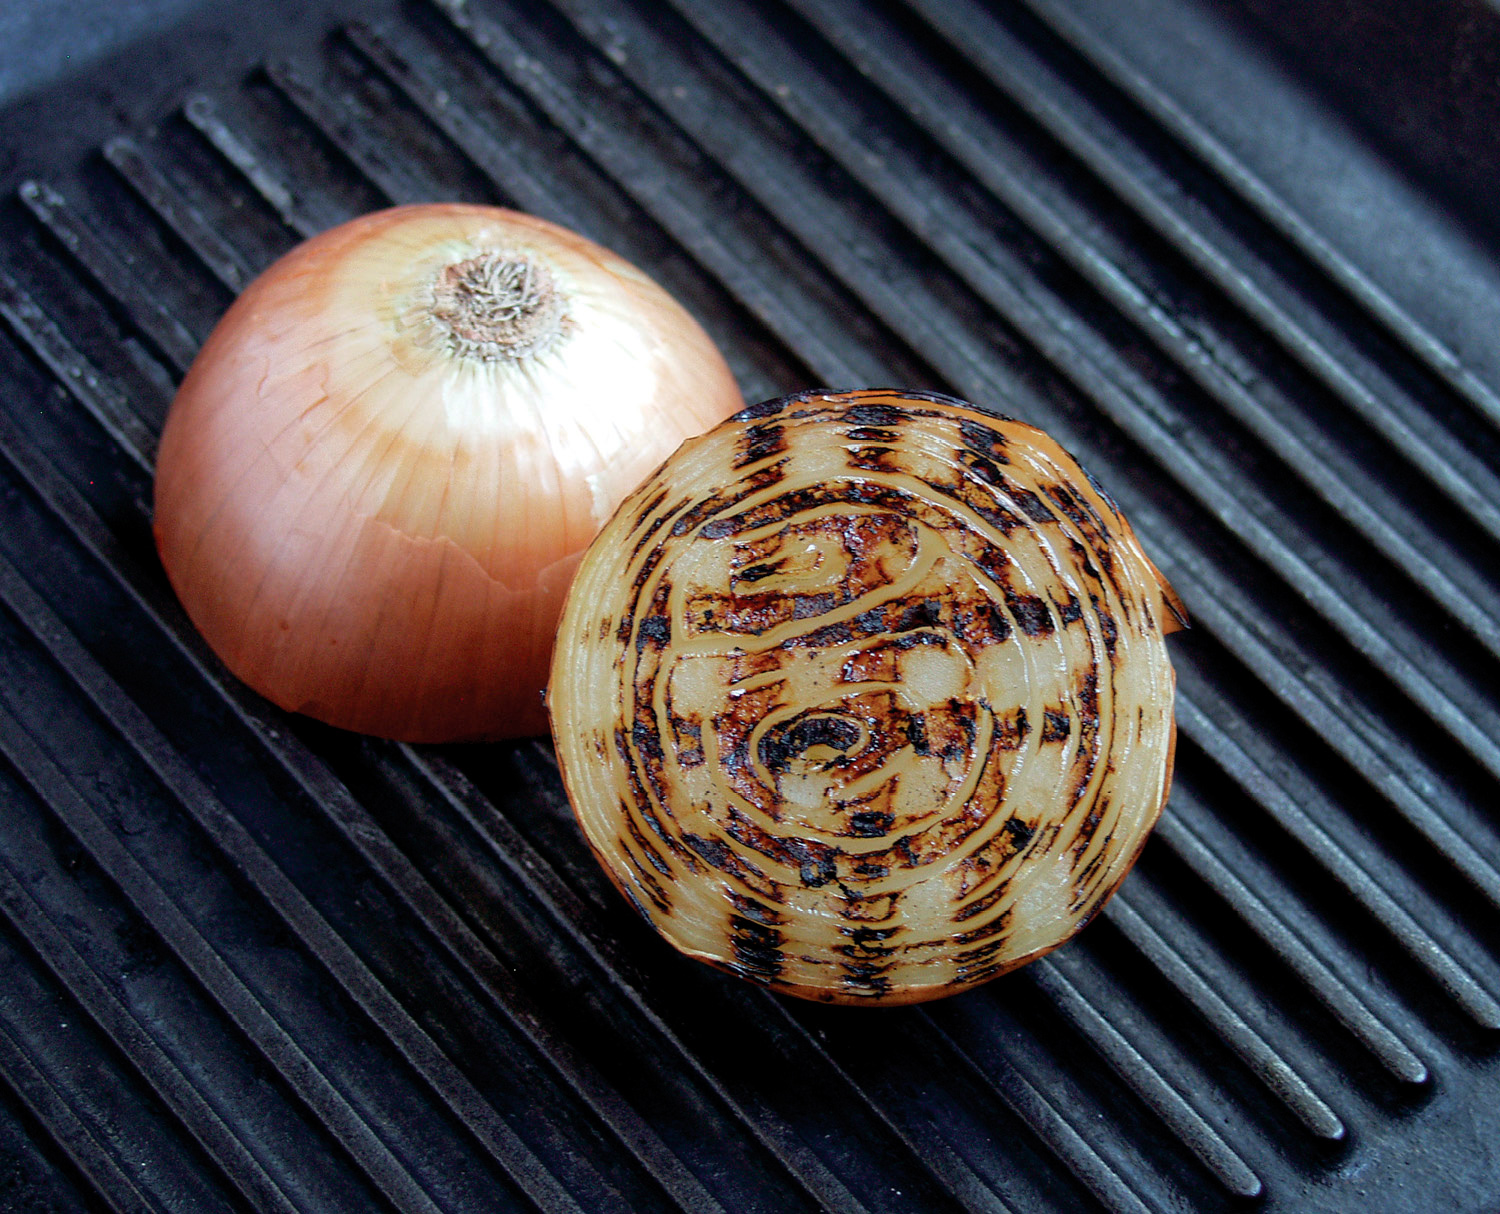
If you don’t have a lot of time to spend in the kitchen, this is the stock for you. It’s done in under an hour, including the oignon brûlé (burnt onion) that mimics the rich, amber hue of a brown meat stock. Use in vegetarian soups and stews like Cream of Nontoxic Mushroom Soup or as a poaching liquid for vegetables or fish.
This is a delicious, light-tasting vegetable stock made from commonly found, vitamin-packed vegetables and aromatics, as well as a few optional ingredients to boost color and flavor.
Makes about 2 quarts
Ingredients
2 large leeks (white and light-green parts only), cut into 1-inch pieces
1 tablespoon vegetable oil
2 medium carrots, chopped (see Knife Skills)
2 celery stalks, chopped
4 to 6 fennel stalks, chopped
1 cup mushrooms or mushroom stems, chopped
½ medium onion, cut crosswise, skin on
3 garlic cloves, whole
6 fresh parsley sprigs
2 fresh thyme sprigs
2 bay leaves
6 whole peppercorns
1 whole red chile pepper (optional)
1 2-inch piece dried mushroom, such as porcini, morel, or shiitake (optional)
1 sun-dried tomato (not in oil) (optional)
1 6-inch piece kombu (dried kelp) (optional)
Method
Rinse the chopped leeks thoroughly in a bowl of cold water before scooping them out with a slotted spoon, leaving the silt and sand behind. Shake dry in a clean dishcloth or salad spinner.
In a large stockpot, heat the oil over medium heat. Add the leeks, carrots, celery, fennel, and mushrooms. Cook gently, stirring occasionally until soft, about 10 minutes. Cover with 2 quarts of cold water, increase the heat to medium-high, and bring to a boil.
Meanwhile, make the oignon brûlé, or burnt onion. Heat a small cast-iron pan or grill pan over medium-high heat. Place the onion on the dry pan, cut side down. Cook until blackened, 5 to 7 minutes.
Also make a bouquet garni. Wrap the garlic, parsley, thyme, bay leaves, peppercorns, and chile, dried mushroom, sun-dried tomato, and kombu, if desired (see Notes), in a square of cheesecloth and tie with string, or enclose the items in a large tea ball.
Reduce the heat under the stockpot to low and add the burnt onion and bouquet garni. Simmer for 30 minutes. Ladle the finished stock through a strainer lined with several layers of damp cheesecloth, or a clean, damp cotton or linen dishcloth, into a glass or metal container. Gently press on the solids to extract all the liquid.
Cool quickly and store in the refrigerator up to 1 week, or in the freezer for 6 weeks.
Notes
• The optional ingredients add color and flavor to your stock. Use none, one, or all.
• For a quick lunch or light dinner, cook store-bought frozen wontons or dumplings in stock, season (I like a little soy sauce and chile oil), garnish with chopped scallions, and serve.
A multipurpose pastry crust for sweet or savory fillings that is easy to work with and substantial enough to hold up outside the pan for recipes such as Rolls with Pigeon and Truffles, yet tender enough to yield easily under your fork as the base for Governor Tryon’s Humble Crumble Apple Pie.
Makes one 12-inch crust or two 8-inch crusts
Ingredients
3 cups all-purpose flour
1 tablespoon sugar
1½ teaspoons kosher salt
1 cup (2 sticks) cold butter
½ cup ice water
1 large egg yolk
1 teaspoon lemon juice or vinegar
Method
BY HAND: Stir together the flour, sugar, and salt in a large bowl. Grate the butter into the flour and work it in with your fingertips until the butter is reduced to pea-size lumps and the flour is the color of cornmeal. Make a well in the bottom of the bowl. Whisk together the ice water, egg yolk, and lemon juice. Pour the liquid mixture into the well and use your fingertips to bring the dough together into a shaggy ball.
IN A FOOD PROCESSOR: Combine the flour, sugar, and salt in a large bowl. Pulse three times to combine. Cut the butter into ½-inch cubes and scatter into the flour. Pulse five or six times, until you have mostly pea-size lumps. Whisk together the ice water, egg yolk, and lemon juice. Add to the bowl and pulse five more times.
Pour the dough and any loose flour from your bowl or food processor onto the counter and knead quickly and lightly into a ball. Divide the dough in half and form into two 1-inch-thick disks. Wrap tightly and refrigerate for at least 30 minutes.
Store in the fridge up to 2 days, or in the freezer up to 1 month.
To roll out, lightly dust the counter with flour. Use even pressure to roll the dough out from the center in all four compass directions, north, south, east, and west. Turn and loosen the dough occasionally as you continue to roll the pastry out into a circle or square shape that is an even ⅛ inch thick (unless otherwise directed in the recipe).
Cut out shapes as directed, or roll the pastry lightly up onto the rolling pin and transfer to a tart pan or pie plate.
Notes
• If it’s very humid, hold back a couple of tablespoons of water when you first mix the dough. Add more water gradually if needed.
• If the dough is chilled for more than 30 minutes, it may have to rest on the counter for a few minutes before it will be soft enough to roll.
• The leftover egg white can be whisked with a teaspoon of water and a pinch of salt for use as an egg wash before parbaking. It won’t result in quite as golden a crust as a whole-egg wash, but it’s a great way to avoid waste.
The folding of the dough creates dozens of buttery layers, which, when baked, are forced upward by the steam released from the melting butter. The result is a light, flaky pastry that can be used in both sweet and savory treats, such as Warm Almond Pastry with Father Anselm and Goat Cheese and Bacon Tarts.
Makes about 2 pounds (900 grams), or two 12 x 18-inch sheets
Ingredients
3 cups all-purpose flour
1½ teaspoons kosher salt
1¼ cups (2½ sticks) cold unsalted butter, cut into ½-inch cubes
½ cup ice water
1 teaspoon lemon juice or vinegar
Method
BY HAND: In a large bowl, mix together the flour and salt. Blend in the butter with a pastry cutter or two forks until all the cubes are well broken up. Make a well in the bottom of the bowl and pour in the ice water and lemon juice. Use your hands to bring the dough together into a rough ball. Work quickly, so the heat of your hands doesn’t melt the butter. Add water a tablespoon at a time, as needed, to make a soft, shaggy dough that just stays together—it’s better that the dough appear slightly dry than wet and sticky.
IN A STANDING MIXER: In the bowl of a standing mixer fitted with the paddle attachment, mix the flour and salt on low speed. Add the butter and mix on medium-low until the butter just begins to break up, about 1 minute. Add the ice water and lemon juice, and continue to mix on medium-low, adding water a tablespoon at a time, as needed, to make a soft, shaggy dough that just stays together, 60 to 90 seconds—it’s better that the dough appear slightly dry than too wet and sticky.
Transfer the dough from your bowl or standing mixer to a lightly floured counter and knead lightly into a smooth ball. Form into a flat rectangle about 1 inch thick, wrap tightly, and refrigerate for at least 30 minutes.
On a lightly floured counter, use even pressure to roll from the center of the dough all the way out to each corner. Turn and loosen the dough occasionally as you continue to roll out the corners to a rectangle measuring approximately 12 x 24 to 30 inches. Fold in thirds lengthwise, like a business letter, to complete one single fold. Use the rolling pin to gently mark an X in the top of the dough to help the layers adhere to one another.
If the dough is still cold and firm, repeat another fold immediately. Wrap and refrigerate for 30 to 60 minutes. If the dough is becoming soft or sticky, cover and return to the fridge before completing the second fold.
Repeat the folding process for a total of four to six single folds, doing up to two single folds back-to-back. Rest and chill the dough for 30 to 60 minutes in between each set. After all the folds have been completed, rest the dough for a minimum of 60 minutes, and up to overnight, before rolling out the final sheet.
Unless you have a long stretch of open counter to roll the dough out in one sheet, cut the dough in half crosswise with a sharp knife and roll out two separate final sheets. On a lightly floured counter, use even pressure to roll from the center of the dough all the way out to each corner. Turn and loosen the dough occasionally as you roll out each half of the dough to a sheet approximately 12 x 18 inches and ⅛ inch thick. If it becomes difficult to roll, cover the pastry with plastic and rest it for 5 minutes in the refrigerator before resuming.
Use as directed in recipes calling for puff pastry.
Notes
• The lemon juice or vinegar prevents the dough from oxidizing and allows you to keep it in the fridge up to 2 days without developing brown spots.
• Finished sheets of pastry can be lightly floured, gently folded, wrapped tightly, and stored in the fridge up to 2 days, or in the freezer up to 1 month.
• This recipe is easier than traditional homemade puff pastry, though still 3 to 4 hours’ work—but worth the effort—and it wins hands down in a side-by-side taste test against the frozen, store-bought stuff.
A modern adaptation of Scotland’s most ancient cheese. At one time, every crofter in the Highlands made it by souring freshly skimmed milk beside a warm fire, then cooking it gently until it curdled. The whey was drained away, leaving a crumbly, unripened white cheese.
A common currency accepted as rent in the Highlands before Culloden, crowdie is the crud in Mrs. Bug’s Gingerbread and Fresh Crud, as well as being delicious on oatcakes, bannocks, scones, and sandwiches.
Makes about 1 cup
Ingredients
1 quart whole milk
2 tablespoons lemon juice or vinegar
1 teaspoon kosher salt
Method
In a large, nonreactive saucepan (not aluminum) over medium heat, heat the milk. Stir occasionally, scraping along the bottom and sides of the pot to prevent the milk from scorching.
Heat the milk until it simmers and foams, 195°F on an instant-read thermometer, about 20 minutes. Do not allow the milk to boil. Remove the pan from the heat and drizzle in the vinegar. Stir once and leave undisturbed for 5 minutes.
Check that the milk has curdled, meaning that the white curds have separated from the translucent whey. If not, stir in another tablespoon of vinegar and wait another 5 minutes. Once the curds and whey have separated, allow the pot to sit undisturbed for 30 minutes.
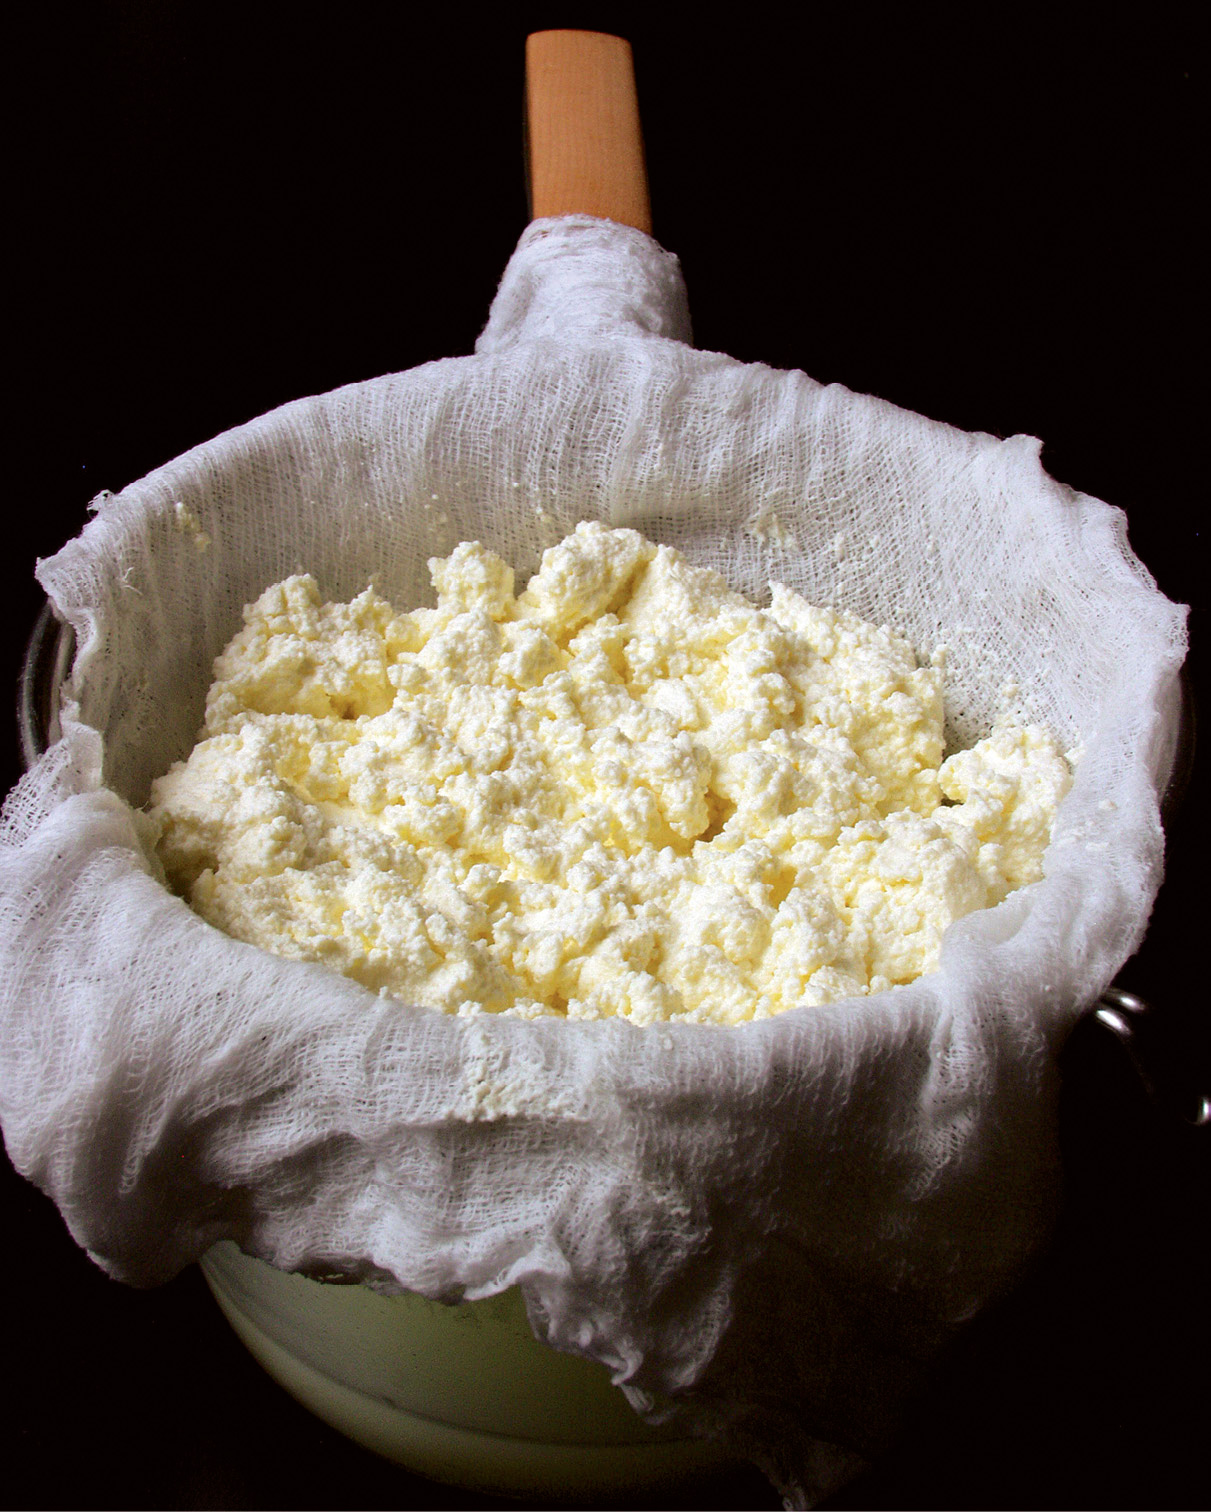
Line a colander with four layers of cheesecloth or a clean cotton or linen dishcloth. Gently ladle the curds into the colander and drain until the crowdie is like wet cottage cheese, about 30 minutes. To speed up the draining, use a rubber spatula to gently fold the curds over each other occasionally, but do not press down on the curds.
Gather the corners of cloth together and tie around a sink faucet or a wooden spoon handle set over a tall pot. Hang the cheese for 30 minutes and twist the bag gently once or twice to expel the last of the whey.
Scrape the cheese into a bowl and stir in the salt. Store, covered, in the refrigerator up to 5 days.
Notes
• Use the cooled whey in place of milk to make Brown Buns at Beauly or in smoothies, feed it to the chickens and pigs, or, at the very least, pour it into the compost.
• Add more flavor to your crowdie by folding chopped fresh herbs such as basil, dill, or oregano, or aromatics like lemon zest, rosewater, freshly ground pepper . . . shall I go on?
A light, adaptable oil-and-vinegar based dressing that is as at home on iceberg lettuce as it is on the salad of bitter leaves in Pheasant and Greens at Ardsmuir.
Makes about ½ cup
Ingredients
3 tablespoons extra-virgin olive oil
3 tablespoons vegetable oil
2 tablespoons red wine vinegar
2 teaspoons Dijon mustard
½ teaspoon kosher salt
¼ teaspoon freshly ground pepper
Method
In a small bowl or a jar with a tight-fitting lid, combine all the ingredients and whisk or shake until well combined. Taste, and season if necessary.
Dress your salad sparingly—the greens should just glisten. A soggy salad is no one’s cup of tea.
Store in the refrigerator, tightly sealed, up to 1 week.
Notes
• I prefer to lighten the taste of my dressing by combining olive and vegetable oils. Alone, olive oil is powerful stuff, and it can smother the taste of a delicate salad.
• The Dijon mustard acts as an emulsifier to temporarily keep the dressing from separating. Whisk or shake to recombine.
• Switch up the vinegar for a different dressing. Balsamic, white wine, champagne, and rice vinegar are some of my favorites. You can also substitute some or all of the vinegar with citrus juice, such as lemon, lime, or orange.
• For more flavor, add a few dashes of sesame oil, grated or minced garlic, the zest of a lemon, lime, or orange, or chopped fresh herbs such as dill, basil, or mint. (Note that if you add fresh garlic, it reduces the dressing’s shelf life in the fridge to 2 days.)