Cheese, ham and pickle toasted sarnies
Cream of onion soup with rosemary
Chipolatas, red peppers and Puy lentils
Smoky aubergine and tomato lentils
Lemony lamb and cannellini beans
Butter beans, prosciutto, greens and Gorgonzola
Pasta with feta, peppers and hazelnuts
Couscous with tuna, chickpeas and halloumi
In a perfect world, my ideal day would involve escaping the city at dawn and heading off to somewhere wild and windswept for a really long walk to clear cobwebs from body and soul. There is something enormously energizing about standing on top of a hill or cliff where the horizon is so big you simply can’t take it all in. And as a greedy cook, for me no perfect day would be complete without something nice to eat, and the food I have eaten in wild places ranks high among my most memorable meals of all time.
At the moment, with two young children in tow, this kind of perfection is not reached quite often enough, but to maintain sanity I do need to escape from the rat race on a regular basis and I am trying hard to give my city-dwelling kids the sense of outdoor adventure I relished growing up. My early teenage years were spent yomping over Dartmoor as an air cadet, sustained only by Kendal mint cake and endless boil-in-the-bag slops in various shades of brown. I have no idea now what we were eating – a testament to their blandness that my memory fails me – but what I remember vividly was the sheer exhilaration of lighting up the stove and the pleasure of cooking something, anything, outside.
This chapter is all about minimal cooking for wild places (quite possibly in wild weather too!) and one-pan feasts that anyone can knock up on a single burner on a mountain side, including hearty, warming one-pot dishes and sustaining salads that are prepared in advance. And no walk in the wilderness would be complete without a few easy-to-carry treats to keep motivation up when spirits start flagging.
WILD COOKING EQUIPMENT
To cook in the wild you need a fairly compact and efficient cooker that you can shove into a rucksack, preferably one that is self-contained with its own pans.
My number one bit of kit is my Trangia stove, a single burner stove fuelled by methylated spirits. Also known as a ‘storm cooker’, it will let you cook in practically any weather, thanks to a wind baffle that protects the heat source from the elements. It comes with a couple of saucepans, a frying pan and a little kettle that all pack inside one another like Russian dolls. It is invaluable and I would rarely think of venturing into the hills without it.
As well as a cooker and pans to cook in, some sort of small spatula or lightweight wooden spoon is very useful for turning and stirring your food, as is a fork or a spoon with which to eat your hard-earned meal.
The other simply brilliant invention that was made for adventures is the food flask, perfect for transporting hot and ready-to-eat stews and soups, not to mention the ingenious ‘pot noodles’ here. I like the individual serving-size flask as it means everyone has their own food to carry in their own rucksack, thus sharing the burden evenly. It also means you don’t need to worry about taking serving bowls to eat out of, plus they usually contain a little fork or spoon tucked into the lid.
GETTING AHEAD – THE KEY TO A GOOD FEED
With these recipes you pretty much do all the work at home so that there is minimal faffing around in the wild. The other bonus is that many of these dishes are great for lunch and dinners at home too. So what I often do is make a big batch, then I have plenty to take with me on a wild adventure.
When I’m travelling with food that needs reheating, I usually pack it into individual portions in sturdy ziplock food bags. I then pop each one inside an enamel mug so they are protected from being spilt open as you walk.
EASY IDEAS WHEN YOU HAVEN’T COOKED AHEAD
With the best will in the world it’s not always possible to get organized the night before, sometimes simply because the day has turned out to be more special than the weatherman thought and a spontaneous adventure is called for. Here are my favourite things for days just like that…
▪ A tin of soup: Tinned tomato soup was a favourite lunch of mine as a child, and it still hits the spot today, especially when you crumble a little bit of cheese over the top that melts slowly as you eat it. A recent holiday to North Yorkshire saw a morning dash to the corner shop for a couple of tins and a hunk of Wensleydale, which eaten nestled amongst the heather on top of a grouse moor made a lunch fit for a king.
▪ Boiled eggs, again: Just as with an impromptu picnic, hard-boiled eggs provide an endlessly useful travelling tucker option for when you’re stomping in the hills. Neatly encased in their own protective shells, a couple of hard-boiled eggs per person, packed along with a little twist of salt and black pepper, make a very nutritious and sustaining lunch, especially when eaten with a bag of crisps for added crunch.
▪ Something piggy: You can’t really go wrong with a bacon or sausage sandwich. To make life simple, get ahead just a little at home by taking the rashers or sausages out of their packaging and repacking them in a sturdy food bag, with a little drizzle of oil. Then all you need to do is get your frying pan nice and hot before sliding the contents of the bag in and cooking until crisp. I usually go one step further at home, slicing and buttering a few bread rolls, adding a squeeze of my favourite sauce and wrapping each in foil which then provides a reasonable sort of plate to eat off too.
AND FINALLY…
At risk of teaching you to suck eggs, don’t forget to pack the cooker, pan and fuel too. Memorable for all the wrong reasons, a 15-mile walk on Dartmoor was recently completed with little more than a couple of ketchupy rolls between us when I packed the cooker but forgot the fuel. Not my finest hour. But it did mean that we’d really, really earned the cream tea at the end of the walk. Never has a scone tasted so fine.
When you’re halfway up a mountain or several hours into a country ramble, you want to be able to dig into your rucksack and pull out something sustaining and tasty. These toasted cheese and ham sarnies will both cheer you up and keep you fuelled in a way a standard sandwich will never do.
I use my portable Trangia stove, which is a super-handy bit of kit (see here). A little spatula is also useful to turn the sarnie over and lift it out, but with a bit of a deft juggle a fork would do!
Per person
2 slices bread (white, brown, seeded, whatever you like)
Softened butter, for spreading
Few slices of mature Cheddar cheese (about 60–70g)
1 slice ham
A little finely chopped onion, to taste (optional)
1 generous tsp or so of your favourite chutney or pickle
Tear off a generous sheet of foil and lay a slice of bread in the middle. Butter generously, then turn over and butter the other side. Lay on the cheese, then the ham and scatter over the onion, if using. Spread the chutney or pickle over the other slice of bread, then lay chutney-side down on to the filling. Butter the outside, then wrap tightly in the foil and pack away in your rucksack, along with a portable stove with which to fry it.
When you are ready to eat, fire up your portable stove. Get the frying pan nice and hot, then unwrap your sandwich and slide it in. Cook for a few minutes on each side until the bread is crisp and the cheese has started to melt. Use the foil you wrapped your sarnie in as a sort of plate and tuck in whilst still warm.
And for something different…
It’s easy to adapt this sandwich, and here are a few of my favourite combos. The two important constants are the butter on the outside (this does the ‘frying’ bit) and the cheese. You can swap and change the type of cheese – just use something that melts nicely.
▪ Cheddar, tuna and roast pepper melt
▪ Mozzarella, salami and pesto
▪ Brie and cranberry sauce
▪ Stilton, grape and chopped walnuts
And for a pudding sarnie, what about a Banana and Nutella toastie? Spread Nutella on the insides of both slices of bread, adding a layer of sliced banana in the middle, then butter the outside.
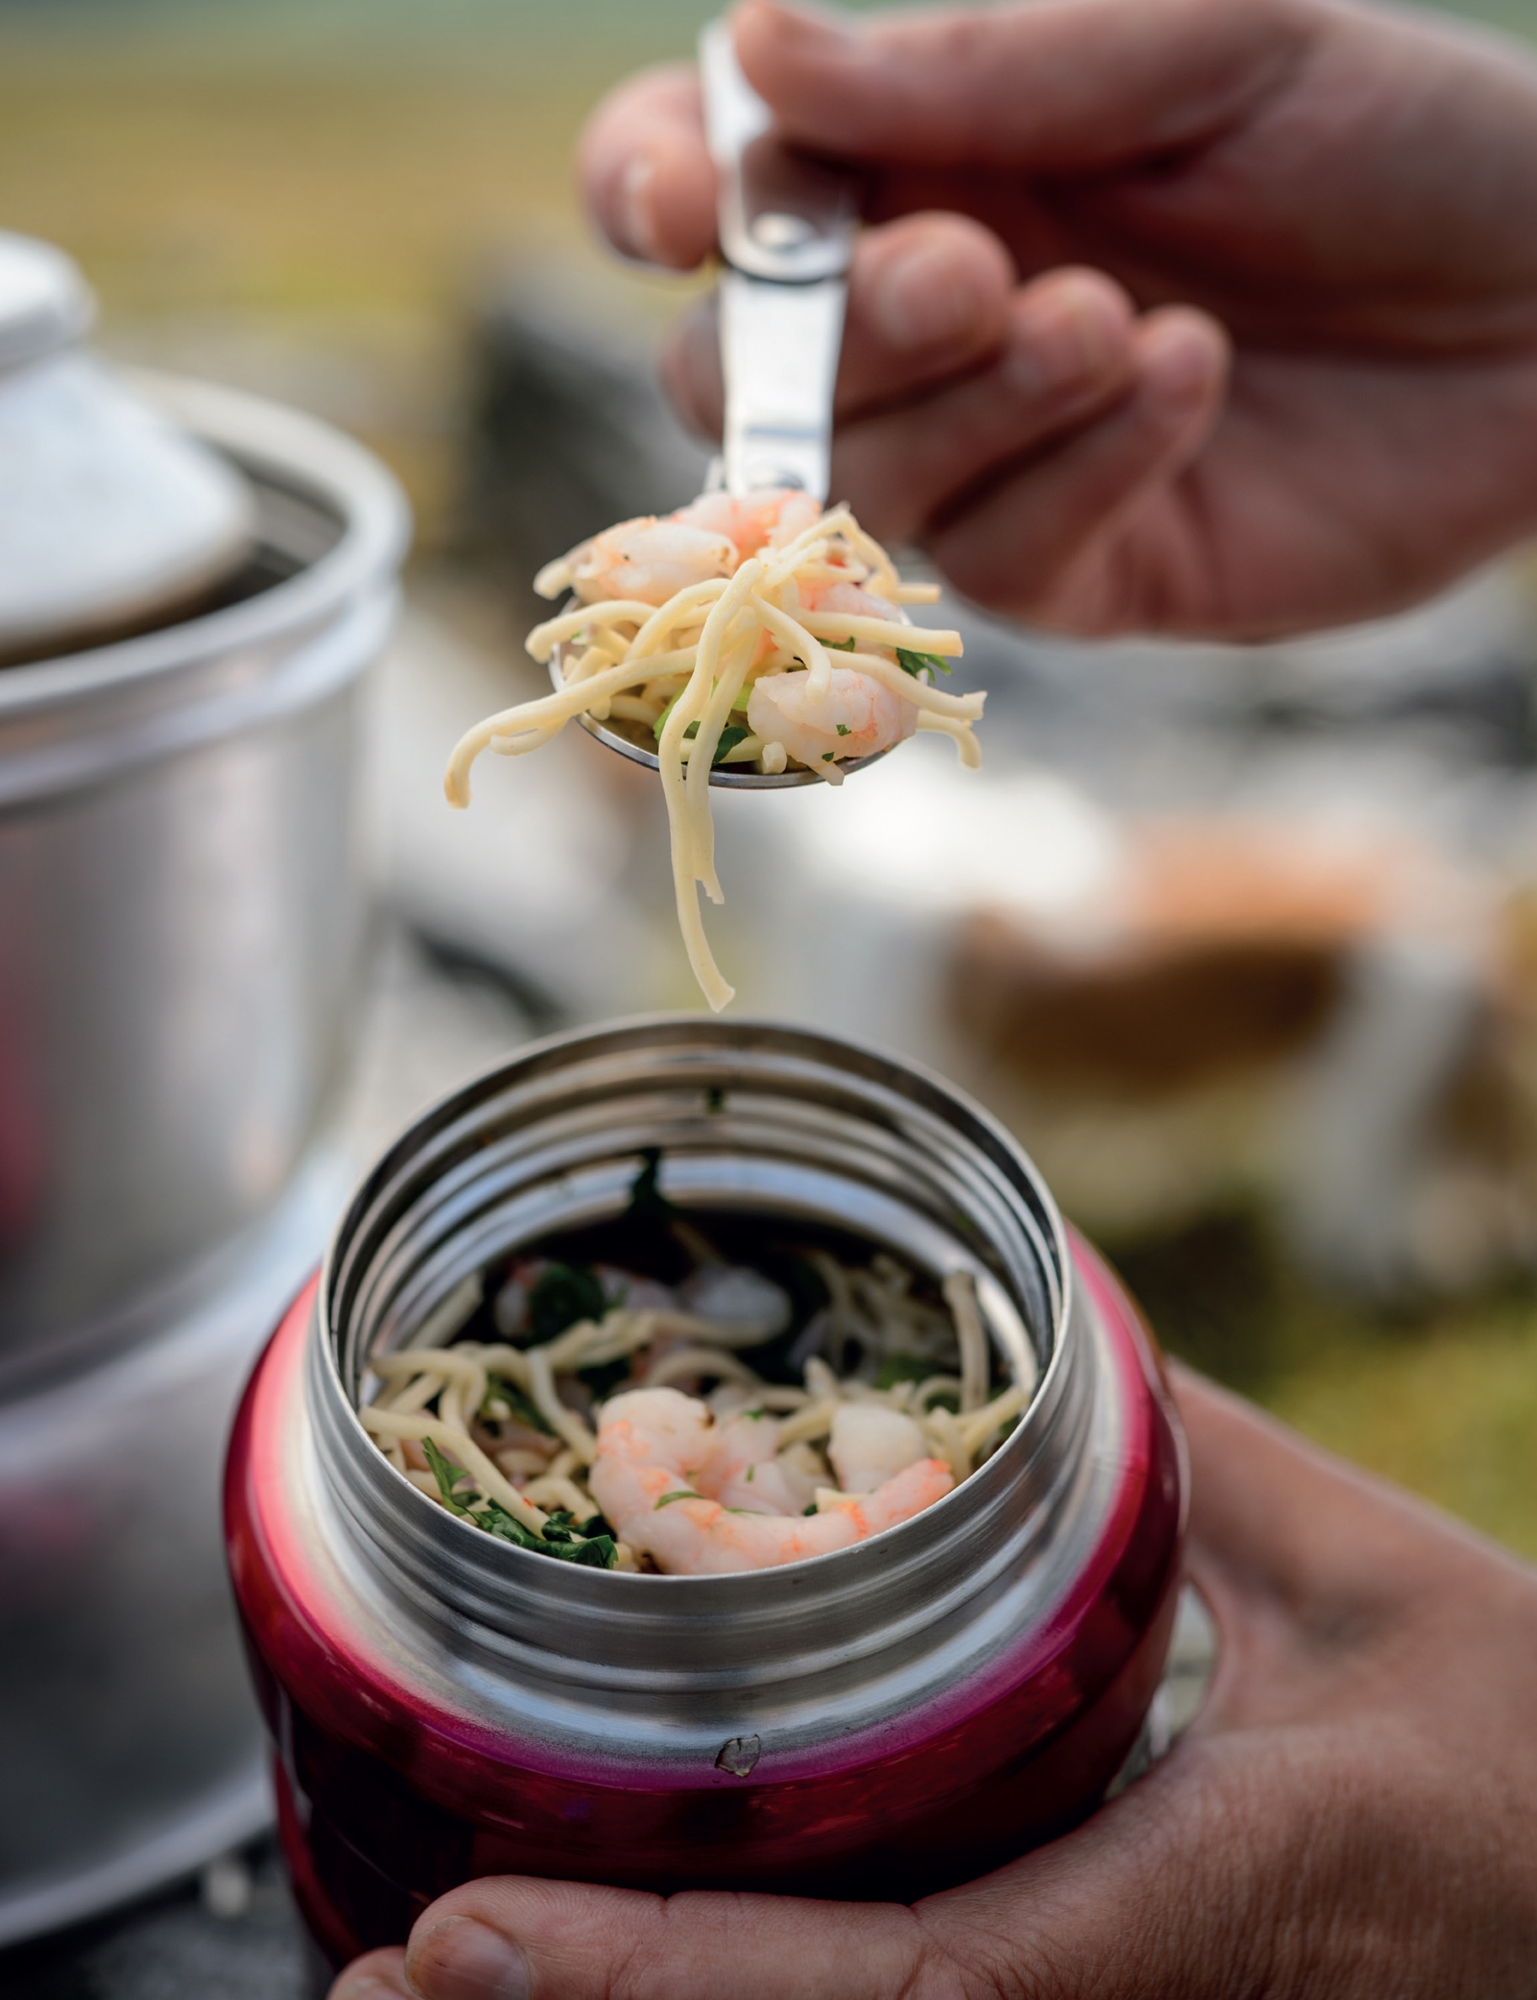
This hiker’s lunch is so simple and so incredibly satisfying you’ll wonder why you’ve never made it before. All you need is a food flask and something with which to boil a bit of water. And best of all, you can create an almost endless combination of flavours. I’ve listed a few of my faves below but I’m sure you’ll come up with your own. The food flask keeps everything cool and insulated in transit so there are no worries about seafood or meat being unrefrigerated as you hike.
Per person
1 tsp soy sauce
½ tsp Thai red curry paste
1 nest fine (quick-cook) noodles (about 60g)
1 chestnut mushroom, finely chopped
1 spring onion, finely chopped
Finely chopped red chilli, to taste
Couple of sprigs of coriander, chopped
60g cooked peeled freshwater prawns
Sea salt and freshly ground black pepper
Get prepared at home before you leave. Add the soy sauce and Thai curry paste to the bottom of the food flask, then add the nest of noodles, snapping it up a bit to get it in if necessary. Follow with the mushroom, spring onion, chilli and coriander, just sprinkling them on top. Finally, scatter over the prawns and season to taste with a little salt and black pepper. Seal up your flask tight and pack away in your rucksack, along with a bottle of water for boiling.
When you’ve reached your lunch spot, boil some water, then pour it into your food flask. You need about 250ml (which in my food flask is two lots of the cup that sits on top of the flask). It might pay to measure the volume of your cup before you leave home. Turn the flask up and down a couple of times, then leave for about 10 minutes.
Give the flask another shake, then unseal and stir well to mix it up – the noodles should be cooked (if they are not, reseal and leave for a couple more minutes) and surrounded by a warming flavourful broth. Tuck in!
Other top pot noodle ideas…
Add these flavourings along with the noodles…
▪ Curried chicken noodles – add 1 teaspoon each of curry paste and mango chutney, 1 tablespoon finely chopped red onion, 1 tablespoon frozen peas, a little chopped coriander and around 60g shredded leftover roast chicken.
▪ Beef, ginger and tomato – add 1 teaspoon each of vegetable stock powder and soy sauce, 1cm piece finely grated fresh ginger, dried chilli flakes to taste, 60g shredded leftover roast beef and a few quartered cherry tomatoes.
▪ Roast pork, sweetcorn and sweet chilli sauce – add 1 teaspoon each of vegetable stock powder and soy sauce, 1–2 teaspoons sweet chilli sauce, 2 tablespoons sweetcorn, 1 sliced spring onion and 60g shredded leftover roast pork.
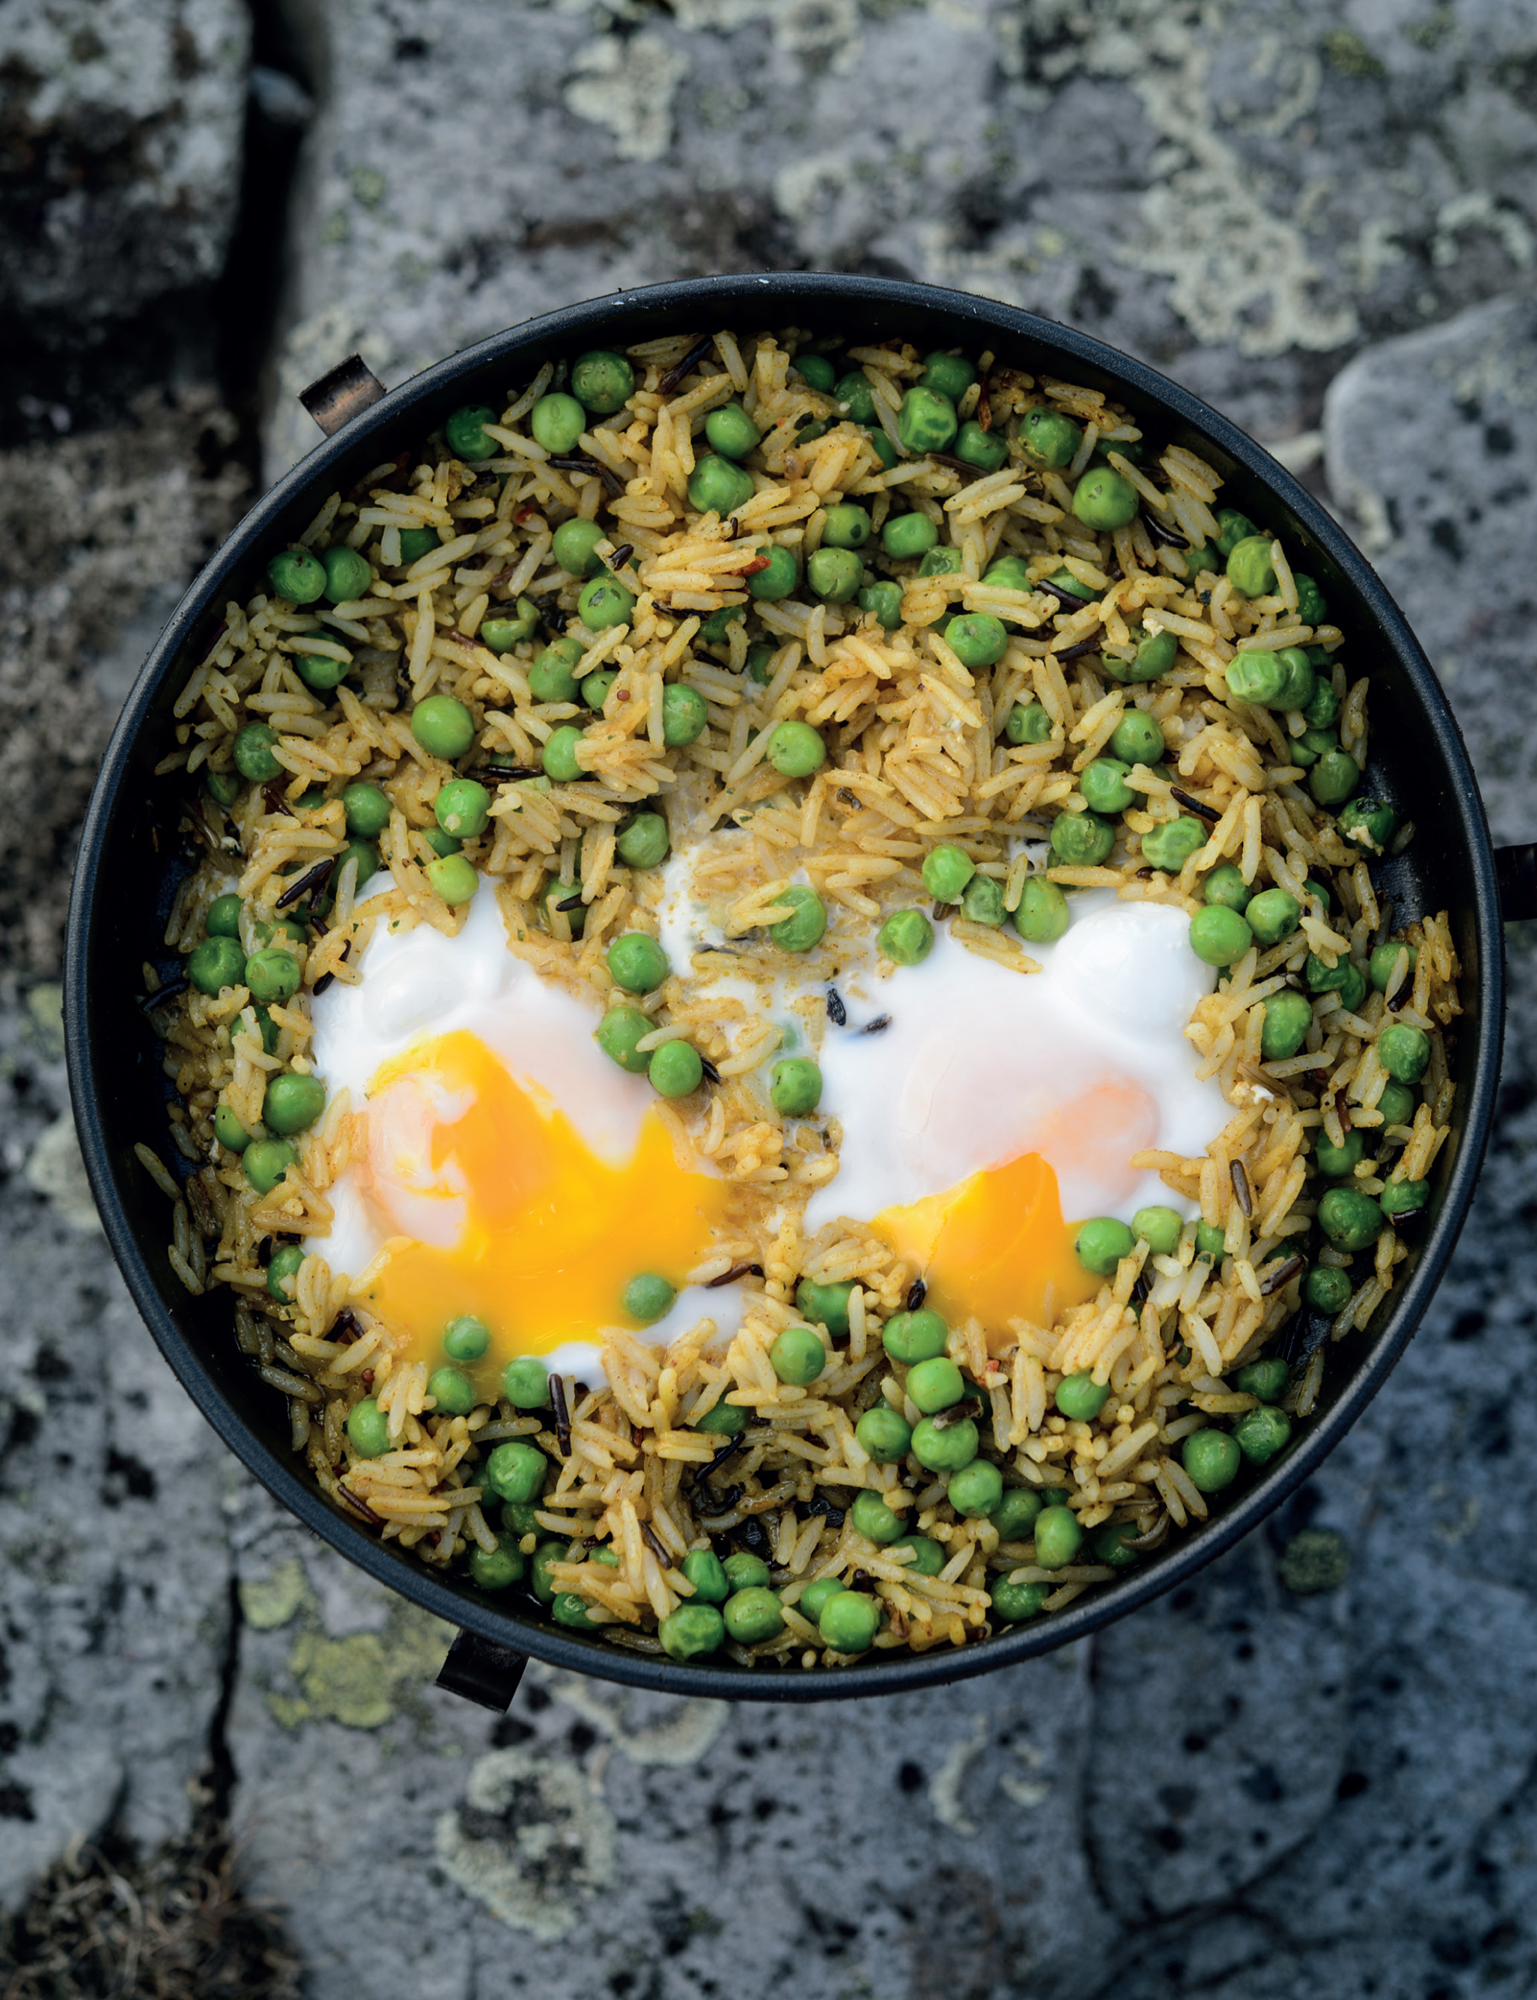
I’m so thrilled with this easy way to use up a bowlful of leftover rice that it’s now become one of my go-to quick lunches, whether I’m out walking or, far more boringly, at home chained to my desk. Eggs and spice were made for each other, and the rice gets a fabulous buttery crust on the bottom.
Rice safety is very important, so to keep it nicely chilled when I’m on the move I prep it straight into a food bag and pop it in the freezer overnight. Then it defrosts in my rucksack as I’m walking. After a couple of hours at ambient temperature it’s ready to cook. If you want to eat it straight away or simply don’t want to freeze it, pack the bag snugly against either an ice block or, even better, a frozen bottle of water that you can drink later.
SERVES 1 (GENEROUSLY)
About 200g cooked, chilled rice (white or brown, your choice)
Handful of frozen peas, about 75g (no need to defrost)
1 tsp of your favourite curry powder
A pinch of chilli powder (optional)
1 tsp olive oil
Small knob of butter (10–15g or so)
A little chopped coriander
A little sea salt and freshly ground black pepper
1–2 eggs
Spoonful or so of mango chutney to serve (optional), packed into a little tub
This is so easy. Simply take a food bag and add everything bar the eggs and chutney, giving it a shake-about to mix, then seal and freeze until you are ready to walk. Don’t freeze it for more than a week to enjoy it at its best.
Pack the eggs (I normally opt for 2) into a small pot, tucking kitchen roll snugly around them so they don’t break. Also pack a sheet of foil, folded up, that is big enough to cover your frying pan – this creates a lid for the pan, to speed up the egg-cooking process.
When you are ready to cook, fire up your portable stove and set the frying pan over the heat. Tip in the rice and pea mixture and stir-fry until piping hot throughout. Use a spatula or fork to push the rice aside to make a gap on the base of the pan. Crack in an egg (or two). Cover with the foil and cook the eggs to your liking. Eat straight from the pan whilst piping hot, dolloping on the mango chutney as you like.
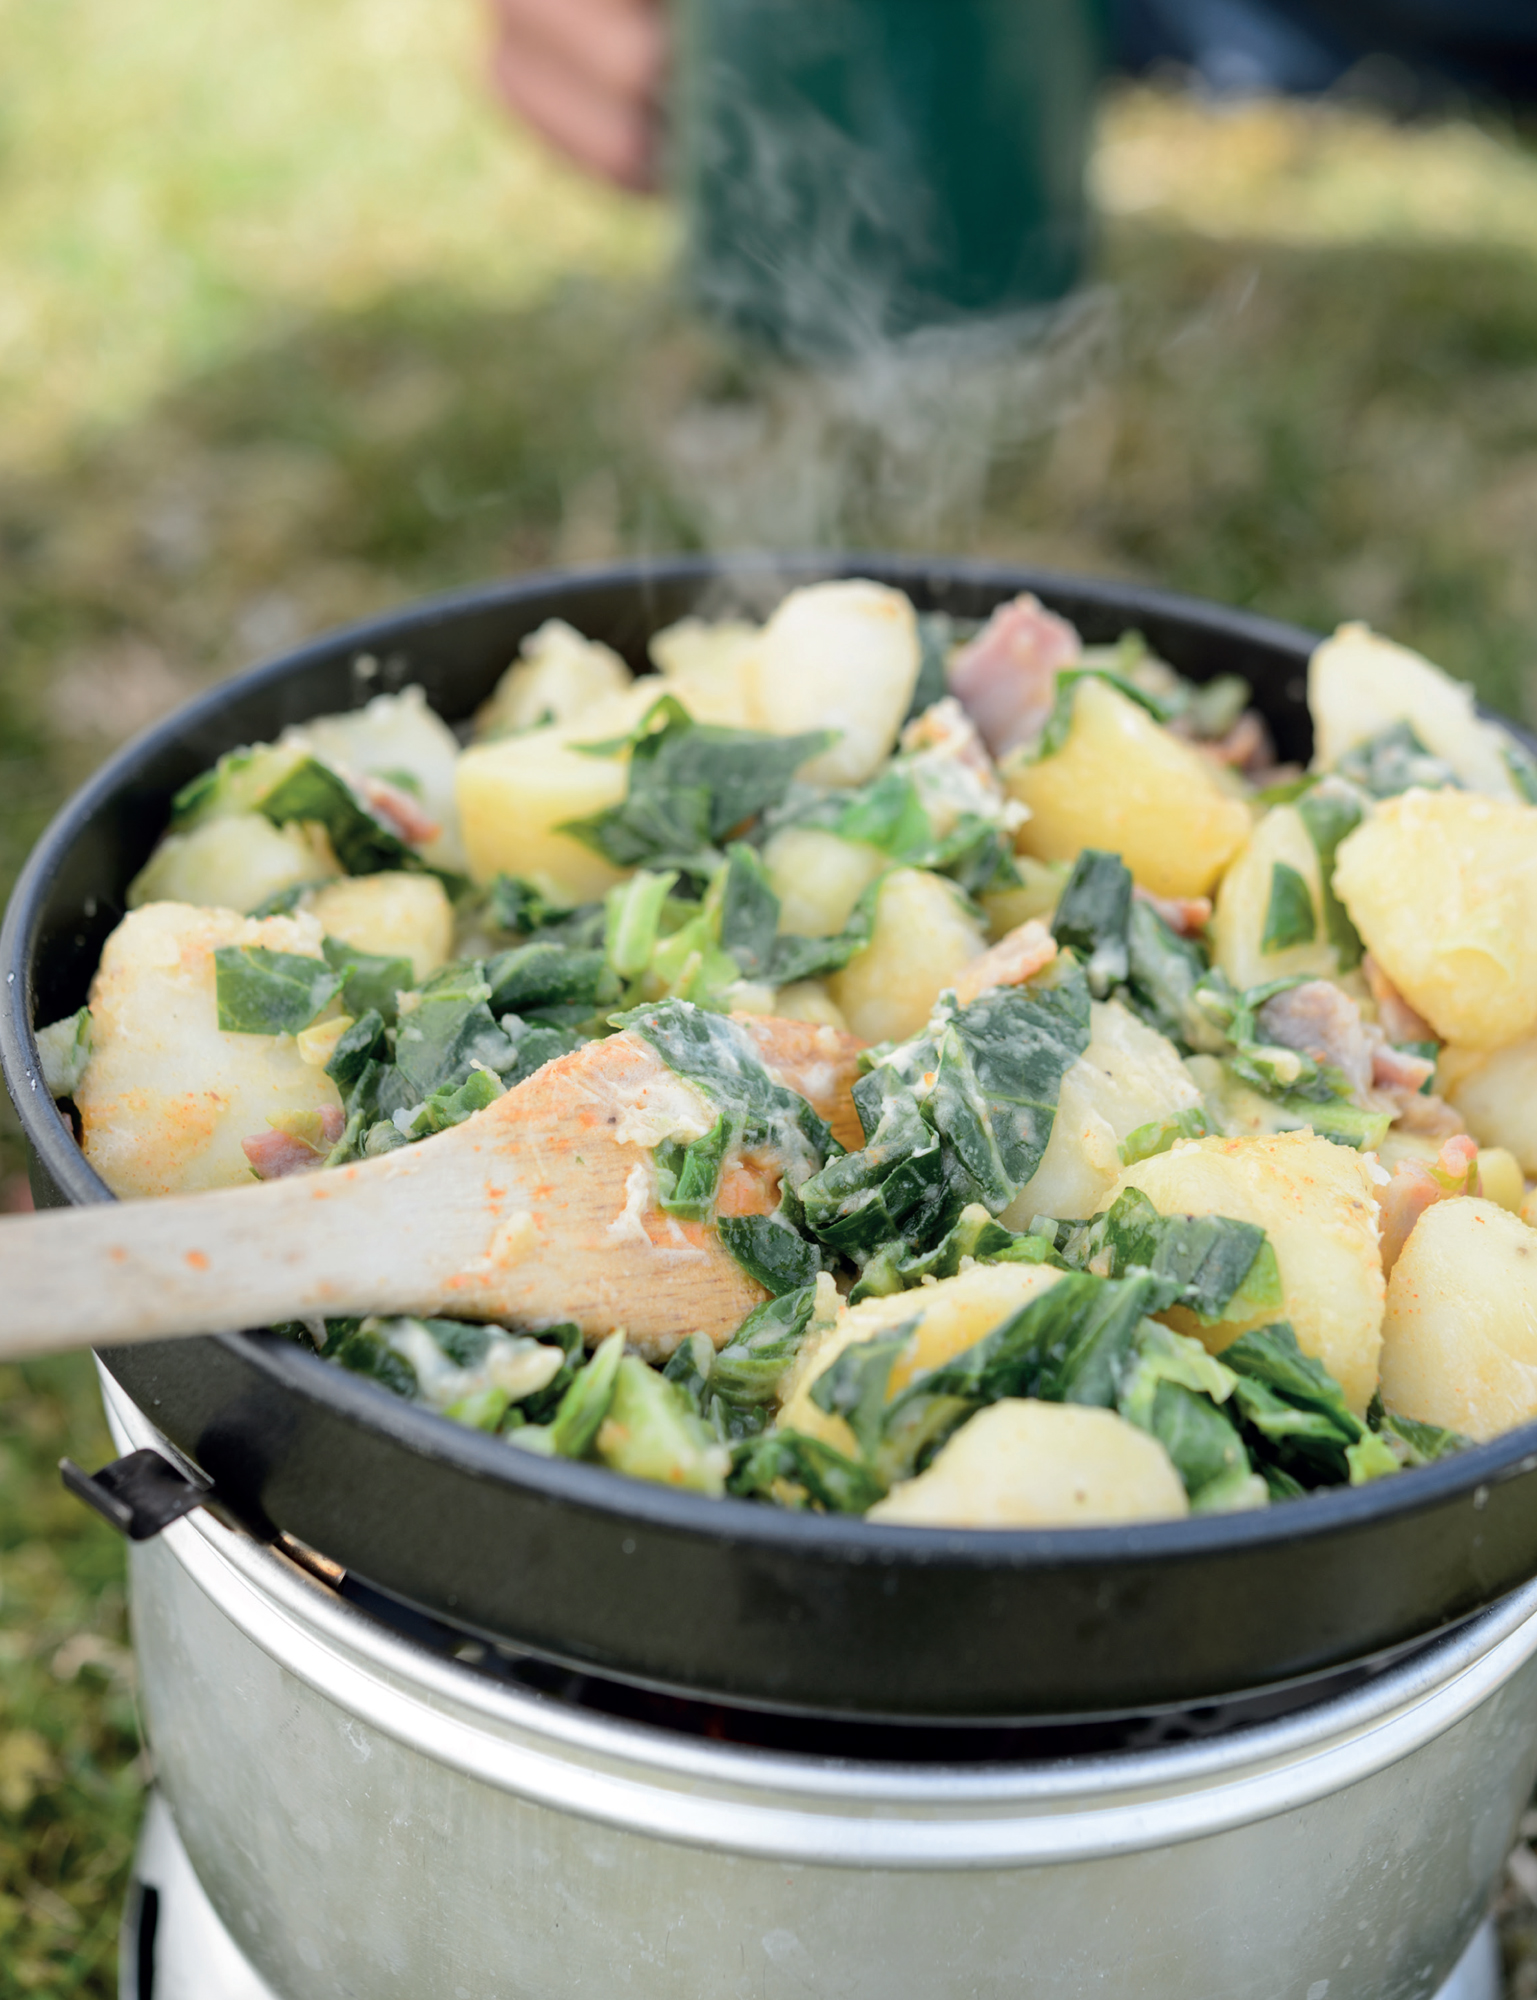
An absolute ‘leftovers’ classic, bubble and squeak is one of my favourite things to cook on a hillside. And like all of my favourite things to cook, this one follows no hard and fast rules about ingredients – see below for plenty of ideas of how to ring the changes. Remember to pack your portable stove and frying pan.
SERVES 2
4 rashers streaky bacon, snipped into pieces
1 tbsp olive oil
500–600g cold cooked potatoes, crushed a little
Large handful of cooked cabbage/spring greens, shredded (about 100g raw weight)
25g butter
A pinch of cayenne pepper (optional)
75g mature Cheddar cheese, grated
Sea salt and freshly ground black pepper
You need 3 sealable sandwich bags for this easy recipe.
Put the bacon and oil into one sandwich bag and seal. Put the potatoes, cabbage, butter, cayenne pepper, if using, and a generous grind of salt and black pepper into another slightly bigger bag and seal. Add the cheese to the last bag and seal. Pack all three bags into your backpack, along with a small spatula or wooden spoon for stirring, and off you go (not forgetting a fork or two).
When you are ready to eat, fire up your portable stove and tip the oily bacon into the frying pan. Cook for as long as is necessary to get it slightly crisp, about 5 minutes on my stove.
Add the potato and cabbage mixture, stirring well to mix, and fry until hot and just getting tasty golden crispy bits on the potato, another 10 minutes or so on my stove. Finally, add the cheese and stir until just melting. Eat immediately – best straight out of the pan.
Some other easy ideas…
▪ Add some shredded cooked ham or leftover roast meat (beef, pork or lamb are all great) to the bag with the potatoes instead of taking raw bacon in a separate bag. Or how about a little diced chorizo for a bit of spice?
▪ Lose the meat altogether and add a handful of shredded smoked salmon – bag it separately and stir through just at the end of cooking to warm through.
▪ Ditch the Cheddar and replace it with something a little grander – Roquefort, Brie or aged Gouda are all great.
▪ Vary the veg – anything cooked will do, just have roughly equal amounts (by volume, not weight) of veg to potato.
▪ A bit of crumbled leftover stuffing in the mix is delicious!
These soups serve more than you’ll probably need in one sitting, but they keep well in the fridge for up to 3 days and also freeze brilliantly for up to 3 months. Once cooked, simply cool, then pack into food bags or containers (as individual portions) and refrigerate or freeze, ready to take with you. You can then either reheat them at home and transport them hot in a food flask ready to eat on your travels, or you can pack them in your rucksack along with a portable stove, ready to heat through at your lunching spot.
When it comes to eating, the classics are often the best, and this humble soup is both quick and delicious to make and very filling to boot.
SERVES 4–6
25g butter
2 tbsp olive oil
4 large leeks, washed and thinly sliced
3 large potatoes, cut into 1cm cubes
1 litre chicken or vegetable stock
2 tsp dried mixed herbs
Sea salt and freshly ground black pepper
Melt the butter with the oil in a large saucepan and sweat the leeks over a low heat for 5 minutes. Add the potatoes, pour in the stock and bring to a gentle simmer.
Stir through the herbs and season well with salt and black pepper, then cook, uncovered, for around 15–20 minutes until the vegetables are soft, stirring occasionally.
Use a wooden spoon to break up the potatoes a little for a rustic soup, or purée with a stick blender until smooth, if you prefer.
Anything creamy is comforting in my world, and this exceedingly simple soup is no exception.
SERVES 4–6
50g unsalted butter
750g onions, roughly chopped
1 tbsp rosemary leaves
2 tbsp plain flour
1 litre milk
salt and freshly ground black pepper
Melt the butter in a large saucepan and add the onions and rosemary leaves. Cover with a lid and cook over a low heat for 30 minutes, stirring occasionally, until the onions are very soft. Stir through the flour thoroughly, then pour in the milk, stirring constantly over a medium heat until the soup thickens. Remove from the heat and whizz until completely smooth using a stick blender. Season to taste with salt and freshly ground black pepper.
Bright green fresh pea soup would probably be my desert island soup dish. I love it both for its vibrancy and simplicity, but in this recipe I have used dried split peas along with the fresh to give a bit more filling sustenance. The pancetta can easily be left out for a vegetarian soup, but for meat-eaters it adds a great salty boost.
SERVES 4–6
1 tbsp vegetable oil
200g diced smoked pancetta or lardons
2 sticks celery, diced
1 large onion, chopped
2 cloves garlic, crushed
250g dried split peas (green or yellow)
1.5 litres vegetable stock
300g fresh or frozen peas
Splash of double cream (optional)
Sea salt and freshly ground black pepper
Heat the oil in a large saucepan, add the pancetta, celery and onion and sauté over a medium-low heat for around 15 minutes until the vegetables are soft.
Add the garlic and cook for a further minute, then stir through the split peas and pour in the stock. Bring to the boil and season with plenty of black pepper. Simmer gently, uncovered, for around 40 minutes until the split peas are soft. Stir in the fresh or frozen peas and simmer for a further 5 minutes.
Use a stick blender to purée the soup in the pan to a consistency you like (I like mine fairly smooth). Stir through the cream, if using, and add a little salt or more black pepper if necessary.
One-pot cooking is absolutely ideal for on-the-move food as everything you need comes in one neat ready-prepared package. These next few recipes can all be made ahead of time and taken chilled in a ziplock food bag packed into a mug or bowl, ready for reheating on your portable stove. Or you can reheat them at home and transport them steaming hot in a food flask for even speedier eating along your route. These recipes will all keep for up to 3 days in the fridge.
Two tasty ways with lentils…
Neat little parcels of energy and goodness, lentils have come a long way in recent years, shaking off their dull hippyish overcoat to become something of a vogue ingredient. I love them a myriad different ways, particularly the firm type, like Puy, or the large flat brown ones, that stay intact on cooking.
Here are two of my favourite ways with lentils, but both are ripe for tweaking so do experiment. Both recipes serve 2 but can easily be doubled to each serve 4. Once cooked, cool, then pack into food bags or containers and refrigerate, ready to take with you.
I like to use thin chipolatas as you get more of the delicious caramelized crispy outside than with regular fat sausages but, of course, you can substitute those if you like.
SERVES 2
2 tbsp olive oil
6 chipolatas, each cut into 3 pieces
1 large onion, chopped
1 large red pepper, deseeded and chopped
A pinch of dried chilli flakes (optional)
125g Puy lentils
Handful of black olives
1 clove garlic, crushed
½ tsp dried oregano
500ml chicken stock
Sea salt and freshly ground black pepper
Heat the oil in a heavy-based saucepan set over a medium-high heat, add the chipolatas and fry for around 10 minutes until golden brown all over. Add the onion, red pepper and chilli flakes, if using, and fry for a further 10 minutes or so until starting to colour a little at the edges.
Stir through the lentils, olives, garlic and oregano, then pour in the stock and season well with black pepper. Bring to the boil, then cover and simmer steadily for around 40 minutes until the lentils are soft, stirring occasionally. Add a little salt and more black pepper if necessary.
Crème fraîche enriches this delicious vegetarian dish and elevates it firmly beyond ‘worthy’!
SERVES 2
3 tbsp olive oil
1 large aubergine, cut into 2cm pieces
2 cloves garlic, crushed
½ tsp smoked paprika
4–5 ripe tomatoes, roughly chopped
1 tbsp balsamic vinegar
125g large brown lentils
500ml vegetable or chicken stock
1 heaped tbsp crème fraîche
Sea salt and freshly ground black pepper
Heat the oil in a saucepan over a medium-low heat, then fry the aubergine until softening and starting to colour, about 15–20 minutes. Add the garlic, smoked paprika, tomatoes and balsamic vinegar and fry for a further couple of minutes.
Stir through the lentils, pour in the stock and season with black pepper. Bring to the boil, then cover and simmer steadily for around 40 minutes until the lentils are soft, stirring every so often. Stir through the crème fraîche and season to taste with a little salt.
Slow-cooked lamb and soft beans are sure to cheer you up mid-hike, but this stew is also a winner for the supper table too. It also freezes well for up to 3 months, so is a good one for batch cooking – enjoy half for your dinner and freeze the rest in portion-size food bags ready to take out on a wild adventure.
SERVES 4
2 tbsp olive oil
500g lamb neck fillet, cut into 2–3cm cubes
1 large onion, chopped
3 cloves garlic, crushed
3 sprigs of rosemary
2 × 400g tins cannellini beans, drained and rinsed
400ml vegetable, chicken or lamb stock
Large glass of white wine (about 250ml)
1 lemon
Small bunch of parsley, chopped
Sea salt and freshly ground black pepper
Heat the oil in a heavy-based saucepan over a high heat and quickly fry the lamb in a couple of batches until golden brown all over, transferring to a plate as you go. Reduce the heat a little, add the onion and sauté for 15 minutes or so until starting to caramelize at the edges.
Return the lamb to the pan, then add the garlic, rosemary and beans, stirring for a minute, before pouring in the stock and wine. Peel 2 or 3 wide strips of rind from the lemon using a vegetable peeler and throw them into the pan, then squeeze in the juice of half the lemon. Season well with salt and black pepper.
Bring to the boil, then reduce the heat; cover and simmer gently for around 1½ hours, stirring occasionally, until the lamb is really tender. Remove the lid towards the end of cooking to thicken the stock if you like.
Stir through the parsley and taste, adding an extra squeeze of lemon juice if desired. Cool, then pack into food bags or containers and refrigerate, ready to take with you.
And some more one-pot ‘baked’ beans
There’s nothing wrong with tinned baked beans topped with a generous sprinkle of Cheddar (one of my go-to warming lunches when I’m working at home), but home-made bean recipes are in a different league altogether. In fact, these are not baked at all (nor, I suspect, are the ones in the tins), but they are perhaps the ultimate comfort food and just the ticket mid-hike.
Make at home the night before and take bagged and ready to reheat in a pan on your portable stove mid-walk. Or reheat at home and pour into a warmed food flask to carry them hot and ready to eat.
SERVES 2 (RECIPE CAN EASILY BE DOUBLED TO SERVE 4)
2 tbsp olive oil
1 large onion, chopped
1 clove garlic, crushed
About 4 slices prosciutto, roughly chopped
1 head spring greens, shredded
1 × 400g tin butter beans, drained and rinsed
A little pinch of dried thyme
250ml vegetable or chicken stock
150g Gorgonzola, roughly diced
Sea salt and freshly ground black pepper
Add the oil and onion to a deep frying pan and cook gently for 15–20 minutes until lightly caramelized. Stir through the garlic and prosciutto and cook for a further couple of minutes, before adding the greens, butter beans and thyme, mixing well.
Pour in the stock and season with salt and black pepper, then bring to a simmer, cover and cook for 15 minutes until the greens are just cooked through. Stir through the cheese until it melts, then adjust the seasoning to taste. Cool, then pack into a food bag and refrigerate, ready for reheating the next day.
And another thing…
This is not so much a recipe but an idea to experiment with. From the recipe above, keep the gently caramelized onion (it adds much body and sweetness to the beans), and the garlic and stock. Everything else is very much a moveable affair, making it a great dish to use up bits and bobs of this and that…
▪ Swap the spring greens for green beans for a double-bean feast, or try a large handful of fresh or frozen peas. Add roughly chopped cherry tomatoes, or even sun-dried tomatoes for a richer taste.
▪ Replace the stock with an equal quantity of passata for a tomatoey dish.
▪ Change the beans. Cannellini beans go particularly well with tomatoes, and black-eye beans are great, especially if you add a pinch each of ground cumin and chilli powder (or dried chilli flakes) to the mix for a hint of Mexico.
▪ Use chopped bacon, chorizo or salami in place of the prosciutto. Or try it with some chopped sun-dried tomatoes and a few sliced black olives or capers.
▪ Replace the meat element with something salty and piquant, like chopped anchovies or capers.
▪ Try a different cheese – traditional Cheddar is great, especially with tomatoey beans.
▪ Change the herbs – try chopped coriander or parsley, added at the end of cooking.
▪ Spice it up with curry powder, chilli powder (or dried chilli flakes), cumin (ground or seeds) or smoked paprika.
Salads are perhaps not your first choice for a filling and hearty lunch, but both of these tasty Mediterranean-inspired salads will keep you going for hours and are great for warm-weather adventures.
SERVES 3–4
175g dried pasta (any shape you like)
50g whole unblanched hazelnuts
3 tbsp olive oil
2 red peppers, deseeded and chopped
1 clove garlic, crushed
200g feta cheese, crumbled
50g sun-dried tomatoes, chopped
A generous handful of flat-leaf parsley, chopped
Sea salt and freshly ground black pepper
Cook the pasta according to the packet instructions, then drain well.
Whilst the pasta is cooking, set a large frying pan over a high heat. Add the hazelnuts and toast for 2–3 minutes until they smell nutty. Tip on to a board and roughly chop. Set aside.
Add the oil to the frying pan and tip in the red peppers. Fry over a high heat, stirring from time to time, for 8–10 minutes until lightly charred at the edges.
Remove from the heat and stir through the garlic, then add to the cooked pasta (along with all the tasty oil), mixing well. Stir through the chopped nuts, feta, sun-dried tomatoes and parsley and season well with salt and black pepper. Spoon into containers and cool, then cover and chill in the fridge until you are ready to travel.
SERVES 3–4
150g couscous
200ml hot vegetable stock
3 tbsp olive oil, plus extra for frying
1 × 250g pack halloumi cheese, cut into 1cm slices
1 × 400g tin chickpeas, drained and rinsed
Finely grated zest and juice of 1 smallish orange
Handful of black olives
1 tbsp (drained) capers, roughly chopped
1 × 200g tin tuna (ideally in olive oil), drained
Sea salt and freshly ground black pepper
Add the couscous to a mixing bowl, pour over the hot stock, then cover with cling film and set aside for 10 minutes or so to allow the couscous to soak up the liquid.
Heat a griddle pan over a high heat until smoking hot, then lightly brush with a little oil. Fry the halloumi on both sides for a few minutes until crisp, then remove, chop into bite-size pieces and add to the couscous, fluffing lightly with a fork.
Stir through the chickpeas, orange zest and juice, the oil, the olives and capers, mixing well. Finally, lightly fork through the tuna and season with salt and black pepper. Pack into tubs, cover and chill in the fridge until ready to take with you.
In my book, an old-fashioned flapjack should be just the right side of teeth-achingly crunchy, so these get a good baking, but cook them a little less if you like a softer bite. The sesame seeds not only add a lovely taste but are a nutritious superfood too, giving you masses of the good stuff wrapped up in neat little packages. These keep well for around 5 days in an airtight tin or wrapped in foil.
MAKES 12–18 PIECES
300g butter, plus extra for greasing
250g golden syrup
100g soft dark brown sugar
450g porridge oats
100g sesame seeds
Preheat the oven to 190°C/Gas 5. Grease and line a shallow 30 × 20cm baking tin with non-stick baking paper, leaving two ‘tails’ of paper overhanging to help lift the flapjacks out once baked.
Weigh the butter, syrup and sugar into a saucepan, then bring to a simmer over a medium heat, stirring well, until the butter melts and you have a smooth glossy sauce. Remove from the heat.
Combine the oats and sesame seeds in a large mixing bowl. Pour over the hot syrup sauce and stir thoroughly until evenly mixed. Scrape into the prepared tin, pressing down level with the back of a spoon.
Bake in the oven for 30 minutes until golden brown on top. Cool in the tin for a few minutes before slicing through into pieces, then leave to cool completely in the tin. Once cold, remove, wrap and pack up to take with you.
Or flavour your flapjack another way…
▪ If sesame seeds are not your thing, try swapping them for the same weight of different seeds or chopped nuts.
▪ Or you could try adding chopped dried cranberries, apricots, stoned dates or prunes.
▪ Add a little spice – a big pinch of ground cinnamon, ginger or mixed spice is ideal.
▪ If you’re a fan of chocolate, you might like to drizzle over some melted chocolate as the bars are cooling, or how about adding a handful or so of chocolate chips to the mixture before you bake?
Home-made shortbread is such a treat at any time, but eaten with a spectacular view in front of you and a mug of hot tea in your hand, it tastes mighty fine indeed. You can even freeze the uncooked mixture in the tin, well-wrapped, for up to 3 months, if you fancy making a double batch, then defrost before baking. Once baked, these keep well for around 5 days in an airtight tin or wrapped in foil.
MAKES ABOUT 12 PIECES
250g butter, softened, plus extra for greasing
100g caster sugar, plus a little extra for dusting
Finely grated zest of 1 large orange
250g plain flour
100g cornflour
200g dried stoned prunes, chopped
Grease and line a shallow 30 × 20cm baking tin with non-stick baking paper, leaving two ‘tails’ of paper overhanging to help lift the shortbread out once baked.
Add the butter, sugar and orange zest to a mixing bowl and beat together briskly with a wooden spoon until pale and a little fluffy. Sift over the flour and cornflour, then scatter in the prunes and stir really well until you have a crumbly dough. Tip the mixture into the prepared tin, pressing down firmly and evenly with the back of the spoon.
Cover with cling film and chill in the fridge for at least 30 minutes, or even overnight. This helps firm up the dough, giving you a crisper result on baking.
When you are ready to bake, preheat the oven to 190°C/Gas 5.
Bake the chilled shortbread in the oven for about 30 minutes until pale golden. Cool in the tin for a few minutes before cutting into about 12 pieces using a sharp knife, then leave to cool completely in the tin. Once cold, remove, wrap and pack up to take on your travels.
Other ideas to try…
▪ Leave out the prunes for a deliciously plain shortbread.
▪ Replace the prunes with other dried fruit – cranberries are a great sharp contrast to the sweetness, or try chopped dried apricots, stoned dates or dried apples.
▪ Add a teaspoon of caraway seeds for an interesting spicy flavour.
▪ Add a handful of chocolate chips when you sift in the flour.
With just a handful of ingredients, these speedy bars are absolutely packed full of energy and they are sure to give you a boost when you need it most. They are also a brilliant way to use up odd leftover nuts and seeds that you might have hanging around from past baking projects. These keep well for around a week in an airtight tin or wrapped in foil.
MAKES ABOUT 16 BARS (A LITTLE GOES A LONG WAY)
Butter, for greasing
250g honey (runny or set)
250g peanut butter (smooth or crunchy)
250g mixed nuts (like walnuts, almonds, cashews and brazils), roughly chopped
200g dried apricots, chopped
100g mixed seeds (such as pumpkin, sunflower and sesame)
100g desiccated coconut
Preheat the oven to 190°C/Gas 5. Grease a 25cm square cake tin with butter and line with non-stick baking paper.
Weigh the honey and peanut butter into a small saucepan. Melt over a medium-low heat, stirring from time to time, until you have a thick sauce. Remove from the heat.
Put the nuts, apricots, seeds and coconut into a mixing bowl. Pour in the honey and peanut sauce and stir thoroughly to combine, making sure everything is nicely coated and sticky. Scrape into the prepared tin, pressing down evenly with the back of a spoon.
Bake in the oven for 15–20 minutes until deep golden on top. Cool in the tin for a few minutes before cutting into squares, then leave to cool completely in the tin. Once cold, remove, wrap and pack up to take on your travels.