Chapter Eight
Little Bags & Accessories
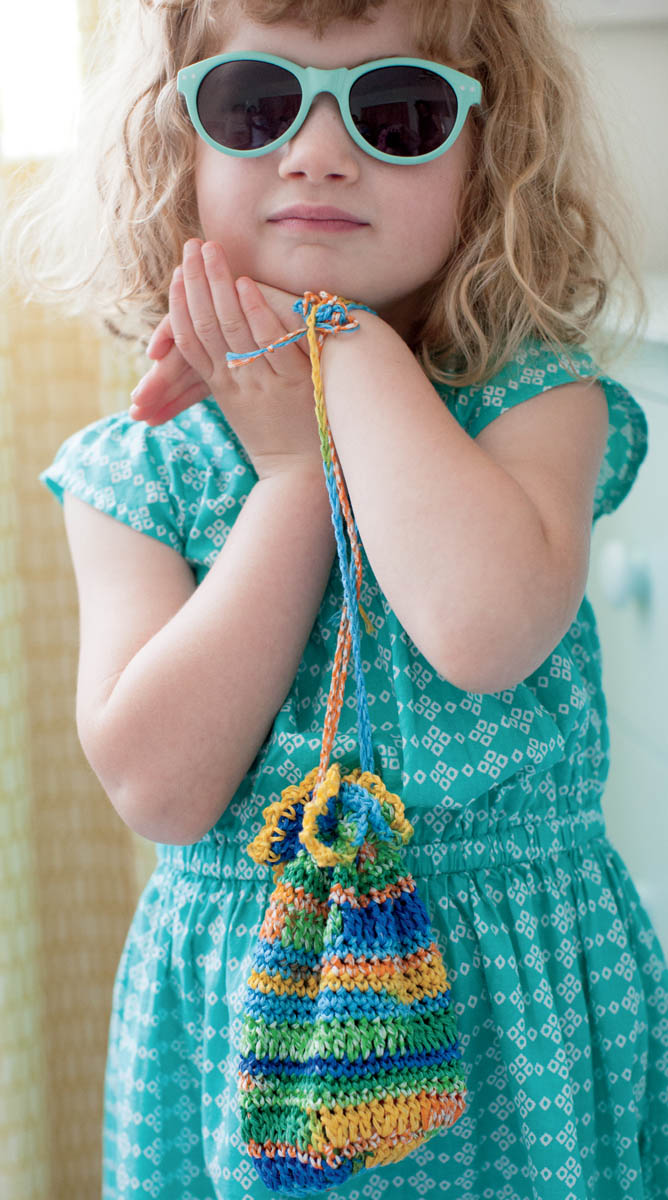
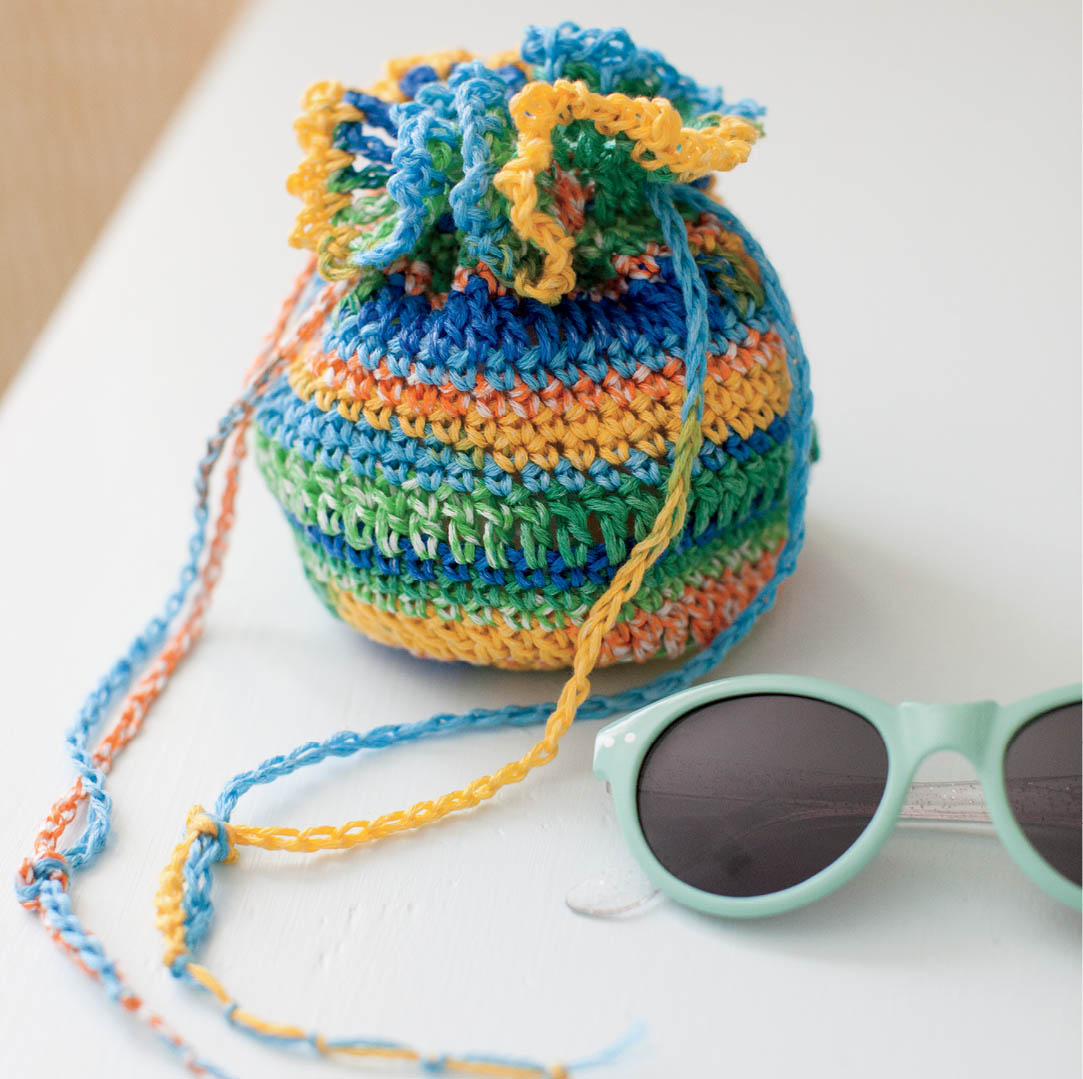
Put-and-Take Purse
Designed by Gwen Steege
What little girl doesn’t want to play dress up? This colorful little purse is perfect for playing “put-and-take,” too — a place to hide and retrieve favorite items. Because of the long drawstrings, this purse is not suitable for children under the age of three.
Finished Measurements
Yarn
- Adriafil Kimera, 100% Egyptian mercerized cotton, 148 yds (135 m)/1.75 oz (50g), Color 16 Proust Fancy

Crochet Hook
- US E/4 (3.5 mm) or size needed to obtain correct gauge
Gauge
- Rnds 1–5 = 4"/10 cm in diameter
Other Supplies
Crocheting the Purse
- Begin with an adjustable ring.
- Rnd 1: Ch 3 (counts as dc here and throughout), 11 dc in ring, join with slip st to top of ch-3. You now have 12 dc.
- Rnd 2: Ch 3, dc in same st, 2 dc in each dc around, join with slip st to top of ch-3. You now have 24 dc.
- Rnd 3: Ch 3, dc in same st, dc in next dc, *2 dc in next dc, dc in next dc; repeat from * around, join with slip st to top of ch-3. You now have 36 dc.
- Rnd 4: Ch 1, sc in each dc around, join with slip st to first sc.
- Rnd 5: Ch 3, dc in same st, dc in next 2 sc, *2 dc in next sc, dc in next 2 sc; repeat from * around, join with slip st to top of ch-3. You now have 48 dc.
- Rnds 6–8: Ch 1, sc in each st around, join with slip st to first sc.
- Rnd 9: Ch 3, dc in each sc around, join with slip st to top of ch-3.
- Rnds 10–14: Ch 1, sc in each st around, join with slip st to first sc.
- Rnd 15: Ch 3, dc in each sc around, join with slip st to top of ch-3.
- Rnds 16–18: Ch 1, sc in each st around, join with slip st to first sc.
- Rnd 19: Ch 3, dc in each sc around, join with slip st to top of ch-3.
- Rnd 20: Ch 4 (counts as dc, ch 1), (dc, ch 1) in each dc around, join with slip st to 3rd ch of ch-4.
- Rnd 21: Ch 1, sc in same st, ch 3, (sc, ch 3) in each ch-space around, join with slip to first sc. Fasten off. Weave in ends.
Crocheting the Drawstrings
- Leaving 7"/18 cm yarn tails at each end, crochet two lengths of 100 chains each. Thread one chain onto a yarn needle and run it under and over the dc’s worked in Rnd 19. Using photo as a guide, knot the ends together on one side of the purse, then knot yarn tails together with four evenly spaced overhand knots.
- Thread the other chain onto the yarn needle and, beginning at the exact opposite side of the purse, weave it through the same path as the first chain. Knot its ends together.
- To close purse, draw out each loop.
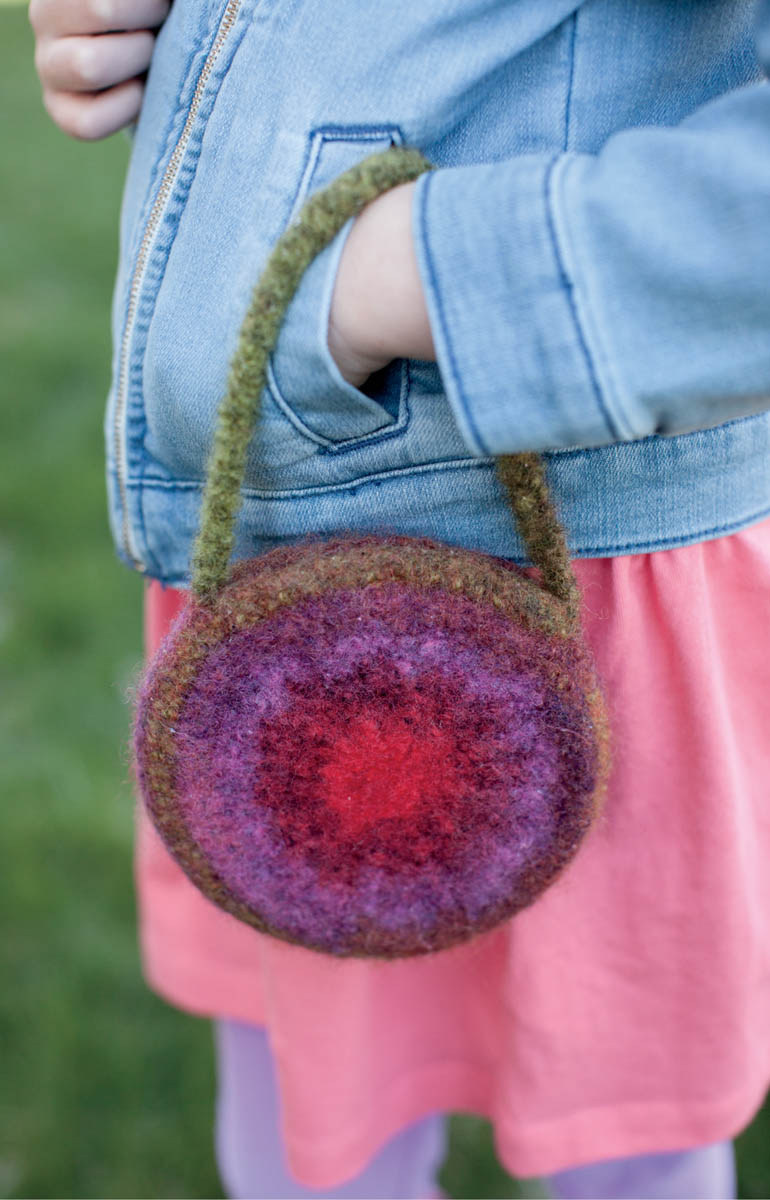
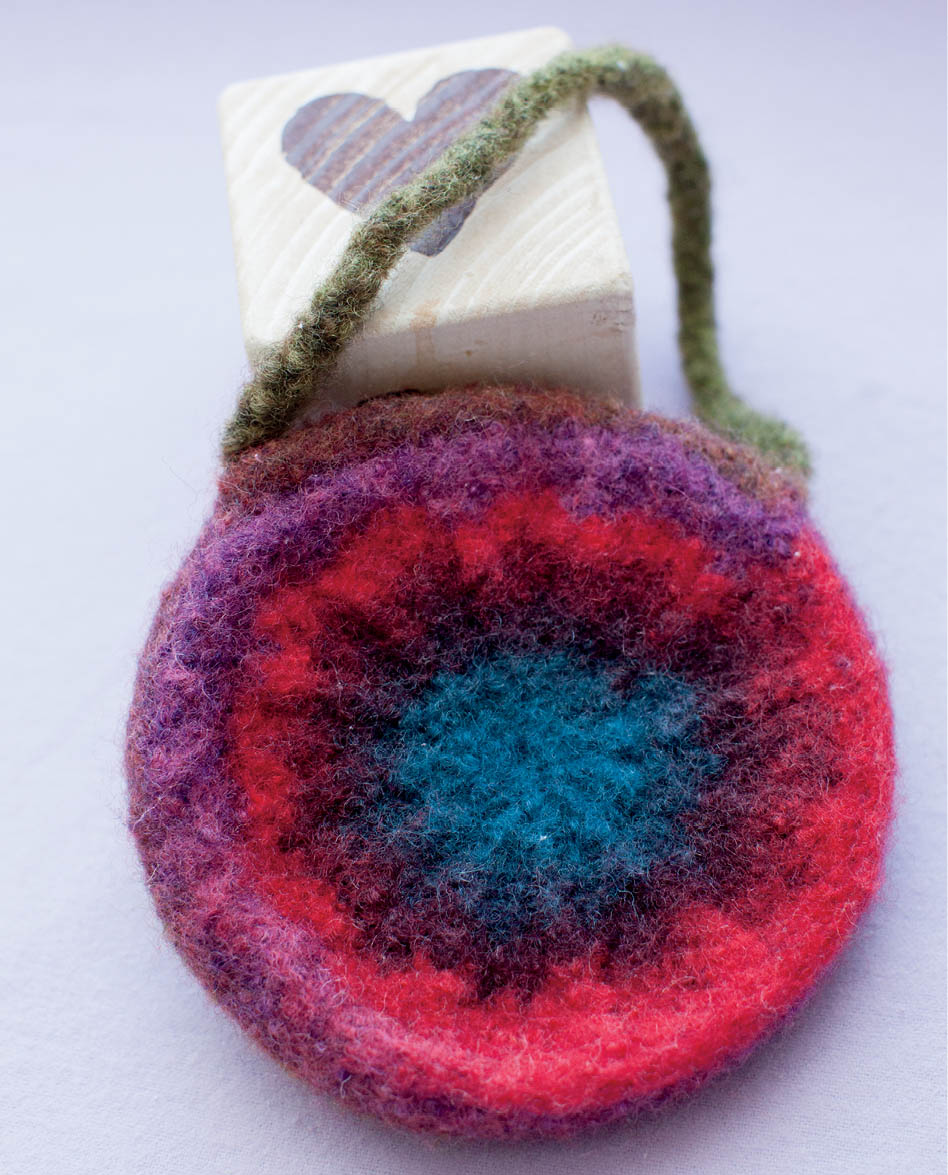
Little Miss Felted Purse
Designed by Gwen Buttke McGannon
The sides of this purse are worked circularly with post stitches to create the visual texture of the spokes of a wheel. After felting, the purse is ready to hold little precious things while your girl is out and about.
Finished Measurements
- Approximately 5"/12.5 cm diameter
Yarn
- Plymouth Yarn Gina, 100% wool, 109 yds (100 m)/1.75 oz (50 g),Color 0007

Crochet Hook
- US J/10 (6 mm) or size needed to obtain correct gauge
Gauge
- 16 stitches and 8 rounds = 4"/10 cm in front post double crochet before felting
Other Supplies
- Yarn needle, snap, sewing needle and coordinating thread
Crocheting the Sides
- Make an adjustable ring.
- Rnd 1: Ch 3 (counts as dc here and throughout), ch 3, 11 dc in ring, join with slip st to top of ch-3. You now have 12 sts.
- Rnd 2: Ch 3, FPdc in same st, *dc in next st, FPdc in same st; repeat from * around, join with slip st to top of ch-3. You now have 24 sts.
- Rnd 3: Ch 3, dc in same st, (dc, FPdc) in next FPdc, *2 dc in next dc, (dc, FPdc) in next FPdc; repeat from * around, join with slip st to top of ch-3. You now have 48 sts.
- Rnd 4: Ch 3, dc in same st and in next 2 dc, FPdc in next FPdc, *2 dc in next dc, dc in next 2 dc, FPdc in next FPdc; repeat from * around, join with slip st to top of ch-3. You now have 60 sts.
- Rnd 5: Ch 3, dc in same st and in next 3 dc, FPdc in next FPdc, *2 dc in next dc, dc in next 3 dc, FPdc in next FPdc; repeat from * around, join with slip st to top of ch-3. You now have 72 sts.
- Rnd 6: Ch 1, BPsc in each st around, join with slip st to first sc.
- Rnd 7: Ch 1, sc in each st around, join with slip st to first sc. Fasten off.
- Repeat to make a second side but do not fasten off.
Finishing
Join the Sides
- Holding both pieces with RS together, ch 1, sc through double thickness in each sc to last 18 sts; stitching only into one piece, ch 1, hdc in next 18 sts, turn, continue working the across remaining sts on opposite side, hdc in each of the 18 sts, slip st in next hdc. Do not fasten off. Turn RS out.
The Handle
- Fsc 45, join to opposite side of opening with slip st. Fasten off.
- Weave in ends. Felt (see Other Techniques).
Max’s Backpack
Designed by LeAnna Nocita-Lyons, The Eccentric Haus Frau
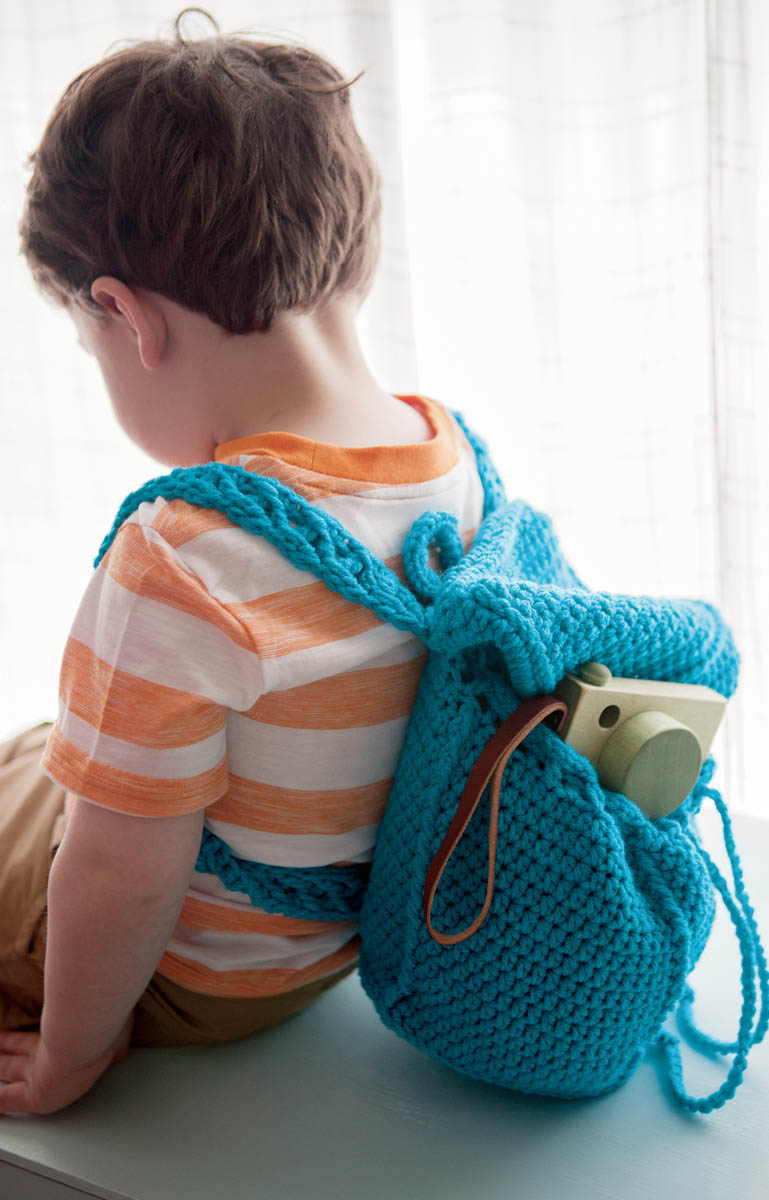
This little backpack is perfect for transporting favorite toys for a trip to the park or to Grandma’s house. Stitched with single, double, and front post double crochet, the pack works up quickly and requires no extra notions. Because of the long drawstrings, this backpack is not suitable for children under the age of three.
Finished Measurements
- 51⁄2"/14 cm wide, 7"/18 cm tall, and 51⁄2"/14 cm deep
Yarn
- Red Heart With Love, 100% acrylic, 370 yds (338 m)/7 oz (198 g), Color 1803 Blue Hawaii

Crochet Hook
- US G/6 (4 mm) or size needed to obtain correct gauge
Gauge
- 16 stitches and 18 rows = 5"/12.5 cm in single crochet
- 16 stitches and 11 rows = 5"/12.5 cm in half double crochet
Other Supplies
- Stitch marker, yarn needle
Crocheting the Bag
The Bottom
- Chain 21.
- Row 1: Sc in 2nd st from hook and in each ch across, turn. You now have 20 sc.
- Row 2: Ch 1, sc in each sc across, turn.
- Rows 3–20: Repeat Row 2 eighteen times. At end of Row 20, do not turn.
The Sides
- Rnd 1: Ch 1, working along the side of Rows 20–1, 1 sc in each row to corner, 2 sc in corner st; working along opposite side of foundation ch, sc in each ch across, 2 sc in corner st; working along side of Rows 1–20, 1 sc in each row to corner, 2 sc in corner st, sc in each sc across to last st, 2 sc in corner. You now have 84 sc.
- Rnd 2: Ch 1, BPsc around post of each sc around, join with slip st to first sc.
- Rnd 3: Ch 2 (counts as hdc), hdc in each st around. Do not join. Pm in the first st of the rnd and move it up as you work the rnds.
- Rnd 4: (Hdc in next 19 sts, hdc2tog) four times. You now have 80 sts.
- Rnd 5: FPdc in first BPsc in Rnd 2, *hdc in next 19 sts, FPdc in next corresponding st in Rnd 2; repeat from * around. You now have 80 hdc and 4 FPdc.
- Rnd 6: *Hdc in next 19 sts, FPdc in next FPdc of rnd below; repeat from * around. You now have 80 hdc and 4 fpdc.
- Rnds 7–15: Repeat Rnd 6.
- Rnd 16: *Dc in first st, ch 1, skip 1 st; repeat from * around, join with slip st to first dc. You now have 40 dc and 40 ch-spaces.
- Rnd 17: Slip st in each st and ch-space around. Fasten off. Weave in ends.
Crocheting the Drawstring
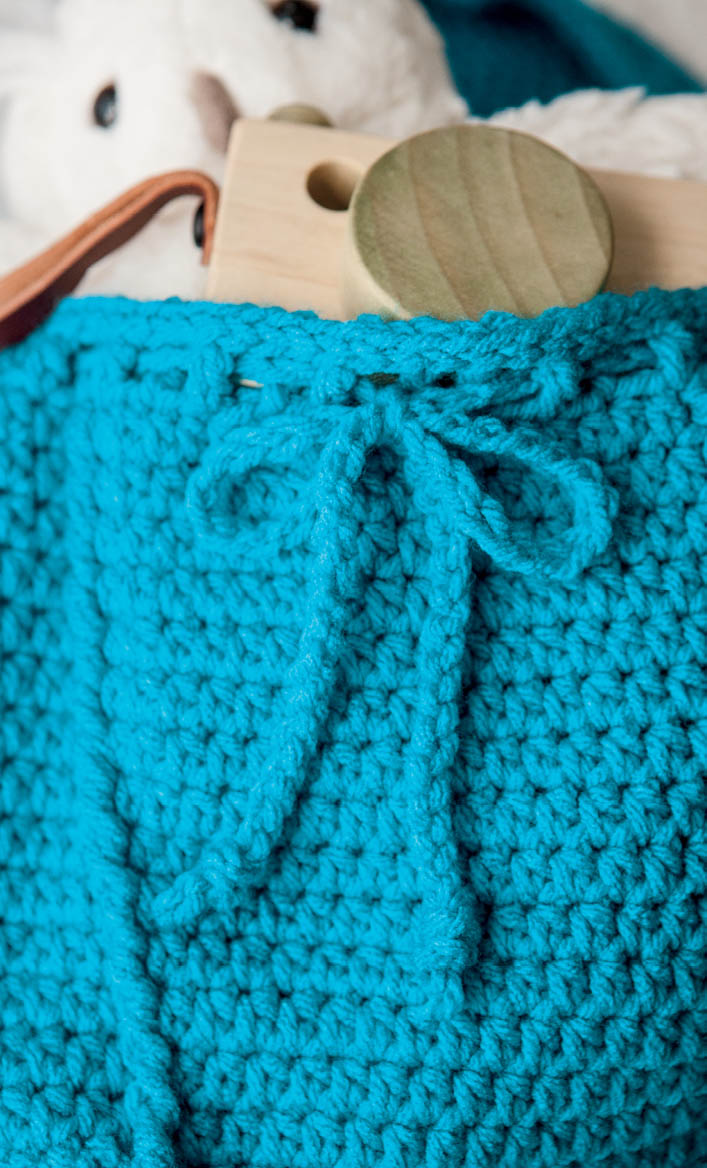
- Leaving a 2"/5 cm tail, ch 120. Fasten off, leaving a 2"/5 cm tail. Fray 2"/5 cm of tails, and trim if necessary to make even. Tie an overhand knot at each ends of chain, leaving the frayed tassels below the knots. Thread through Rnd 16. Once the drawstring has been woven through and evened out, tack with a few stitches to the back of the pack.
Crocheting the Top Cover
The Top
- Chain 21.
- Repeat Rnds 1–20 of bottom.
The Sides
- Rnds 1–4: Repeat Rnds 1–4 of sides.
- Rnd 5 (front of top cover): Sc in next 8 st, ch 5, skip 2 st, sc in each st around.
- Rnd 6: Slip st in each st to ch-5 space, sc in next 5 ch of ch-space, slip st in each st around. Fasten off. Weave in ends.
Attach Top Cover to Backpack
- With yarn needle and approximately 20"/51 cm of yarn, sew edge of back top to the back edge of Rnd 15 using a whipstitch in each hdc. Fasten off and weave in ends.
The Back Loop
- Attach yarn with slip st to 6th st on back of top cover, ch 10, skip 4 sts, slip st in next st (loop made). Turn, slip st in loop just made, 23 sc in same loop, slip st in loop. Fasten off. Weave in ends.
Crocheting the Back Straps
Note: Strap will measure approximately 32"/81 cm before being folded in half and stitched to back of pack.
- Chain 116.
- Row 1: Dc in 4th ch from hook, dc in next ch; work FPdc around posts of last 2 dc’s, *dc in next 2 ch, FPdc around posts of last 2 dc’s; repeat from * to last st, dc in last st. Do not turn. You now have 56 FPdc.
- Row 2: Ch 1, work 3 sc around the dc post at end of row; working across opposite side of foundation ch, sc in chain at base of next 3 dc, *FPdc around base of the posts of last and next dc’s; from the previous row (one dc from each 2-dc pair, to form a V with the dc’s), sc in next ch at base of 2 dc; repeat from * to last dc, sc in chain at base of last dc, 3 sc in beginning ch-3, join with slip st to first st of Row 1. Fasten off. Weave in ends.
Finishing
- Fold strap in half and, with yarn needle and approximately 20"/51 cm of yarn, sew center of strap to the center back bottom. Making sure not to twist the strap, sew ends of straps to the top left and right corners at Row 15. Fasten off. Weave in ends.
Optional: Add a lining to the backpack and sew on a large button that will fit the loop of the top cover.
Dad’s Diaper Bag
Designed by Dana Bincer, Yarnovations.com
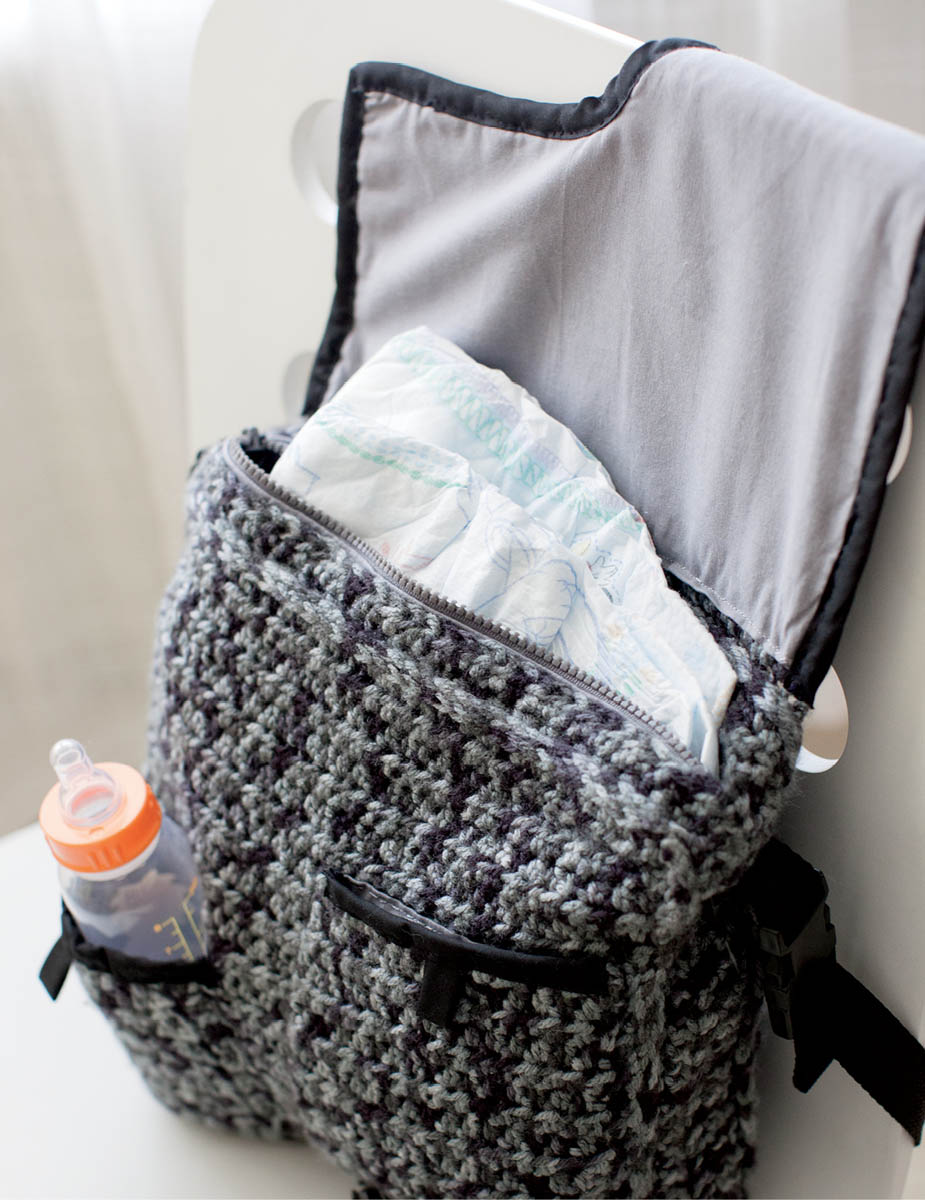
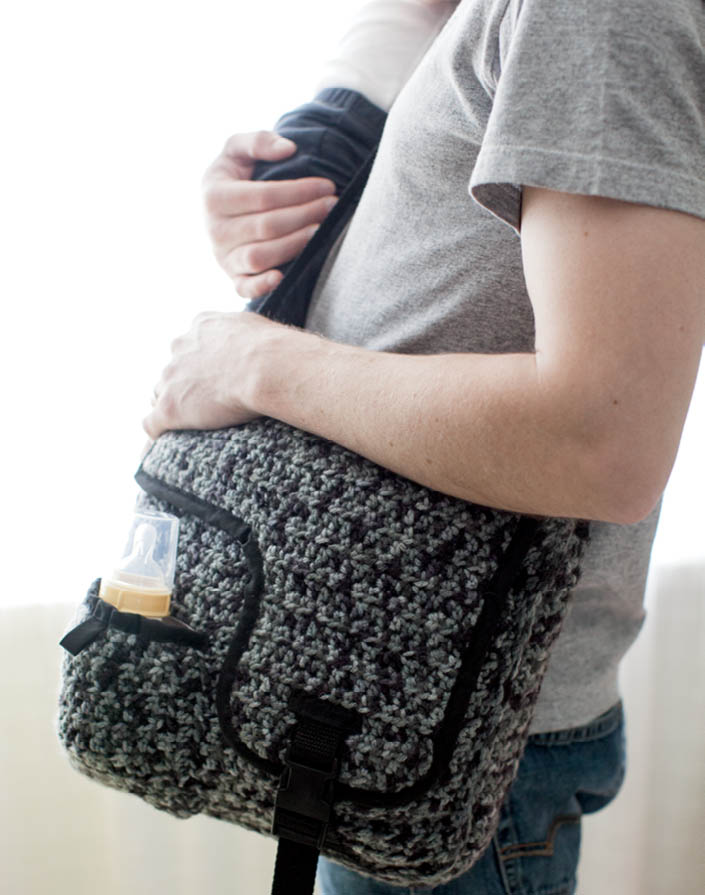
While we don’t see a problem, some men just don’t like walking in public carrying pink-flowered diaper bags. Problem solved with this masculine tote. Straps, buckles, and bias tape give the simple-to-crochet bag an industrial feel.
Finished Measurements
- 12"/30.5 cm wide, 11"/28 cm tall, and 2"/5 cm deep
Yarn
- Caron Jumbo, 100% acrylic, 659 yds (602 m)/12 oz (340 g), Color 09012 Dalmation

Crochet Hook
- US J/10 (6 mm) or size needed to obtain correct gauge
Gauge
- 13 stitches and 11 rows = 4"/10 cm in half double crochet
Other Supplies
- Yarn needle, 1 yd/1 m lining fabric, sewing needle and coordinating thread, 12"/30.5 cm metal zipper, 5"/12.5 cm of 1⁄4"/6 mm elastic (optional), 5 yds/4.5 m of 1⁄2"/13 mm extra-wide double-fold bias tape, 50"/127 cm of 1"/2.5 cm nylon strapping, two 1"/2.5 cm plastic side release buckles, straight pins
Crocheting the Front Panel
- Chain 38.
- Row 1: Hdc in 2nd ch from hook and in each ch across, turn. You now have 37 hdc.
- Rows 2–30: Ch 1, hdc in each hdc across, turn.
- Fasten off.
Crocheting the Back Panel
- Repeat instructions for front panel but do not cut yarn. Continue as follows.
- Rows 31–46: Repeat Row 2 from front panel.
- Row 47: Ch 1, hdc in next 20 hdc, turn, leaving remaining sts unworked. You now have 20 hdc.
- Row 48: Ch 2 (does not count as st), skip first st, hdc in each across, turn. You now have 19 hdc.
- Row 49: Ch 1, hdc in next 18 hdc, turn. You now have 18 hdc.
- Rows 50–56: Ch 1, hdc in each hdc across, turn.
- Row 57: Ch 2, skip first st, hdc in next 16 hdc, turn. You now have 16 hdc.
- Row 58: Ch 2, skip first st, hdc in next 14 hdc, slip st in next st. You now have 15 hdc.
- Fasten off.
Crocheting the Gusset
- Chain 149.
- Row 1: Hdc in 2nd ch from hook and in each ch across, turn. You now have 148 hdc.
- Row 2: Ch 1, hdc in each hdc across, turn.
- Row 3: Ch 1, hdc in next 111 sts, ch 38 to form zipper opening, turn.
- Row 4: Ch 1, hdc in 2nd ch from hook and each ch and st across. You now have 148 hdc.
- Row 5: Repeat Row 2.
- Fasten off. Weave in ends.
Crocheting the Bottle Pocket
- Chain 14.
- Row 1: Hdc in 2nd ch from hook and in each ch across, turn. You now have 13 hdc.
- Rows 2–14: Ch 1, hdc in each hdc across, turn.
- Row 15: Ch 1, hdc in each hdc across; do not turn.
- Row 16: Ch 1, working along side of Rows 15–1, work 20 hdc across; working along opposite side of foundation ch, hdc in each ch across; working along side of Rows 1–15, work 20 hdc across, turn. You now have 53 hdc.
- Row 17: Ch 1, hdc in each hdc across.
- Fasten off, leaving a long tail for sewing. Weave in ends.
Crocheting the Flat Pocket
- Chain 17.
- Row 1: Hdc in 2nd ch from hook and in each ch across, turn. You now have 16 hdc.
- Rows 2–15: Ch 1, hdc in each hdc across, turn.
- Fasten off, leaving a long tail for sewing.
Assembling the Bag
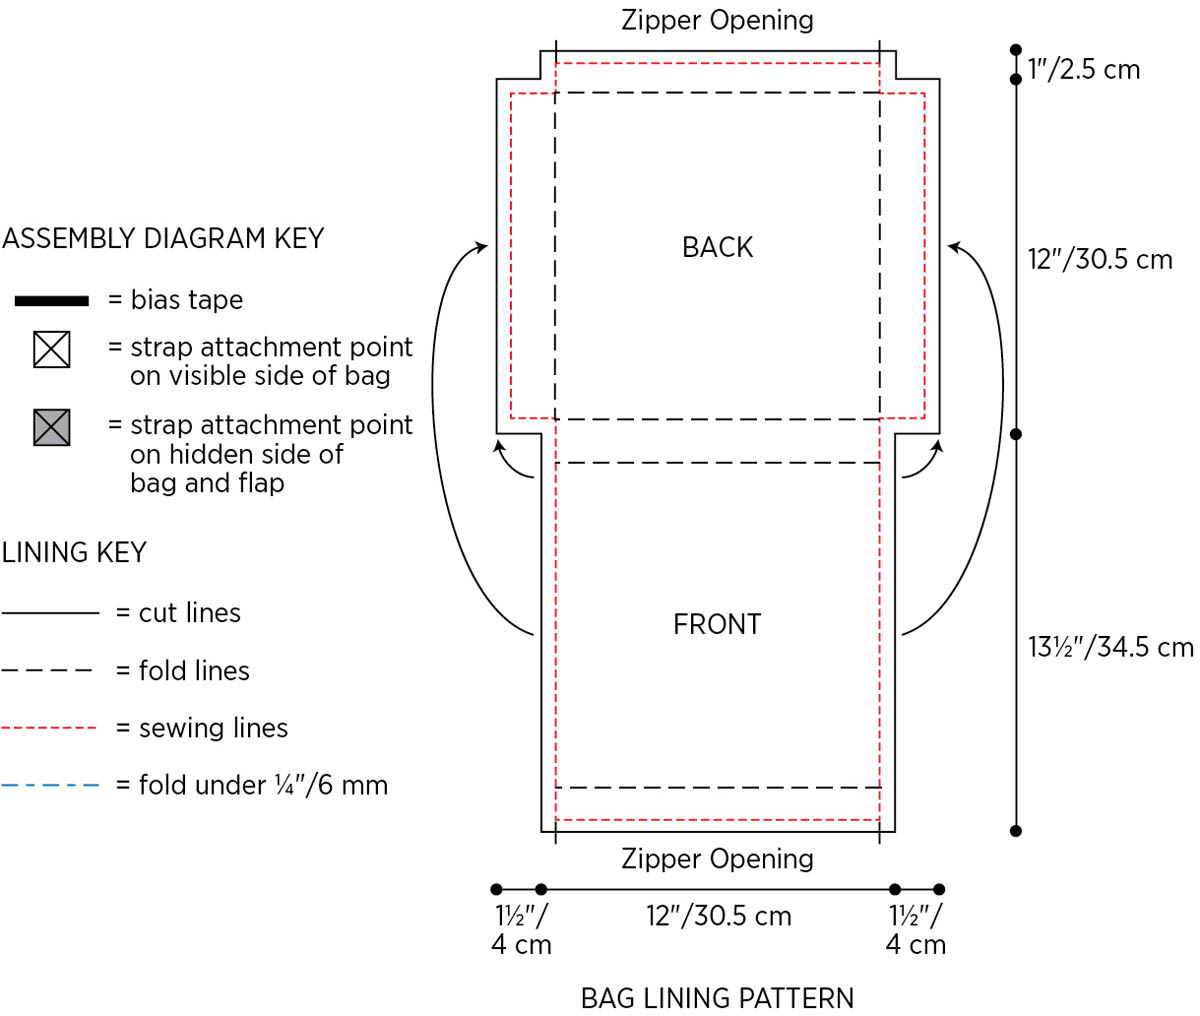
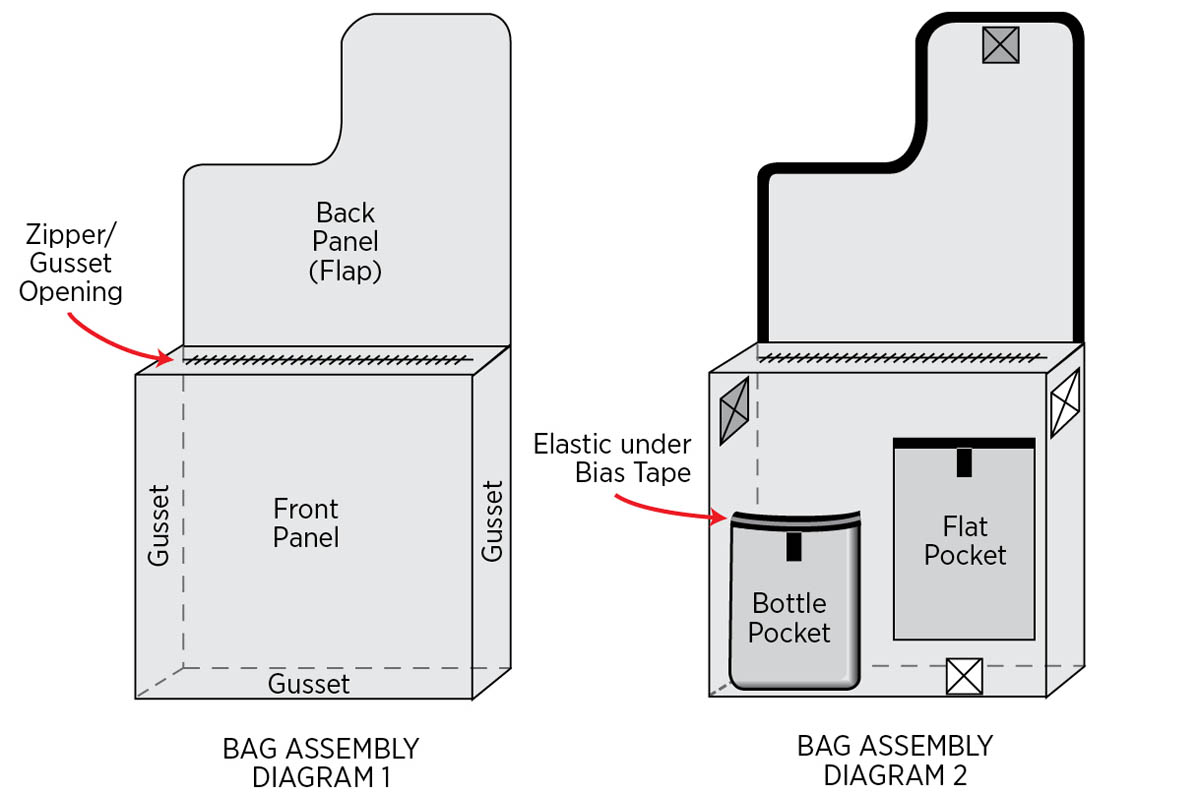
- Referring to assembly diagrams, pin gusset to top, bottom, and sides of front panel and to bottom and Rows 1–30 of back panel, placing opening for zipper at center top of bag. Rows 31–58 of back panel serve as a flap.
- Working from RS, slip st through both thicknesses around to join gusset to front panel. Fasten off. Repeat to join gusset to 3 sides of back panel. Sew remaining side of gusset to Row 30 of back panel. Fasten off. Weave in ends.
- Pin bottle pocket to front of bag in area not covered by the front flap. With yarn and yarn needle, attach with whipstitch across sides and bottom, leaving top open. Pin flat pocket to front of bag in area to be covered by front flap. Attach with whipstitch on sides and bottom.
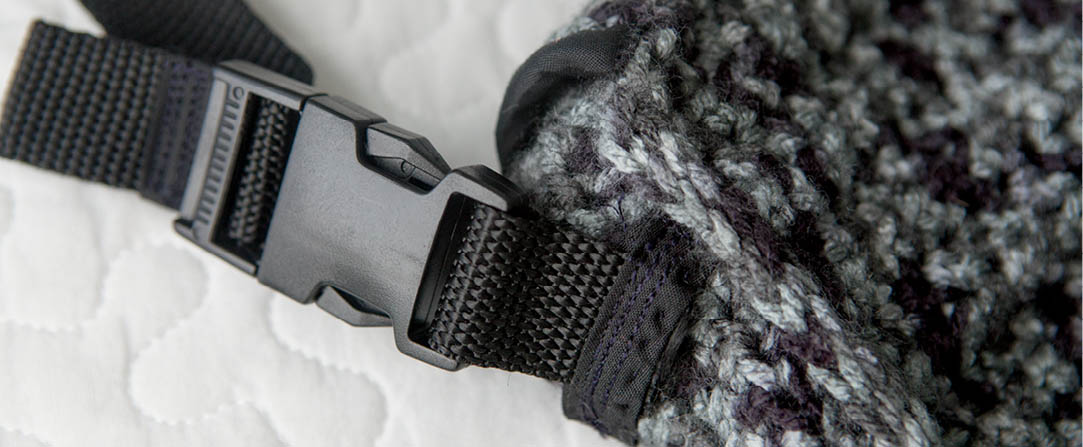
- Attach a 2"/5 cm loop of strapping to the non-adjustable part of one buckle and sew it to one side of the gusset, near the top. Attach one end of a 40"/101.5 cm piece of strapping to the adjustable part of the buckle and snap the strap in place. Sew the other end of the strap to the other side of the gusset, opposite the end with the buckle.
- Attach a 2”/5 cm loop of strapping to the non-adjustable part of the other buckle and sew it to the front flap. Sew one end of the remaining 6”/15 cm piece of strapping to the lower front, in line with the buckle on the front flap. Attach the adjustable part of the buckle to the other end of this strap.
- Place a folded piece of bias tape over all strapping ends sewn to bag and machine- or hand-sew securely in place. Wrap all remaining ends of strapping with bias tape and sew the tape securely to the strapping to prevent fraying.
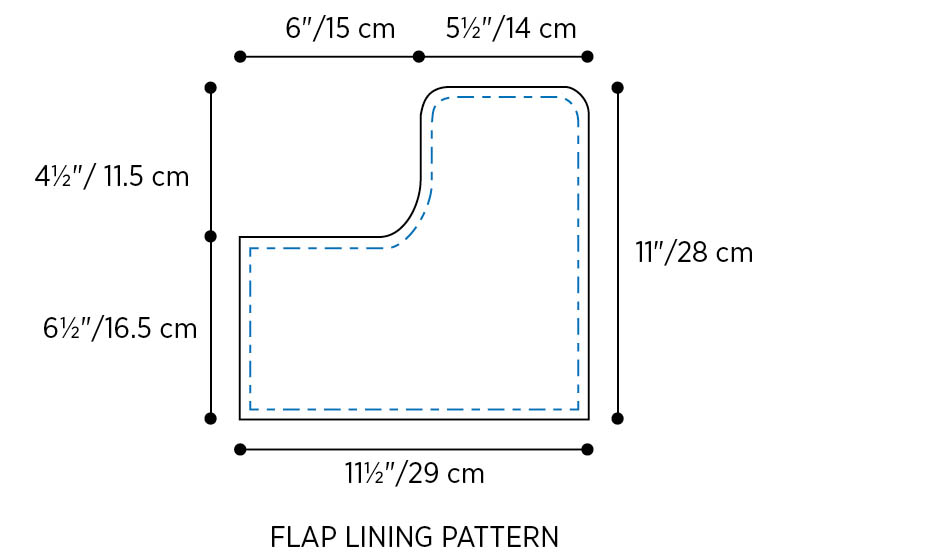
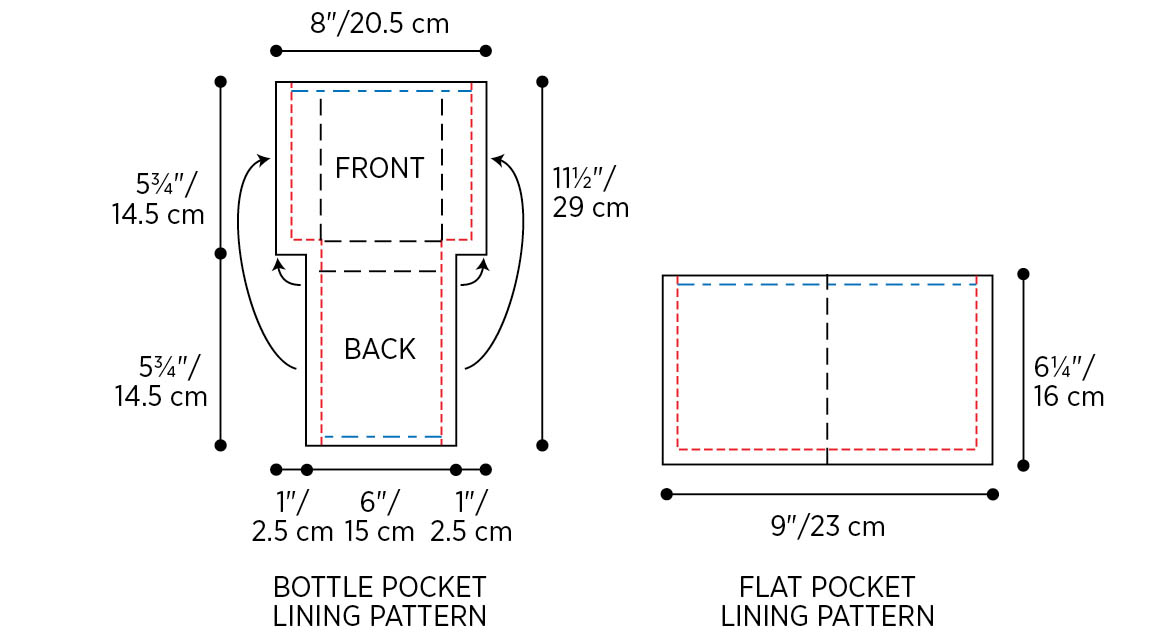
- Cut linings from each lining pattern. With sewing needle and thread, sew bag lining together with 1⁄2"/13 mm seam allowances, leaving top open. Hand-sew zipper into opening at top of lining. Hand-sew lining into bag.
- Fold down edges of flap lining 1⁄4"/6 mm and sew to inside of flap with needle and thread.
- With needle and thread, sew linings for two front pockets and hand-sew linings into pockets.
- Hand-sew elastic to top inside of bottle pocket, if desired, using a length that’s half the width of the pocket opening.
- Folding it in half, sew bias tape around outer edge of flap.
- Folding it in half, sew bias tape to top of pockets; add a 2"/5 cm folded piece of bias tape in the center of each binding to act as a pull tab.
- Wrap ends of strapping with bias tape and sew in place to prevent fraying.
Cady’s Cowl
Designed by Gwen Buttke McGannon
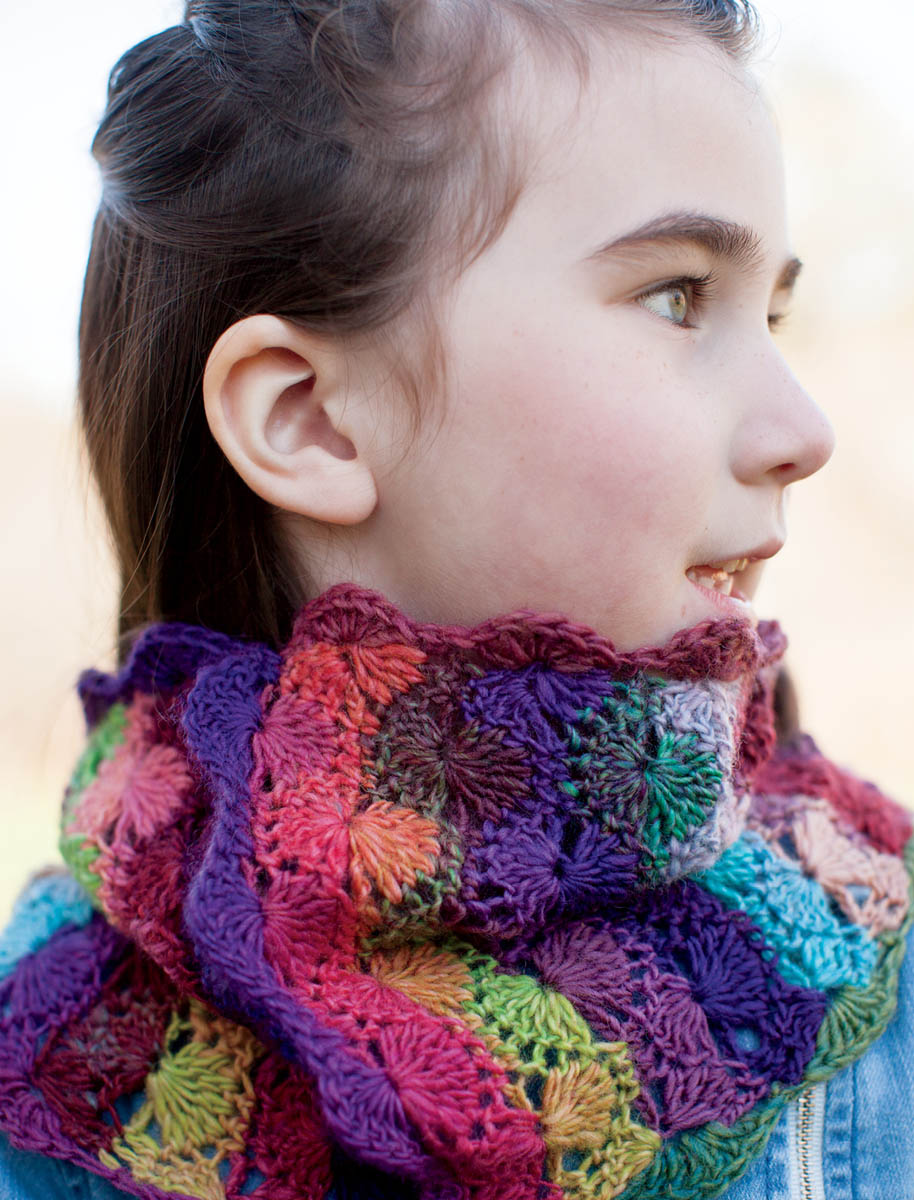
A lovely cowl of Catherine wheel and shell stitches is worked from beginning to end in one piece — no extra ends to weave it. It will delight and warm your child. (And if you borrow it for yourself, we won’t tell.)
Finished Measurements
- 21"/53.5 cm circumference and 81⁄2"/21.5 cm deep
Yarn
- Lang Mille Colori Baby, 100% superwash merino wool, 207 yds (190 cm)/1.75 oz (50 g), Color 53 Macaw

Crochet Hook
- US H/8 (5 mm) or size needed to obtain correct gauge
Gauge
- 2 shells = 41⁄4"/11 cm
- 8 rows = 4"/10 cm
Other Supplies
Pattern Essentials
Cluster (Yo, insert hook and pull up a loop, yo, pull through 2 loops on hook) over designated number of stitches, yo and pull through all loops on hook.
Crocheting the Cowl
See chart below.
- Chain 37.
- Row 1: Sc in 2nd ch from hook, sc in next ch, *skip 3 ch, 7 dc in next ch, skip 3 ch, sc in next 3 ch; repeat from * to last 4 ch, skip 3 ch, 4 dc in last ch, turn.
- Row 2: Ch 1, sc in first 2 dc, *ch 3, cluster over next 7 sts, ch 3, sc in next 3 sts, repeat from * to last 4 sts, ch 3, cluster over last 4 sts, turn.
- Row 3: Ch 3 (counts as dc here and throughout), 3 dc in first st, *skip 3 ch, sc in next 3 sc, skip 3 ch, 7 dc in top of next cluster; repeat from *, ending last repeat skip 3 ch, sc in last 2 sc, turn.
- Row 4: Ch 3, cluster over next 3 sts, *ch 3, sc in next 3 sts, ch 3, cluster over next 7 sts; repeat from * across, ending with ch 3, sc in last 2 sts, turn.
- Row 5: Ch 1, sc in first 2 sts, *skip 3 ch, 7 dc in next st, skip 3 ch, sc in next 3 sc; repeat from * across, ending with skip 3 ch, 4 dc in last st, turn.
- Repeat Rows 2–5 until piece measures 21"/53.5 cm, ending with Row 4 of pattern.
The Edging
- Working evenly along long edge of cowl, ch 1, sc in same st, (7 dc in edge of next pattern Row 3, sc in edge of next pattern Row 2) to corner, ending with sc in last st of edge. Holding both short ends of cowl together and working through both layers, ch 1, sc in first st, sc in next st, skip next 3 sts, (7 dc in next st, skip next 3 sts, sc in next 3 sts) across, ending 7 dc in last st. Working across the other long edge of cowl, (sc in edge of next pattern Row 3, 7 dc in edge of next pattern Row 5) around, ending 7 dc in last pattern Row 5, join with slip st to first sc.
- Fasten off. Weave in ends.
Dewdrop Flower Pin
Designed by Alla Koval, Alla Koval Designs
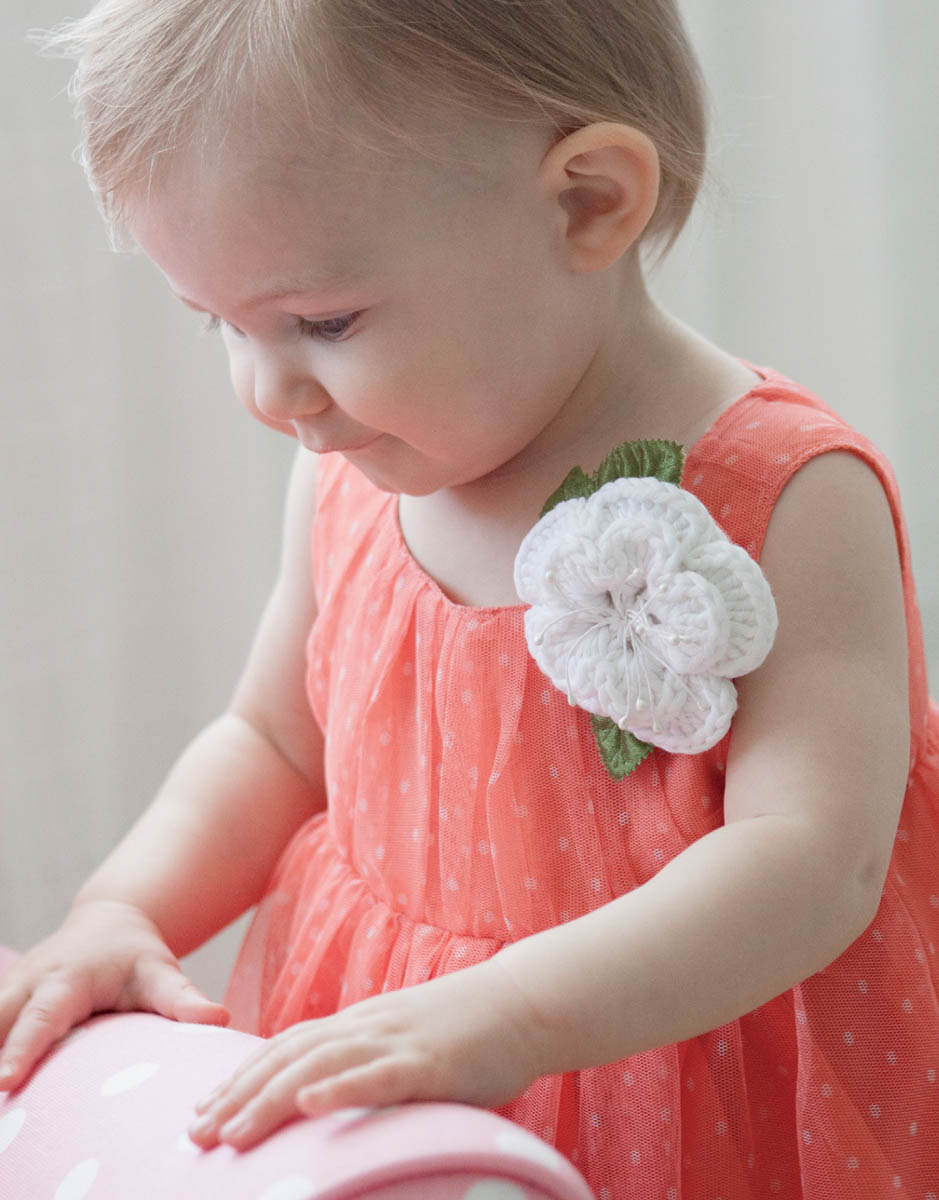
A double layer of crochet surrounds a purchased spray of stamen and is trimmed with purchased green satin leaves. Pin this to a favorite garment, or make it a hair accessory.
Finished Measurements
Yarn
- Cascade Yarns Avalon, 50% cotton/50% acrylic, 175 yds (160 m)/3.5 oz (100 g), Color 01 White

Crochet Hook
- US G/6 (4 mm) or size needed to obtain correct gauge
Gauge
- Rounds 1 and 2 = 21⁄4"/5.5 cm in diameter
Other Supplies
- Yarn needle; sewing needle and coordinating thread or hot glue; purchased leaves, stamen, and backing pin or hair clip
Crocheting the Flower
- Ch 5, join with slip st to form a ring.
- Rnd 1 (RS): Ch 1, (sc, ch 3) five times in ring, join with slip st to first sc. You now have 5 ch-3 spaces and 5 sc.
- Rnd 2: Ch 1, (sc, hdc, 5 dc, hdc, sc) in each ch-3 space around, join with slip st to first sc. You now have five petals.
- Rnd 3: Ch 1, working behind petals of Rnd 2, (sc in next sc of Rnd 1, ch 5) around, join with slip st to first sc.
- Rnd 4: Ch 1, (sc, hdc, 9 dc, hdc, sc) in each ch-5 space around, join with slip st to first sc. Fasten off. Weave in ends.
Crocheting the Backing
- Make an adjustable ring.
- Rnd 1: Ch 2 (counts as hdc here and throughout), 11 hdc in ring. You now have 12 hdc.
- Rnd 2: Ch 2, hdc in same st, 2 hdc in each st around, join with slip st to top of ch-2. You now have 24 hdc.
- Rnd 3: Ch 2, 2 hdc in next st, (hdc in next st, 2 hdc in next st) around, join with slip st to top of ch-2. You now have 36 hdc.
- Fasten off.
Finishing
- Referring to photograph for placement and using needle and thread or hot glue, attach stamen to center front of flower. Attach leaves to WS of flower. With WS facing, attach backing to back of flower, then attach backing pin or hair clip to backing.
Diaper Stacker
Designed by Deborah Bagley, Yarnovations.com
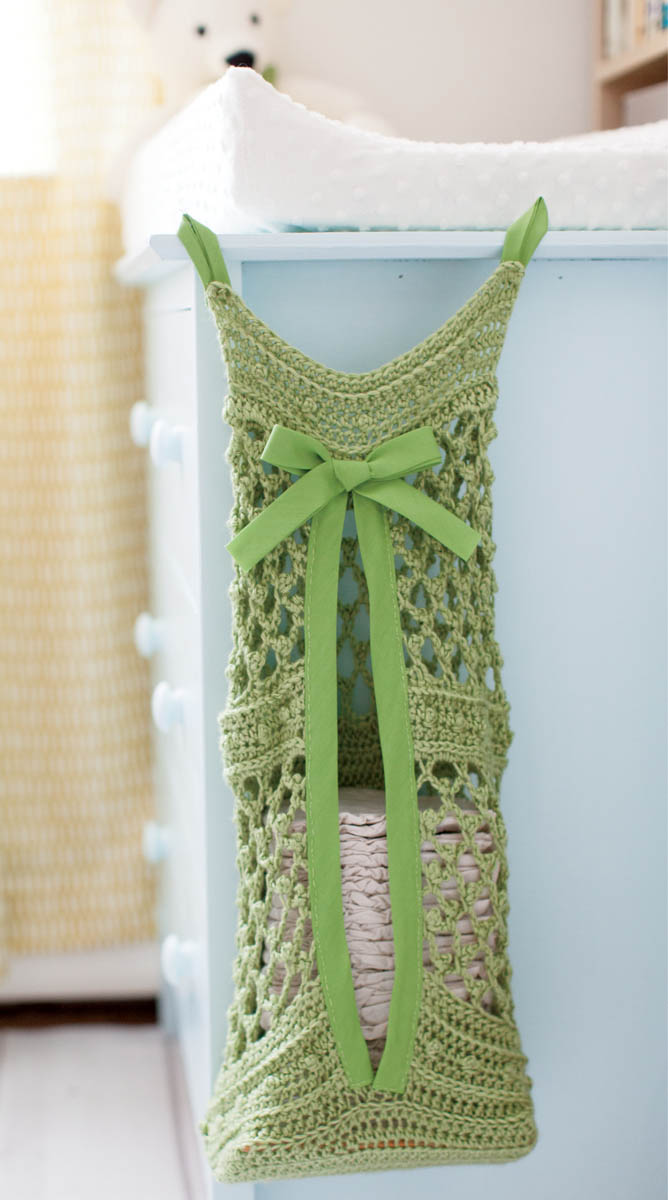
This innovative stacker will add a touch of class as well as practicality to your nursery. The design maximizes stitch characteristics in terms of shaping and stretching, and the ribbon edge adds to its looks and functionality.
Finished Measurements
- 10"/25.5 cm wide and 15"/38 cm tall
Yarn
- Caron Simply Soft, 100% acrylic, 315 yds (288 m)/6 oz (170 g), Color 0003 Pistachio

Crochet Hook
- US J/10 (6 mm) or size needed to obtain correct gauge
Gauge
- 12 stitches and 10 rows = 4"/10 cm in half double crochet
Other Supplies
- Stitch markers, yarn needle, 2 yds/2 m double-fold bias tape binding or 2"/5 cm ribbon (fold ribbon in half lengthwise), straight pins, sewing needle and coordinating thread
Pattern Essentials
Hdc under backmost bar Yo, insert hook from bottom to top under the horizontal bar that lies behind and just below the V at the top of the next st and pull up a loop, yo and pull through 3 loops on hook.
Hdc under frontmost bar Yo, insert hook from bottom to top under the horizontal bar that lies in front of and just below the V at the top of the next st and pull up a loop, yo and pull through 3 loops on hook.
Crocheting the Base
- Chain 31.
- Row 1 (RS): Working in the back bump across row (see Working in back bump of chain), hdc in 2nd ch from hook and each ch across, turn. You now have 30 sts.
- Rows 2–11: Ch 1 (does not count as st throughout), hdc in each across, turn.
- Rnd 12: Ch 1, BLhdc in next 30 hdc; working across side edge of base, hdc in each row-end st across to next corner; working across opposite side of foundation ch, BLhdc in st across to next corner; working across side edge, hdc in each row-end st across to next corner, join with slip st to first hdc. Fasten off. You now have 82 sts.
Crocheting the Sides
- Row 1: With RS facing, skip 16 sts, standing hdc in next st, hdc in next 79 hdc, turn, leaving last 2 sts unworked. You now have 80 sts.
- Row 2: Ch 1, working under frontmost bar of sts, hdc in next 4 sts, (picot, hdc in next 4 sts) across, turn.
- Row 3: Ch 1, hdc in each hdc across, pushing each picot to RS, turn.
- Row 4: Ch 1, hdc in each hdc across, turn.
- Row 5: Ch 1, hdc under backmost bar of each hdc across, turn.
- Row 6: Ch 1, hdc in each hdc across, turn.
- Row 7: Ch 5, skip first 3 hdc, sc in next hdc, picot, (ch 5, skip 3 hdc, sc in next hdc, picot) to last 4 sts, ch 5, skip 3 hdc, sc in last hdc, turn. You now have 20 ch-5 spaces and 19 picots.
- Rows 8–13: (Ch 5, sc in next ch-5 space, picot) to last space, ch 5, sc in 3rd ch of beginning ch-5, turn.
- Row 14: Ch 5, sc in 3rd ch of next ch-5, (ch 3, sc in third ch of next ch-5) across, turn.
- Row 15: Ch 1, (hdc in next sc, 3 hdc in next space) across, turn. You now have 80 sc.
- Rows 16–19: Repeat Rows 2–5.
- Row 20: Repeat Row 7.
- Row 21–26: Repeat Row 8.
- Rnd 27: Ch 5, sc in 3rd ch of next ch-5, (ch 3, sc in 3rd ch of next ch-5) 20 times, ch 2, join the two sides together with slip st in 3rd ch of beginning ch-5. Do not turn.
- Rnd 28: Ch 1, hdc in first st, 2 hdc in next ch-2 space, (hdc in next sc, 3 hdc in next ch-3 space) to last space, 2 hdc in last ch-2 space. You now have 82 hdc.
- With the opening facing, starting with the left-hand st of the 2 center sts and counting to the left, place st markers in the 11th, 20th, 22nd, and 31st sts.
- Starting with the right-hand st of the 2 center sts and counting to the right, place st markers in the 15th, 16th, 26th, and 27th sts.
- Row 29 will close the top by joining the front, back, and sides together. Attach yarn to the 15th st on the right. Start by crocheting the sts with the st markers in the 15th, 16th, 26th, and 27th together as follows.
- Row 29 (joining rnd): Starting with the front side facing, push the right-hand side of the diaper stacker inward toward the center. Yo, insert hook in the 15th, 16th, 26th, and 27th sts on the right-hand side, hdc all 4 of those sts together, working through four layers of sts on front, back, and two inner folded parts together, hdc in next 4 sts (leave the last inner st unused), working through double layer of front and back together, hdc in next 20 sts, push the side panel toward the center, working through 4 marked sts (11th, 20th, 22nd, and 31st), hdc in marked sts, working through four layers of front, back, and two inner folded parts together, hdc in next 4 sts, turn. You now have 30 sts.
- Row 30: Ch 1, (hdc under frontmost bar of next 5 sts, picot) five times, hdc under frontmost bar of next 5 sts, turn.
- Row 31: Ch 1, hdc in each st across, pushing each picot to RS, turn. You now have 5 picots.
- Row 32: Ch 1, hdc in each hdc across, turn.
- Row 33: Ch 1, hdc under backmost bar of each hdc across. Fasten off and weave in ends.
Finishing
- Cut two strips of double-fold bias tape or ribbon about 141⁄2"/37 cm long. (Check to be sure this length matches the length of the opening on your diaper stacker when it is stretched.) Pin, then sew one length of binding on each side of the opening.
- Cut a strip of double-fold bias tape or ribbon about 22"/56 cm long. Tie into a bow. Pin, then sew the bow by hand at the top of the diaper stacker where the ribbon is.
- Cut two strips of double-fold bias tape or ribbon about 5"/12.5 cm long. Fold in half crosswise and pinch them together. Pin, then sew the binding to the back top corners as hangers.
Optional: Sew a strip of binding to the back (top to bottom) and bottom of the stacker so they don’t stretch more than the front.
Bottle Cozies
Designed by Carrie Carpenter
Keep baby’s bottles cool when you’re on the run. Quick to stitch, these make great shower gifts.
Finished Measurements
- 5"/12.5 cm high and 7"/18 cm circumference
Yarn
- Bernat Vickie Howell Sheep(ish), 70% acrylic/30% wool, 167 yds (153 m)/3 oz (85 g), Color 0017 Chartreuse(ish)

Crochet Hook
- US F/5 (3.75 mm) or size needed to obtain correct gauge
Gauge
Cozy 1: 19 stitches and 12 rows = 4"/10 cm in double crochet
Cozy 2: 9 stitches and 14 rows = 4"/10 cm in pattern
Other Supplies
Crocheting Cozy 1
- Chain 35.
- Row 1: Dc in 4th ch from hook, dc in next ch, *ch 3, skip next 3 ch, dc in next 5 ch; repeat from * across, ending with dc in each of the last 3 ch, turn.
- Row 2: Ch 3 (counts as dc here and throughout), dc in next 2 dc, *working over next ch-3 loop, work 3 dc in corresponding center skipped ch-st 2 rows below**, dc in each of the next 5 dc; repeat from * across, ending last repeat at **, dc in each of the last 3 sts, turn.
- Row 3: Ch 3, dc in next 6 dc, *ch 3, skip next 3 dc, dc in next 5 dc; repeat from * to last 2 sts, dc in last 2 sts, turn.
- Row 4: Ch 3, dc in next 6 dc, *working over next ch-3 loop, work 3 dc in corresponding center skipped dc 2 rows below, dc in next 5 dc; repeat from * to last 2 sts, dc in last 2 sts, turn.
- Row 5: Ch 3, dc in next 2 dc, ch 3, skip next 3 dc, *dc in next 5 dc, ch 3, skip next 3 dc; repeat from * to last 3 sts, dc in last 3 sts, turn.
- Rows 6–16: Repeat Rows 2–5, ending with Row 4. Fasten off.
Finishing
- Fold piece in half, bringing sides together. Using yarn needle and matching yarn, sew sides together. Weave in ends.
Crocheting Cozy 2
- Chain 33.
- Row 1: 2 dc in 3rd ch from hook, *skip next 2 ch, (sc, 2 dc) in next ch; repeat from * to last 3 ch, skip next 2 ch, sc in last ch, turn.
- Row 2: Ch 2, 2 dc in first sc, *skip next 2 dc, (sc, 2 dc) in next sc; repeat from * to last 2 dc, skip last 2 dc, sc in next ch.
- Rows 3–19: Repeat Row 2. Fasten off.
Finishing
- Fold piece in half, bringing sides together. Using yarn needle and matching yarn, sew side seam. Weave in ends.
Pacifier Clip
Designed by Andrea Lyn Van Benschoten
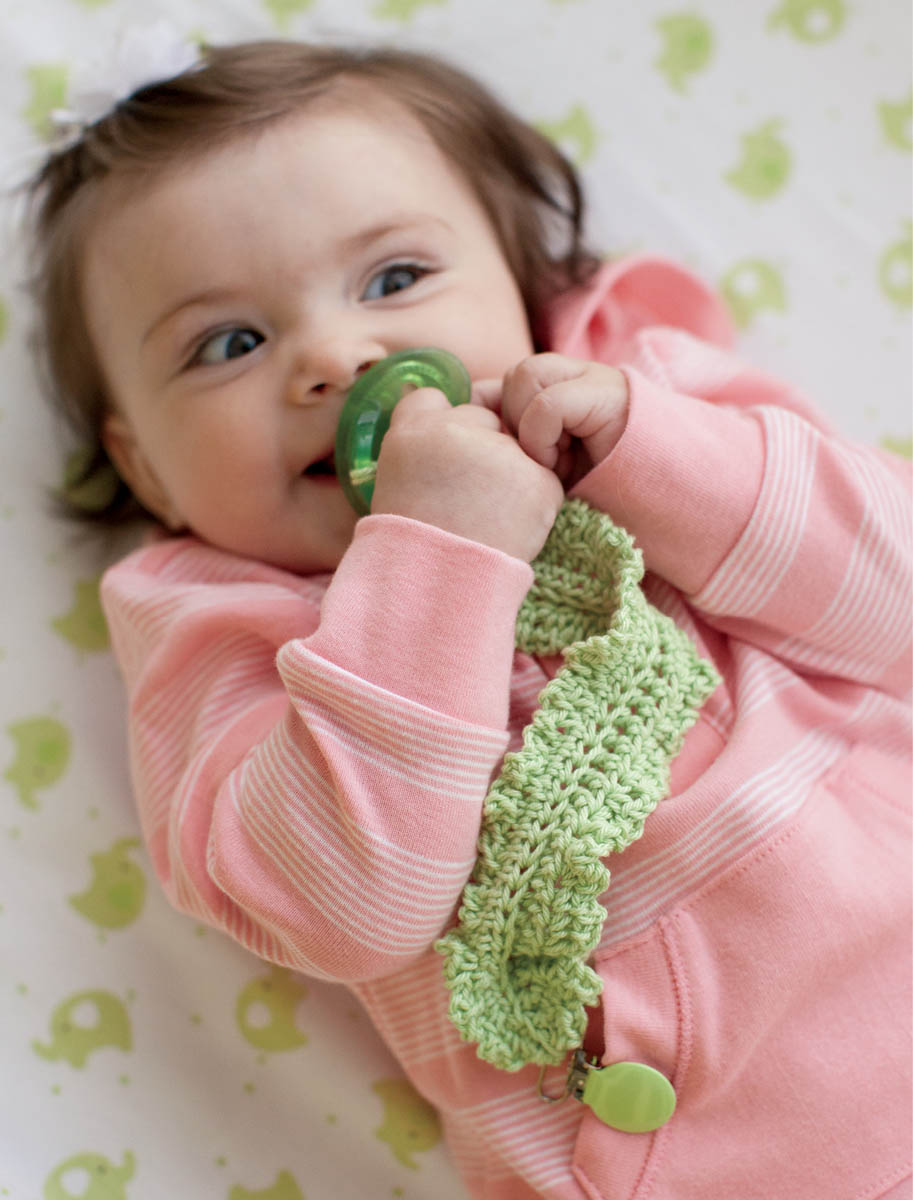
Never again worry about picking up your baby’s pacifier from the street, the beach, or a dirty floor. Simply clip this holder to a blanket or clothing — when the pacifier inevitably leaves baby’s mouth, it won’t go far!
Finished Measurements
- 8"/20.5 cm long, excluding clip, and 11⁄2"/4 cm wide
Yarn
- Patons Grace, 100% mercerized cotton, 136 yds (125 m)/1.75 oz (50 g), Color 62027 Ginger

Crochet Hook
- US F/5 (3.75 mm) or size needed to obtain correct gauge
Gauge
- 18 stitches and 12 rows = 4"/10 cm in back loop half double crochet
Other Supplies
- Suspender or pacifier clip, yarn needle
Crocheting the Strap
- Chain 40.
- Row 1: Hdc in 2nd ch from hook and in each ch across, turn. You now have 39 hdc.
- Row 2: Ch 2 (does not count as st), BLhdc in each hdc across, turn.
- Row 3: Ch 2, BLhdc in each st across, turn.
- Fasten off, leaving a long tail for sewing.
Attaching the Clip
- Fold over one short edge through clip; sew closed using yarn needle and tail.
- On opposite short edge, make a 2"/5 cm long loop to hold pacifier; sew in place.
Adding the Edging
- With RS facing, join yarn, *ch 3, sc in next st; repeat from * to clip. Fasten off. Repeat edging on opposite side. Weave in ends.
Little Bunny Mittens
Designed by Brenda K. B. Anderson
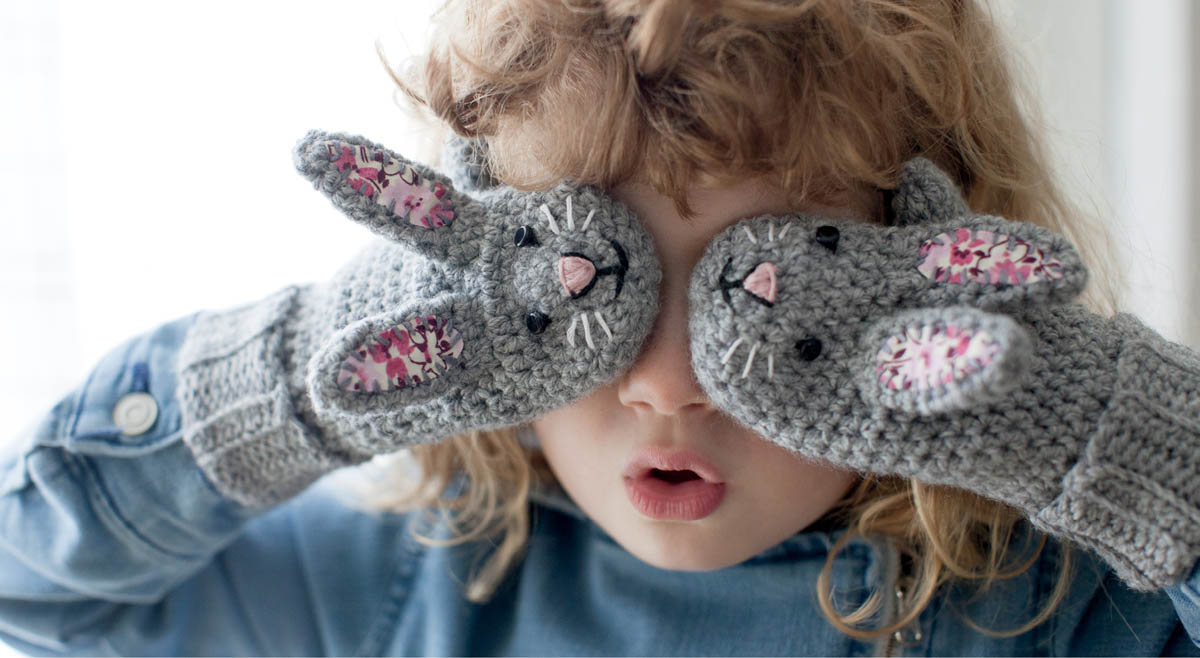
These little bunny mittens are worked from the extra-long folded cuff to the fingertip. The ears are made separately, appliquéd with scraps of fabric, and stitched onto the mitten. The nose, mouth, and whiskers are embroidered, and tiny buttons are added for eyes.
Size and Finished Measurements
- To fit 4–5 years: 6"/15 cm hand circumference (excluding thumb) and 43⁄4"/12 cm hand length (excluding cuff)
Yarn
- Berroco Vintage DK, 52% acrylic/40% wool/8% nylon, 288 yds (263 m)/3.5 oz (100 g), Color 2106 Smoke

Crochet Hook
- US F/5 (3.75 mm) or size needed to obtain correct gauge
Gauge
- 20 stitches and 16 rounds = 4"/10 cm in half double crochet
Other Supplies
- Four stitch markers, yarn needle, small amount of fabric or felt* for ears, embroidery needle and floss (in pink, black, white, and coordinating with yarn), sewing needle and coordinating thread, tiny black buttons for eyes
- *If you use fabric, you will also need Fray Check (found at fabric and craft stores) to keep the cut edges of the fabric from fraying. If you plan to machine-wash often, consider using felt or a fabric that will not fray, as Fray Check may wash out.
Pattern Essentials
Hdc dec (half double crochet decrease) Yo, insert hook under front loop only of next st, then from front to back under both loops of following st, yo and pull up a loop through both sts (3 loops are now on hook), yo and pull through all 3 loops.
Crocheting the Cuff (make 2)
- Chain 22.
- Row 1 (RS): Working in the back bump of each ch across (see Working in back bump of chain), hdc in 3rd ch from hook and in each ch across, turn. You now have 20 hdc.
- Rows 2–18: Ch 2, BLhdc in each hdc, turn.
- Ch 1, fold the ribbing in half with RS together. Working through double thickness of the front loops of the foundation row and back loops of row just worked, slip st in each st across. Do not fasten off. You now have 20 slip sts. Leaving slip st seam on outside of cuff, reposition cuff to work in row ends around. Use st markers to divide the cuff edge into four equal sections.
Crocheting the Hand
- Rnd 1: Ch 1, working in row-edge sts around top edge of cuff, work 7 hdc between each set of markers for a total of 28 hdc sts around top edge of cuff, removing markers as you come to them. Do not join. Pm in the first st of the rnd and move it up as you work the rnds.
- Rnd 2: Hdc in each st around. You now have 28 hdc.
- Rnd 3: Hdc in next 13 hdc, 2 hdc in next 2 hdc, hdc in next 13 hdc. You now have 30 hdc.
- Rnd 4: Hdc in next 14 hdc, 2 hdc in next 2 hdc, hdc in next 14 hdc; hdc in next st (marked st) to shift beginning of rnd; move marker to following st to indicate new beginning of rnd. You now have 32 sts.
- Rnd 5: Hdc in next 15 hdc, 2 hdc in next 2 hdc, hdc in next 15 hdc. You now have 34 sts.
- Rnd 6: Hdc in next 16 hdc, 2 hdc in next 2 hdc, hdc in next 16 hdc. You now have 36 sts.
- Rnd 7: Hdc in next 17 hdc, 2 hdc in next 2 hdc, hdc in next 17 hdc. You now have 38 sts.
- Rnd 8: Hdc in each hdc around; hdc in next st (marked st) and following st to shift the beginning of the rnd; move marker to following st to indicate new beginning of rnd.
- Rnd 9: Hdc in next 14 hdc, skip next 10 hdc, place second marker in the first skipped st, hdc in next 14 hdc. You now have 28 sts, not including the 10 sts skipped for the thumb.
- Rnds 10–17: Hdc in each hdc around.
- Rnd 18: (Hdc in next 2 sts, hdc dec) seven times. You now have 21 sts.
- Rnd 19: (Hdc dec, hdc in next st) seven times. You now have 14 sts.
- Rnd 20: (Hdc dec) seven times. You now have 7 sts.
- Fasten off, leaving a long tail. Using yarn needle, run yarn tail through the front loop of each of the remaining 7 sts and pull tight to close the top of hand. Weave in ends.
The Thumb
- Rnd 1: Leaving beginning yarn tail dangling on outside of mitten, pull up loop of yarn in marked stitch at thumb opening, ch 1, beginning with same st, hdc into each of the 10 skipped thumb sts, work 2 extra hdc where thumb meets hand. You now have 12 hdc. Do not join. Pm in the first st of the rnd and move it up as you work the rnds.
- Rnds 2–5: Hdc in each st around.
- Rnd 6: (Hdc dec) six times. You now have 6 sts.
- Fasten off, leaving long tail. Using yarn needle, run yarn tail through the front loop of each of the remaining 6 sts and pull tight to close the top of thumb. Use beginning yarn tail to stitch any holes closed where thumb meets hand. Weave in ends.
The Ears (Make 4)
- Make an adjustable ring.
- Rnd 1: Ch 1, 6 hdc in loop. Do not join. You now have 6 hdc. Pm in the first st of the rnd and move it up as you work the rnds.
- Rnd 2: 2 hdc in first hdc, hdc in next 5 hdc. You now have 7 sts.
- Rnd 3: 2 hdc in first hdc, hdc in next 6 hdc. You now have 8 sts.
- Rnd 4: 2 hdc in first hdc, hdc in next 7 hdc. You now have 9 sts.
- Rnd 5: 2 hdc in first hdc, hdc in next 8 hdc. You now have 10 sts.
- Rnds 6 and 7: Hdc in each hdc around.
- Rnd 8: Hdc dec, hdc in next 8 hdc. You now have 9 sts.
- Rnd 9: Hdc dec, hdc in next 7 hdc. You now have 8 sts.
- Fasten off, leaving a long sewing length. Weave in beginning yarn tail at tip of ear.
Finishing
Note: When adding the ears and facial features, position them on the mittens so that there is a right and a left hand. Use photograph for reference.
- Block all pieces, if necessary.
- Cut a small oval-shaped piece of fabric or felt for each ear, similar in shape but slightly smaller than ear. (If you are using a fabric that might fray, apply Fray Check to all edges of cut pieces and allow them time to dry.) Using embroidery floss and an embroidery needle, whipstitch each appliqué piece to the center of each flattened ear.
- Using pink embroidery floss, create a satin-stitch triangle about 1⁄2"/13 mm from tip of mitten for each nose. Using black embroidery floss, outline the two sides of the nose, and create a V-shaped stitch below nose for the mouth, and a vertical stitch that connects center of mouth to the bottom point of nose. Make three long stitches on each side of nose with white embroidery floss for whiskers.
- Using needle and thread, stitch each button to face for eyes.
- Using yarn needle and yarn tails, stitch the bottom edge of each ear to mitten. Slip st the underside of ear to mitten about 1⁄2"/13 mm up from where ear connects to mitten. This will keep the ears back and not flopping about.
Baby’s First Christmas Stocking
Designed by Edie Eckman
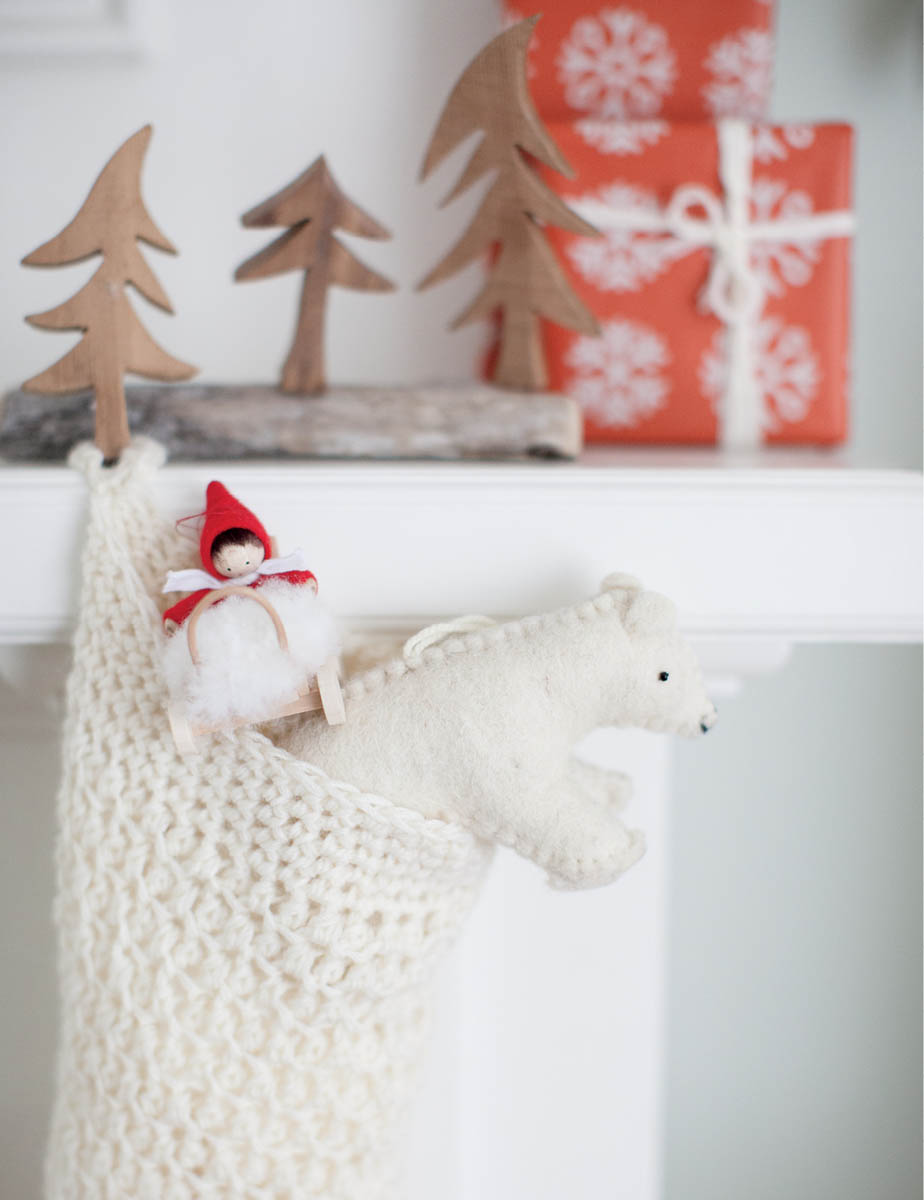
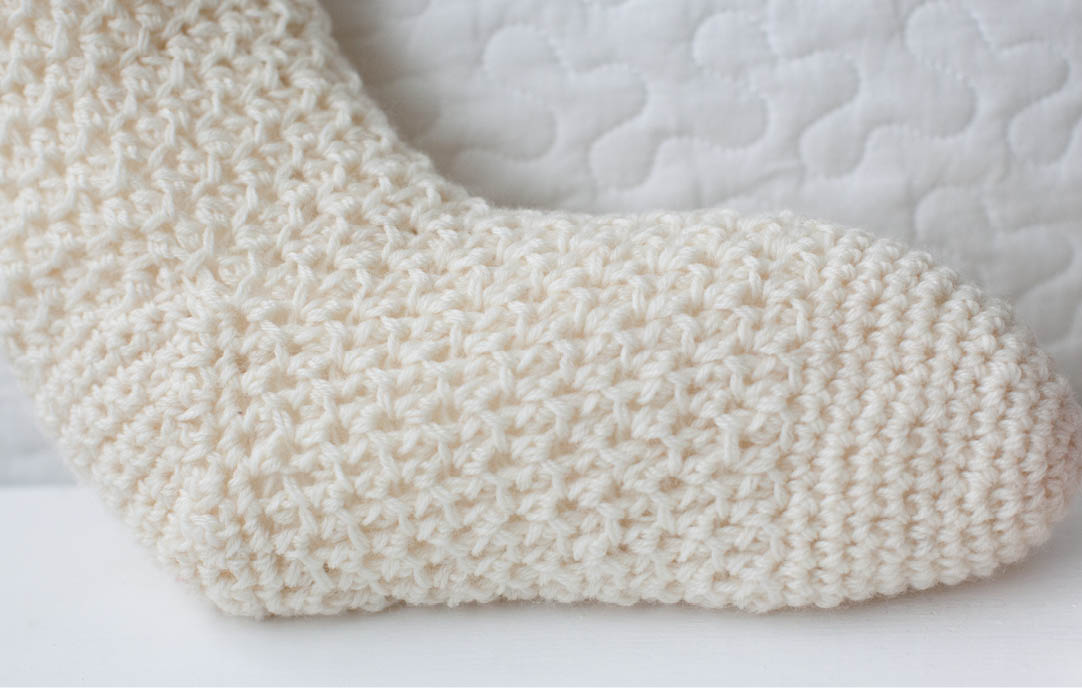
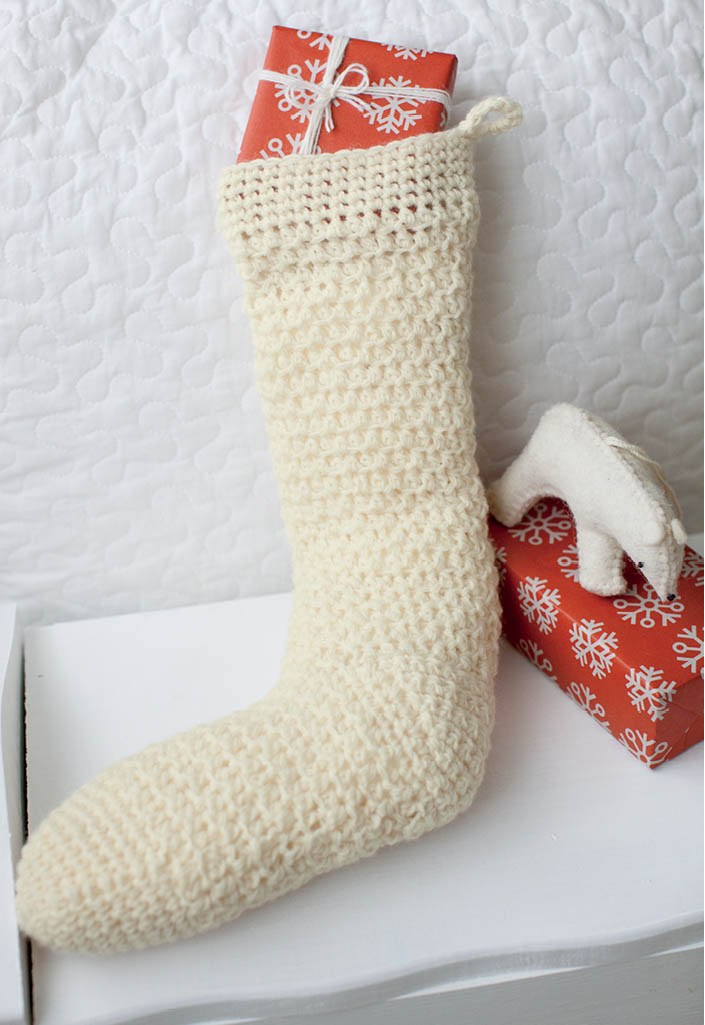
What better way to celebrate Christmas than with a new baby in the house? Fine-weight yarn held doubled creates a light, springy fabric, and since it’s made from the toe up, if you run short of yarn, you can just make it shorter. Worked in a cream color, it’s just right for baby girl or boy.
Finished Measurements
- 10"/25.5 cm circumference and 17"/43 cm from cuff to toe
Yarn
- Lion Brand Sock-Ease, 75% wool, 25% nylon, 438 yds (400 m)/3.5 oz (100 g), Color 100 Marshmallow

Crochet Hook
- US J/10 (6 mm) or size needed to obtain correct gauge
Gauge
- 15 stitches and 10 rounds = 4"/10 cm in Texture Stitch with yarn held doubled
Other Supplies
Pattern Essentials
Texture Stitch (multiple of 2 stitches)
Rnd 1: Ch 2 (counts as BLhdc), FLhdc in next st, *BLhdc in next st, FLhdc in next st; repeat from * around, join with slip st to front loop only at top of ch-2.
Rnd 2: Ch 2 (counts as FLhdc), BLhdc in next st, *FLhdc in next st, BLhdc in next st; repeat from * around, join with slip st to back loop only at top of ch-2.
Repeat Rnds 1 and 2 for pattern.
Crocheting the Stocking
See chart below.
The Toe
- With yarn held doubled throughout, ch 4. Join with slip st to form a ring.
- Rnd 1: Ch 1, 6 sc in ring, join with slip st to first sc. You now have 6 sc.
- Rnd 2: Ch 1, 2 sc in each sc around, join with slip st to first sc. You now have 12 sc.
- Rnd 3: Ch 1, sc in first sc, 2 sc in next sc, *sc in next st, 2 sc in next sc; repeat from * around. You now have 18 sc.
- Rnd 4: Ch 1, sc in each sc around, join with slip st to first sc.
- Rnd 5: Ch 1, sc in first 2 sc, 2 sc in next sc, *sc in next 2 sc, 2 sc in next sc; repeat from * around, join with slip st to first sc. You now have 24 sc.
- Rnds 6 and 7: Repeat Rnd 4.
- Rnd 8: Ch 1, sc in first 3 sc, 2 sc in next sc, *sc in next 3 sc, 2 sc in next sc; repeat from * around, join with slip st to first sc. You now have 30 sc.
- Rnd 9: Repeat Rnd 4.
- Rnd 10: Ch 1, 2 sc in first sc, sc in next 4 sc, *2 sc in next sc, sc in next 4 sc; repeat from * around, join with slip st to first sc. You now have 36 sc.
- Rnd 11: Ch 1, sc in each sc around, join with slip st to back loop only of first sc.
The Foot
- Rnds 1–10: Work Rows 1 and 2 of Texture Stitch five times. Fasten off.
The Heel
- Row 1: Skip first 27 sts, standing sc in next st, sc in next 17 sts, turn. You now have 18 sc.
- Row 2: Ch 1, sc in first 13 sc, turn.
- Row 3: Ch 1, sc in first 8 sc, turn.
- Row 4: Ch 1, sc in first 8 sc, sc in next st of Row 2, turn. You now have 9 sc.
- Row 5: Ch 1, sc in first 9 sc, sc in next st of Row 1, turn. You now have 10 sc.
- Row 6: Ch 1, sc in each sc across, sc in next st of Row 2, turn. You now have 11 sc.
- Row 7: Ch 1, sc in each sc across, sc in next st of Row 1, turn. You now have 12 sc.
- Rows 8–13: Repeat Rows 6 and 7 three times. You will have 18 sc at the end of Row 13.
- Fasten off, leaving an 8"/20.5 cm tail.
The Leg
- Rnd 1 (RS): Skip first 9 sc of heel, standing hdc in front loop only of next sc, (BLhdc in next sc, FLhdc in next sc) four times, (BLhdc in next hdc, FLhdc in next hdc) nine times, (BLhdc in next sc, FLhdc in next sc) four times, BLhdc in next sc, join with slip st in back loop only of first hdc. You now have 36 sts.
- Rnds 2–21: Work Rnds 1 and 2 of Texture Stitch pattern 10 times.
The Cuff
- Rnds 1–5: Ch 1, sc in each st around, join with slip st to first sc.
Finishing
Note: Stocking leg may have biased. If necessary, sc in each sc to center back of leg.
- Hanging Loop: Ch 8, slip st in same st, turn. Ch 1, 10 sc in ch-8 space. Fasten off.
- Sew holes closed at corners of heels. Weave in ends.
Hyperbolic Mobile
Designed by Edie Eckman
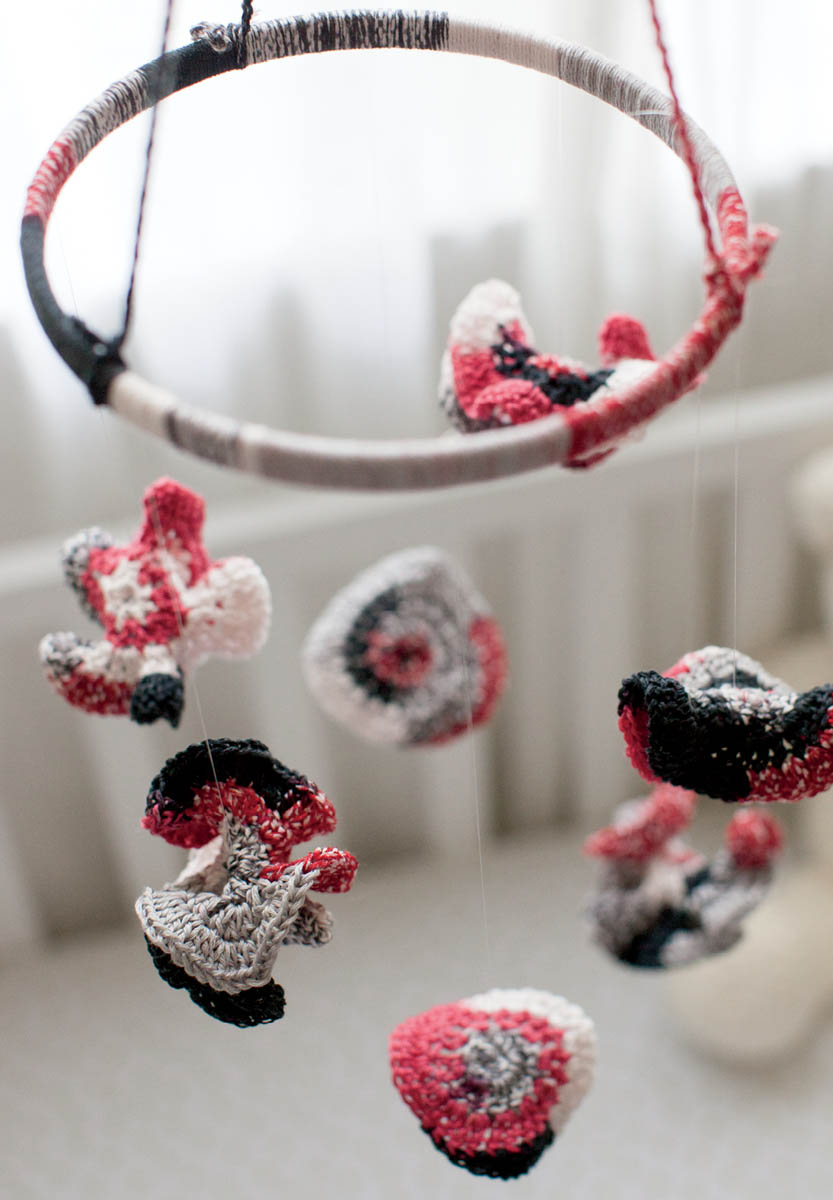
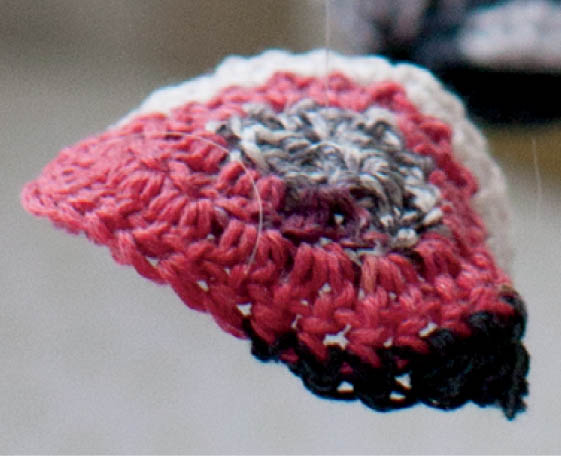
Swirling hyperbolic shapes in strongly contrasting colors will entertain your newborn. It is thought that, in the early weeks and months, babies see strong contrasts best, making this black, white, and red printed yarn perfect for this purpose. Just be sure to hang mobile out of baby’s reach.
Finished Measurements
- 7"/18 cm diameter and 25"/63.5 cm (or as desired) long
Yarn
- Adrialfil Kimera, 100% Egyptian mercerized cotton, 148 yds (135 m)/1.75 oz (50 g), Color 015 Dumas Fancy

Crochet Hook
- US G/6 (4 mm) or size needed to obtain correct gauge
Gauge
- Motif 1 = 23⁄4"/7 cm diameter
- Gauge is not crucial in this project.
Other Supplies
- 7"/18 cm diameter wooden hoop or wire circle, yarn needle, clear monofilament, fabric glue or hot glue
Preparing the Mobile
- Glue one end of yarn to inside of hoop. Wrap yarn around hoop, keeping strands parallel and covering the entire hoop. Cut yarn and glue end of yarn to inside of hoop.
- *Ch 75. Fasten off. Weave in ends. Repeat from * two more times.
- Tie each chain to hoop, placing them equidistant from each other. Holding hoop suspended by chains, tie top of chains together in an overhand knot so that hoop hangs straight. Set aside.
Crocheting the Motifs
Motif 1 (Make 2)
- Ch 4, join with slip st to form a ring.
- Rnd 1: Ch 3 (counts as dc), 5 dc in ring. Do not join. You now have 6 sts. Pm in the first st of the rnd and move it up as you work the rnds.
- Rnds 2 and 3: 2 dc in each dc around. You now have 24 dc.
- Row 4: Dc in next dc, hdc in next 2 dc, sc in next 2 dc, slip st in next st. Fasten off.
Motif 2 (Make 1)
- Ch 4, join with slip st to form a ring.
- Rnd 1: Ch 1, 6 sc in ring. Do not join. You now have 6 sts. Pm in the first st of the rnd and move it up as you work the rnds.
- Rnd 2: 2 sc in each sc around. You now have 12 sc.
- Rnd 3: *Sc in next sc, 2 sc in next sc; repeat from * around. You now have 18 sc.
- Rnds 4 and 5: 2 dc in each st around. You now have 72 dc.
- Row 6: Hdc in next 2 sts, sc in next st, slip st in next st. Fasten off.
Motif 3 (Make 2)
- Ch 4, join with slip st to form a ring.
- Rnd 1: Ch 1, 6 sc in ring. Do not join. You now have 6 sts. Pm in the first st of the rnd and move it up as you work the rnds.
- Rnd 2: 2 dc in each sc around. You now have 12 dc.
- Rnds 3 and 4: 3 dc in each dc around. You now have 108 dc.
- Row 5: Hdc in next dc, sc in next dc, slip st in next st. Fasten off.
Motif 4 (Make 2)
- Ch 4, join with slip st to form a ring.
- Rnd 1: Ch 1, 6 sc in ring. Do not join. You now have 6 sts. Pm in the first st of the rnd and move it up as you work the rnds.
- Rnds 2–4: 3 dc in each st around. You now have 162 dc.
- Row 5: Hdc in next dc, sc in next dc, slip st in next st. Fasten off.
Crocheting the Centers (make 7)
- Ch 4, 4-dc cluster in 4th chain from ring. Fasten off, leaving a long sewing length.
Finishing
- Insert yarn tail of one center through center hole of one motif. Sew in place. Repeat for other six centers, placing each in the center of any motif to provide contrasting centers as desired.
- Cut monofilament to different lengths and tie motifs to hoop.
Ombré Wrap
Designed by Julie Blagojevich
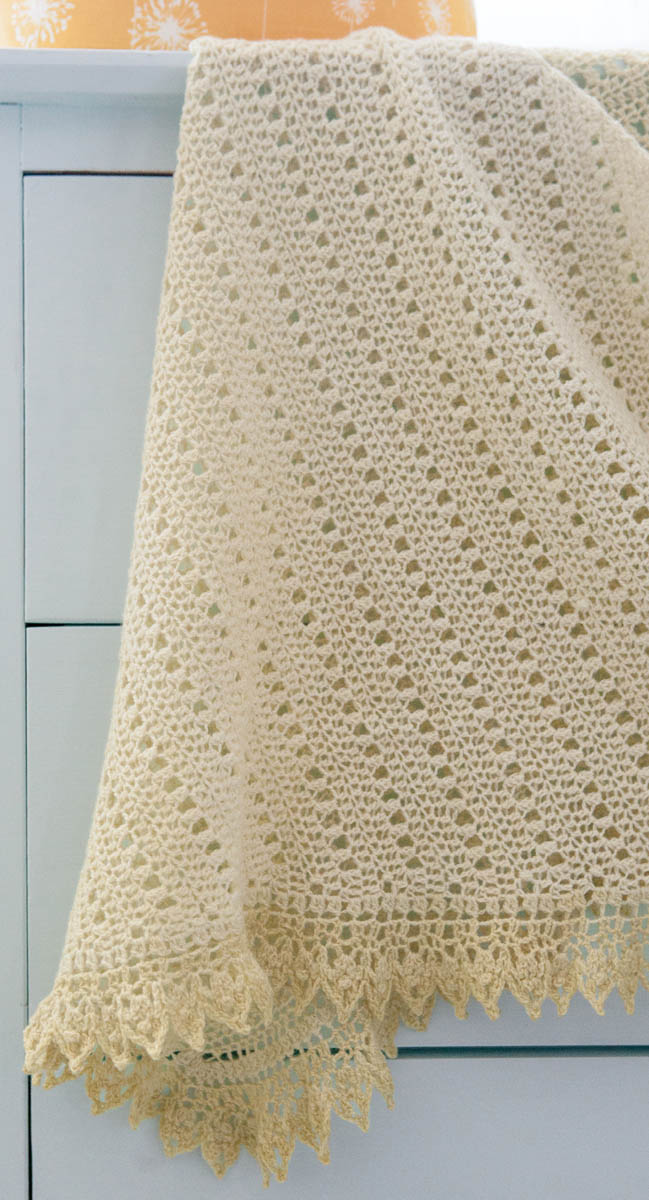
This generous wrap will come in handy for nursing while away from home. The pattern runs diagonally across the shawl and is worked in a combination of basic stitches.
Finished Measurements
- 68"/173 cm wide and 26"/66 cm at deepest point, blocked
Yarn
- Apple Tree Knits Pure Lace (Jumbo), 100% merino wool, 1,313 yds (1,200 m)/6 oz (170 g), Buttercup Gradient

Crochet Hook
- US F/5 (3.75 mm) or size needed to obtain correct gauge
Gauge
- 18 stitches and 14 rows = 4"/10 cm in pattern
Other Supplies
- Yarn needle, blocking tools
Crocheting the Wrap
- Ch 4, join with slip st to form ring.
- Set-Up Row: Ch 1, 5 sc in ring, turn. You now have 5 sts.
- Row 1: Ch 2 (counts as hdc here and throughout), 2 hdc in next 2 sc, hdc in next 2 sc, turn. You now have 7 hdc.
- Row 2: Ch 2, hdc2tog, hdc in each st across to last st, 2 hdc in last st, turn.
- Row 3: Ch 2, hdc in same st, 2 hdc in next st, hdc in each st across, turn. You now have 9 hdc.
- Row 4: Ch 3, dc in same st (counts as 2-dc cluster), dc2tog, *ch 1, skip next st, 2-dc cluster in next st; repeat from * across, 2-dc cluster in same st as last 2-dc cluster, turn. You now have 9 sts.
- Row 5: Ch 2, 2 hdc in next cluster, 2 hdc in next ch-1 space, hdc in each st and space across, placing last hdc in top of beginning cluster. You now have 11 sts.
- Rows 6–145: Repeat Rows 2–5 thirty-five times, turn. You now have 151 sts.
- Row 146: Repeat Row 2.
The Edging
- Row 1: Ch 3, dc in same st (counts as first 2-dc cluster), 2-dc cluster in next 2 sts, 2-dc cluster in each st across to bottom point; work a 2nd 2-dc cluster in same st at point, working across other edge of shawl, 2-dc cluster into each row end across to next corner; three 2-dc cluster in the side of the Set-Up Row, turn. You now have 303 clusters.
- Row 2: Ch 1, (sc, ch 3, sc) in first st, *sc in next st, (sc, ch 3, sc) in next st; repeat from * across, turn.
- Row 3: Ch 1, (sc, ch 3, sc) in first ch-3 space, *sc in next sc, (sc, ch 3, sc) in next ch-3 space; repeat from * across, turn.
- Row 4: Ch 3, dc in first ch-3 space (counts as first 2-dc cluster), (picot, 2-dc cluster) in same space, *ch 3, skip next sc, sc in next sc, ch 3, (2-dc cluster, picot, 2-dc cluster) in next ch-3 space; repeat from * across, turn.
- Row 5: Ch 3, dc in first cluster (counts as first 2-dc cluster), *picot, skip 1 picot, 2-dc cluster in next cluster**, ch 3, sc in next sc, ch 3, 2-dc cluster in next cluster; repeat from * across, ending last repeat at **.
- Fasten off. Weave in ends. Wet block to finished dimensions.
Mom’s (or Dad’s) Hot-or-Cold Pack
Designed by Judith Durant
This handy little bag is filled with beans and can be used hot or cold to ease sore muscles or soothe a headache. While the little one sleeps, remove this from the freezer or zap it for a minute or two in the microwave, place where you need it, and relax.
Finished Measurements
- Approximately 10"/25.5 cm wide and 5"/12.5 cm tall
Yarn
- Cascade Heritage Paints, 75% superwash merino wool/25% nylon, 437 yds (400 m)/3.5 oz (100 g), Color 9825 Isle of Skye

Crochet Hook
- US G/6 (4 mm) or size needed to obtain correct gauge
Gauge
- 33 stitches (3 pattern repeats) and 20 rows = 4"/10 cm in pattern
- Note: Gauge is not crucial, just be sure your stitches are small enough to hold the filling. Hook size used on sample is smaller than yarn manufacturer’s recommended size.
Other Supplies
- Yarn needle, 2 cups small white beans
Pattern Essentials
Chevron Stitch (multiple of 11 stitches + 1, add 1 for base chain)
Row 1: 2 sc in 2nd ch from hook, *sc in next 4 ch, skip 2 ch, sc in next 4 ch, 3 sc in next ch; repeat from * across, ending with 2 sc in last ch, turn.
Row 2: Ch 1, 2 sc in first st, *sc in next 4 sts, skip 2 sts, sc in next 4 st, 3 sc in next st; repeat from * to across, ending with 2 sc in last st, turn.
Repeat Row 2 for pattern.
Crocheting the Bag
- Ch 90, leaving a tail long enough to sew a short seam. Work Chevron Stitch pattern until piece measures 10"/25.5 cm from beginning. Do not fasten off.
Finishing
- With yarn still attached, block piece to 10"/25.5 cm square. With RS together, join last row to foundation ch with slip st, matching peaks to valleys. Steam seam to flatten, if necessary. Turn RS out and, with long seam positioned along the center back of the tube, sew one short seam. Fill bag with beans as desired (sample uses 2 cups). Sew remaining seam. Weave in ends.


