Makers focusing on wall art seem to have a very experimental attitude toward their craft. Perhaps this hails from the combination of an entire wall as a blank canvas and minimal need for function. Really, it’s all about form, and form can come in any size, shape, or material and from any inspiration.
One form I will never forget is a large piece of wall art my mother made when she was in her mid-twenties: a tiger, painted in perfect detail in Hobbytex* onto a solid black velvet surface, that crouched majestically above our living room sofa. Keeping in mind that it was the 1970s and black velvet and Hobbytex were considered incredibly fabulous, it was through this piece that my mother managed to express the skill of her hand and, unintentionally, the youth and vitality of our family and home. At the time, my young maker’s eye was developing and our velvet tiger fascinated me. The way its blended stripes fell gently away into the raised surface of the velvet and the touches of gold in its coat, which sparkled ever so slightly through the fibers, was mesmerizing. Today, some 36 years on, while Hobbytex and black velvet are no longer considered incredibly fabulous, my feelings for that tiger still linger. I remain acutely aware of where the furniture was placed and of the gifted and inherited objects in that room, and the tiger gives it all a residual sense of place.
The following pages feature a collection of wall art that has been felted, cut, knotted, stitched, welded, sculpted, painted, or glued by many makers’ hands—some by my own and others by makers whose work I am inspired by. Shown styled within different spaces and settings, they illustrate the many facets of wall art, the self-expression it offers, and the ability it has to go beyond decorating. They should also serve as inspiration for your own unique wall art pieces and, ultimately, space.
* Hobbytex is a trademarked fabric paint of paste-like consistency, contained in a soft metal tube and fed with gentle pressure through a specialized nib.
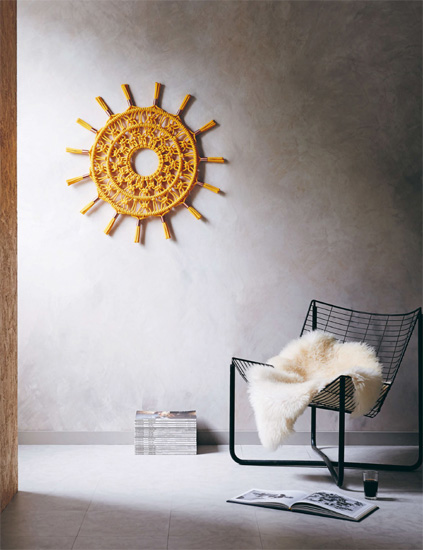
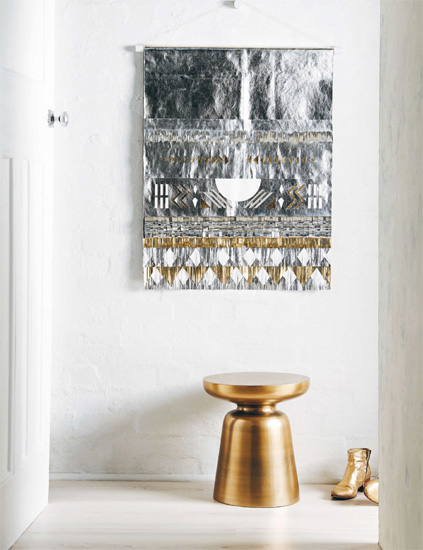
Circular macramé wall hanging, using polypropylene rope and polished copper hardware / Tamara Maynes
As I mastered the technique of macramé it felt natural to experiment with design and see where the knots could take me. I love that I managed to bring this technique out of the era it’s associated with and move it forward.
TAMARA MAYNES

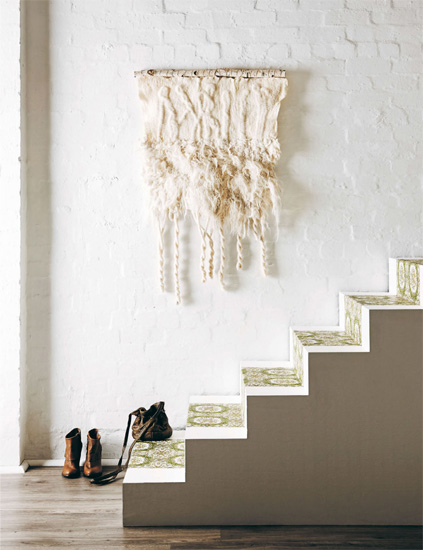
“I started felting because someone gave me seven bags of alpaca fleece! Making felt is elemental and primitive: the combination of only nature’s intelligent design and my elbow grease. I get into a rhythm. I need a whole day. I need to be alone. I am completely absorbed.”
HARRIET GOODALL, FIBER ARTIST & BASKET MAKER
(ROBERTSON, AUSTRALIA)
Wet-felted wall hanging, using merino tops, local alpaca, and chunky Loopy Mango wool, hung on found birch / Harriet Goodall
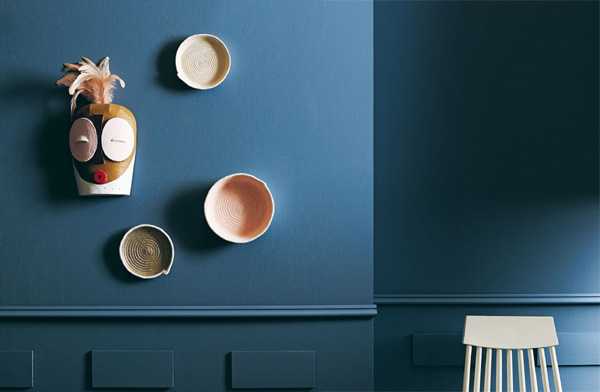
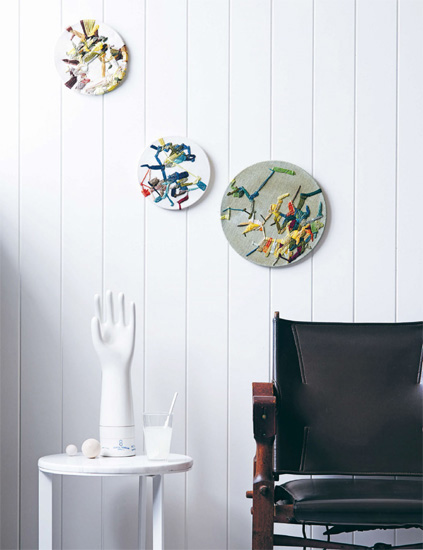
Modern tribal mask, using papier-mâché layer built over plywood frame / Tamara Maynes & Machine-sewn and hand-painted coiled cotton rope vessels / Gemma Patford Legge
“When I make, I zone out. I’m meditative. I listen to audio books. I am covered in paint. I tangle the cat up with rope. I experiment.”
GEMMA PATFORD LEGGE, MAKER
(MELBOURNE, AUSTRALIA)
“No matter how many times I move and how many different walls I hang my papier-mâché mask on, seeing it staring back always makes me feel I’m home.”
TAMARA MAYNES
Maker to Maker with...
Kate Keara Pelen, fine artist
(London, UK)
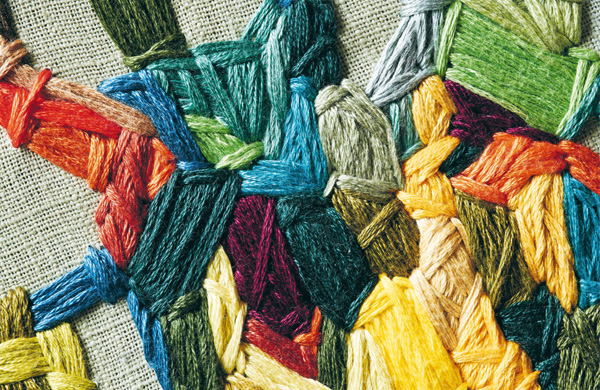
TM: Kate, what materials do you use?
KKP: These pieces are embroidered using cotton and synthetic threads on linen cotton.
TM: How did you get into embroidery?
KKP: A few years ago I was working on a piece for a church interior. I became fascinated by the modest, unsung tradition of embroidered hassocks and it took off from there.
TM: You are also an abstract painter, which is such a different practice from embroidery. What draws you to these two extremes?
KKP: Working with needle and thread, slowly and steadily creating tactile compositions, provides me with an interesting counterpoint to the energy and speed of abstract painting. In contrast to painting, embroidery helps to still my sometimes restless mind.
TM: Can you describe your process?
KKP: My embroidery is always abstract and derived from what I notice and appreciate, rather than identifiable scenes or objects that I wish to represent. I start with a clutch of colors and a particular piece of fabric to stitch onto, but the rest is entirely improvised. The first few stitches tend to determine the direction of the piece; although I try not to think about an end point and rather just explore, leaving my hands to work things out as they go along.
TM: Where do you make?
KKP: I am at my best working in a fairly organized and tidy space, at a large table surrounded by threads arranged by color.
TM: What does embroidery bring to a space?
KKP: It brings a surface that is, curiously, also an object.
TM: Any advice for aspiring embroiderers?
KKP: Be open to inspiration from everywhere. It could be the shape or color of a vegetable at the market, the pattern on a wall, or a piece of music that conjures up images in your mind.
“I work quickly and intuitively; I’m absorbed by the moment. I work alone, but there is a constant internal dialogue – ideas popping, hands trying to keep up.”
DION HORSTMANS, METAL SCULPTOR & ARTIST
(SYDNEY, AUSTRALIA)
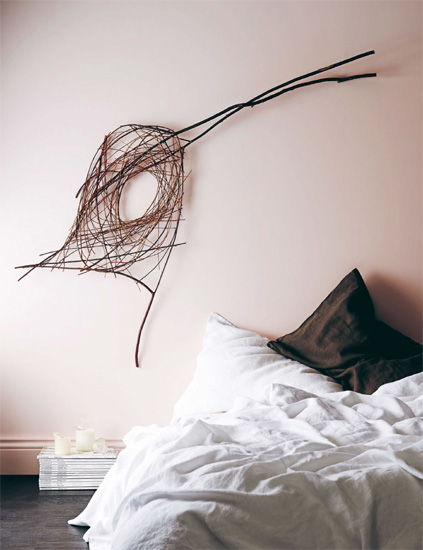
This page / Organic wall sculpture, using woven branches bound together with wire / Wona Bae Opposite / 3D wall sculpture, using butt-welded, powder-coated ¼ in (6 mm) solid steel bar / Dion Horstmans
“The cycles of nature and beauty in organic materials are the source of my creativity. These allow me to draw inspiration from their form and create something truly unique.”
WONA BAE, FLORIST & STICK SCULPTOR
(MELBOURNE, AUSTRALIA)
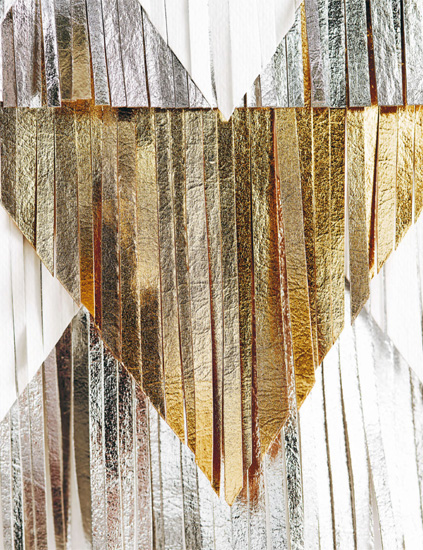
“Making has no rules, no restrictions. It’s whatever you want it to be. The beauty of working with paper is that you can change it from something very basic to something quite extraordinary. A simple fold can create a new perspective.”
MARSHA GOLEMAC, STYLIST, ART DIRECTOR, & PAPER ARTIST
(MELBOURNE, AUSTRALIA)
Uashmama washable paper, layered and cut wall hanging, hung on dowel rod / Marsha Golemac
“A maker’s knowledge and understanding of their materials and processes is something very intimate and unique. It’s good to work with one technique over a number of years: you can really push and explore its boundaries.”
THE FORTYNINE STUDIO COLLECTIVE OF DESIGNERS & MAKERS
(SYDNEY, AUSTRALIA)
“I enjoy the slow, tedious parts of my making practice as much as the exciting bits. It makes all the difference, because metalwork is slow and hard.”
ANNA VARENDORFF, JEWELER & SCULPTOR
(MELBOURNE, AUSTRALIA)
“In my mind are stamped from previous teachers: ‘Embrace the wobble,’ and ‘Test, test, test!’”
MICHELE QUAN, CERAMIC SCULPTOR
(NEW YORK, USA)
I fear craftsmanship can be a little taken for granted in our fast-paced world and for that reason I love to advocate its importance. Ultimately, craftsmanship is the skill a maker possesses, one that is established over time and based on strong technique, good design, and a genuine understanding of their raw materials. You may not know the maker, but, if they have mastered their craft, their craftsmanship will be visible and, without sounding too dramatic, have the ability to astound. Reaching that level of mastery in your chosen craft means practicing patience, conjuring commitment, and coming from a place of passion. Anyone with a spare afternoon can whip up something handmade, but a true maker will obsess over every small detail, research the perfect material, and take the utmost care and pride in making something worthy of the title.
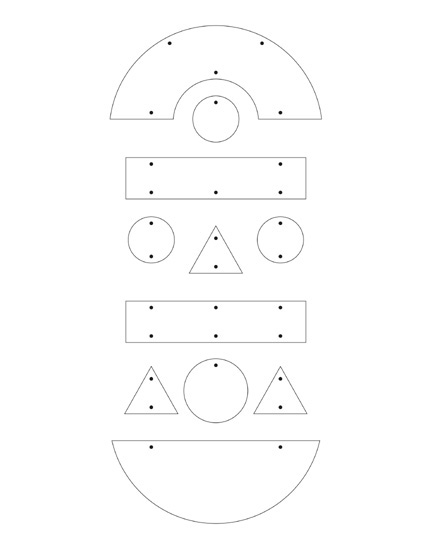
PROJECT No 1
metalwork wall hanging
The template on the following pages is a guide only and not to scale. A complete ready-to-print template and layout guide can be found at www.tamaramaynes.com.
This project is a great introduction to working with sheet metal, using a manual cutting technique. Sheet metal is available in many gauges: the medium-weight sheet used here is sturdy enough to hold its shape but thin enough to cut with scissors or, preferably, specific sheet-metal shears. Thin sheet metal and wire usually come rolled and you can buy them at jewelry-making supply stores, art and craft stores, and online.
Metalwork is a craft that generally requires the use of specialized tools and equipment, but this wall hanging has been designed to keep those to a minimum. You can go up or down in gauge but be warned, any thinner and you risk denting the metal quite easily and anything thicker will require more particular tools. Besides pipe cutters (and pipe), which are available at hardware stores, all other tools can be purchased from the same outlets as sheet metal and wire.
The best advice when working with metal is to wear gloves, particularly when you will be dodging the sharp edges of sheet metal. They will also help you avoid leaving fingerprints on the shiny surface, minimizing the need for polishing the finished piece. Choose gloves that are thick enough to protect your hands while still allowing your fingertips to feel and work with the material easily.
› Printed template online: www.tamaramaynes.com
› 30-gauge copper sheet metal
› 24-gauge copper wire
› 6-gauge copper pipe
› Spray-on clear lacquer for metal
TOOLS
› Fitted cotton gloves
› Pencil
› Sheet metal shears
› Ruler
› Metal hole punch
› Pipe cutters
› Wire cutters
› Chain-nose pliers with non-serrated jaws
› Polishing cloth
PREPARE
1 / Download the template and print out onto plain 11 x 17 in (A3) paper at 100%.
2 / Wear protective gloves to unroll and carefully flatten out sheet metal. Lay it on an unmarked flat surface under a stack of heavy books overnight.
3 / To prepare copper wire for joining metal pieces, cut fourteen 3 in (7.5 cm) lengths of wire.
4 / To prepare copper wire for hanging, cut one 13 in (32 cm) length of wire.
5 / To prepare copper pipe, cut one 5 in (13 cm) length using pipe cutters.
MAKE
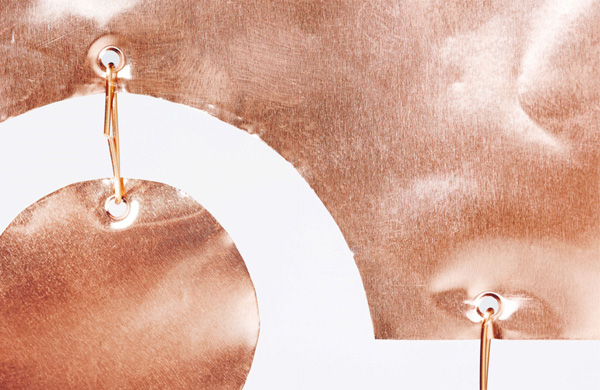
1 / Cut out the paper template pieces, place on the metal sheet, and trace around them with a pencil, also marking the spots where holes are to be punched. Wearing protective gloves, use sheet metal shears to carefully cut out the individual metal pieces.
2 / To make holes, use a metal hole punch to gently pierce metal pieces where indicated on the template.
3 / To join the metal pieces, thread the short wire lengths through the punched holes, as indicated in the photograph. Use pliers to fold one wire end over and back onto itself to secure. Thread the other end of the wire through the corresponding hole. Keep all the folded wire ends to the back.
4 / To hang, first thread the 13 in (32 cm) wire length through the pipe. Thread the ends through the holes at top left and right of the top curved metal piece, as shown on this page. Use pliers to fold the wire ends over to secure, as before.
5 / To polish, gently clean entire hanging with polishing cloth.
6 / Immediately after cleaning, hang outside and spray with lacquer to seal as per manufacturer's instructions. This step will help prevent the copper from oxidizing.