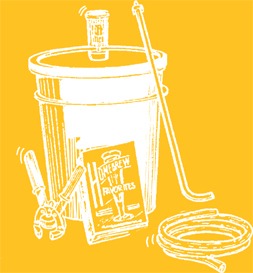
WHAT BASIC EQUIPMENT DO I NEED TO MAKE BEER?
If you are just getting started, a few basic items are a must. You should be able to find the equipment you need at a homebrewing supply shop or on the Internet.
Pot
 Pot. You will need a 7-gallon (26 L) pot, large enough to boil 5½–6 gallons (21–23 L) of wort plus about 20 percent extra space to prevent boilovers. Most home kitchens are not equipped with a pot this large. Homebrew shops and Internet sites sell a wide array of brew kettles, a good investment for those who want to give homebrewing a serious try. (See brew pot materials, page 46.)
One thing you need to verify before buying a big pot is that your kitchen stove has enough power to boil that much liquid (a 5-gallon [19-L] pot requires a 10,000 BTU burner). If not, you should use the high gravity method or consider buying an outdoor propane burner.
Wort chiller. You will also need to make or buy this device to cool the large volume of near-boiling wort to about 75°F (24°C) before pitching yeast.
An immersion chiller made from copper tubing is the easiest to build and least expensive type of wort chiller. Many great batches of homebrew are made using immersion chillers, and some brewers stick with them. Other brewers prefer counterflow wort chillers, which are more difficult to build. The main difference is that wort is cooled in the kettle with an immersion chiller and in-line between the kettle and fermenter when using a counterflow chiller.
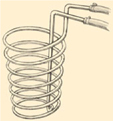
Copper immersion chiller
Primary fermenter. My preference for primary fermentation is a glass carboy. Some brewers use plastic buckets for fermenters, but I don’t because oxygen goes through plastic very easily. When I was a graduate student at UC Davis, we made a lot of different beers in the pilot brewery; all were fermented in the trusty carboy.
The only disadvantages are that carboys are breakable and they expose beer to light. At Davis, we did fermentations in a walk-in cooler and turned on the light only when someone was in there. I have never had beer skunked during fermentation in glass, but covering the fermenter with something like a towel to protect it from light is a cheap safety policy.
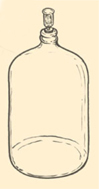
Glass carboy
Secondary fermenter. Racking out of the primary fermenter is not required but is recommended. A second carboy works well.
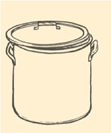
Plastic bucket. More yeast will settle in the secondary, so the beer must be racked again before bottling; a 5-gallon (19 L) plastic bucket with an easy-to-fit lid and racking cane works well as a bottling bucket. I am not so concerned with the plastic at this stage because the beer will only be in it for a short time. One thing to keep in mind is that racking can introduce oxygen into beer by splashing and simply by the fact that the beer is racked into a container filled with air. I have reliably used dry ice to evacuate air from tanks. A little chunk in the bottling bucket could be used to displace the air before filling.
Bottle capper. The last major piece of equipment is a bottle capper. I have used both of the styles available — gooseneck style and hand held — and prefer the gooseneck type.
Airlock. Allows carbon dioxide to escape during fermentation but keeps air from reaching your beer.
Racking cane and hose.
Bottle brushes.
Thermometer.
Hydrometer.
Long-handled metal spoon.
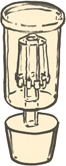
Airlock
Food-grade hoses, such as silicone or Teflon-lined,  –⅜ inches (5–10 mm) in diameter.
Bottles.
Supplies to clean and dry bottles.
You should be able to buy everything you need to get started for a couple hundred dollars, and if you add an outdoor propane burner to that list, your costs will still be quite reasonable. This amount is not a bad investment at all for a hobby that returns on the initial investment!

Thermometer
Q Do brew pots need to be stainless steel, or can I use aluminum, ceramic, or other materials?
A A pot needs to satisfy a few simple requirements to become a qualified brew pot. For starters, it should not leak. A good candidate for the job should also be large enough — 7 gallons (26 L) — to hold and boil a whole batch of wort. It is much better to boil the whole volume of wort than do a concentrated wort boil. A concentrated boil affects hop utilization; improves aroma, such as dimethyl sulfide (DMS) removal, during boiling; and develops color much differently. The kettle should also be made from a material that can adequately conduct heat from the source to the wort. The final requirement for the kettle is that it should not harm the wort by leaching compounds into it.
Stainless steel is the most common material for kettle construction nowadays, though its heat conductivity is less than stellar. Stainless steel is inert, is easily formed and welded, and can be heated either by direct flame or with the use of steam jackets and coils. Commercial brewers use steam because it does not result in scorching. Unfortunately, stainless steel kettles are pretty spendy. A 7-gallon (26 L) stainless steel pot can easily cost more than $150.
Ceramic canning vessels and crab or lobster pots meet the basic requirements for a kettle. Canning vessels are usually made of tin with a thin enamel coating. These pots are inert, have high heat conductivity, and are less expensive than stainless pots. One drawback to ceramic is that you cannot weld a valve to them because the coating chips off.
Also, if they get chipped or cracked, the metal under the ceramic is not inert. If you handle these pots carefully and don’t mind not having an outlet valve, then they are a viable option. Another drawback is that the handles of canning pots are not very strong; you should not attempt to lift a pot full of near-boiling wort. This is dangerous regardless of the handles and ought to be avoided.
Aluminum pots are readily available in all sizes, are really inexpensive, and have a terrific thermal conductivity. An outlet valve can be welded to an aluminum pot, but you will probably have a difficult time finding anyone who can weld a stainless steel ferrule to an aluminum pot because aluminum welding is a fairly specialized technique. Another issue with aluminum is that it is not inert, making it unsafe to clean aluminum pots with sodium hydroxide (commonly referred to as caustic), and other caustic-based cleaners, which are the workhorse cleaners of the food and beverage industries. Sodium hydroxide is listed on the label of any cleaner containing it, because it is pretty nasty. Drano and Easy Off oven cleaner both contain sodium hydroxide. Some studies have suggested that there may be some cause-and-effect relationship between aluminum and Alzheimer’s disease, but I haven’t read anything very convincing on that idea. Keep in mind that aluminum is commonly used for making all sorts of cooking utensils. If you don’t need an outlet valve and don’t use caustics, an aluminum kettle is fine.
The granddaddies of all kettles are made from copper. These dudes look great, have the highest thermal conductivity of all metals, and are traditional. However, copper is expensive, difficult to weld (soldering is typically used on copper and is easy), and not inert. Unfortunately, copper is not commonly used to make big pots, and they are hard to find for an affordable price. I hope you didn’t have your heart set on copper!
Many homebrewers convert an old beer keg into a kettle. They make good kettles, but I feel obligated to remind everyone that stainless steel beer kegs are the property of breweries. The paltry deposit is only a small fraction of the true cost of a beer keg. If you use a keg for a kettle, make sure you buy the keg from its true owner. Give breweries a break and don’t steal kegs!

Q Is there special equipment needed to make beer from just grain?
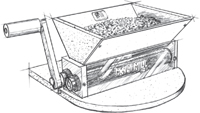
A There is special equipment — a mash tun and a hot water storage vessel — required for all-grain brewing, but fortunately it is neither expensive nor difficult to make. My first mash tun was built following Charlie Papazian’s Zapap design that used two 5-gallon buckets, anger management exercises with a hand drill, and a plastic spigot. I used this for years before building a copper manifold with downward facing slits that fit into the bottom of a cooler. A problem with the Zapap design is that it is not insulated, which allows the mash to cool off some over time. This is not a huge deal, however.
You also need a water cooler that you can use for storing hot water for sparging. Since sparge water is usually held at about 170°F (77°C), you need to make sure the cooler can be used for hot water. If you use batch sparging, you really don’t need anything else to get started. If you want to be a little fancier, you can fashion some type of sparge head to go with your mash tun, but that is not required.
Q What homebrew gadgets would you want in your home brewery?
A This is a terrible question to ask of a guy who designs gadgets for a living! I really dig gadgets and love working with projects where new gadgets are needed.
My dream homebrew setup would feature brewing equipment fitted with stainless steel tri-clamp ferrules like those used on commercial equipment. These fittings make it easy to clamp valves to the equipment and valves make it easier and safer to move hot water and wort in and out of the brewing vessel. The same thing can be done using threaded fittings, but these fittings are not sanitary because they can hide crud that can be a breeding ground for microorganisms. At a minimum, the kettle should have a valve to eliminate the need to siphon hot wort. The downside to adding a bunch of stainless ferrules is that you need to buy valves to attach to them, and you can spend a lot of money in a hurry.
I do not promote the addition of gadgets for the sake of adding bells and whistles. I suggest focusing on the fermentation area of the operation. Most beer tastes best when the fermentation temperature is controlled. Most of the ales I brew at our brewery are fermented at 64°F (18°C), much cooler than the ambient temperature advice offered by most homebrewers making ales. A refrigerator with a thermostat that replaces the original equipment allows a controlled environment for fermentation, so both ales and lagers can be fermented at a chosen temperature.
Kegs are great because they allow for all sorts of fun options. Cornelius kegs previously used to store soda syrup are really handy and relatively easy to locate. These can be used as secondary fermenters as well as kegs. One clever technique is to put a couple of gallons of hot water in a Corny keg to heat the keg up and then to empty and seal the keg. As the keg cools, it pulls a vacuum that can be used to start a siphon when racking beer from a carboy. Once the siphon starts, vent the Corny keg through the pressure relief valve and watch it fill!
Once you have kegs, you can build your own tap setup and have draft beer. I think this a great gadget, because it’s not just for the brewer, but also friends and family who drink your homebrew. I really like nitrogenated beers, and kegs with a home tap system allow the use of this method.
A submersible pump to pump mash and sparge water from my hot water tank to the mash tun is another item I would put on my gadget wish list. With that, the hot water tank does not have to be elevated.
A malt mill would also be nice, so that you can purchase whole grain and mill it immediately before use. This addition offers some economy, as it allows you to buy malt in larger quantities and store it for months without worrying about it picking up moisture.
I would toss in a counterflow wort cooler equipped with an aeration stone in-line between the kettle and fermenter. And just for the fun of it, add a stainless steel conical fermenter with a racking port on the cone, a bottom connection, a thermometer in the side, and a top lid giving access for cleaning and sneaking peaks of the action inside the fermenter. Oh, and some small wooden barrels to barrel-age some funky Brettanomyces brews would be nice! A plastic wine thief is handy to take samples from barrel bungs and carboys for gravity checks.
The last thing I would really want is a dedicated space for brewing. The ultimate space would have a sloped floor with a drain so that equipment could be hosed down and cleaned up without worrying about spilling stuff on the floor. This area would also have some of those nice commercial kitchen tables for storage and to dress up the space. If you want to boil in your brew space and use a gas flame to boil your wort, make sure the area is ventilated. I have heard of some brewers putting ventilation hoods in their basement, but I would skip that gadget and do my boil outside and gravity flow the wort into my basement through a window.
Malt mill
Q What are the best ways to chill wort before adding yeast? I let mine sit until it gets down to pitching temperature. This can take a while. I don’t know how I can affect the brew by accelerating the cooling process.
A The best way to cool wort is with a specialized cooling system. The two most common types are the counterflow heat exchanger and the submersion chiller. In the first type, wort passes through a copper tube or some other good conductor of heat while cool water is passing over the outside of the tube. The water flows counter to the wort flow, hence the name.
Submersion chillers are also made of copper or an equivalent conductor. In these devices, however, the cool water runs inside the tube and the whole device is submerged in the hot wort. They both work well and will cool 5 gallons (19 L) of wort within 20 minutes. I like the counterflow chillers because the wort is cooled more rapidly; it enters hot and exits cool about 20 seconds later. The total cooling time for the batch is the same, but since the time for any given wort droplet to cool is quick, you get better cold-break formation.
The bottom line is that hanging around waiting for your wort to cool should make you nervous because of the increased risk of spoilage. The other perk of a specialized cooling system may be a crisper, cleaner barley pop!
Q When measuring specific gravity, is the original gravity taken during the mash, during boil, or after the wort has cooled?
A Check the specific gravity of the wort after the boil to determine original gravity. Because original gravity is defined as the specific gravity of the wort before fermentation, this is the only point in the process to determine it.
There are good reasons to check the specific gravity of the wort during sparging and during the kettle boil, namely to hit the target gravity and to make sure that excessive sparging doesn’t occur. However, these measurements are very different from the original gravity measurement.
Brewers use hydrometers to measure density. I like to measure the wort gravity that first flows from the mash tun to know my first wort gravity, a function of mash thickness and how fine the malt was milled. Knowing the first wort gravity allows you to troubleshoot low first wort runnings rather than discover a problem after the boil when it is too late to make a change to the plan. I also measure the wort gravity toward the end of wort collection and avoid collecting wort that is less than 1.008 SG or 2° Plato.
It is important to know the temperature to which your hydrometer is calibrated and to make corrections to your measurements using a correction chart supplied with the hydrometer. I prefer hydrometers with a built-in thermometer and correction scale positioned adjacent to the thermometer; they can be found in laboratory supply catalogs. Hot wort should be cooled before measuring. You can quickly chill samples by plunging a copper sample cylinder into a cold-water bath.
Hydrometers are also great for monitoring the progress of fermentation. I do not believe in the bubble-watching method for knowing when fermentation is complete. The only way to have a good idea of what is happening in the fermenter is to pull a sample and measure the gravity of the beer. This gives you an indication of the apparent extract. (See page 210.)
When measuring the gravity of beer, it is important to make sure that bubbles of carbon dioxide do not buoy the hydrometer and give an artificially low reading. Spinning the spindle of the hydrometer while it is suspended in the sample helps shake bubbles loose. Again, make sure the proper temperature corrections are made.
Finally, you must know whether your hydrometer should be read from the top or bottom of the meniscus. To read the top-reading style, look for the spot where the liquid hits the spindle. To read the bottom-reading design, look across the unit to see the number at the level that lines up with the liquid in the sample container. Many cheaper hydrometers are not labeled: The only way to know if it is top- or bottom-reading is to measure the density of water, which should always be 1.000, provided that it is mineral free.
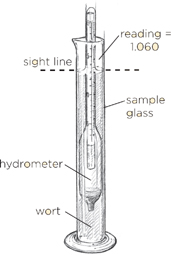
Top-reading hydrometer
Q What’s the best way to take an accurate original specific gravity reading? I use a sampling thief to collect a wort sample from my carboy before pitching. The readings are different depending on how long the wort settles before measuring and how deep into the carboy I dip to collect the sample. Should the sample come from wort that is relatively free of sediment? Should specific gravity be measured before pitching the yeast?
A I usually collect a wort sample from a sample valve placed in-line between the wort cooler and the fermenter. I do this because I want to know my wort density prior to pitching, since liquid yeast will lower the wort gravity slightly by diluting the wort sugars with the liquid in the starter. That said, your method of sampling from the fermenter should work fine, as long as you take your sample before fermentation begins. Just keep in mind that the wort gravity is higher before adding the yeast. This exercise is only of importance if you are strictly tracking your brewhouse efficiency. Otherwise, the difference in gravity is trivial.
There are some oddities about gravity checks that I want to point out. But before I drift too far off, here is one key piece of information for extract brewers — be diligent about mixing your wort and any topping-up water prior to checking your specific gravity. If the wort is not thoroughly mixed, the likelihood of having stratification in the wort gravity is very high. In fact, it’s almost a guarantee!
Let’s assume, however — for the sake of argument — that you are an all-grain brewer and that the wort is thoroughly mixed. The puzzling part about this scenario is that the wort gravity changes depending on the depth of the sample. If you had pitched, I would suspect that the culprit was your yeast starter not being completely mixed in the wort, especially if you used a large-volume starter. Liquids of varying density are more difficult to mix thoroughly than one would guess. The only other thing that could cause this difference is temperature variation, as temperature affects liquid density and the hydrometer reading. Temperature stratification in liquids is very common. If you are not measuring the temperature of your sample along with the specific gravity, you should.
I usually add some water after wort boiling to adjust gravity and want to know the wort gravity after the water addition to confirm that my calculations and water addition were correct. I have collected multiple samples during the course of wort cooling and have observed that samples do vary slightly from beginning to end. The variation is typically between 0.1 and 0.2° Plato or about 0.0004–0.0008 SG. The only conclusion that makes any sense to me is that the top-up water is not evenly distributed in the wort, even after pumping it to a whirlpool and allowing it to rest before cooling to allow the trub to settle.
Personally, I feel the best place to sample wort is from the kettle, immediately after boiling. At this stage, the wort is well mixed and nothing has been added, such as water for top-up or yeast. The wort gravity combined with wort volume is used to calculate brewhouse efficiency, and this is the place to collect the data. Although suspended solids, such as trub and hop particles, should not affect the hydrometer reading — since hydrometers measure dissolved solids — I collect a sample and first allow the solids to settle, then transfer clear wort to my hydrometer test container.
Q Is it possible my hydrometer might not be calibrated correctly?
A For starters, don’t ever assume any measuring instrument is properly calibrated. A hydrometer should indicate that distilled water has a specific gravity of 1.000 SG (a Plato hydrometer should read 0.00°) at the temperature for which the hydrometer is calibrated. Most laboratory-type hydrometers read true at 68°F (20°C), and many homebrew hydrometers read true at 60°F (16°C). In most cases, the sample is at some other temperature and the hydrometer reading must be adjusted up if the sample is warmer than the hydrometer temperature calibration or adjusted down if the sample is cooler than this temperature.
This trivial issue gets nasty when you step back and carefully look at the problem. For example, I have a sample of wort and plunk a hydrometer in it and the reading is 12.5° Plato. Having a good idea that the sample is warmer than room temperature (68°F/20°C) in my chilly, imaginary room, I grab a floating thermometer from the bench, plunk it into my wort sample, and determine that the wort temperature is 78°F (25.5°C). I can go to a table and determine that I need to add about 0.5° Plato to my reading. No problem, right? Wrong. When I put the thermometer in the wort, I changed the wort temperature, since the large floating thermometer was cooler than the wort sample.
One way to get around this problem is to measure the gravity and the temperature at the same time. You can do this with a separate hydrometer and thermometer, or you can buy a hydrometer with a built-in thermometer. These little guys are nice and range in price from about $15 up to $160.
Q Is the final gravity taken during the primary or secondary fermentation, and how is this accomplished without infecting the brew?
A Unlike original gravity, final gravity can be determined at many stages in the process. It can be checked once fermentation is complete and sampled from the primary fermenter. The sample can be taken from the secondary fermenter or from a bottle or keg. In all cases, the specific gravity of the beer will be the same because fermentation is complete. There are exceptions to this rule: bottle-conditioned beers or beers with additives such as honey or fruit added after fermentation. These beers have different specific gravities before and after the addition of such materials.
The best method of sampling beer from a fermenter involves a device known as a thief. A thief is a large-diameter, turkey-basterlike thingamabob with a small hole in each end. The brewer simply inserts the sanitized thief into the fermenter, covers one end with a thumb, and removes the thief.

Thief
Q How do you convert from degrees Plato to specific gravity?
A A rough conversion between degrees Plato and specific gravity can be made by dividing the specific gravity number behind the decimal (often called points of gravity) by 4. A specific gravity of 1.048 has 48 gravity points and 48 ÷ 4 = 12° Plato. This approximation is pretty good up to about 1.070 SG. After this, the approximation begins to deviate from the actual conversion.
A conversion table between specific gravity and degrees Plato can easily be made in a spreadsheet using the following formula. An example converting 12° Plato to specific gravity is shown (the order of operations is a little confusing at first glance).
Specific gravity = 1 + [Plato ÷ {258.6 – (Plato × 227.½58.2)}]
= 1 + [12 ÷ {258.6 – (12 × 227.½58.2)}]
= 1 + [12 ÷ {258.6 – 10.555}]
= 1 + [0.0484] = 1.048
Q How are the Brix, Plato, Balling, and specific gravity scales different?
A This question raises some issues of semantics. In general terms, degrees Brix, degrees Plato, and degrees Balling are interchangeable. All three scales express the weight percentage of sucrose solutions and relate this weight percentage to specific gravity. The Balling scale, established in 1843, is the oldest. Brix later corrected some calculation errors in the Balling tables and introduced the Brix tables. In the early 1900s, Plato and his collaborators made further improvements. Essentially they are the same, but the tables differ in their conversion from weight percent to specific gravity in the fifth and sixth decimal place of the specific gravity number. Specific gravity, by the way, relates the weight of a given volume of liquid to the same volume of water. Liquids heavier than water, like wort, have a specific gravity greater than 1.000, and liquids lighter than water, such as alcohol, have a specific gravity less than 1.000.
Winemakers and the sugar and juice industries typically use degrees Brix, continental brewers typically use degrees Plato, British brewers use specific gravity multiplied by 1,000 (for example, 1.040 becomes 1040), and American brewers use a mixture of degrees Balling, degrees Plato, and specific gravity.
I use Plato and specific gravity because my hydrometers indicate degrees Plato, and specific gravity is always required when doing brewing calculations. For example, if you multiply degrees Plato (expressed in decimal form) by specific gravity, the result is kilograms of extract, a convenient number when doing calculations.
Q I have a refractometer and was told that I can check the gravity of my runoff when sparging. How would I do this?
A If you have a refractometer, you certainly can use it to determine density. Most refractometers are scaled in terms of degrees Brix because they are most often used in industries that use the Brix scale. For all practical purposes, you can use the simplified formula (4×°Brix) rule for the conversion. Use caution with your refractometer, because light refraction is temperature dependent, just like specific gravity. Your sample temperature should ideally be around 68°F (20°C). The great thing about a refractometer is that the sample size is small (about 1 mL or 0.03 oz.) and very easy to cool to room temperature before measuring.
I don’t like refractometers for two reasons. The first is that they are difficult to read unless they are really high-end. I do like the high-end ones (they resemble a microscope), but they cost thousands of dollars! The second reason I don’t like them is that they are not reliable for checking samples from the fermenter because alcohol interferes with the measurement differently than it does with a hydrometer. In other words, a hydrometer measurement on beer may indicate 2° Plato and the refractometer will indicate something different on the same sample. Most brewers express the final gravity as measured by a hydrometer. If you do want to use the refractometer, use it on wort only, and you will be fine.
Q How do plastic bottles compare to glass bottles, and how good in general are plastic bottles for homebrewing?
A I hate bottles. I mean, taking the soggy cigarette butts out of those bar bottles, getting the labels off, cleaning them, filling them, and then cleaning them again for reuse is a royal pain in the can! The only good thing about the whole process is the drinking stage. Plastic soda bottles obviously cut down on a lot of this effort. You can save them from home use, and it only takes ten 2-liter bottles to bottle off a 5-gallon (19 L) batch.
So what’s the downside? Plastic soda bottles allow light to strike your prized beer and eventually allow for the slow transfer of gasses across the bottle wall. This means that, over time, the beer will flatten due to carbon dioxide escape and that the beer will gradually oxidize due to oxygen ingress. If you don’t mind skunky, oxidized homebrew, plastic bottles will do the trick!
On the upside, however, the gas transfer business is slow, and light can be kept out by putting the bottles in the dark. Research from England shows that beer will hold its carbonation for up to 3 months in polyethylene terephthalate (PET) plastic bottles. These bottles also ward off beer oxidation for the same time period. This means that if you don’t drink the beer within 3 months, its quality will start to show noticeable signs of deterioration. No problem — just drink your beer while it is fresh.
Q What is the downside to fermenting in a plastic fermenter?
A Plastic fermenters work fine for fermentation but really should be avoided for prolonged aging. A longer-term aging should occur in stainless steel or glass containers. This opinion stems from the fact that most plastics, including the types used to make most buckets and fermenters, are permeable to gas. This means that oxygen can cross from outside into the beer in a plastic fermenter. The same thing happens with carbonated beverages stored in plastic bottles. Sodas, for example, will lose carbonation over time when packaged in plastic bottles. There are now plastic beer bottles made from special polymers that have better gas barrier properties.
The advantage to stainless steel and glass vessels is that they allow no gas transfer. Also, stainless steel and glass are more difficult to scratch if treated with a modicum of care. Plastic, on the other hand, is easier to scratch. Scratches are the sort of crevices that bacteria love and make sanitizing that much more difficult. Even without scratching the plastic surface, it is often the case that heavy-wall plastics are rougher on a microscopic level than steel or glass.
Q Does a conical fermenter help create better tasting beers?
A I would not say that conical fermenters alone make beer that tastes better, but I would agree that they are the ideal shape for a multipurpose vessel. The real advantage of conicals is that yeast will settle in the cone and can be removed from the fermenter with minimal beer loss. Most commercial brewers will reuse some of the yeast harvested from the cone of a fermenter and will discard yeast that is either not suitable for reuse (the first and last layers off the cone, for example) or yeast that is in excess of what is needed. This use of the cone comes early in the process, typically within a few days of the fermentation’s end.
Another use of the cone comes later in the process, during aging. To use the cone during aging, you need to age the beer in the fermenter. If you buy into my gas barrier argument, you are probably aging in stainless steel. During aging, more yeast will continue to settle from the beer. Over time, this yeast will begin to die and autolyze or decay.
Yeast autolysis is bad for two reasons: It imparts off-flavors to beer and it increases amino acid concentration in the area surrounding the dead yeast. Most beer spoilage bacteria do better in high amino acid environments; the bottom of a fermenter full of autolyzing yeast is a perfect environment for bacteria growth. When beer is aged in a conical fermenter, this layer of dead and decaying yeast is very easily removed from the bottom and the problems with yeast autolysis can be greatly reduced or even eliminated.
The last real advantage to fermenting and aging in one vessel is that it allows a single beer transfer. This means you have only one fermenter to clean per brew and the chances of contamination and air pickup encountered during racking are reduced. All-in-all, the conical fermenting (and aging) vessel, often referred to as a uni-tank, is a great tool.
Q I am thinking of stepping up to a stainless steel conical fermenter. I notice that most are listed as seamless with no welds, but some brag about being welded. What is the difference, and which is better?
A Weld quality is a very big deal; it affects stainless steel corrosion and its ability to be cleaned. I want to give a little background on welding, because both welded and seamless kettles can be excellent pieces of gear.
As a general rule, welds are only used when required, as they are for big vessels, because stainless steel coils come in a standard width of 48 inches (122 cm). The standard method used to build tanks is to form a tube and attach bottom and top heads to the tube to complete the tank. Fermenters typically have a cylindroconical bottom and dished top head. The heads and tube all have weld seams, and the welds are ground flush on the interior of the vessel. A good weld must have full penetration to provide strength and to eliminate crevices where microorganisms grow.
Excessive heat applied to a weld leaves a large heat-affected zone around a weld, and the alloy composition around this area is different from stainless steel that is not exposed to the heat of welding. Corrosion is more likely to occur in the heat-affected zone, especially when the welds are made using too much heat. Various testing methods, such as radiography, are used to evaluate welds. Tube or pipe welds can be really problematic if the tube or pipe is not properly purged before welding. Improper purging causes sugaring inside the tube; this black, granular oxide is a veritable breeding ground for bacteria.
Most long pipe runs are fit up with very small tack welds and the joints taped. The line is then purged with an inert gas, usually argon or a blend of argon and nitrogen, before the welds are made. A good pipe weld, like that used to attach a valve or ferrule into a line, is fully penetrated, has only one start and stop, is smooth (often having the appearance of a stack of dimes slid off into an even and overlapping row), and has very little discoloration. Pipe and tube welds often cannot be ground on the interior, and boroscopes are used to visually inspect the weld for penetration, starts and stops, and color.
If welding can be avoided, it is, because of all the associated concerns. One way to build a pot without welding is through metal forming. Stainless steel has very good mechanical properties and can be stretched and formed without tearing the material. Although stainless does not look elastic, it is really like a sheet of dough and can be formed into a variety of smooth shapes with the proper tools. Spinning dies can be used to stretch and form the steel into the shape of a bowl or pot, for example, and most stainless steel cookware is made using such methods. Knuckles can be added to a dish-shaped head using special dies to add strength to the head. These methods do not require welding and avoid the potential problems associated with welds.
Here is the take-home message: Excellent equipment can be purchased with or without weld seams. The key is to know how to properly inspect equipment before purchasing. All beer contact surfaces should be smooth. Polished surfaces should not be scratched or pitted. Welds should be uniform and free of crevices and discoloration. Once you pick out your gear, you then want to maintain it in this condition. Do not use abrasive scrubbing pads to clean stainless steel and be very careful of the metal tips many scrub brushes have; they can quickly scar a perfectly smooth stainless surface. (See cleaning stainless steel, page 103.)
Q How many times can you reasonably use flexible silicone hose for siphoning before it needs to be thrown out?
A I have no trouble recommending that you use a section of hose for as many times as you can, as long as the hose is kept clean and the inside surface is not cracked. Hose cleaning is one of those things that are sometimes overlooked. If you cleaned your blowoff tube with a hot bleach solution after using it, I bet it would look like new! Make a good cleaning solution by mixing ½ cup unscented bleach per gallon (118.3 mL/3.8 L) of hot tap water.
Hoses should be cleaned by either recirculating cleaning solution through the hose (this requires a pump) or by soaking the hose in a cleaning solution. This cleaning is best done soon after the hose is used, so that the soil has little time to harden inside the hose. Many hoses have some type of barbed fitting connected to the end. It is a good idea to routinely remove the fitting and clean the area around the connection or, better yet, cut a small portion off the hose and reattach the fitting to a smooth hose section. This helps to keep the intersection between the fitting and hose clean and the crevices in this region to a minimum. When I have a long piece of hose and am unsure if it is in good condition, I cut a piece off the hose, split the sample in half, and inspect the inside of the hose. If there are small cracks, or if the hose has a buildup of beer stone (calcium oxalate deposits that look like brown-tinted glass), I will toss it. Otherwise, there is no reason to waste good hose.
One thing to be careful about at home is pressure. Hoses that are not reinforced with braids should not be pressurized, especially with hot liquids. When silicone hose is heated, it gets soft and is easy to rupture when pressurized, for example, by a pump. If you pump wort or beer, or move wort or beer using compressed gas, you need to buy braided hose. As long as the braided hose has an interior made of silicone, you can treat it as you do your nonbraided hose. I use the same sections of commercial-grade hose continuously for several years without any problem.
Q What would you recommend for optimal distance between grain mill rollers? Does it depend on the particular grain being milled?
A The gap between rollers in a malt mill does depend on the type of grain being milled as well as the roller size and surface texture. Most commercial mills with large-diameter rolls (6–8 inches/15–20 cm) have a gap setting of 1 to 1.2 millimeters. This setting is typically used for pale malt and may be set tighter for smaller grains, such as wheat and rye malts, and special malts for which husk integrity is not an issue. In fact, some brewers prefer very finely milled roasted barley and roasted malt because less grain is needed to provide a given color. This may also have a flavor benefit because less roasted/burnt husk material is added to the mash. The best way to determine the best gap setting is to start with coarsely milled malt and gradually tighten the gap over time while monitoring the ease of wort collection. The best gap setting is one that gives good extract yield while also allowing for easy wort recovery during lautering.
Q I recently saw a filtration kit with three cartridges: 5 micron, 1 micron, and ½ micron. What would be filtered out by each of these cartridges?
A This is a difficult question because filters can remove particles based on two properties: size exclusion and adsorption (sticking). Size exclusion is the mode of filtration that most filters are designed to use. This method essentially removes particles that get trapped in the filter or on the filter, depending on the filter type.
Cotton filters, paper pulp filters (sheet filters, for example), and diatomaceous earth (DE) filters (swimming pool filters and commercial beverage filters, for example) remove particles based on size and are known as depth filters, the first type of size-exclusion filters. The flow of liquid through a depth filter follows a tortuous path that is responsible for the removal of solids. The key feature of depth filters is that they are rated in nominal sizes. Your 5-micron filter and perhaps the 1-micron filter are depth filters rated on a nominal rating system. This means that they effectively remove particles of 5 and 1 microns respectively, but the size of the openings in the filter are much larger than the filter ratings. This means these filters can remove relatively high solids loads, but will also let through some particles the same size as and smaller than the filter rating. Depth filters are extensively used for beverage clarification.
The second category of size-exclusion filters is the membrane filter. A ½-micron is probably a membrane filter, referred to as an absolute filter. This means that the pore sizes in the membrane absolutely will not allow particles larger than ½ micron, the size of the membrane pore, through the filter. These filters are terrible at handling high solids loads, like cloudy beer, because the surface of the filter quickly becomes blinded. Membrane filters are used only after beer clarification, and the absolute filter is useful primarily to remove spoilage organisms. Most yeast cells are between 5 and 10 microns in diameter. A 5-micron filter is a good size to remove yeast and will remove most chill haze caused by protein/polyphenol interaction.
The key to filtration is to filter as cold as possible without freezing the beer. If you want a really clear beer, then you may want to filter twice. Yes, twice, starting with 5 microns and then again with 1 micron, which removes more of the nonyeast beer haze. Double filtration is not necessary, but it will make your 1-micron filter last longer. Finally, if you want to remove bacteria and extend your beer’s shelf life, then pull out the ½-micron filter. Make sure the beer is brilliantly clear before using this size; if it is not, the membrane will quickly blind.
Q I want to add a spigot to my kettle. Should I weld it on or could I use another method?
A You can go with a welded outlet or a bulkhead fitting. A bulkhead fitting is inserted in a hole and sealed with a gasket and nut. The advantage of this kind of fitting is that it requires no welding and is easy to replace. The disadvantage is that the gasket and nut present a crevice on the inside of the kettle and are not as easy to clean as a smooth, welded connection. I prefer welded fittings for this reason.
If you have the outlet welded to the kettle, you can either weld a valve directly to the kettle or have a fitting welded to the kettle. I prefer using a fitting and then attaching my valve to the fitting. This allows the valve to be removed for maintenance or replacement if it becomes damaged.
If you want to use a ball valve with a threaded connection, you can have an NPT coupling welded so that it will mate to a ball valve. I have a personal thing against threaded connections and prefer sanitary fittings. I would have a ferrule welded in the kettle and attach my valve with a clamp and gasket. This method requires a more expensive outlet valve which is also more difficult to find than the ubiquitous ball valve available at every hardware store.
Q I’ve heard that brass contains lead and shouldn’t be used in brewing. Is this true?
A Brass is an alloy consisting of the elements copper and zinc; brass contains no lead. Brass, like copper, can be soldered, and if lead-containing solders were used, then a brass fitting would contain lead. Brass by itself, however, does not pose a health risk.
I have a personal beef with brass, though, and want to add some meat to this answer. Most brewhouses found in commercial breweries contain metals other than stainless steel. Even an “all-stainless” brewhouse will incorporate a bit of copper somewhere to contribute a small amount of copper and usually trace amounts of zinc to wort. These elements play an important role in fermentation. Copper helps bind volatile sulfur, and zinc is a yeast micronutrient. Other metals found in older brewhouses include carbon steel (the type of steel that rusts), brass, and bronze. Excellent beers can be made when these metals are part of the “hot side” of brewing — although carbon steel can cause some real problems and is best avoided because it easily releases iron into liquids.
After yeast is pitched, the rules change in my book. Yeast rapidly decreases the pH of wort from about 5.2 to around 4.5 and begins to produce flavor compounds that are very susceptible to oxidation. Oxygen is not the only element capable of filling the oxidant role; metal ions from equipment can and do act as oxidants. In beer, the ones to look out for are copper and iron, because the equipment we use often contains these two elements. Filter sheets and filter powder such as diatomaceous earth (DE) can carry iron that will contaminate beer being filtered with this very potent oxidizer. Most brewers are very picky about specifying low-iron filter materials. Iron can also come from carbon steel used in the construction of brewhouse equipment, and the use of carbon steel in brewhouses is virtually nonexistent today.
In my opinion, brass, copper, and carbon steel should never touch the actual beer . . . never. In wort, these metallic flavors are absorbed by yeast or react with products of fermentation when wort is fermented. Once fermentation is complete, however, metal ions will make the beer taste metallic. After a while, the beer will begin to taste oxidized if enough metal is present, just as it would if it were in contact with air or oxygen.
This blanket statement really flies in the face of much written about beer. After all, brass is the most common metal used to make beer faucets, and many fittings used in kegging equipment are also brass. The fitting used to tap into a keg is commonly made of chrome-plated brass (the chrome plating really does not last long where it touches beer, and what lies below is plain old brass). The little barbed pieces with nuts used for connecting the keg tap to a beer hose are also made from chrome-plated brass. Chrome is an alloy of chromium and other metals, usually molybdenum. Chrome is not bad, but when it is plated on top of brass and begins to wear, the plating comes off and brass is exposed. Some people even use copper tubing to cool beer in a jockey box on its way from keg to faucet.
The point to all of this is that when you start thinking about how beer flavor is affected by the materials you use in the brewery, you realize that improvements in flavor can often be made by focusing on your equipment rather than your brewing technique. You don’t have to worry about lead from a brass nut, but you may find that a flavor improvement can be realized by using a different material.
Q I am looking to expand my home brewery and was wondering if there are any issues with using CPVC pipes instead of copper to move my wort around?
A The most important thing to consider when evaluating construction materials is product compatibility. CPVC, or chlorinated polyvinyl chloride, is a heat-resistant type of PVC rated for continual exposure to water at 190°F (88°C). The main use for CPVC is in hot water lines in new homes. This type of pipe has advantages: It is heat resistant; it is easy to cut and “weld” together with liquid PVC bonding agents; and as a food-grade polymer, it stands up to a wide range of brewery cleaning solutions, including strong bases like sodium hydroxide (caustic) and acids like phosphoric acid.
I prefer rigid piping or tubing, such as copper or stainless steel, for permanently installed wort lines, because these lines just feel tougher. With this personal opinion aside, I can’t think of any red flag issues concerning CPVC in the home brewery other than the obvious — you don’t want to use this plastic with boiling wort as it’s not rated for temperatures that high. Another thing to be mindful of is keeping this material away from the flame under your wort kettle or hot water tank.
Q I was told that all the equipment that comes in contact with a lambic beer I want to make will have to become my exclusive lambic equipment, and if I use it to brew anything but lambics, the other beers will get off-flavors. Is that true?
A The really big problem with lambic cultures is not the yeast: It is the bacteria. The bacteria in lambics include Lactobacillus and Pediococcus species. These two genera of bacteria just happen to be the most potent beer spoilage organisms of regular beers. They produce sourness and diacetyl (buttery aroma). The other feature of these bacteria is that just a few cells of the buggers can cause beer to spoil. When lambics are made, there are more than just a few cells, since the growth of these bacteria is actually encouraged — unthinkable for any other type of beer! Some of the yeasts used in lambic fermentations are considered “wild,” meaning they are not brewing strains. One such example is the genus Brettanomyces. This yeast imparts the wet-horse-blanket aroma to lambics.
The bottom line is that all these microbes are bad news for brewing regular beer. It’s the brewing equivalent of introducing a population of toxic, food spoilage bacteria into your kitchen. As with cooking, these bacteria can be carried from a batch of lambic to a batch of regular beer. One way to avoid this cross-contamination is to use only certain pieces of equipment for certain tasks, the way a cook might have separate cutting boards for raw and cooked meats. This preventive measure keeps kitchenware that has not been cleaned properly from carrying bacteria from raw to cooked meat. The same rule is not usually applied to utensils like cutting knives, because they are easier to clean. This philosophy can also be applied to brewing equipment.
In general, glass and metal (usually stainless steel) utensils are smooth and hard and should not have crevices that make cleaning difficult. These tools can be used for lambics and for regular beers if they are designed for thorough cleaning. For example, a stainless steel fermenter with a threaded fitting is a poor design with respect to cleaning. Racking canes, hoses, tubes, plastic fermenters, and other soft materials also fall into the cutting board category. I would recommend having separate soft tools for lambic brewing to help prevent cross-contamination.
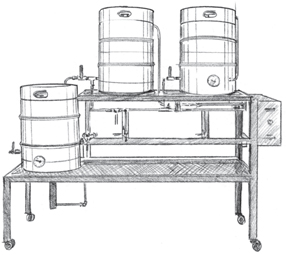
SABCO’s Brew-Magic RIMS
Q How exactly does a RIMS (recirculated infusion mash system) work differently than a regular three-vessel system?
A The recirculating infusion mash system is a cleverly designed assembly that allows the homebrewer to use the temperature profile or step–infusion mash method without having a heated mash tun. Most RIM systems have a mash tun, a brew kettle, and a hot-water pot used to heat the mash and sparge water. The only vessel that is unique is the mash tun. At first glance, it looks like a normal mash tun made from a stainless steel pot or old keg, but closer examination will reveal a pump and a heater. These two elements are the heart of the RIM system.
Mashing begins normally in the RIM system, but usually at a lower temperature because the mash is later heated. When the first temperature rest is complete, the recirculating and heating begins. Basically, wort is pumped from beneath the mash tun false bottom, through an in-line heating element, and on top of the mash bed. This process is continued until the wort entering the pump equals the temperature of the next step of the mash profile.
Some fancy RIM systems have little programmable logic controllers (PLCs) that will automatically run the mash profile, whereas the simpler (and more affordable) systems are manually operated. The in-line heater uses the principle of external heat transfer. Many large breweries use external heaters for wort boiling because these heaters can be cheaper to install than internal wort boilers. They also operate with more energy efficiency, and are more easily cleaned (the cleaning solution is pumped through the heater) than their internal heater cousins. RIM systems are essentially small-scale adaptations of large, industrial, external vessel heaters.
Q I have been looking for information on how to calculate the volume of exhaust and makeup air required for a 200,000 BTU natural gas ring burner. How can I figure this out?
A Safety and brewing is a topic near and dear to my heart. No matter how much fun the hobby of home-brewing is, one cannot forget that some of the brewing procedures done at home can be dangerous. And firing up a 200,000 BTU/hr burner in the comfort of one’s living quarters qualifies as a legitimate safety concern. My local building codes require 1 standard cubic foot per minute (scfm) of airflow per 2,400 BTU/hr of burner capacity. Based on this guideline, your whopper of a burner requires 80 scfm of makeup air. Fortunately, most high-end kitchen exhaust fans I checked into supply this sort of air volume.
The key fact to keep in mind is that fresh air must be supplied to the room where your burner is located. In the brewery where I work, we have a large louver panel that opens when our 2,000,000 BTU/hr boiler flame is on. This means that when the flame is burning, we have makeup air flowing into the boiler room, and the combustion gases from the boiler exit the space through a chimney. Makeup requirement is something that the burner manufacturers provide; I suggest that you call the supplier of your burner to determine the recommended scfm required for your unit.
Speaking of your unit . . . it’s a monster! Your 200,000 BTU/hr flame-thrower is one tenth the size of the boiler that simultaneously heats our 1,000-gallon hot-water tank and powers our 500-gallon kettle’s peak demand. Either you have a huge brew kettle or plenty of horsepower under the hood. Good luck and stay safe!