
Q What is the difference between primary fermentation and secondary fermentation?
A Primary fermentation occurs when yeast is added to aerated wort and ends when the change in beer specific gravity either dramatically slows or stops. After primary fermentation, most brewers, using carboys and other fermenter types without bottom cones, transfer the beer to another fermenter, usually called the secondary fermenter. The aging period taking place in this vessel is typically called secondary fermentation.
Commercial brewers do not use these definitions because they really don’t make much sense. Some brewers add krausen beer or fermenting wort that is in the peak of fermentation to beer that has completed primary fermentation. Although this process is simply called krausening, it is a type of secondary fermentation because more fermentables are added to fermented beer.
Other brewers add yeast and sugar to beer that has completely fermented and immediately package. Some commercial brewers simply call this process bottle conditioning, while others use the term secondary fermentation or refermentation. This language makes sense because the beer really is going through a second fermentation because of the addition of priming sugar.
Brewing terminology varies by brewer or brewery, and I try not to get caught in bickering over semantics. It is helpful to know that a term, such as secondary fermentation, does not mean the same thing to all brewers.
Q What temperature should the wort be before I add yeast?
A I prefer cooling my wort to my target fermentation temperature or a degree or two less and aerating it before adding yeast. This makes fermentation temperature control easier, because all you need to worry about is dissipating the heat produced by fermentation. This process is easy to do in small fermenters. If you start out too warm, you may have a hard time getting the fermentation down to the temperature range you want without doing more than relying on air to cool the fermenter.
This is really straightforward advice, but it does require one important item: a wort cooler capable of cooling the wort down to your target temperature. Both immersion and counterflow coolers can do the job, provided that they are sized appropriately and that the cooling water flowing through the chiller is at least 5°F (3°C) cooler than the desired wort temperature.

Q What is the best way to siphon or rack beer between my primary and secondary fermenters?
A The proper tool for siphoning from primary fermenter to secondary is a racking cane. This device has a rigid tube usually made from PVC or acrylic. A tip on one end holds the tube off the bottom of the fermenter to get the suction of the tube above the yeast sediment. A flexible hose on the other end is attached to the secondary fermenter after priming.
The easiest way to start a siphon is by sucking on the flexible hose until beer is below the level in the primary, then quickly placing the hose into the secondary. This method works, but it is pretty crude. If you mouth-siphon, I suggest using a removable implement, such as a turkey baster minus the rubber ball, so that you are not putting your mouth on the siphon tube.
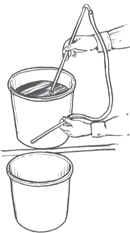
Racking cane
Another reliable method is to fill the racking cane and hose with water and start the siphon with a primed hose. This method is difficult to describe and takes a bit of practice, but is my preferred method of starting a siphon. If you don’t want the water in your beer, you can easily collect the water in a small container, stop the siphon by pinching the hose, and then resuming the siphon after the hose has been placed into the secondary.
Some clever siphon starters available from homebrew supply houses make siphoning easy. Some have check valves or plungers to prime the siphon and others have sterile filters attached to a carboy cap that allow you to blow air through the filter and into the carboy to start the siphon.
Q My yeast is foaming up through the airlock like mad? Is it contaminated?
A It sounds like you are witnessing a normal fermentation! The foamy ferments are most likely not contaminated by bacteria during the foam-over. Foam, or krausen volume, is a function of several variables. The two most important are yeast strain and the pitching rate of viable and vital yeast. In my experience, weizen and wit beer strains of yeast take the grand prize when it comes to krausen volume. Normal ale and lager strains seem to have krausen volumes that are comparable to each other. In general, increased pitching rate results in a more aggressive fermentation with more krausen. The caveat to this statement is that the yeast pitched must be viable (alive) and vital (healthy).
Commercial brewers anticipate an aggressive fermentation because they really want to use healthy yeast and pitch enough to get a rapid fermentation. They want a rapid fermentation, in part, to minimize the time taken for primary fermentation — after all, time is money. But more importantly, rapid and aggressive fermentation is one of the best ways to reduce the risk of contamination during fermentation. A good pitching rate when using yeast harvested from a previous fermentation is about 250 mL (8.5 oz.) of thick yeast slurry per gallon (3.8 L) batch.
A slow, pathetic fermentation takes several days for pH reduction and for alcohol levels to rise. Alcohol and lower pH are two keys to suppressing the growth of bacterial invaders, especially during the early stages of fermentation. Excessive foaming and a big mess in the airlock can certainly cause problems if environmental contaminants begin to grow and make their way into the fermenter.
Another serious problem that can occur with blowoff is that the airlock becomes plugged and blows off the fermenter like a rocket or the fermenter breaks, for example, if a carboy is used. I personally do not like to see bubbler-style airlocks on fermenters during rapid fermentation. A better device is a large tube with an outside diameter that is the same as the inside diameter of the carboy opening. Make the hose long enough to place the loose end in a small bucket of water, and you now have a larger version of an airlock. This style of airlock is much less likely to become clogged, and if foam does blow off from the fermentation, you can replace the bucket of foamy water without having to remove the airlock.
Another way to minimize blowoff is to use a larger carboy or to make a smaller batch. I would rather make as much beer as I can get out of my kettle and buy a fermenter large enough to handle the volume versus allowing my fermenter to dictate my batch size. A foamy fermentation can be a very healthy sign of good beer to come!
Q Will a slightly higher fermentation temperature ruin my brew?
A High fermentation temperature alone won’t ruin a beer. Temperature does play a crucial role in flavors generated from yeast during fermentation. As temperature increases, fermentation rate accelerates; with this faster fermentation come more aromatic compounds. The aromas arise because the metabolic rate is going along at such a clip that more metabolic intermediates are excreted from the yeast cell. I liken this to people getting stinky and sweaty during vigorous exercise.
Fruity is the most common type of aroma associated with warmer fermentations. This generic term includes aromas reminiscent of banana, pineapple, and pear, which belong to a class of compounds called esters. Some esters, like ethyl acetate, smell like solvent (ethyl acetate is used in acetone-free fingernail polish remover). I don’t mind fruity beers, but I hate smelling fingernail polish remover when trying to enjoy a pint.
Warm fermentation also increases the concentration of higher alcohols. Higher alcohols, a class of compounds, are known for their spicy, vinous aroma and the propensity to cause headaches. Strong beers normally have detectable levels of higher alcohols, but normal gravity beers, like the one you brewed, shouldn’t have a detectable level.
If you discover after bottling and aging that your beer smells fruity, solventy, and vinous, the warmer fermentation is probably the culprit.
Q After 8 days of primary fermentation, I went to rack my beer into a carboy. But, when I opened the bucket for this brew, the beer was busily foaming away. Why was this batch fermenting so slowly?
A I am forced into an unavoidable tangent about the length of fermentation before answering this question. I have yet to figure out why so many recipes for beer include a time period for fermentation. The duration of a brewery fermentation is somewhat dependent on the wort’s original gravity and hence a particular recipe. But the most important factors about the duration are the concentration, viability, and vitality of the yeast, the temperature of fermentation, the level of wort oxygenation, and the amount of certain key nutrients, such as zinc. Even breweries with very tight control over every step of the process experience variations in fermentation. I am a firm believer in the “let the fermentation go to completion” method of brewing.
In this particular case, I don’t agree that your yeast was behaving oddly simply because it was still fermenting after 8 days. Suppose you underpitched the yeast, a very common occurrence. I would not be surprised at all if the fermentation took longer to begin and end than expected. Or maybe the wort was cooled to 60°F (15°C) instead of 70°F (21°C) and your house temperature was cool due to the time of year; under these circumstances, I would expect a slower fermentation.
What I recommend for all brewers is to rack the beer only after the goals of primary fermentation have been achieved. If the goal is to ferment to completion, then racking should only occur after the beer’s specific gravity is stable or the fermentation is visibly complete. The yeast head thins and usually sinks into the beer as fermentation ends. A foam-free surface is a very good visual indicator that fermentation is complete. Nonetheless, I strongly suggest verifying this observation with a hydrometer. In fermenting some beers, such as lagers that depend on secondary fermentation for carbonation, the beer must be racked before terminal gravity is reached. In both examples, the beer is not racked until the goals of primary fermentation are complete. Don’t worry too much about fermentations that seem to move a little slower or a little faster than expected. As long as the fermentation finishes in an acceptable range of time, you’re probably fine. I get concerned when a fermentation starts very slowly and lasts longer than about 2 weeks.
Q What would cause my last few beers from not fermenting all the way to the final gravity the recipe calls for? What factors influence fermentation?
A The final gravity of a beer is an important number to hit. Bottle a beer with residual fermentables, and you are likely to end up with over-carbonated beer and perhaps even bottle grenades. The beer is also likely to taste worty and oversweet. But how do you know where a beer should stop fermenting?
Wort fermentability refers to the percentage of fermentable sugars in wort. Table sugar, unlike wort, contains no unfermentable sugar and is 100 percent fermentable. Wort fermentability typically ranges between 65 and 85 percent. Fermentability depends on three principal variables of the mash: grain types, mash temperature, and mash time.
There is a rather broad range when you look at the finish gravity of beers at the lower and upper ends. For example, a 12° Plato wort (1.048 SG) that is 65 percent fermentable finishes at 4.2° Plato (1.017 SG) compared to 1.8° Plato (1.007 SG) when the fermentability increases to 85 percent. (By the way, I am referring to apparent fermentability gauged using a hydrometer.)
When extracts are used for brewing, you really don’t know how they were made and cannot predict the fermentability of the wort, until you experiment with different brands of extract. Brewers who mash can look at a few key variables to predict how their wort should ferment. Worts with a lot of unfermentable sugars typically contain a high percentage of special malts (like crystal malts) and are made using a single temperature mash from 155 to 158°F (68–70°C). Highly fermentable worts usually contain little or no special malts and are made using multitemperature mashes with extended steps in the temperature range from 140 to 150°F (60–65°C). This is how dry beers (remember Bud Dry and Asahi Super Dry?) and some light beers are made.
One easy method of assessing the fermentability of a wort sample is running a forced fermentation. To do this, take a sample of wort from a batch, pitch a healthy dose of yeast (at double the normal rate), and proceed with a quick, warm fermentation. Most brewers who rely on this method put a magnetic stir bar in a flask and speed things up by using a stir plate to continuously stir the fermentation. At home, you can swirl the fermenter periodically. When signs of fermentation end, measure the finish gravity and you have an indicator of where your actual fermentation should end.
Let’s assume your test shows that the wort has a low fermentability. Extract brewers don’t have much of an alternative other than choosing a different extract. The companies that make extracts make wort the same as all-grain brewers, so the factors affecting fermentability hold true for both. Talk to your local homebrew store about their selection of extracts with respect to fermentability before purchasing.
Or your forced fermentation indicates a high fermentability, but the actual fermentation fails to finish properly. This test result would indicate a problem with the fermentation itself. My guess is that the root cause of your problem falls in this category. Factors such as wort aeration, yeast pitching rate, yeast health (viability and vitality), and yeast strain (flocculation and attenuation traits) dramatically affect the properties of fermentation. In my experience, a normal ale fermentation ferments to completion in 3 to 5 days. Sometimes fermentations that seem slow and lack vigor do not make it to the finish. The key factors are having enough healthy yeast to handle the task and properly aerating your wort. Meeting these needs should set the stage for a strong fermentation.
(See forced fermentation, page 229.)
Q How can I unstick my stuck fermentation?
A The most common cause of a good fermentation that suddenly slows, is poor wort aeration and/or underpitching. A stuck fermentation ferments for several days but the final gravity gets stuck at a higher level than the true final gravity of the wort. The only way to properly diagnose a stuck fermentation is to run a forced fermentation, during which the wort is overpitched and fermented warm. At the end of the forced fermentation, you measure the final gravity and use this number as a benchmark. Though effective, this is not a practical method for homebrewers.
Stuck fermentations are frequently caused by yeast that prematurely flocculate. In most cases, the yeast have been overused and are beginning to lose some of their basic properties. Another possible cause could be nutrient deficiency in the wort (especially low levels of zinc).
Some brewers will try to rouse a stuck fermentation by racking it, or they may krausen the beer to try to get it to the proper final gravity. Krausening involves adding a small amount of new fermenting wort to a fully fermented lagering to create a secondary fermentation.
If you think that you underpitched, review your pitching methods. A rule of thumb is 1 cup (237 mL) of thick yeast harvested from a fermenter or 1 quart (.95 L) propagation per every 5 gallons (19 L) of wort. If you simply follow this advice, your future fermentations should almost always go off without a hitch.
Q Is it ever good to add oxygen once fermentation has started?
A I would never aerate beer during fermentation, but this answer would be incomplete if Yorkshire stone squares were not mentioned. Yorkshire stone squares are a type of fermenter developed in Yorkshire, England. A Yorkshire square is an open fermenter with two chambers separated by a deck and connected with some tubes. The center of the deck has an opening that flares upward to allow the fermenting beer to spill up onto the deck.
One key feature of a square is a recirculation device that pumps the beer from the lower chamber and sprays it through a device resembling a showerhead onto the shallow deck that separates the upper from the lower chamber. The beer in the upper chamber flows back into the lower chamber through tubes called organ pipes. Yorkshire squares sound really strange when described — it is no surprise they were invented in merry old England. The pump-over simultaneously rouses and aerates the fermentation. This method of rousing was apparently developed to deal with brewing yeasts that are very flocculent and demand lots of oxygen. The technique works for the brewers who use it, and they make some really nice beers. One of the side effects of aerating a fermentation is abnormally high levels of diacetyl; that’s a trait of beers fermented this way.
If all else fails, aerating your beer during fermentation will not be the end of the world. You may even be pleasantly surprised with the resulting beer!
Q I’ve currently got a Belgian white in my primary, and it’s still got a pretty vigorous fermentation after 7 days. Would transferring now be a good idea, or should I wait for the primary fermentation to settle more?
A The main reason to rack the beer from primary to secondary is to reduce the yeast load for aging. This is not absolutely necessary, but it does help reduce autolysis if the beer is aged in the fermenter for several weeks prior to bottling. This method is still widely practiced by commercial brewers, but it is gradually being replaced by the uni-tank method of fermentation in which beer is fermented and aged in cylindrical tanks with conical bottoms that permit removal of yeast without racking. If the beer is still fermenting when you rack it into the secondary, you will carry more yeast over than if you wait until fermentation is substantially finished and the yeast has had a chance to flocculate. It certainly will not hurt the beer to rack it before it is completely finished . . . but if the point is to get it off the yeast, you don’t want to rack it too soon.
Doing gravity checks at home can be viewed in a negative light, because each sample is equal to about a half bottle of beer and each time the fermenter is breached with a sampling device you risk contamination. I firmly believe that the pros of sampling far outweigh the cons and like to check my fermentation for completeness. If you don’t test it, you really don’t know if it fermented properly until it is too late. I take several samples during fermentation to track the progress. This practice gives me a chance to take a corrective measure — adding more yeast, for example, if things are not going as planned. It also produces a sample to taste. If something really bad happens early that results in a bad batch, I prefer to jump ship then instead of spending any more time than necessary on a lost cause. My advice is to test it, taste it, and rack it when the time is right!
Q What is a forced fermentation?
A A forced fermentation reaches completion faster than the normal batch of beer (made from the same wort and yeast), so that a final gravity value can be obtained for that particular combination of wort and yeast — the two factors affecting the final gravity. The main difference between a forced fermentation and a regular fermentation is that a forced fermentation has a higher yeast density, a higher temperature, and a smaller sample size; it is frequently stirred to accelerate things even more. The reasons for the higher pitching rate and stirring are not only to accelerate the fermentation, but also to prevent the fermentation from hanging or failing to reach completion.
Forced fermentation is akin to reading the end of a novel before the bits in between. Knowing the terminal gravity ahead of the normal fermentation comes in handy when trying to decide whether it’s time to rack the barleywine when it stops bubbling at 1.020 SG. This method might not be the highest-tech method in the world but it works, and many brewers rely on forced fermentations to predict the final gravity of a brew. In fact, many professional brewers who use this method will perform a forced fermentation on every wort produced in the brewhouse.
The most important point to remember is that sanitation is as important here as in the normal batch, even though the beer is not mixed with the good stuff. The reason for the sanitation is that certain yeasts and bacteria are capable of overattenuation, or giving a lower final gravity than the normal, or uncontaminated, lot. If this happens in the test batch, then results are not representative of the larger batch — unless, of course, both lots are contaminated.
Q Does fermentation activity cause increased temperature inside my fermenter? I’ve noticed it seems higher than my room temperature. Do I need to compensate for this difference if it exists?
A An active fermentation does create an appreciable amount of heat energy. In small fermenters where the ambient air temperature is used for cooling, an increase in fermentation temperature is present as the brew goes into active fermentation. Most brewers compensate for this difference by setting the room temperature a little cooler than the desired fermentation temperature. If you are brewing an ale and you want to keep the beer around 70°F (21°C) during fermentation, you may choose to cool the wort to 68°F (20°C) and set your room temperature at 66°F (19°C). If you have healthy yeast, chances are that fermentation begins before your wort temperature drops down to the ambient temperature. As fermentation proceeds toward completion, the temperature will begin to fall, eventually equalizing with the ambient temperature.
Q My last two 5-gallon (19 L) batches of beer seemed to ferment to completion in about 3 days. I am worried about the effects of such a fast fermentation. Is this going to significantly affect the taste of the beer?
A I will assume that this 3-day fermentation was an ale and not a lager. In commercial brewing, ale fermentations often finish in 3 days, and many popular domestic microbrews ferment just as quickly.
One possible side effect of a very fast primary fermentation is the temptation to skip over the diacetyl rest and jam the beer into cold storage for clarification purposes, then fill it into bottles or a keg too quickly. The diacetyl rest, a 2-day hold at fermentation temperatures before going into cold storage, allows diacetyl precursors secreted by yeast during fermentation to convert to diacetyl. This process takes time and occurs more quickly at warm temperatures as opposed to cool ones. After the diacetyl rest the yeast can absorb diacetyl and turn it into compounds that have much higher flavor thresholds (difficult to smell) than diacetyl and do not smell like butter.
If the diacetyl rest is skipped and the beer is bottled with diacetyl precursors present, the precursors will begin turning into diacetyl (especially if the beer is stored warm) and will stay in the beer if no yeast is present to reabsorb it. (See fast fermentation, page 228, and diacetyl, page 331.)
Q I dry hopped with hop pellets in my secondary fermenter, and it looked like lots of bubbles were slowly coming out of the muslin bag and filling my airlock. Were the hops causing another fermentation, or were they simply rehydrating?
A I once was a bubble watcher, too, but no longer. Tracking the course of fermentation without using a hydrometer is like hiking without a map; you may end up in the right spot, but a map makes things a whole lot easier. And without taking gravity checks toward the end of fermentation, you don’t really know if fermentation is complete. In my experience at the brewery where I work, ale fermentations quickly drop to near-completion and then slowly cruise into their finish gravities over several days.
Let’s assume this fermentation was indeed complete. My guess is that the hops you added were packed into the muslin bag a bit too tight and did not immediately hydrate. I assume they were packed in tightly because the bag had to be small enough to fit through the small hole in the carboy. The gas you observed was likely caused by a combination of slow hydration and the hops acting as nucleation sites for gas breakout. Even in finished beer stored at atmospheric pressure, dissolved carbon dioxide is present. Slight increases in temperature will drive the carbon dioxide out of the beer until equilibrium is reestablished.
Personally, I do not see the need to place hops for dry hopping in a muslin bag. When using pellet or whole hops, it is OK to put the hops into the secondary fermenter and to simply rack the beer onto the hops. Once the beer has been racked into the bottling bucket, you can easily remove the spent hops from the secondary. If you choose not to use a hop bag, you probably will find a nylon stocking tied to the end of your racking cane handy. The nylon will prevent hop particles from being siphoned to the bottling bucket. The key with dry hopping is to allow the hops to fully hydrate and not be restrained after they swell up — this would be less effective. My suggestion for future dry-hop trials is to eliminate the muslin bag. (See dry hopping, page 143.)
Q Will the lack of krausen removal have a major effect on the flavor of my beer?
A The topic of krausen removal is not discussed much in commercial brewing circles because most modern fermenters are not designed to remove krausen. And frequently, blowover creates an unwanted mess in the brewery. This is not to say that krausen removal has no effect on beer flavor. Some brewers firmly believe that krausen removal helps smooth out the flavor of beer. Anheuser-Busch has specially designed fermenters that remove the braun hefe (brown yeast) from beer during fermentation. The braun hefe is the trub-yeast-scum that floats on top of beer during fermentation. Many other brewers in the world have their own special way of removing braun hefe during fermentation. Every brewer should taste braun hefe just for grins; most of us will agree that it doesn’t taste all that good. This is one of the reasons that traditional methods of fermentation involved skimming.
It sounds like you removed the braun hefe by relying on an active and aggressive fermentation to blow it out of your fermenter. This method works well to push the brown crud out of your fermenter, but I doubt that it has a drastic effect on beer flavor. I think skimming is one of many techniques that are used to make subtle changes to beer flavor.
Most commercial brewers have gone to uni-tank fermenters since the late ’80s. Beer is fermented — usually without “blowing over” — and aged in the same vessel. During this time, the krausen rises and falls, yeast cells grow and flocculate, and the beer goes from wort to aged beer. It makes a brewer wonder how many subtleties have disappeared because of this method of fermentation.
Q I brewed an Imperial Stout, and after the primary fermentation was complete, probably a month ago, I racked the stout into the secondary. I got busy, and there it remains. The airlock is still in place, and there are still small bubbles rising to the top. Will I need to do anything different from the normal priming and bottling?
A Many beers, especially big beers such as Imperial Stouts, mellow with extended aging in the secondary fermenter. It is usually best to place the secondary in a cool place for extended aging to prevent excessive yeast autolysis and to stunt the growth of bacteria that may be slowly growing and contributing funky flavors to your beer.
Your beer has only been around for a month, so it probably is still OK, but take a sample of the beer and taste it. If it tastes like good beer, then continue to the next step and don’t worry too much. Depending on the type of yeast you used and the room temperature, the beer may have very little yeast left in suspension. Visual inspection in a very thin glass will show how much yeast is suspended in the beer. Another point to keep in mind is that the yeast in solution may not be in great health. If the beer seems extremely clear or if you feel the yeast may be cranky, you may want to add some yeast to ensure proper carbonation.
The actual amount of yeast required for conditioning is extremely small, about one-tenth the amount required for pitching. Although I recommend using liquid yeast for pitching wort when possible, dry yeast works very well for bottle conditioning. Let’s face it, all you really want the yeast to do is to cough out a little carbon dioxide and then sink to the bottom and keep quiet! As long as you choose a brewing-quality dry yeast, you’ll be fine.
When using dry yeast, it is always best to hydrate the yeast in boiled and cooled water before use. The easiest way to measure out a very small quantity of yeast into your bottling carboy is to hydrate a whole pack of brewing yeast in a known volume of water: 8 ounces (237 mL) works well. Then use about 1 ounce (about 2 tablespoons/30 mL) of the slurry per 5 gallons (19 L) of beer for conditioning purposes. If you decide to do this to ensure proper carbonation, be sure to mix the yeast slurry and priming sugars evenly in the beer prior to bottling. If the beer still tastes good on bottling day, your unintentional neglect shouldn’t cause any future problems. (See high-gravity fermentations, page 405.)
Q I just switched over to brewing lagers from ales, and I am noticing the yeast is taking a long time to start up compared with my ale batches. Could I be doing something wrong?
A The lag between pitching yeast and the onset of vigorous fermentation is determined by pitching rate, wort aeration, and wort temperature. When seasoned ale brewers brew lagers, they often make the mistake of simply switching yeast strains and fermentation temperature.
In my experience, lagers ferment much better when a higher pitching rate is used. For example, many commercial ale brewers use between 5 and 10 million yeast cells per milliliter of wort, while some lager brewers typically use between 15 and 20 million yeast cells per milliliter of wort. Home-brewers do not usually count yeast cells like commercial brewers, but given the same type of yeast-slurry thickness, you would need to double or triple your pitching volume to get these results. It is my experience that many brewers add insufficient amounts of yeast. Your description of the slow start sounds like a classic case of underpitching.
Wort aeration also has a dramatic influence on the length of the lag time because the yeast uses oxygen for growth. Low wort-oxygen levels translate to decreased yeast growth, lower peak-cell density in solution, and longer fermentation times. The best methods for aeration utilize some device to actively transfer oxygen into wort, such as an aeration stone. Simply splashing the wort as it enters the carboy is not as effective as an aeration stone, and relying on oxygen from the atmosphere to diffuse into the wort by briefly leaving the airlock off is the least effective method. If you are using the latter technique, your slow starts could certainly be due to poor aeration. Try a different method, then put the airlock on immediately to minimize the risk of contaminating your wort with airborne microorganisms.
Finally, there is the temperature variable. Some lager brewers like to add plenty of yeast, begin fermentation between 46 and 48°F (7–8°C) and allow the fermentation to rise to about 52°F (11°C). These brewers feel this method produces the cleanest lager flavor. Other brewers advocate beginning fermentation around 70°F (21°C) and cooling it down to around 52°F (11°C) after fermentation begins. This method compensates for lower cell densities by stimulating yeast growth. I have experimented with various methods and have found that some lager strains are more finicky than others and really don’t work well with cool starts. The lager strain I most frequently use is a German Pilsner strain. It works best for me if I use a healthy pitching rate and begin fermentation no cooler than 52°F (11°C). I typically see active signs of fermentation within a day of pitching, and primary fermentation is usually complete within 14 days.
Q When I lager, should I drop the temperature quickly or gradually?
A There are several different lagering practices used around the world. The world’s largest lager brewer, the one with the Eagle trademark, ferments its beer near 55°F (13°C) and holds its flagship brand at the same temperature for its 3-week krausen process. The idea behind this practice is that the yeasts still have work to do and cooling the beer to very cold temperatures will drastically slow their metabolic activity. Other brewers slowly cool the beer from around 50 to 32°F (10–0°C) over several days to allow the yeasts to finish their work and to start the beer’s clarification process. Other brewers quickly cool their beer from 50 to 32°F (10–0°C) under the “don’t waste time” philosophy.
One lagering method that is gaining in popularity, especially in Europe, is to warm the beer to 68°F (20°C) after fermentation for an accelerated diacetyl rest. After about 2 days, the beer is then chilled to 32°F (0°C) for lagering. In a commercial brewery, tanks are designed to cool beer, not heat it up, and this method requires special equipment. However, at home it is easy enough to carry a 5-gallon (19 L) carboy from one spot to another to change the beer’s temperature, so it’s easy to try this method at home. Commercial and home brewers use these methods of fermentation and lagering successfully to make good beer. The method of choice really depends on which one seems to work best for the individual brewer. When lagers are about 2° Plato (8–10 specific gravity points) higher than the terminal gravity, I suggest transferring to a soda keg and allowing the beer to naturally carbonate at 50°F (10°C) for 4 days. Then cool the beer to 39°F (4°C) for 10 days, and finally, cool the beer to 32°F (0°C) for 2 weeks.
Q What is the right temperature for a diacetyl rest?
A There is no right temperature at which to do a diacetyl rest, the process of allowing the beer to remain on the yeast after fermentation finishes to reduce diacetyl and the buttery flavors it causes. Ale brewers use a warm temperature (65–75°F/18–24°C), and some lager brewers use their primary fermentation temperature. Others warm the beer up to ale temperatures, and some high-tech, chemical engineer–brewer hybrid types heat the beer to pasteurization temperatures and pass it over an immobilized yeast column to reduce diacetyl in only a couple of hours. The most helpful thing I can do to help answer your question is to go over some facts about the rise and fall of diacetyl in beer:
 Yeast cells do not produce diacetyl but the precursor of diacetyl called alpha-acetolactate. This compound is secreted from the yeast cell and is converted into diacetyl in beer through a chemical oxidation reaction. The conversion of alpha-acetolactate to diacetyl can be catalyzed by numerous oxidizing compounds, including oxygen, iron, and copper.
Yeast can reduce diacetyl only if the alpha-acetolactate has had an opportunity to convert to diacetyl. Higher temperature diacetyl rests speed aging because the conversion rate of alpha-acetolactate to diacetyl increases with temperature.
Yeast will reduce diacetyl only if the yeast cells are alive, kicking, and have access to diacetyl (beer). Yeast that is too flocculent often produces beer high in diacetyl, because by the time the diacetyl is ready to be reduced, the yeast is lying on the bottom of the fermenter. The need to increase yeast surface area during aging is one of the reasons a certain big brewery says it uses beech-wood chips.
Diacetyl also can come from bacterial contamination. Certain lactic acid bacteria that spoil beer have the ability to crank out enormous quantities of diacetyl. For example, the rich butter aroma found in many wines comes from an intentional bacterial malolactic fermentation usually accomplished by adding Leuconostoc oenos following primary fermentation. Yeast, especially lager yeast, is a common vector of lactic acid bacteria.
Diacetyl also can mysteriously appear in a beer following packaging if the beer still contains alpha-acetolactate. Remember that alpha-acetolactate converts to diacetyl when it is oxidized. Since bottling always incorporates some oxygen, beers that have been insufficiently aged at very cold temperatures may develop a nice diacetyl nose after bottling. This scent is a good sign that the diacetyl rest was unsuccessful.
When brewing lagers, I use a fairly specific temperature profile during fermentation. I ferment my lagers at 50°F (10°C) until the gravity reaches about 1.014 SG. At this point I transfer the beer to a keg for natural carbonation. The keg is held at 50°F (10°C) for 4 days, and the pressure is maintained at 15 psi. This gives me a naturally carbonated lager without the need for carbonating after aging. After this period, I cool the lager to 40°F (4°C) and hold it for 10 days. Finally, I cool my lagers to 32°F (0°C) and lager them for 3 to 4 weeks. This method works for me, but as I said, there is more than one way to age a lager!
Q What is the best way to approximate your final gravity when developing a recipe?
A Predicting the final gravity of a brew is very difficult for numerous reasons. Yeast strain, yeast health, pitching rate, fermentation procedure, wort aeration, mashing, the type of malts used, and the concentration of minerals (especially zinc), all affect wort attenuation. Yeast has a large influence on attenuation; suppliers cite typical attenuation rates for the strains they sell.
If all variables relating to yeast (health, pitching rate, aeration, fermentation procedure, wort aeration, and zinc concentration) are held constant, the final gravity of beer can easily be changed by altering the mash profile. Holding constant all variables relating to yeast is a monumental task, but it is possible! In general, lower mash temperatures (140–150°F/60–65°C) produce more fermentable worts than high mash temperatures (155–160°F/68–71°C). Conversely, higher mash temperatures give better extract yields, because of increased temperature and alpha-amylase activity. Certain grains also affect final gravity. Crystal malts are well known for increasing the final gravity, and starch adjuncts, like rice and corn, can decrease final gravity. Simple sugars (like white sugar, brown sugar, and Belgian candi sugar) are the most fermentable ingredients and are used by some brewers to boost the alcohol content of beer without increasing the final gravity.
There is no master calculation that can account for all of these variables to predict final gravity. The brewers who are really concerned about hitting their final gravities are the big guys. They make the same beer day in and day out and are able to focus their attention on key variables. Their yeast is consistent; they are not experimenting with new raw materials. These brewers can adjust their mash profile to gain sufficient control over their final gravity. Some add zinc to wort in the brewhouse; small changes in concentration have a pronounced effect on yeast performance.
In my opinion, the brewer can best affect final gravity during wort production. During fermentation, we can change the temperature of the beer or cause the fermentation to prematurely stop by cooling it, but this method is riddled with flaws. Yeast strain can also be changed, based on the attenuation rate and the type of beer being brewed. Although yeast strain does influence final gravity, you can’t really predict yeast performance based upon typical attenuation ranges because the strain is influenced by too many environmental factors.
You have asked one of those questions that simply do not have a precise answer. In a sense, brewers set the stage and the yeasts take it from there. We can augment the grain bill, tweak the mash temperature, adjust wort aeration rates, add yeast nutrients, and play with pitching rates. After that, the fermentation takes over, and we become observers to a fascinating process.
Q I prefer brewing German-style lagers. Although my beginning gravity is always close, my final is always two or three points higher than desired. When racking into the secondary, could I be leaving too much bottom-feeding yeast in the primary?
A This problem is familiar, as I have struggled through developing a method to ensure that my own lagers finish around my target final gravity. I used to judge when to transition from the primary to secondary based upon fermentation activity and then allow the beer to stay in the secondary for a set number of days at the same temperature, usually around 50°F (10°C). Then I would gradually cool the beer down to 32°F (0°C) for lagering. I have found that lagers finish higher than desired because fermentation was cut short by premature cooling to temperatures below 38°F (4°C) — at that point, lager yeast typically stops fermenting. Lager fermentations behave differently than ale fermentations as they near completion. Ales usually transition from the original gravity to the final gravity in a rapid fashion — 3 to 5 days is normal for worts in the 12 to 14° Plato (1.048–1.056 OG) neighborhood. Lagers on the other hand, will drop within 1 to 2° Plato (4–8 gravity points) in the first 5 to 7 days of fermentation and then slowly drop to the final target gravity. This period can last as long as 2 weeks.
The method I currently use is based upon “go, no-go” points commonly found in quality control programs that larger breweries use. The idea is simple, even though developing a program takes time and implementing that program requires diligence. I had lagers that were finishing all over the place, and I could detect obvious flavor differences between batches of the same recipe. This is not a good thing! To tighten the process a bit, I established target points that had to be met during fermentation and before the next step could begin.
The method I have developed to ferment most lagers has five steps:
1. Ferment at 54°F (12°C) until gravity is within 1.0–1.5° Plato of the finish gravity.
2. Spund the fermenter (a special valve that releases pressure at a defined point is made for spunding) and allow the beer to carbonate naturally.
3. Cool the beer to 38°F (4°C) 6 days after spunding, only if the beer has reached the target finish gravity. The beer is then held at 38°F (4°C) for 10 days.
4. Cool the beer to 32°F (0°C) and hold for at least 7 days.
5. Filter the beer and transfer to the serving tank.
I use this procedure to produce 1-month lagers (a typical duration for fermentation and aging in commercial breweries). When I brew stronger lagers like doppelbock, I extend the fermentation and cold-aging steps. The key is meeting the goal of each step before proceeding to the next. For steps 1 and 3, take a gravity sample to verify the goal. Time and temperature parameters mark completion in steps 3 and 4. The methodology is quite simple.
Frequently, recipes include vague terms, because a recipe, by nature, is only a road map that describes how one brewer made a batch using certain ingredients and pieces of equipment. Some recipes lay down times like lines in the sand. For example, “ferment for 7 days, rack to the secondary, and hold for 3 weeks before bottling.” This type of instruction is great for describing the overall process but should not be used as action items on a calendar. They are not qualified with goals that can be measured. My simple yet effective monitoring method has given me lagers much more consistent in finish gravity.
The other extremely important thing with brewing lagers is yeast. Whenever I have flavor problems or lagging fermentations, the first thing I turn to is the yeast. Questions about age, pitching rate, adequate wort aeration, and propagation steps are all important to address when dealing with lagging fermentations. I don’t offer too many guarantees with my advice, but I will offer this tidbit: Lager fermentations almost always lag at the end if your brew is underpitched. Since pitching rate refers to the number of living cells added to wort, underpitching can be a result of yeast viability or simply not adding enough cells.
I’ll offer another assurance with respect to finish gravity and other beer specifications. Recipes give a laundry list of ingredients, procedures, and all sorts of numerical specifications that will be met at each step. The fact is, these numbers can only realistically be met if you take the time to tweak the recipe. Parameters such as wort fermentability can rarely be replicated simply following a mashing profile in a recipe. To really hone in on these somewhat illusive targets, minor adjustments to the mash profile, mash thickness, water salts, and base malt type may be required. In other words, if you get close to a target cited in a recipe, you may have done everything well and have no problems to solve!
Q My fermenting lager smells like sulfur. Will it affect the taste of my beer?
A Welcome to the wonderful and often smelly world of lager brewing! The lore of lager brewing is steeped in glorious tales of storing large wooden barrels of beer in deep earthen cellars to slowly mature, patiently awaiting consumption. These stories may be romantic, and for the most part true, but the plain fact is that lager beers usually have a strong sulfur stench that only mellows with time. Like ale yeasts, many different lager strains exist, and they each have their own character. It is safe to say, however, that most lager yeast strains produce more sulfur aromas compared with ale yeast. These stinky smells usually begin to blossom after the first 2 or 3 days of fermentation and slowly mellow from that point.
Unlike some beer flavors, such as the buttery diacetyl and the green applelike acetaldehyde, that mellow with time due to their uptake by yeast, sulfur aromas escape from the beer and pass into the atmosphere. This trait is why commercial breweries do not lager in a sealed container. Instead, they age lagers in aptly named lager vessels fitted with some type of constant pressure valve. These devices allow the brewer to carbonate the lager naturally by trapping a certain top pressure of carbon dioxide produced from fermentation, usually about 15 psi, and letting the excess carbon dioxide escape. The ability for the excess pressure to escape is critical because the vented carbon dioxide carries with it the volatile sulfur compounds produced during primary fermentation. In time, the sulfur smells will drop to an acceptable level.
Subtle sulfur aromas are a crucial part of the aroma profile of a good lager. Some factors that affect the amount and type of sulfur aromas. Pitching rate and wort original gravity play important roles in the amount of sulfur compounds produced during fermentation. Usually, lower pitching rates and/or high original gravity worts will produce more sulfur aromas.
Yeast nutrient levels also influence sulfur levels. Worts that are low in sulfur-containing amino acids, such as methionine, typically produce more sulfury aromas during fermentation. Nutrient-deficient worts are not normally encountered when brewing all-malt beers, but they are typically found when high percentages of nutrient-devoid adjuncts, such as rice and corn, are used. To combat this problem, many large-scale brewers add proprietary yeast nutrient blends to their fermentations.
When brewing lagers, a detectable amount of sulfur aromas will always be produced during fermentation. The key to controlling it is patience. If you are patient and the beer still smells too sulfury, then begin looking at other factors such as yeast strain, pitching rate, original gravity, and adjunct usage.
Q I can’t seem to get rid of diacetyl when I brew lagers. The problem is that I cannot taste the diacetyl in the green beer; I can detect it only after the lagering period. Is there any hope, or am I an ale drinker for the rest of my days?
A The first thing that comes to mind when contemplating diacetyl problems is yeast strain. Highly flocculent yeast strains are often associated with diacetyl problems, because the yeast drops out of solution before the diacetyl in the beer is reduced. The observation you make about detecting no diacetyl in the green beer before racking but picking it up after is important. I think you are picking up some oxygen during your racking step, and the oxygen converts diacetyl precursor (alpha-acetolactate) in the green beer into diacetyl during lagering.
Another possible cause is bacterial growth that occurs slowly and shows up later in the process. If you maintain effective sanitation practices and ferment with healthy yeast, this is probably not the problem.
Yet another possibility is that you detect the diacetyl only late in the process when some of the funky flavors associated with fermenting and young beer have mellowed; the diacetyl was present before you racked to lagering, but you were unable to taste it.
Let’s get back to the late-blooming diacetyl. It is quite common, and prematurely chilling the beer causes it. What happens is that diacetyl precursor remains in the beer after the yeast has been effectively knocked out by chilling. Any oxygen or oxidizing ions, like iron or copper, later convert the precursor to diacetyl; there will not be any yeast left to mop it up. Krausening is an effective technique to correct diacetyl problems associated with rushed fermentation; however, this technique cannot mend bacterial problems.
Most brewers who krausen add about 1 part krausen beer to 9 parts finished beer. The key to the method is an actively fermenting population of yeast. The high krausen stage of fermentation is the peak of excitement — for ales this occurs about 24 hours after pitching and for lagers about 48 to 72 hours after pitching (yeast health and pitching rate heavily influence both durations).
If you are going to take the time to save your buttery brew, spend a little time making a krausen beer. I would suggest making 2 quarts (about 2 L) of wort using dry malt extract and a sprinkle of hops to get the bitterness in the same ballpark as your troubled batch. If I were doing this, I would boil the wort for 30 to 60 minutes, transfer to a gallon jug, screw on the lid, and throw the jug in the fridge or in an ice bath to cool it down. Such a small volume will be easy to cool without a wort chiller. Once cooled to about 68°F (20°C), add your lager yeast and start the propagation. At this time, move your keg out of cold storage and allow it to warm up to around 60°F (15°C) in preparation for the yeast. Keep an eye on the progress of the starter. When it kicks into high gear (approaches high krausen), transfer this to your keg. Hold at 60°F (15°C) for 1 to 2 weeks and move it back into cold storage. You may want to rack before transferring back to the cold to remove the yeast added with the krausen beer.
(See diacetyl rest, page 240, and krausening, page 214.)
Q What would cause my lagers to taste more like ales?
A A warmish lager fermentation sometimes produces a fruitier lager than cooler temperatures, for example, 50°F (10°C). Many brewers use the practice of warming a lager after the primary fermentation is complete to accelerate diacetyl reduction; typically it has no affect on aroma compounds related to fermentation (as fermentation is complete when the temperature is increased). Yeast strain can also make a lager smell like an ale. Many lagers have a distinctive sulfur aroma and lack the fruity esters found in many ales — this aroma profile typifies lagers. This is not true of all lager strains and some have little sulfur in the nose and can be slightly fruity (to the point that they’re mistaken for ale). Anchor Steam is a lager fermented in the 65°F (18°C) range that is known for its alelike aroma. Ingredient selection is another factor that can confuse the yeast strain. For example, if you make a really hoppy wort with ale hops, such as Cascades, the finished beer may be so dominated by an aroma typically associated with ales that the yeast strain becomes a nonfactor. There are many commercially available stouts actually made using lager yeast. The typical consumer would never be the wiser because the dark grains and hopping dominate the flavor.
Q I was wondering whether or not you should 1) remove hops and 2) remove trub?
A I would advise hop and trub removal because that is how beer as we know it is made. Leaving the hops in the fermenter will have a different flavor effect, and leaving the trub in the wort will also affect flavor. Furthermore, if you plan to reuse the yeast, a practice I recommend for several reasons, trub separation is advisable because trub leaves a film on the surface of the yeast cell, leading to longer lag times in subsequent fermentations. Also, you have better chances of brewing a clear beer if you remove sediment when you can.
I view brewing as a continual process of extraction and purification. Wort production extracts sugars, colors, and flavors from grain and releases bittering compounds and a wide variety of aromas from the hops. Yeast processes fermentables into alcohol, carbon dioxide, and flavor compounds. Some flavor compounds, such as sulfur aromas, are vented from the beer, and others are retained for their pleasant aromatic properties. Clear beer is then separated from yeast solids, often by using a filter or some sort of yeast fining. Finally, our body extracts the alcohol out of the beer, and the whole process is brought full circle.
My philosophy is simple: When brewing beer, extract and purify when given the chance, especially if the action affects flavor positively. If removing something from the beer, for example yeast removal via filtration, is found to be detrimental to flavor, don’t remove it.
Q Is secondary fermentation really necessary? If the beer is done fermenting in 10 days, why not bottle and let the beer condition in the bottle? Some beer recipes actually state that secondary fermentation occurs in the bottle.
A Secondary fermentation is a loosely defined term used by both homebrewers and commercial brewers to describe several different changes that beer undergoes after its main fermentation. Most brewers would agree that a true secondary fermentation is used to naturally carbonate beer, to allow the beer to clarify naturally by sedimentation, and to allow the beer to mature in flavor. Classical examples of secondary fermentation include lagering, cask conditioning, and bottle conditioning.
In the true lager process, beer is transferred from the primary fermenter when some residual fermentable sugars remain. In the fermentation of a normal strength beer, a common point for the transfer is when the gravity has dropped to about 1.016 SG. In traditional lagering the beer is held in a closed vessel (the secondary) at cold temperatures for a period of 3 to 12 weeks. During this period, fermentation completes, the beer becomes carbonated, yeasts settle out of the beer (resulting in clarity), and green flavors (such as the buttery-smelling diacetyl and green-applelike acetaldehyde) left in the beer from primary fermentation mellow.
The krausen process is a variation of the lager process, except the beer is completely fermented during the primary fermentation, and actively fermenting beer, or krausen, is added as the beer is transferred to the aging tank.
Cask-conditioned ales are somewhat similar to krausened lagers, except priming sugar, usually corn sugar, is added to the completely fermented ale instead of actively fermenting wort. Also, cask-conditioned ales are usually dry hopped for aroma and have finings added to the cask to accelerate clarification. Like lagers, cask ales mature in flavor, carbonate, and clarify during their secondary fermentation. The process is much shorter, however, lasting several days versus several weeks.
The last example of a traditional beer using a secondary fermentation is bottle-conditioned beer. Usually, these beers are allowed to settle for some period prior to bottling to remove most of the yeast. When the time is right, the beer is transferred out of the fermenter, priming sugar is added, and the beer is packaged.
Some brewers actually filter the beer after fermentation and add yeast in addition to the priming sugar. The carbonation and flavor maturation then occurs in the bottle. So does natural clarification, when the bottle is left undisturbed.
All of these methods have three things in common: carbonation, flavor maturation, and clarification. Not all beers are made using these techniques. For example, many micro-breweries and brewpubs allow the beer to finish fermenting and then hold the beer at fermentation temperature for a couple of days for the diacetyl rest. This time allows for diacetyl that is left after fermentation to be absorbed by yeast and converted into a flavorless compound. After the diacetyl rest, the beer is quickly cooled, filtered, and carbonated.
Beer made using this method can be as tasty and satisfying as one made using a traditional method of secondary fermentation. Maturing flavor and settling yeast are the only differences during its short aging period. However, the beer is not clear, and it is not carbonated.
None of these methods is right or wrong; all can be used to make good beer. The method you are currently using is bottle conditioning, and it does involve a secondary fermentation. If you are happy with the results, stick with it. Personally, I like my bottled beers to contain very little yeast sediment and always allow the beer to settle for at least 1 week before bottling. Whether this is done in a separate carboy or in the same vessel the beer fermented in, the secondary fermentation still occurs in the bottle and the beer is clear, mature, and carbonated.