Understanding Remote Mail Options 399
Working with Message Headers 401
Selective Downloading for IMAP Accounts 404
Selective Downloading for POP3 Using Send/Receive Groups 405
LIKE earlier versions of Microsoft Outlook, Outlook 2010 includes a feature called remote mail that allows you to manage your email messages without downloading them from the server. Although you might not believe that you need yet another way to retrieve your messages, remote mail offers advantages that you’ll come to appreciate over time.
Originally, remote mail was primarily a feature for Microsoft Exchange Server, but the Remote Mail feature for Exchange Server is removed in Outlook 2010 and replaced by the functionality in Cached Exchange Mode. However, non–Exchange Server accounts can take advantage of similar capabilities (which, for the sake of simplicity, this chapter refers to generically as remote mail). For example, you can download just message headers to review your messages before downloading the message bodies and attachments.
This chapter focuses specifically on using remote mail features in Outlook 2010. It explains how to set up your system to use remote mail for Internet Message Access Protocol (IMAP) and POP3 accounts, how to manage your messages through remote mail, and how to use alternatives to remote mail, such as send/receive groups.
The primary advantage of using remote mail is the ability to work with the message headers of waiting messages without downloading the messages themselves. You can simply connect to the email server, download the headers for new messages, and disconnect. You can then take your time reviewing the message headers to decide which messages to download, which ones to delete without reading, and which ones to leave on the server to handle later. After you’ve made your decisions and marked the headers accordingly, you can connect again and download those messages you’ve marked to retrieve, either leaving the others on the server or deleting them.
Remote mail is extremely useful when you are pressed for time but have a message with a large attachment waiting on the server. You might want to retrieve only your most critical messages without spending the time or connect charges to download that message and its attachment. To accomplish this, you can connect with remote mail and select the messages that you want to download, leaving the one with the large attachment on the server until a less busy time when you can download it across the network or through a broadband Internet connection.
Remote mail is also useful when you discover a corrupt message in your mailbox, a message with a very large attachment, or a message that you suspect could be infected with a virus, and that message might otherwise prevent Outlook 2010 from downloading other messages. You can connect with remote mail, delete the offending message without downloading it, and then continue working normally.
Note
Remote mail works only for the Inbox with POP3 accounts; you can’t use it to synchronize other folders. As explained later in this chapter, IMAP offers more flexibility.
The Remote Mail features in Outlook are much onethe same for POP3 and IMAP accounts. However, there are a few differences in the results. For example, for a POP3 account, after you download a message header, Outlook will not download the message automatically if the Reading pane is open and you click the message header. With an IMAP account, Outlook does download the message.
Another difference is that with a POP3 account, marking a message to download will cause the message to be downloaded to your computer and removed from the server. With IMAP accounts, the messages always remain on the server until you delete them. If you want to leave a copy of the message on the server for a POP3 account, mark the message to download a copy instead.
Finally, IMAP accounts offer additional capabilities for working with message headers that POP3 accounts do not, such as the capability to synchronize more than just the Inbox folder.
The following sections explain the specific steps to follow as you perform various tasks with message headers through remote mail. You’ll learn how to download the headers, how to mark them selectively, and how to process them.
When you want to process messages selectively, you first download the message headers and then decide what action you want to perform with each message based on its header. Downloading message headers for an account is easy. In Outlook 2010, click the Send/Receive tab, click Send/Receive Groups, <Account> Only, Download Inbox Headers, where <Account> is the name of the account whose headers you want to download.
After you choose the Download Inbox Headers command, Outlook 2010 performs a send/receive operation but downloads only message headers from the specified account. If you use a dialup connection, you can then disconnect from the server to review the headers and decide what to do with each message.
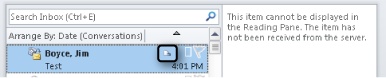
Outlook 2010 displays the downloaded message headers in the Inbox. Outlook 2010 displays an icon in the Header Status column to indicate that the message has not yet been downloaded, as shown in Figure 15-1. A message header that has not been marked for download shows a sheet of paper with the corner folded over. A message marked for download shows the same icon but with an arrow at the bottom.
After you download the headers, you can decide what to do with each message: retrieve it, download a copy, or delete it.
To mark a message to be downloaded from the server to your local store, select the message header, click the Send/Receive tab, and choose Mark To Download. Alternatively, you can right-click the message header and choose Mark To Download.
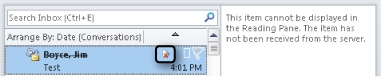
In some cases, you might want to download a copy of a message but also leave the message on the server—for example, you might need to retrieve the same message from a different computer. To mark a message header to have Outlook 2010 retrieve a copy, select the message header, click the Send/Receive tab, click the arrow beside Mark to Download, and choose Mark To Download Message Copy. Outlook 2010 indicates in the Header Status column of the Inbox that the message is marked for download by changing the message icon accordingly, as shown in Figure 15-2.
You also can mark messages to be deleted from the server without downloading. You might do this for junk mail or messages with large attachments that you don’t need and don’t want choking your download session.
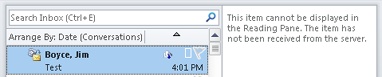
To mark a message for deletion, select the message header, right-click it, and choose Delete or press the Delete key. Outlook 2010 strikes through the message header and changes the download icon to indicate that the message will be deleted the next time you process messages, as shown in Figure 15-3.
As you work with message headers, you’ll occasionally change your mind after you’ve marked a message. In that case, you can unmark the message. Select the message header, right-click it, and then choose Unmark To Download. Alternatively, you can click the Send/Receive tab and click Unmark To Download.
You also can unmark all message headers, clearing all pending actions. To do so, click the Send/Receive tab, click the arrow beside Unmark To Download, and choose Unmark All to Download.
After you’ve reviewed and marked the message headers, you can process the messages to apply the actions that you’ve chosen. When you do so, for example, messages marked for download are downloaded to your system, and messages marked for deletion are deleted from the server.
To process all marked messages, click the Send/Receive tab and then click Process Marked Headers. Outlook 2010 connects and performs the specified actions.
IMAP accounts offer some features for selective processing that are not available with POP3 accounts, primarily the capability to download headers from multiple folders (not just the Inbox, as with a POP3 account). Outlook gives you the option of downloading message headers from all your subscribed folders.
To configure these settings, click the Send/Receive tab on the ribbon, click Send/Receive Groups, and choose Define Send/Receive Groups. Select the send/receive group that you want to modify for your IMAP account and click Edit. Select the IMAP account in the accounts list, and then note that Outlook gives you the option of selecting multiple folders for download (see Figure 15-4).
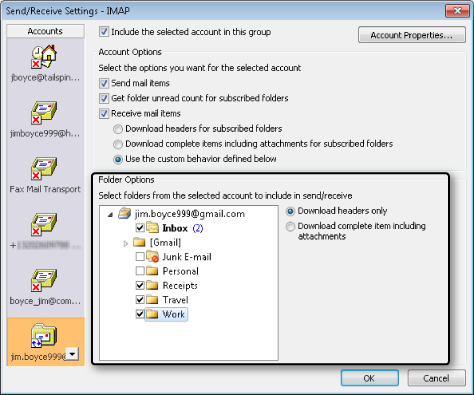
Figure 15-4. You can configure Outlook to download headers for multiple folders in your IMAP mailbox.
You can configure the send/receive group to download headers for all subscribed folders, download the complete item and attachments for subscribed folders, or choose the custom option and specify a selection of folders.
Using send/receive groups in Outlook 2010 gives you additional options for selective message processing with POP3 accounts. You can configure a POP3 account in a send/receive group to download only headers, for example, or to download only those messages smaller than a specified size while retrieving only headers for larger messages. If you prefer to process your POP3 account selectively—perhaps because you connect over a dial-up connection, or because you want to delete unwanted messages before they arrive in your Inbox, or because you need to control which messages are downloaded—you can use a send/receive group to process the account.
Note
For details on setting up send/receive groups, see the section Controlling Synchronization and Send/Receive Times, on page 197.
Let’s assume that your profile includes two POP3 accounts: your main work account and a personal account. You want to download complete items for your work account, but download only headers for your personal account. The solution is to configure a send/receive group accordingly.
You can configure multiple send/receive groups, using different settings for each (although some settings, such as Exchange Server filters, apply to all send/receive groups to which the folder belongs). For example, you might configure your POP3 accounts in the All Accounts send/receive group to download message bodies and attachments, but create a second send/receive group named POP3 Remote, which processes only message headers for your POP3 accounts when that group is executed.
After you decide which combination of send/receive groups makes the most sense for you, follow these steps to configure a POP3 account to retrieve only message headers and then process the headers:
In Outlook 2010, click the Send/Receive tab, click Send/Receive Groups, and choose Define Send/Receive Groups.
Select the existing send/receive group in which you want to configure POP3 accounts for headers only (or create a group for that purpose), and then click Edit.
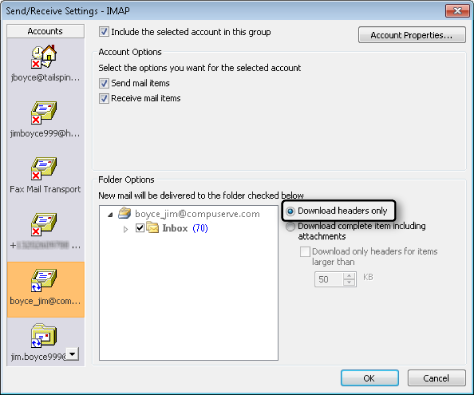
In the Accounts list in the Send/Receive Settings dialog box, shown in Figure 15-5, click the POP3 account.
If you are creating a new group, select the Include The Selected Account In This Group check box.
Select the Download Headers Only option.
If you don’t want the group to send messages from the selected POP3 account, clear the Send Mail Items check box.
Click OK, and then close the Send/Receive Groups dialog box.
Click Send/Receive, Send/Receive Groups, and then select the group to be processed according to the settings that you specified in the preceding steps. Outlook 2010 then downloads message headers.
Review and mark the downloaded message headers, and then click Process Marked Headers on the Send/Receive tab to process the messages.
You can configure a POP3 account in a send/receive group to specify a message size limit. Messages that meet or are below the specified size limit are downloaded in their entirety, complete with attachments. For messages larger than the specified size, only headers are downloaded. This is an easy way to restrict the volume of incoming POP3 mail and keep large messages from choking a low-bandwidth connection such as a dial-up connection.
Follow these steps to configure a POP3 account in a send/receive group to download headers only for messages over a specified size:
In Outlook 2010, click the Send/Receive tab, and then click Send/Receive Groups, Define Send/Receive Groups.
Select or create the send/receive group, and then click Edit.
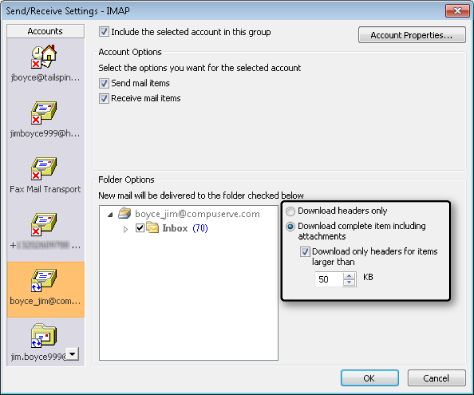
Select the POP3 account in the Accounts list in the Send/Receive Settings dialog box, and then select the Download Complete Item Including Attachments option.
Select Download Only Headers For Items Larger Than n KB, as shown in Figure 15-6.
Enter a value to define the message size limit, and then click OK.
Click Close to close the Send/Receive Groups dialog box.
Often you’ll want to keep a copy of your messages on the server and download a copy. For example, you might be checking your messages from the office but want to be able to retrieve them from home or from your notebook computer. Or perhaps you’re using remote mail to process a few important messages and want to leave copies on the server for safekeeping. You can configure the account to leave a copy of all messages on the server, allowing you to retrieve the messages again from another system.
When you configure a POP3 account to retain messages on the server, you also can specify that the messages must be removed after they’ve been on the server for a designated period of time. Alternatively, you could have Outlook 2010 delete the messages from the server when you delete them from your Deleted Items folder, which prevents the messages from being downloaded again from the server after you’ve deleted your local copies.
Here’s how to configure these options for POP3 accounts:
In Outlook 2010, click File, Account Settings, and Account Settings.
Select the E-Mail tab.
Select the POP3 account, and then choose Change.
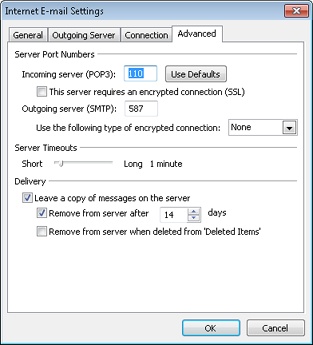
Click More Settings, and then click the Advanced tab, shown in Figure 15-7.
Select the Leave A Copy Of Messages On The Server check box, and then select one of the two associated check boxes (or both) if needed. Click OK.