Overview of Standard Forms, Item Types, and Message Classes 688
Creating Custom Forms from Standard Forms 691
Creating Custom Forms from Scratch 697
Adding and Arranging Controls 699
Adding User-Defined Fields 709
Publishing and Sharing Forms 710
EVEN without any custom programming, Microsoft Outlook 2010 provides an excellent set of features. In fact, many organizations don’t need anything beyond what Outlook 2010 offers right out of the box. Others, however, have special needs that Outlook 2010 does not address, perhaps because of the way these organizations do business or because of specific requirements in their particular industries. In such cases, you have ample opportunity to extend the functionality of Outlook 2010 through custom design and programming.
For example, you might need to add some fields to your message forms or your meeting request forms. Perhaps you need an easier way for users to perform mail merge operations with Microsoft Word 2010 and Outlook 2010 contacts lists. Maybe you simply want to fine-tune your forms to add your company logo, special instructions, or warnings for users.
Whatever your situation, you can easily make changes to the existing Outlook 2010 forms, or you can even design new ones. The changes you make can be simple or complex: You might add one or two fields to the standard contact form, or you might add a considerable amount of program code to allow Outlook 2010 to perform custom tasks or interact with other Microsoft Office 2010 system applications. This chapter starts you on the right path by explaining how Outlook 2010 uses forms and how you can customize them to suit your needs. If you aren’t comfortable programming with Microsoft Visual Basic for Applications (VBA), don’t worry—you can accomplish a lot with custom forms without ever writing a single line of program code.
Forms are such a normal part of everything we do on computers that we sometimes take them for granted. It’s still true, however, that a lot of programs used all over the world can be accessed only with screens that provide monochrome text and puzzling menus with strange codes and submission sequences. With their versatility and ease of use, forms offer a revolutionary approach, and you can unlock their power with several mouse clicks and some solid planning. This chapter discusses using Outlook 2010 forms as part of a software solution for individual computing needs. It also examines the types of forms that you can modify and create and how the forms are created, published, and stored.
With Outlook 2010, you can employ two basic strategies for form development. The first is to use or modify a standard form. The second is to create your own form from scratch. With either strategy, it’s important to remember that you’re programming events that are specifically associated with the item involved, not with the Outlook 2010 application generally. In other words, when you put code behind your form, you’re dealing with events related to the item that’s represented by the form. For example, if you were to design a form to create a custom email message, you’d probably program a common event named Item_Send, which occurs when the item (the message) is sent. You couldn’t program the form to respond to an event that fires (that is, occurs or executes) when the item is specifically sent from the Outbox to another user’s Inbox or when the user’s view changes from one folder to another. This is because in form development, you can access only the events associated with the item in question.
Outlook 2010 uses a combination of forms, item types, and message classes as its fundamental components. Although you don’t need to understand much about any of these three components to use Outlook 2010, a developer must understand them reasonably well. Obviously, the more you know, the more powerful your Outlook 2010–based solution will be.
Outlook 2010 provides numerous predefined forms that you can use as the foundation of your form-based solution. These standard forms include the following:
Appointment form
Contact form
Distribution List form
Journal entry form
Meeting request form
Message form
Note form
Post form
Standard Default form
Task form
Task request form
As this list of Outlook 2010 forms indicates, the basic item types available in a typical Outlook 2010 installation are each represented by a corresponding form. The Outlook 2010 forms in this list match the ones that you are used to working with on a daily basis, so you are not starting with a blank slate when you want to customize a form for your own use.
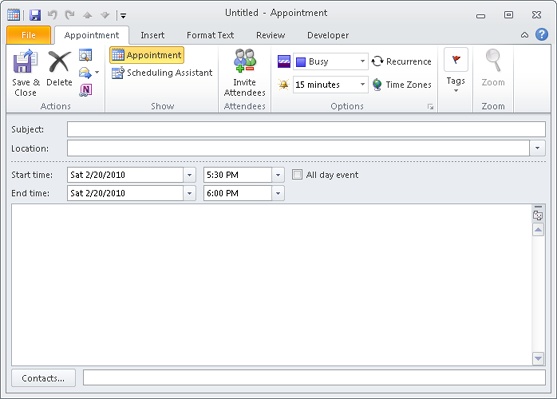
Each of these forms comes with built-in user interface elements and corresponding functionality. For example, the appointment form shown in Figure 27-1 has interface elements and functions that relate to setting appointments, such as generating reminders and controlling the calendar display. The contact form, in contrast, is designed to permit the addition or modification of contact information.
Several basic item types are part of an Outlook 2010 installation. Among the Office 2010 system VBA item types that you can use are the following ones specific to Outlook 2010:
MailItem
ContactItem
TaskItem
AppointmentItem
PostItem
NoteItem
Note
Other item types are built into Outlook 2010, including the JournalItem and DistListItem types. This book does not cover these additional types, but you can find information about them by consulting the Microsoft MSDN website (http://msdn.microsoft.com) and searching for these item types.
These item types represent built-in functionality. If you have ever used Outlook 2010 to create an email message or to add an appointment to your calendar, you have benefited from this functionality. Of particular importance is the fact that this functionality is accessible to you as you develop custom solutions with Outlook 2010. Outlook 2010 provides corresponding forms for each of these item types, and these standard forms are designed with behaviors that directly relate to the item types that they represent. You can extend the behaviors of these forms and use all the functions and properties of the item types, some of which are not exposed in the standard forms. In addition, you can reach beyond Outlook 2010 to incorporate the functionality of other Microsoft Office system applications such as Word 2010, Microsoft Excel 2010, Microsoft InfoPath 2010, Microsoft PowerPoint 2010, Microsoft Project 2010, Microsoft Visio 2010, and any application or control that exposes a programmatic Component Object Model (COM) interface.
Although forms and item types are the basic elements you need to understand to create a custom Outlook 2010 solution, it’s helpful to know what a message class is and how it relates to Outlook 2010 form development. A message class represents to Outlook 2010 internally what an item type represents to a user or developer externally. In other words, when a user opens an email message from the Inbox, that message is a MailItem. Internally, however, Outlook 2010 calls it by a different name: IPM.Note. IPM (which stands for “interpersonal message”) is a holdover from earlier generations of Microsoft’s messaging systems. All messages in Outlook 2010 are representations of an IPM of some sort. An appointment calendar item, for example, is an IPM.Appointment. The list of default message classes includes the following:
IPM.Note
IPM.Contact
IPM.DistList
IPM.Appointment
IPM.Task
IPM.Post
IPM.Activity
IPM.Schedule.Meeting.Request
IPM.StickyNote
IPM.TaskRequest
Again, unless you’re developing a fairly sophisticated collaborative solution, these message classes won’t surface often. However, understanding what they mean to Outlook 2010 will help as you progress in your use of the program and in developing Outlook 2010 solutions.
A standard form is a great point of departure for developing a custom solution. For example, have you ever sent an email message with an attached document to someone and forgotten to include the attachment? In a large company, this rather common error could amount to hundreds, if not thousands, of extra email messages being sent each day as users send follow-up messages containing the omitted attachments. If the attachment was a document needed for review, there is the potential for significant time loss as well. By adding a small script to the standard mail message form, you can avoid this problem. You can assess programmatically whether an attachment has actually been added to the email message and prompt the user to add one if needed.
To begin working with the standard forms, first verify that you have added the Developer tab to the ribbon. If not, right-click the ribbon and choose Customize The Ribbon. Place a check beside Developer in the left-hand list, and then click OK. Next, click the Developer tab in the ribbon, and then click Design A Form to display the Design Form dialog box, shown in Figure 27-2. You can simply select one of the standard forms listed in this dialog box and begin working with the form in design mode. Later sections in this chapter discuss how to save and publish the forms that you modify or create.
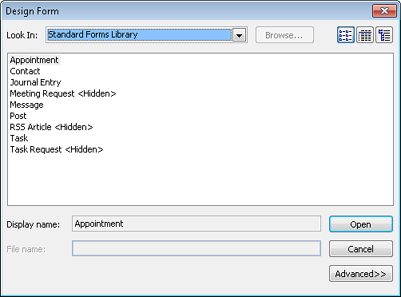
Figure 27-2. In the Design Form dialog box, you can choose the type of form that you want to create.
Tip
INSIDE OUT Avoid scripts when opening forms for design purposes
When you choose to redesign an existing form, that form might have a script with event handlers that will fire when you open the form in design mode. Usually, however, you don’t want to have code firing when you’re trying to design a form. To keep this from happening, hold down the Shift key as you click the form to open it for design. The code will still be present and will run when you debug the form, but it will not run while you open, design, and save the form.
One of the most basic processes in Outlook 2010 is sending and receiving messages and documents. Although this is a fairly simple process, it requires a close look. In nearly all cases, the form that a sender employs to compose an email message is not the exact form that the receiver of that message uses to read the message. For example, the recipient of an email message can’t modify the body of the message without replying to or forwarding the message. This is because the standard forms have Compose and Read areas.
Figure 27-3 shows a message being composed; Figure 27-4 shows the same message after it has been received.
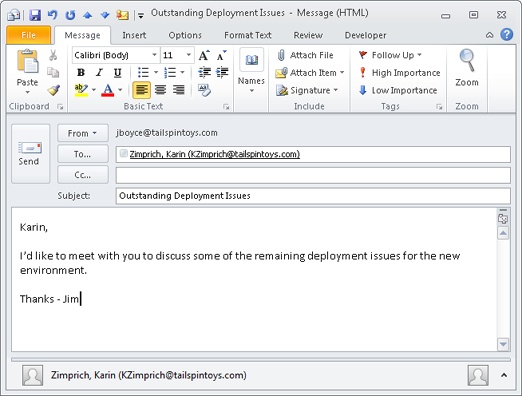
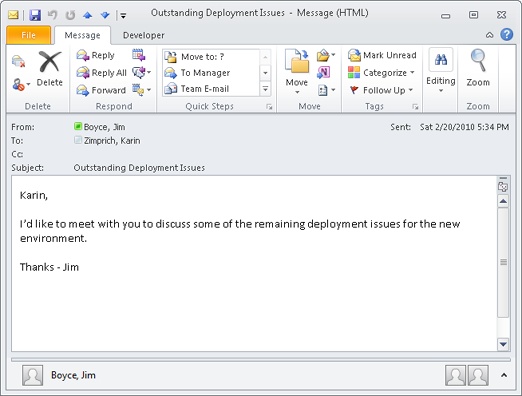
Figure 27-4. Here is the same message shown in Figure 27-3 after it has been received. Notice that some fields can no longer be modified.
Notice that some of the fields, such as Subject and To, can’t be modified by the recipient in the Read version. It is, however, entirely possible to configure a form with identical Compose and Read areas. Whether this makes sense for your Outlook 2010 solution is up to you.
To work with a standard form, click Design A Form on the Developer tab to display the Design Form dialog box (shown in Figure 27-2), and then select a Message type form. When you’re working with a standard form in design mode, you can switch between the Compose and Read pages by clicking the Page button in the Form group on the Developer tab and choosing Edit Compose Page or Edit Read Page. You can select these options by clicking Page, as shown in Figure 27-5, and then clicking the Edit Compose Page or Edit Read Page option.
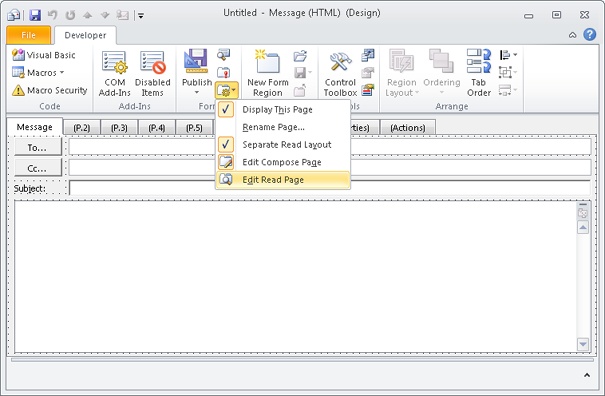
Figure 27-5. Use the Edit Compose Page and Edit Read Page options located in the Page menu to switch between compose and read views of the form.
In Figure 27-6, the Compose page of the standard message form is ready for editing. When you click Edit Read Page, the Read view of the form appears for editing, as shown in Figure 27-7.
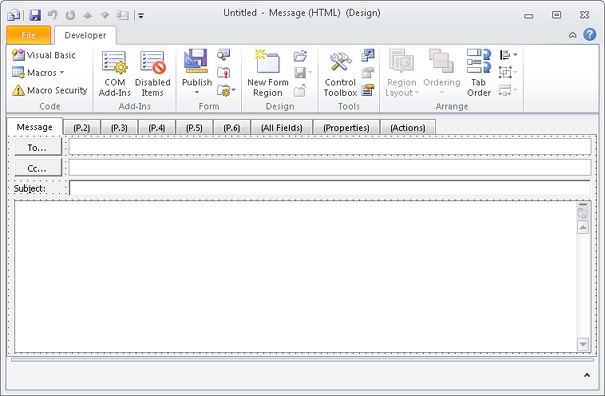

Because this is a standard form, a number of controls are already on the form. For example, the text box control for the body of the message is the largest element on the form. This control is bound to an Outlook 2010 field. The following section examines fields and what they mean to an Outlook 2010 solution; working with controls is discussed in the section Adding and Arranging Controls, on page 699.
An Outlook 2010 field represents a discrete unit of information that is intelligible to Outlook 2010, such as the Bcc and To fields in an email message. You don’t need to tell Outlook 2010 that email messages have these fields—they are already included in the standard form. Outlook 2010 provides a number of fields that you can use, and you can also add new fields. In theory, an unlimited number of fields are available, but the most common practice is to use a generous number of the built-in fields and a judicious number of new, user-defined properties. For now, this discussion focuses on the fields that are already available to you.
Because it provides so many built-in fields, Outlook 2010 groups them to make it easier to find the ones that you need. For example, some fields, such as To, From, Subject, Importance, Expires, Due By, Created, Size, and Attachment, are particular to email messages. Other fields, such as City, Children, and Birthday, are associated with Outlook 2010 contacts. You can, however, use fields from other forms to suit your needs on any form that you’re designing—for example, Outlook 2010 doesn’t prevent you from adding a Birthday field to an email form.
You can find more information about user-defined fields in the Outlook 2007 Developer Reference at http://msdn.microsoft.com/en-us/library/bb208195.aspx. Although this article was written for an earlier version of Outlook, the information in the article also applies to Outlook 2010.
When you work with a form, you can view the available fields in the Field Chooser, shown in Figure 27-8. To display the Field Chooser (if closed), click the Field Chooser button in the Tools group on the Developer tab; this button is a toggle that shows or hides the Field Chooser. In the Field Chooser, the fields are organized by categories and displayed in a list. You can choose a category in the drop-down list and then search in the body of the Field Chooser for the fields you need.
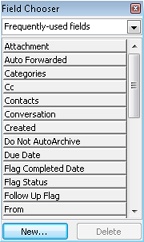
The scrollable list of fields shown in the Field Chooser in Figure 27-8 contains all the fields available for a form published in a certain folder. The standard item types come with a number of fields already defined. For example, a mail message comes with To, Subject, Body, and Sent fields already defined. Although you have the full range of fields available as you modify or create a form, you can speed your development time and decrease your effort by carefully selecting a standard form that most closely corresponds to the solution you’re developing. This way, you can use as many built-in fields as possible. You’ll learn how to represent these fields on your form using controls in the section Adding and Arranging Controls, on page 699.
Working with standard forms is great if you want to build a solution that is directly related to one of the Outlook 2010 item types. However, you might need an Outlook 2010 form that isn’t based on an item type at all. For example, you might want to create a form that allows users to report their work hours or initiate a purchase order. Although you could base these examples on a standard form, they could just as easily require a completely new form that you need to create.
The good news is that creating a completely new form is easier than it sounds. In fact, Outlook 2010 doesn’t really permit you to create forms completely from scratch, although you can certainly achieve the same effect. You have two ways to create a form that doesn’t contain any built-in form elements:
Modify a standard form by deleting all built-in interface elements from the form and adding your own.
Modify a standard form by hiding the page that contains built-in interface elements and showing a new page that contains elements that you add.
You’ll learn how to add pages to forms in the next section. First let’s look at how to break down a standard form to a blank form by removing built-in interface controls.
Follow these steps to turn a standard post form (a form that is used to post a note into a folder) into a blank form:
Click the Developer tab.
Click Design A Form.
Select the Post form, and then click Open. The form opens in design mode, with the Message page selected.
Click each control (TextBox, Label, Button, and so on) on the Message page and delete it.
With the Message page still selected, click Page in the Form group, and then select Rename Page.
Type a new name in the dialog box and then click OK.
The form now looks similar to the form shown in Figure 27-7, although that one was based on the Message form and also has some changes. The figure shows a modified (blank) Compose area for this form, but you can also modify the Read area (via Edit Read Page). Of course, you’ll also want to make these pages do something, but for now, you at least have a blank form to work with. To have this blank form available as a template, click File, File, and Save As, and then select Outlook Template from the Save As Type drop-down list.
A multipage form allows you to fit a great deal of information on one form while also reducing confusion for the user. For example, you could create a form on which employees could both report their time for the week and report any expenses for which they need reimbursement. By using two pages, one form can serve both needs.
Any form can be a multipage form; all possible pages are already on the form that you create or modify. However, these pages are not visible automatically. If you look closely at the names on the page tabs shown previously in Figure 27-7, you’ll see that except for the first name in the list, the name of each page is enclosed in parentheses, indicating that the page is not visible. To change the Visible property of a page, click its tab, click Page, Page, and then select Display This Page.
Note
You can make all pages visible, but you cannot make all pages invisible. If you try to do so, Outlook 2010 tells you that at least one page must be visible on the form.
The first (default) page of a form, which is initially visible, has Compose and Read capabilities already available, as mentioned earlier. The additional pages on a form, which are initially invisible, don’t have these capabilities until you add them. To do so, select one of these pages, click Page, and then choose Separate Read Layout, which activates the Edit Compose Page and Edit Read Page buttons.
The real power of forms comes from the controls that you place on them. To construct a robust Outlook 2010 forms solution, you need to plan carefully what the form is supposed to do; what pieces of information it will display, modify, save, or send; which controls will display these information units; and how the controls will be laid out. You can put two types of controls on a form: a control that is bound to an Outlook 2010 field and a control that is not. This section looks first at field-bound controls. Field-bound controls are bound to specific control types, such as drop-down lists, text boxes, command buttons, labels, or check boxes.
To display a field on your form, follow these steps:
Display the Field Chooser, and then select a field category in the drop-down list.
In the scrollable list in the Field Chooser, select the field that you want, and then drag it onto the form.
Format the control as needed.
Tip
INSIDE OUT Work with the users of the form
You can place any number of controls on a form, but it’s a good idea to plan your form with an eye toward usability. Work closely with those individuals who will be using the form to ensure that it corresponds to their real needs. Find out how the users want the forms to be laid out, and listen to their suggestions about how the information should flow. No matter how much work you put into your solution, it won’t be useful unless people actually use it.
You can resize, move, or rename a control, and you can change a number of its properties. To resize the control, select the control by clicking it, and position the mouse pointer over one of the control handles, which are represented by small boxes. When a small arrow appears, you can drag the handles in the appropriate direction to resize the control.
To move a control to a new location, simply drag it. Notice that the form’s canvas is covered with a grid. Each point on the grid is a possible location for a corner or other relevant point on a control. You can choose to have controls snap to the grid points by right-clicking the grid and selecting Snap To Grid. You can define the distances between the points on this grid. This is important because the greater the scale of the grid (the greater the distance between points on the grid), the fewer places you can locate a control on your form. Conversely, the smaller the scale, the more you can refine the positioning of your controls.
To change the grid, follow these steps:
In the Arrange group, click Align.
Click Set Grid Size.
Type a value (in pixels) for the height and width spacing.
Click OK.
The smaller the number that you use for spacing, the smaller the scale. This means that more points on the grid will appear, and you can have more control over where your objects fit on the grid. The default is 8, but 3 is a good number to choose for greater positioning control.
Tip
INSIDE OUT Limit controls on your forms
When you’re using controls on forms, you can be tempted to make one form do too much. Although there’s no precise limit for the number of controls that can be included on one form, the recommendation is using fewer than 300. However, my experience with custom forms development suggests that even 200 is excessive. You should try to keep the number of controls down to a few dozen or so when possible. Forms that try to do too much usually become confusing to users, and these forms often do not perform well. Keeping your forms focused and giving them a crisp design makes them easier to code and debug too. If you find that your form is overloaded, consider creating a COM add-in to allow a broader application context, or develop a stand-alone application that handles all your information needs.
Controls have a number of properties that you can view and modify. To find out what these properties are, right-click a control and then choose Properties on the shortcut menu to display the Properties dialog box. Figure 27-9 shows a Properties dialog box for a text box control.
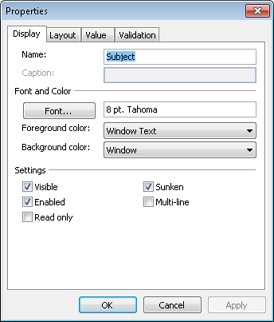
The Display tab of a control’s Properties dialog box (a text box example is shown in Figure 27-9) lists the most commonly used properties of the particular control. Changing the setting of a property in this dialog box enables the Apply button; clicking Apply or OK sets the value of that property for the selected control.
The default names of controls are rather generic, such as TextBox1 or CheckBox1. You’ll want to change these to names that are more descriptive for your solution, such as txtFirstName or chkHasVacation.
You can learn more about naming conventions for controls by visiting the Microsoft MSDN website at http://msdn.microsoft.com and searching for “Visual Basic Coding Conventions Overview.”
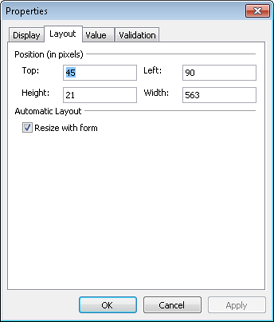
The Layout tab in the Properties dialog box lets you set the position of the field within the form. The position settings are set in pixels offset from the top and left side of the form. You can specify the height and width of the field as displayed in the form by setting the Height and Width values. You can also configure the field to resize itself automatically as the form size is being changed by selecting the Resize With Form check box in the Automatic Layout area, as shown in Figure 27-10.
The Value tab in the Properties dialog box, shown in Figure 27-11, contains a number of settings that relate to the field value that the control represents. As mentioned, each control in the Field Chooser list is bound to an Outlook 2010 field. When you modify the properties of a control, you can change the field to which the control is bound.
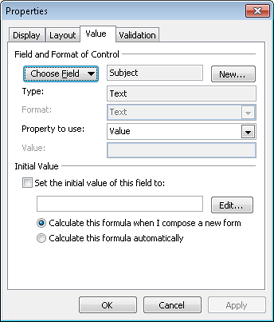
To change the bound-field property, click Choose Field and then select the field to which you want to bind the control in the drop-down list. Make sure that the field value is bound to the correct property of your control. Normally, the field value is tied to the control’s Value property; this is rarely changed. However, you can change this setting so that, for example, the value of a field is tied to your control’s Enabled property. In this case, if the value of the field is True, the control is enabled; if the value is False, the control is not enabled.
You can also set the initial value of your control to display a default value. Select the Initial Value Of This Field To check box, and then type an initial value in the text box. This value doesn’t have to be predetermined—you can have it correspond to a dynamic value, such as the current day or the concatenation of Subject field and the current date. To make the initial value more dynamic, click Edit to open the Initial Value For dialog box; an example is shown in Figure 27-12.
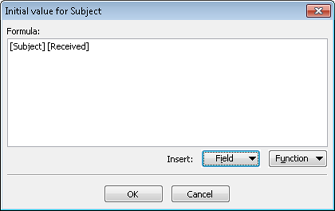
In this dialog box, you establish a formula for the initial value of your control. For example, you can simply insert a built-in function, such as Date( ), for the formula.
To insert a built-in function—the Date( ) function, in this example—follow these steps:
When you run the form, the text box control will contain the current date as its initial value. Your users can always change the control’s initial value unless you set the control to Read Only (on the Display tab).
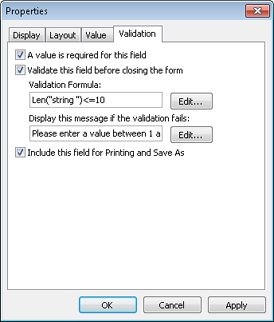
The Validation tab in the Properties dialog box allows you to set certain properties that relate to how (or whether) the value of the control is validated. For example, if you create a form for a purchase order, you might want to ensure that users indicate the quantity of parts that they want to order. The order processing staff will send you many thanks for requiring certain values before the purchase order gets to them because it reduces the amount of information traffic and busywork needed to process an order.
Suppose that you’ve added a control to your form that requires a value for a text box, and that value is required to be less than or equal to 10 characters. If the user fails to enter a valid value, Outlook 2010 will display a message that prompts the user to enter a correct value.
To set the properties on the Validation tab that will be necessary for this example, as shown in Figure 27-13, follow these steps:
Display the Properties dialog box, and then click the Validation tab.
Select the A Value Is Required For This Field check box.
Select the Validate This Field Before Closing The Form check box.
Click the Edit button located to the right of the Validation Formula text box.
Click Function.
Click Text, Len( string ), and then click OK. The Len( string ) function appears in the Validation Formula text box.
In the Validation Formula text box, type <=10 after the function, and then click OK.
In the Display This Message If The Validation Fails text box, type the following text (including the quotation marks):
“Please enter a value between 1 and 10 characters in length.”
Alternatively, you can click Edit, type the message without quotation marks, and then click OK.
Click OK to close the Properties dialog box.
In the example exercise, when a user works with your form, the text box that requires validation must contain a value, and the value must be less than or equal to 10 characters. If the value the user enters is 11 characters or more, Outlook 2010 will display a message box containing the validation text that you provided when the user tries to send the form. The user can then make the appropriate changes to the text box value and attempt to resend the form.
This chapter has thus far concentrated on controls that are bound to Outlook 2010 fields and that appear in the Field Chooser. However, these aren’t the only controls that you can add to a form. This section takes a brief look at some of the standard controls that are available in Outlook 2010, as well as controls that come as part of the Office system.
Controls appear in a Control Toolbox, which is a small, resizable window made visible when you click the button next to the Field Chooser button on the form. Figure 27-14 shows the Toolbox.
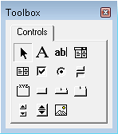
As you hold the mouse pointer over the control icons in the Toolbox, the name of each control appears. To add one of these controls to your form, drag the control icon onto the form. You can then resize and reposition the control or set its properties, as discussed earlier.
Tip
Refer to the Outlook Developer Reference at http://msdn.microsoft.com to learn more about the properties, methods, events, and possible uses of the standard controls.
These standard controls are useful but limited. As your skills in developing Outlook 2010–based solutions progress, you’ll find that you need functionality that transcends the abilities of the standard controls provided in the Toolbox. Fortunately, you can add other controls and make them accessible via the Toolbox window. For example, if you design a number of forms that need the Outlook Date Control to enable the user to pick a date, you can add that control to the Control Toolbox.
Follow these steps to add the Outlook Date control to the Toolbox:
Right-click an empty area of the Toolbox window.
Choose Custom Controls.
Scroll down the Available Controls list, and then click the box next to Microsoft Outlook Date Control.
Click OK. The control appears in the Custom Controls dialog box.
You can now add this control to a form and work with its specific properties and behaviors just as you did for the standard controls.
Custom controls can make your Outlook 2010 solution extremely robust and powerful. However, be aware that the control you’re using might not exist on the computer of the person receiving the message. In other words, although you might have a particular control on your computer, the person who uses your form to compose a message or receives a message composed on your form might not have that control installed. For your solution to work, you need to ensure that the custom controls you use are distributed to and installed on other users’ computers properly.
Note
Methods of distributing custom controls vary widely. Some controls come without an installing package, many use Microsoft Installer, and others use a third-party installation mechanism. You should read the documentation that accompanies your custom control or consult the manufacturer to determine the best method for distributing your control.
After creating your form, you can test it to see what it looks like when it is run. With the new form open, choose Run This Form in the Form group. This won’t cause the form to close or disappear; instead, Outlook 2010 produces a new form based on the form that you’ve just created. The newly created form is an actual running form that you can send and read, and any included functions or scripts are also run when the form is opened.
Although developing solutions in Outlook 2010 can require much thought and effort, users might not necessarily share your enthusiasm and excitement about the forms that you’ve created. One way to increase acceptance and usability is to add some pleasing graphics to the forms. These graphics can come in a variety of formats, such as JPEG, GIF, WMF, EMF, and ICO.
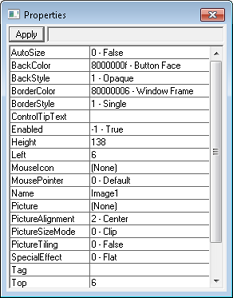
One way to add a graphic to your form is to use the image control from the Control Toolbox. Initially, the control will appear as a gray square. You can resize it, just as you can resize any of the standard controls, although it’s a good idea to place the picture in the control before you resize it. Set the picture source for the image control by using the Properties dialog box, shown in Figure 27-15. Double-click the Picture property, and then select the desired picture in the Load Picture dialog box.
Follow these steps to insert a picture in your control:
Right-click the image control that you placed on your form.
Click Advanced Properties.
In the list of properties, scroll down to the Picture property.
Select the Picture property and then click the ellipsis button (…) at the top of the form, or simply double-click the Picture property.
In the Load Picture dialog box, navigate to the picture that you want to appear in the image control, and then click Open.
Close the Advanced Properties dialog box, and then verify that the control now contains the picture you chose.
Tip
INSIDE OUT Change your images at run time
As is the case with all the controls that you use on a custom form, you can change the values of many of their properties when the form is running. For example, you can create a form with an image that changes based on certain criteria. You can add code to your form that alters the setting of the control’s Picture property and thus loads an image into the control that is different from the image you specified at design time.
Another way to make your forms more attractive and usable is to add an icon to buttons on the forms. You can configure the command button available in the Toolbox to display both a text caption and a graphic. For example, if your button sends a custom message to a recipient when clicked, you could add an envelope image to the button to convey the notion of sending a message. To have the button display an image, set the Picture property for the button just as you would for an image control. You can also set the Picture property for other controls, such as text boxes and labels.
In addition, you can display a custom icon in the form’s title bar. Outlook 2010 always displays a default icon in the upper-left corner of a form that indicates whether it is a task form, an appointment form, and so on. You can change this icon by clicking the Properties tab of your form when you’re working in design mode. Click Change Large Icon or Change Small Icon, and then navigate to the .ico file you want to use. The Large Icon setting tells Outlook 2010 which image to display when a user displays the properties of the form. The Small Icon setting specifies the title bar image and the image that is shown when the form is displayed in an Outlook 2010 folder.
There are times when the types of data that you need to share, gather, or track with forms exceed the Outlook 2010 default field definitions. You might want to have your contact form display the hire date and review date, for example, but these fields don’t exist in the Outlook 2010 field list.
You can define new fields that contain information that is relevant to your use of Outlook 2010. These user-defined fields can be bound to a control in the same way that you bind a preexisting field to controls in Outlook 2010 forms.
When you want to implement a new field in a form, start by opening the Design Form dialog box. To create a new form field, you can either open the Field Chooser and click New or click the All Fields tab and then click New.
The New Column dialog box will prompt you for the field name, data type, and display format for the new field. In the Name box, type the name of the new field, such as Hire Date, and then select the data type for the field in the Type drop-down list—in this case, Date/Time. In the Format drop-down list, select the display format for the date (or day, time, and date) layout that you want for the field.
The new field is added to the Select From drop-down list, and you can find the new field in the User Defined Fields In Inbox item. The field can be selected in the Field Chooser and on the All Fields tab. To use your new field, drag it onto your form. You will need to remember to add the field to both the Compose Page and the Read Page, and commonly you will want to set the properties of the field in the Read Page to read-only (on the Display tab).
After you create your form and define its behaviors, properties, and settings, you’ll want to make it available to users. First, however, you’ll need to preserve your form in one of these two ways:
Save the form as a file.
Publish the form to a folder or other location.
You can save a form by clicking File and then clicking Save As. In the Save As dialog box, select the file name and location. The form file is saved as an Outlook Template file (.oft).
Publishing a form is a lot like saving the form. When you finish your form, you can publish it to a specific folder location. You can publish it to your Inbox or another folder in your mailbox, a public folder, the Organizational Forms Library (with Microsoft Exchange Server), or your Personal Forms Library.
Follow these steps to publish a form to a folder or forms library:
Click Design A Form on the Developer tab.
In the Design Form dialog box, select the location (such as User Templates In File System) containing the form that you want to publish.
Select the form that you want to publish, and then click Open.
In the Form group, click Publish, and then click Publish Form As to open the Publish Form As dialog box. (The first time you use the Publish button, the Publish Form As dialog box will be displayed, but after a form has been saved once, the Publish button will simply save the existing form, overwriting the previous version.)
In the Look In drop-down list, select the folder or forms library where you want to publish the form. (The default is the Personal Forms Library.)
Type the display name and the form name.
Click Publish in the Publish Form As dialog box to save the form in the selected location.
Tip
INSIDE OUT Create a staging area for your forms
When you’re creating a form, it’s a good idea to keep the production version of the form separate from the development version. Create a staging folder where you publish the forms that you’re working on. When you complete a form design, publish your form in this staging folder at regular intervals so that you don’t lose the modifications you’ve made to the form. Only people designing and testing forms for your organization should have access to this folder.
After you publish a form, the folder in which you publish it contains the form itself and all the underlying information that another person’s instance of Outlook 2010 needs to understand the form.
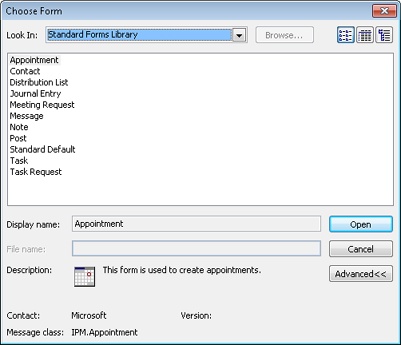
After you have created a custom form and saved or published it for common use, you will need to select the form to use it. Custom forms are normally stored in a location related to their expected use. Custom forms intended for common use, for example, are usually stored in an accessible network location. If you have a custom form intended for your own use, however, you would store it in the Personal Forms Library. Alternatively, if you want to use a form that you have saved to a folder on your local hard disk, you would store it using the User Templates In File System location.
In each of these cases, to locate your custom form, select the appropriate location in the Look In drop-down list of the Choose Form dialog box, shown in Figure 27-16.
To use a custom form from these (or any other) locations, follow these steps:
Each of the forms in Outlook 2010 serves the same purpose—to present information in a specific format. Outlook 2010 forms provide access to all Outlook 2010 items (messages, notes, meetings, tasks, journal entries, and so on) and enable you to create custom forms using any of the available fields. By creating custom forms that align with your workflow, you can ease the communication of information as well as the transfer of data important to your business.
In creating custom forms, you begin by selecting a default form that most closely resembles the form and function that you want for your new forms. You can then choose to add or delete fields on the default page and/or create additional pages containing fields to display or gather further information. Here are some pointers about using forms:
Know when not to create forms Outlook 2010 form creation can give you the capability to customize email messages, meeting requests, and other Outlook 2010 items, but if existing forms provide the functionality you need, it is easier and more effective to use the existing forms. When you consider creating a new form, start by asking “Is the functionality I need already present in an existing form?” Consider that in addition to the time needed to create a custom form, there are distribution logistics (how you get the form to all who would need it), as well as training needed to enable people to effectively use the new form.
When you are communicating to customers, vendors, and others outside your organization, you’ll need to determine whether they are using Outlook 2010 with Rich Text Format (RTF) support enabled or some other email application. For Outlook 2010 forms to work, the recipient must also be using Outlook 2010 as an email client and must have RTF support.
Keep forms simple but comprehensive Once you have decided that a new form is necessary, evaluate the information that you need the form to display, transmit, or gather, and then limit the form information to the minimum data required to fulfill your operational or organizational needs. You can create a custom form with multiple pages containing an exhaustive array of fields, yet the complexity of using such a form could easily outweigh any hoped-for benefits. Keep in mind that each custom form that you create is intended to facilitate the communication of information. The easier it is for people to use the custom form to exchange information, the more likely it is that people will use the form, and thus the more value it will have for your organization.
Consider a custom form created to enhance customer relationship management by including 15 fields of concise contact information, key project assessment, and a project status summary vs. a custom form that includes five pages containing 200 fields of exhaustive contact information, step-by-step project notes, milestones and timelines, equipment reserved, travel time, technical assessments, customer evaluation, and so on. The first option with 15 fields is much more likely to be used. When you actually have a need to gather 200 fields’ worth of information, you’ll want to consider subdividing the data into related sets and then creating separate forms for each set.
Use user-defined fields to store information not included by default in Outlook Although Outlook 2010 contains fields for the data it uses in contacts, email, meeting requests, tasks, and so on, there are invariably additional pieces of information that your organization could benefit by having included that are not part of the Outlook 2010 default field set. Consider additions to the meeting form that could be useful when you’re scheduling meetings with coworkers. For example, to identify who will be leading the meeting, you could add a Presenter field to the custom meeting request form. Likewise, you might consider adding Food Preferences and Food Allergies fields to a custom appointment form for those appointments with clients or staff that involve dining out or food being brought into the event.
You might want to add information in your contacts list that isn’t shared, but that assists you in working with others or relating to their personal interests. You could, for example, create a custom contact form to enable you to track the specialized knowledge or favorite sports of each of the people in your contacts list. Then, for example, when you want to find a coworker who just happens to know how IPv6 actually works, you can search for “IPv6” and display the names of every person in your contacts list who is fluent in IPv6. (Searching for user-defined fields requires you to select the Query Builder and then add your custom form and fields to the query criteria.)