Working with Shared Documents 915
Working with Shared Contacts in Outlook 922
Integrating Outlook and SharePoint Calendars 924
Managing SharePoint List Connections in Outlook 926
Configuring Alerts from Outlook 927
Using Outlook to Work with SharePoint Libraries and Files 931
MICROSOFT SharePoint is a set of technologies that form a rich collaboration framework for sharing documents, calendars, and other data. SharePoint is much more than just a tool for sharing documents or data, however. Its portal features enable organizations to create a rich portal experience for users, complete with audience targeting and personalization features. The Business Data Catalog (BDC) and Business Connectivity Services (BCS) features, in SharePoint 2007 and SharePoint 2010 respectively, provide the tools needed to integrate SharePoint with back-end line-of-business solutions like SAP, Oracle, Structured Query Language (SQL), Business Objects, and many others. The Web 2.0 features of SharePoint, such as wikis and blogs, enable people to connect and share information in a wide variety of ways. These features are just some of the ones offered by SharePoint. This chapter provides an overview of these features and explains how to use the collaboration features in SharePoint from Microsoft Outlook, how to use Outlook as a tool for creating and consuming SharePoint data, and how to publish Outlook data to SharePoint.
The SharePoint name actually encompasses multiple services and components. The 3.0/2007 version of SharePoint includes Windows SharePoint Services 3.0 and Microsoft Office SharePoint Server (MOSS) 2007. The latter builds on Windows SharePoint Services 3.0 as a foundational set of services. Windows SharePoint Services provides the framework for document sharing, portals, collaboration features, workflows, and several other core features. MOSS 2007 extends these core services with additional features and functionality. Windows SharePoint Services can stand on its own as a collaboration tool, although it doesn’t offer the same breadth of features that MOSS does. Windows SharePoint Services is an included feature of Windows Server 2003 and a separate download for Windows Server 2008. Windows SharePoint Services is licensed as part of the operating system and requires a Windows Server Client Access License (CAL) to access. MOSS 2007 is licensed separately, requiring a server license and at a minimum a SharePoint Standard CAL. If you will be leveraging the Enterprise features in MOSS, each user also needs an Enterprise CAL in addition to the Standard CAL.
Note
Whether or not you have Windows SharePoint Services or SharePoint Foundation 2010 installed on a server, you will still need a Windows Server CAL for each user who accesses the server for file or print sharing, or for any other service hosted on that server.
As with MOSS 2007, SharePoint Server 2010 builds on a set of core SharePoint services, which in 2010 are named SharePoint Foundation 2010. Also like its predecessor, SharePoint Foundation 2010 is licensed as part of the Windows Server operating system, so each user who accesses SharePoint must have a Windows Server CAL.
Tip
INSIDE OUT 2007 versus 2010
If you haven’t worked with SharePoint Server 2010 yet, you are probably wondering what the fuss is about. In my “day job,” I manage a collaboration practice that, among other things, designs, deploys, and manages SharePoint implementations for a variety of companies and organizations. SharePoint 2010 is not just a new face on SharePoint 2007. Instead, SharePoint 2010 has been redesigned from the ground up to provide better performance and availability, new features, easier customization, and a new user interface that provides much of the same look and feel as the Outlook ribbon.
Because of the new range of solid features that SharePoint Server 2010 provides, my experience has been that many companies are planning rollouts of the initial release of SharePoint Server 2010, rather than waiting for Service Pack 2 (or even Service Pack 1) to come out. The features in SharePoint 2010 are so compelling, and the stability of the product so solid, that many companies are forgoing the “wait and see” period so they can begin using the new features right away.
SharePoint Server 2010 builds on the features and functions in SharePoint Foundation 2010 to offer a much broader breadth of services and features than the basic SharePoint Foundation features. Also like 2007, SharePoint Server 2010 requires a Standard CAL for all users and the addition of an Enterprise CAL in environments where Enterprise features are enabled.
As mentioned earlier, SharePoint relies on Windows SharePoint Services 3.0 (for the 2007 version) or SharePoint Foundation 2010 to provide its core, foundational features. These features encompass portals for delivering web content, document sharing, sharing of calendars and contacts, workflows for automating processes such as document approvals, and others. The following list describes the key feature areas that underlie SharePoint:
Portals SharePoint enables you to create portals (web pages) for sharing information, whether as a typical intranet portal that serves relatively static pages, for content that changes dynamically, or for collaboration features like document sharing. SharePoint provides several templates that make it a matter of a few clicks and a few seconds to create various types of websites, such as sites focused on team collaboration, document sharing, and other uses.
Document sharing Document sharing allows you to store documents on the SharePoint site, which can then be accessed by other team members. This is useful for sharing project-related documents, for example, or any other document that other team members might need access to. In addition to simple document storage, document sharing provides version control tools such as document check-in and checkout so that a document is not accidentally modified by more than one user at a time. Support for metatags enables you to categorize documents for sorting and searching.
Picture libraries Picture libraries are similar to document libraries in that they store pictures that can be shared among team members. This is basically a web-based photo album.
Lists Lists are formatted collections of information. The list format can vary based on the type of information being stored. Several lists are predefined, such as Announcements, which are displayed on the main page of a team site by default; Calendar, which can contain events relating to your team or project; Links, which stores web links to pages that your team will find useful or interesting; and Tasks, which helps your team members keep track of work. You can also create your own lists and add new columns to existing lists.
Discussion boards Discussion boards allow team members to have threaded discussions on specific subjects. Discussion boards are useful to replace email exchanges when more than two people are involved, as those involved can place comments and replies directly in the appropriate thread rather than exchanging a large number of email messages.
Surveys Surveys are simply a method of polling other team members for information.
Workflows SharePoint provides basic workflow capability to help you automate processes such as document approvals, moving items between lists, and otherwise automating business processes.
Search Locate documents, list items, and other information stored in your SharePoint environment quickly and easily.
Collaboration environments built on Windows SharePoint Services or SharePoint Foundation can be very useful for sharing documents, calendars, and other information, and are often used by large and small companies alike to enable collaboration among groups of people. These foundational features do have some limitations, however, and that’s where MOSS and SharePoint Server 2010 come into play.
These products extend SharePoint functionality in several ways:
Collaboration and social computing Features such as wikis and blogs enable people to share ideas and information in a variety of ways. My Sites adds the capability for each user to have a personal site to share information with others as well as work with his own files, Microsoft Exchange Server mailbox, and other information within a SharePoint web interface. Support for Really Simple Syndication (RSS) feeds enables users to consume RSS content within SharePoint and subscribe to SharePoint content through RSS.
Portals Additional web parts and support for audience targeting and personalization enable you to tailor and deliver a broader range of information to your users, but in a more targeted fashion.
Enterprise content management ECM encompasses a range of features, including additional capabilities for document management and sharing and a publishing infrastructure to provide controlled deployment of content with various approval mechanisms.
Records Management You can use SharePoint to store and manage records, such as email, in addition to documents. Versioning, expiration, and other features help you effectively manage the data.
Business processes and forms Enhanced workflow capabilities make it easier to use out-of-the-box SharePoint features for multi-party document approval and other business process automation.
Enterprise search Extend a search across your enterprise to include file servers, websites, line-of-business systems, and other data, making that data searchable and discoverable within SharePoint.
Business intelligence Use the BDC or BCS to connect to back-end line-of-business systems to expose that data in SharePoint and provide a common interface for users to both consume and modify data stored in those back-end systems. Also use features such as Excel Services to create key progress indicator (KPI) reports, dashboards, and other portal elements that bubble up and organize data from a variety of sources.
As stated earlier, one of the key features of SharePoint is the ability to integrate with Microsoft Office applications. These features include document sharing, which can be done from almost any Office application; lists, which can be synchronized with Microsoft Excel or Microsoft Access files; and Calendar lists, contacts, and alerts, which can be linked to Outlook. In addition, Microsoft SharePoint Designer can be used to edit and customize SharePoint pages. This chapter focuses mainly on the integration of SharePoint and Outlook 2010 to help you consume SharePoint information in Outlook, as well as publish your Outlook data to SharePoint. Before diving into SharePoint and Outlook integration, this chapter explores and explains some common SharePoint tasks and how to accomplish them, starting with setting up alerts.
Alerts are used when you want to be notified when content on a SharePoint site changes, such as when a document is modified or a new item added to or modified in a list. Alerts are sent through email. For example, if a document changes for which you have configured an alert, you receive an email when someone else has modified the document.
To set up an alert in a WSS 3.0 or MOSS site, follow these steps:
Locate the content for which you want to configure the alert. This can be virtually anything on the SharePoint site.
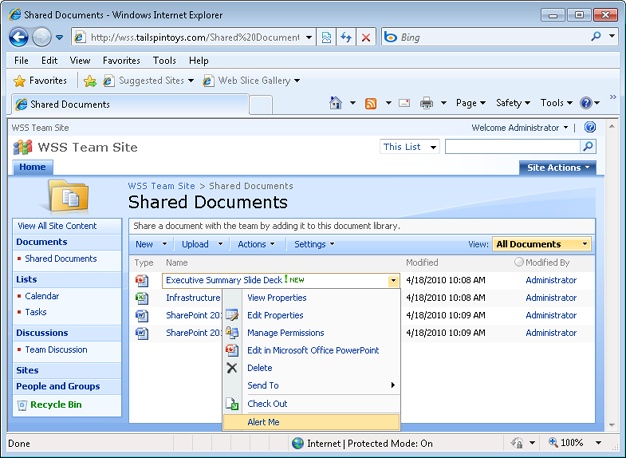
Click an item in a library. A menu appears, as shown in Figure 38-1. Select Alert Me to be alerted when that item is changed.
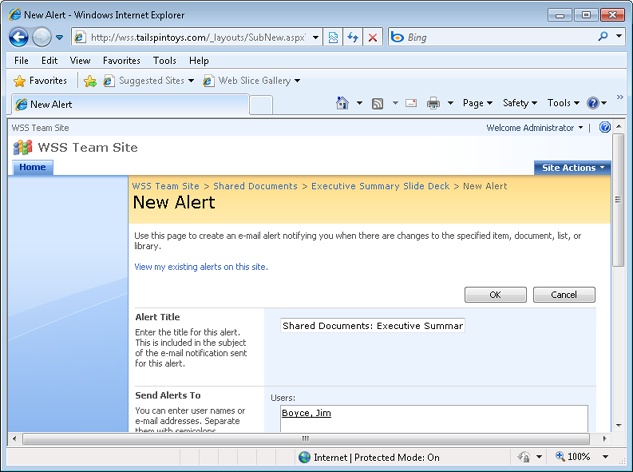
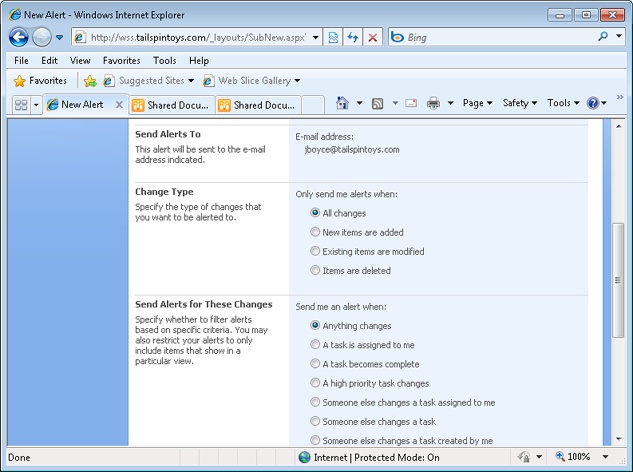
The New Alert page, shown in Figure 38-2, displays the email address to which alerts will be sent. On this page, select the types of changes you want to be alerted about. Some of the options shown in the figure are not available if you are configuring an alert for a specific item. You can be alerted about all changes; item additions, changes, or deletions; or updates to discussions involving the selected item or library.
Select the frequency for alerts from this item or library. The default setting sends an alert message every time the alert is triggered. You can also elect to receive only a daily or weekly summary of alerts. These options are useful if the item or library for which you are configuring the alert changes often.
Click OK, and the alert will be configured.
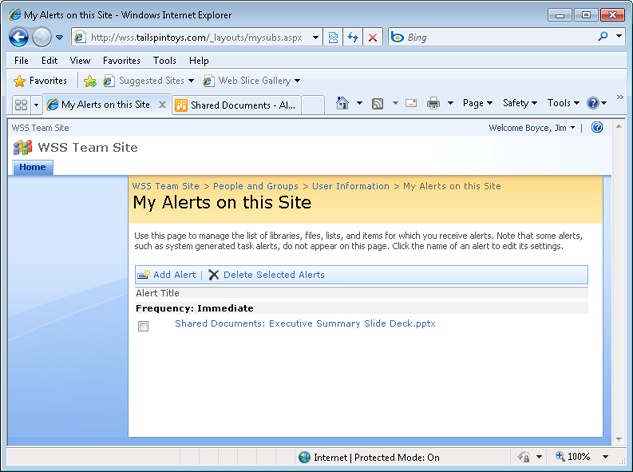
After you have created an alert, you will be notified each time the alert criteria set on the New Alert page are met. You can view a list of all the alerts you have configured on the site by clicking View My Existing Alerts On This Site on the New Alert page. The My Alerts On This Site page, shown in Figure 38-3, shows all the alerts you have configured on the site. You can delete alerts by selecting the check boxes next to the alerts that you want to delete and then clicking Delete Selected Alerts. It is also possible to add an alert for a list or document library (although not individual items) on the My Alerts On This Site page. To do this, click Add Alert, select the library or list for the alert, and then click Next. Set the options on the New Alert page as described earlier in this section.
You use a somewhat different approach to adding alerts in SharePoint Foundation 2010 and SharePoint Server 2010 sites. This method also is available in WSS 3.0 and MOSS sites for adding alerts to entire lists or libraries, although the interface is somewhat different.
Follow these steps in SharePoint Foundation 2010 and SharePoint Server 2010 sites to add alerts for an entire list or library:
Navigate to the site containing the item for which you want to configure an alert.
Click your name (by default in the upper-right corner of the page) and choose My Settings.
Click the My Alerts link to show the My Alerts On This Site page.
Click Add Alert.
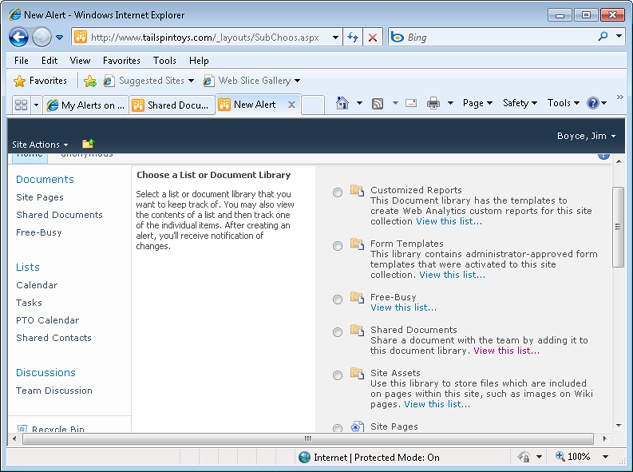
On the New Alert page (see Figure 38-4), if you want to receive alerts for an entire list or library, select the item by clicking the radio button beside it.
Click Next. The resulting page will vary according to the type of list chosen. Figure 38-5 shows the page for a Tasks list.
Choose the settings to apply to the alert, including the alert title, change type, and frequency, and then click OK.
You use a different process to add an alert for a single item in a SharePoint Foundation 2010 or SharePoint Server 2010 site:
Navigate to the list or document library that contains the item for which you want to receive an alert.
Pause the mouse over the item and click the drop-down button to open the context menu for the item.
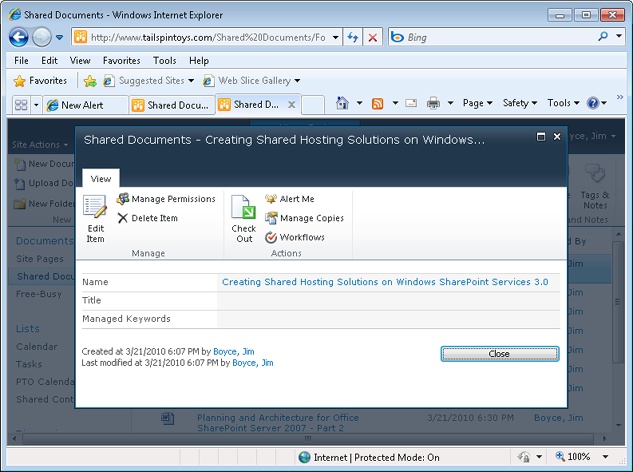
Click View Properties.
In the resulting dialog box (see Figure 38-6), click Alert Me.
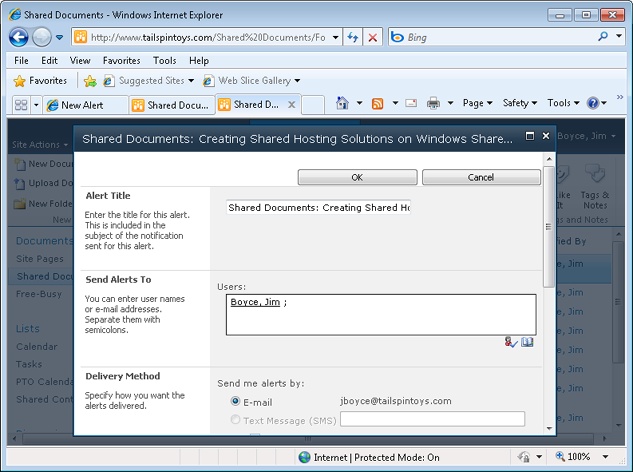
In the resulting form (see Figure 38-7), choose the settings for the alert and click OK.
Document sharing is simple with SharePoint, and it can be done in one of two ways. If you have an existing Office system document, it is an easy process to add the document to a SharePoint document library. If you don’t already have a document created, you can create the document directly on the SharePoint site. When you create a document in a SharePoint site, the appropriate application opens automatically and the template associated with the document type in SharePoint is used. You can then save the document to your local computer or to the SharePoint site.
In addition to creating and adding documents to the SharePoint site, you can do a number of things with existing documents in SharePoint: You can edit or remove existing documents, and you can use features such as document version history, checkout, and check-in to control versions.
To upload a document to a document library, follow these steps:
Locate and open the document library.
In the document library, click the down arrow next to the Upload button. Click Upload Document to upload a single file, or click Upload Multiple Documents to upload several files at once.
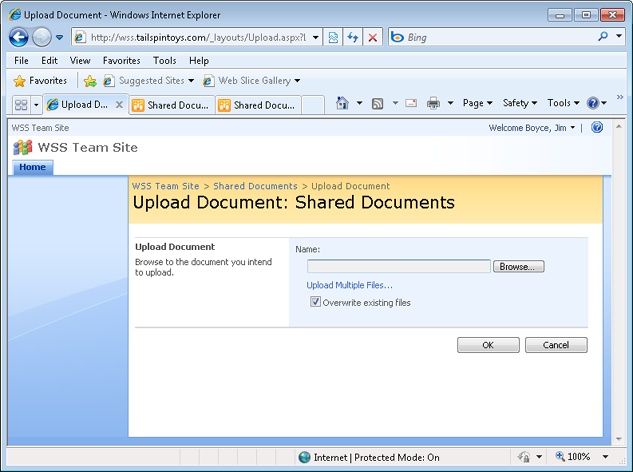
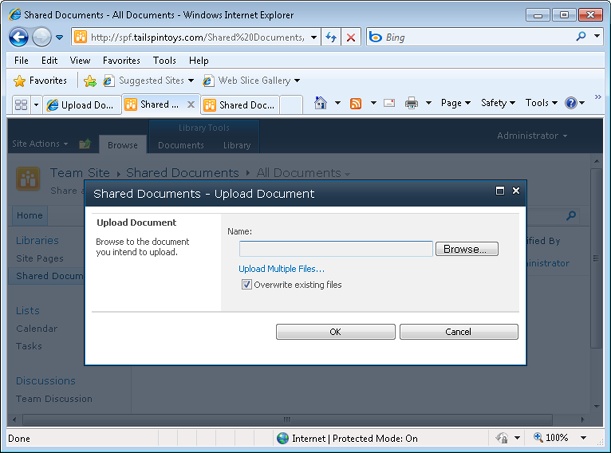
On the Upload Document page, shown in Figure 38-8, click Browse, locate the file to upload, and then click Open. You can also click Upload Multiple Files to open a Windows interface–style browser from which you can select multiple files to upload.
Existing files with the same name as the file or files being uploaded are not overwritten by default. If you want to overwrite any existing files, click the Overwrite Existing Files check box (but make sure you really want to overwrite the existing files before doing so).
After you have specified or selected the files to upload, click OK. The documents are uploaded, and the Documents page appears.
You will now see the uploaded file listed in the document library.
Uploading a document to a SharePoint 2010 site is a little different because of the interface changes. To do this, follow these steps:
Open the document library where you want to upload the document.
In the Upload Document form (see Figure 38-9), specify the document and then click OK.
In addition to uploading an existing document to a document library, you can create a new document directly from the document library. The new document is created using the document template associated with the document library. By default, the Microsoft Word document template is associated with document libraries. The Document Template setting is configured when a new document library is created, and you can set it for an existing document through the settings for the document library (on the Advanced Settings page).
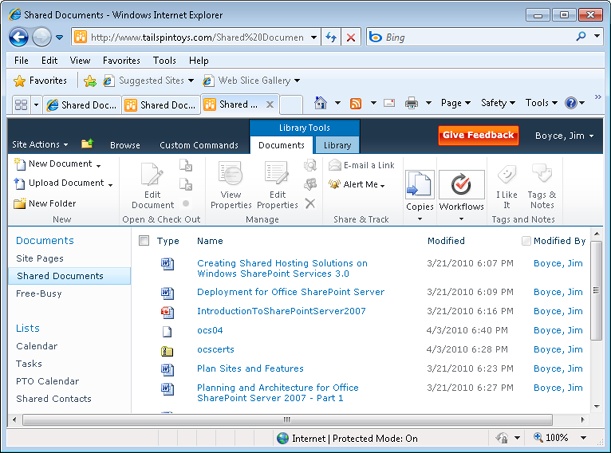
To create a new document, first open the document library in which you want to create the new document. For WSS 3.0 and MOSS, click the down arrow beside New and choose New Document. For a SharePoint 2010 site, click Documents on the Library Tools tab on the ribbon (see Figure 38-10), and then click New Document on the ribbon.
The Office system application associated with the document template specified for the selected document library is downloaded and opened in its native application, such as Word. Create and then save the new document to the document library (or to your local computer, and then upload it to SharePoint).
Your newly created document will now be shown in the document library.
Document options for each item in a document library are found in the item’s drop-down menu. Position the mouse pointer over a document name and a drop-down arrow appears. When you click the arrow, the Item drop-down menu (shown earlier in Figure 38-1) appears. From this menu, you can edit the document (clicking the document name also has this effect); view or edit the document properties, which include the name and a descriptive title for the document; delete the document from the library; manage permissions; start workflows; and check in or check out the document.
The key features in a shared document library are the version control features. In SharePoint, these features include the ability to check a document in and out as well as view its version history. When you check out a document, other users can no longer edit the document until you return it to the document library by checking it in.
To check out a document, simply choose Check Out from the Item drop-down menu, as shown in Figure 38-11. Click OK when warned that you are about to check out the document. The icon in the Type column changes to display a green arrow to indicate that the document is checked out. After you specify that you want to check out the document, click the Item drop-down arrow again and click Edit In Microsoft Word (or whichever application name appears). The document is downloaded to your computer and displayed in the application for editing.

When you have finished editing, you can save the document with or without checking it in. To save without checking it in, click File, Save. If you then close the document without checking it in, whichever Office application you are using prompts to ask if you want to check in the document. You can click Yes to check it in, or you can choose No and then return to the SharePoint site and check in the document.
Checking a document back into the document library from SharePoint is handled from the same drop-down menu as checking out. Click the Item drop-down arrow, and then click Check In. The Check In page shown in Figure 38-12 is displayed. Enter any comments for the version history, and then click OK. A message box appears, asking whether you want to continue. Click Yes. The document is then checked in.
Tip
INSIDE OUT Force the check-in of a document
A site administrator can force the checking in of a document even if another user has it checked out. This can be useful, for example, if a user checks out a document and forgets to check it back in and then leaves for the day, and other users want to work with it. Changes made while the document was checked out (by the user who forgot to check it back in) might be lost in this case.

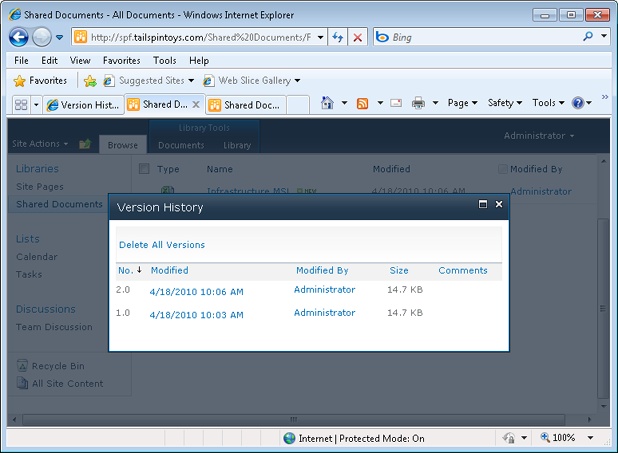
In the document library, choose Version History from the Item drop-down menu for a document. If version history is enabled for the document library, every time a document is checked in, it will appear in the version history, as shown in Figure 38-13. You can view each version of the document by pausing the mouse pointer over the date and time for a version and then clicking View. You also can restore a document by clicking the Restore option on this drop-down menu. You can delete old versions by clicking Delete Minor Versions, or click the Delete All Versions link to delete all document versions.
Tip
INSIDE OUT Enable version history
Before you can use version history in a SharePoint document library, versioning must be turned on. To do this in WSS 3.0/MOSS, click Settings in the document library and choose Document Library Settings. Click Versioning Settings and choose the desired version settings. To do this in SharePoint 2010, open the library, click the Library tab in the Library Tools group on the ribbon, and click Settings, Library Settings. Click Versioning Settings and set the desired options.
SharePoint provides lists that can be used to store, manage, and share a variety of information. One of the defined list types is contacts, which is used to store contact information in a way similar to the Contacts folder in Outlook. You can view these shared contacts within SharePoint or connect them to Outlook. This section explains how to use these shared contacts in Outlook.
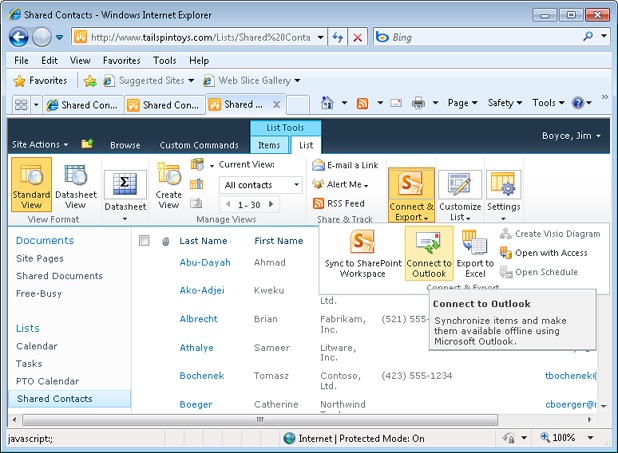
Start by navigating in SharePoint to the contacts list you want to use in Outlook. Click the List tab in the List Tools group on the ribbon, then click Connect & Export and choose Connect To Outlook (see Figure 38-14). If you are working with a WSS 3.0 or MOSS site, click Actions, Connect To Outlook. (You don’t need to click Connect & Export if your screen size is large enough that the Connect To Outlook item appears in the Connect & Export group.)
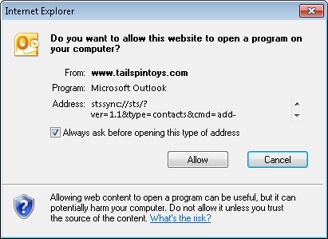
A dialog box opens, similar to the one shown in Figure 38-15, prompting you to allow the connection. The dialog box indicates the Uniform Resource Locator (URL) of the site and other information. Click Allow. Outlook then displays a dialog box that prompts you to confirm that you want to add the list to SharePoint. You can simply click Yes to add the list to Outlook without configuring any other settings. Alternatively, click Advanced to display the SharePoint List Options dialog box shown in Figure 38-16.
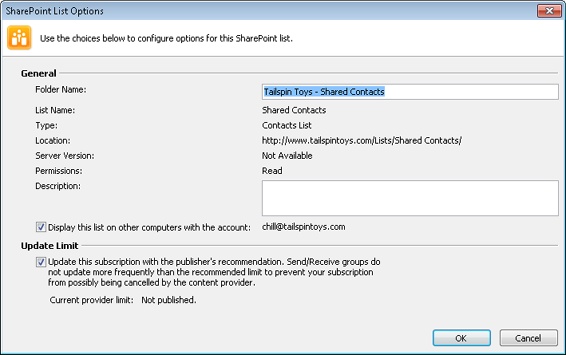
In the SharePoint List Options dialog box, use these two options to control the connection:
Display This List On Other Computers With The Account Choose this option to include the SharePoint list on other computers from which you use Outlook.
Update This Subscription With The Publisher’s Recommendation If the SharePoint list is published through RSS, this setting determines how frequently the content is synchronized to Outlook based on the content’s Time To Live (TTL) value. If no value is specified, the update defaults to 60 minutes. If you want to synchronize the content more frequently, clear this check box and create a custom send/receive group to update your SharePoint list(s).
When you are satisfied with the settings, click OK, and then click Yes. The SharePoint list appears in the Navigation pane when your Contacts folder is open, and the contents of the SharePoint list appear in Outlook, as shown in Figure 38-17.
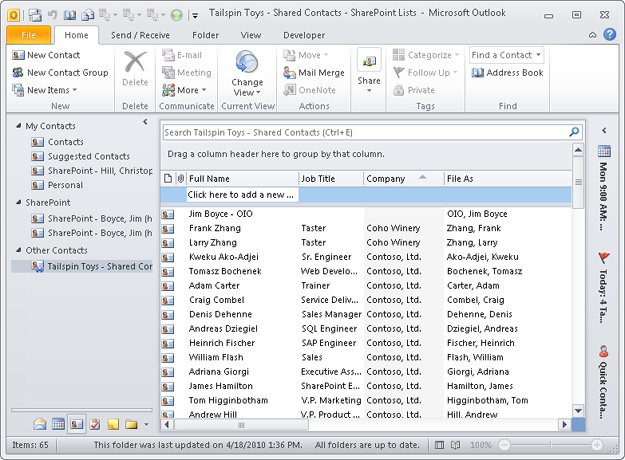
With the list now connected to SharePoint, you can work with it just as you would a local Contacts folder. You can view individual items and even update items, subject to your permissions in SharePoint. Changes that you make in Outlook to the list are synchronized back to the SharePoint list the next time a send/receive action occurs for the list.
You can connect a SharePoint Calendar list to Outlook 2010, just as you can a Contacts list. SharePoint calendars are typically used to share schedules such as project timelines, vacation schedules, and so on. When you create a team site in SharePoint, the site includes a Calendar by default. When you connect the SharePoint calendar to Outlook, the calendar looks and functions just like the calendars in your local Outlook data store(s). Subject to your permissions in the SharePoint calendar, you can modify the SharePoint calendar in Outlook and the changes are synchronized to SharePoint the next time a send/receive action takes place for the list.
To link a Calendar list to Outlook 2010, follow these steps:
Open the SharePoint site and navigate to the calendar you want to connect to Outlook.
For WSS 3.0 or MOSS, click Actions, and then click Connect To Outlook. For SharePoint 2010, click the Calendar tab in the Calendar Tools group on the ribbon, and then click Connect To Outlook in the Connect & Export group on the ribbon.
If you receive a prompt from Internet Explorer, click Allow. Then click Yes to add the SharePoint calendar to Outlook.
When the calendar is linked to Outlook 2010, it is displayed as shown in Figure 38-18. You can see the new calendar listed in the Navigation pane on the left.

If you have Contribute permissions in the SharePoint calendar, you can modify the SharePoint calendar from within Outlook. Just click in or select a time slot and add appointments as you would for a local calendar. The next time a send/receive action occurs for the list, those changes are synchronized to the SharePoint list, where they will be visible by other SharePoint users.
Because SharePoint calendars that are linked to Outlook function like Outlook calendars, you can use the same features for both. For example, you can overlay a SharePoint calendar on one or more of your local calendars for a combined view. Just select the calendars in the Navigation pane to display them, and click the View In Overlay Mode button at the top of the calendar to overlay it with the others.
To manage settings for SharePoint lists in Outlook, click File, Account Settings, and finally Account Settings. In the Account Settings dialog box, click the SharePoint Lists tab, as shown in Figure 38-19.
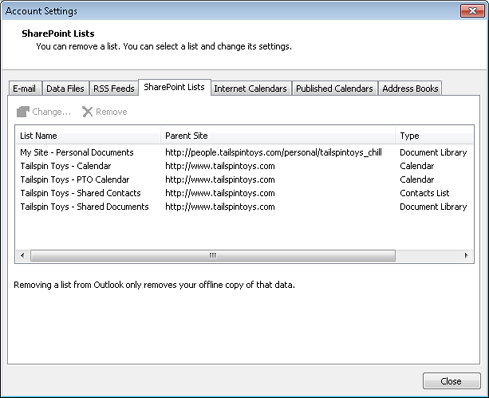
To change the settings for a SharePoint list’s connection to Outlook, click the list and then click Change. The SharePoint List Options dialog box, similar to the one shown earlier in Figure 38-16, is shown. You can use this dialog box to change update limits and specify whether the list appears on all computers where you run Outlook. To remove a connected SharePoint list from Outlook, click the list on the SharePoint Lists tab and then click Remove. Removing a list from SharePoint only breaks the connection to SharePoint; it does not delete the SharePoint list itself from SharePoint.
We looked at alerts in the section Setting Up Alerts, on page 909. If you received alerts from multiple sources, you might prefer to manage those alerts from Outlook. Although Outlook doesn’t technically provide the features or capabilities to manage your alerts from the Outlook interface, it does enable you to navigate to your alerts from the various sources currently sending you alerts.
To manage SharePoint alerts from Outlook 2010, follow these steps:
Configure an alert for a resource on the SharePoint site. The alert notification will be sent to you through email and will appear in your Inbox.
Ensure that a mail folder is open.
On the Home tab on the ribbon, click Rules, Manage Rules And Alerts. The Rules And Alerts dialog box appears.
Click the Manage Alerts tab, shown in Figure 38-20. Wait for Outlook 2010 to retrieve alert information from the SharePoint site(s).
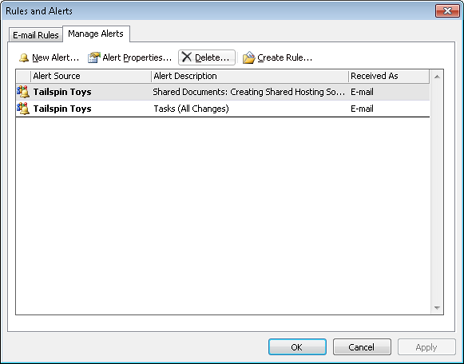
Figure 38-20. The Manage Alerts tab in the Rules And Alerts dialog box is used to manage SharePoint alerts directly from within Outlook 2010.
Note
You must configure the first alert manually from the SharePoint site because when an alert is processed by Outlook 2010, the site is trusted, and you can then manage alerts from the Rules And Alerts dialog box. It is possible to manage alerts without first configuring an alert through the SharePoint site if an administrator adds the site as a trusted domain for alerts.
You can now work with alerts directly within the client computer running Outlook 2010. To add a new alert, follow these steps:
Click New Alert on the Manage Alerts tab in the Rules And Alerts dialog box.
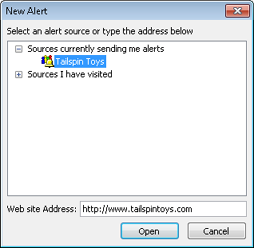
Expand Sources Currently Sending Me Alerts in the New Alert dialog box.
Select the SharePoint site in the list, as shown in Figure 38-21, and then click Open. You can also type the URL for the SharePoint site in the Web Site Address box and then click Open.
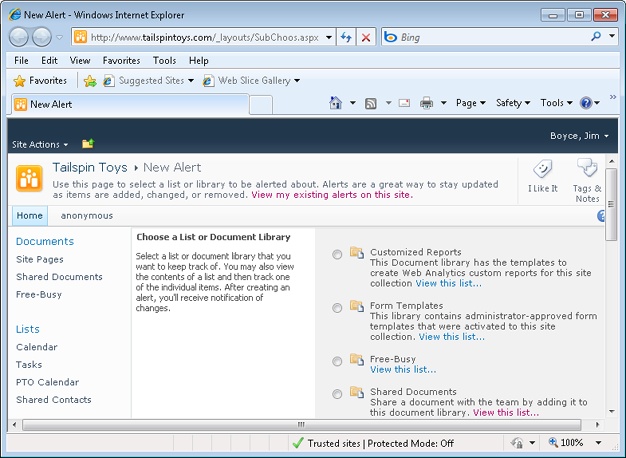
The New Alert page on the SharePoint site opens automatically in a web browser, as shown in Figure 38-22. Select the list or document library for which to set the alert, and then click Next.
Set the alert type and frequency as described in the section Setting Up Alerts, on page 909.
Click OK to set the alert. You are then taken to the My Alerts On This Site page on the SharePoint site to review your alerts.
Switch to Outlook 2010.
Click OK to close the Rules And Alerts dialog box.
Reopen the Rules And Alerts dialog box.
Click the Manage Alerts tab in the Rules And Alerts dialog box. The new alert is shown on the Manage Alerts tab in the Rules And Alerts dialog box.
In addition to adding alerts directly from within Outlook 2010, you can edit existing alerts by following these steps:
Select the alert that you want to edit on the Manage Alerts tab in the Rules And Alerts dialog box, and then click Alert Properties.
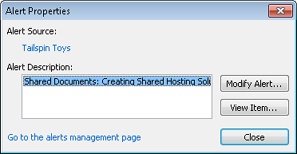
The Alert Properties dialog box opens, as shown in Figure 38-23. This dialog box shows the alert source as a clickable link to the home page of the SharePoint site and includes a link to the main alerts management page in SharePoint. Click Modify Alert to edit the alert.
The Edit Alert page on the SharePoint site opens in the web browser. Make any changes you need on the Edit Alert page, and then click OK. You can also click Delete to remove the alert.
You can also remove alerts on the Manage Alerts tab by selecting the alert and then clicking Delete. You are prompted to verify the deletion, and the alert is removed when you click Yes.
If you have a lot of alerts configured in a SharePoint site (or multiple sites), they can fill your mailbox quickly and distract from other messages. Outlook 2010 provides a simple way to create rules based on alerts. As you learned in Chapter 11, rules are used to process messages when they arrive in your mailbox. To configure a rule based on an alert, follow these steps:
Select the alert for which to configure a rule on the Manage Alerts tab in the Rules And Alerts dialog box.
Click Create Rule.
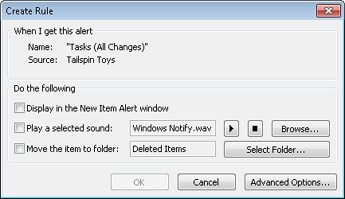
The Create Rule dialog box opens, as shown in Figure 38-24. Specify what Outlook 2010 should do when it receives the selected alert. You can have Outlook 2010 display the alert in the New Item Alert window, play a sound, and move the message to a new folder.
You can click Advanced Options to open the Rules Wizard and go into more detailed configuration for the rule. Use of the Rules Wizard is explained in Chapter 11. In most cases, this is not necessary for a basic alert.
Click OK to create the rule.
When the rule is created, Outlook displays the Success dialog box, shown in Figure 38-25. You are notified that the rule is a client-side rule and given the option to run the rule against your mailbox immediately to find any messages that fit the rule criteria.
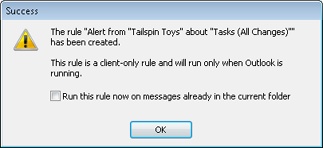
After you click OK in the Success dialog box, you can see the newly created rule by clicking the E-Mail Rules tab in the Rules And Alerts dialog box, which is already open.
As already explained in previous sections of this chapter, you can connect SharePoint lists and document libraries to Outlook 2010. This makes the library and its items available within Outlook 2010 so that you don’t have to use a web browser to view and work with them—you can use Outlook 2010 instead. For example, you might want to have a list of current project documents that have been uploaded to your team’s SharePoint site as you create email messages to update your team members, support staff, and management. By having the list of documents appear in Outlook, you can view the document name, its status, and other information quickly without leaving Outlook. Also, if you open a SharePoint document from within Outlook, that file is stored locally on your hard drive while you view it. This makes the document open faster and reduces network traffic. If you make any edits to the document, you then check in the file to the SharePoint site. Files are stored on your hard drive in your personal folders (.pst) file.
Caution
Before you connect a document library to Outlook, make sure you understand the consequences in terms of disk space. If the SharePoint document library contains 2GB of documents, the synchronized copy on your computer will take the same amount of space on your local computer.
To use Outlook 2010 to view and work with your SharePoint documents, first connect the SharePoint library to Outlook 2010. This enables SharePoint and Outlook 2010 to synchronize your files so that you can have them available for offline use in Outlook.
To connect a library to Outlook 2010, follow these steps:
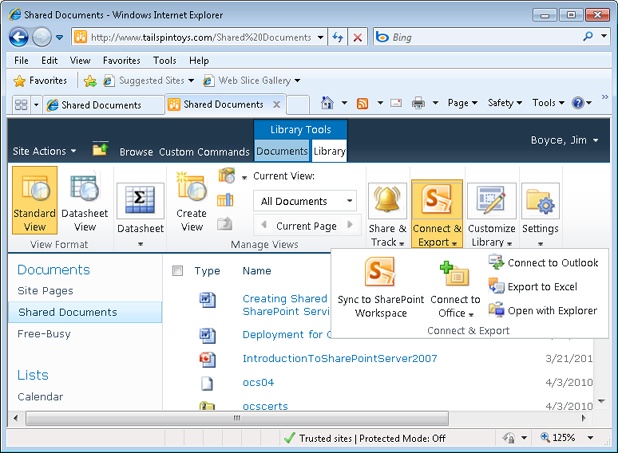
Navigate to the document library that you want to connect to Outlook. Click the Library tab in the Library Tools group on the ribbon, click Connect & Export, and then choose Connect To Outlook (see Figure 38-26). For a WSS 3.0 or MOSS site, click Actions, Connect To Outlook.
A warning message might appear, telling you that you should connect lists only from sources you trust. Click Allow if you trust the source. Otherwise, click Cancel.
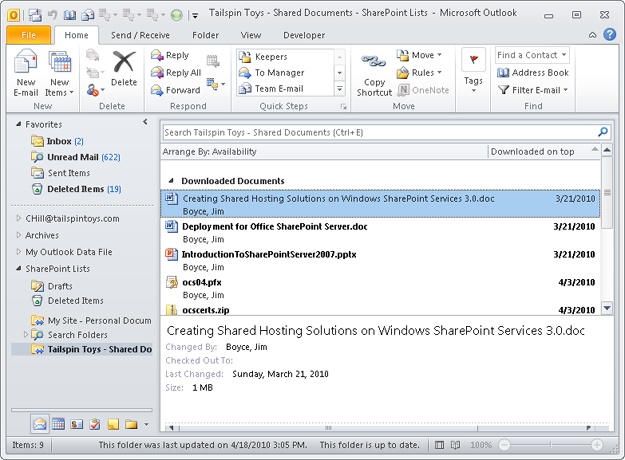
Click Yes. Outlook starts a send/receive action to synchronize the documents. When finished, Outlook 2010 displays the library as a SharePoint list, as shown in Figure 38-27.
The libraries that you connect to Outlook 2010 are in the SharePoint Lists branch in the Navigation pane.
Sometimes when you connect a SharePoint library to Outlook 2010, the library is too large to download to your local hard drive. Instead, Outlook 2010 displays a group named Available For Download in the message list area. You can use this group to select individual files that you want to download to Outlook 2010. You can use the Ctrl key to select multiple files to download. Some files might include a button in the preview window labeled Download This Document. Click that button to download the file.
Once you have a SharePoint library connected to Outlook 2010, you can open files stored in that library from within Outlook. Outlook enables you to view a number of different file formats, including the following:
Word documents
Excel worksheets
Microsoft PowerPoint presentations
Adobe Portable Document Format (PDF) files
Pictures
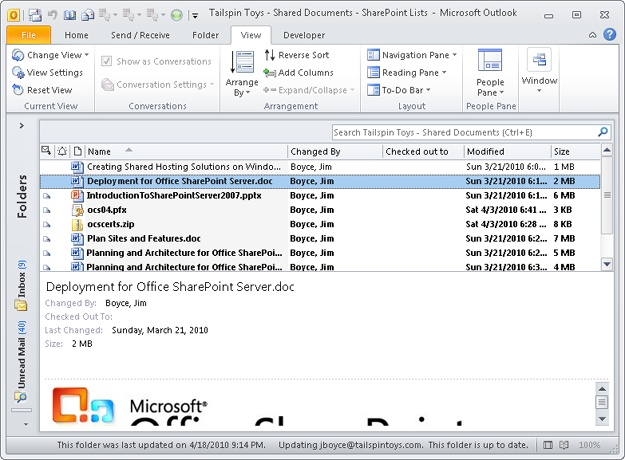
To open a SharePoint library file in Outlook 2010, browse to a folder in the SharePoint Lists folder in the Outlook 2010 Navigation pane. Click a folder to display that folder’s list of files in the messages list. Files are displayed here just like email messages. Each file, however, includes information about that file, such as name, file format, last user to edit the file, checkout information, modification date and time, and size. Figure 38-28 shows the messages list pane resized to display all the file details for files in a SharePoint document library.
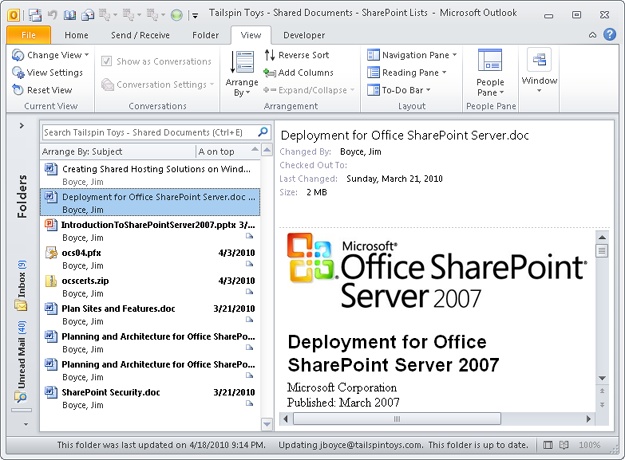
To view a file, you can click it to display the file in the Outlook 2010 Reading pane. For example, Figure 38-29 shows a Word file displayed in the Reading pane.
Not only can you open and view SharePoint files in Outlook 2010, you also can edit them. Before doing so, however, you should return to the SharePoint site and check out the document so that no one else can work on the document while you are working on it. (Outlook 2010 does not provide a way to check out the document locally.)
To edit the file, double-click it. The file opens in the default application for that file format (for example, an .xlsx file opens in Excel 2010, .pptx in PowerPoint 2010, and so on). For applications compatible with SharePoint, a banner appears across the top of the document telling you that the document is an offline server document and that you should save the file to the server later, as shown in Figure 38-30.
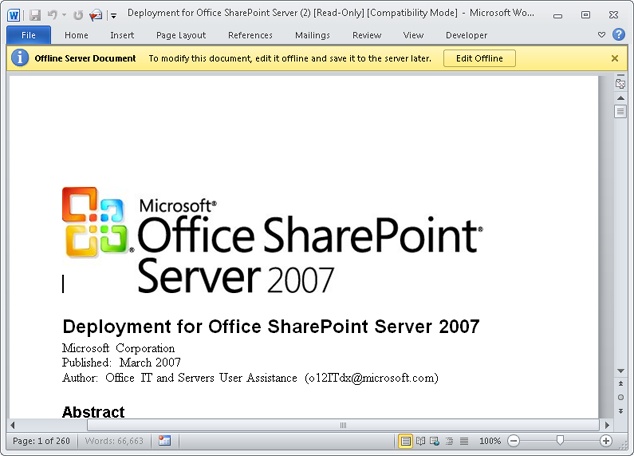
Figure 38-30. The Offline Server Document banner reminds you that the file that you are editing needs to be updated to the server later.
Click Edit Offline. A message box appears, telling you that the document will be stored on your computer in the SharePoint Drafts folder. Click OK, and then edit the file. After you complete your edits, click File, Save to save the file, and then close the application. If you are connected to your SharePoint site at this time, the Edit Offline dialog box appears. You can click Update to update the SharePoint site with your edited file. (You also can click Do Not Update Server to update the server later.)
When you click Update, the application (such as Word 2010) saves the changes to the SharePoint site.
If you chose not to update the files using the Update button, return to Outlook 2010 and then click Send/Receive when you are ready to update your files. Outlook 2010 synchronizes with the SharePoint Site to save your changes in the online library.
You can remove one or more files from a SharePoint library list in Outlook 2010 without actually removing the documents from the SharePoint library. The document remains on the server, but it is removed from your cached list in Outlook. This feature simplifies browsing libraries that contain a large number of items.
To remove files from a SharePoint library that have been connected to Outlook, follow these steps:
In the Outlook 2010 Navigation pane, select the library that contains the files you want to remove.
Click the file that you want to remove. To remove multiple files, press Ctrl as you click the files.
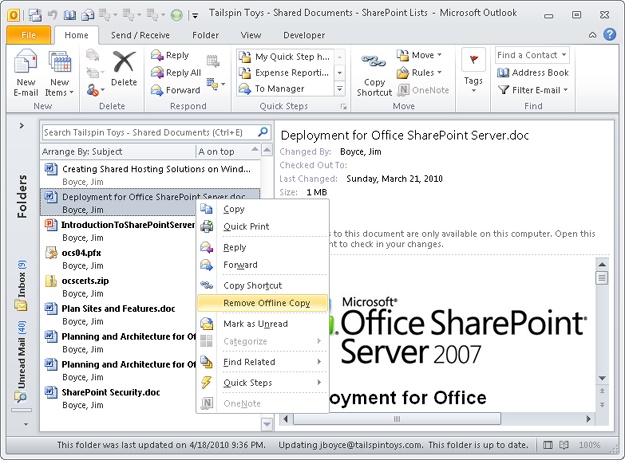
Right-click the file, and then choose Remove Offline Copy, as shown in Figure 38-31.
When you remove a file from Outlook 2010, the Reading pane no longer displays the preview of the file, and the file shows as available for download. Outlook 2010 moves the file to the Available For Download group and adds a Download This Document button to the file.
If you don’t need a particular library anymore, you can remove it from Outlook 2010 easily. Removing the library does not affect it on the SharePoint site; it only removes it from the Navigation pane in Outlook. One thing to keep in mind, however, is that if you have not sent updates to the SharePoint site before you delete the folder, you will lose any edits that you made to the offline files.
To remove a SharePoint folder, right-click it in the Navigation pane. On the shortcut menu that appears, click Delete Folder and then click Yes.
If the SharePoint document library is configured to accept documents by email, you can add a document to a library simply by sending an email message, with the document attached, to the library. This is handy if you do not want to go through the process of opening your web browser, connecting to your SharePoint site, locating a library, and uploading the file to it.
To use this feature, you need to know the email address for the library to which you plan to send the file. Some organizations include the email address for libraries in their address book. If you have access to the list’s settings, look in the List Information area for an E-Mail Address item. If your library is configured to receive files via email, the address will appear here.
Others might include the email address as part of the library’s description—for example, placing the address beneath the title of the library so that users can see it while viewing the library in a web browser. After you get the address, if your company does not already include the address in your Contacts folder or in the Outlook Address Book, add it to your Contacts folder.
After you get the email address, return to Outlook 2010 and then create your message. Attach the file that you want to send to the SharePoint site. Add the address of the library in the To box, and then click Send.
Note
Some organizations use SharePoint groups so that users can send an email message and attachment to other members in a group. When you do this, the attached file is added to the SharePoint site automatically. If this is the case, type the address of the SharePoint group in the To box instead of the library address. The SharePoint group will already have the library address configured.