The tiles on the Start screen don’t represent all of your programs—only the ones to which you want quick access (just like the old Start menu). But there will come a time when you want to add a new program’s tile here.
Installing a new app’s tile to the Start screen is called pinning it. You can pin either TileWorld apps or Windows desktop programs to the Start screen.
And apps are just the beginning. Eventually, you’ll discover that you can also pin tiles for Web sites, playlists, photo albums, people from your contacts list, mail accounts or mailboxes, icons from desktop Windows, and more.
But first things first: pinning apps.
Windows 8 offers two ways to pin TileWorld apps to the Start screen: from the All Apps list, or from the Search screen.
One way to find the app you want to pin is to use the Apps screen.
1. Open the Apps screen.
To open this list from the Start screen, use one of these techniques:
Touchscreen: Swipe up anywhere on the screen.
Mouse: Click the
 that appears when you move your cursor
toward the lower-left side of the screen.
that appears when you move your cursor
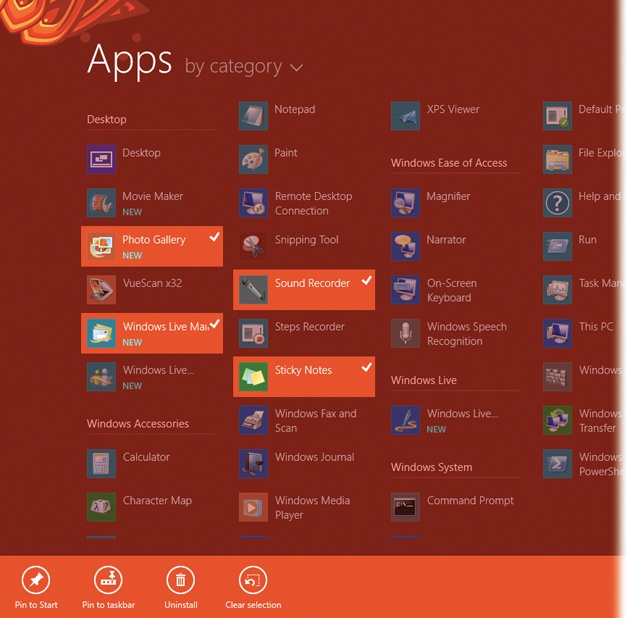
toward the lower-left side of the screen.The master list of every program installed on your computer, both TileWorld apps and Windows desktop programs, is now arrayed before you (Figure 2-1).
2. When you find the icon you want to pin to the Start screen, “right-click” it:
Touchscreen: Hold your finger on its icon until it bulges briefly (one second).
Mouse: Right-click its icon.
Keyboard: Use the arrow keys to highlight the program’s icon, and then press the space bar.
In each case, the App bar now appears—and it contains a Pin to Start button.
4. Select Pin to Start.
When you select that button, the selected program’s icon now appears on the Start screen—at the far right. (You might have to scroll through a few “pages” to see it.) You can always move it into a better position, as described below.
If you know the name of the app you want to pin, it may be faster to find it using search.
Touchscreen: Open the Charms bar (swipe in from the right edge); tap Search. Type the app’s name.
Keyboard: From the Start screen, just start typing the app’s name.
Once you see the app’s name and icon in the search results, proceed as described from step 2 above.
It may be screamingly obvious that the Start screen belongs to the new TileWorld. But it’s going to be your primary launcher for regular Windows desktop icons, too, so you’d better figure out how to pin files, folders, disks, libraries, and programs from the Windows desktop here, too.
From the Start screen, jump to the Windows desktop.
Touchscreen: Tap the Desktop tile.
Right-click the icon you want to pin.
It can be anything that would have appeared in the Start menu in days of yore: a folder, a program, a document, a photo, whatever.
Here’s how you right-click in the desktop world:
Touchscreen: Hold your finger down on an icon for about a second.
Mouse: Right-click an icon.
Keyboard: Select the icon; press the
 key (or Shift+F10).
In each case, the shortcut menu appears.
In the shortcut menu, choose Pin to Start.
It might look like nothing has happened. But in the parallel universe of TileWorld, you have indeed installed this desktop icon’s tile on the Start screen. (Once again, it appears at the far right of the last page of the Start screen, so you may have to scroll to find it.)

Windows software giveth, and Windows software taketh away. You may someday decide that a tile you never use should not be taking up precious real estate on the Start screen. Or some software installer may someday have the gall to put its tile on your Start screen without asking you. Or you may not want to have to keep looking at the junkware that came preinstalled on your Start screen by your PC manufacturer.
Getting rid of a tile is easy as pie:
Touchscreen: Hold your finger down on the tile for about a second.
Mouse: Right-click the tile.
Keyboard: Use the arrow keys to select the tile, and then press the space bar.
In each case, the App bar now appears at the bottom of the screen. Hit Unpin from Start.
Note
You’re not uninstalling anything. Whatever you’ve just unpinned is still on your computer—it just no longer has a tile on the Start screen. If you find yourself seized with remorse, you can always put its tile back onto the Start screen as described above.
You can also unpin a bunch of apps all at once; see the box on Multiple Selections.
You can, of course, drag the Start screen’s tiles into a new order, putting the personal back into personal computer.
Most tutorials cheerfully inform you that you can simply drag tiles into new positions. And that’s works fine if you have a mouse.
But if you’re using a touchscreen, that instruction leaves out a key fact: Dragging scrolls the Start screen itself! Instead, follow the trick shown in Figure 2-2.
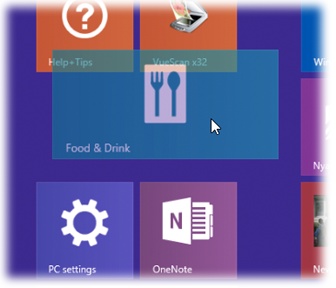
Figure 2-2. To move a tile, first hold your finger on it until it bulges slightly (and the App bar appears). Once you do that, you’re free to drag it anywhere you like; the unhooked tile follows your finger.
As you drag, the other tiles scoot out of the way as you find a new place for the unhooked tile.