Microsoft’s dearest hope for TileWorld is that it will become as ubiquitous, recognizable, and popular as the iPad. And as simple: full screen, no menus, no dialog boxes, no file structure.
What? No file structure? You can’t save and name a file, or open an old one?
That’s going too far. It may fly on the iPad, but Windows 8 needs to get real work done.
Therefore, here and there in TileWorld apps, you’ll run into something called the File Picker (Figure 3-14). In the days of Olde Windows, it was called the Open dialog box. But the idea is the same: It lets you navigate to any folder on your hard drive so that you can hunt for a file or a document that you want to open.
Now, in the real desktop world, the Save and Open dialog boxes are miniature desktops. They have columns that you can sort or widen, a list of folder links down the left side, a toolbar, and so on.
The File Picker serves the same purpose—it lets you navigate all the folders of your computer—but it’s been incredibly stripped down. If the Open dialog box is a Boeing 767, the File Picker is a kite.
Here are its elements, newly overhauled in Windows 8.1:
This PC
 . This is actually a pop-up menu. It lists
the primary sources of files that TileWorld can access, like
SkyDrive (files stored online, on your free 7-gigabyte
SkyDrive), This PC (files on your machine), Homegroup (your home
network, if you’ve set one up), and Network (other computers on
your office network).
. This is actually a pop-up menu. It lists
the primary sources of files that TileWorld can access, like
SkyDrive (files stored online, on your free 7-gigabyte
SkyDrive), This PC (files on your machine), Homegroup (your home
network, if you’ve set one up), and Network (other computers on
your office network).Tip
You can operate this menu in all the usual ways: with your finger (if you have a touchscreen), with the mouse, or with the arrow keys (press the space bar to “click” something).
Once you’ve chosen a source, you see its folder contents, as shown in Figure 3-13. Tap or click a folder to open it. (You see the folder’s name above the tiles.)
Go up. There’s no Back button in the File Picker. There is, however, this button. As you’d guess, it takes you up one folder level—in other words, to the folder that contains this one. (For example, if you’re currently browsing the contents of the Chicago folder, one click on “Go up” takes you to the Illinois folder; another click opens the United States folder.)
To go down again—burrowing back into folders instead of out of them—you tap or click one of the folders on the screen.
Sort by. This, too, is a pop-up menu. It lets you control how the icons are sorted: chronologically (“by date”) or alphabetically (“by name”). If you want to sort them in any other way (by size, tag, rating, and so on), you can always flip back to the desktop.
All right. So now you’ve navigated to the proper folder. The time has come at last to do what the File Picker was made for: picking files.
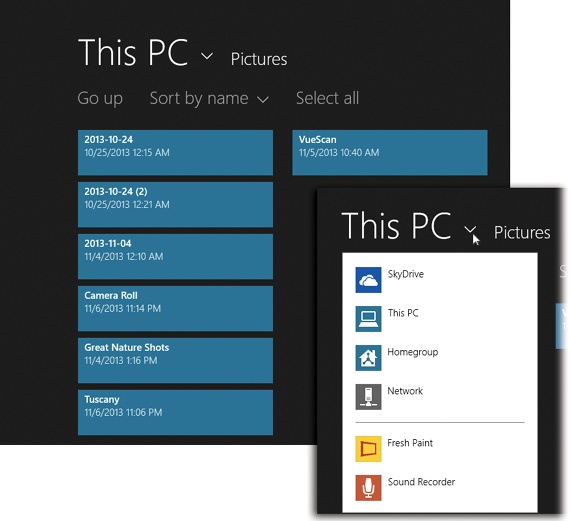
Figure 3-13. The File Picker appears when, for example, you want to find a file to attach to an outgoing email message. Almost everything you see here is tappable or clickable. Inset: The phrase “This PC” is actually a pop-up menu of locations that Microsoft thinks you might want to visit.
Often, you’re allowed to choose only one file (when you’re choosing a new desktop wallpaper, for example). In other apps, you can choose several at once (when you’re attaching files to an email message, say). Either way, here’s how it works.
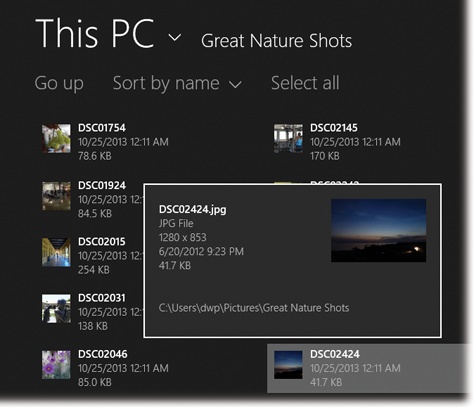
The File Picker ordinarily shows you a thumbnail of each file, plus a few details like file size and modification date. (In some apps, you may be able to change the display to a more listy view.) But a handy preview box can also show you details like file type, pixel dimensions (for a photo), and folder location (Figure 3-14).
To see this box:
If it turns out you’ve found the correct file, confirm your choice like this:
When you do that, a checkmark appears in the corner of the file’s icon tile.
Note
If you’re in a situation where you’re allowed to choose multiple files, the File Picker also adds the tiny icon of the newly selected file to the collection of icons at the bottom of the screen.
In some apps, you can go on choosing additional files the same way (when you’re choosing files to attach to an email, for example). If you change your mind, you can remove a file from the selection by tapping, clicking, or space-barring again.
When you’ve checkmarked the right icon(s), use the important-looking button in the lower right to close the File Picker and proceed. That button’s wording varies depending on the app you’re using—it may say Attach or Choose Picture, for example—but you’ll get the idea. It’s right next to the Cancel button, which closes the File Picker without choosing any file at all.