You’d be forgiven if you’ve never even heard of taskbar toolbars; this is one obscure feature.
These toolbars are separate horizontal sections on the taskbar that offer special-function features. You can even build your own toolbars—for example, one stocked with documents related to a single project. (Somewhere, there’s a self-help group for people who spend entirely too much time fiddling with this kind of thing.)
To make a toolbar appear or disappear, right-click a blank spot on the taskbar and choose from the Toolbars submenu that appears (Figure 6-33). The ones with checkmarks are the ones you’re seeing now; you can click to turn them on and off.
Tip
You can’t adjust the toolbars’ widths until you unlock the taskbar (right-click a blank spot and turn off “Lock the taskbar”). Now each toolbar is separated from the main taskbar by a dotted “grip strip.” Drag this strip to make the toolbar wider or narrower.
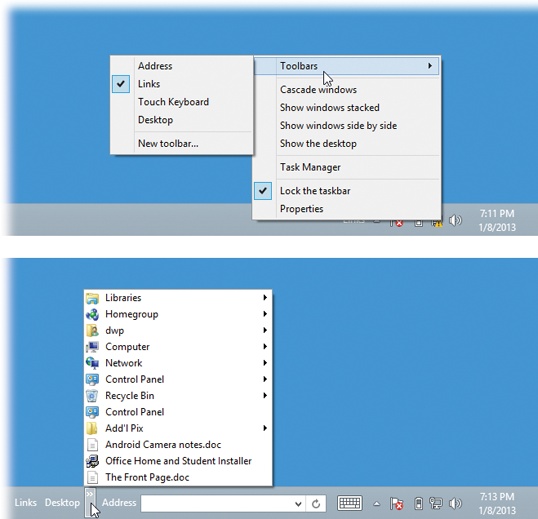
Figure 6-33. Top: Make toolbars appear by right-clicking a blank area on
the taskbar, if you can find one. Bottom: Toolbars eat into
your taskbar space, so use them sparingly. (All four of the basic
Windows 8 toolbars are shown open here.) If you’ve added too
many icons to the toolbar, a  button appears at its right end. Click it to
expose a list of the commands or icons that didn’t fit.
button appears at its right end. Click it to
expose a list of the commands or icons that didn’t fit.
Here’s a rundown of the ready-made taskbar toolbars at your disposal.
This toolbar offers a duplicate copy of the address bar that appears in every Explorer window, complete with a Recent Addresses pop-up menu—except that it’s always available, even if no Explorer window happens to be open.
From its name alone, you might assume that the purpose of this toolbar is to provide links to your favorite Web sites. And sure enough, that’s one thing it’s good for.
But in fact, you can drag any icon at all onto this toolbar—files, folders, disks, programs, or whatever—to turn them into one-click buttons.
In other words, the Links toolbar duplicates the “park favorite icons” function of the Start screen, taskbar, and Quick Launch toolbar. But in some ways, it’s better. It can display any kind of icon (unlike the taskbar). It’s always visible (unlike the Start screen). And it shows the icons’ names.
Note
The Links toolbar is a mirror of the Favorites toolbar in Internet Explorer (Tools→Toolbars→Favorites), just in case you were baffled. Edit one, you edit the other.
NOSTALGIA CORNER: Bringing Back the Quick Launch Toolbar
The whole point of the old Quick Launch toolbar was to display the icons of programs you used a lot—exactly like the new Windows 7/8 taskbar itself. So Microsoft took the Quick Launch toolbar out behind the barn and shot it.
Besides, if “a toolbar filled with icons of my choosing, ready for one-click opening” is the idea behind the Quick Launch toolbar, then why not use the Links toolbar or the “build your own” toolbar described on these pages?
Well, all right. If you really feel it’s that important to have the Quick Launch toolbar—the actual, original one—you can bring it back.

Start by creating a folder that contains the icons for everything you want displayed on the toolbar.
Now right-click a blank spot on the taskbar. From the shortcut menu, choose Toolbars→New Toolbar. In the resulting dialog box, type this (AutoComplete is there to help you save typing)…
%appdata%\Microsoft\Internet Explorer\Quick Launch
…and then click Select Folder.
And presto: The Quick Launch toolbar now appears on your taskbar. It works exactly like the Links toolbar, in that you can drag anything onto it for easy access: folder, file, disk, shortcut, program, anything with an icon.
It still doesn’t look much like the old Quick Launch toolbar, though. But you can fix that.
First, unlock the taskbar. (Right-click it; from the shortcut menu, choose “Lock the taskbar,” if necessary, so that the checkmark disappears.)
Now right-click the Quick Launch toolbar itself; turn off Show Title and Show Text. Drag the dotted “grip strip” handle at the toolbar’s left edge all the way to the left so that it’s right next to the Start menu, where the old Quick Launch toolbar used to be. Drag the right-side “grip strip” to adjust the width. Relock the taskbar, if you like.
From now on, you can install any file, folder, or disk onto this toolbar just by dragging it there. It shows up, tiny but legible, ready for opening with one click.
If you change your mind, you can get rid of the Quick Launch toolbar. Right-click the taskbar; from the shortcut menu, choose Toolbars→“Quick Launch toolbar,” so that the checkmark disappears.
Here are a few possibilities of things to stash here, just to get your juices flowing:
Install icons of the three or four programs you use the most (or a few documents you work on every day).
Install the Recycle Bin’s icon, so you don’t have to mouse all the way over to…wherever you keep the real Recycle Bin.
Install icons for shared folders on the network. This arrangement saves several steps when you want to connect to them.
Install icons of Web sites you visit often so you can jump directly to them when you sit down in front of your PC each morning. (In Internet Explorer, you can drag the tiny icon at the left end of the address bar directly onto the Links toolbar to install a Web page there.)
You can drag these links around on the toolbar to put them into a different order, or remove a link by dragging it away—directly into the Recycle Bin, if you like. (They’re only shortcuts; you’re not actually deleting anything important.) To rename something here—a good idea, since horizontal space in this location is so precious—right-click it and choose Rename from the shortcut menu.
This “toolbar” is actually the onscreen typing keyboard, the one you’ll need if you have a touchscreen tablet that doesn’t have a keyboard. In other words, you can make the onscreen keyboard appear and disappear by clicking this button. Chapter 3 has the details.
The Desktop toolbar (Figure 6-33, bottom) offers quick access to whichever icons are sitting on your desktop—the Recycle Bin, for example, and whatever else you’ve put there. As a convenience, it also lists a few frequently used places that aren’t on the desktop, including your Personal folder, libraries, HomeGroup, Network, Control Panel, and so on.
When it first appears, the Desktop toolbar takes the form of a >> button at the right end of the taskbar. You can widen the Desktop toolbar if you like, making its buttons appear horizontally on the taskbar. But if you leave it compressed, then many of its icons sprout pop-up submenus that give you direct access to their contents. That’s a useful way to get at your stuff when your screen is filled with windows.
To change the look of a toolbar, first unlock it. (Right-click it; from the shortcut menu, choose “Lock the taskbar,” if necessary, so that the checkmark disappears. Later, repeat this procedure to lock the taskbar again.)
Next, right-click any blank spot on the toolbar. The resulting shortcut menu offers these choices, which appear above the usual taskbar shortcut menu choices:
View lets you change the size of the icons on the toolbar.
Open Folder works only with the Quick Launch and Links toolbars.
It turns out that the icons on these toolbars reflect the contents of corresponding folders on your PC. To see one, right-click a blank spot on the toolbar itself; from the shortcut menu, choose Open Folder.
Why is that useful? Because it means you can add, rename, or delete icons en masse, by working in the folder instead of on the toolbar itself. Of course, you can also delete or rename any icon on these toolbars by right-clicking it and choosing Delete or Rename from the shortcut menu. But a window isn’t nearly as claustrophobic as the toolbar itself.
Show Text identifies each toolbar icon with a text label.
Show Title makes the toolbar’s name (such as “Quick Launch” or “Desktop”) appear on the toolbar.
Close Toolbar makes the toolbar disappear.
Tip
How much horizontal taskbar space a toolbar consumes is up to you. Drag the border at the left edge of a toolbar to make it wider or narrower. That’s a good point to remember if, in fact, you can’t find a blank spot to right-click on. (Sub-tip: In a pinch, you can right-click the clock.) Don’t forget that you have to unlock the toolbar before you can change its size (right-click, and then choose “Lock the taskbar” so the checkmark disappears).
The Quick Launch and Links toolbars are such a delight that you may find that having only one isn’t enough. You may wish to create several different Links toolbars, each stocked with the icons for a different project or person. One could contain icons for all the chapters of a book you’re writing; another could list only your games.
Fortunately, it’s easy to create as many different custom toolbars as you like, each of which behaves exactly like the Links toolbar.
Windows creates toolbars from folders, so before creating a toolbar of your own, you must create a folder and fill it with the stuff you want to toolbar-ize.
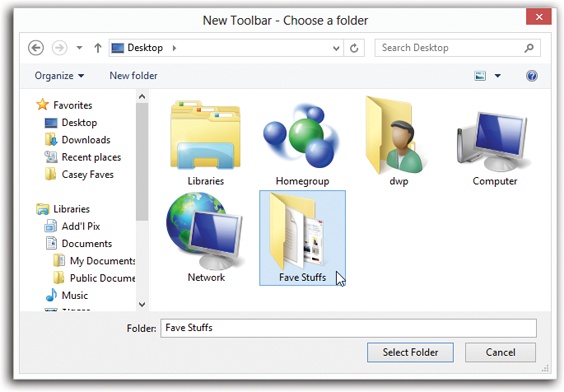
Next, right-click a blank spot on the taskbar. From the shortcut menu, choose Toolbars→New Toolbar to open the New Toolbar dialog box, as shown in Figure 6-34. Find and click the folder you want, and then click Select Folder.
Now there’s a brand-new toolbar on your taskbar, whose buttons list the contents of the folder you selected. Feel free to tailor it as described—by changing its icon sizes, hiding or showing the icon labels, or installing new icons onto it by dragging them from other Explorer windows.