As you can see in Figure 8-2, Windows includes a number of predesigned design themes that affect the look of your desktop and windows.
Each design theme controls these elements of Windows:
Your wallpaper (desktop picture).
Your screen saver.
The design of icons like Computer, Network, Control Panel, and Recycle Bin.
The color scheme for your window edges, plus any tweaks you make in the Color and Appearance dialog box (font size, window border width, and so on).
The size and shape of your arrow cursor.
The sounds your PC uses as error and alert beeps.
It’s fun to customize your PC (especially because it’s your opportunity to replace, at last, that huge Dell or HP logo that came as your preinstalled wallpaper). This is also yet another way to shut off some of Windows’ predefined cosmetics.
Figure 8-2. Top: Most people’s Windows desktop windows look like this. But your computer may look different, especially if you’ve turned on one of the other styles—like a high-contrast theme (bottom).
To see your theme choices, right-click a blank spot on the desktop. From the shortcut menu, choose Personalize.
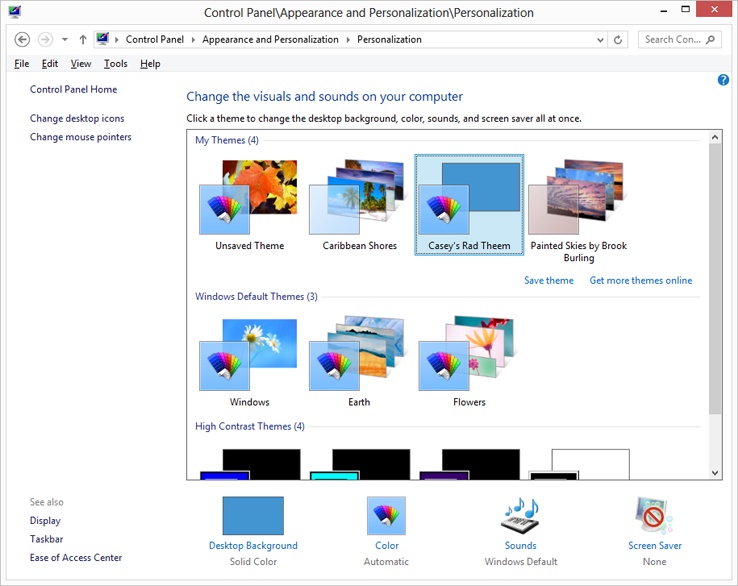
The Personalization control panel opens, revealing a window full of factory-installed icons for different visual themes (Figure 8-3). Clicking one applies its look to your desktop world instantaneously, making it simple to try on different themes.
The control panel offers three categories of themes: My Themes (ones you’ve modified yourself), Windows Default Themes (Microsoft’s canned starter designs), and High Contrast themes. These are designed to help out people with limited vision, who require greater differences in color between window elements. High-contrast themes more closely resemble the squared-off windows and dialog boxes of Windows 2000.
The real fun, however, awaits when you choose one of the canned themes and then modify it. Four of the modification tactics are represented by buttons at the bottom of the window (Desktop Background, Window Color, Sounds, and Screen Saver); two more are represented by links at the left side of the window (Desktop Icons and Mouse Pointers). The following pages cover each of these elements in turn.