You wouldn’t get much work done without a screen on your computer. It follows, then, that you can get more work done if you tinker with your screen’s settings to make it more appropriate to your tastes and workload.
There are two reasons why Windows offers a quick-and-easy way to magnify everything on the screen.
First, people tend to get older—even you. Come middle age, your eyes may have trouble reading smaller type.
Second, the resolution of computer screens gets higher every year. That is, more and more dots are packed into the same-sized screens, and therefore those dots are getting smaller, and therefore the type and graphics are getting smaller.
Microsoft finally decided enough was enough. That’s why there’s a one-click way to enlarge all type and graphics, with crisp, easier-to-see results.
There are also various older schemes for accomplishing similar tasks. Here’s a rundown of all of them.
Your screen can make its picture larger or smaller to accommodate different kinds of work. You perform this magnification or reduction by switching among different resolutions (measurements of the number of dots that compose the screen).
When you use a low-resolution setting, such as 800 x 600, the dots of your screen image get larger, enlarging (zooming in on) the picture—but showing a smaller slice of the page. Use this setting when playing a small movie on the Web, for example, so that it fills more of the screen.
At higher resolutions, such as 1280 x 1024, the dots get smaller, making your windows and icons smaller but showing more overall area. Use this kind of setting when working on two-page spreads in your page-layout program, for example.
Unfortunately, adjusting the resolution isn’t a perfect solution if you’re having trouble reading tiny type. On a flat-panel screen—that is, the only kind sold today—only one resolution setting looks really great: the maximum one. That’s what geeks call the native resolution of that screen.
POWER USERS’ CLINIC: Some Clear Talk About ClearType
ClearType is Microsoft’s word for a sneaky technology that makes type look sharper on your screen than it really is.
Imagine a lowercase s at a very small point size. It looks great on this page, because this book was printed at 1,200 dots per inch. But your monitor’s resolution is far lower—maybe 96 dots per inch—so text doesn’t look nearly as good. If you were to really get up close, you’d see that the curves on the letters are actually a little jagged.
Each dot on an LCD screen is actually composed of three subpixels (mini-dots): red, green, and blue. What ClearType does is simulate smaller pixels in the nooks and crannies of letters by turning on only some of those subpixels. In the curve of that tiny s, for example, maybe only the blue subpixel is turned on, which to your eye looks like a slightly darker area, a fraction of a pixel; as a result, the type looks finer than it really is.
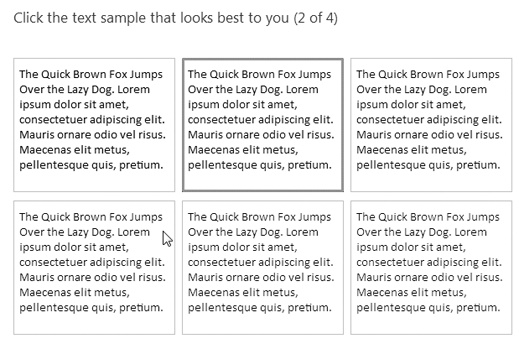
ClearType’s behavior is adjustable. To see the options, open the Start screen. Type cleartype; click Settings; when you see “Adjust ClearType text” in the results list; click it.
On the first screen, you have an on/off checkbox for ClearType. It’s there just for the sake of completeness, because text on an LCD screen really does look worse without it.
If you click Next, Windows walks you through a series of “Which type sample looks better to you?” screens, where all you have to do is click the “Quick Brown Fox Jumps Over the Lazy Dog” example that you find easiest to read. Behind the scenes, of course, you’re adjusting ClearType’s technical parameters without even having to know what they are. When it’s all over, you’ll have the best-looking small type possible.
That’s because on flat-panel screens, every pixel is a fixed size. At lower resolutions, the PC does what it can to blur together adjacent pixels, but the effect is fuzzy and unsatisfying. (On the old, bulky CRT monitors, the electron gun could actually make the pixels larger or smaller, so you didn’t have this problem.)
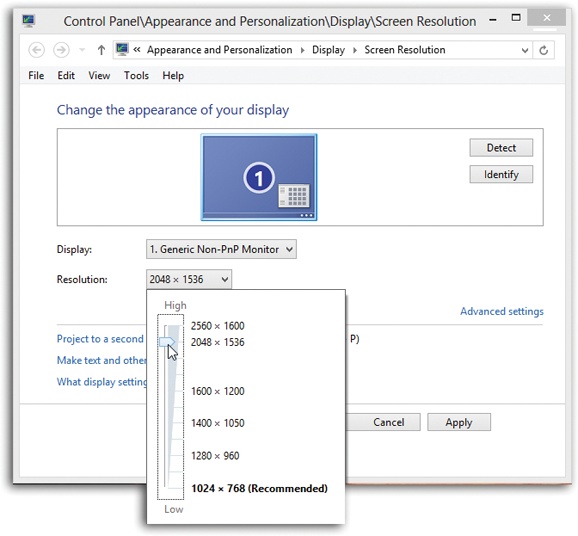
If you still want to adjust your screen’s resolution, here’s how you do it. Right-click the desktop. From the shortcut menu, choose “Screen resolution.” In the dialog box (Figure 8-11), use the Resolution pop-up menu.
Tip
Depending on your monitor, you may see a weird Orientation pop-up menu here. Believe it or not, this control lets you flip your screen image upside-down or left/right, forming a mirror image.
These options make hilarious practical jokes, of course, but they were actually designed to accommodate newfangled PC designs where, for example, the screen half of a laptop flips over, A-frame style, so people across the table from you can see it.
In any case, once you choose an orientation and click Apply or OK, a dialog box lets you either keep or discard the setting. Which is lucky, because if the image is upside-down on a regular PC, it’s really hard to get any work done.
This feature is one of Microsoft’s most inspired, most useful—and least publicized. It turns out that you can enlarge the type and graphics on the screen without changing the screen’s resolution. So type gets bigger without getting blurrier, and everything else stays sharp, too.
To make this adjustment, right-click the desktop; from the shortcut menu, choose Resolution. In the resulting dialog box, click “Make text and other items larger or smaller.”
Now you arrive at a new dialog box; proceed as directed in Figure 8-12.
Tip
The box in Figure 8-12 offers only two fixed degrees of magnification: 125% and 150%. You can actually dial up any amount you like, though. Click “Custom sizing options” to produce the dialog box shown at bottom in Figure 8-12.
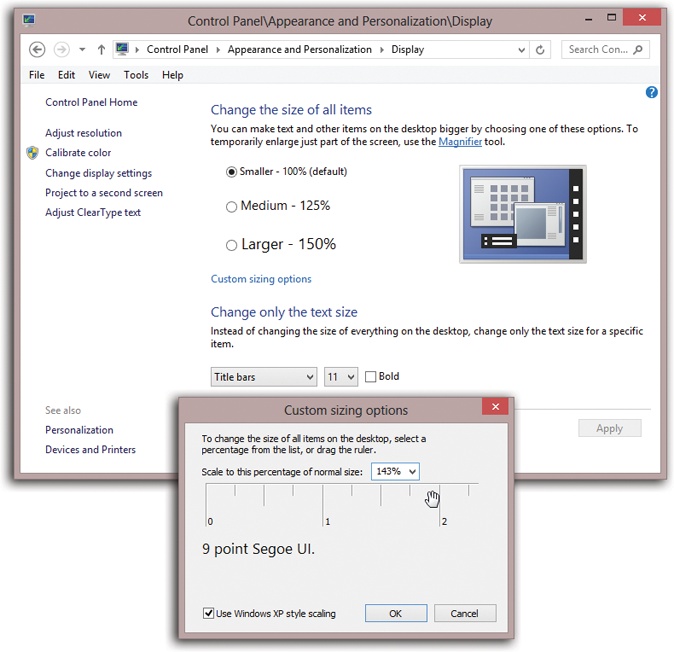
Figure 8-12. Top: Click either Medium or Larger, and then click Apply. A message lets you know, “You must log off your computer.” Click “Log off now.” When the computer logs you in anew, you see larger type and graphics. Bottom: If you prefer an in-between magnification, or a higher amount (up to 500%), drag right or left on the ruler until the sample text looks good to you; click OK. Older apps may not respond to the text-scaling feature, so you may get blurry text at large degrees of magnification. The “Use Windows XP style scaling” option is supposed to fix that, although it has side effects, too; it may produce weird-looking dialog boxes and chopped-off text in some programs.
In Windows 7, you could open an Advanced Appearance Options dialog box that let you change every single aspect of the selected visual theme independently. That box is gone now, but the heart of it lives on—in the “Change only the text size” pop-up menu at the bottom of the dialog box shown in Figure 8-12.
Proceed with your interior-decoration crusade by choosing from the drop-down list: Title bars, Menus, Message boxes, Palette titles, Icons, or Tooltips. Then use the font-size pop-up menu to its right to suit your artistic urges and eyeglasses prescription.
You can even make some of these elements appear in boldface, if you so desire (turn on Bold).
When you’ve exhausted your options—or just become exhausted—click Apply. You can now explore the world of your new, larger-type icon and window elements.
If your “type is too small” problem is only occasional, you can call up Windows’ Magnifier. It’s like a software magnifying glass that fills the top portion of your screen; as you move your pointer around the real-size area beneath, the enlarged image scrolls around, too. Details are on File Explorer.
Today’s video cards offer different color depth settings, each of which permits the screen to display a different number of colors simultaneously. You usually have a choice between settings like Medium (16-bit), which was called High Color in early versions of Windows; High (24-bit), once known as True Color; and Highest (32-bit).
In the early days of computing, higher color settings required a sacrifice in speed. Today, however, there’s very little downside to leaving your screen at its highest setting. Photos, in particular, look best when you set your monitor to higher-quality settings.
To check your settings, right-click the desktop. From the shortcut menu, choose “Screen resolution.” In the dialog box, click “Advanced settings” to open the Properties dialog box for your monitor. Click the Monitor tab, and use the Colors pop-up menu to choose your color depth.