For years, there’s been quite a gulf between the promise of computer speech recognition (as seen on Star Trek) and the reality (as seen just about everywhere else). You say “oxymoron”; it types “ax a moron.” (Which is often just what you feel like doing, frankly.)
Microsoft has had a speech-recognition department for years. But until recently, it never got the funding and corporate backing it needed to do a really bang-up job.
The speech recognition in today’s Windows, however, is another story. It can’t match the accuracy of its chief rival, Dragon NaturallySpeaking, but you might be amazed to discover how elegant its design is now, and how useful it can be to anyone who can’t, or doesn’t like to, type.
In short, Speech Recognition lets you not only control your PC by voice—open programs, click buttons, click Web links, and so on—but also dictate text a heck of a lot faster than you can type.
To make this all work, you need a PC with a microphone. The Windows Speech Recognition program can handle just about any kind of mike, even the one built into your laptop’s case. But a regular old headset mike—“anything that costs over $20 or so,” says Microsoft—will give you the best accuracy.
The easiest way to fire up Speech Recognition for the first time is to open the Start screen. Type speech. In the search results, click Windows Speech Recognition.
The first time you open Speech Recognition, you arrive at a very slick, very impressive full-screen tutorial/introduction, featuring a 20-something model in, judging by the gauzy whiteness, what appears to be heaven.
Click your way through the screens. Along the way, you’re asked to do the following:
Specify what kind of microphone you have. Headset, desktop, array, or built-in?
Read a sample sentence, about how much Peter loves speech recognition, so your PC can gauge the microphone’s volume.
Give permission to Windows to study your documents and email collection. Needless to say, there’s no human rooting through your stuff, and none of what Speech Recognition finds is reported back to Microsoft. But granting this permission is a great way to improve your ultimate accuracy, since the kinds of vocabulary and turns of phrase you actually use in your day-to-day work will be built right into Speech Recognition’s understanding of your voice.
Print the reference card. This card is critical when you’re first learning how to operate Windows by voice. Truth is, however, you don’t really need to print it. The same information appears in this chapter, and you can always call the reference card up on the screen by saying into your microphone, “What can I say?”
Practice. The tutorial is excellent; it’ll take you about half an hour to complete. It teaches you how to dictate and how to operate buttons, menus, windows, programs, and so on.
But there’s another, better reason to try the tutorial: At the outset, Windows is just simulating its responses to what you say. But behind the scenes, it’s actually studying your real utterances, learning about your voice, and shaping your voice profile. This, in other words, is the “voice training” session you ordinarily have to perform with commercial dictation programs.
Now you’re ready to roll. Operating Windows by voice entails knowing three sets of commands:
Controlling Speech Recognition itself.
Controlling Windows and its programs.
Dictating.
The following sections cover these techniques one at a time.
Slip on your headset, open Windows Speech Recognition, and have a gander at these all-important spoken commands:
“Start listening”/“Stop listening.” These commands tell your PC to start and stop listening to you. That’s important, because you don’t want it to interpret everything you say as a command. It would not be so great if it tried to act when you said to your roommate, “Hey, Chris, close the window.”
So say, “Start listening” to turn on your mike—you see the microphone button on the Speech palette (Figure 10-5) darken. Say “Stop listening” when you have to take a phone call.
“What can I say?” This one’s incredibly important. If you can’t figure out how to make Windows do something, look it up by saying this. You get the Speech Recognition page of the Windows Help system, complete with a collapsible list of the things you can say.
“Show Speech Options.” This command opens the shortcut menu for the Speech palette, as shown in Figure 10-5. From this menu, you can leap into further training, open the “What can I say?” card, go to the Speech Recognition Web site, and so on.
“Hide Speech Recognition”/“Show Speech Recognition” hides or shows the Speech palette itself when screen real estate is at a premium.


The beauty of controlling Windows by voice is that you don’t have to remember what to say; you just say whatever you would click with the mouse.
For example, to open the little Calculator program using the mouse, you’d open the Charms bar, click to go to the Start screen, right-click to open the App bar to get to All Programs, and finally click Calculator. To do the same thing using speech recognition, you just say, “Start Calculator.”
Here’s the cheat sheet for manipulating programs. In this list, any word in italics is meant as an example (and other examples that work just as well are in parentheses):
“Start Calculator (Word, Excel, Internet Explorer…).” Opens the program you named, without your having to touch the mouse. Super convenient.
“Switch to Word (Excel, Internet Explorer…).” Switches to the program you named.
“File. Open.” You operate menus by saying whatever you would have clicked with the mouse. For example, say “Edit” to open the Edit menu, then “Select All” to choose that command, and so on.
GEM IN THE ROUGH: Mousegrid
The voice commands described in this section are all well and good when it comes to clicking onscreen objects. But what about dragging them?
When you say the word “Mousegrid,” Speech Recognition superimposes an enormous 3 x 3 grid on your screen, its squares numbered 1 through 9.
Say “Five” and a new, much smaller 3 x 3 grid, also numbered, appears in the space previously occupied by the 5 square. You can keep shrinking the grid in this way until you’ve pinpointed a precise spot on the screen.
Dragging something—say, an icon across the desktop—is a two-step process.
First, use Mousegrid to home in on the exact spot on the screen where the icon lies; on your last homing-in, say, “Four mark.” (In this example, the icon you want lies within the 4 square. “Mark” means “This is what I’m going to want to drag.”)
When you say “mark,” the Mousegrid springs back to the full-screen size; now you’re supposed to home in on the destination point for your drag. Repeat the grid-shrinking exercise—but in the last step say, “Seven click.” Watch in amazement as Windows magically grabs the icon at the “mark” position and drags it to the “click” position.
You can use Mousegrid as a last resort for any kind of click or drag when the other techniques (like saying button or menu names, or saying, “Show numbers”) don’t quite cut it.
“Print (Cancel, Desktop…).” You can also click any button (or any tab name in a dialog box) by saying its name.
“Contact us (Archives, Home page…).” You can click any link on a Web page just by saying its name.
“Double-click Recycle Bin.” You can tell Windows to “double-click” or “right-click” anything you see.
“Go to Subject (Address, Body…).” In an email message, Web browser, or dialog box, “Go to” puts the insertion point into the text box you name. “Address,” for example, means the address bar.
“Close that.” Closes the frontmost window. Also “Minimize that,” “Maximize that,” “Restore that.”
“Scroll up (down, left, right).” Scrolls the window. You can say “up,” “down,” “left,” or “right,” and you can also append any number from one to 20 to indicate how many lines: “Scroll down 10.”
“Press F (Shift+F, capital B, down arrow, X three times…).” Makes Windows press the key you named.

Tip
You don’t have to say “press” before certain critical keys: Delete, Home, End, Space, Tab, Enter, Backspace. Just say the key’s name: “Tab.”
It’s great to know you can click any button or tab by saying its name. But what if you don’t know its name? What if it’s some cryptic little icon on a toolbar? You can’t exactly say, “Click the little thing that looks like a guy putting his head between two rollers.”
For this purpose, Microsoft has created a clever command called “Show numbers.” When you say that, the program overlays every clickable thing with superimposed colorful numbers; see Figure 10-6.
The numbers appear automatically if there’s more than one button of the same name on the screen, too—several Settings buttons in a dialog box, for example. Say, “One OK.”
The real Holy Grail for speech recognition, of course, is dictation—you speak, and Windows transcribes your words, typing them into any document. (This feature is especially important on tablet PCs that don’t have keyboards.)
Windows’ dictation accuracy isn’t as good as, say, Dragon NaturallySpeaking’s. But it’s a close second, it’s free, and it’s a lot of fun.
It’s also very easy. You just talk—at regular speed, into any program where you can type. The only real difference is that you have to say the punctuation. You know: “Dear Mom (comma, new line), How are things going (question mark)? Can’t believe I’ll be home for Thanksgiving in only 24 more weeks (exclamation mark)!”
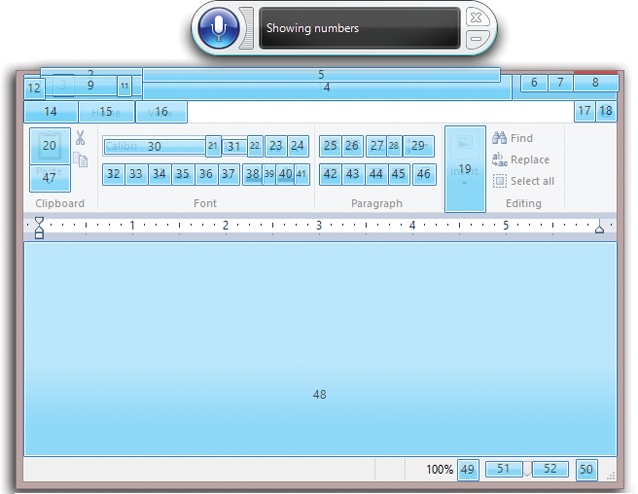
Figure 10-6. When you say a number, that number turns green and changes into an OK logo—your clue that you must now say “OK” to confirm the selection. (You can run these utterances together without pausing—for example, “Three OK.”) Not all programs respond to the “Show numbers” command, alas.
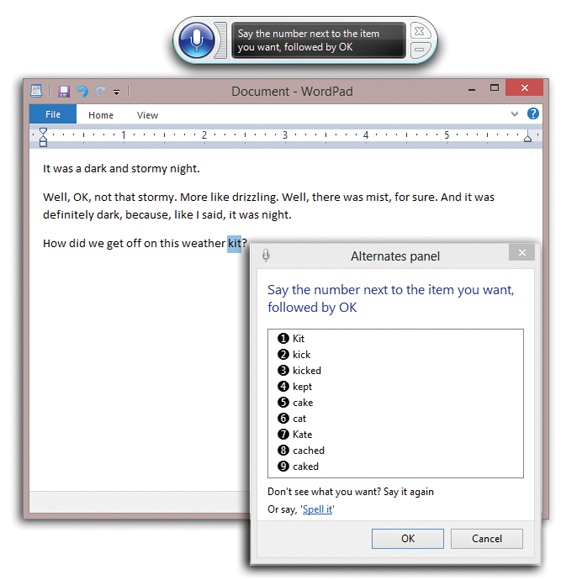
Sooner or later—probably sooner—Speech Recognition is going to misunderstand you and type out the wrong thing. It’s very important that you correct such glitches—for two reasons. First, you don’t want your boss/family/colleagues to think you’re incoherent. Second, each time you make a correction, Windows learns. It won’t make that mistake again. Over time, and over hundreds of corrections, Speech Recognition gets more and more accurate.
Suppose, then, that you said, “I enjoyed the ceremony,” and Speech Recognition typed out, “I enjoyed this era money.” Here’s how you’d proceed:
Say, “Correct this era money.”
Instantly, the Alternates panel pops up (Figure 10-7).
If the correct transcription is among the choices in the list, say its number and then “OK.”
As noted in Figure 10-7, you don’t have to pause before “OK.”
If the correct transcription doesn’t appear in the list, then speak the correct text again.
In this example, you’d say, “the ceremony.” Almost always, the version you wanted now appears in the list. Say its number and then “OK.”
If the correct transcription still doesn’t appear in the list, say “Spell it.”
You arrive at the Spelling panel; see Figure 10-8.
When you finally exit the Alternates panel, Speech Recognition replaces the corrected text and learns from its mistake.
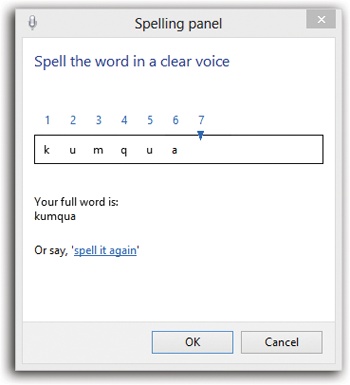
Figure 10-8. Just spell out the word you really wanted: “F-I-S-H,” for example. For greater clarity, you can also use the “pilot’s alphabet”: Alpha, Bravo, Charlie, Delta, and so on—or even “A as in alligator” (or any word you like). If it mishears a letter you’ve spoken, say the number over it (“three”) and then repronounce the letter. Say “OK” once you’ve gotten the word right.
Here are the other things you can say when you’re dictating text. The first few are extremely important to learn.
“Select next (previous) two (10, 14, 20…) words (sentences, paragraphs).” Highlights whatever you just specified—for example, “Select previous five sentences.”
At this point, you’re ready to copy, change the font or style, say “Cap that” to capitalize the first words—or just redictate to replace what you wrote.
“Correct ax a moron.” Highlights the transcribed phrase and opens the Alternates panel, as described above. (You can say a whole phrase or just one word.)
“Undo.” Undoes the last action.
“Scratch that.” Deletes the last thing you dictated. (“Delete that” works, too.)
“Delete your stupid parents.” Instantly deletes the text you identified.
Tip
If you use commands like “Delete,” “Select,” “Capitalize,” or “Add hyphens to” on a word that occurs more than once in the open window, Speech Recognition doesn’t try to guess. It puts colorful numbered squares on every occurrence of that word. Say, “One OK” (or whatever the number is) to tell it which occurrence you meant.
“Go to little.” Puts the insertion point right before the word “little.”
“Go after lamb.” Puts the insertion point right after the word “lamb.”
“Go to the start (end) of the sentence (paragraph, document).” Puts the insertion point where you said.
“Caps.” Capitalizes the first letter of the next word you dictate (no pause is necessary). Saying “All caps” puts the next word ENTIRELY in caps.
“Ready no space Boost.” Types “ReadyBoost”—no space.
“He typed the word literal comma.” The command “literal” tells Speech Recognition to type out the word that follows it (“comma”), rather than transcribing it as a symbol.
“Add hyphen to 3D.” Puts a hyphen in the word (“3-D”).
“Start typing I, P, C, O, N, F, I, G; stop typing.” When you say “Start typing” (and then pause), you enter Typing mode. Now you can spell out anything, letter by letter, in any program on earth. It’s a handy way to dictate into programs that don’t take dictation well, like PowerPoint and Excel.
There are zillions of secrets, tips, and tricks lurking in speech recognition—but here are a few of the most useful:
You can teach Speech Recognition new words—unusual last names, oddball terminology—by adding them directly to its dictionary. Say “Show speech options” to open the shortcut menu, and then click (or say), “Open the Speech Dictionary.” You’re offered the chance to add words, change existing words, or stop certain words from being transcribed.
When you want to spell out a word, say, “Spell it,” and then launch right into the spelling: “F, R, E, A, K, A, Z, O, I, D.” You don’t have to pause between letters or commands.
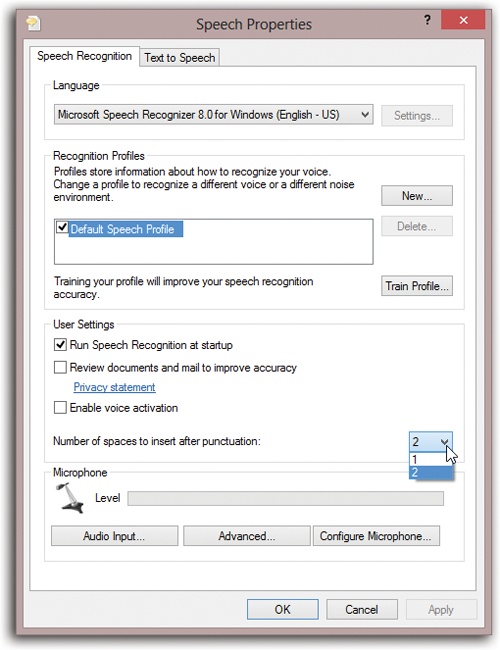
Out of the box, Speech Recognition puts two spaces after every period—a very 1980s thing to do. Nowadays, that kind of gap looks a little amateurish. Fortunately, you can tell Speech Recognition to use only one space.
Making this change requires you to visit the little-known Advanced Speech Options dialog box. Open the Start screen. Start typing speech until you see “Speech Recognition” in the results list; click it. In the task pane at left, click “Advanced speech options” (Figure 10-9).
Figure 10-9. In this dialog box, you can find the “Number of spaces to insert after punctuation” (meaning “periods”) pop-up menu near the bottom. The other controls here let you create new voice files (“speech profiles”)—one for your quiet home office, for example, and another for use in a busy, humming office.
In the Spelling window, say the digit over the wrong letter, and then say, “A,” or “Alpha,” or “A as in alligator” (or any word that starts with that letter).
Beginning any utterance with “How do I” opens up Windows Help; the next part of your sentence goes into the search box.
“Computer” forces the interpretation of your next utterance as a command; “Insert” forces it to be transcribed.