Almost every computer today has a built-in WiFi antenna, officially known as 802.11 (WiFi) wireless networking technology. WiFi can communicate with a wireless base station up to 300 feet away, much like a cordless phone. Doing so lets you surf the Web from your laptop in a hotel room, for example, or share files with someone across the building from you.
Chapter 25 has much more information about setting up a WiFi network. The real fun begins, however, when it comes time to join one.
Sometimes you just want to join a friend’s WiFi network. Sometimes you’ve got time to kill in an airport, and it’s worth a $7 splurge for half an hour. And sometimes, at some street corners in big cities, WiFi signals bleeding out of apartment buildings might give you a choice of several free hotspots to join.
If you’re in a new place, and Windows discovers, on its own,
that you’re in a WiFi hotspot, then the  icon sprouts an asterisk. And where is the
icon? It’s in two places:
icon sprouts an asterisk. And where is the
icon? It’s in two places:
On the taskbar (Figure 13-1, top left).
On the Settings pane of the Charms bar. (In other words, open the Charms bar and select Settings.)
Figure 13-1 shows you how to proceed. Along the way, you’ll be offered the “Connect automatically” checkbox; if you turn it on, you’ll spare yourself all this clicking the next time your PC is in range. It’ll just hop on that network by itself.
Some hotspots (most these days, actually) are protected by a password. It serves two purposes: First, it keeps everyday schlumps from hopping onto that network, and it also encrypts the connection so that hackers armed with sniffing software can’t intercept the data you’re sending and receiving.
Tip
Some modern WiFi routers offer a feature called WPS (WiFi Protected Setup). If you press the special WPS button at this point, it will transmit the password automatically to your PC, saving you the trouble of filling in the password yourself. (This technology is great because it transmits a huge, complicated password that nobody would ever be able to guess. But it’s not so great because if any other WiFi gadget—one that doesn’t have the WPS feature—tries to get online, you’ll have to type in that endless password manually.)
One more note: The first time you connect to a new network—the first time you use a wireless hotspot, the first time you connect to a dial-up ISP, the first time you plug into an office network—you’re asked the question at lower right in Figure 13-1.
The choice you make here tells Windows how much security to apply to the network you’ve just joined.
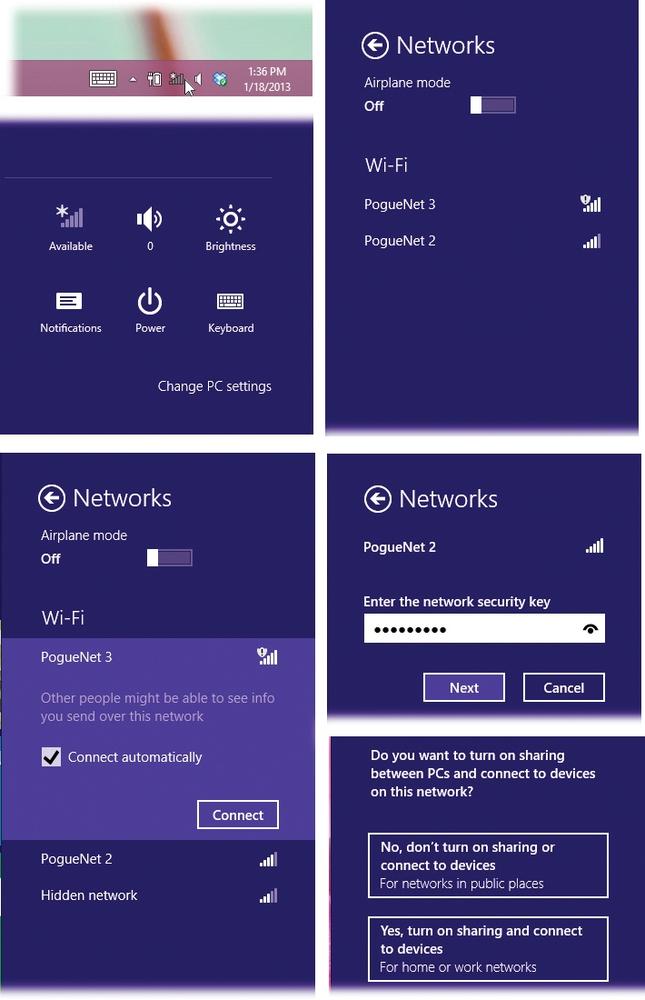
Figure 13-1. Top left: Hey, look! On the taskbar, and on the Settings pane
of the Charms bar, my icon is has an asterisk—there’s WiFi
here! (Tip: If you point to the taskbar icon without clicking,
you see your current network’s name and signal strength. And if you
right-click the icon, you get links to a troubleshooting app and the
Network and Sharing Center.) OK, so there are available
networks. Suppose I select that icon? Top right: This panel
pops up, identifying all the available WiFi networks. Suppose
I select one of them? Lower left: You’re offered a Connect
button. If you don’t want to have to go through all this the next
time you’re in this hotspot, turn on “Connect automatically.” Lower
right: If a password is required, type it now. Lower lower
right: “No, don’t turn on sharing” tells Windows that this is a
public hotspot (café, for example). “Yes, turn on sharing” means
you’re at home or work. This is all to keep evil WiFi-sniffing geeks
out of your files.
If you choose “No, don’t turn on sharing or connect to devices,” for example, Windows makes your computer invisible to other computers nearby. (Technically, it turns off the feature called network discovery.) That’s not ideal for file sharing, printer sharing, and so on—but it means hackers have a harder time “sniffing” the airwaves to detect your presence. This is what you’d want for public hotspots, like coffee shops.
If you make this choice, you may be visited quite a bit by the “Unblock?” messages from the Windows firewall. That’s just Windows being insecure, asking for permission every time any program (like a chat program) tries to get through the firewall.
If you choose “Yes, turn on sharing and connect to devices,” on the other hand, you’ll find it much easier to share files, printers, and other goodies on your own home network. For example, you’ll be able to use the HomeGroups feature described in Chapter 27. This is the right choice for a home or office network.
That should be all that’s necessary to get you onto a WiFi hotspot. You should now be able to surf the Web or check your email.
Before you get too excited, though, some lowering of
expectations is in order. There are a bunch of reasons why your
icon might indicate that you’re in a hotspot,
but you can’t actually get online:
It’s locked. If there’s no little
 icon next to the hotspot’s signal
strength in the pop-up list of networks, then the hotspot has
been password-protected. That’s partly to prevent hackers from
“sniffing” the transmissions and intercepting messages, and
partly to keep random passersby like you off the network.
icon next to the hotspot’s signal
strength in the pop-up list of networks, then the hotspot has
been password-protected. That’s partly to prevent hackers from
“sniffing” the transmissions and intercepting messages, and
partly to keep random passersby like you off the network.The signal isn’t strong enough. Sometimes the WiFi signal is strong enough to make the hotspot’s name show up, but not strong enough for an actual connection.
You’re not on the list. Sometimes, for security, hotspots are rigged to permit only specific computers to join, and yours isn’t one of them.
You haven’t logged in yet. Commercial hotspots (the ones you have to pay for) don’t connect you to the Internet until you’ve supplied your payment details on a special Web page that appears automatically when you open your browser, as described below.
The router’s on, but the Internet’s not connected. Sometimes wireless routers are broadcasting, but their Internet connection is down. It’d be like a cordless phone that has a good connection back to the base station in the kitchen—but the phone cord isn’t plugged into the base station.
Choosing the name of the hotspot you want to join is generally all you have to do—if it’s a home WiFi network.
Unfortunately, joining a commercial hotspot—one that requires a credit card number (in a hotel room or an airport, for example)—requires more than just connecting to it. You also have to sign into it before you can send so much as a single email message.
To do that, open your browser. You see the “Enter payment information” screen either immediately or as soon as you try to open a Web page of your choice. (Even at free hotspots, you might have to click OK on a welcome page to initiate the connection.)
Supply your credit card information or (if you have a membership to this WiFi chain, like Boingo or T-Mobile) your name and password. Click Submit or Proceed, try not to contemplate how this $8 per hour is pure profit for somebody, and enjoy your surfing.
If you turned on “Connect automatically,” then whenever your laptop enters this hotspot, it will connect to the network automatically. You don’t have to do any clicking at all.
POWER USERS’ CLINIC: PPPoE and DSL
If you have DSL service, you may be directed to create a PPPoE service.
It stands for PPP over Ethernet, meaning that although your DSL “modem” is connected to your Ethernet port, you still have to make and break your Internet connections manually, as though you had a dial-up modem.
To set this up, open the Network and Sharing Center (The Network and Sharing Center). Click “Set up a new connection or network.” In the next box, click “Connect to the Internet.”
In the next box—which is known as the “Connect to the
Internet” wizard—click “Broadband (PPPoE).” Fill in the PPPoE box
as directed by your ISP (usually just your account name and
password). From here on in, you start and end your Internet
connections exactly as though you had a dial-up modem—for example,
by clicking the icon on your taskbar tray, and then
clicking the network name.
Behind the scenes, Windows is capable of piling up quite a list of these hotspots, representing a bread-crumb trail of the hotspots you’ve used at every hotel, airport, coffee shop, and buddy’s house.
In Windows 7, there was a “Manage wireless networks” link that let you look over the list and delete the ones you didn’t need. That’s gone now.
But you can still tell Windows to force-forget a network it can see. Open the Charms bar; select Settings, and then the WiFi icon. Then right-click the name of the network you want Windows to forget (or hold your finger down on it). From the shortcut menu, choose “Forget this network.”
But what about the much longer list of hotspots you’ve told Windows to memorize, including those you’re not actually in right now? For that purpose, you need a free software tool like WiFi Profile Manager 8. You can download it from this book’s “Missing CD” page at www.missingmanuals.com.