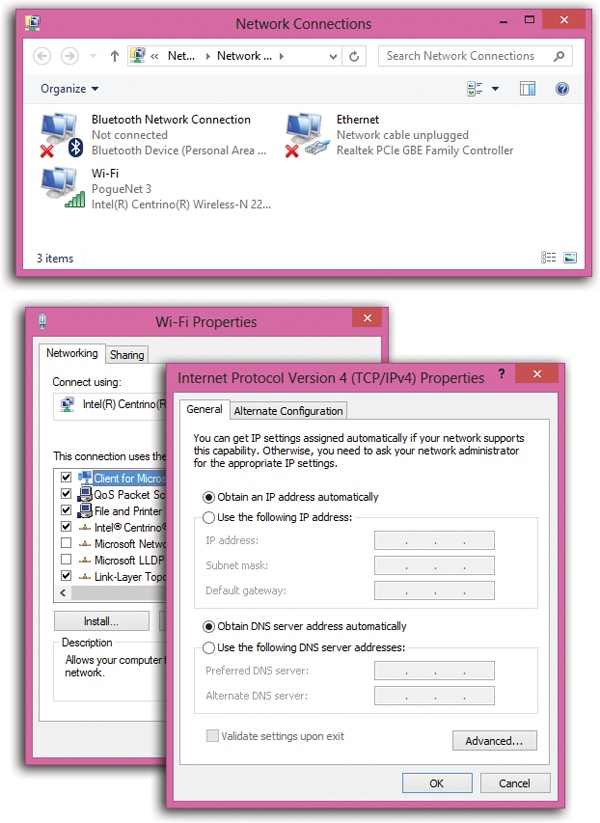
No matter what crazy combination of Internet connections you’ve accumulated on your computer, Windows represents each one as a connection icon. You can view them, rename them, change their settings, or just admire them by opening the window shown at top in Figure 13-2.
To get there, open the Network Connections window. Here’s the quickest way to go about it: Open the Start screen. Type view net and then select Settings. You see “View network connections” in the results; select it.
These icons are handy because their Properties boxes are crammed with useful information. A dial-up connection icon stores your name, password, phone number, and so on; a broadband or wireless icon stores various technical Internet connection details.
In these and other situations, you need a way to make manual changes to your connections. Here, for example, is how you might change the Internet settings for a cable modem, DSL, or wireless connection:
Double-click a connection icon.
You get the dialog box shown in Figure 13-2, lower left.
Click Properties.
Authenticate yourself, if necessary.
Double-click the listing that says Internet Protocol Version 4.
An even more intimidating dialog box now appears (Figure 13-2, lower right).
Edit the connection details.
Most of the time, Internet companies instruct you to turn on “Obtain an IP address automatically” and “Obtain DNS server address automatically.” You’re lucky; you’ve been saved from typing in all the other numbers in this dialog box. Otherwise, turn on “Use the following IP address” and type in the appropriate numbers. Do the same with “Use the following DNS server addresses.”
Click OK.
Windows doesn’t make you restart the PC for your new settings to take effect.
Figure 13-2. Top: Here’s a summary of the ways your computer can get online. (The ones that are X’ed out aren’t connected at the moment.) Lower left: In this dialog box, double-click the Internet Protocol (TCP/IP) item that corresponds to your Ethernet card. Lower right: Your cable or phone company generally configures these settings for you. But if a freak solar eclipse wipes out all your settings, you can re-enter them here. When you click OK, you should be back online.