Internet Explorer is filled with shortcuts and tricks for better speed and more pleasant surfing. For example:
The Web is supposed to be a visual experience; losing a bunch of your monitor’s real estate to toolbars and other window dressing isn’t necessarily a good thing.
But if you press F11 (or choose View→Full Screen from the Classic menus), all is forgiven. The browser window explodes to the very borders of your monitor, hiding the Explorer bar, toolbars, and all. The Web page you’re viewing fills your screen, edge to edge—a glorious, liberating experience.
You can return to the usual crowded, toolbar-mad arrangement by pressing F11 again—but you’ll be tempted never to do so.
The first Web site you encounter when IE connects to the Internet is a Microsoft Web site—or one of Dell’s, or EarthLink’s; the point is, you didn’t choose it. This site is your factory-set home page.
Unless you actually work for Microsoft, Dell, or EarthLink, you’ll probably find Web browsing more fun if you specify your own favorite Web page as your startup page.
The easiest way to go about it is to follow the instructions shown in Figure 15-9.
Google makes a nice home page; so does a news site. But here are a couple of possibilities that might not have occurred to you:
A blank page. If you can’t decide on a home page, or if your mood changes from day to day, set up a blank—empty—home page. This setup makes IE load very quickly when you first launch it. Once this window opens, then you can tell the browser where you want to go today.
To set this up, choose Tools→Internet Options→General. In the “To create home page tabs” box at the top, type about:blank. (Not kidding; that’s how you do it.) Click OK.
Multiple home page tabs. This is a cool one. You can designate a bunch of tabs to open all at once each time you fire up Internet Explorer. It’s a great way to avoid wasting time by calling up one site after another, because they’ll all be loading in the background as you read the first one.
Note
See Tab Settings; a few settings there pertain exclusively to home page tab groups.
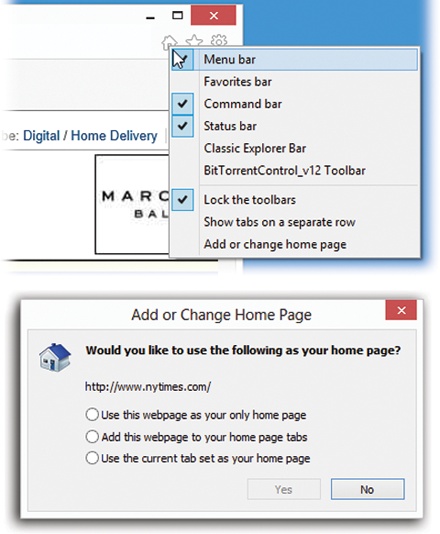
The quickest way to set up a Home tab set: Open all the Web sites into their own tabs, just the way you’ll want IE to do automatically in the future. Then, from the Home shortcut menu shown in Figure 15-9, choose “Add or change home page.” Next, in the dialog box (Figure 15-9, bottom), select “Use the current tab set as your home page,” and click Yes.
Figure 15-9. Top: Start by visiting the page you want to designate as your home page. Then right-click the Home icon shown here. From the shortcut menu, choose “Add or change home page.” Bottom: In this dialog box, choose “Use this webpage as your only home page,” and click Yes.
Thereafter, you can always add additional tabs to this starter set by choosing “Add this webpage to your home page tabs,” the middle option shown in Figure 15-9.
Note
Although it’s a little more effort, you can also edit your home page (or home page tab sets) manually in a dialog box, rather than opening them up first.
Choose Tools→Internet Options→General. In the “Home page” text box, type each address, complete with http:// and so on. If you want to create a home page tab set, type each address on its own line. (Leave the box empty for a blank home page.) Click OK, OK?
When your eyes are tired, you might like to make the text bigger. When you visit a site designed for Macintosh computers (whose text tends to look too large on PC screens), you might want a smaller size. You can adjust the point size of a Web page’s text using the View→Text Size command.
So much for magnifying the text; what about the whole Web page?
There are plenty of ways to zoom in or out of the whole affair:
If you have a touchscreen, pinch or spread two fingers against the glass.
If you have a scroll-wheel mouse, press the Ctrl key as you turn the mouse’s wheel. (This works in Microsoft Office programs, too.)
Press Ctrl+plus or Ctrl+minus on your keyboard.
Use the pop-up menu in the right corner of the status bar, if you’ve made that visible (it probably says “100%” at the moment). Just clicking the digits repeatedly cycles the page among 100, 125, and 150 percent of actual size. Alternatively, you can use its
 menu to choose a degree of zoom from 50
to 400 percent—or choose Custom to type anything in
between.
menu to choose a degree of zoom from 50
to 400 percent—or choose Custom to type anything in
between.
Internet Explorer is loaded with features for handling graphics online. Right-clicking an image on a Web page, for example, produces a shortcut menu that offers commands like “Save picture as,” “E-mail picture,” “Print picture,” and “Set as background” (that is, wallpaper).
By the way, when you see a picture you’d like to keep, right-click it and choose “Save picture as” from the shortcut menu. After you name the picture and then click the Save button, the result is a new graphics file on your hard drive containing the picture you saved. (You can also choose Set as Background, which makes the picture part of your desktop image itself.)
You can make Internet Explorer store a certain Web page on your hard drive so that you can peruse it later—on your laptop during your commute, for example.
The short way is to choose  →Page→Save As.
For greatest simplicity, choose “Web Archive, single file (*.mht)” from the “Save as type” drop-down list. (The other options here save the Web page as multiple files on your hard drive—a handy feature if you intend to edit them, but less convenient if you just want to read them later.) Name the file and click the Save button. You’ve just preserved the Web page as a file on your hard drive, which you can open later by double-clicking it.
Internet Explorer provides two ways of telling a friend about the page you’re looking at. You might find that useful when you come across a particularly interesting news story, op-ed piece, or burrito recipe.
Hiding in the Page menu are commands that let you email the page to someone, or only the link to it.
Accelerators are time-saving commands that process selected Web text in useful ways. Highlight an address: An accelerator can show you where it is on a map. Highlight a sentence or a paragraph in another language: An accelerator can translate it into your language. Highlight a term you want to look up online: An accelerator feeds it directly to Google or Bing. And so on.
Better yet, accelerators are a kind of plug-in; you can add new ones as other people write them.
Note
The first time you open Internet Explorer, you’re asked if you want a starter set of accelerators installed. If you decline them at that time, you can always install them (or a different set) later, as described below.
When you see some text that you want to map, define,
translate, or otherwise process with one of your accelerators,
highlight it. When you point to the highlighted text, the
Accelerator icon ( ) appears at the corner of the selection.
Click it to see the menu of accelerators (Figure 15-10).
) appears at the corner of the selection.
Click it to see the menu of accelerators (Figure 15-10).
As you can see in the figure, some accelerators reveal their goodies when you just point to their names. That’s handy, since you don’t lose your place on the Web. Other times, you have to click the accelerator’s name, which takes you to a different Web page containing the desired info.
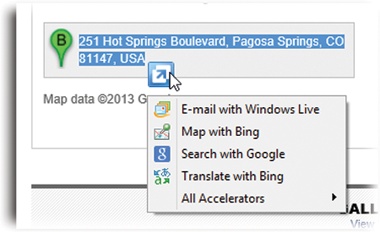
Figure 15-10. Click the Accelerator icon to see this menu. You can point to one without clicking to view a preview of the results (like a map); sometimes, as with a dictionary definition, that’s all you need to do. Other times, click the accelerator’s name to trigger its magic.
Here’s what the starter accelerators do:
Email with Windows Live. Again, this option appears if you’ve installed the Essentials. The accelerator sends the highlighted text into a new, outgoing email message. Great for little “I told you so” notes! (“According to this article, I was right about the Steelers’ starting lineup in 1973!”)
Map with Bing. If you’ve highlighted a street address, this opens up the Bing maps site and shows you the address on a map.
Search with Bing/Search with Google. Copies the selected text into the Bing or Google search box—and actually performs the search for you.
Translate with Bing. Sends the highlighted text to the Bing translation Web site. Use the pop-up menus there to specify what languages you want the text translated from and to. (Keep in mind that it’s a computer, not a person; there may be some goofy words and phrases in the automated translation.)
If you find your shortcut menu of accelerators cluttered by
commands you never use, you can turn them off. Choose
Tools→“Manage Add-ons,” click Accelerators (in the “Add-on Types”
column); click the one you’re tired of, and then click either
Disable or Remove. (You can also find the Manage Accelerators
command in the shortcut menu that appears when you click the
actual Accelerator icon .)
The starter accelerators are only the beginning; you can install a world of additional ones.
Choose Tools→“Manage Add-ons,” click Accelerators (in the “Add-on Types” column), and then click Find More Accelerators (bottom of the screen).
On the site that appears, you find additional accelerators that send the selected text to Google Maps, Yahoo Maps, LinkedIn, Hotmail, Bing Shopping, Digg, eBay, Facebook search, a dictionary, and on and on. Click Add to Internet Explorer for each one you want to try out.
Tip
A lot of these features duplicate one another. There’s Yahoo Maps, Bing Maps, Google Maps, and so on. That’s why, when you add a new accelerator in an existing category, the confirmation box offers a “Make this my default provider for the Accelerator Category” option. Turn it on to make that your main Maps option, for example.
If you have several accelerators in a single category, you
can always get to the nondefault ones by choosing All
Accelerators from the Accelerator () shortcut menu.
Later, you can always change the default option for each category in the Manage Accelerators box described previously.
Happy accelerating!
The decade of chopped-off printouts is over. In IE11, when you press Ctrl+P or choose Print (the little printer icon), all the page’s text is auto-shrunk to fit within the page.
Tip
You can print only part of a page, too. Drag through the portion you want, press Ctrl+P, click Selection, and then click Print.
Better yet, if you choose Print Preview from the little printer icon (it’s on the command bar), you get a handsome preview of the end result. The icons in the Print Preview window include buttons like these:
Portrait, Landscape (Alt+O, Alt+L) controls the page orientation: upright or sideways.
Turn headers and footers on or off (Alt+E) hides or shows the header (the text at the top of the printout, which usually identifies the name of the Web site you’re printing and the number of pages) and the footer (the URL of the Web page and the date).
View Full Width (Alt+W) blows up the preview to fill your screen, even if it means you have to scroll down to see the whole page. (This option has no effect on the printout itself.)
View Full Page (Alt+1) restores the original view, where the entire print preview is shrunk down to fit your screen.
The 1 Page View pop-up menu governs how many pages fit in the preview window at a time.
The Change Print Size pop-up menu affects the size of the image on the printed pages. Shrink to Fit adjusts the printout so it won’t be chopped off, but you can manually magnify or reduce the printed image by choosing the other percentage options in this menu.
Tip
Lots of Web sites have their own “Print this Page” buttons. When they’re available, use them instead of Internet Explorer’s own Print command. The Web site’s Print feature not only makes sure the printout won’t be chopped off, but it also eliminates ads, includes the entire article (even if it’s split across multiple Web pages), and so on.
If blinking ads make it tough to concentrate as you read a Web-based article, choose Tools→Internet Options→Advanced tab, and then scroll down to the Multimedia heading. Turn off “Play animations in web pages” to stifle most animated ads. Alas, it doesn’t stop all animations; the jerks of the ad-design world have grown too clever for this option.
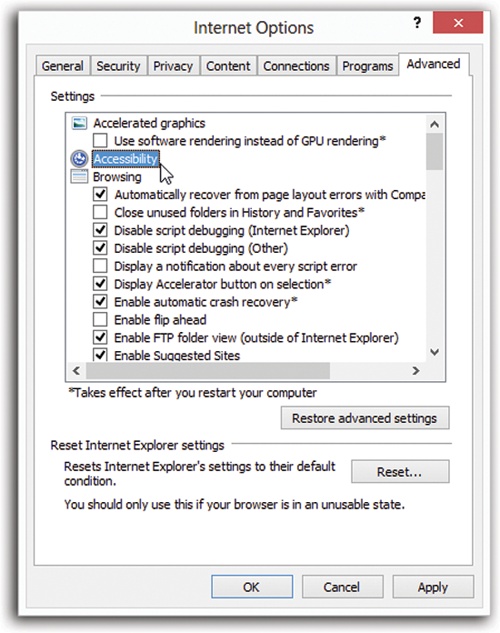
Figure 15-11. Choosing Tools→Internet Options opens this dialog box, the identical twin of the Internet Options program in the Control Panel. Double-click one of the headings (like “Accessibility”) to collapse all of its checkboxes. Your sanity is the winner here.
Take a moment, too, to look over the other annoying Web page elements that you can turn off, including sounds.
Internet Explorer’s Options dialog box offers roughly 68,000 tabs, buttons, and nested dialog boxes. Most of the useful options have been described in this chapter, with their appropriate topics (like Tabbed Browsing). Still, by spending a few minutes adjusting Internet Explorer’s settings, you can make it more fun (or less annoying) to use.
To open this cornucopia of options, choose Tools→Internet Options (Figure 15-11).