If you’ve imported your photos into Photo Gallery, you now see a neatly arranged grid of thumbnails in the main photo-viewing area. This is, presumably, your entire photo collection, including every last picture you’ve ever imported—the digital equivalent of that old shoebox you’ve had stuffed in the closet for the past 10 years.
Your journey out of chaos has begun. From here, you can sort your photos, give them titles, group them into smaller subcollections (called albums), and tag them with keywords so you can find them quickly.
If you point to a photo thumbnail without clicking, Photo Gallery is kind enough to display, at your cursor tip, a larger version of it. Think of it as a digital version of the magnifying loupe that art experts use to inspect gemstones and paintings.
Tip
If this feature gets on your nerves, choose File→Options, and then turn off “Show photo and video previews in tooltips.”
You can also make all the thumbnails in Photo Gallery grow or shrink using the Size slider—the horizontal slider at the lower-right corner of the window. Drag the slider all the way left, and you get micro-thumbnails so small that you can fit 200 or more of them in the window. If you drag it all the way to the right, you end up with such large thumbnails that only a few fit on the screen at a time.
For the biggest view of all, though, double-click a thumbnail. It opens all the way, filling the window. At this point, you can edit the picture, too, as described below.
Even before you start naming your photos, assigning them keywords, or organizing them into albums, Photo Gallery imposes an order of its own on your digital shoebox.
The key to understanding it is the navigation tree at the left side of the Photo Gallery window. This list grows as you import more pictures and organize them.
The first icon in the navigation tree, “All photos and videos,” is a very reassuring little icon, because no matter how confused you may get in working with subsets of photos later in your Photo Gallery life, clicking this icon returns you to your entire picture collection. It makes all your photos and videos appear in the viewing area.
Click a folder in the list to see only those photos.
Tip
You can Ctrl-click several folders in the list at once. For example, if you want to see both Family photos and Vacation photos, click Family, and then Ctrl-click Vacation.
Click the My Pictures or My Videos subhead to filter the thumbnails so that only photos or only videos are visible.
Browsing, selecting, and opening photos is straightforward. Here’s everything you need to know:
Use the vertical scroll bar, or your mouse’s scroll wheel, to navigate through your thumbnails.
To create the most expansive photo-viewing area possible, you can hide or show two space-eating panels: the Ribbon and the “Tag and caption pane” at the right side of the window.
To collapse the Ribbon, click the
 button at its upper right. To hide or
show the tag and caption pane, click “Tag and caption pane” on
the Ribbon’s View tab.
button at its upper right. To hide or
show the tag and caption pane, click “Tag and caption pane” on
the Ribbon’s View tab.
Each time you import a new set of photos into Photo Gallery, it appears with its own heading. Each batch is like one film roll you’ve had developed. Photo Gallery starts out sorting your photo library chronologically, meaning that the most recently imported photos appear at the top of the window.
Tip
If you’d prefer that the most recent items appear at the bottom of the Photo Gallery window instead of the top, click “Reverse sort” on the Ribbon’s View tab.
You can exploit these mini-categories within Photo Gallery in several ways:
For speed in scrolling through a big photo collection, you can collapse these groupings so only their names are visible. To do that, just click the tiny
 button at the left end of each horizontal
line.
button at the left end of each horizontal
line.The “categories” don’t have to be chronological. You can also ask Photo Gallery to cluster your photos into other logical groups: by rating (all the five-starrers together), by date taken, by person (who’s in the photo), and so on. Just click the desired button at the left end of the Ribbon’s View tab.
To highlight a single picture in preparation for printing, opening, duplicating, or deleting, click its thumbnail once with the mouse.
That much may seem obvious. But first-time PC users may not know how to manipulate more than one icon at a time—an essential survival skill.
To highlight multiple photos, use one of these techniques:
To select all the photos. Select all the pictures in the set you’re viewing by pressing Ctrl+A (the equivalent of the Select All command on the Ribbon’s Edit tab).
To select several photos by dragging. You can drag diagonally to highlight a group of nearby photos. You don’t even have to enclose the thumbnails completely; your cursor can touch any part of any icon to highlight it. In fact, if you keep dragging past the edge of the window, the window scrolls automatically.
To select consecutive photos. Click the first thumbnail you want to highlight, and then Shift-click the last one. All the files in between are automatically selected, along with the two photos you clicked. This trick mirrors the way Shift-clicking works in a word processor, the Finder, and many other kinds of programs.
To select nonconsecutive photos. If you want to highlight only, for example, the first, third, and seventh photos in a window, start by clicking the photo icon of the first one. Then Ctrl-click each of the other two. Each thumbnail darkens to indicate that you’ve selected it. (You can also click the checkbox in the upper-left corner of each photo as you point to it.)
If you’re highlighting a long string of photos and then click one by mistake, you don’t have to start over. Instead, just Ctrl-click it again, and the highlighting disappears. (If you do want to start over from the beginning, however, just deselect all selected photos by clicking any empty part of the window.)
The Ctrl-key trick is especially handy if you want to select almost all the photos in a window. Press Ctrl+A to select everything in the folder, and then Ctrl-click any unwanted photos to deselect them. You’ll save a lot of time and clicking.
Tip
You can also combine the Ctrl-clicking business with the Shift-clicking trick. For instance, you could click the first photo, then Shift-click the 10th, to highlight the first 10. Next, you could Ctrl-click photos 2, 5, and 9 to remove them from the selection.
Once you’ve highlighted multiple photos, you can manipulate them all at once. For example, you can drag them en masse out of the window and onto your desktop—a quick way to export them.
In addition, when multiple photos are selected, the commands in the shortcut menu (which you can access by right-clicking any one of the icons)—like Rotate, Copy, Delete, Rename, or Properties—apply to all the photos simultaneously.
As every photographer knows—make that every good photographer—not every photo is a keeper. You can relegate items to the Recycle Bin by selecting one or more thumbnails and then performing one of the following:

Note
That’s the forward-delete key, not the regular delete (Backspace) key. In Photo Gallery, the Backspace key means “Go back to the previous view,” just as in a Web browser.
If you suddenly decide you don’t really want to get rid of any of these trashed photos, it’s easy to resurrect them. Switch to the desktop, open the Recycle Bin, and then drag the thumbnails out of the window and back into your Pictures folder.
(Of course, if you haven’t deleted the imported pictures from your camera, you can still recover the original files and reimport them even after you empty the Recycle Bin.)
It’s often useful to have two copies of a picture. For example, a photo whose dimensions are appropriate for a slideshow or a desktop picture (that is, a 4:3 proportion) isn’t proportioned correctly for ordering prints (4 x 6, 8 x 10, or whatever). To use the same photo for both purposes, you really need to crop two copies independently.
To make a copy of a photo, you can copy and paste it right back where it is. That’s easy, thanks to the Copy and Paste icons on the Ribbon’s Home tab.
Behind the scenes, Photo Gallery stores a wealth of information about each individual photo in your collection. To take a peek, highlight a thumbnail; if you don’t already see the details pane at the right side of the window (Figure 17-8), then click the “Tag and caption pane” button on the Ribbon’s View tab.
How does Photo Gallery know so much about how your photos were taken? Most digital cameras embed a wealth of image, camera, lens, and exposure information in the photo files they create, using a standard data format called XMP (Extensible Metadata Platform) or EXIF (Exchangeable Image Format). With that in mind, Photo Gallery automatically scans photos for XMP or EXIF data as it imports them (see Figure 17-8).
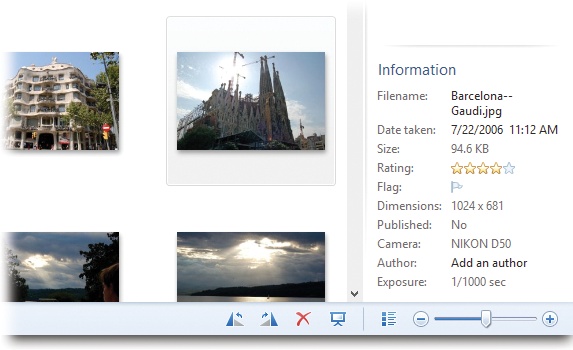
Figure 17-8. The Information pane reveals a picture’s name, rating, creation time and date, dimensions (in pixels), file size, camera settings, and any comments you’ve typed into the Captions area. It isn’t just a place to look at the details of your pictures, though. You can also edit a lot of it. You can even change the date a photo was taken—a good tip to remember if you’re a defense attorney.
Note
Some cameras do a better job than others at embedding EXIF data in photo files. Photo Gallery can extract this information only if it’s been properly stored by the camera when the digital photo was created. Of course, most of this information is missing if your photos didn’t come from a digital camera (if they were scanned in, for example).
You can rename a photo easily enough. Just click its existing name in the Info panel, and then retype it.
Tip
Most people find this feature especially valuable when it comes to individual photographs. When you import them from your digital camera, the pictures bear useless gibberish names like CRS000321.JPG, CRS000322.JPG, and so on. If you highlight a bunch of photos and then change the name, you’re renaming all of them at once. Photo Gallery even numbers them.
You can also batch rename a bunch of photos—so that they’re called Spaghetti On Baby’s Head 1, Spaghetti On Baby’s Head 2, and so on. Just select the batch and then click the Rename button on the Ribbon’s Edit tab.
While you can make a photo’s title as long as you want, it’s smart to keep it short (about 10 characters or so). This way, you can see all or most of the title in the Title field (or under the thumbnails).
Tip
Once you’ve gone to the trouble of naming your photos, you can make these names appear right beneath the thumbnails for convenient reference. On the Ribbon’s View tab, click “File name.”
Conveniently enough, the same tab has buttons for other things you can display beneath each photo: “File size,” “Date taken,” “Image size,” “Date modified,” and so on. Each of these infobits can appear in place of the file name.
