It’s awfully hard for software to search for a photo by what it shows. Scientists are working on this problem, but at the moment, only a human can quickly spot a photo that shows “Uncle Frank looking humiliated on his porch.”
Photo Gallery helps to solve this problem with five powerful text bits that you can associate with each photo—and search for them:
People tags. The program can instantly locate all photos of a certain person—either because you’ve hand-labeled those photos, or because you’ve used its face-recognition feature to label those photos automatically.
Descriptive tags are descriptive keywords—like Family, Vacation, or Kids—that you can use to label and categorize your photos and videos.
Geotags. Some cameras (and most phones) can automatically stamp each photo not just with the time and date you took it, but also with where you took it. The geographic coordinates are embedded right into the file itself.
Captions. Sometimes you need more than a one- or two-word title to describe a picture. Fortunately, Photo Gallery lets you add much longer captions to your photos.
Ratings are, of course, star ratings from 0 to 5, meaning that you can categorize your pictures by how great they are.
The beauty of people tags, geotags, captions, descriptive tags, and ratings is that they’re searchable. Want to comb through all the photos in your library to find every closeup taken of your children during summer vacation? Instead of browsing through dozens of folders, just click the tags Kids, Vacation, Closeup, and Summer in the navigation tree. You’ll have the results in seconds.
Or want to gather only the cream of the crop into a slideshow or DVD? Let Photo Gallery produce a display of only your five-star photos.
Here’s a walkthrough of these five data features.
Photo Gallery may not be able to tell what’s in a photo, but it’s taken one giant step toward that ambitious software goal: It can automatically identify whose face is in a photo. Once it knows who’s in which photos, it’s easy to round up all photos of, say, Grandpappy. And when you post photos to Facebook, those “Who is this?” tags go along for the ride; they’re alive even when they’re on your Facebook page.
You have to help Photo Gallery out first, though, by holding a few training sessions, like this:
On the Ribbon’s Home tab, click “People tag.”
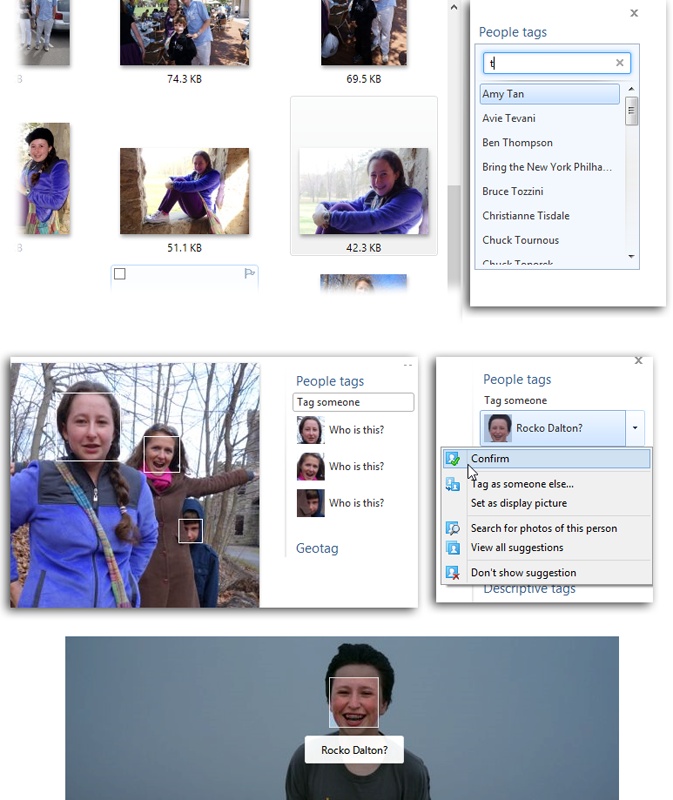
A new panel appears at the right side of the screen, called “People tags.” It’s a list of everybody in your Contacts app (Figure 17-9, top) (This feature doesn’t work unless you’ve signed into your Microsoft account—and linked your Facebook account to it.)
Figure 17-9. Work through your photos, either thumbnails (top) or opened pictures (bottom), identifying who’s in them. Photo Gallery has no trouble picking out faces in your pictures; it just needs you to tell it whose faces they are. Once you’ve done a few, the program seems to get the hang of it. It starts to guess who’s in the shot (middle); all you have to do is confirm the guess.
Click a photo’s thumbnail. Click where it says “Who is this?” in the “People tags” pane, and tell Photo Gallery who it is.
As you type, the program narrows down your master Contacts list. If the person’s name isn’t already in the list, type the correct name and then click “Add new person.”
Press Enter to confirm the name. Click the next thumbnail. Repeat the process.
Once you’ve identified a certain person in a few photos, Photo Gallery starts to catch on. It starts guessing that person’s name (Figure 17-9, middle). Whenever it makes a guess, you can click the guess and, from the shortcut menu, choose Confirm.
You can also tag people in photos you’ve opened up to full size by double-clicking their thumbnails (Figure 17-9, bottom).
Once you’ve tagged a few people, you can blow through your entire photo collection, confirming many people’s faces at once.
Click “Batch people tag” on the Ribbon’s Home tab, and then proceed as shown in Figure 17-10.
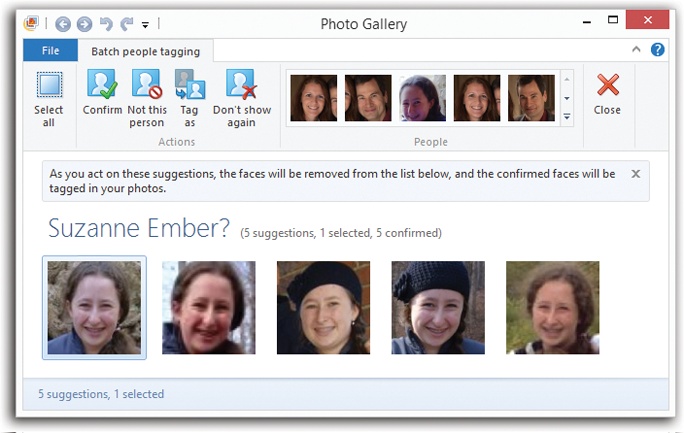
Figure 17-10. Click the first face in the rogue’s gallery at top; Photo Gallery displays closeups of everyone in your photo collection that seems to be that person. Select each thumbnail (or Select All) and click Confirm. Click the next headshot at top; lather, rinse, repeat.
In essence, Photo Gallery is rounding up all the faces it can find that seem to match, and allowing you to confirm all of them at once. (Well, about 11 at a time.)
If you see a face that Photo Gallery can’t put a name to, click it and then click “Tag as.”
As you go, you can always re-tag someone, remove a tag, or combine two tags into a single new name, using the commands in the menu shown in Figure 17-9, middle.
The fun begins once you’ve tagged your photos so that Photo Gallery knows who’s in them. Does your kid need a really good shot of Grandpa for a school project? One click later, you’re looking at your entire Grandpa collection.
On the Home tab of the Ribbon, just click the face of the person you want to find. (If you’re not seeing all known faces, then use the tiny vertical scroll arrows.) Or just point without clicking to scan your various people collections.
A similar set of “click me” headshots awaits on the Find tab of the Ribbon. It’s handy both because it shows more headshots without scrolling, and also because it has “and” and “or” buttons. That’s handy when, for example, you want to find a photo that contains Grandpa and Grandma together. Click Grandpa’s face, then the “and” button, and then Grandma’s face. Photo Gallery shows you only photos of the couple.
As you work with your photos (and read this chapter), you’ll soon discover the convenience of adding tags (keywords) to them, like Family, Trips, or Baby Pix.
A tag is a keyword you can attach to a photo so it’s easier to search for it later. You can create as many tag labels as you want to create a meaningful, customized list.
To build your list, you can operate in either of two ways:
In the “Tags and captions” pane. On the Ribbon’s Home tab, click “Descriptive tags.” Your cursor pops into the “Descriptive tags” box in the “Tags and captions” pane so that you can type a tag. As you type, Photo Gallery proposes previous tags spelled the same way to save you typing.
In the Manage Tags window. On the Ribbon’s Home tab, click the
 ; from the shortcut menu, choose “Manage
tags.” You get a Manage Tags window, where you can rapidly enter
a bunch of tag names.
; from the shortcut menu, choose “Manage
tags.” You get a Manage Tags window, where you can rapidly enter
a bunch of tag names.
It may take some time to develop a really good master set of keywords. The idea is to assign labels that are general enough to apply across your entire photo collection, but specific enough to be meaningful when conducting searches.
Photo Gallery offers two methods of applying tags to your pictures:
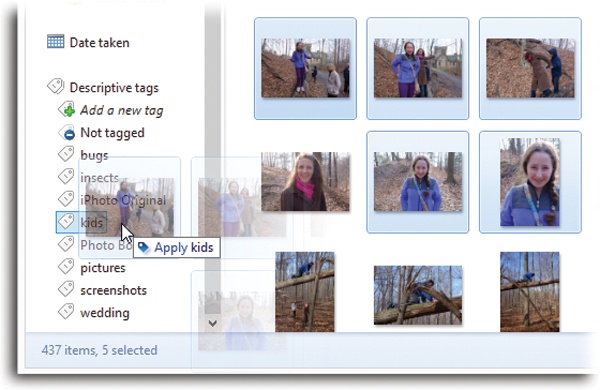
Method 1: Drag the picture. One way to apply tags to photos is, paradoxically, to apply the photos to the tags. That is, drag relevant photos directly onto the tags in the navigation tree, as shown in Figure 17-11.
Tip
You can apply as many tags to an individual photo as you like. A picture of your cousin Rachel at a hot dog–eating contest in London might bear all of these keywords: Rachel, Relatives, Travel, Food, Humor, and Medical Crises. Later, you’ll be able to find that photo no matter which of these categories you’re hunting for.
This method is best when you want to apply a whole bunch of pictures to one or two keywords. It’s pretty tedious, however, when you want to apply a lot of different keywords to a single photo. That’s why Microsoft has given you a second method, described next.
Method 2: Use the tag and captions pane. Highlight a thumbnail. On the tag and captions pane, you find a simple list of all the tags you’ve applied to this photo. Add a tag by clicking “Add descriptive tags” and then typing a tag name (or as much as necessary for Photo Gallery to AutoComplete it).
The beauty of this system is that you can keep the little info pane open on the screen as you move through your photo collection. Each time you click a photo—or, in fact, select a group of them—the tags list updates itself to reflect the tags of whatever is now selected.
To remove tag assignments from a certain picture, right-click the name of the tag. From the shortcut menu, choose “Remove tag.”
To edit a tag: On the Ribbon’s Home tab, click the
; from the shortcut menu, choose “Manage
tags.” You get a Manage Tags window, where you can edit a tag name
by clicking it and then retyping.
Note
Be careful about renaming tags after you’ve started using them; the results can be messy. If you’ve already applied the keyword Fishing to a batch of photos but later decide to replace it with Romantic in your keyword list, then all the fishing photos automatically inherit the keyword Romantic. Depending on you and your interests, this may not be what you intended.
The big payoff for your diligence arrives when you need to get your hands on a specific set of photos, because Photo Gallery lets you isolate them with one quick click.
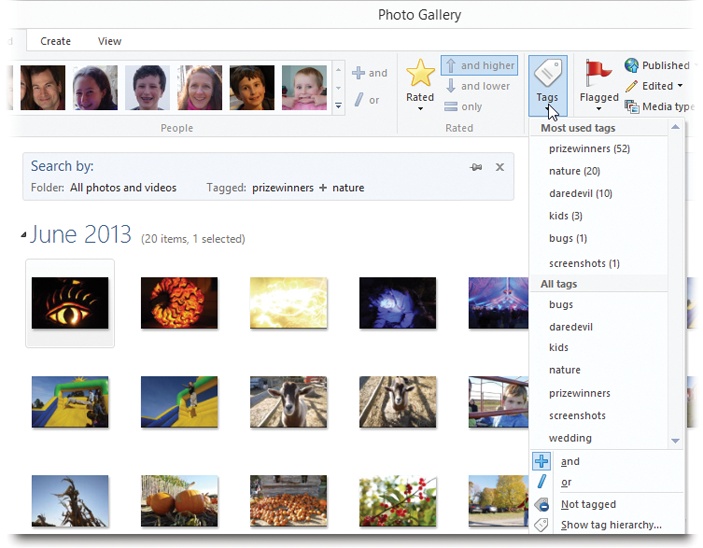
To round up all the photos with, say, the Kids tag, click the Find tab of the Ribbon. From the Tags pop-up menu, choose the tag you want. (You can also point to the tag names in this menu without clicking for real-time previews of the matching photos.) Photo Gallery immediately rounds up all photos labeled with that tag, displays them in the photo-viewing area, and hides all others.
Note
Windows can’t embed metadata (and therefore tags or star ratings) to BMP, PNG, or MPEG files. Actually, you can apply such identifying information to those file types in Photo Gallery, but it won’t show up in Explorer windows or anywhere else in Windows (like the Photo Viewer program).
You also won’t be able to apply Windows-wide metadata to files that are locked, in use by another program, or corrupted.
More tips:
To find photos that match multiple keywords, just open the Tags pop-up menu (on the Find tab of the Ribbon) and click additional tag labels. For example, if you click Travel and click Holidays, Photo Gallery reveals all the pictures that have both of those keywords.
Figure 17-12. The key to finding photos based on tags is the Tags pop-up menu (on the Find tab of the Ribbon). It lets you find photos based on their tags, or combinations of tags (“and” and “or” are at the bottom), or no tags at all. “Show tag hierarchy” opens a small window that reveals your nested tags.
You can even perform an “or” keyword roundup—that is, to find pictures that have either Travel or Holidays tags. To do that, choose “or” from the Tags pop-up menu.
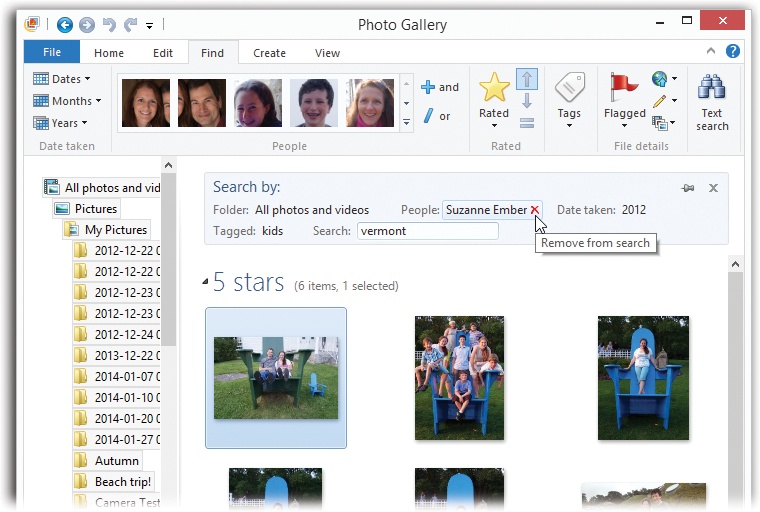
As you find photos based on tags, the information bar above the thumbnails summarizes what you’ve done so far, as shown in Figure 17-13. Click the
 at the right end to conclude your
finding mission and restore the full view of all
thumbnails.
at the right end to conclude your
finding mission and restore the full view of all
thumbnails.Figure 17-13. As you refine your search using the various pop-up menus and icons on the Find tab, the “Search by” bar reveals the search criteria you’ve built so far. If you make a mistake, you can point to a criterion to reveal its
(Remove) button. Or click the main
button (top right of the “Search by”
bar) to cancel the search.If you’ve added the tag list to the navigation tree as described in Figure 17-11, you can drag tags up or down to rearrange them. And if you drag a tag on top of another one, it becomes a subtag (nested tag). That is, you could have a tag called Trips, and then subtags called Vermont, Florida, and Ohio. As the tag list grows, remember that you can collapse any branch of the tree by clicking its flippy triangle.
Your camera invisibly stamps the time on every photo—why not the place?
Most smartphones, some cameras, and some memory cards do exactly that. They have GPS circuitry that embeds location coordinates on every shot you take. In Photo Gallery, you can search or sort your photos by where they were shot, or even look at their origins on a map.
The geotagging information is visible on the tag and caption pane, right along with all the other information about a selected photo. (If the pane isn’t open, click Geotag on the Ribbon’s Home tab. Or “Tag and caption pane” on the View tab, for that matter.)
Most cameras, of course, don’t have GPS features; fortunately, you can also add location data manually. Select a photo (or a bunch); under the Geotag heading in the tag and caption pane, click “Add geotag.” Start typing a place name (city, state, country) until Photo Gallery autocompletes it for you.
After you’ve assigned some geotags, you can harness their power like this:
Sort by location. On the Ribbon’s View tab, in the box at far left, click Geotag. All your thumbnails are now sorted by location, with place-name headings to match.
Search by location. On the Ribbon’s Find tab, click “Text search.” Now you can find photos by typing a place name.
See on a map. If you right-click the geotag itself (in the tag and caption pane), you can choose “Map it” from the shortcut menu. You’re taken into your Web browser, where the correct slice of Bing Maps appears. A numbered circle identifies the exact spot where the photo was taken. (Other programs, like Picasa, and Web sites like Flickr, can also show you geotags on a map.)
Tags are fine, but a word or two is not very descriptive. Fortunately, you can also add true captions to your photos. The best thing about adding them is that they’re searchable. After you’ve entered all this free-form data, you can use it to quickly locate a photo using the “Text search” button on the Ribbon’s Find tab, as described below.
To add a caption, click the Caption button on the Ribbon’s Home tab. The corresponding box appears in the tag and caption pane; type away.
Even if you don’t write full-blown captions for your pictures, you can use the Captions box to store little details, such as the names, places, dates, and events associated with your photos.
Photo Gallery offers another way to slice and dice your photo collection: by how great your pictures are! You can assign each one a rating, from one to five stars, and then use the ratings to sort your library or to round up only, for example, the cream of the crop for a book or a slideshow.
Here are a couple of ways to rate your digital masterpieces. In each case, begin by highlighting a thumbnail (or several). Then:
Once you’ve rated your photos, you can make that effort pay off in any number of ways:
Sort by ratings. At the left end of the Ribbon’s View tab, there’s a set of icons that control how the photos are sorted. Click Ratings.
Usually, the best photos appear at the top and the worst ones (0 stars) at the bottom. Click “Reverse sort” to put the unrated photos and the duds at the top.
View ratings. On the Ribbon’s View tab, click the big Rating icon. The program displays a small row of stars beneath every thumbnail, showing you all the ratings at once.
Find by ratings. You can round up all the five-star photos in the current folder. On the Ribbon’s Find tab, use the Ratings pop-up menu to choose a number of stars (from 0 to 5). Then click either “and higher,” “and lower,” or “only.” So to find photos rated three stars or better, you’d choose three stars and click “and higher”; to find only your five-starrers, you’d choose five stars and click “only.”
Click the
button (at the top of the “Search by” bar
above the thumbnails) to un-hide all the photos.
Just in case it’s not enough to annotate your photos by name, tag, caption, rating, and geotag, Photo Gallery also offers a simple Flag button. A photo can be either flagged or not.
So what does the flag mean? Anything you want it to mean, but it’s usually used for temporary organizational tasks.
For example, you might want to cull only the most appropriate images from a photo album for use in a slideshow. As you browse through the images, flag each shot you want. Later you can round up all the images you flagged so you can drag them all into a new album en masse.
To flag a photo, select its thumbnail and click Flag on the Ribbon’s Home tab. (You can flag a bunch of them at once, too.) The Flag button darkens whenever this thumbnail is selected. (Unflag the photo by clicking the same button again.)
Tip
Ordinarily, you don’t see any flag mark on the photo itself—unless you click the Flags button on the Ribbon’s View tab.
Now suppose you’ve worked through all your photos for some purpose, carefully flagging them as you go. Here’s the payoff: rounding them up so that you can delete them all, hide them all, incorporate them into a slideshow, export them as a batch, or whatever.
On the Ribbon’s Find tab, click the Flags button. (You can
also find all unflagged photos. Use that button’s button; choose “Unflagged photos” from the
pop-up menu.)
Now Photo Gallery shows you all flagged photos in your entire library.