The Task Scheduler, another power-user trick for techies, lets you set up programs and tasks (like disk defragmentation) so they run automatically according to a schedule you specify. Both mere mortals and power geeks may find it useful. For example:
Create an email message that gets sent to your boss each morning, with yesterday’s sales figures attached automatically.
Have the Recycle Bin emptied automatically once a month.
Create a phony dialog box that appears every time the office know-it-all’s PC starts up. Make it say: “The radiation shield on your PC has failed. Please keep back seven feet.” You get the idea.
Here’s how you add a new task:
Open the Task Scheduler.
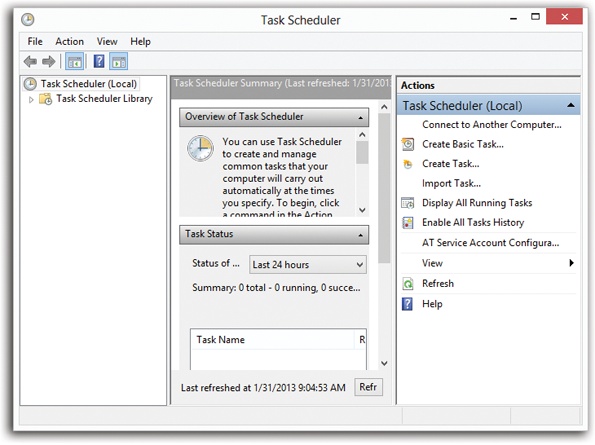
To do that, open the Start screen. Type schedule and select Settings under the search box. In the search results, click “Schedule a task.” The Task Scheduler window appears (Figure 21-7).
This link appears on the right-hand pane of the Task Scheduler. A wizard appears.
Type a name for the task and a description, and then click Next.
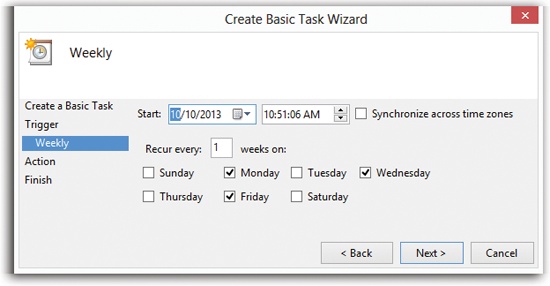
Now you’re supposed to choose what Windows calls a “trigger”—in plain English, when to run the task (Figure 21-8). You can specify that it run daily, weekly, monthly, or just once; every time the computer starts or every time you log in; or when a specific event occurs—like when a program starts.
Choose a trigger, and then click Next.
The next screen varies according to the trigger you chose. If you chose to run the task on a daily, weekly, or monthly basis, you’re now asked to specify when during that day, week, or month. Once that’s done, click Next.
You now wind up at the Action screen. This is where you say what you want to happen at the appointed time. Your choices are “Start a program,” “Send an e-mail,” or “Display a message.”
Choose an action; click Next.
Now you’re supposed to say what program, email, or message you want the PC to fire up.
If you choose the email option, you now fill out a form with the recipient’s name, address, subject line, message body, and so on; you can even specify an attachment.
If you choose to run a program, you now browse to select the program. At this point, programmers can also add arguments, which are codes that customize how the program starts.
And if you opt to display a message, you get to type a name and text for the message. At the appointed time, an actual Windows dialog box will appear on the screen—except that it will contain text that you wrote.
Complete the details about the email, program, or phony dialog box, and then click Next.
Finally, a screen appears, summarizing the task, when it will run, and so on. To edit it, click the Back button.
To confirm the automated task, click Finish.
You return to the Task Scheduler window. Although you may have to scroll down to see it, your new task appears in the Active Tasks list at the bottom of the window. If all goes well, Windows will fire it up at the moment you specified.
To change a scheduled task, you first need to find it in the Task Scheduler Library, which is on the left side of the window. Click Task Scheduler Library, and then look at the topmost pane in the middle part of your screen (Figure 21-9). You see a list of scheduled tasks. Highlight the one you want to change.
Delete the task by simply hitting the Delete key. To edit a task, click it and then click the Properties link at the right side of the screen. The tabs in the resulting dialog box (General, Triggers, and so on) may sound familiar, but they actually give you far more control over how each task runs than the basic controls you saw when you first set the task up.
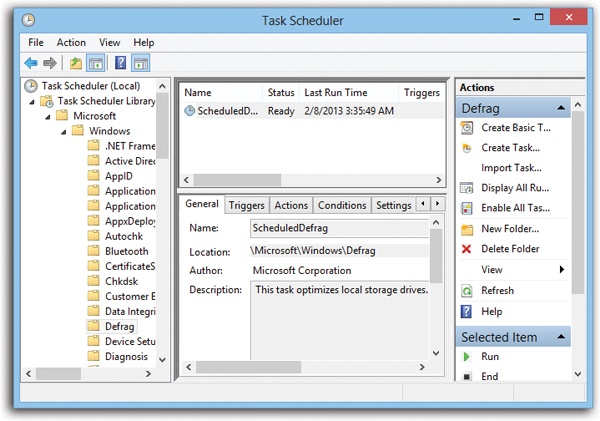
Figure 21-9. This screen lets you do more than just edit a task. Look at the right-hand pane; you see links that let you run the task right now, end the task if it’s already started, and disable the task, among others.
Here are some examples of what you can do on each tab:
General. Select which user account should run the task, and tell Windows whether or not to run when the user is logged in.
Triggers. You can delay the task’s execution by a few minutes or until a certain date; have it repeat automatically at regular intervals; stop it after a certain time period; and so on. The “Begin the task” pop-up menu offers a wealth of new triggers, like “On idle” and “On workstation unlock.”
Actions. Change the action.
Conditions. Specify that the task will run only under certain conditions—for example, after the computer has been idle for a certain amount of time, when the computer is on AC power, or when it switches to battery power, and so on. You can even say you want to run the task if the PC is sleeping (by waking it first).
Settings. Here’s a miscellaneous batch of additional preferences: what actions to take if the task doesn’t work, what to do if the computer was turned off at the appointed time, and so on.
History. On this tab, you get to see the task’s life story: when it ran and whether each attempt was successful.
Note
Lots of tasks are already present on your PC. Microsoft set them up to ensure the proper running of your computer. To see them all, expand the flippy triangle next to the words “Task Scheduler Library” and then expand Microsoft, and then Windows. You see dozens of tasks in many different categories. In other words, your PC is very busy even when you’re not there.