When your hard disk crashes, you lose more than just your personal files. You also lose your operating system—and all the programs you’ve installed, and all their updates and patches, and all your settings and options and tweaks. It can take you a very long time to restore your PC to that state.
A system image solves the problem easily. This feature (called Complete PC Backup in the Windows Vista days), creates a perfect snapshot of your entire hard drive at this moment: documents, email, pictures, and so on, plus Windows, and all your programs and settings. Someone could steal your entire hard drive, or your drive could die, and you’d be able to install a new, empty one and be back in business inside of an hour.
It’s a good idea to make a fresh system image every few months, because you’ll probably have installed new programs and changed your settings in the interim.
Note
For the techies scoring at home, a system image is a .vhd file, the same kind that’s created by Microsoft’s Virtual PC software—and, therefore, you can mount it using Virtual PC, if you like.
To make a system image, open the Control Panel. Under the System and Security heading (in Category view), click “Save backup copies of your files with File History.” When the corresponding screen appears, click System Image Backup. Continue as shown in Figure 22-1.
No matter where you store the image, you’ll need a lot of empty disk space. Not as much as your entire PC drive, because you won’t be backing up empty space or temporary files. But a lot.
Note
You can keep multiple system images around—representing your PC’s world at different times—if you back up to discs or hard drives. If you save to a network location, though, you can keep only the most recent system image.
When you click Next, you’re offered a list of all your computer’s drives, and informed how much storage space the backup will need. You may, if you wish, include other drives as part of the system image, so that they’ll be restored, too, if the worst should come to pass. (Your Windows drive is automatically selected; you’re not allowed to include the drive you’re saving the image onto.)
Click “Start backup”; the backup begins. You’ll be prompted when you need to insert new discs.
Tip
At the end of the backing up, Windows asks if you’d like it to burn a system repair disc—a CD or DVD that can start up your PC when it won’t start up from the hard drive. It’s an excellent idea.
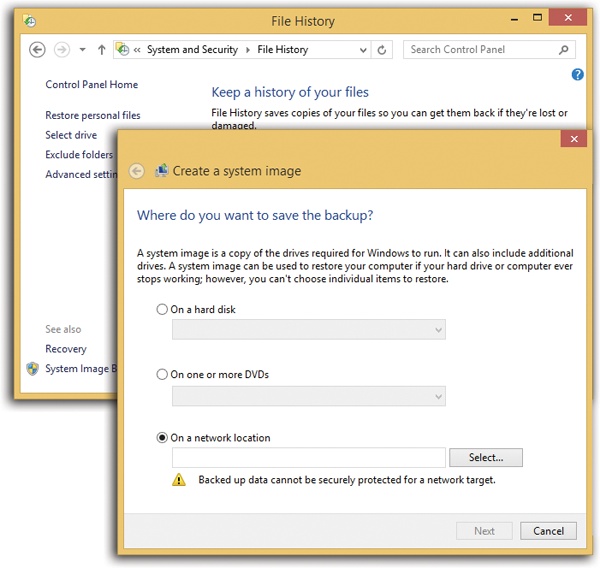
Figure 22-1. Top: At the lower-left side of this Control Panel screen, click System Image Backup. Authenticate if necessary. Bottom: You’re now asked where you want to store the backup image. Your options: a hard drive (must be NTFS formatted), a stack of CDs or DVDs, or (if you have the Pro or Enterprise editions of Windows 8.1) another computer on the network.
Suppose disaster strikes: Your hard drive is trashed. Fortunately, restoring your entire system using a system image is very easy. You just have to open the Windows Recovery Environment, like this:
If your PC is running, hold down the Shift key as you click Restart. (To find the Restart button, open the Charms bar, select Settings, and select Power.)
If the PC won’t even start up, start up from a Windows DVD or a flash drive. At the Windows Setup screen, hit Next; then choose “Repair your computer.” (Alternatively, just boot up from the system repair disc you made when you created the system image.)
Once you see the “Choose an option screen,” click Troubleshoot, then “Advanced options,” then System Image Recovery. (You can see this sequence of screens illustrated in Figure 21-15.)
In the System Recovery Options dialog box that appears, choose an administrator’s account. Enter the appropriate password, and then click Continue.
On the next screen (Figure 22-2), choose “Use the latest available system image (recommended),” and click OK. (Of course, if you have some weird agenda, you can also choose an older system image using the other option here.)
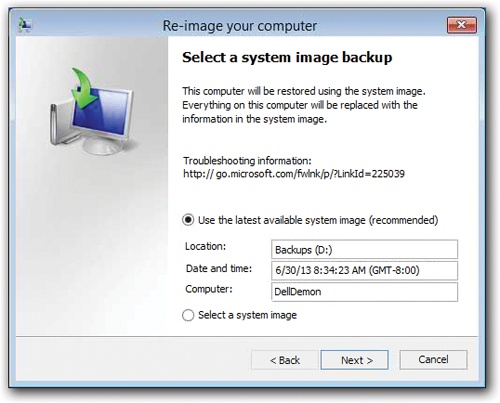
Figure 22-2. Here’s the payoff for your diligent system imaging. Windows is about to turn your current, messed-up computer back into the model of PC health that it was the day you made the image.
When prompted, find the drive or disc that contains your system image.
When you click Next, you’re offered the “Choose additional restore options” dialog box, which offers some complicated options. The key element worth inspecting is the “Format and repartition disks” option:
If it’s turned on, then every disk and partition will be formatted and partitioned to match the system image. (If this box is turned on and dimmed, then you have no choice; the disk will be formatted and partitioned to match the system image.)
If you can’t turn on this checkbox—it’s dimmed and unchecked—then you’re probably restoring a system image from one partition to another on the same disk. Clearly, Windows can’t erase the disk it’s operating from.
The “Only restore system drives” option does what it says: leaves your other drives alone.
When you click Finish and then Yes in the confirmation box, the long, slow restoration process begins. And the rest, as they say, is history recreated.
Just remember that this process reformats your hard drive, and in the process wipes out all your data and files. They’ll be replaced with the most recent snapshot (system image) you’ve made. Of course, you may well have a regular backup that’s more recent; you can restore that as the final step.